ECO mode HONDA ELEMENT 2010 1.G Owners Manual
[x] Cancel search | Manufacturer: HONDA, Model Year: 2010, Model line: ELEMENT, Model: HONDA ELEMENT 2010 1.GPages: 342, PDF Size: 5.76 MB
Page 40 of 342

●Automatic front seat belt
tensioners (see page 20).
● Sensors that can detect a moderate
to severe front impact, side impact,
or rollover.
● Sensors that can detect whether a
child is in the passenger's side
airbag path and signal the control
unit to turn the airbag off (see
page 29).
● Sensors that can detect whether
the driver's seat belt and the front
passenger's seat belt are latched or
unlatched (see page 18).
● A driver's seat position sensor that
monitors the distance of the seat
from the front airbag. If the seat is
too far forward, the airbag will
inflate with less force (see page 27). ●
Weight sensors that monitor the
weight on the front passenger's
seat. If the weight is about 65 lbs
(29 kg) or less (the weight of an
infant or small child), the
passenger's front airbag will be
turned off (see page 27).
● A sophisticated electronic system
that continually monitors and
records information about the
sensors, the control unit, the
airbag activators, the seat belt
tensioners, and driver and front
passenger seat belt use when the
ignition switch is in the ON (II)position.
● An indicator on the instrument
panel that alerts you to a possible
problem with your airbags,
sensors, or seat belt tensioners
(see page 31). ●
An indicator on the instrument
panel that alerts you that the
passenger's side airbag has been
turned off (see page 32).
● An indicator on the dashboard that
alerts you that the passenger's
front airbag has been turned off
(see page 32).
● Emergency backup power in case
your vehicle's electrical system is
disconnected in a crash.
Additional Information About Your Airbags
24
Table of Contents
Page 41 of 342
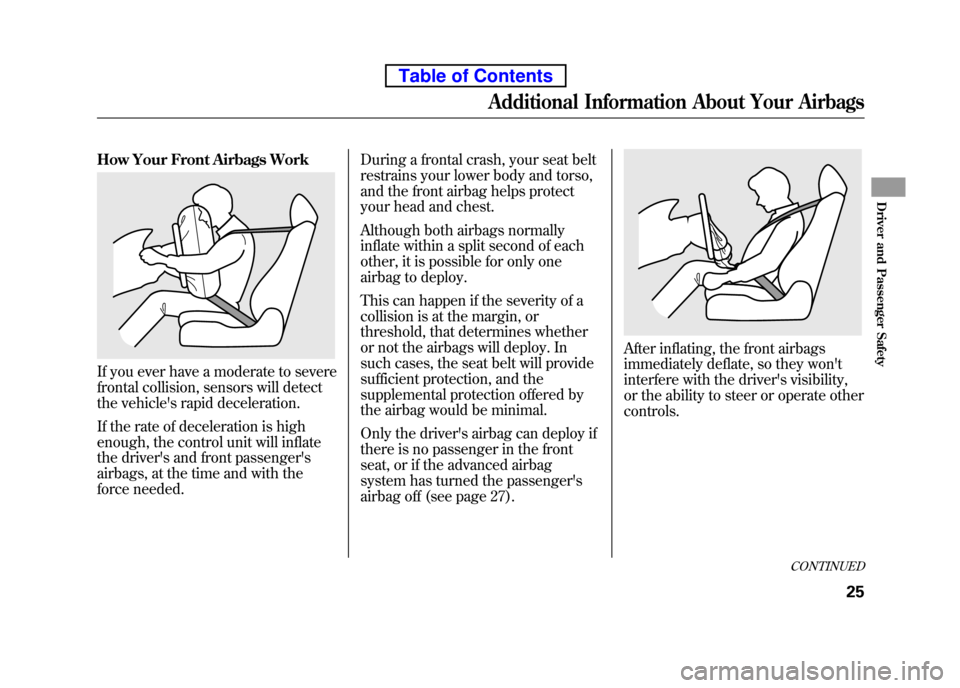
How Your Front Airbags Work
If you ever have a moderate to severe
frontal collision, sensors will detect
the vehicle's rapid deceleration.
If the rate of deceleration is high
enough, the control unit will inflate
the driver's and front passenger's
airbags, at the time and with the
force needed.During a frontal crash, your seat belt
restrains your lower body and torso,
and the front airbag helps protect
your head and chest.
Although both airbags normally
inflate within a split second of each
other, it is possible for only one
airbag to deploy.
This can happen if the severity of a
collision is at the margin, or
threshold, that determines whether
or not the airbags will deploy. In
such cases, the seat belt will provide
sufficient protection, and the
supplemental protection offered by
the airbag would be minimal.
Only the driver's airbag can deploy if
there is no passenger in the front
seat, or if the advanced airbag
system has turned the passenger's
airbag off (see page 27).
After inflating, the front airbags
immediately deflate, so they won't
interfere with the driver's visibility,
or the ability to steer or operate othercontrols.
CONTINUED
Additional Information About Your Airbags
25
Driver and Passenger Safety
Table of Contents
Page 52 of 342

All Children Should Sit in a Back Seat
According to statistics, children of all
ages and sizes are safer when they
are restrained in a back seat.
The National Highway Traffic Safety
Administration and Transport
Canada recommend that all children
aged 12 and under be properly
restrained in a back seat.
Some states have laws restricting
where children may ride.
Children who ride in back are less
likely to be injured by striking
interior vehicle parts during a
collision or hard braking. Also,
children cannot be injured by an
inflating front airbag when they ride
in the back.The Passenger's Front Airbag Can
Pose Serious Risks
Front airbags have been designed to
help protect adults in a moderate to
severe frontal collision. To do this,
the passenger's front airbag is quite
large, and it can inflate with enough
force to cause very serious injuries.
Even though your vehicle has an
advanced front airbag system that
automatically turns the passenger's
front airbag off under certain
circumstances (see page 32), please
follow these guidelines:
Infants
Never put a rear-facing child seat inthe front seat of a vehicle equipped
with a passenger's front airbag.
If the
airbag inflates, it can hit the back of
the child seat with enough force to
kill or very seriously injure an infant.
Small Children
Placing a forward-facing child seat inthe front seat of a vehicle equipped
with a passenger's front airbag can be
hazardous.
If the vehicle seat is too
far forward, or the child's head is
thrown forward during a collision, an
inflating front airbag can strike the
child with enough force to kill or
very seriously injure a small child.
Larger Children
Children who have outgrown childseats are also at risk of being injuredor killed by an inflating passenger's
front airbag.
Whenever possible,
larger children should sit in the back
seat, on a booster seat if needed, and
be properly restrained with a seat
belt (see page 49 for important
information about protecting largerchildren).
Protecting Children -General Guidelines
36
Table of Contents
Page 56 of 342
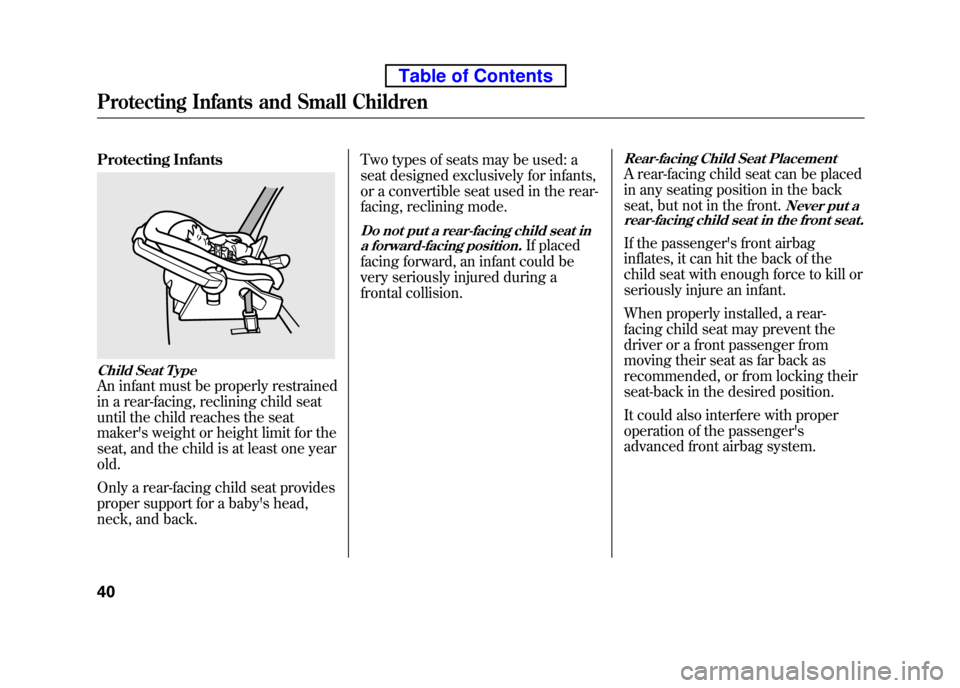
Protecting Infants
Child Seat Type
An infant must be properly restrained
in a rear-facing, reclining child seat
until the child reaches the seat
maker's weight or height limit for the
seat, and the child is at least one year old.
Only a rear-facing child seat provides
proper support for a baby's head,
neck, and back.Two types of seats may be used: a
seat designed exclusively for infants,
or a convertible seat used in the rear-
facing, reclining mode.
Do not put a rear-facing child seat in
a forward-facing position.If placed
facing forward, an infant could be
very seriously injured during a
frontal collision.
Rear-facing Child Seat Placement
A rear-facing child seat can be placed
in any seating position in the back
seat, but not in the front.
Never put a
rear-facing child seat in the front seat.
If the passenger's front airbag
inflates, it can hit the back of the
child seat with enough force to kill or
seriously injure an infant.
When properly installed, a rear-
facing child seat may prevent the
driver or a front passenger from
moving their seat as far back as
recommended, or from locking their
seat-back in the desired position.
It could also interfere with proper
operation of the passenger's
advanced front airbag system.
Protecting Infants and Small Children
40
Table of Contents
Page 66 of 342
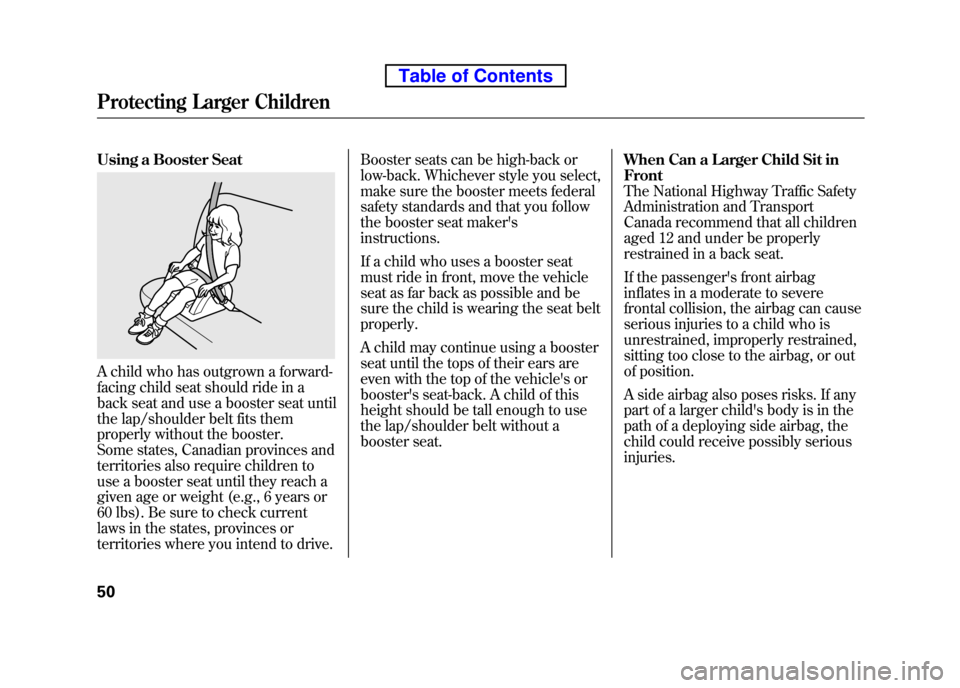
Using a Booster Seat
A child who has outgrown a forward-
facing child seat should ride in a
back seat and use a booster seat until
the lap/shoulder belt fits them
properly without the booster.
Some states, Canadian provinces and
territories also require children to
use a booster seat until they reach a
given age or weight (e.g., 6 years or
60 lbs). Be sure to check current
laws in the states, provinces or
territories where you intend to drive.Booster seats can be high-back or
low-back. Whichever style you select,
make sure the booster meets federal
safety standards and that you follow
the booster seat maker's instructions.
If a child who uses a booster seat
must ride in front, move the vehicle
seat as far back as possible and be
sure the child is wearing the seat beltproperly.
A child may continue using a booster
seat until the tops of their ears are
even with the top of the vehicle's or
booster's seat-back. A child of this
height should be tall enough to use
the lap/shoulder belt without a
booster seat.
When Can a Larger Child Sit inFront
The National Highway Traffic Safety
Administration and Transport
Canada recommend that all children
aged 12 and under be properly
restrained in a back seat.
If the passenger's front airbag
inflates in a moderate to severe
frontal collision, the airbag can cause
serious injuries to a child who is
unrestrained, improperly restrained,
sitting too close to the airbag, or out
of position.
A side airbag also poses risks. If any
part of a larger child's body is in the
path of a deploying side airbag, the
child could receive possibly seriousinjuries.
Protecting Larger Children
50
Table of Contents
Page 69 of 342
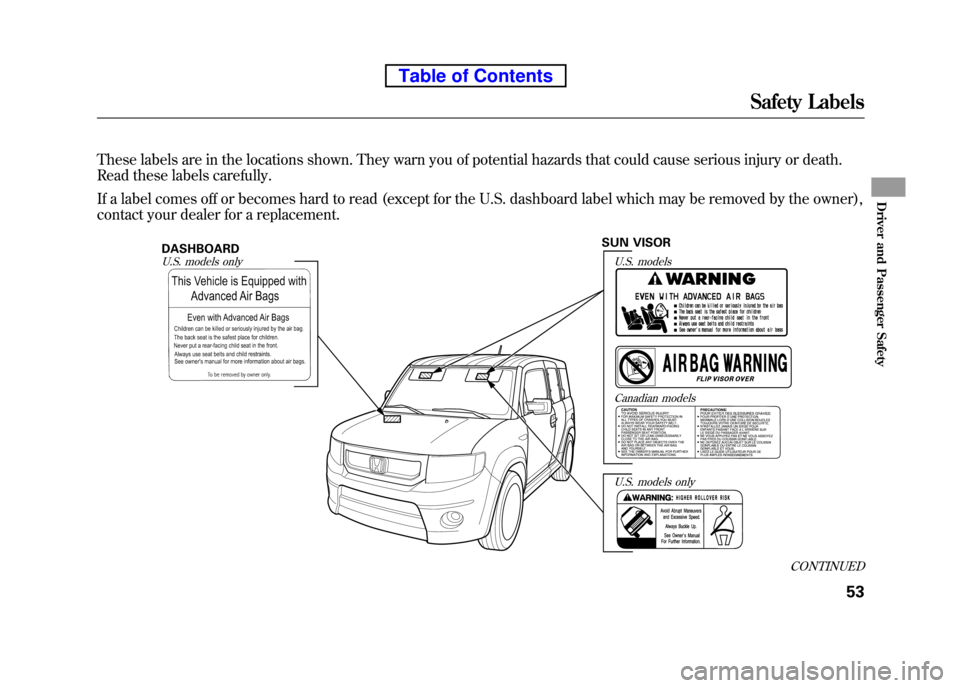
These labels are in the locations shown. They warn you of potential hazards that could cause serious injury or death.
Read these labels carefully.
If a label comes off or becomes hard to read (except for the U.S. dashboard label which may be removed by the owner),
contact your dealer for a replacement.
U.S. models only
Canadian models
U.S. models
SUN VISOR
DASHBOARD
U.S. models only
CONTINUED
Safety Labels
53
Driver and Passenger Safety
Table of Contents
Page 84 of 342

Outside Temperature Indicator
On EX and SC models
This indicator displays the outside
temperature in Fahrenheit (U.S.
models) or Celsius (Canadian models).
The temperature sensor is in the
front bumper. The temperature
reading can be affected by heat
reflection from the road surface,
engine heat, and the exhaust from
surrounding traffic. This can cause
an incorrect temperature reading
when your vehicle speed is under 19
mph (30 km/h). When you start your
trip, the sensor is not fully
acclimatized, therefore it may take
several minutes until the proper
temperature is displayed.In certain weather conditions,
temperature readings near freezing
(32°F, 0°C) could mean that ice is
forming on the road surface.
If the outside temperature is
incorrectly displayed, you can adjust
it up to
ꭗ5°F in U.S. models ( ꭗ3°C
in Canadian models) warmer orcooler. NOTE: The temperature must be
stabilized before doing this procedure. To adjust the outside temperature
indicator, make sure the odometer is
shown in the display, then press and
hold the select/reset knob for 10
seconds. The following sequence will
appear for 1 second each: 0, 1, 2, 3, 4,5,
-5, -4, -3,-2, -1, 0 (U.S.) or
0, 1, 2, 3, -3, -2,- 1, 0 (Canada).
When the temperature reaches the
desired value, release the select/
reset knob. You should see the new
outside temperature displayed.
Gauges
68
Table of Contents
Page 89 of 342
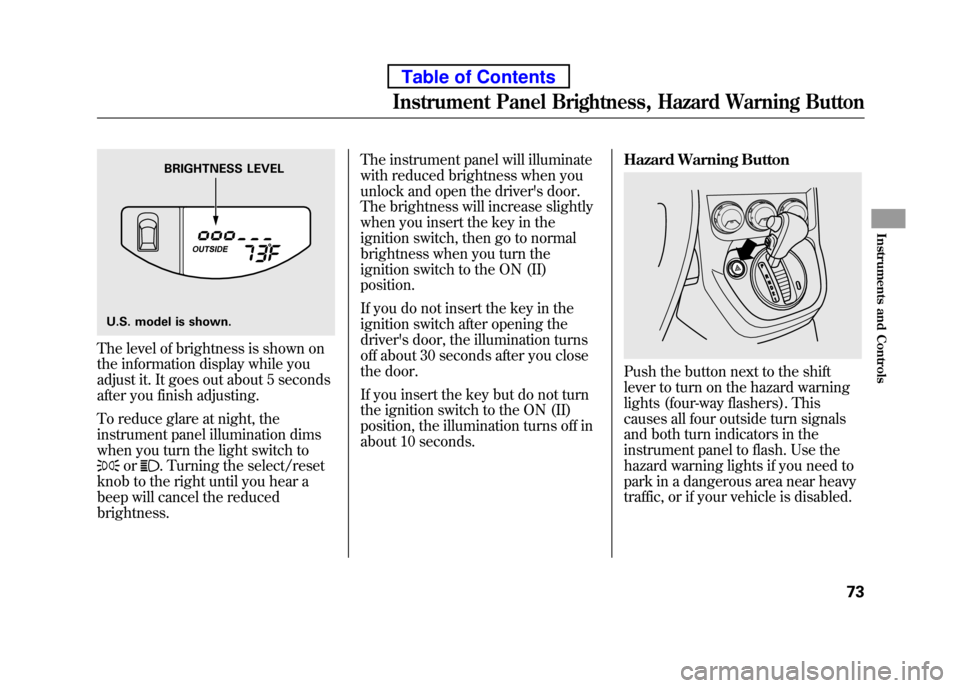
The level of brightness is shown on
the information display while you
adjust it. It goes out about 5 seconds
after you finish adjusting.
To reduce glare at night, the
instrument panel illumination dims
when you turn the light switch to
or. Turning the select/reset
knob to the right until you hear a
beep will cancel the reducedbrightness. The instrument panel will illuminate
with reduced brightness when you
unlock and open the driver's door.
The brightness will increase slightly
when you insert the key in the
ignition switch, then go to normal
brightness when you turn the
ignition switch to the ON (II)position.
If you do not insert the key in the
ignition switch after opening the
driver's door, the illumination turns
off about 30 seconds after you close
the door.
If you insert the key but do not turn
the ignition switch to the ON (II)
position, the illumination turns off in
about 10 seconds.
Hazard Warning Button
Push the button next to the shift
lever to turn on the hazard warning
lights (four-way flashers). This
causes all four outside turn signals
and both turn indicators in the
instrument panel to flash. Use the
hazard warning lights if you need to
park in a dangerous area near heavy
traffic, or if your vehicle is disabled.
BRIGHTNESS LEVEL
U.S. model is shown.
Instrument Panel Brightness, Hazard Warning Button
73
Instruments and Controls
Table of Contents
Page 94 of 342
UNLOCK-Press this button once
to unlock the driver's door. Push it
twice to unlock the passenger's door
and the hatch. Some exterior lights
will flash twice each time you press
the button. If you do not open either
door or the hatch within 30 seconds,
they will automatically relock. PANIC -Press this button for
about 1 second to attract attention;
the horn will sound and the exterior
lights will flash for about 30 seconds.
To cancel panic mode, press any
other button on the remote
transmitter, or turn the ignition
switch to the ON (II) position.Remote Transmitter Care● Avoid dropping or throwing thetransmitter.
● Protect the transmitter from
extreme temperature.
● Do not immerse the transmitter in
any liquid.
● If you lose a transmitter, the
replacement needs to be
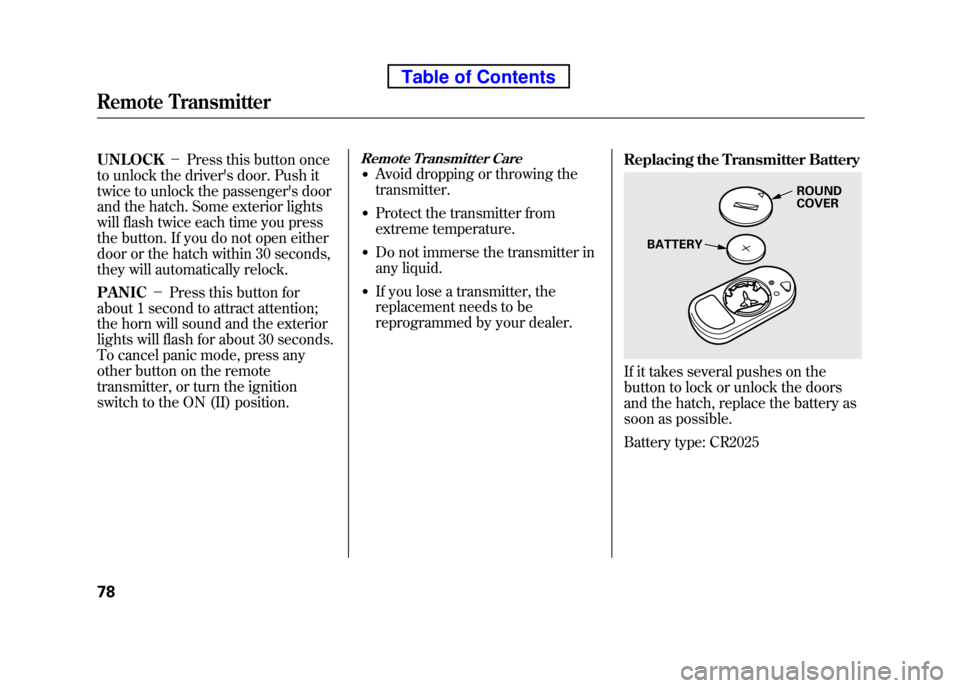
reprogrammed by your dealer. Replacing the Transmitter Battery
If it takes several pushes on the
button to lock or unlock the doors
and the hatch, replace the battery as
soon as possible.
Battery type: CR2025
ROUND COVER
BATTERY
Remote Transmitter
78
Table of Contents
Page 111 of 342
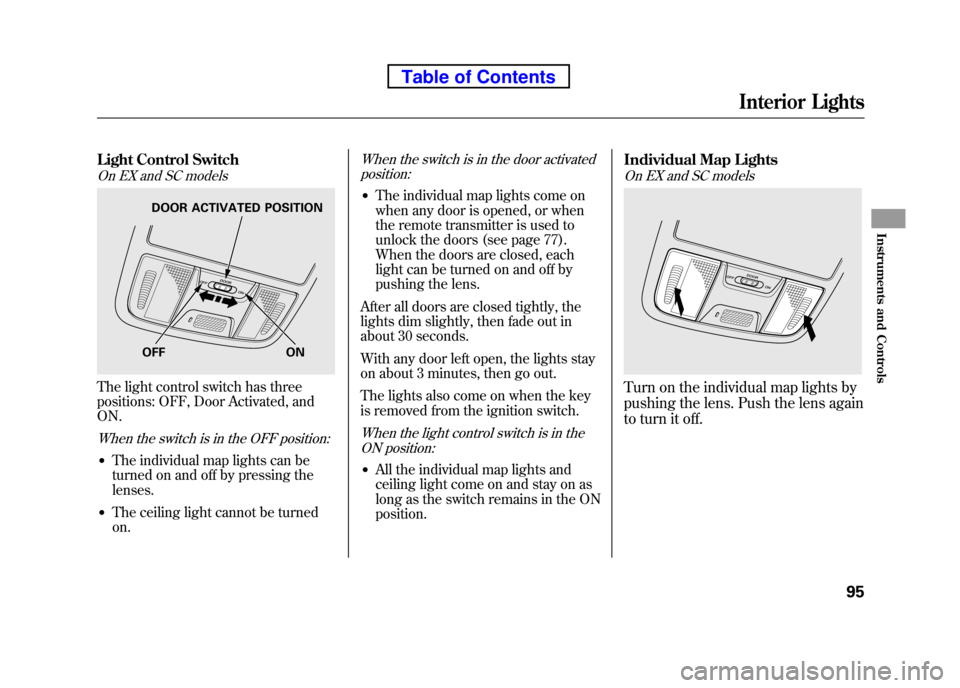
Light Control Switch
On EX and SC models
The light control switch has three
positions: OFF, Door Activated, andON.
When the switch is in the OFF position:
●The individual map lights can be
turned on and off by pressing thelenses.
● The ceiling light cannot be turnedon.
When the switch is in the door activated
position:
● The individual map lights come on
when any door is opened, or when
the remote transmitter is used to
unlock the doors (see page 77).
When the doors are closed, each
light can be turned on and off by
pushing the lens.
After all doors are closed tightly, the
lights dim slightly, then fade out in
about 30 seconds.
With any door left open, the lights stay
on about 3 minutes, then go out.
The lights also come on when the key
is removed from the ignition switch.
When the light control switch is in the ON position:
● All the individual map lights and
ceiling light come on and stay on as
long as the switch remains in the ONposition. Individual Map Lights
On EX and SC models
Turn on the individual map lights by
pushing the lens. Push the lens again
to turn it off.
OFF ON
DOOR ACTIVATED POSITION
Interior Lights
95
Instruments and Controls
Table of Contents