fuel HONDA FIT 2010 2.G Owner's Guide
[x] Cancel search | Manufacturer: HONDA, Model Year: 2010, Model line: FIT, Model: HONDA FIT 2010 2.GPages: 351, PDF Size: 5.67 MB
Page 243 of 351
If the vehicle speed decreases below
the redline of the selected lower gear
while the indicator is flashing, the
transmission downshifts, and the
indicator displays the selected gear.● You upshift before the engine
speed reaches the lowest
threshold of the higher gear.
● You pull both paddle shifters at the
same time.Starting in Second Gear
When you are in sequential shift
mode, and the vehicle is stopped,
pull the +(right) paddle shifter to
shift to second gear. You will see‘‘ M2 ’’in the display. Starting in
second gear helps to reduce
wheelspin in deep snow or on a
slippery surface. Recommended Shift Points
Drive in the highest gear that lets the
engine run and accelerate smoothly.
This will give you good fuel economy
and effective emissions control. The
following shift points are
recommended:
Shift up Normal acceleration
1st to 2nd 15 mph (24 km/h)
2nd to 3rd 25 mph (40 km/h)
3rd to 4th 40 mph (64 km/h)
4th to 5th 47 mph (76 km/h )
Driving with the Paddle Shifters (Sport only)
228
Table of Contents
Page 245 of 351
Your vehicle is equipped with front
disc brakes. The brakes on the rear
wheels are drum. A power assist
helps reduce the effort needed on the
brake pedal. The anti-lock brake
system (ABS) helps you retain
steering control when braking veryhard.
Resting your foot on the pedal keeps
the brakes applied lightly, builds up
heat, and reduces their effectiveness
and reduces brake pad life. In
addition, fuel economy can be
reduced. It also keeps your brake
lights on all the time, confusing
drivers behind you.
Constant application of the brakes
when going down a long hill builds
up heat and reduces their
effectiveness. Use the engine to
assist the brakes by taking your foot
off the accelerator and downshifting
to a lower gear.Check your brakes after driving
through deep water. Apply the
brakes moderately to see if they feel
normal. If not, apply them gently and
frequently until they do. Be extra
cautious and alert in your driving.
Braking System Design
The hydraulic system that operates
the brakes has two separate circuits.
Each circuit works diagonally across
the vehicle (the left-front brake is
connected with the right-rear brake,
etc.). If one circuit should develop a
problem, you will still have braking
at two wheels.
Brake Pad Wear Indicators
If the front brake pads need
replacing, you will hear a distinctive,
metallic screeching sound when you
apply the brake pedal. If you do not
have the brake pads replaced, they
will screech all the time. It is normal
for the brakes to occasionally squeal
or squeak when you apply them.
Braking System
230
Table of Contents
Page 250 of 351
U.S. models only
Your vehicle is equipped with a tire
pressure monitoring system (TPMS)
that turns on every time you start the
engine and monitors the pressure in
your tires while driving.
Each tire has its own pressure sensor
(not including the spare tire). If the
air pressure of a tire becomes
significantly low, the sensor in that
tire immediately sends a signal that
causes the low tire pressure indicator
to come on.
Low Tire Pressure Indicator
When the low tire pressure indicator
is on, one or more of your tires is
significantly underinflated. You
should stop and check your tires as
soon as possible, and inflate them to
the proper pressure as indicated on
the vehicle's tire information placard.
If you think you can safely drive a
short distance to a service station,
proceed slowly, and inflate the tire to
the recommended pressure shown
on the driver's doorjamb.
If the tire is flat, or if the tire pressure
is too low to continue driving, replace
the tire with the compact spare tire
(see page 284). If you cannot make the low tire
pressure indicator go out after
inflating the tires to the specified
values, have your dealer check the
system as soon as possible.
Driving on a significantly under-
inflated tire causes the tire to
overheat and can lead to tire failure.
Under-inflation also reduces fuel
efficiency and tire tread life, and may
affect the vehicle's handling and
stopping ability.
Because tire pressure varies by
temperature and other conditions,
the low tire pressure indicator may
come on unexpectedly.
CONTINUED
Tire Pressure Monitoring System (TPMS)
235
Driving
Table of Contents
Page 254 of 351
5. Release the parking brake.
Manual transmission:
1. Move the shift lever into theNeutral position.
2. Release the parking brake.
Leave the ignition switch in the
ACCESSORY (I) position so the
steering wheel does not lock. Make
sure the radio and any items plugged
into the accessory power sockets are
turned off so you do not run down
the battery.
When you stop towing your vehicle
and shift out of the neutral position,
you may not be able to move the shift
lever from neutral to reverse or Park.
If this happens, press the brake pedal
and turn the ignition switch to the
ON (II) position, then shift out ofneutral.
Extended Towing
If you tow more than 8 hours in one
day, you should repeat the above
procedure at least every 8 hours
(when you stop for fuel, etc.).Failure to follow the recommended
instructions exactly will result in severe
automatic transmission damage. If you
cannot shift the transmission or start
the engine, your vehicle must be
transported on a flat-bed truck ortrailer.
CONTINUED
Towing Your Vehicle Behind a Motorhome
239
Driving
Table of Contents
Page 259 of 351
All service items not detailed in this
section should be performed by a
certified technician or other qualifiedmechanic.
Important Safety Precautions
To eliminate potential hazards, read
the instructions before you begin,
and make sure you have the tools
and skills required.● Make sure your vehicle is parked
on level ground, the parking brake
is set, and the engine is off.
● To clean parts, use a commercially
available degreaser or parts
cleaner, not gasoline.
● To reduce the possibility of fire or
explosion, keep cigarettes, sparks,
and flames away from the battery
and all fuel-related parts.
● Wear eye protection and protective
clothing when working with the
battery or compressed air.
Improperly maintaining this
vehicle, or failing to correct a
problem before driving can
cause a crash in which you can
be seriously hurt or killed.
Always follow the inspection
and maintenance
recommendations and
schedules in this owner'smanual.
Potential Vehicle Hazards ● Carbon Monoxide poison from
engine exhaust. Be sure there is
adequate ventilation whenever you
operate the engine.
● Burns from hot parts. Let the
engine and exhaust system cool
down before touching any parts. ●
Injury from moving parts. Do
not run the engine unless
instructed to do so.
Failure to properly follow
maintenance instructions and
precautions can cause you to
be seriously hurt or killed.
Always follow the procedures
and precautions in this owner's manual.
Some of the most important safety
precautions are given here. However,
we cannot warn you of every
conceivable hazard that can arise in
performing maintenance. Only you
can decide whether or not you
should perform a given task.
Maintenance Safety
244
Table of Contents
Page 263 of 351
To change the information display
from the engine oil life display to the
odometer, the trip meter or average
fuel mileage, press and release the
select/reset knob.
When the engine oil life is 0 percent
or negative mileage, the maintenance
minder indicator (
) remains on
even if you change the information display.
Immediately have the service
performed, and make sure to reset
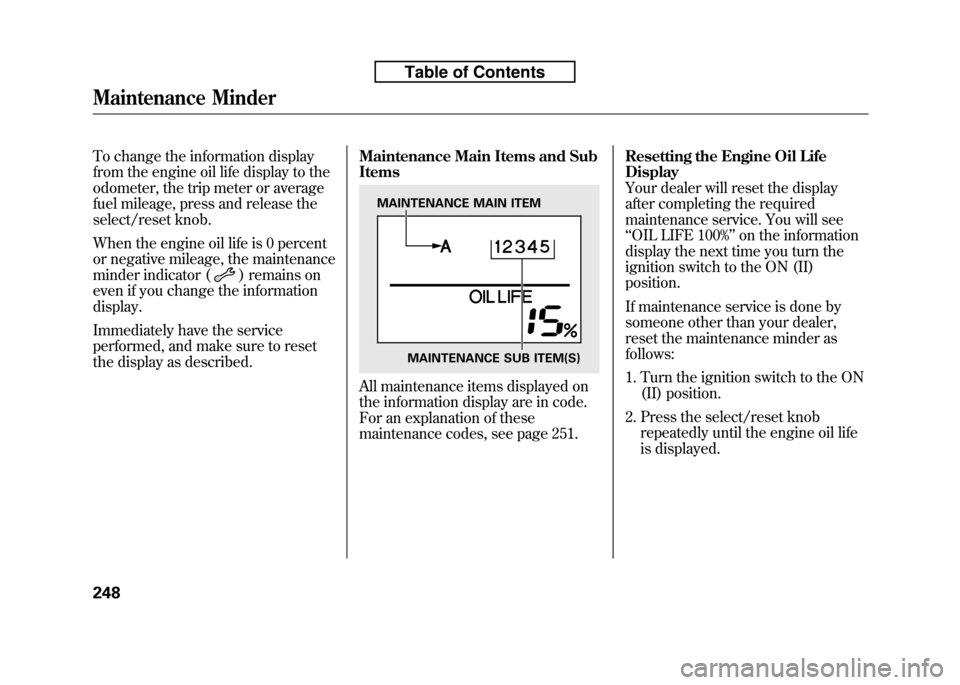
the display as described. Maintenance Main Items and SubItems
All maintenance items displayed on
the information display are in code.
For an explanation of these
maintenance codes, see page 251.Resetting the Engine Oil LifeDisplay
Your dealer will reset the display
after completing the required
maintenance service. You will see‘‘
OIL LIFE 100% ’’on the information
display the next time you turn the
ignition switch to the ON (II)position.
If maintenance service is done by
someone other than your dealer,
reset the maintenance minder asfollows:
1. Turn the ignition switch to the ON (II) position.
2. Press the select/reset knob repeatedly until the engine oil life
is displayed.
MAINTENANCE MAIN ITEM
MAINTENANCE SUB ITEM(S)
Maintenance Minder
248
Table of Contents
Page 265 of 351
However, service at a dealer is not
mandatory to keep your warranties in
effect. Maintenance may be done by
any qualified service facility or
person who is skilled in this type of
automotive service. Make sure to
have the service facility or person
reset the display as previously
described. Keep all receipts as proof
of completion, and have the person
who does the work fill out your
Honda Service History or Canadian
Maintenance Log. Check your
warranty booklet for moreinformation.
We recommend using Honda parts
and fluids whenever you have
maintenance done. These are
manufactured to the same high
quality standards as the original
components, so you can be confident
of their performance and durability.U.S. Vehicles:
Maintenance,
replacement, or repair of
emissions control devices and
systems may be done by any
automotive repair establishment
or individual using parts that are‘‘ certified ’’to EPA standards.
According to state and federal
regulations, failure to perform
maintenance on the items markedwith #will not void your emissions
warranties. However, all
maintenance services should be
performed in accordance with the
intervals indicated by the informationdisplay.
Owner's Maintenance Checks
You should check the following
items at the specified intervals. If you
are unsure of how to perform any
check, turn to the appropriate pagelisted. ●
Engine oil level -Check every
time you fill the fuel tank. See page201.
● Engine coolant level -Check the
radiator reserve tank every time
you fill the fuel tank. See page 202.
● Automatic transmission -Check
the fluid level monthly. See page259.
● Brakes -Check the fluid level
monthly. See page 261.
● Tires -Check the tire pressure
monthly. Examine the tread for
wear and foreign objects. See page274.
● Lights -Check the operation of
the headlights, parking lights,
taillights, high-mount brake light,
and license plate lights monthly.
See page 262.
Maintenance Minder
250
Table of Contents
Page 266 of 351
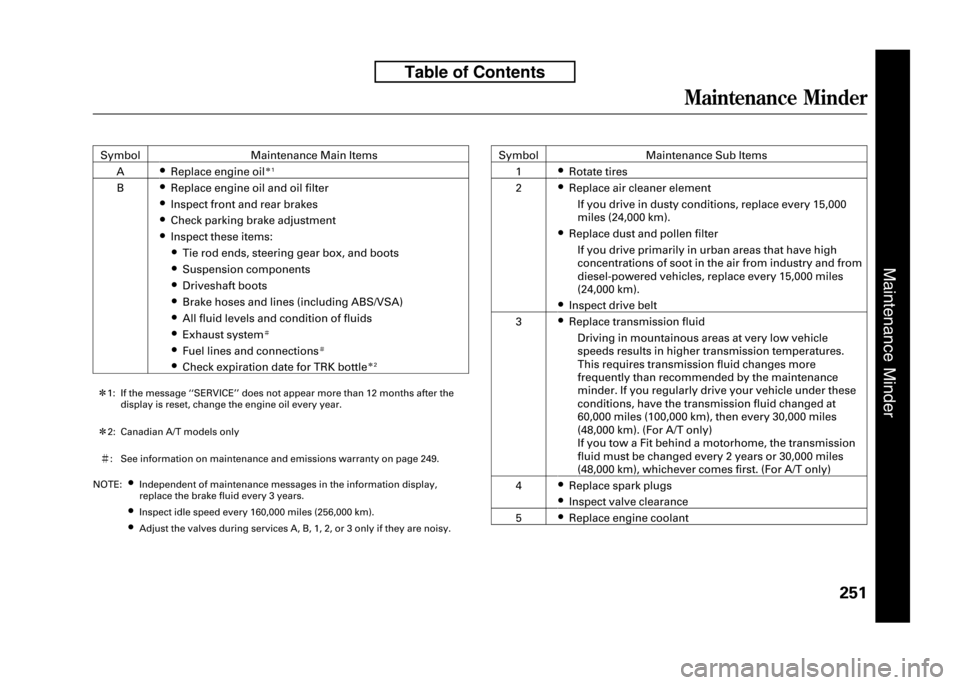
Symbol Maintenance Main ItemsA ●
Replace engine oilꭧ1
B ●
Replace engine oil and oil filter
● Inspect front and rear brakes
● Check parking brake adjustment
● Inspect these items:
● Tie rod ends, steering gear box, and boots
● Suspension components
● Driveshaft boots
● Brake hoses and lines (including ABS/VSA)
● All fluid levels and condition of fluids
● Exhaust system
#
●Fuel lines and connections#
●Check expiration date for TRK bottleꭧ2
ꭧ 1: If the message ‘‘SERVICE ’’does not appear more than 12 months after the
display is reset, change the engine oil every year.
ꭧ 2: Canadian A/T models only
# : See information on maintenance and emissions warranty on page 249.
NOTE: ●
Independent of maintenance messages in the information display,
replace the brake fluid every 3 years.
● Inspect idle speed every 160,000 miles (256,000 km).
● Adjust the valves during services A, B, 1, 2, or 3 only if they are noisy. Symbol Maintenance Sub Items
1 ●
Rotate tires
2 ●
Replace air cleaner element
If you drive in dusty conditions, replace every 15,000
miles (24,000 km).
● Replace dust and pollen filter
If you drive primarily in urban areas that have high
concentrations of soot in the air from industry and from
diesel-powered vehicles, replace every 15,000 miles
(24,000 km).
● Inspect drive belt
3 ●
Replace transmission fluid
Driving in mountainous areas at very low vehicle
speeds results in higher transmission temperatures.
This requires transmission fluid changes more
frequently than recommended by the maintenance
minder. If you regularly drive your vehicle under these
conditions, have the transmission fluid changed at
60,000 miles (100,000 km), then every 30,000 miles
(48,000 km). (For A/T only)
If you tow a Fit behind a motorhome, the transmission
fluid must be changed every 2 years or 30,000 miles
(48,000 km), whichever comes first. (For A/T only)
4 ●
Replace spark plugs
● Inspect valve clearance
5 ●
Replace engine coolant
Maintenance Minder
Maintenance Minder
251
Table of Contents
Page 268 of 351
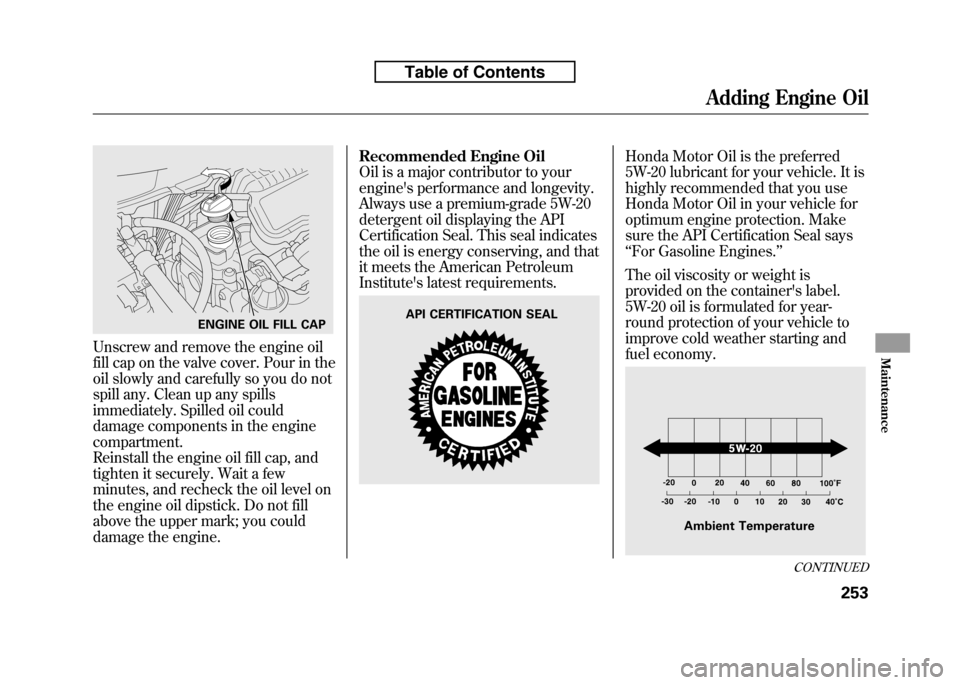
Unscrew and remove the engine oil
fill cap on the valve cover. Pour in the
oil slowly and carefully so you do not
spill any. Clean up any spills
immediately. Spilled oil could
damage components in the enginecompartment.
Reinstall the engine oil fill cap, and
tighten it securely. Wait a few
minutes, and recheck the oil level on
the engine oil dipstick. Do not fill
above the upper mark; you could
damage the engine.Recommended Engine Oil
Oil is a major contributor to your
engine's performance and longevity.
Always use a premium-grade 5W-20
detergent oil displaying the API
Certification Seal. This seal indicates
the oil is energy conserving, and that
it meets the American Petroleum
Institute's latest requirements.
Honda Motor Oil is the preferred
5W-20 lubricant for your vehicle. It is
highly recommended that you use
Honda Motor Oil in your vehicle for
optimum engine protection. Make
sure the API Certification Seal says‘‘
For Gasoline Engines. ’’
The oil viscosity or weight is
provided on the container's label.
5W-20 oil is formulated for year-
round protection of your vehicle to
improve cold weather starting and
fuel economy.
ENGINE OIL FILL CAPAPI CERTIFICATION SEAL
Ambient Temperature
CONTINUED
Adding Engine Oil
253
Maintenance
Table of Contents
Page 288 of 351
To safely operate your vehicle, your
tires must be the proper type and
size, in good condition with adequate
tread, and correctly inflated.
The following pages give more
detailed information on how to take
care of your tires and what to do
when they need to be replaced.
Using tires that are excessively
worn or improperly inflated can
cause a crash in which you can
be seriously hurt or killed.
Follow all instructions in this
owner's manual regarding tire
inflation and maintenance.Inflation Guidelines
Keeping the tires properly inflated
provides the best combination of
handling, tread life, and ridingcomfort.
● Underinflated tires wear unevenly,
adversely affect handling and fuel
economy, and are more likely to
fail from being overheated.
● Overinflated tires can make your
vehicle ride more harshly, are
more prone to damage from road
hazards, and wear unevenly.
The tire pressure monitoring system(TPMS)
ꭧwarns you when a tire
pressure is low. See page 235 for
more information. ꭧ : If equipped Even though your vehicle is
equipped with TPMS, we
recommend that you visually check
your tires every day. If you think a
tire might be low, check it
immediately with a tire gauge.
Use a gauge to measure the air
pressure in each tire at least once a
month. Even tires that are in good
condition may lose 1 to 2 psi (10 to
20 kPa, 0.1 to 0.2 kgf/cm
2) per
month. Remember to check the
spare tire (if equipped) at the sametime.
Check the air pressures when the
tires are cold. This means the vehicle
has been parked for at least 3 hours,
or driven less than 1 mile (1.6 km).
Add or release air, if needed, to
match the recommended cold tirepressures.
CONTINUED
Tires
273
Maintenance
Table of Contents