tires HONDA FIT 2016 3.G Quick Guide
[x] Cancel search | Manufacturer: HONDA, Model Year: 2016, Model line: FIT, Model: HONDA FIT 2016 3.GPages: 75, PDF Size: 5.39 MB
Page 45 of 75
82 || 83
DRIVING
NAVIGATION
Taking a Detour
You can calculate a detour route manually if you encounter a road closure or other obstacle.
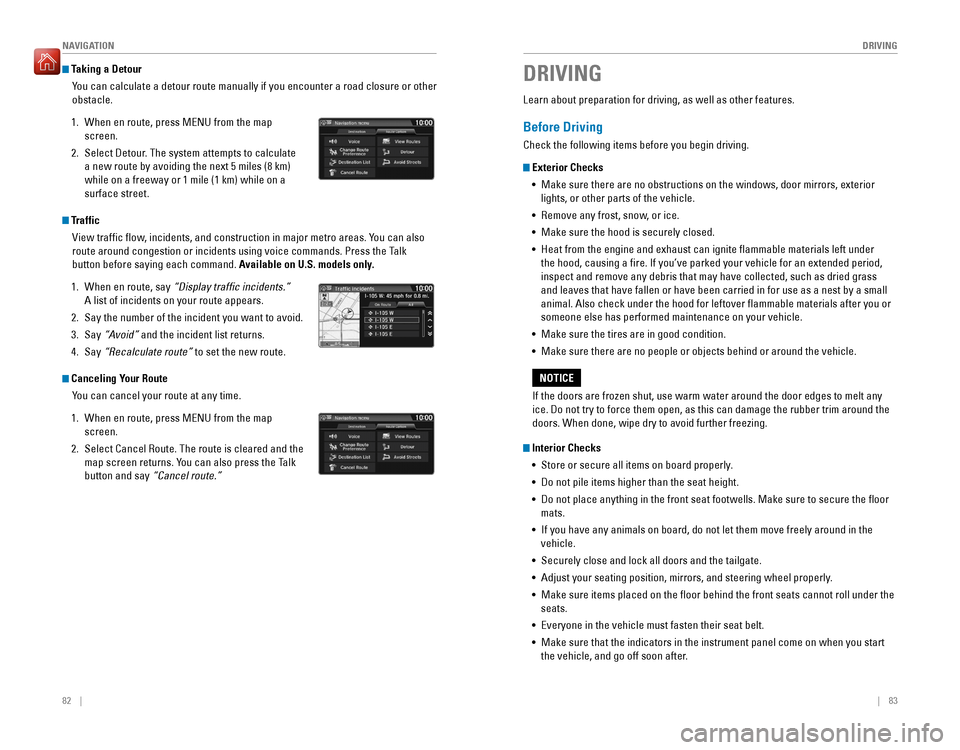
1. When en route, press MENU from the map screen.
2. Select Detour. The system attempts to calculate a new route by avoiding the next 5 miles (8 km) while on a freeway or 1 mile (1 km) while on a surface street.
Traffic
View traf�c �ow, incidents, and construction in major metro areas. You can also
route around congestion or incidents using voice commands. Press the Talk
button before saying each command. Available on U.S. models only.
1. When en route, say “Display trafic incidents.”
A list of incidents on your route appears.
2. Say the number of the incident you want to avoid.
3. Say “Avoid” and the incident list returns.
4. Say “Recalculate route” to set the new route.
Canceling Your Route
You can cancel your route at any time.
1. When en route, press MENU from the map screen.
2. Select Cancel Route. The route is cleared and the map screen returns. You can also press the Talk button and say “Cancel route.”
Learn about preparation for driving, as well as other features.
Before Driving
Check the following items before you begin driving.
Exterior Checks
•
Make sure there are no obstructions on the windows, door mirrors, exterior
lights, or other parts of the vehicle.
• Remove any frost, snow, or ice.
• Make sure the hood is securely closed.
• Heat from the engine and exhaust can ignite lammable materials left under
the hood, causing a ire. If you’ve parked your vehicle for an extended period,
inspect and remove any debris that may have collected, such as dried grass and leaves that have fallen or have been carried in for use as a nest by a small animal. Also check under the hood for leftover lammable materials after you or someone else has performed maintenance on your vehicle.
• Make sure the tires are in good condition.
• Make sure there are no people or objects behind or around the vehicle.
Interior Checks
• Store or secure all items on board properly.
• Do not pile items higher than the seat height.
• Do not place anything in the front seat footwells. Make sure to secure the loor mats.
• If you have any animals on board, do not let them move freely around in the
vehicle.
• Securely close and lock all doors and the tailgate.
• Adjust your seating position, mirrors, and steering wheel properly.
• Make sure items placed on the loor behind the front seats cannot roll under the
seats.
• Everyone in the vehicle must fasten their seat belt.
• Make sure that the indicators in the instrument panel come on when you start
the vehicle, and go off soon after.
DRIVING
If the doors are frozen shut, use warm water around the door edges to melt any ice. Do not try to force them open, as this can damage the rubber trim around the doors. When done, wipe dry to avoid further freezing.
NOTICE
Page 46 of 75
84 || 85
DRIVING
DRIVING
Improper accessories or modiications can affect your vehicle’s handling, and
stability, and performance, and cause a crash in which you can be seriously hurt or killed.
Follow all instructions in the vehicle owner’s guide regarding accessories and modi�cations.
WARNING
In addition:
• During the irst 600 miles (1,000 km) of operation, avoid sudden acceleration or full throttle operation so as not to damage the engine or powertrain.
• Avoid hard braking for the irst 200 miles (300 km). You should also follow this
when the brake pads are replaced.Maximum Load Limit
Carrying too much cargo or improperly storing it can affect your vehicle’s handling,
stability, stopping distance, and tires, and make it unsafe.
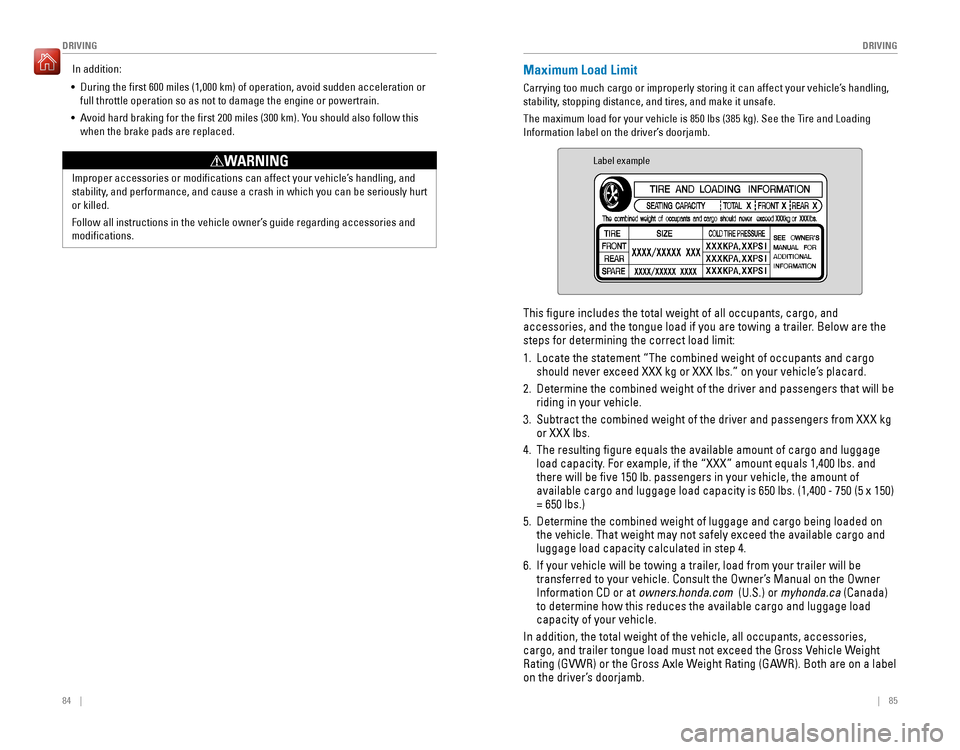
The maximum load for your vehicle is 850 lbs (385 kg). See the Tire and Loading
Information label on the driver’s doorjamb.
Label example
This �gure includes the total weight of all occupants, cargo, and
accessories, and the tongue load if you are towing a trailer. Below are the steps for determining the correct load limit: 1. Locate the statement “The combined weight of occupants and cargo
should never exceed XXX kg or XXX lbs.” on your vehicle’s placard.
2. Determine the combined weight of the driver and passengers that will be riding in your vehicle.
3. Subtract the combined weight of the driver and passengers from XXX kg or XXX lbs.
4. The resulting igure equals the available amount of cargo and luggage
load capacity. For example, if the “XXX” amount equals 1,400 lbs. and there will be ive 150 lb. passengers in your vehicle, the amount of
available cargo and luggage load capacity is 650 lbs. (1,400 - 750 (5 x 150) = 650 lbs.)
5. Determine the combined weight of luggage and cargo being loaded on the vehicle. That weight may not safely exceed the available cargo and luggage load capacity calculated in step 4.
6. If your vehicle will be towing a trailer, load from your trailer will be
transferred to your vehicle. Consult the Owner’s Manual on the Owner Information CD or at owners.honda.com (U.S.) or myhonda.ca (Canada)
to determine how this reduces the available cargo and luggage load capacity of your vehicle.
In addition, the total weight of the vehicle, all occupants, accessories,
cargo, and trailer tongue load must not exceed the Gross Vehicle Weight
Rating (GVWR) or the Gross Axle Weight Rating (GAWR). Both are on a label
on the driver’s doorjamb.
Page 54 of 75
100 || 101
HANDLING THE UNEXPECTED
HANDLING THE UNEXPECTED
Overheating
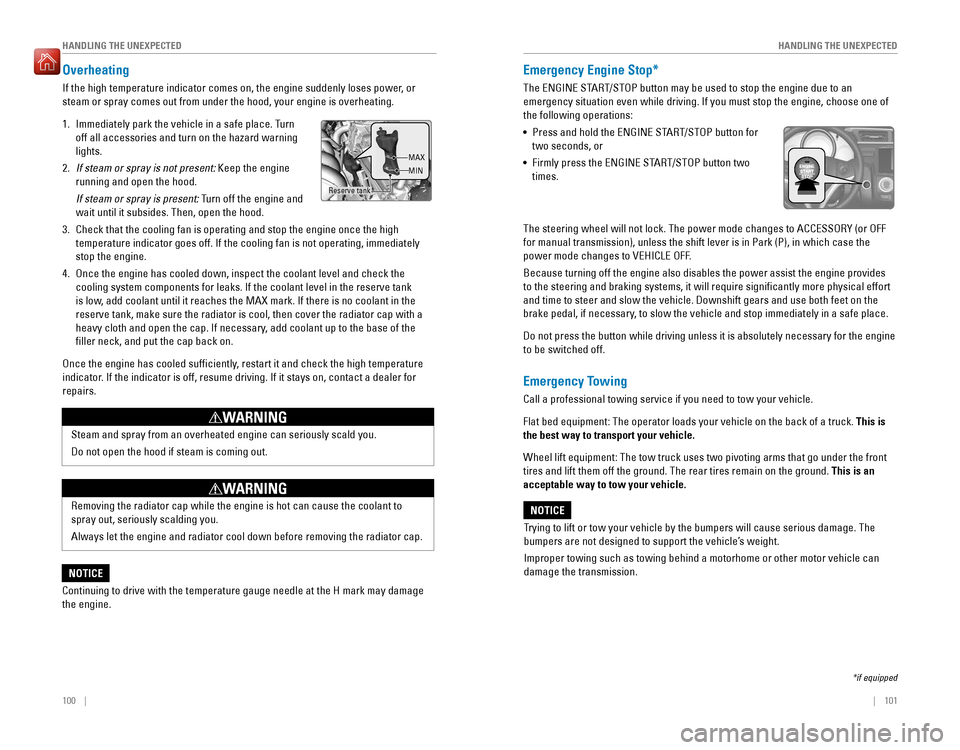
If the high temperature indicator comes on, the engine suddenly loses power, or steam or spray comes out from under the hood, your engine is overheating. 1. Immediately park the vehicle in a safe place. Turn off all accessories and turn on the hazard warning lights.
2. If steam or spray is not present: Keep the engine
running and open the hood.
If steam or spray is present: Turn off the engine and
wait until it subsides. Then, open the hood.
3. Check that the cooling fan is operating and stop the engine once the high temperature indicator goes off. If the cooling fan is not operating, immediately stop the engine.
4. Once the engine has cooled down, inspect the coolant level and check the cooling system components for leaks. If the coolant level in the reserve tank
is low, add coolant until it reaches the MAX mark. If there is no coolant in the
reserve tank, make sure the radiator is cool, then cover the radiator cap with a
heavy cloth and open the cap. If necessary, add coolant up to the base of the iller neck, and put the cap back on.
Once the engine has cooled suf�ciently, restart it and check the high temperature
indicator. If the indicator is off, resume driving. If it stays on, contact a dealer for repairs.
Steam and spray from an overheated engine can seriously scald you. Do not open the hood if steam is coming out.
WARNING
Removing the radiator cap while the engine is hot can cause the coolant to spray out, seriously scalding you. Always let the engine and radiator cool down before removing the radiator cap.
WARNING
Continuing to drive with the temperature gauge needle at the H mark may damage the engine.
NOTICE
Emergency Engine Stop*
The ENGINE START/STOP button may be used to stop the engine due to an
emergency situation even while driving. If you must stop the engine, choose one of the following operations: • Press and hold the ENGINE START/STOP button for
two seconds, or
• Firmly press the ENGINE START/STOP button two
times.
The steering wheel will not lock. The power mode changes to ACCESSORY (or OFF
for manual transmission), unless the shift lever is in Park (P), in which case the
power mode changes to VEHICLE OFF. Because turning off the engine also disables the power assist the engine provides
to the steering and braking systems, it will require signiicantly more physical effort and time to steer and slow the vehicle. Downshift gears and use both feet on the
brake pedal, if necessary, to slow the vehicle and stop immediately in a safe place.
Do not press the button while driving unless it is absolutely necessary for the engine to be switched off.
Emergency Towing
Call a professional towing service if you need to tow your vehicle. Flat bed equipment: The operator loads your vehicle on the back of a truck. This is
the best way to transport your vehicle.
Wheel lift equipment: The tow truck uses two pivoting arms that go under the front tires and lift them off the ground. The rear tires remain on the ground. This is an
acceptable way to tow your vehicle.
Trying to lift or tow your vehicle by the bumpers will cause serious damage. The
bumpers are not designed to support the vehicle’s weight.
Improper towing such as towing behind a motorhome or other motor vehicle can damage the transmission.
NOTICE
*if equipped
Reserve tank MAX MIN
Page 55 of 75

102 || 103
HANDLING THE UNEXPECTED
HANDLING THE UNEXPECTED
Tire Pressure Monitoring System (TPMS)
Monitors the tire pressure while you are driving. Available on U.S. models only.
If your vehicle’s tire pressure becomes signiicantly
low, the low tire pressure indicator comes on. Stop your vehicle in a safe place. Check the tire pressure and adjust the pressure to the speci�ed level. The speciied tire pressure is on a label on the
driver’s doorjamb.
TPMS Calibration
Any time you in�ate, change, or rotate one of more
of the tires, you need to recalibrate the system. Press and hold the TPMS button. The TPMS indicator blinks, and calibration begins. The calibration process requires approximately 30 minutes of cumulative driving at speeds between 30–60 mph (48–97 km/h). The process inishes
automatically.
Driving on an extremely underinlated tire can cause it to overheat. An overheated tire can fail. Always in�ate your tires to the speci�ed pressure.
NOTICE
TPMS button
Low tire
pressure indicator
Tire Pressure Monitoring System (TPMS)—Required Federal Explanation
U.S. models only
Each tire, including the spare (if provided), should be checked monthly when cold and inlated to the inlation pressure recommended by the vehicle manufacturer on the vehicle placard or tire in�ation pressure label. (If your vehicle has tires of a different size than the size indicated on the vehicle placard or tire inlation pressure label, you should determine the proper tire in�ation pressure for those tires.) As an added safety feature, your vehicle has been equipped with a tire pressure monitoring system (TPMS) that illuminates a low tire pressure telltale when one or more of your tires is
signi�cantly under-in�ated.
Accordingly, when the low tire pressure telltale illuminates, you should
stop and check your tires as soon as possible, and inlate them to the proper pressure.
Driving on a signiicantly under-inlated tire causes the tire to overheat
and can lead to tire failure. Under-in�ation also reduces fuel ef�ciency
and tire tread life, and may affect the vehicle’s handling and stopping
ability. Please note that the TPMS is not a substitute for proper tire maintenance,
and it is the driver’s responsibility to maintain correct tire pressure, even
if under-in�ation has not reached the level to trigger illumination of the TPMS low tire pressure telltale.
Your vehicle has also been equipped with a TPMS malfunction indicator
to indicate when the system is not operating properly. The TPMS malfunction indicator is combined with the low tire pressure telltale. When the system detects a malfunction, the telltale will �ash for approximately one minute and then remain continuously illuminated. This sequence will continue upon subsequent vehicle start-ups as long as the malfunction exists. When the malfunction indicator is illuminated, the system may not be able to detect or signal low tire pressure as intended. TPMS malfunctions may occur for a variety of reasons, including the installation of replacement or alternate tires or wheels on the vehicle that
prevent the TPMS from functioning properly. Always check the TPMS malfunction telltale after replacing one or more tires or wheels on your vehicle to ensure that the replacement or alternate tires and wheels allow the TPMS to continue to function
properly.
Page 61 of 75
114 || 115
MAINTENANCE
MAINTENANCE
Maintenance Minder Service Codes
These codes indicate what services are due on your vehicle.
*1: If a message SERVICE does not appear more than 12 months after the display is reset, change the engine oil every year.
#: See information on maintenance and emissions warranty.
CODEMaintenance Main Items
A �
Replace engine oi l*1
B�
Replace engine oil and oil �lter
� Inspect front and rear brakes/service as necessary
� Check parking brake adjustment
� Inspect tie rod ends, steering gearbox, and boots
� Inspect suspension component s
� Inspect driveshaft boot s
� Inspect brake hoses and lines (Including ABS/VSA)
� Inspect all �uid levels and condition of �uids
� Inspect exhaust system #
� Inspect fuel lines and connections #
*2:If you drive in dusty conditions, replace the air cleaner element every 15,000 miles (24,000 km).*3:If you drive primarily in urban areas with high concentrations of soot in the air from industryand diesel-powered vehicles, replace the dust and pollen �lter every 15,000 miles (24,000 km).
CODEMaintenance Sub Items
1 �
Rotate tires
2�Replace air cleaner element *2
� Replace dust and pollen �lte r*3
� Inspect drive belt
3 �
Replace transmission �uid
4�Replace spark plugs
� Inspect valve clearance
5 �
Replace engine coolan t
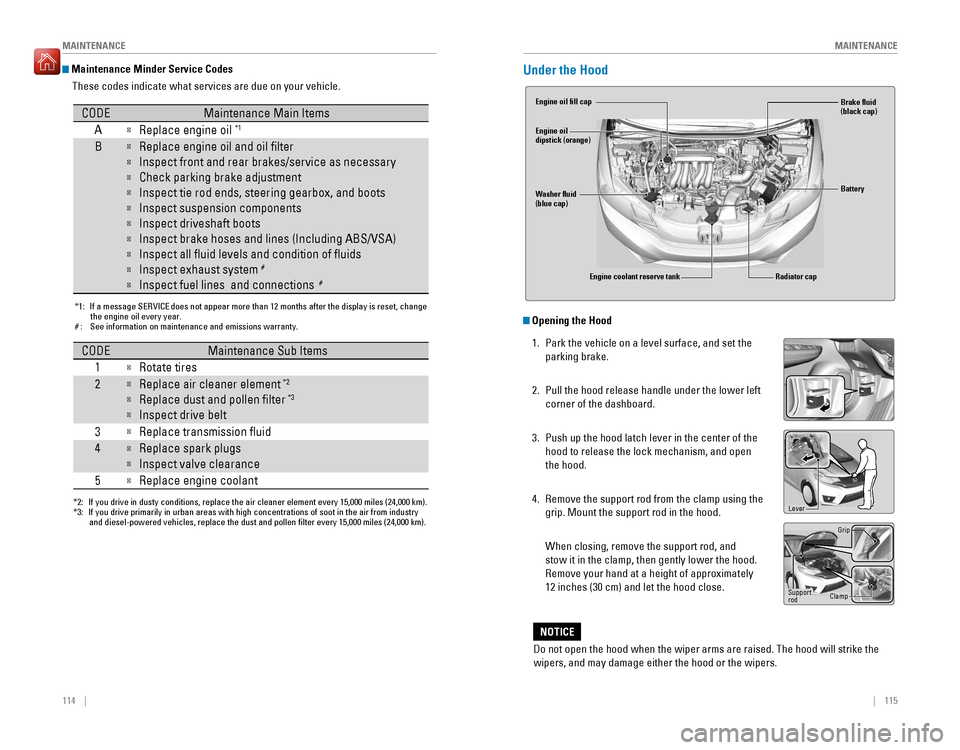
Under the Hood
Opening the Hood
1. Park the vehicle on a level surface, and set the
parking brake.
2. Pull the hood release handle under the lower left corner of the dashboard.
3. Push up the hood latch lever in the center of the hood to release the lock mechanism, and open the hood.
4. Remove the support rod from the clamp using the grip. Mount the support rod in the hood.
When closing, remove the support rod, and stow it in the clamp, then gently lower the hood. Remove your hand at a height of approximately 12 inches (30 cm) and let the hood close.
Do not open the hood when the wiper arms are raised. The hood will strike the wipers, and may damage either the hood or the wipers.
NOTICE
Engine coolant reserve tank
Washer �uid (blue cap)
Engine oil �ll cap Engine oil dipstick (orange)
Brake �uid (black cap) Battery
Radiator cap
Lever
Support rod Grip
Clamp
Page 65 of 75
122 || 123
MAINTENANCE
MAINTENANCE
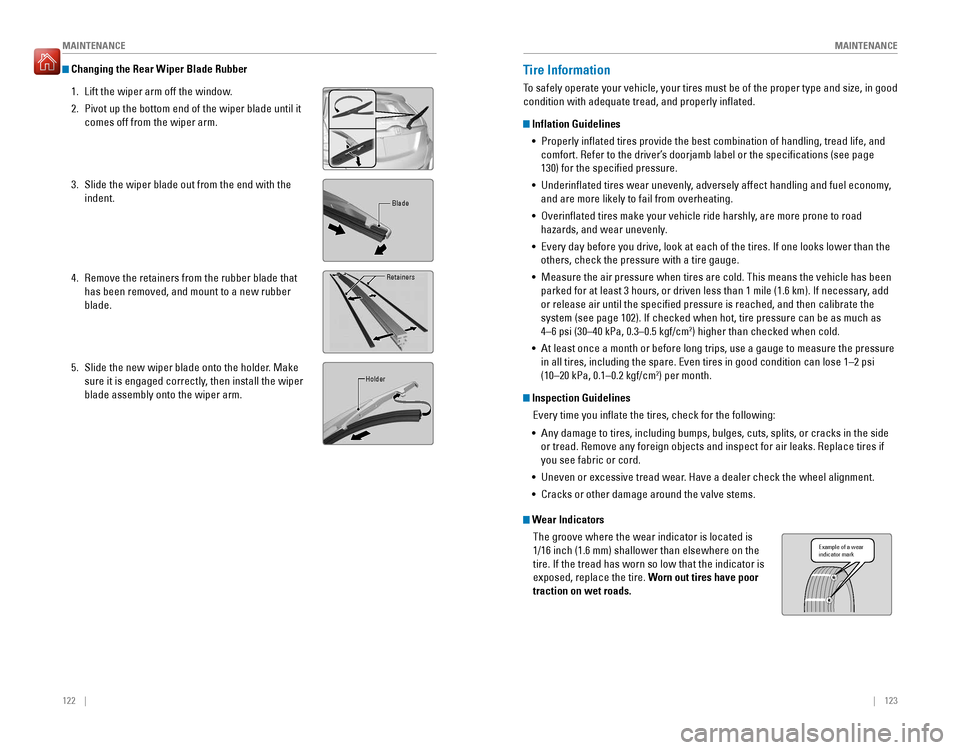
Changing the Rear Wiper Blade Rubber
1. Lift the wiper arm off the window. 2. Pivot up the bottom end of the wiper blade until it comes off from the wiper arm.
3. Slide the wiper blade out from the end with the indent.
4. Remove the retainers from the rubber blade that has been removed, and mount to a new rubber blade.
5. Slide the new wiper blade onto the holder. Make
sure it is engaged correctly, then install the wiper blade assembly onto the wiper arm.
Blade
Retainers
Holder
Tire Information
To safely operate your vehicle, your tires must be of the proper type and size, in good condition with adequate tread, and properly inlated.
Inflation Guidelines
• Properly inlated tires provide the best combination of handling, tread life, and
comfort. Refer to the driver’s doorjamb label or the speciications (see page 130) for the speci�ed pressure.
• Underin�ated tires wear unevenly, adversely affect handling and fuel economy,
and are more likely to fail from overheating.
• Overin�ated tires make your vehicle ride harshly, are more prone to road
hazards, and wear unevenly.
• Every day before you drive, look at each of the tires. If one looks lower than the others, check the pressure with a tire gauge.
• Measure the air pressure when tires are cold. This means the vehicle has been
parked for at least 3 hours, or driven less than 1 mile (1.6 km). If necessary, add
or release air until the speciied pressure is reached, and then calibrate the
system (see page 102). If checked when hot, tire pressure can be as much as 4–6 psi (30–40 kPa, 0.3–0.5 kgf/cm 2
) higher than checked when cold.
• At least once a month or before long trips, use a gauge to measure the pressure
in all tires, including the spare. Even tires in good condition can lose 1–2 psi
(10–20 kPa, 0.1–0.2 kgf/cm 2
) per month.
Inspection Guidelines
Every time you inlate the tires, check for the following:
• Any damage to tires, including bumps, bulges, cuts, splits, or cracks in the side or tread. Remove any foreign objects and inspect for air leaks. Replace tires if you see fabric or cord.
• Uneven or excessive tread wear. Have a dealer check the wheel alignment.
• Cracks or other damage around the valve stems.
Wear Indicators
The groove where the wear indicator is located is
1/16 inch (1.6 mm) shallower than elsewhere on the tire. If the tread has worn so low that the indicator is exposed, replace the tire. Worn out tires have poor
traction on wet roads.Example of a wear indicator mark
Page 66 of 75
124 || 125
MAINTENANCE
MAINTENANCE
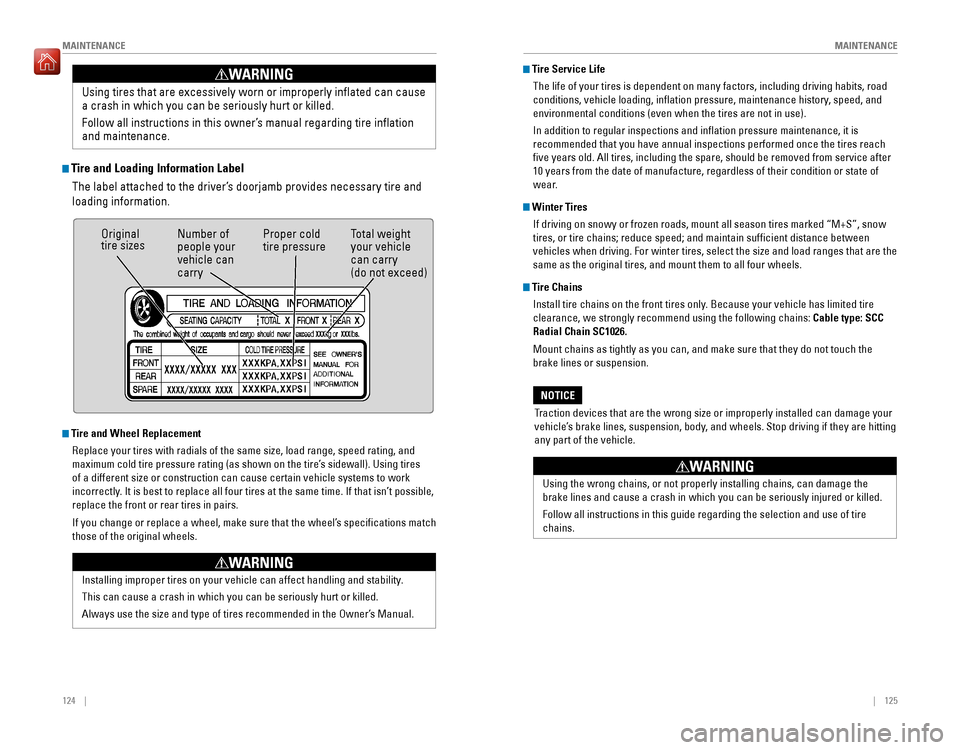
Tire and Loading Information Label
The label attached to the driver’s doorjamb provides necessary tire and loading information. Using tires that are excessively worn or improperly in�ated can cause a crash in which you can be seriously hurt or killed.
Follow all instructions in this owner’s manual regarding tire in�ation and maintenance
.
WARNING
Original tire sizesNumber of people your vehicle can carry Proper cold tire pressure
Total weight your vehicle can carry (do not exceed)
Tire and Wheel Replacement
Replace your tires with radials of the same size, load range, speed rating, and
maximum cold tire pressure rating (as shown on the tire’s sidewall). Using tires
of a different size or construction can cause certain vehicle systems to work
incorrectly. It is best to replace all four tires at the same time. If that isn’t possible, replace the front or rear tires in pairs.
If you change or replace a wheel, make sure that the wheel’s speciications match those of the original wheels.
Installing improper tires on your vehicle can affect handling and stability. This can cause a crash in which you can be seriously hurt or killed.
Always use the size and type of tires recommended in the Owner’s Manual.
WARNING
Tire Service Life
The life of your tires is dependent on many factors, including driving habits, road
conditions, vehicle loading, in�ation pressure, maintenance history, speed, and environmental conditions (even when the tires are not in use). In addition to regular inspections and inlation pressure maintenance, it is recommended that you have annual inspections performed once the tires reach
ive years old. All tires, including the spare, should be removed from service after 10 years from the date of manufacture, regardless of their condition or state of
wear.
Winter Tires
If driving on snowy or frozen roads, mount all season tires marked “M+S”, snow tires, or tire chains; reduce speed; and maintain suficient distance between
vehicles when driving. For winter tires, select the size and load ranges that are the same as the original tires, and mount them to all four wheels.
Tire Chains
Install tire chains on the front tires only. Because your vehicle has limited tire clearance, we strongly recommend using the following chains: Cable type: SCC
Radial Chain SC1026. Mount chains as tightly as you can, and make sure that they do not touch the brake lines or suspension.
Traction devices that are the wrong size or improperly installed can damage your
vehicle’s brake lines, suspension, body, and wheels. Stop driving if they are hitting any part of the vehicle.
NOTICE
Using the wrong chains, or not properly installing chains, can damage the brake lines and cause a crash in which you can be seriously injured or killed.
Follow all instructions in this guide regarding the selection and use of tire chains.
WARNING
Page 67 of 75
126 || 127
MAINTENANCE
MAINTENANCE
Tire Labeling
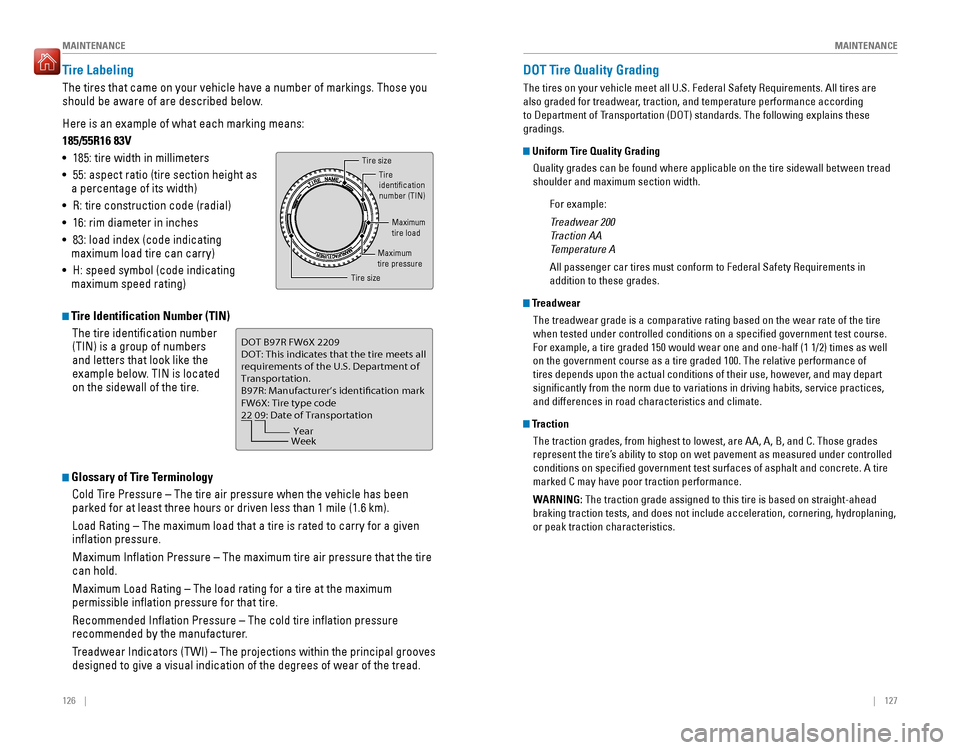
The tires that came on your vehicle have a number of markings. Those you
should be aware of are described below. Here is an example of what each marking means: 185/55R16 83V• 185: tire width in millimeters
• 55: aspect ratio (tire section height as
a percentage of its width)
• R: tire construction code (radial)
• 16: rim diameter in inches
• 83: load index (code indicating
maximum load tire can carry)
• H: speed symbol (code indicating maximum speed rating)
Tire Identification Number (TIN)
The tire identiication number (TIN) is a group of numbers and letters that look like the
example below. TIN is located on the sidewall of the tire.
Glossary of Tire Terminology
Cold Tire Pressure – The tire air pressure when the vehicle has been parked for at least three hours or driven less than 1 mile (1.6 km). Load Rating – The maximum load that a tire is rated to carry for a given in�ation pressure. Maximum Inlation Pressure – The maximum tire air pressure that the tire can hold. Maximum Load Rating – The load rating for a tire at the maximum
permissible inlation pressure for that tire. Recommended Inlation Pressure – The cold tire inlation pressure
recommended by the manufacturer.
Treadwear Indicators (TWI) – The projections within the principal grooves designed to give a visual indication of the degrees of wear of the tread.
Tire size
Tire identi�cation
number (TIN)
Maximum tire load
Maximumtire pressure
Tire size
DOT B97R FW6X 2209 DOT: This indicates that the tire meets al l
requirements of the
Page 68 of 75
128 || 129
MAINTENANCE
MAINTENANCE
Temperature
The temperature grades are A (the highest), B, and C, representing the tire’s
resistance to the generation of heat and its ability to dissipate heat when tested under controlled conditions on a speciied indoor laboratory test wheel. Sustained high temperature can cause the material of the tire to degenerate and reduce
tire life, and excessive temperature can lead to sudden tire failure. The grade
C corresponds to a level of performance which all passenger car tires must
meet under the Federal Motor Vehicle Safety Standard No. 109. Grades B and A represent higher levels of performance on the laboratory test wheel than the
minimum required by law.
WARNING: The temperature grade for this tire is established for a tire that
is properly inlated and not overloaded. Excessive speed, underinlation, or excessive loading, either separately or in combination, can cause heat buildup and possible tire failure.
Testing of Readiness Codes
Your vehicle has “readiness codes” as part of the onboard self-diagnostic system.
Some states refer to these codes as a test to see if your vehicle’s emissions
components are working properly. The codes may not be read if you go through the emissions testing just after the battery has gone dead or been disconnected.
To check if they are set, turn the vehicle on without starting the engine. The
malfunction indicator lamp will come on for several seconds. If it goes off, the
readiness codes are set. If it blinks ive times, the readiness codes are not set.
If you are required to have your vehicle emissions tested before the readiness codes are set, prepare the vehicle for retesting by doing the following: 1. Fill the gas tank to approximately 3/4 full.
2. Park the vehicle and leave the engine off for 6 hours or more.3. Make sure the ambient temperature is between 40°F and 95°F (4°C and 35°C).
4. Start the engine without touching the accelerator pedal, and let it idle for 20 seconds.
5. Keep the vehicle in Park (P) or Neutral (manual transmission). Increase the
engine speed to 2,000 rpm, and hold it there for about 3 minutes.
6. Let the engine idle with your foot off the accelerator for 20 seconds. 7. Select a nearby, lightly traveled major highway where you can maintain a speed
of 50 to 60 mph (80 to 97 km/h) for at least 20 minutes. Drive on the highway with
the vehicle in Drive (D) or 5th gear (manual transmission). Do not use cruise
control. When traf�c allows, drive for 90 seconds without using the accelerator
pedal. (Vehicle speed may vary slightly; this is OK.) If you cannot do this for a continuous 90 seconds because of trafic conditions, drive for at least 30 seconds, then repeat two more times (for a total of 90 seconds).
8. Drive in city/suburban trafic for at least 10 minutes. When trafic conditions
allow, let the vehicle coast for several seconds without using the accelerator pedal or the brake pedal.
9. Park the vehicle and leave the engine off for 30 minutes. The readiness codes are erased when the battery is disconnected, and set again only after several days of driving under a variety of conditions. If an emissions testing facility determines that the readiness codes are not set, you
may be requested to return at a later date to complete the test, or see your dealer.
Page 69 of 75
130 || 131
SPECIFICATIONS
SPECIFICATIONS
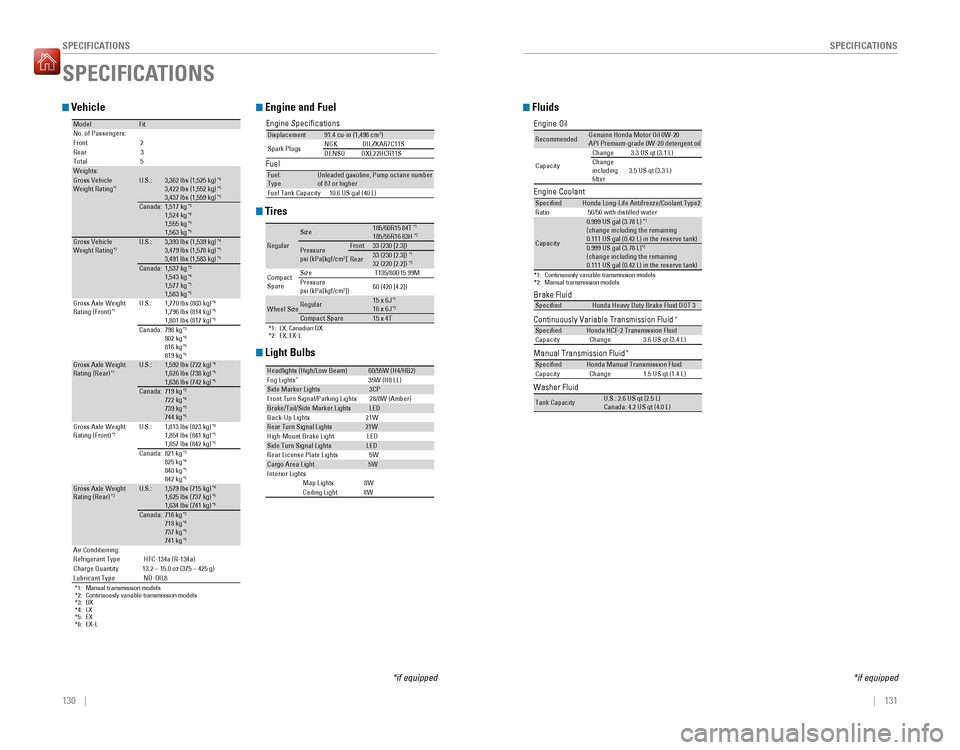
Vehicle
ModelFitNo. of Passengers: Fron t2
Rear 3
Tota l5
Weights:Gross Vehicle
Weight Rating *1U.S.:3,362 lbs (1,525 kg
)*4
3,422 lbs (1,552 kg )*5
3,437 lbs (1,559 kg )*6
Canada
:1,517 kg *3
1,524 kg *4
1,555 kg *5
1,563 kg *6
Gross Vehicle
Weight Rating *2U.S.:3,393 lbs (1,539 kg
)*4
3,479 lbs (1,578 kg )*5
3,491 lbs (1,583 kg )*6
Canada
:1,537 kg *3
1,543 kg *4
1,577 kg *5
1,583 kg *6
Gross Axle Weight Rating (Front)
*1U.S.:1,770 lbs (803 kg
)*4
1,796 lbs (814 kg )*5
1,801 lbs (817 kg )*6
Canada
:798 kg*3
802 kg *4
816 kg *5
819 kg *6
Gross Axle Weight Rating (Rear) *1U.S.:1,592 lbs (722 kg
)*4
1,626 lbs (738 kg )*5
1,636 lbs (742 kg )*6
Canada
:719 kg*3
722 kg *4
739 kg *5
744 kg *6
*1: Manual transmission models
*2: Continuously variable transmission models*3
:D X
*4 :L X
*5 :E X
*6:E X-L
Gross Axle Weight Rating (Front) *2U.S.:1,813 lbs (823 kg
)*4
1,854 lbs (841 kg )*5
1,857 lbs (842 kg )*6
Canada:821 kg *3
825 kg *4
840 kg *5
842 kg *6
Gross Axle Weight Rating (Rear
)*2U.S.:1,579 lbs (715 kg
)*4
1,625 lbs (737 kg )*5
1,634 lbs (741 kg )*6
Canada:716 kg
*3
718 kg *4
737 kg *5
741 kg *6
Air Conditioning: Refrigerant Type HFC-134a (R-134a)
Charge Quantity 13.2 – 15.0 oz (375 – 425 g)Lubricant Type ND-OIL8
Engine and Fuel
Engine Speci�cations FuelDisplacement91.4 cu-in (1,498 cm 3
)
Spark Plug sNG
KD ILZKAR7C11 S
DENSODXE22HCR11S
Fuel:
Typ eUnleaded gasoline, Pump octane number of 87 or higher
Fuel Tank Capacity 10.6 US gal (40 L)
Tires
*1: LX, Canadian DX*2: EX, EX-L
Regula r
Size185/60R15 84 T*1
185/55R16 83 H*2
Pressure psi (kPa[kgf/cm
2
])Front33 (230 [2.3])
Rear33 (230 [2.3]) *1
32 (220 [2.2]) *2
Compact Spar e Size
T135/80D15 99M
Pressure psi (kPa[kgf/cm 2
]) 60 (420 [4.2])
Wheel SizeRegular15 x 6J
*1
16 x 6J *2
Co
mpact Spar e15 x 4T
SPECIFICATIONS
*if equipped
Light Bulbs
Headlights (High/Low Beam)60/55W (H4/HB2)
Fog Lights *
35W (H8 LL)
Side Marker Lights3CP
Front Turn Signal/Parking Lights 28/8W (Amber )
Brake/Tail/Side Marker LightsLED
Back-Up Lights 21W
Rear Turn Signal Lights21W
High-M ount Brake Ligh tLED
Side Turn Signal Light sLED
Rear License Plate Light s5W
Cargo Area Ligh t5W
In teri or Lights
Map Light s8WCeiling Light 8W
Fluids
Brake Fluid
Continuously Variable Transmission Fluid *
Manual Transmission Fluid*
Speci�edHonda Heavy Duty Brake Fluid DOT
3
Speci�edHonda HCF-2 Transmission Fluid
Capacity Change 3.6 US qt (3.4 L)
Speci�edHonda Manual Transmission Fluid
Capacity Change 1.5 US qt (1.4 L)
Engine Oil
Engine Coolan
t
*1:Continuously variable transmission models*2:Manual transmission model s
Recommended·Genuine Honda Motor Oil 0W-2 0
·API Premium-grade 0W-20 detergent oi l
Capacity Change
3.3 US qt (3.1 L)
Change including �lter 3.5 US qt (3.3 L)
Speci�e
dHonda Long-Life Anti freeze/Coolant Type 2
Ratio 50/50 with distilled wate r
Capacity
0.999 US gal (3.78 L) *1
(change including the remaining 0.111 US gal (0.42 L) in the reserve tank )
0.999 US gal (3.78 L)*2
(change including the remaining 0.111 US gal (0.42 L) in the reserve tank )
Washer Fluid
Tank CapacityU.S.: 2.6 US qt (2.5 L) Canada: 4.2 US qt (4.0 L)
*if equipped