brake HONDA HR-V 2017 2.G Quick Guide
[x] Cancel search | Manufacturer: HONDA, Model Year: 2017, Model line: HR-V, Model: HONDA HR-V 2017 2.GPages: 78, PDF Size: 5.33 MB
Page 5 of 78
2 || 3
S AFETY
V
ISUAL I NDEX
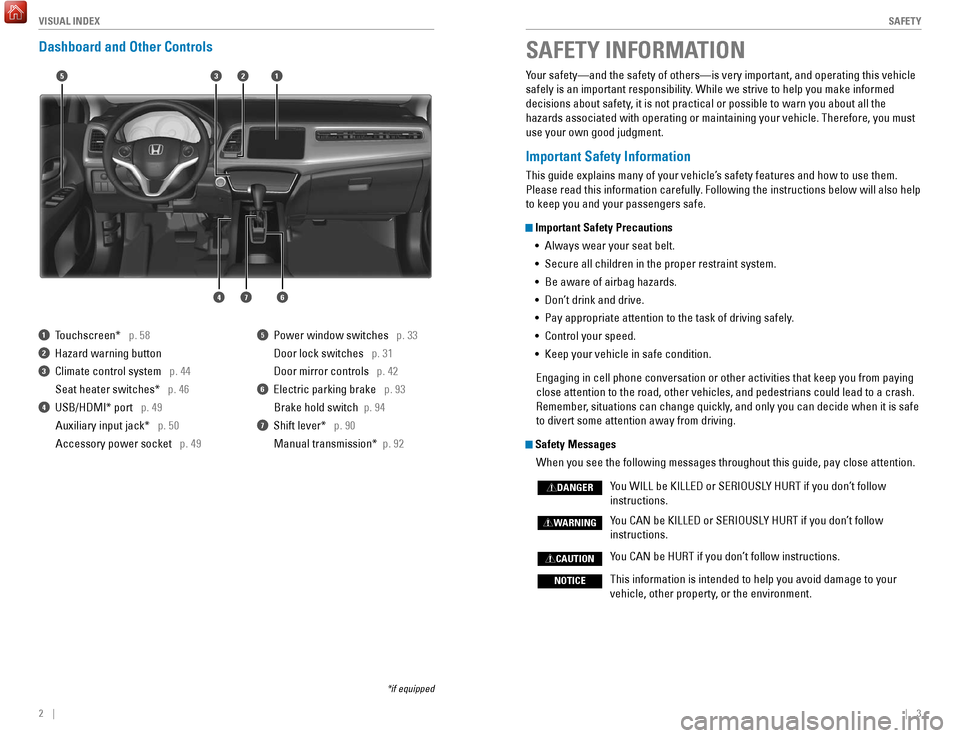
Dashboard and Other Controls
1 Touchscreen* p. 58
2 Hazard warning button
3 Climate control system p. 44
Seat heater switches*
p. 46
4 USB/HDMI* port p. 49Auxiliary input jack* p. 50
Accessory power socket p. 49
5 Power window switches p. 33
Door lock switches
p. 31
Door mirror controls
p. 42
6 Electric parking brake p. 93
Brake hold switch
p. 94
7 Shift lever* p. 90
Manual transmission*
p. 92
*if equipped
Your safety—and the safety of others—is very important, and operati\
ng this vehicle
safely is an important responsibility. While we strive to help you make informed
decisions about safety, it is not practical or possible to warn you about all the
hazards associated with operating or maintaining your vehicle. Therefore\
, you must
use your own good judgment.
Important Safety Information
This guide explains many of your vehicle’s safety features and how to use them.
Please read this information carefully. Following the instructions below will also help
to keep you and your passengers safe.
Important Safety Precautions•
Always wear your seat belt.
•
Secure all children in the proper restraint system.
•
Be aware of airbag hazards.
•
Don’
t drink and drive.
•
Pay appropriate attention to the task of driving safely
.
•
Control your speed.
•
Keep your vehicle in safe condition.
Engaging in cell phone conversation or other activities that keep you fr\
om paying
close attention to the road, other vehicles, and pedestrians could lead \
to a crash.
Remember
, situations can change quickly, and only you can decide when it is safe
to divert some attention away from driving.
Safety Messages
When you see the following messages throughout this guide, pay close att\
ention.
Y
ou WILL be KILLED or SERIOUSLY HURT if you don’t follow
instructions.
Y
ou CAN be KILLED or SERIOUSLY HURT if you don’t follow
instructions.
Y
ou CAN be HURT if you don’t follow instructions.
This information is intended to help you avoid damage to your
vehicle, other property
, or the environment.
DANGER
WARNING
CAUTION
NOTICE
SAFETY INFORMATION
15
46
32
7
Page 16 of 78
24 || 25
I NSTRUMENT P
ANELI
NSTRUMENT P
ANEL
Malfunction indicator lamp (check engine light)
• The emissions control system may have a problem, or the fuel cap is\
loose
or missing.
• (Blinks) A
misfire in the engine’s cylinders is detected. Stop in a safe place,
and wait for the engine to cool down.
Anti-lock Brake System (ABS)
There is a problem with the anti-lock brake system. Your vehicle still has
normal braking ability, but no anti-lock function.
Tire Pressure Monitoring System (TPMS) (U.S. models only)
There is a problem with the tire pressure monitoring system, or the vehi\
cle is
fitted with the compact spare tire.
Forward Collision Warning (FCW)* (Canadian models only)
There is a problem with the FCW system.
Lane Departure Warning (LDW)* (Canadian models only)
There is a problem with the LDW system.
Vehicle Stability Assist (VSA)
There is a problem with the VSA system or hill start assist system.
Brake system
There is a problem with the automatic brake hold system.
Electric parking brake system
There is a problem with the electric parking brake system. Avoid using the
parking brake. Have your vehicle inspected immediately.
Electric Power Steering (EPS)
There is a problem with the EPS system. Stop in a safe place, and restar\
t the
vehicle.
Starter system*
There is a problem with the starter system.
All Wheel Drive (AWD)*
There is a problem with the AWD system. If the indicator blinks, the system
is overheated and inactive. Stop in a safe place, and idle until the ind\
icator
goes off.
High temperature
The engine coolant temperature is high. Drive slowly to prevent overheat\
ing.
If the indicator remains on, immediately stop the vehicle in a safe plac\
e (see
page 105).
Canada U.S.
U.S.
Canada
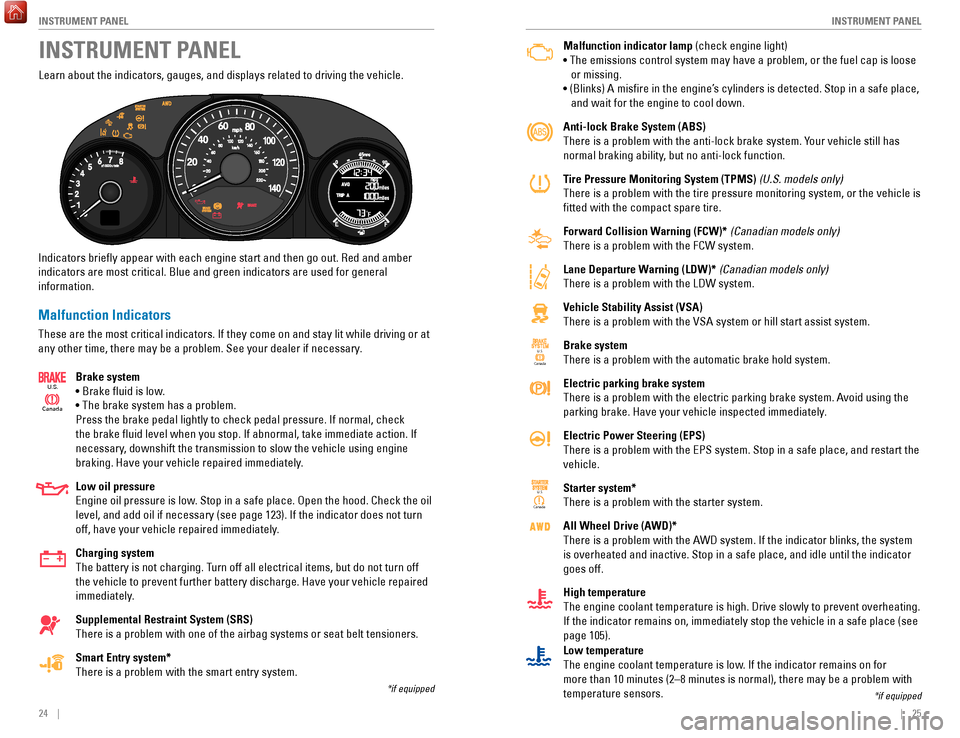
Learn about the indicators, gauges, and displays related to driving the \
vehicle.
Indicators briefly appear with each engine start and then go out. Red \
and amber
indicators are most critical. Blue and green indicators are used for gen\
eral
information.
Malfunction Indicators
These are the most critical indicators. If they come on and stay lit whi\
le driving or at
any other time, there may be a problem. See your dealer if necessary. Brake system
• Brake fluid is low.
• The brake system has a problem.
Press the brake pedal lightly to check pedal pressure. If normal, check \
the brake fluid level when you stop. If abnormal, take immediate actio\
n. If
necessary, downshift the transmission to slow the vehicle using engine
braking. Have your vehicle repaired immediately.
Low oil pressure
Engine oil pressure is low. Stop in a safe place. Open the hood. Check the oil
level, and add oil if necessary (see page 123). If the indicator does \
not turn
off, have your vehicle repaired immediately.
Charging system
The battery is not charging. Turn off all electrical items, but do not turn off
the vehicle to prevent further battery discharge. Have your vehicle repa\
ired
immediately.
Supplemental Restraint System (SRS)
There is a problem with one of the airbag systems or seat belt tensioner\
s.
Smart Entry system*
There is a problem with the smart entry system.
Canada
U.S.
INSTRUMENT PANEL
*if equipped
*if equipped
Low temperature
The engine coolant temperature is low. If the indicator remains on for
more than 10 minutes (2–8 minutes is normal), there may be a proble\
m with
temperature sensors.
Page 17 of 78
26 || 27
I NSTRUMENT P
ANELI
NSTRUMENT P
ANEL
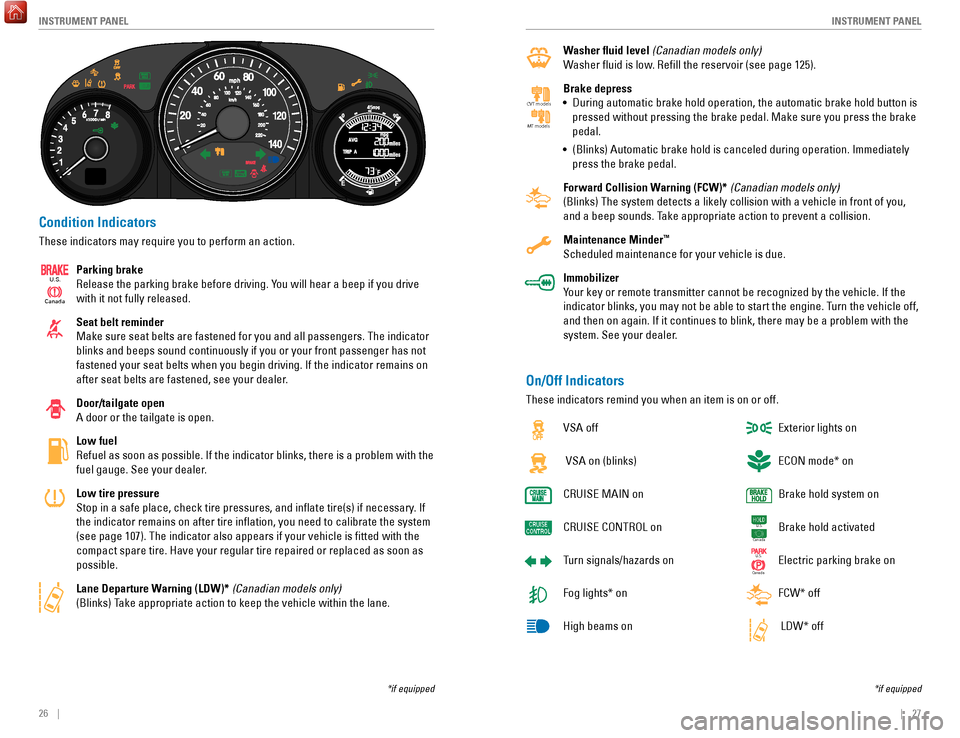
Condition Indicators
These indicators may require you to perform an action.
Parking brake
Release the parking brake before driving. You will hear a beep if you drive
with it not fully released.
Seat belt reminder
Make sure seat belts are fastened for you and all passengers. The indica\
tor
blinks and beeps sound continuously if you or your front passenger has not
fastened your seat belts when you begin driving. If the indicator remain\
s on
after seat belts are fastened, see your dealer.
Door/tailgate open
A door or the tailgate is open.
Low fuel
Refuel as soon as possible. If the indicator blinks, there is a problem \
with the
fuel gauge. See your dealer.
Low tire pressure
Stop in a safe place, check tire pressures, and inflate tire(s) if n\
ecessary. If
the indicator remains on after tire inflation, you need to calibrate t\
he system
(see page 107). The indicator also appears if your vehicle is fitted\
with the
compact spare tire. Have your regular tire repaired or replaced as soon \
as
possible.
Lane Departure Warning (LDW)* (Canadian models only)
(Blinks) Take appropriate action to keep the vehicle within the lane.
Canada
U.S.
*if equipped
Washer fluid level (Canadian models only)
Washer fluid is low. Refill the reservoir (see page 125).
Brake depress
•
During automatic brake hold operation, the automatic brake hold button i\
s
pressed without pressing the brake pedal. Make sure you press the brake \
pedal.
•
(Blinks) Automatic brake hold is canceled during operation. Immediatel\
y
press the brake pedal.
Forward Collision W
arning (FCW)* (Canadian models only)
(Blinks) The system detects a likely collision with a vehicle in front\
of you,
and a beep sounds. Take appropriate action to prevent a collision.
Maintenance Minder
™
Scheduled maintenance for your vehicle is due.
Immobilizer
Your key or remote transmitter cannot be recognized by the vehicle. If th\
e
indicator blinks, you may not be able to start the engine. Turn the vehicle off,
and then on again. If it continues to blink, there may be a problem with\
the
system. See your dealer.
CV T models
MT models
On/Off Indicators
These indicators remind you when an item is on or off.
VSA off
VSA on (blinks)
CRUISE
MAIN on
CRUISE
CONTROL on
Turn signals/hazards on
Fog lights* on
High beams on Exterior lights on
ECON mode* on
Brake hold system on
Brake hold activated
Electric parking brake on
FCW* off
LDW* off
U.S.
Canada
U.S.
Canada
*if equipped
Page 24 of 78
40 || 41
V EHICLE C ONTROLS
V
EHICLE C ONTROLS
Improperly positioning head restraints reduces their effectiveness and
increases the likelihood of serious injury in a crash.
Make sure head restraints are in place and positioned properly before dr\
iving.
WARNING
Failure to reinstall, or correctly reinstall, the head restraints can re\
sult in
severe injury during a crash.
Always replace the head restraints before driving.
WARNING
Adjusting the Head Restraints
Your vehicle is equipped with head restraints in all seating positions. H\
ead
restraints are most effective for protection against whiplash and other \
rear-impact
crash injuries.
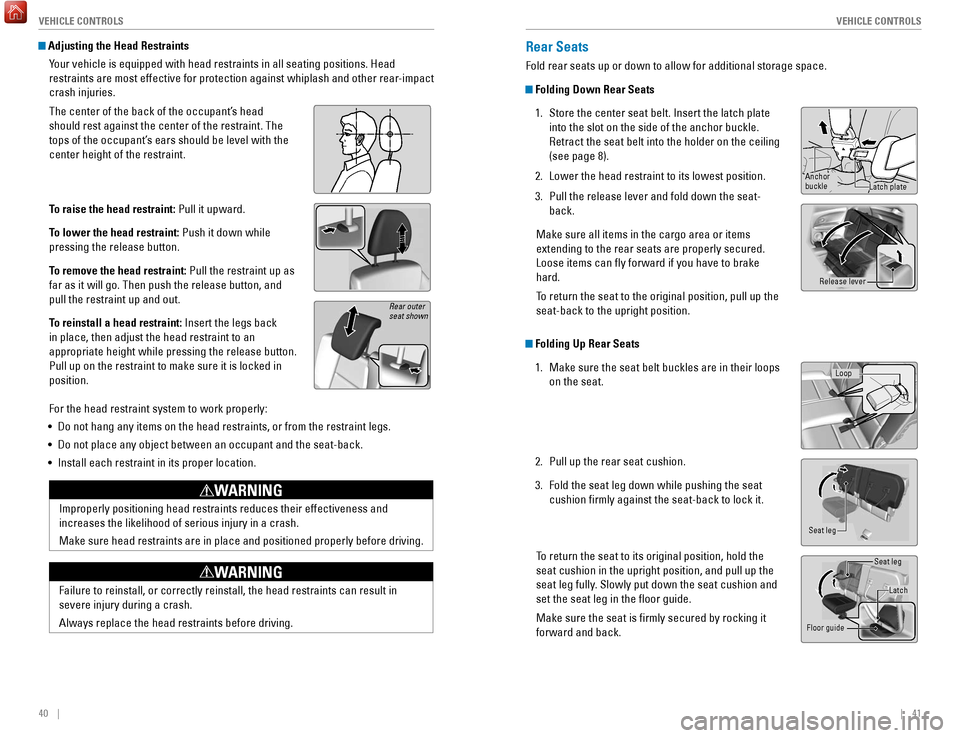
The center of the back of the occupant’s head
should rest against the center of the restraint. The
tops of the occupant’s ears should be level with the
center height of the restraint.
To raise the head restraint: Pull it upward.
To lower the head restraint: Push it down while
pressing the release button.
To remove the head restraint: Pull the restraint up as
far as it will go. Then push the release button, and
pull the restraint up and out.
To reinstall a head restraint: Insert the legs back
in place, then adjust the head restraint to an
appropriate height while pressing the release button.
Pull up on the restraint to make sure it is locked in
position.
For the head restraint system to work properly:
•
Do not hang any items on the head restraints, or from the restraint legs\
.
•
Do not place any object between an occupant and the seat-back.
•
Install each restraint in its proper location.
Rear outer
seat shown
Rear Seats
Fold rear seats up or down to allow for additional storage space.
Folding Down Rear Seats1.
Store the center seat belt. Insert the latch plate
into the slot on the side of the anchor buckle.
Retract the seat belt into the holder on the ceiling
(see page 8).
2.
Lower the head restraint to its lowest position.
3.
Pull the release lever and fold down the seat-
back.
Make sure all items in the cargo area or items
extending to the rear seats are properly secured.
Loose items can fly forward if you have to brake
hard.
T
o return the seat to the original position, pull up the
seat-back to the upright position.
Folding Up Rear Seats
1.
Make sure the seat belt buckles are in their loops
on the seat.
2.
Pull up the rear seat cushion.
3.
Fold the seat leg down while pushing the seat
cushion firmly against the seat-back to lock it.
T
o return the seat to its original position, hold the
seat cushion in the upright position, and pull up the
seat leg fully. Slowly put down the seat cushion and
set the seat leg in the floor guide.
Make sure the seat is firmly secured by rocking it
forward and back.
Anchor
buckle Latch plate
Release lever
Loop
Seat leg
Seat leg
Latch
Floor guide
Page 47 of 78
86 || 87
DRIVING
DRIVING
Improper accessories or modifications can affect your vehicle’s handling, and
stability, and performance, and cause a crash in which you can be seriously
hurt or killed.
Follow all instructions in the vehicle owner’s guide regarding accessories and
modifications.
WARNING
In addition:
•
During the first 600 miles (1,000 km) of operation, avoid sudden acc\
elerat
ion or
full throttle operation so as not to damage the engine or powertrain.
•
A
void hard braking for the first 200 miles (300 km). You should also follow this
when the brake pads are replaced.
Your vehicle has been designed primarily for use on pavement; however, its higher
ground clearance allows you to occasionally travel on unpaved roads. It \
is not
designed for trail-blazing or other challenging off-road activities.
If you decide to drive on unpaved roads, you will find that it require\
s somewhat
different driving skills and that your vehicle will handle somewhat diff\
erently than
it does on pavement. Pay attention to the precautions and tips in this s\
ection, and
get acquainted with your vehicle before leaving the pavement.
Improperly operating this vehicle on or off pavement can cause a crash o\
r
rollover in which you and your passengers can be seriously hurt or kille\
d.
Follow all instructions and guidelines in this guide.
Keep your speed low, and don’t drive faster than conditions permit.
WARNING
Maximum Load Limit
Carrying too much cargo or improperly storing it can affect your vehicle\
’s handling,
stability, stopping distance, and tires, and make it unsafe.
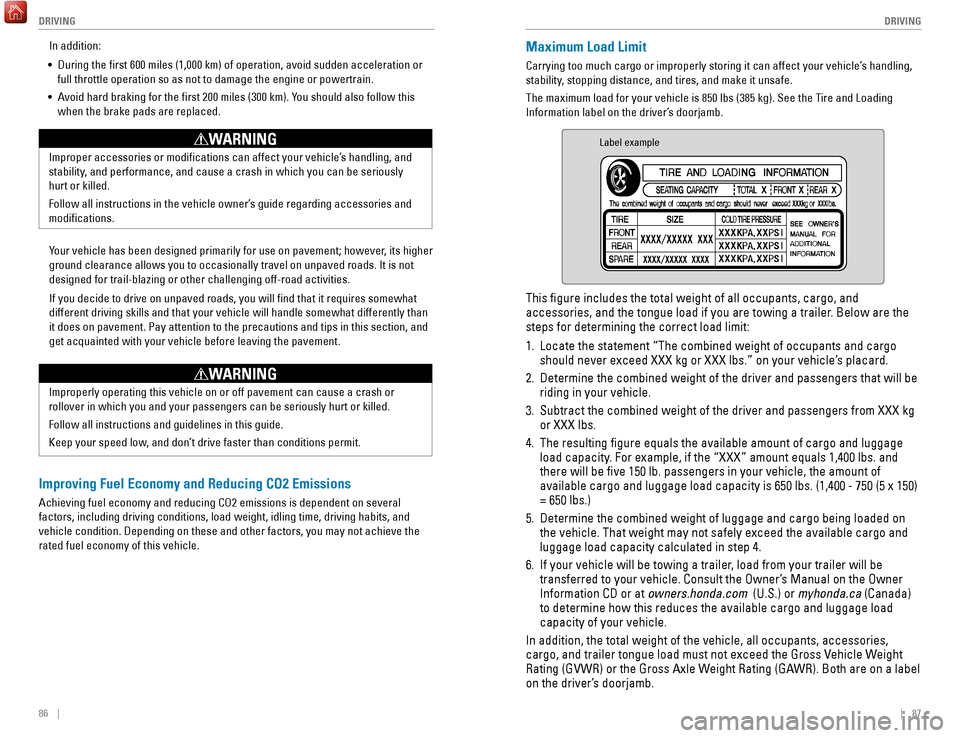
The maximum load for your vehicle is 850 lbs (385 kg). See the Tire and Loading
Information label on the driver’s doorjamb.
Label example
This figure includes the total weight of all occupants, cargo, and
accessories, and the tongue load if you are towing a trailer. Below are the
steps for determining the correct load limit:
1.
Locate the statement “The combined weight of occupants and cargo
should never exceed XXX kg or XXX lbs.” on your vehicle’
s placard.
2.
Determine the combined weight of the driver and passengers that will be \
riding in your vehicle.
3.
Subtract the combined weight of the driver and passengers from XXX kg
or XXX lbs.
4.
The resulting figure equals the available amount of cargo and luggage \
load capacity
. For example, if the “XXX” amount equals 1,400 lbs. and
there will be five 150 lb. passengers in your vehicle, the amount of
available cargo and luggage load capacity is 650 lbs. (1,400 - 750 (5 \
x 150)
= 650 lbs.)
5.
Determine the combined weight of luggage and cargo being loaded on
the vehicle. That weight may not safely exceed the available cargo and
luggage load capacity calculated in step 4.
6.
If your vehicle will be towing a trailer
, load from your trailer will be
transferred to your vehicle. Consult the Owner’s Manual on the Owner
Information CD or at owners.honda.com (U.S.) or myhonda.ca (Canada)
to determine how this reduces the available cargo and luggage load
capacity of your vehicle.
In addition, the total weight of the vehicle, all occupants, accessories\
,
cargo, and trailer tongue load must not exceed the Gross Vehicle Weight
Rating (GVWR) or the Gross Axle Weight Rating (GAWR). Both are on a label
on the driver’s doorjamb.
Improving Fuel Economy and Reducing CO2 Emissions
Achieving fuel economy and reducing CO2 emissions is dependent on severa\
l
factors, including driving conditions, load weight, idling time, driving\
habits, and
vehicle condition. Depending on these and other factors, you may not ach\
ieve the
rated fuel economy of this vehicle.
Page 48 of 78
88 || 89
DRIVING
DRIVING
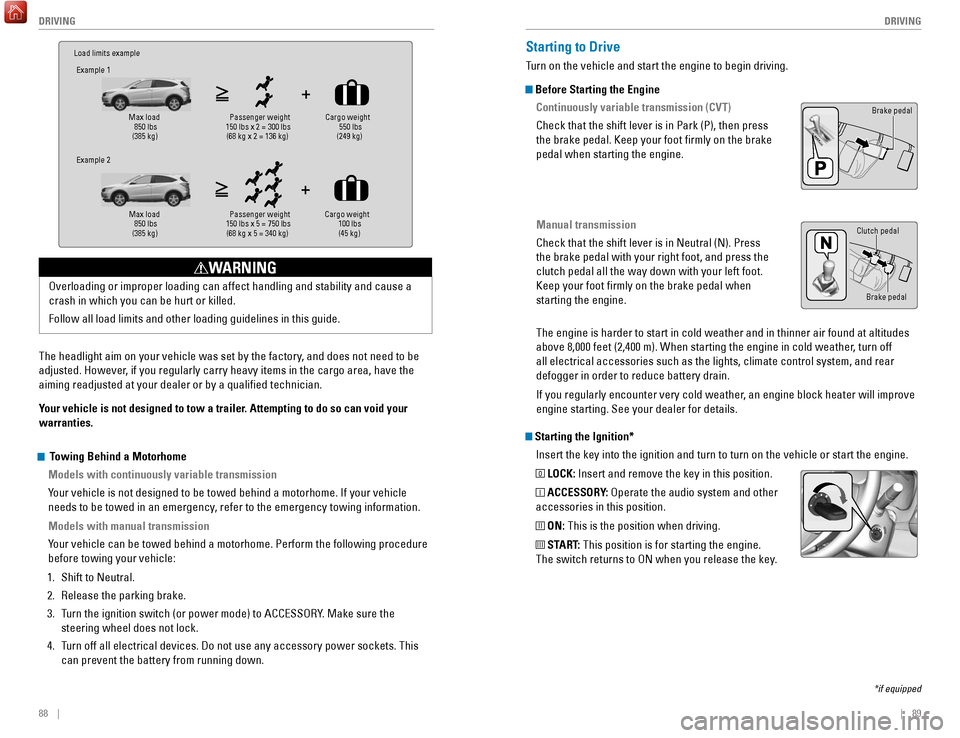
Load limits example
Example 1
Max load 850 lbs
(385 kg ) Passenger weight
150 lbs x 2 = 300 lbs (68 kg x 2 = 136 kg )Cargo weight
550 lbs
(249 kg)
Example 2
Max load 850 lbs
(385 kg ) Passenger weight
150 lbs x 5 = 750 lbs (68 kg x 5 = 340 kg )Cargo weight
100 lbs
(45 kg)
The headlight aim on your vehicle was set by the factory, and does not need to be
adjusted. However, if you regularly carry heavy items in the cargo area, have the
aiming readjusted at your dealer or by a qualified technician.
Your vehicle is not designed to tow a trailer. Attempting to do so can void your
warranties. Overloading or improper loading can affect handling and stability and ca\
use a
crash in which you can be hurt or killed.
Follow all load limits and other loading guidelines in this guide.
WARNING
Starting the Ignition*
Insert the key into the ignition and turn to turn on the vehicle or star\
t the engine.
0 LOCK: Insert and remove the key in this position.
I ACCESSORY: Operate the audio system and other
accessories in this position.
II ON: This is the position when driving.
III START: This position is for starting the engine.
The switch returns to ON when you release the key.
Starting to Drive
Turn on the vehicle and start the engine to begin driving.
Before Starting the Engine
Continuously variable transmission (CVT)
Check that the shift lever is in Park (P), then press
the brake pedal. Keep your foot firmly on the brake
pedal when starting the engine.
Manual transmission
Check that the shift lever is in Neutral (N). Press
the brake pedal with your right foot, and press the
clutch pedal all the way down with your left foot.
Keep your foot firmly on the brake pedal when
starting the engine.
Brake pedal
The engine is harder to start in cold weather and in thinner air found a\
t altitudes
above 8,000 feet (2,400 m). When starting the engine in cold weather, turn off
all electrical accessories such as the lights, climate control system, a\
nd rear
defogger in order to reduce battery drain.
If you regularly encounter very cold weather, an engine block heater will improve
engine starting. See your dealer for details.
*if equipped
Brake pedal
Clutch pedal
Towing Behind a Motorhome
Models with continuously variable transmission
Your vehicle is not designed to be towed behind a motorhome. If your vehi\
cle
needs to be towed in an emergency, refer to the emergency towing information.
Models with manual transmission
Your vehicle can be towed behind a motorhome. Perform the following proce\
dure
before towing your vehicle:
1.
Shift to Neutral.
2.
Release the parking brake.
3.
T
urn the ignition switch (or power mode) to ACCESSORY. Make sure the
steering wheel does not lock.
4.
T
urn off all electrical devices. Do not use any accessory power sockets. This
can prevent the battery from running down.
Page 49 of 78
90 || 91
DRIVING
DRIVING
Changing the Power Mode*
Use the ENGINE START/STOP button to cycle through power modes or start the
engine.
Accessory or On mode: Press ENGINE START/STOP
once without pressing the brake pedal for Accessory
mode. Press it again for On mode.
Starting the engine: Press and hold the brake pedal
(and the clutch for manual transmission), then press
ENGINE START/STOP. Keep your foot firmly on the
brake pedal when starting the engine.
Turning the vehicle off: Shift to Park (P) (or apply the parking brake for manual
transmission), then press ENGINE START/STOP.
If you press the button and the shift lever is not in Park (P), the ve\
hicle goes into
Accessory mode (automatic transmission models).
*if equipped
Shifting
Change the shift position based on your driving needs.
Continuously Variable Transmission (CVT)*Park (P): Used for parking or starting/stopping
the engine. Press the brake pedal, then press the
release button to shift.
Reverse (R): Used for reversing.
Neutral (N): Used for idling.
Drive (D): Used for normal driving.
Drive (S): Used for better acceleration, increased
engine braking, driving in hilly terrain, or when using
paddle shifters*.
Low (L)*: Used for stronger engine braking when driving in hilly terrain.
When you change the shift lever from D to R and vice versa, come to a co\
mplete
stop and keep the brake pedal pressed. Operating the shift lever before \
the vehicle
has come to a complete standstill can damage the transmission.
Do not operate the shift lever while pressing the accelerator pedal. You could
damage the transmission.
NOTICE
Release button
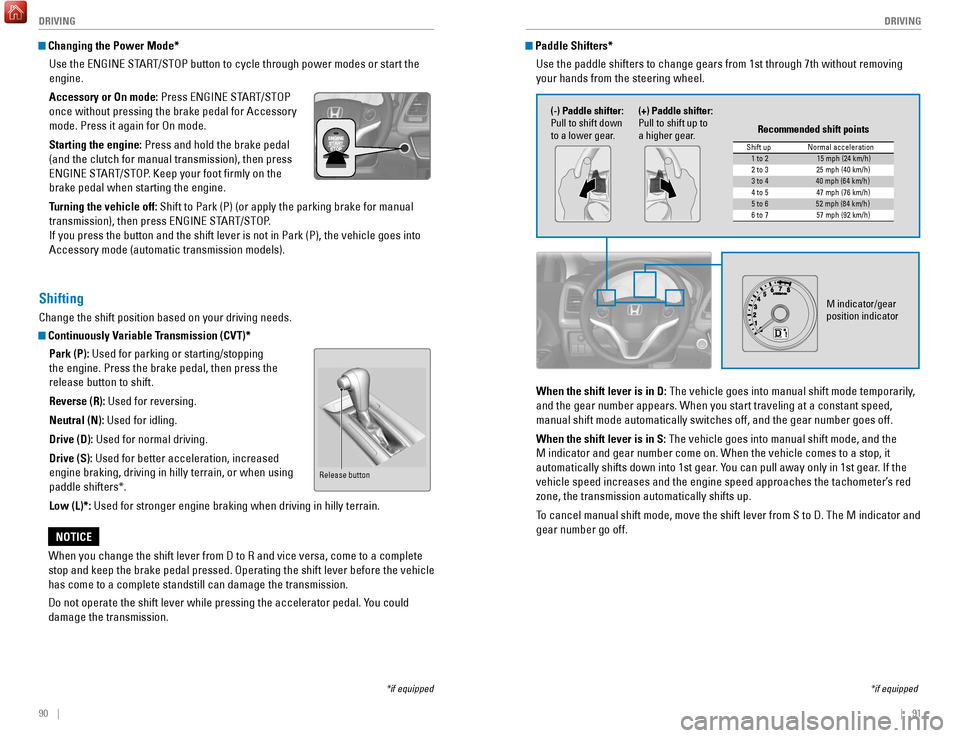
Paddle Shifters* Use the paddle shifters to change gears from 1st through 7th without rem\
oving
your hands from the steering wheel.
*if equipped
When the shift lever is in D: The vehicle goes into manual shift mode temporarily,
and the gear number appears. When you start traveling at a constant spee\
d,
manual shift mode automatically switches off, and the gear number goes o\
ff.
When the shift lever is in S: The vehicle goes into manual shift mode, and the
M indicator and gear number come on. When the vehicle comes to a stop, i\
t
automatically shifts down into 1st gear. You can pull away only in 1st gear. If the
vehicle speed increases and the engine speed approaches the tachometer’\
s red
zone, the transmission automatically shifts up.
To cancel manual shift mode, move the shift lever from S to D. The M indi\
cator and
gear number go off.
M indicator/gear
position indicator
Shift up Normal acceleration1 to 215 mph (24 km/h)
2 to 32 5 mph (40 km/h)
3 to 440 mph (64 km/h)
4 to 54 7 mph (76 km/h)
5 to 652 mph (84 km/h)
6 to 75 7 mph (92 km/h)
Recommended shift points
(-) Paddle shifter:
Pull to shift down
to a lower gear. (+) Paddle shifter:
Pull to shift up to
a higher gear.
Page 50 of 78
92 || 93
DRIVING
DRIVING
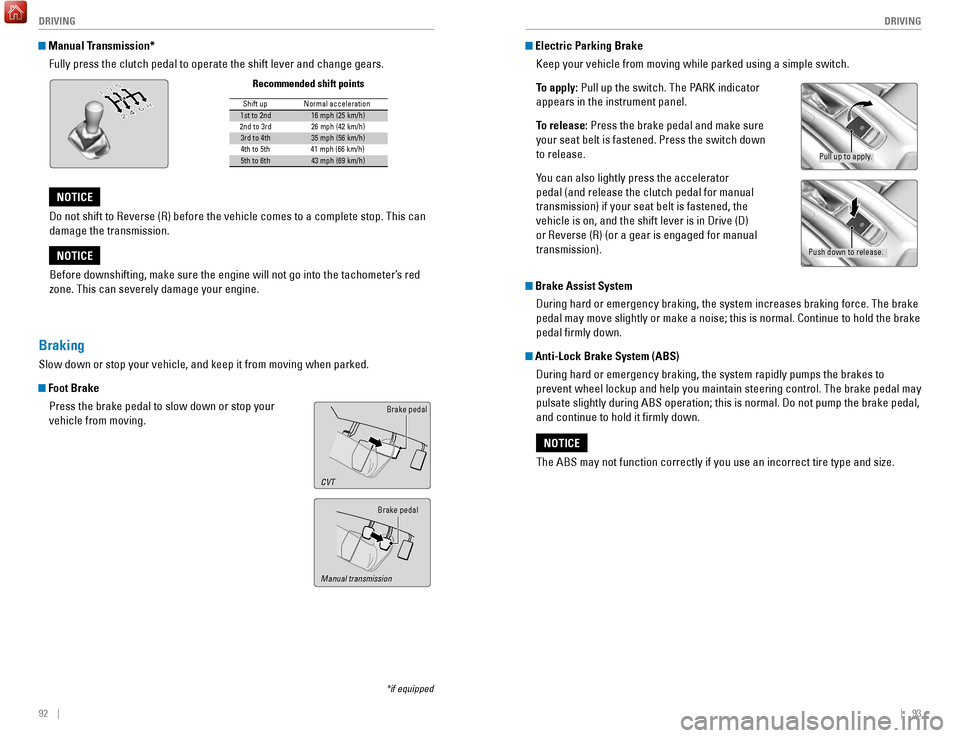
Manual Transmission*
Fully press the clutch pedal to operate the shift lever and change gears\
.
Do not shift to Reverse (R) before the vehicle comes to a complete sto\
p. This can
damage the transmission.
NOTICE
Before downshifting, make sure the engine will not go into the tachomete\
r’s red
zone. This can severely damage your engine.
NOTICE
Shift up Normal acceleratio n1st to 2n d16 mph (25 km/h)
2nd to 3rd 26 mph (42 km/h)
3rd to 4th35 mph (56 km/h)
4th to 5th 41 mph (66 km/h)
5th to 6th43 mph (69 km/h)
Recommended shift points
*if equipped
Braking
Slow down or stop your vehicle, and keep it from moving when parked.
Foot Brake
Press the brake pedal to slow down or stop your
vehicle from moving.
Brake pedal
Brake pedal
CVT
Manual transmission
Electric Parking Brake
Keep your vehicle from moving while parked using a simple switch.
To apply: Pull up the switch. The PARK indicator
appears in the instrument panel.
To release: Press the brake pedal and make sure
your seat belt is fastened. Press the switch down
to release.
You can also lightly press the accelerator
pedal (and release the clutch pedal for manual
transmission) if your seat belt is fastened, the
vehicle is on, and the shift lever is in Drive (D)
or Reverse (R) (or a gear is engaged for manual
transmission).
The ABS may not function correctly if you use an incorrect tire type and\
size.
NOTICE
Brake Assist System During hard or emergency braking, the system increases braking force. The brake
pedal may move slightly or make a noise; this is normal. Continue to hol\
d the brake
pedal firmly down.
Anti-Lock Brake System (ABS) During hard or emergency braking, the system rapidly pumps the brakes to
prevent wheel lockup and help you maintain steering control. The brake p\
edal may
pulsate slightly during ABS operation; this is normal. Do not pump the b\
rake pedal,
and continue to hold it firmly down.
Pull up to apply.
Push down to release.
Page 51 of 78
94 || 95
DRIVING
DRIVING
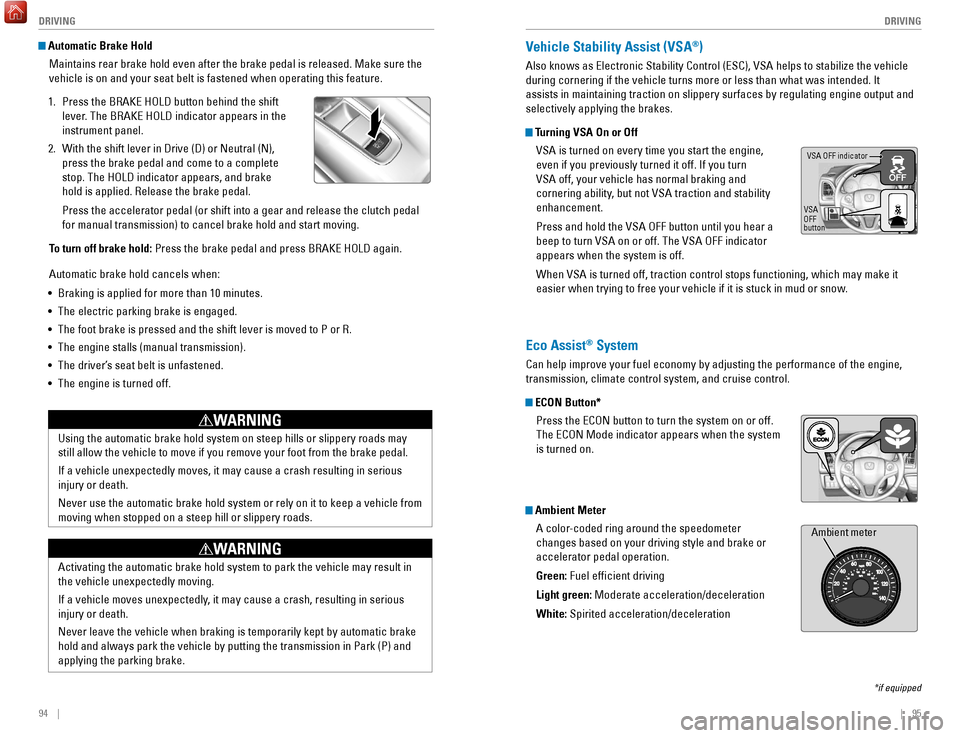
Automatic Brake Hold
Maintains rear brake hold even after the brake pedal is released. Make sure the
vehicle is on and your seat belt is fastened when operating this feature\
.
1.
Press the BRAKE HOLD button behind the shift
lever
. The BRAKE HOLD indicator appears in the
instrument panel.
2.
With the shift lever in Drive (D) or Neutral (N),
press the brake pedal and come to a complete
stop. The HOLD indicator appears, and brake
hold is applied. Release the brake pedal.
Press the accelerator pedal (or shift into a gear and release the clutc\
h pedal
for manual transmission) to cancel brake hold and start moving.
T
o turn off brake hold: Press the brake pedal and press BRAKE HOLD again.
Automatic brake hold cancels when:
•
Braking is applied for more than 10 minutes.
•
The electric parking brake is engaged.
•
The foot brake is pressed and the shift lever is moved to P or R.
•
The engine stalls (manual transmission).
•
The driver’
s seat belt is unfastened.
•
The engine is turned off.Using the automatic brake hold system on steep hills or slippery roads m\
ay
still allow the vehicle to move if you remove your foot from the brake p\
edal.
If a vehicle unexpectedly moves, it may cause a crash resulting in serio\
us
injury or death.
Never use the automatic brake hold system or rely on it to keep a vehicl\
e from
moving when stopped on a steep hill or slippery roads.
WARNING
Activating the automatic brake hold system to park the vehicle may resul\
t in
the vehicle unexpectedly moving.
If a vehicle moves unexpectedly, it may cause a crash, resulting in serious
injury or death.
Never leave the vehicle when braking is temporarily kept by automatic brake
hold and always park the vehicle by putting the transmission in Park (P\
) and
applying the parking brake.
WARNING
Vehicle Stability Assist (VSA®)
Also knows as Electronic Stability Control (ESC), VSA helps to stabili\
ze the vehicle
during cornering if the vehicle turns more or less than what was intende\
d. It
assists in maintaining traction on slippery surfaces by regulating engin\
e output and
selectively applying the brakes.
Turning VSA On or Off
VSA is turned on every time you start the engine,
even if you previously turned it off. If you turn
VSA off, your vehicle has normal braking and
cornering ability, but not VSA traction and stability
enhancement.
Press and hold the VSA OFF button until you hear a
beep to turn VSA on or off. The VSA OFF indicator
appears when the system is off.
When VSA is turned off, traction control stops functioning, which may ma\
ke it
easier when trying to free your vehicle if it is stuck in mud or snow.
VSA OFF indicator
VSA
OFF
button
*if equipped
Eco Assist® System
Can help improve your fuel economy by adjusting the performance of the e\
ngine,
transmission, climate control system, and cruise control.
ECON Button* Press the ECON button to turn the system on or off.
The ECON Mode indicator appears when the system
is turned on.
Ambient MeterA color-coded ring around the speedometer
changes based on your driving style and brake or
accelerator pedal operation.
Green: Fuel efficient driving
Light green: Moderate acceleration/deceleration
White: Spirited acceleration/deceleration
Ambient meter
Page 52 of 78
96 || 97
DRIVING
DRIVING
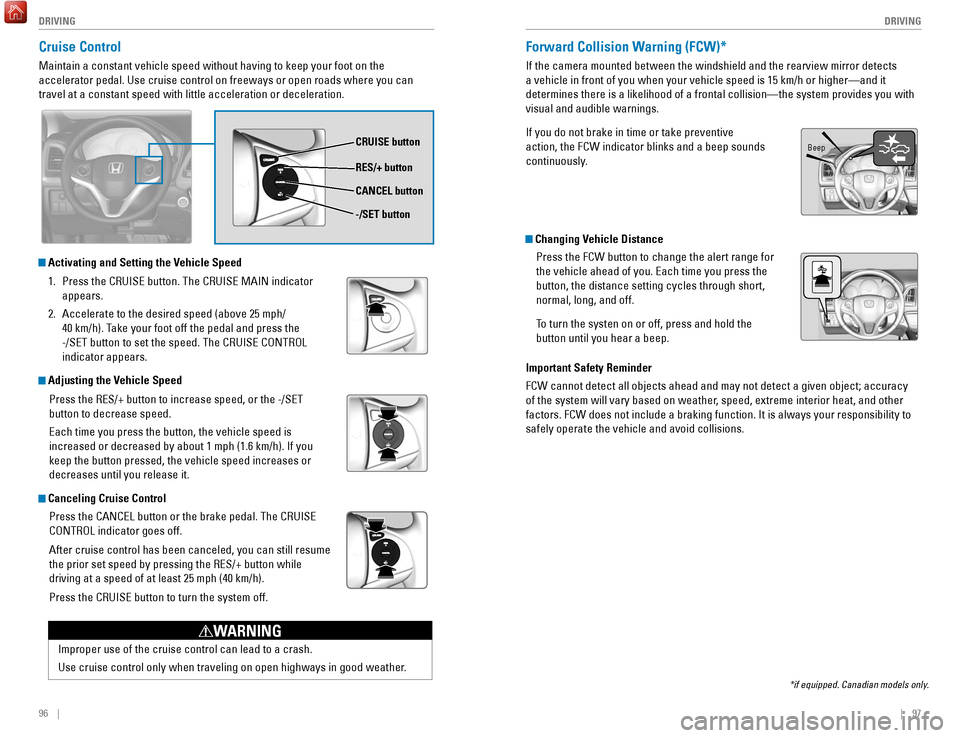
Cruise Control
Maintain a constant vehicle speed without having to keep your foot on th\
e
accelerator pedal. Use cruise control on freeways or open roads where yo\
u can
travel at a constant speed with little acceleration or deceleration.
CRUISE button
RES/+ button
-/SET button CANCEL button
Improper use of the cruise control can lead to a crash.
Use cruise control only when traveling on open highways in good weather.
WARNING
Activating and Setting the Vehicle Speed
1.
Press the CRUISE button. The CRUISE MAIN indicator
appears.
2.
Accelerate to the desired speed (above 25 mph/
40 km/h). Take your foot off the pedal and press the
-/SET button to set the speed. The CRUISE CONTROL
indicator appears.
Adjusting the Vehicle Speed
Press the RES/+ button to increase speed, or the -/SET
button to decrease speed.
Each time you press the button, the vehicle speed is
increased or decreased by about 1 mph (1.6 km/h). If you
keep the button pressed, the vehicle speed increases or
decreases until you release it.
Canceling Cruise ControlPress the CANCEL button or the brake pedal. The CRUISE
CONTROL indicator goes off.
After cruise control has been canceled, you can still resume
the prior set speed by pressing the RES/+ button while
driving at a speed of at least 25 mph (40 km/h).
Press the CRUISE button to turn the system off.
Forward Collision Warning (FCW)*
If the camera mounted between the windshield and the rearview mirror det\
ects
a vehicle in front of you when your vehicle speed is 15 km/h or higher—\
and it
determines there is a likelihood of a frontal collision—the system pr\
ovides you with
visual and audible warnings.
If you do not brake in time or take preventive
action, the FCW indicator blinks and a beep sounds
continuously.
Changing Vehicle DistancePress the FCW button to change the alert range for
the vehicle ahead of you. Each time you press the
button, the distance setting cycles through short,
normal, long, and off.
To turn the systen on or off, press and hold the
button until you hear a beep.
Important Safety Reminder
FCW cannot detect all objects ahead and may not detect a given object; a\
ccuracy
of the system will vary based on weather, speed, extreme interior heat, and other
factors. FCW does not include a braking function. It is always your resp\
onsibility to
safely operate the vehicle and avoid collisions.
*if equipped. Canadian models only.
Beep