Oil HONDA INTEGRA 1994 4.G Workshop Manual
[x] Cancel search | Manufacturer: HONDA, Model Year: 1994, Model line: INTEGRA, Model: HONDA INTEGRA 1994 4.GPages: 1413, PDF Size: 37.94 MB
Page 592 of 1413
Differential (Automatic Transmissionl
Oil Seal Installation/Side Clearance
(cont'dl
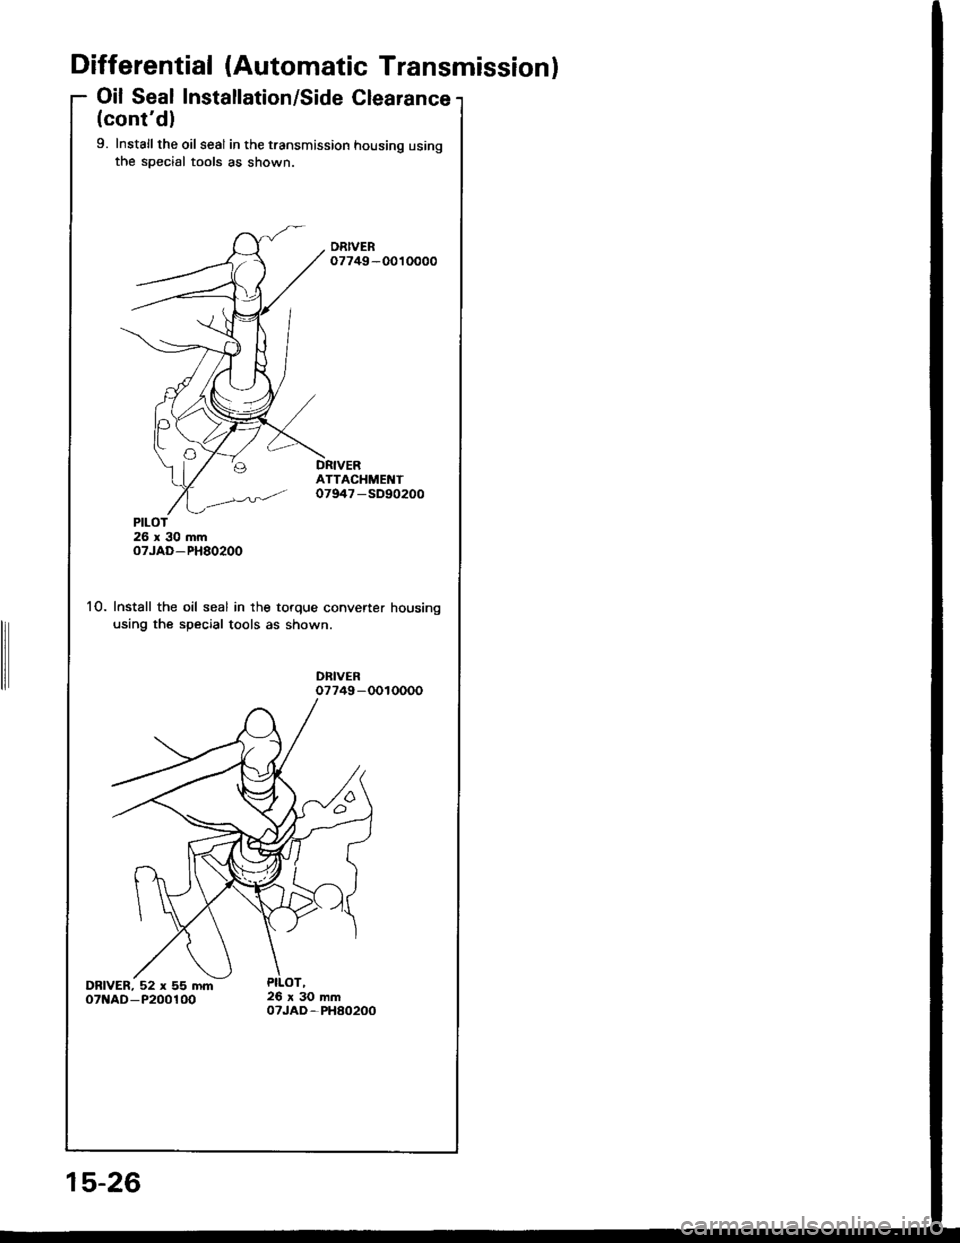
9. Installthe oil seal in the transmission housing usingthe special tools as shown.
DRIVER07749-0010000
ATTACHMENT07947 -SD90200
26x30mmoTJAD-PH80200
10. Install the oil seal in the torque converter housing
using the special tools as shown.
DFIVER07749-0010000
DRIVER, 52 x 55 mmoTNAD-P200100
PILOT
15-26
Page 595 of 1413
Driveshafts
Inspection
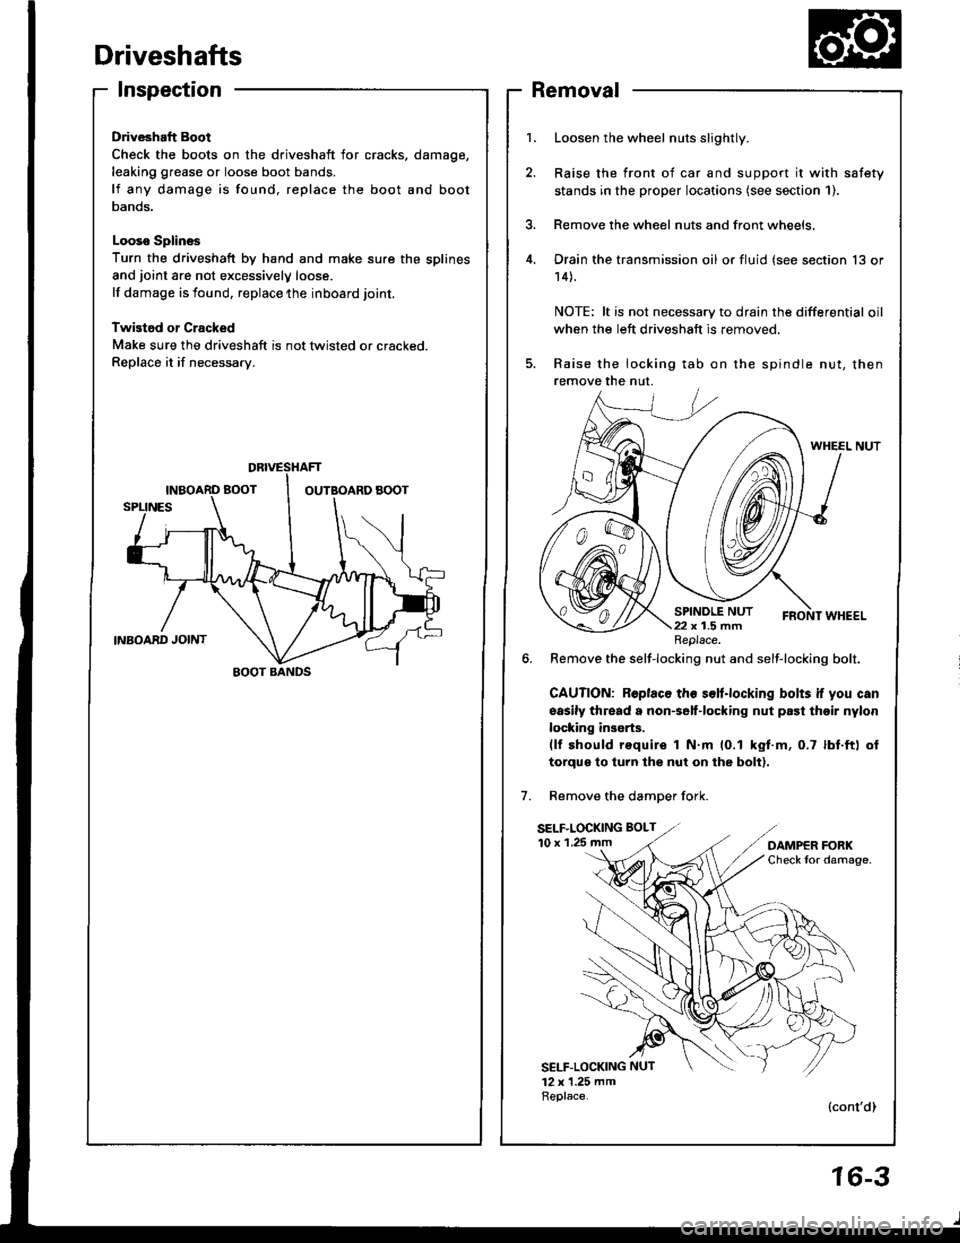
Driveshaft Boot
Check the boots on the driveshaft for cracks,
leaking grease or loose boot bands.
lf any damage is found, replace the boot
Danos.
Looso Splines
Turn the driveshaft by hand and make sure the splines
and joint are not excessivelV loose.
lf damage is found, replace the inboard joint,
Twistod or Cracked
Make sure the driveshaft is not twisted or cracked.
Replace it if necessarv.
damage,
and boot
Removal
Loosen the wheel nuts slightly.
Raise the front of car and support it with safety
stands in the proper locataons (see section 1),
Remove the wheel nuts and front wheels,
Drain the transmission oil or fluid (see section 13 or
14).
NOTE: lt is not necessary to drain the differential oil
when the left driveshaft is removed.
Raise the locking tab on the spindle nut, then
remove the nut.
WHEEL NUT
6. Remove the self-locking nut and self-locking bolt.
GAUTION: Roplaco th€ s€lt.locking bolts if you can
sasily thread a non€elf-locking nut prst thoir nylon
locking inserts.(lf should require I N.m (0.1 kgt.m, 0.7 lbf.ft) ol
torqus to turn lhs nut on the bolt).
Remove the damDer fork.
SELF.LOCKING BOLT
10 x 1.25 mm
SELF-LOCKING NUT
12 x 1.25 mmReplace.(cont'dl
DBIVESTIAFT
EOOT BANDS
Replace.
16-3
Page 596 of 1413
Driveshafts
Removal (cont'dl
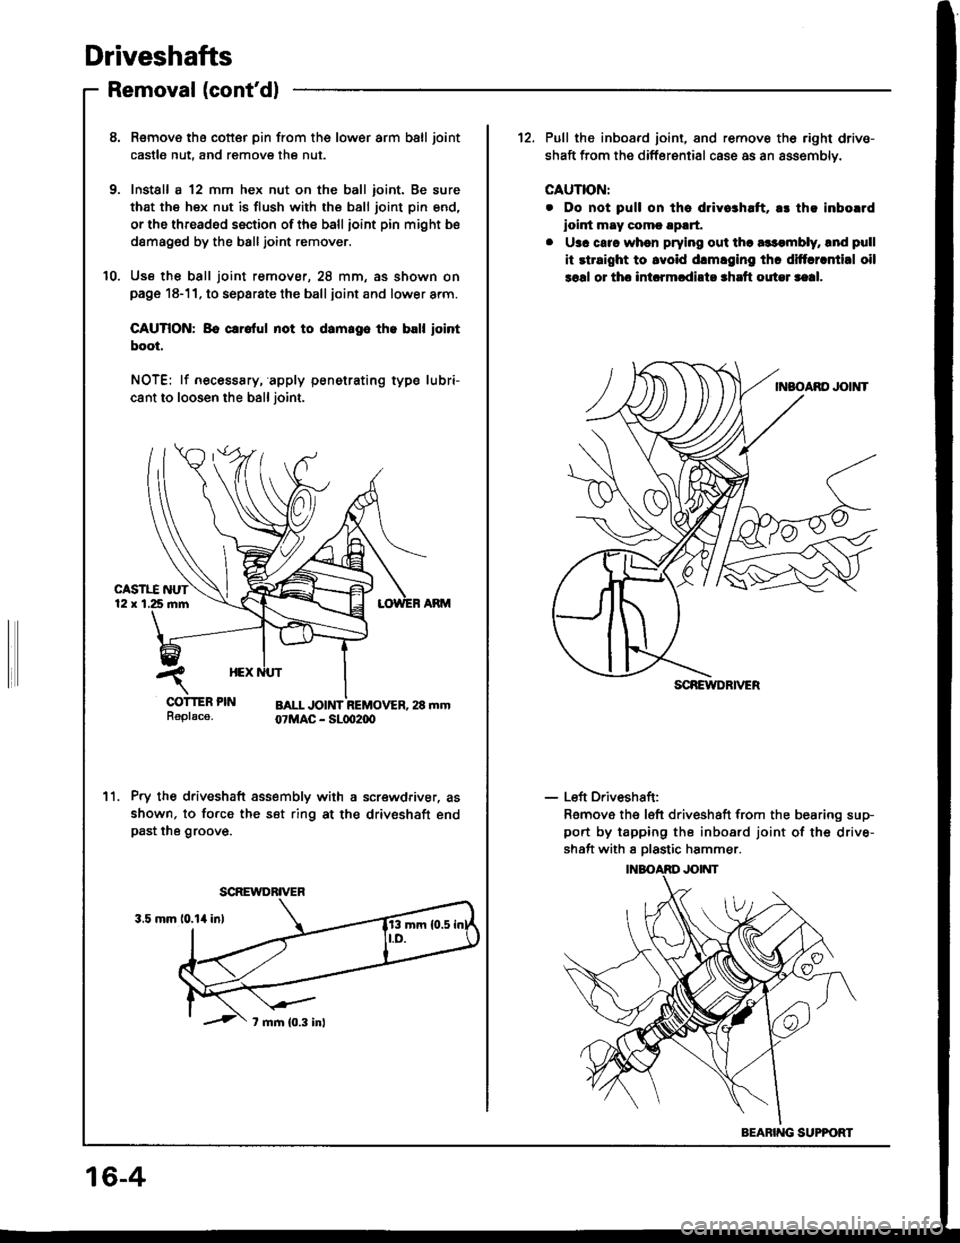
8. Remove tha cotter pin from the lower arm ball joint
castle nut, and remove the nut.
9. Install a 12 mm hex nut on the ball ioint. Be sure
that the hex nut is flush with the ball joint pin end,
or the threaded section of the ball ioint pin might be
damag6d by the balljoint remover.
10. Use th€ ball joint remover, 28 mm, as shown onpage 18-11. to separate the ball joint and lower arm.
CAUTION: Bo crrolul not to damrgo th. ball iointboot.
NOTE: lf necesssry, apply penetrating type lubri-
cant to loosen the ball joint.
Pry the driveshaft assembly with a screwdriver, as
shown, to force the set ring at the driveshaft endpast the groove.
11.
SCREWDRIVER
12. Pull the inboard joint, and remove th6 right drive-
shaft from the differential case as an assemblv.
CAUTION:
. Do not pull on tha dlivo3haft, a! th! inborrd
ioint may comc !p!rt,
. U3c carc when prying out tha a$qnbly, lnd pull
it rtraight to lvoid drmlging thc diftcrrntial oil
soal or thc int.rmcdirto shrft outel saal.
- Left Driveshaft:
Remove the left driveshaft from the bearing sup-
port by tapping the inboard joint of the drive-
shaft with I Dlastic hammer.
SCREIYDRIVER
BEARING SUPPOFT
16-4
Page 603 of 1413
5.
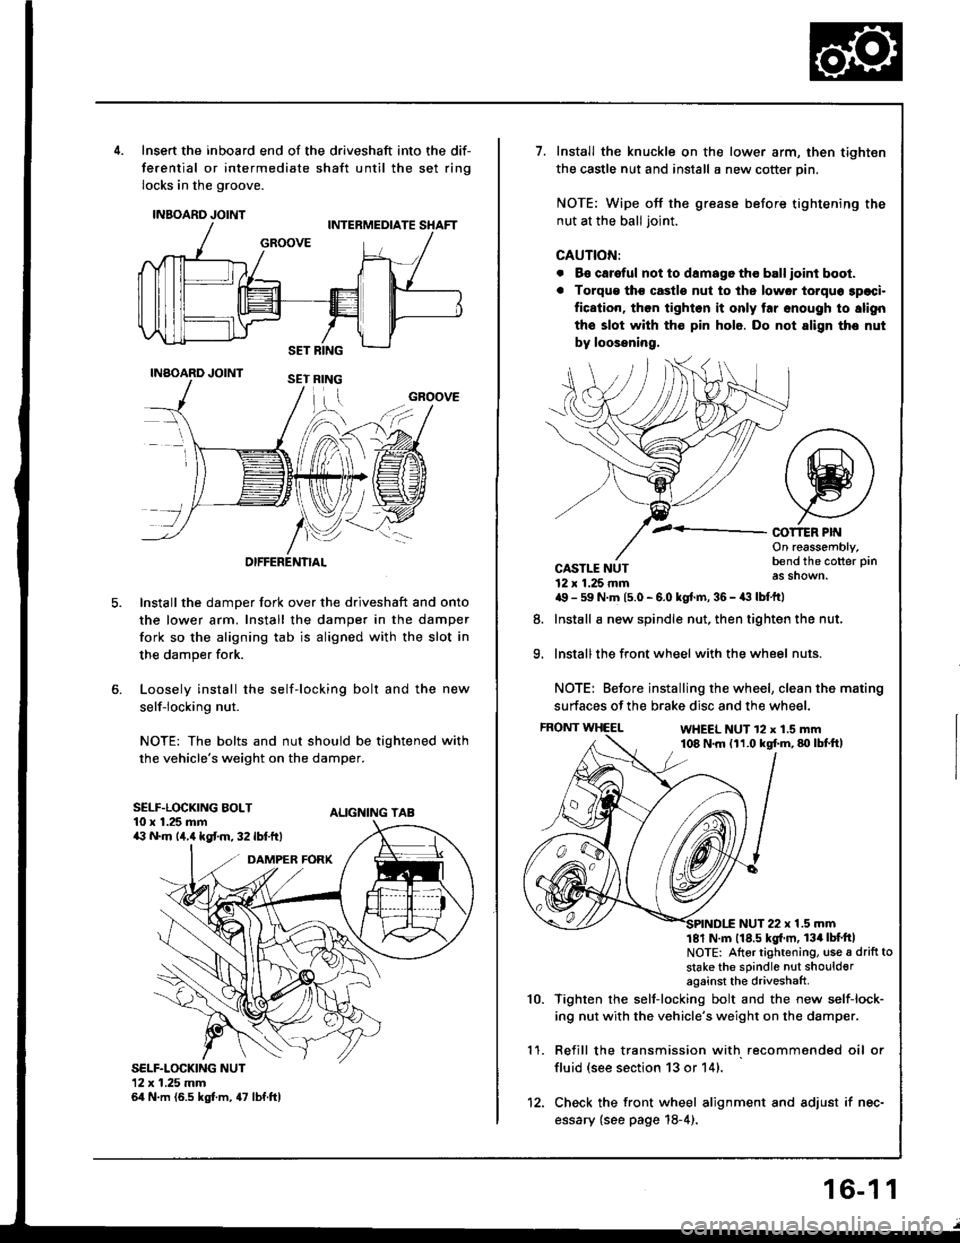
Insert the inboard end of the driveshaft into the dif-
ferential or intermediate shaft until the set ring
locks in the groove.
INBOARD JOINT
INAOARD JOINT
OIFFERENTIAL
Install the damper fork over the driveshaft and onto
the lower arm. Install the damper in the damper
fork so the aligning tab is aligned with the slot in
the damper fork.
Loosely install the self-locking bolt and the new
self-locking nut.
NOTE: The bolts and nut should be tightened with
the vehicle's weight on the damper.
ALIGNING TAB
SELF.LOCKING NUT12x 1.25 mm64 N.m (6.5 kgt m, 47 lbf.ftl
GROOVE
SELF.LOCKING BOLT10 x 1.25 mma:' N.m lir,4 kgt m, 32 lbf.ftt
1.Install the knuckle on the lower arm, then tighten
the castle nut and install a new cotter pin.
NOTE: Wipe off the grease before tightening the
nut at the ball joint.
CAUTION:
. B€ careful not to damago tho ball ioint boot.
. Torqu€ tho castle nut to ths lower torquo 3paci.
fication, then tighlon it only tar snough to slign
the slot with th€ pin hole. Do not align tho nut
by loossning,
COT1ER PIf{On reassembly,bend the cotter pin
as shown.
9.
CASTLE NUT12 x 1.25 rnma9 - 59 N.m 15.0 - 6.0 kgt.m, 36 - a:t lbtftl
Install a new spindle nut, then tighten the nut,
Install the front wheel with the wheel nuts.
NOTE: Before installing the wheel, clean the mating
surfaces of the brake disc and the wheel.
FRONT WHEELWHEEL NUT 12 x 1.5 mm108 N.m (11.0 kgf.m,80lbtft,
8.
1 '�I.
10.
NUT 22 x 1.5 mm181 N m 118.5 kgl'm, 134lbt'ftlNOTE: Altor tightening, use a drift to
stake the sPindle nut shoulderagainst the driveshaft
Tighten rhe self-locking bolt and the new self-lock-
ing nut with the vehicle's weight on the damper.
Refill the transmission with recommended oil or
fluid (see section 13 or 14).
Check the front wheel alignment and adjust if nec-
essary {see page 18-4).
12.
16-1 1
Page 604 of 1413
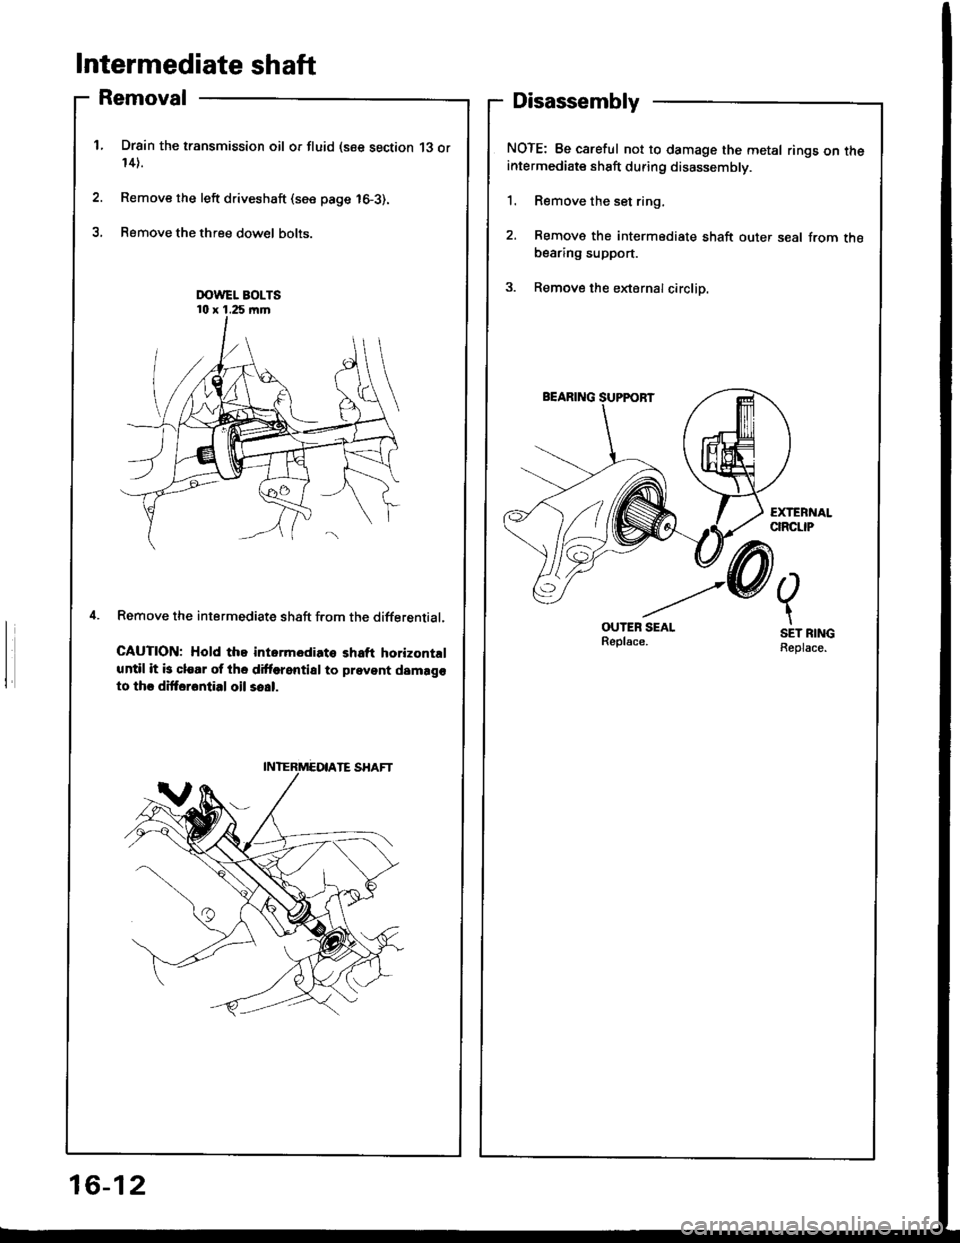
Intermediate shaft
Removal
Drsin the transmission oil or fluid (see section 13 or14).
Remove the left driveshaft (see page 16-3).
Remove the three dow€l bolts.
Remove the intermediate shaft f.om the differential.
CAUTION; Hold the intormediato shaft horizontrl
until it b clear of the dittorential to prevent damago
to thr dittarontial oil so!|.
Disassembly
NOTE: Be careful not to damage the metal rings on theintermediate shaft during disassembly.
1. Remove the set ring,
2. Remove the intermediate shaft outer seal from thebearing support.
3. Remove the eldernalcirclip.
OUTEB SEALReplsce.
2.
t
SET RINGReplace.
16-12
Page 607 of 1413
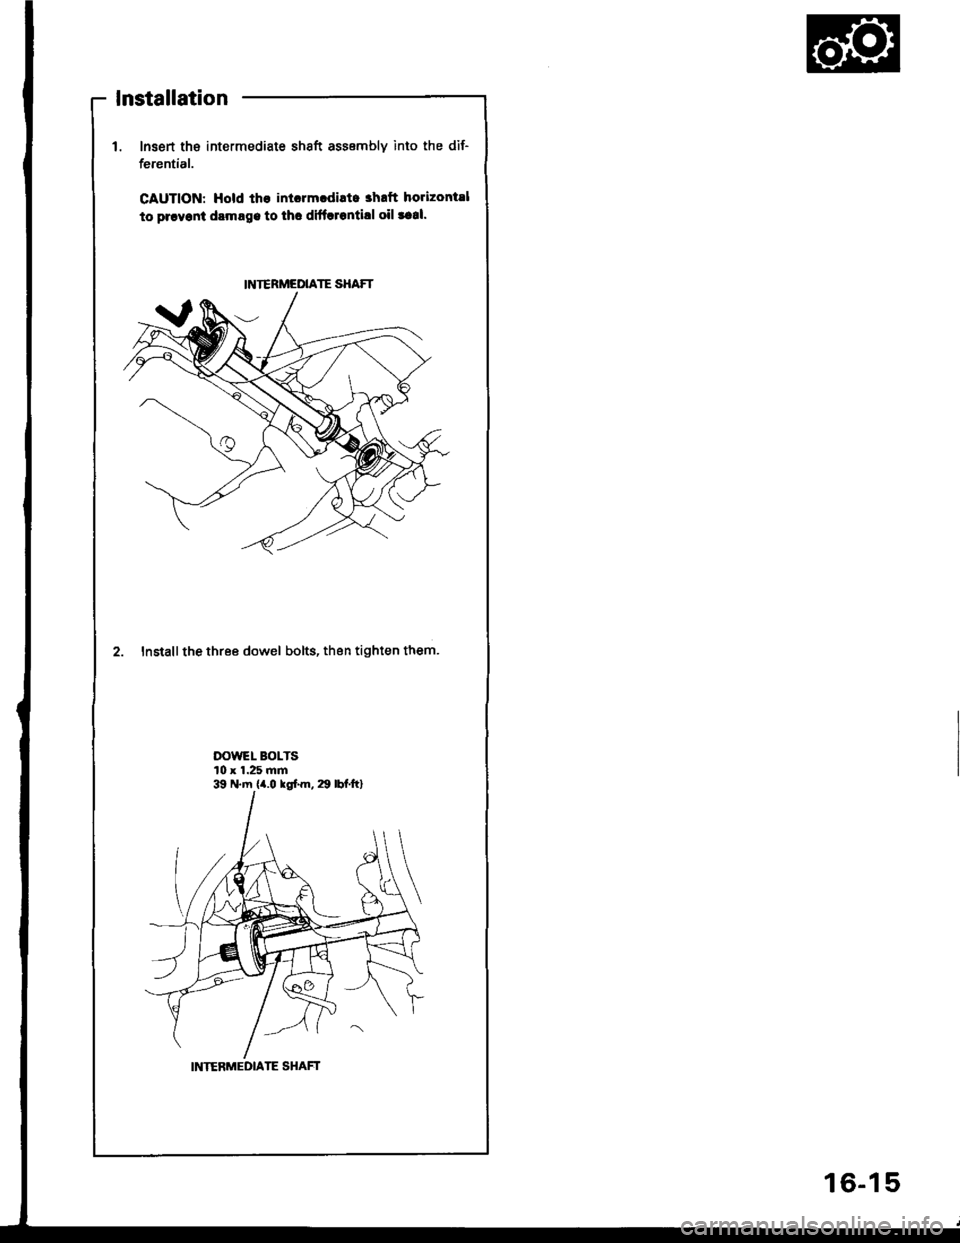
lnsert tha intermediate shaft assembly into the dif-
ferential.
CAUTION: Hold th€ inlorm.diltc ahrft horizontsl
to prryonl dsmrge to thc difflrontill oil taal.
2. Install the three dowel bolts, then tighten them.
DOWEL BOLTS10 x 1.25 mm
INTERMEDIATE SHAFT
39 N.m {a.O rgl.m, 29 lbl.ft}
INIERMEDIATE SHAFT
lnstallation
16-15
Page 620 of 1413
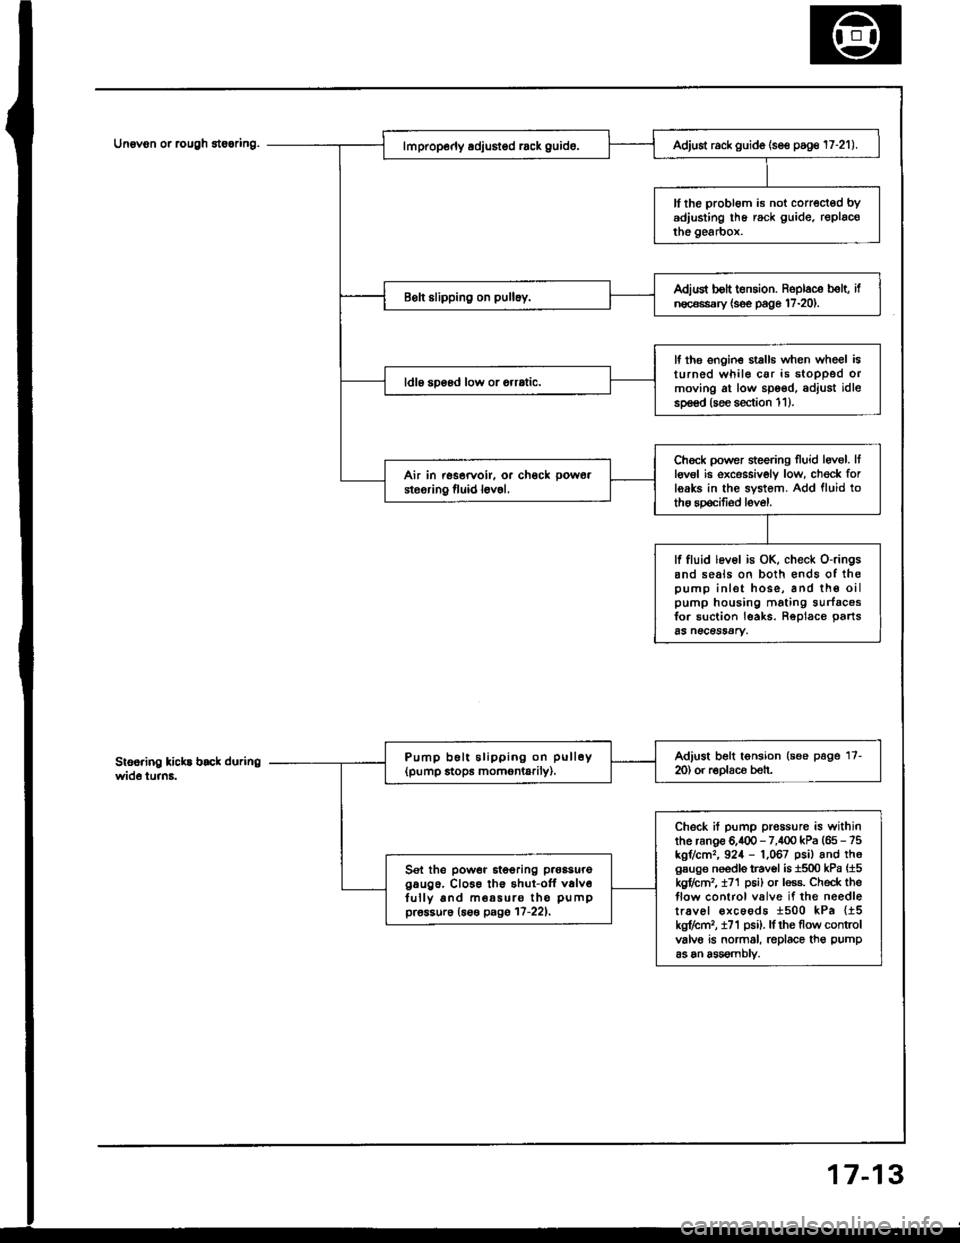
Unovon or rcugh 8te6ring.
3
Adjust rack guide (se€ poge 17-21).
ll the probl6m is not corrected bYadjusting lhe rack guide. replacothe gearbox.
Adiud bolt t€nsion. Roplace b€lt, ifn€c€ssary {s€e page 17-20).
lf the ongin€ stalls when wheel isturned whil€ car is stoDPed ormoving at low spoed, adjust idlesp€€d (soe section 1 1 ).
ldl6 soosd low or orrrtic.
Chock power sieering Iluid levol. Itlgv6l ie excessivoly low, ch€ck forleaks in the system. Add fluid totho spocifiod level.
Air in rssorvoir. or ch€ck pow6a
steoring fluid l6v6l.
lf fluid lev6l is OK, check o-ringsand seals on both €nds of ihopump inlet hose, and th€ oilpump housing mating surfacosfor suction leaks. Reolace oarts65 n€CeSSAry.
Adjust belt tonsion (see page 17-m) or r€Dlaco beh.Pump b6lt slipping on pull6y(pump stops momontarily).
Check if pump prossure is withinthe ranoe 6.400 - 7,100 kPa (65 - 75kgr/cm,, 924 - 1,067 psil and th6gsuge needls travol is 1500 kPa {15kgflctn2, t71 p6i) or less. Check theflow control valve if the needletr.vel €xcoods 1500 kPa {15kg?cm,, i71 psi). lf rhe flow controlvalvo is normal, replace th€ pump
as an assomblv.
Sel the power itooring p.oasuregaug6. Cl066 th€ shut-off v6lv6fully and m€a5uro tho pumppr6ssur6 (6s€ pagg 17-221,
7-1
Page 623 of 1413
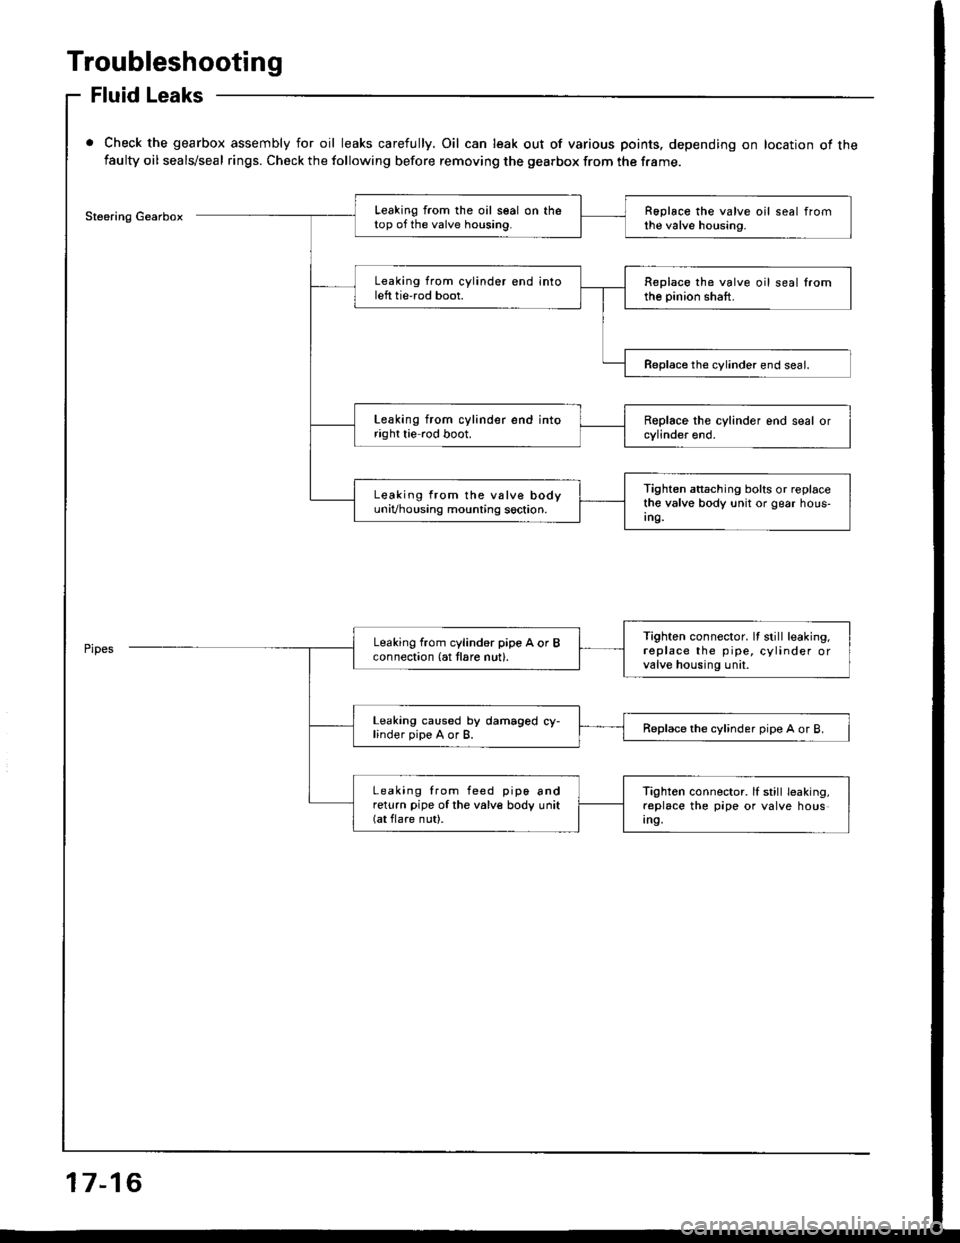
Troubleshooting
Fluid Leaks
Check the gearbox assembly for oil leaks carefully. Oil can leak out of various points. depending on location of thefaulty oil seals/seal rings. Check the following before removing the gearbox from the frame.
Steering GearboxLeaking from the oil seal on thetop of the valve housing.Roplace the valve oil seal fromthe valve housing.
Leaking from cylinder end intoleft tie'rod boot.Replace the valve oil seal lromthe pinion shaft.
Reolace the cvlinder end seal.
Leaking from cylinder end intoright tie rod boot.
Tighten attaching bolts or replacethe valve body unit or gear hous-Ing.
Leaking from the vslve bodyuniVhousing mounting soction.
Tighten connector. It still leaking.replace the pipe, cylinder orvalve housing unil.
Leaking from cylind6r pipe A or Bconnection (at tlare nut).
Leaking caused by damaged cy-linder pipe A or B.Replace the cylinder pipe A or B.
Leaking from feed pip6 andreturn pipe of the valve body unit(at flare nut).
Tighten connector. lI still leaking,replace the pipe or valve housIn9,
17-16
Page 628 of 1413
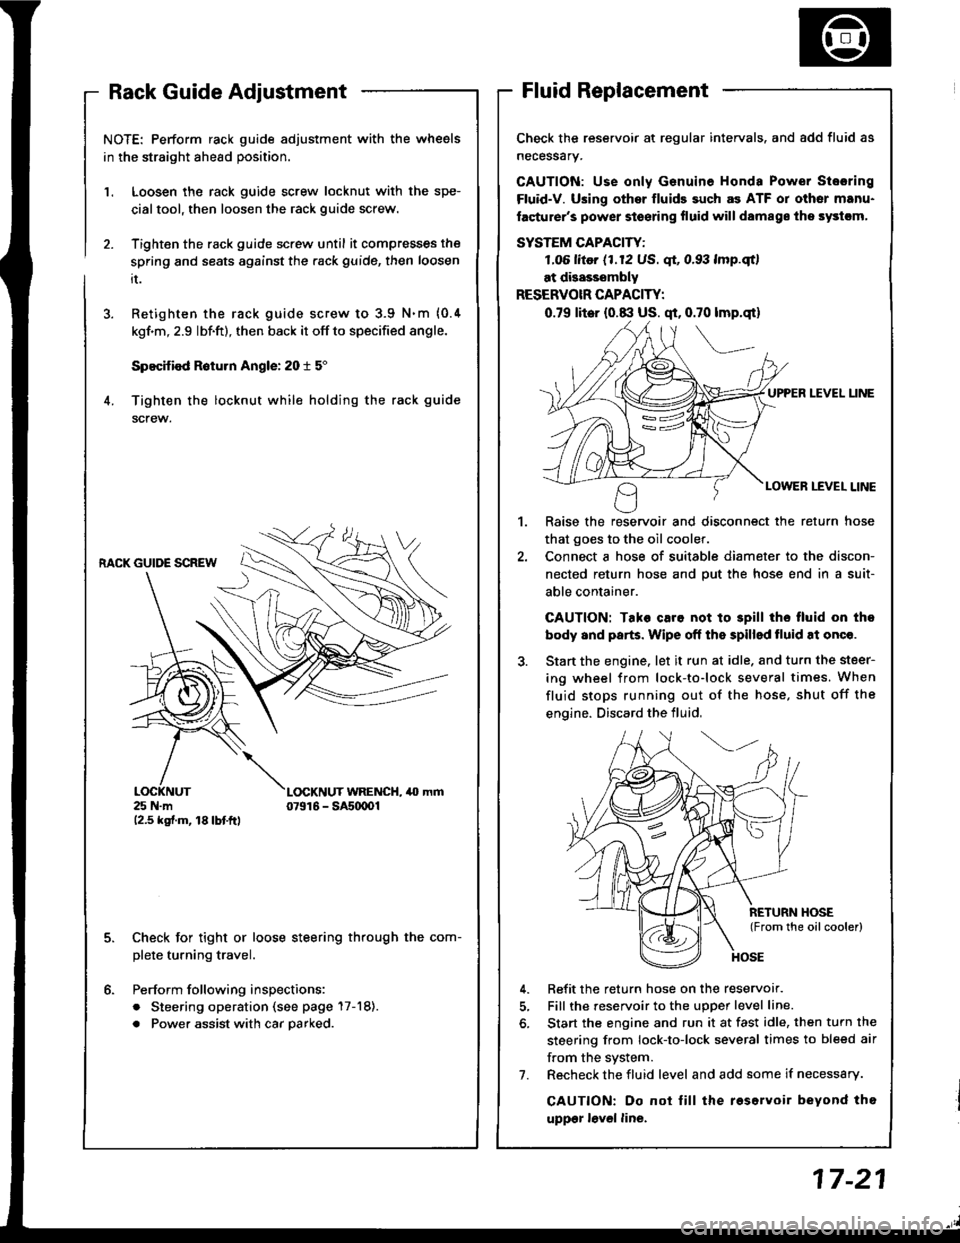
NOTE: Perform rack guide adjustment with the wheels
in the straight ahead position.
Loosen the rack guide screw locknut with the spe-
cialtool, then loosen the rack guide screw.
Tighten the rack guide screw until it compresses the
spring and seats against the .ack guide, then loosen
it.
Retighten the rack guide screw to 3.9 N.m {0.4
kgf'm, 2.9 lbf.ft), then back it off to specified angle.
Specified R6turn Angle: 20 t 5"
Tighten the locknut while holding the rack guide
screw.
1.
6.
RACK GUIDE SCREW
25 N.m12.5 kgf.m, 18lbtftl
L(rcKNUT WRENCH, 40 mm07916 - SAs(xtOl
Check for tight or loose steering through the com-
plete turning travel.
Perform following inspections:
. Steering operation (see page 17-18).
. Power assist with car parked.
Check the reservoir at regular intervals. and add fluid as
necessary.
GAUTION: Use only Genuine Honda Power Stosring
Fluid-V. Using othsr fluids such as ATF or other manu-
facturer's power stoering fluid will damags ths systcm,
SYSTEM CAPACITY:
LO6 litor (1.12 US. qt, 0.93 lmp.qtl
at disasssmbly
RESERVOIR CAPACITY:
0.79 lit6r (0.8:l US. qt, 0.70 lmp.qt)
UPPER LEVEL UNE
LOWER LEVEL LINE
,l
Raise the reservoir and disconnect the return hose
that goes to the oil cooler.
Connect a hose of suitable diameter to the discon-
nected return hose and put the hose end in a suit-
able container.
CAUTION: Tako caro not to 3pill tho tluid on tho
body and parts. Wipe off the spilled tluid at onqe.
Start the engine. let it run at idle. and turn the steer-
ing wheel from lock-to-lock several times. When
fluid stops running out of the hose, shut off the
engine. Discard the fluid,
Refit the return hose on the reservor.
Fill the reservoir to the uDoer level line.
Start the engine and run it at fast idle, then turn the
steering from lock-to-lock several times to bleed air
f.om the system.
Recheck the fluid level and add some if necessary.
CAUTION: Do not lill the roservoir beyond tho
uppgr lovel line.
7.
Page 646 of 1413
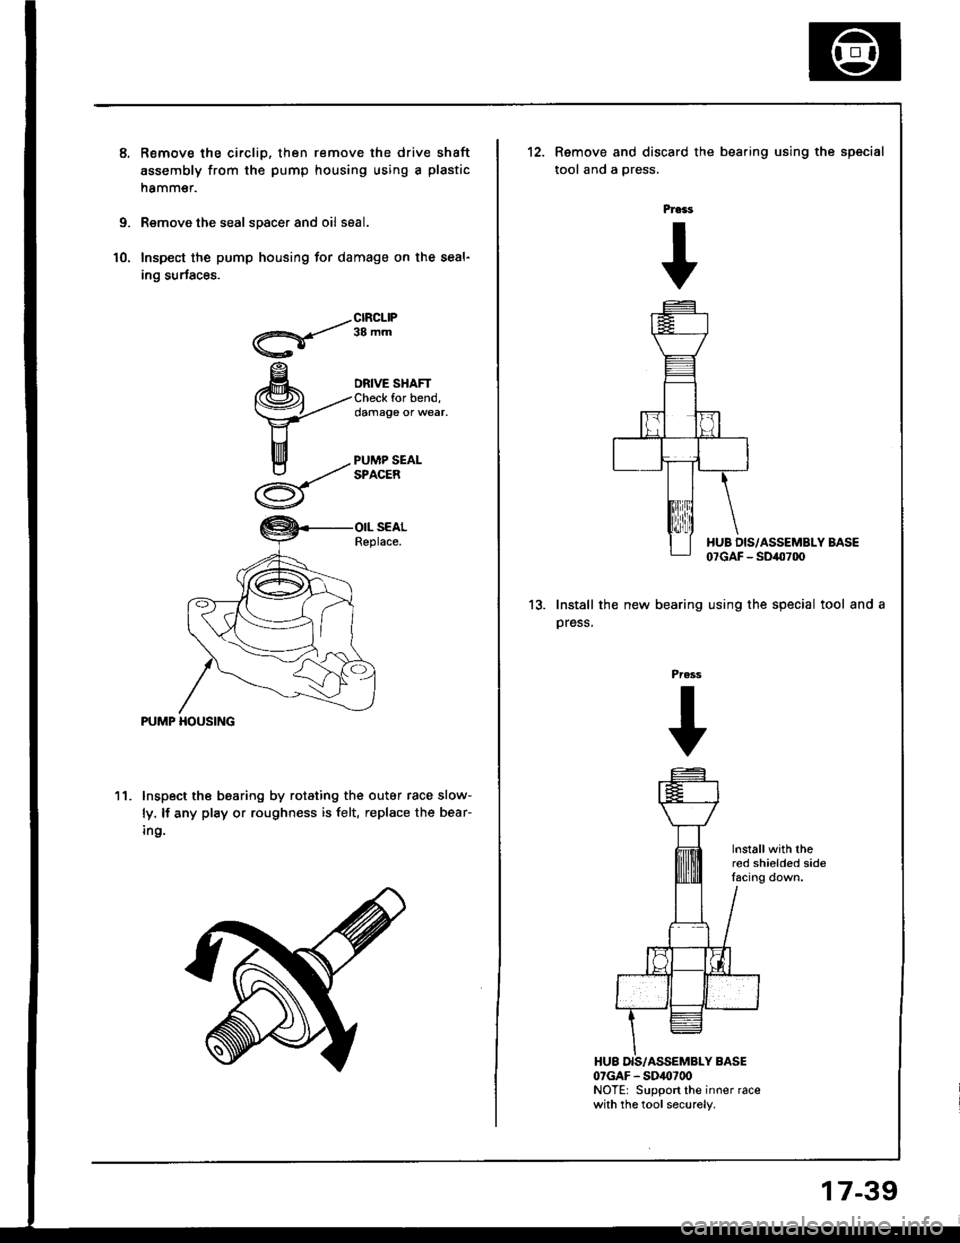
Remov€ the circlip, then remove the drive shaft
assembly from the pump housing using a plastic
namm€r.
Remove the seal spacer and oil seal.
Inspect the pump housing for damage on the seal-
ing surfaces.
/-clRcLlP
Q'/
ra -,"
DRIVE SHAFTfor bend,damage or wear,
PUMP HOUSING
11. lnspect the bearing by rotating the outar race slow-
ly. lf any play or roughness is felt, replace the bear-
ing.
Remove and discard the bearing using the
tool and a gress.
Pra3s
+
special
13.Install the new bearing
press.
I{UB DIS/ASSEMBLY BASE07GAF - SD40700
using the special tool and a
Press
+
Installwith thered shielded sidelacing down.
07GAF - SDis)700NOTE: Support the inner racewith the tool securely.
17-39