sensor HONDA INTEGRA 1994 4.G Owner's Guide
[x] Cancel search | Manufacturer: HONDA, Model Year: 1994, Model line: INTEGRA, Model: HONDA INTEGRA 1994 4.GPages: 1413, PDF Size: 37.94 MB
Page 250 of 1413
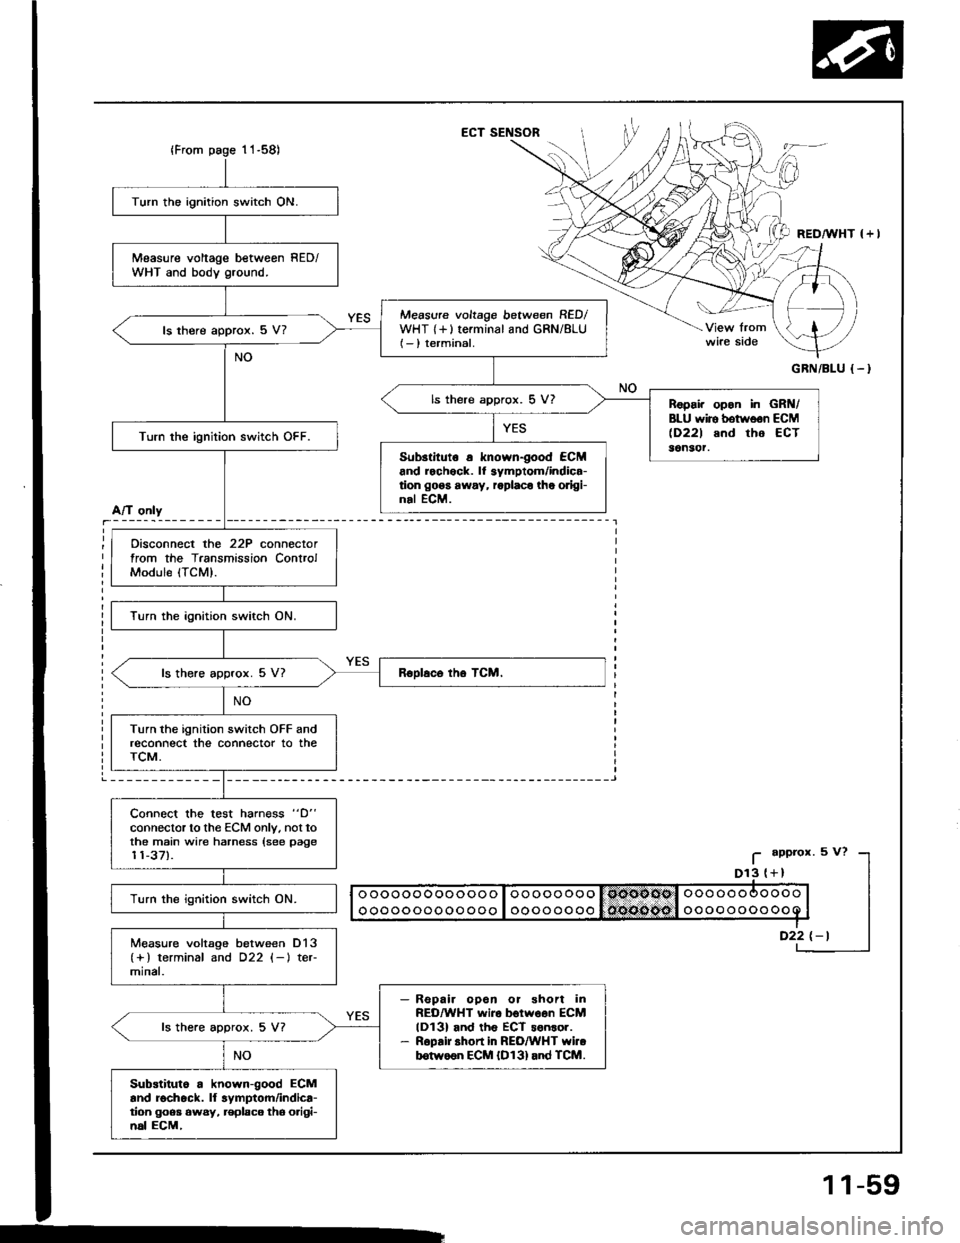
ECT SENSOR
GRN/BLU {-}
Turn the ignition switch ON.
Measure voltage betweon RED/WHT and body ground.
Measure voltage between RED/WHT {+}terminal and GRN/8LU(- ) terminal.ls there approx. 5 V?
ls there approx. 5 V?Ropai. opon in GRN/BLU wiro botwoon ECM(D221 and tho ECT36n3('r.Turn the ignition switch OFF.
Sub3tituto a known-good €CMand rochock. lf 3ymptom/indica-tion go6s away, roplaco the odgi-nal ECM.
Oisconnect the 22P connectortrom the Transmission ControlModule (TCM).
Turn the ignition switch ON.
ls there approx. 5 V7
Turn the ignition switch OFF andreconnect the connector to theTCM.
Connect the test harn€ss "D"
connector to the ECM only. not tothe main wire harness {see page11-37).
Turn the ignition switch ON.
Measure voltage between D13(+) terminal and D22 (-l ter-mlnal.
Repair opoa or shon inREO/WHT wiro botwoen ECMlDl3l and th6 ECT sonsor.R6pair shon in REO/WHT YYi..b6tw66n ECM {D131and TCM.
ls the.e approx. 5 V?
Substiluto a known-good ECMand rochock. ll lymptom/indica-tion goea 6wsy, replaco tho o.igi-n6l ECM,
A/T only
I
_i
11-59
Page 251 of 1413
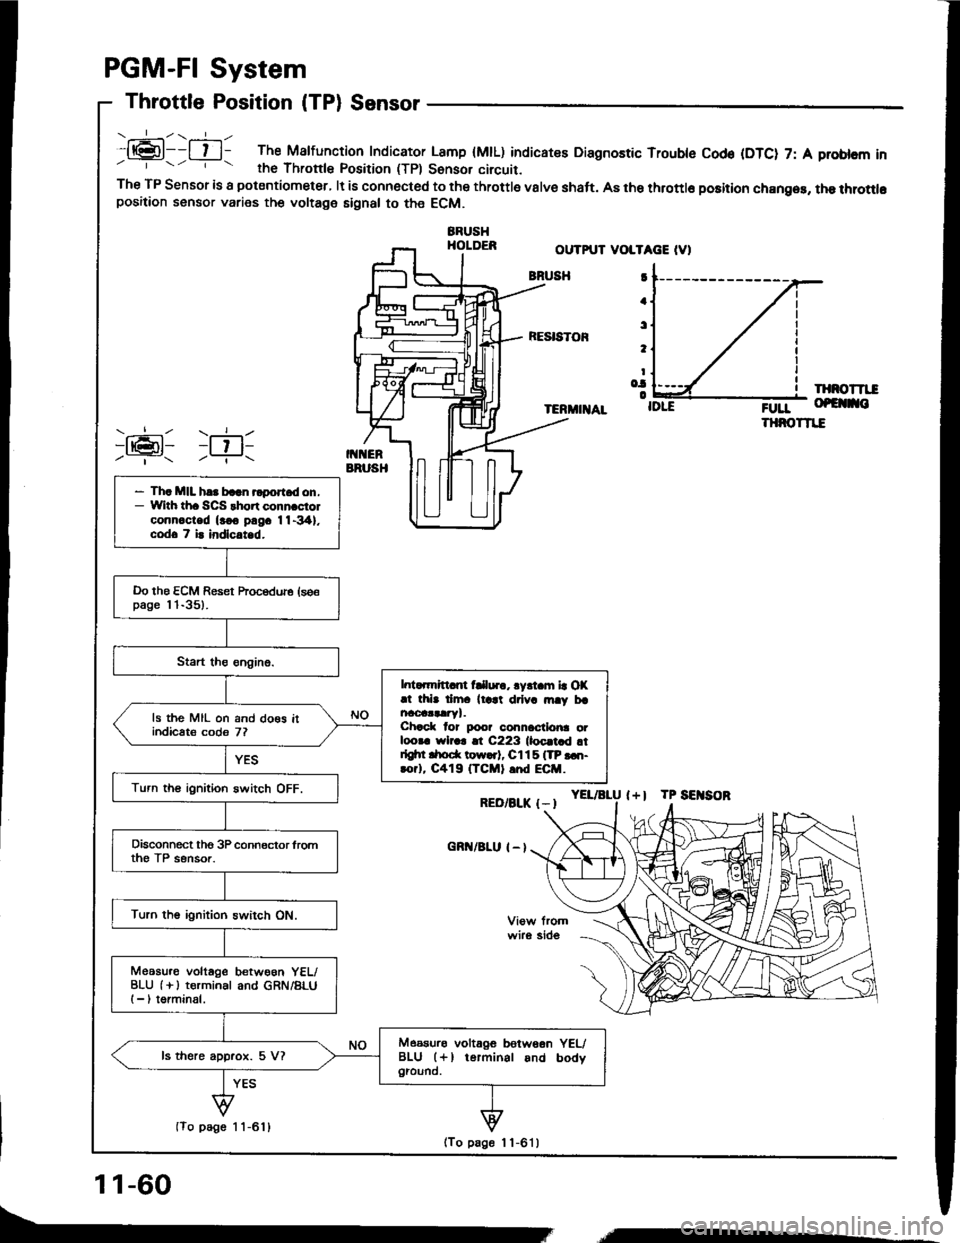
.:-\.-----ll@l--l t l- The Malfunction Indicator Lamp (MtL) indicatee Diagnostic Trouble Cod€ (DTC) 7: A problcm inrhe Thronle Position (TPl Sonsor circuit.The TP Sensor is a potsntiometer, lt is connected to the throttle valve shaft. A8 the throttlo position chan96, the throttlopositaon sensor varies the voltage signal to the ECM.
BBUSHHOLDER
PGM-FI System
Throttle Position (TPl Sensor
OUTPUT VOLTAGE IV)
BNUSH
RESISTOF
IXNOTTII
TERMIIIAL;0rr- of€ no
THNOTTIE
YEL/aLU l+l TP SEITSOR
I
a
t
t
Io.|o
RED/BLK {-I
cnn/BLu I - l
)ran1 )ril-Y- -?..
- Th. MIL h.. baln rlport d on.- With th. SCS thort conn.ciolconn.c-ted (rco pngc 11-341.codo 7 i. indlc.t d.
Do the ECM Reset hocedure (se€page l 'l-35).
l. ..mrtt nt fClur., lyrt m la OX.t thb dm. ll.at drlv. rn.y brncoaataryl.Chack lor poo? connactlo|ra otloora wlr.r !t C223 lloc.t d !tdgtn drod( tow..t, Cl15 ITP ...t-rorl, C419 (TCMI .nd ECM.
ls the MIL on and do€s itindicats codo 7?
Turn th€ ignition switch OFF.
Disconnect tho 3P connector lromth€ TP sensor.
Turn the ignition switch ON.
Meosu.o voltage betwoon YEL/BLU (i ) terminal and GRN/BLUI -, torminal.
Measurs voltagG betw66n YEUBLU (+l terminal and bodygiound.ls there approx. 5 V?
(To page 1 1-611
11-60
(To page 1 1-6'l )
,,,----
Page 253 of 1413
PGM-FI System
Intake Air Temperature (lAT) Sensor
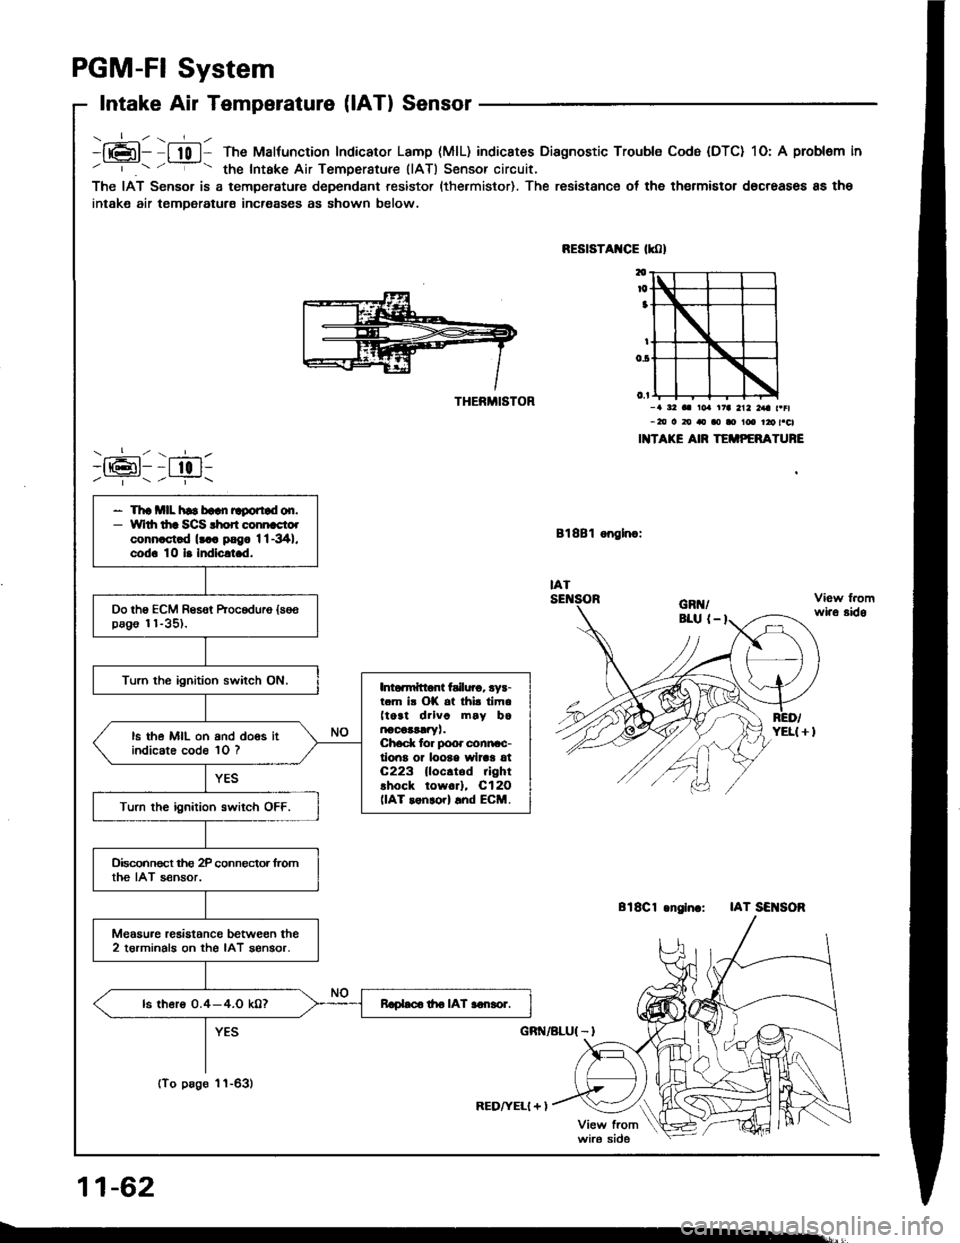
----:-- z ---L /-h6l- I t0 l- The Malfunction Indicator Lamp (MlL) indicstes Diagnostic Trouble Cod6 (DTC) 1O: A problem in/ | / - the Intake Air TemDerature (lAT) Sensor circuit,
The IAT Sensor is a temperature dependant resistor (the.mistor). The resistanc€ of the thermistor d6creases 8s the
intake air temDeratura incroases as shown below.
)1611:till/ ---l- z ---i-\
THERMISTOR
RED/YELI + )
RESTSTAXCE tmt
Bl8Bl onglnc:
-a a2 aa roa .t7a 212 a t |l-20 o 20 rto ao I t6 rro t.cl
I TAKE AIR TEiiIPTFATURE
818C1 .nglnc:IAT SEI{SOR
11-62
wi.a sido
- Th! *llL hs b!!n Egortad on.- \|
rdr dra SCS rhon connrcto.conn.ct.d lt . psg. 1l-341.cod. 10 l. hdlclt.d.
Do the ECM Resot kocoduro {se€pago 11-35).
Turn the ignition switch ON.Into.n{tlont failuro. rys-r.m ir OK .t thi. iim.(toat drlvc m6y b6arooa!!1ryt.Ched( tor poor clnncc-lioiE or loote wlrar 6tC223 lloc.tod rightlhock toworl, C12O(lAT renrcrl and ECM.
ls the MIL on and doos itindicate code 10 ?
Turn the ignition swiich OFF.
Oisconnoct tho 2P connector fromthe IAT sensor.
Meosu.e resistonc€ between the2 torminals on the IAT aengor.
ls thero 0.4-4.0 k0?Rlobco tho IAT aonsor.
(To pago 1'l-63)
Page 255 of 1413
PGM-FI System
Barometric Pressure (BAROI Sensor
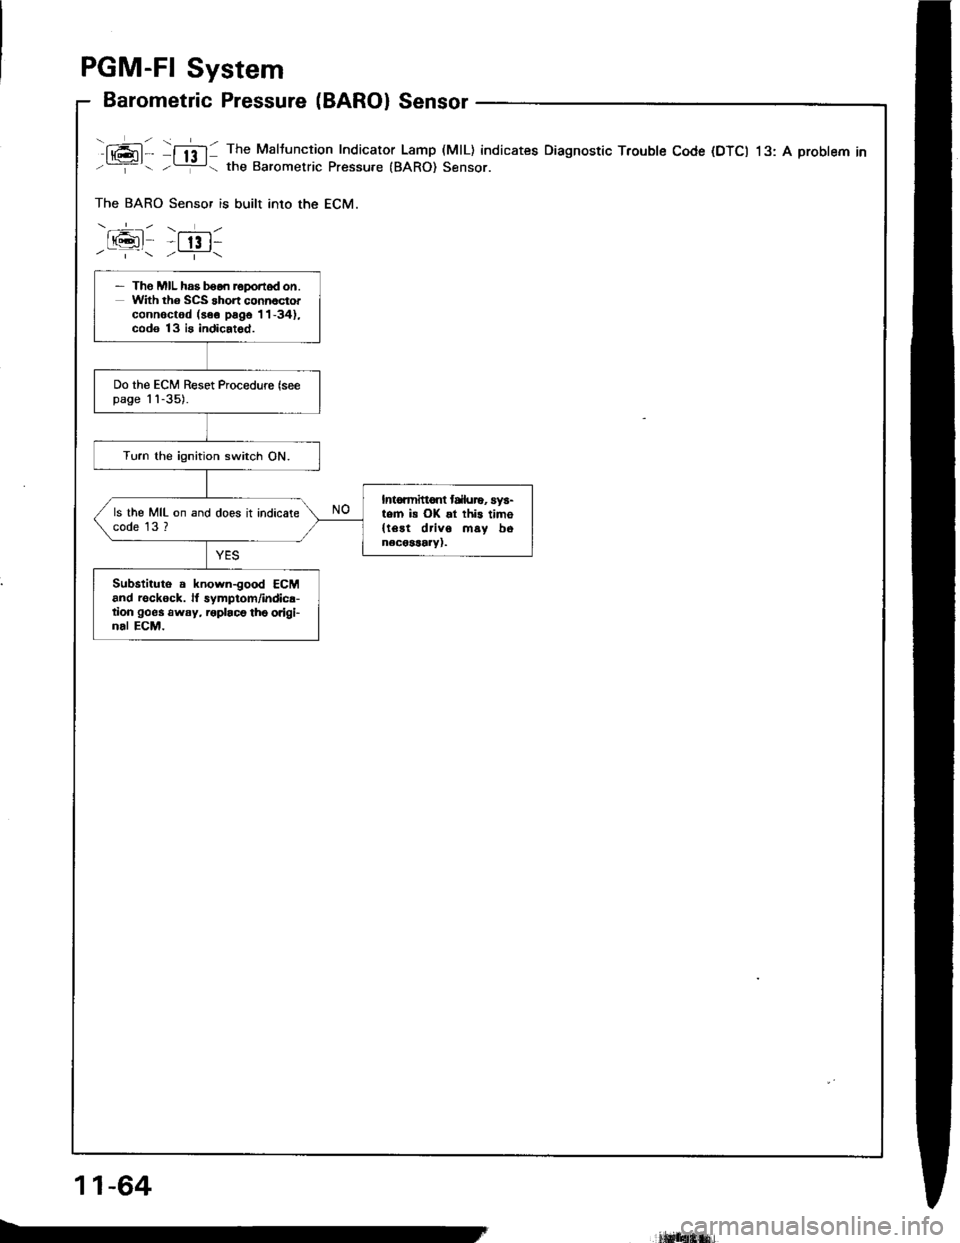
fAl- f;ff: The Maltuncrion Indicator Lamp (MtL) indicates Diagnostic Troubte Code (DTCI 13: A probtem inL--:g the Barometric Pressure {BARO) Sensor.
The BARO Sensor is built into the ECM.
-.+.-- \--r- /
t(gt -t 13 t-/'\/_i-\
- Tho MIL has booo reponod on.with th6 scs Short COnnOCtO.connoctod (aeo psgo 11-34),cod€ 13 is indicatod.
Do the ECM Reset Procedurc (seepage 1'l-35).
Turn the ignition switch ON.
Intormitt€nt trluro, sys-tem is OK !l this timo{le!t driv6 msy bonecoSaaiy).
ls the MIL on and does it indicatecode 13 ?
Substituto . knorvn-good ECMand reck6ck. lt symptom/indicr-tion goes away, roplaco th6 origi-nal ECM.
11-64
lrl$fiiHrfi.
Page 258 of 1413
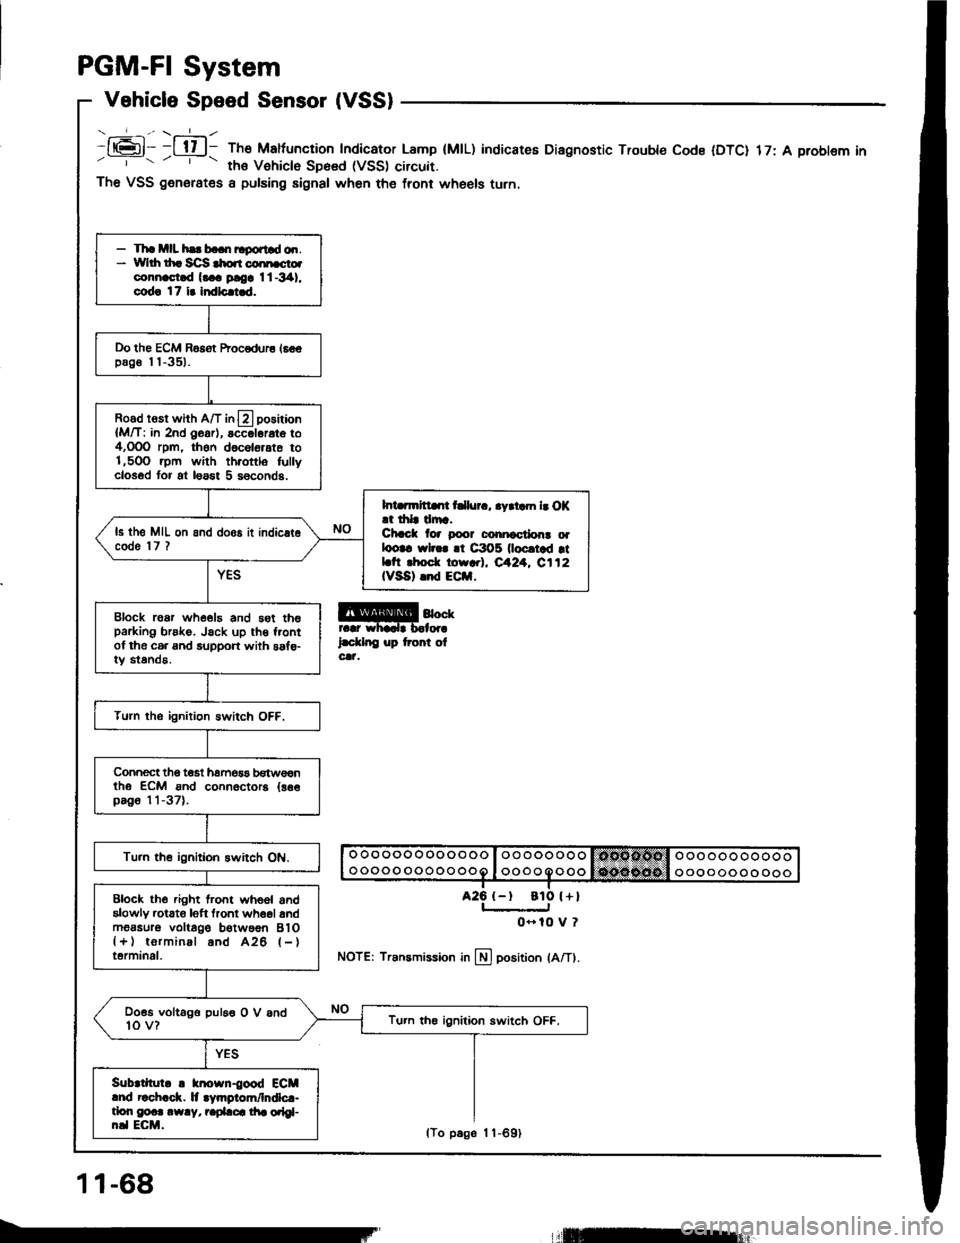
PGM-FI System
Vehicle Speed Sensor (VSS)
- _-_f_-., \-=1_ -
It6l- -l tl l- The Maltuncrion Indicator Lamp (MtL)' ths Vehiclo SD6sd (VSS) circuit.
indicateE Diagnostic Trouble Code IDTC) 17: A problem in
a25 {-t
The VSS generates a pulsing signal when the front wheels turn.
@4""rr.r whadr b.lor.
l.d.lnC up tront olcat,
NOTE: Transmission in llj position lA/Tl.
- Tha mll hs b..n ltgortld o.r.* Yvlrh th. Sc]S $o.r coi[cto.connast.d l... ploa I l -341,
cod! 17 i. Indlc.i.d.
Do the ECM Basot Procodur6 16€€pag€ I I -351.
Road rosr whh A/T in13 positaon
{M/T: in 2nd O6ar), accol6rat6 to4,OOO rpm, thon d6c6l6,ate to1,5OO .pm with th.ottlo fullyclosod tor at loast 5 s6conds.
Int rmltllrt t llur., .yrtam b O|(.t drlr drr.Chcct lor poor conicctlon! oalootc wl... !t C3O5 0ocrtad rtLtt rhod. torr.l, eA24. C112IVSA) .nd ECil.
ls th6 MIL on and doos it indic.t6code 'l7 ?
Block roar whe€19 and 5st th6parking brsko. Jsck up th€ f.ontof the c6. and support with saf€-iy standa.
Turn the ignition Bwitch OFF.
Connect tho t€st hamos3 b€tw€€ntho ECM ond connoctora {as€pag6 11-37).
Tu.n th€ ignitioh switch ON.
Block the .ight lront whoel andalowly rctato loft tront wh6ol andm6asur6 voltago b€twoon BlO{+) torminal and A26 l-}terminal.
Doss voltago puleo O V and10 v?Tu.n th€ ignition switch OFF.
Sub|tllul. ! knosn{ood ECMlnd r!ch.ck. lt .Vmgiom/lndlc.-tlon g@.. .w.y, r.pLca di. orlgl-n.l ECM.
ato l+l
0- 10 V ?
11-68
lTo p6ge 1 1-691
llEur
Page 263 of 1413
PGM-FI System
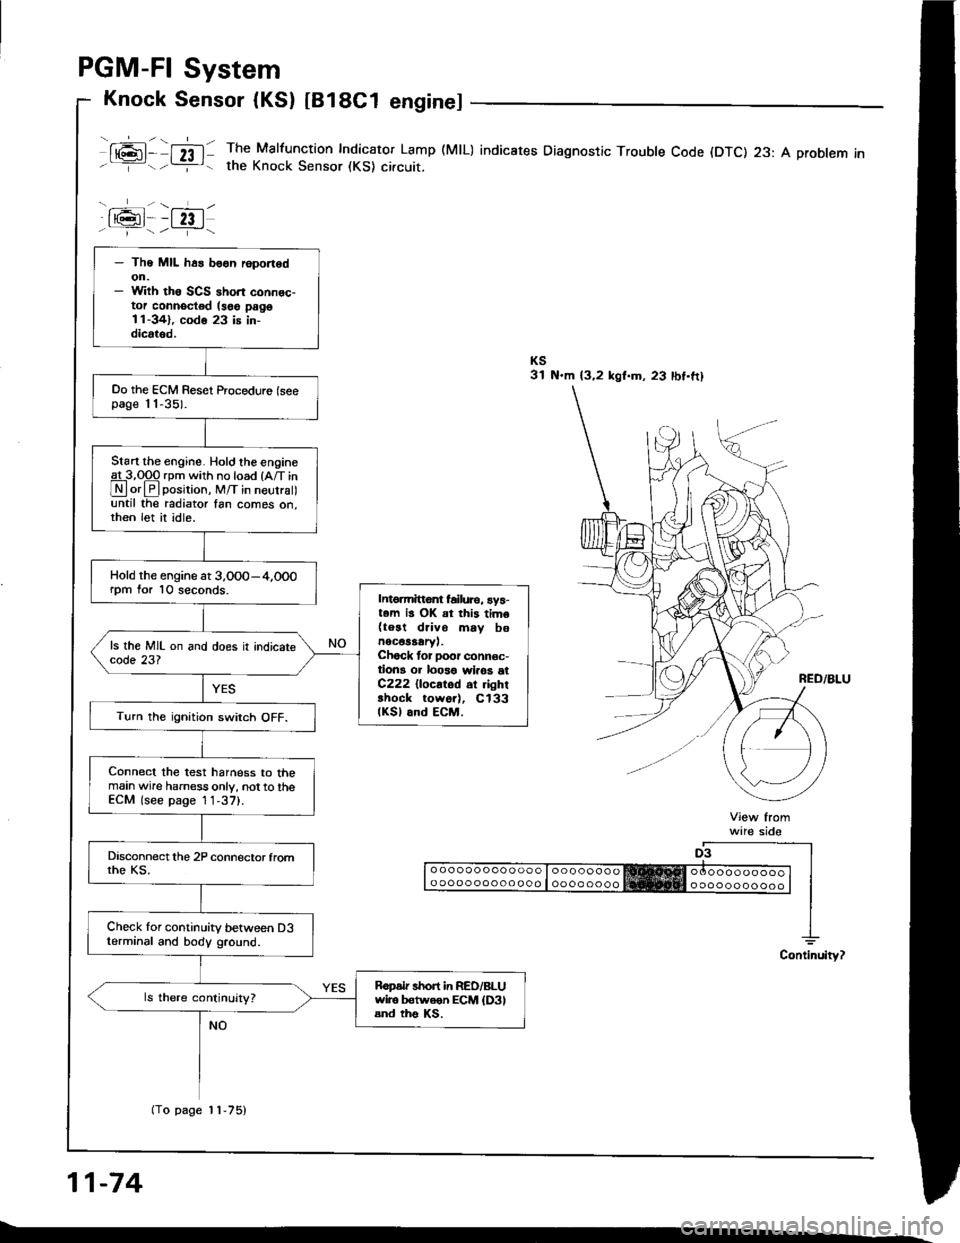
Knock Sensor (KS) tB18C1 enginel
ml- nl: The Malfunction Indicator Lamp (MlL) indicates Diagnostic Troubte Code (DTC) 23: A probtem inthe Knock Sensor (KS) circuit.
a6l--fzt.i--1/.---r+\
ware sido
o ooooo ooo ooo o looooooooo oooo ooo oo ooo I oooo oooo
11-74
- The MIL h6s boon r6port6don.- With th6 SCS ahort connec-tor connoctod (soe pago11-341, codo 23 is in-dicrtod.
Oo the ECM Reset Proceduro (seepage 11-35).
Start the engine. Hold the engineg!-3,Opq rpm with no load {A/T in
Lryl orlPlposirion, M/T in neurra until the radiator fan comes on,then let it idle.
Hold the engine at 3,0O0-4,000rpm for 10 seconds.Intomittor failure, ay5-t.m is OK at this tim6(teat drivo mav bonec€saary,.Chock tor Door connec-tion3 or loo3o wlaos etC222 {locatod 6r ghrshock tow6r), Cl33(KSl and ECM.Turn the ignition swirch OFF.
Connect the test harness to themain wire harness only, not to theECM (see page 1 1-37).
Check for continuity between D3terminal and body ground.
Ropdr short in RED/BLUwiro b€tweon ECM {D3land ths Ks.
(To page 11-75)
Page 268 of 1413
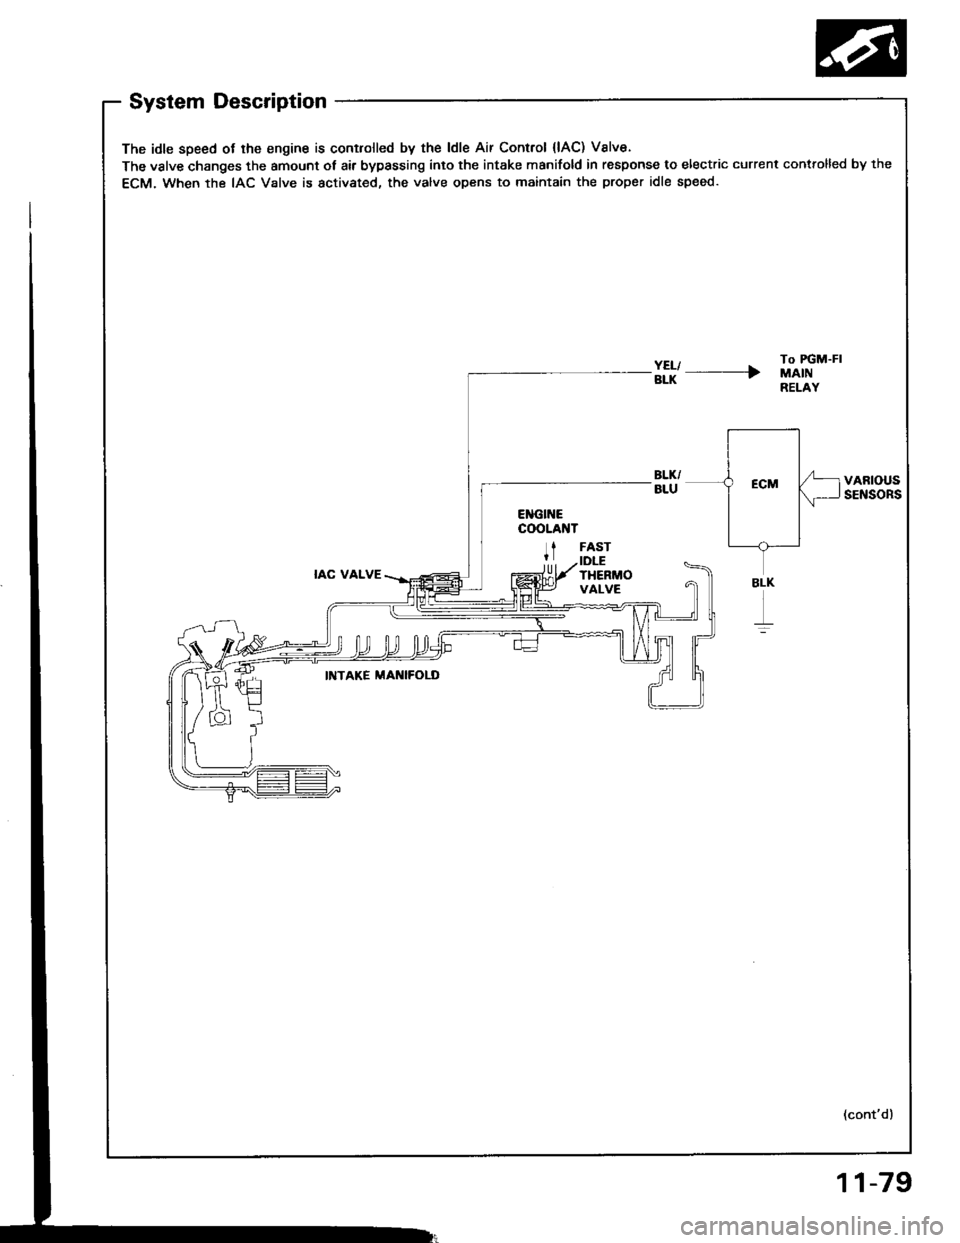
System Description
The idle speed ot lhe engine is controlled by the ldle Air Control {lAC) Valve.
The valve changes the amount ot air bypassing into the intake manifold in response to electric current controlled by the
ECM. When the IAC Valve is activated, the valve opens to maintain the proper idle speed.
#l' ----rTo FGM-FIMAINRELAY
VARIOUSSENSORS
IAC VALVE
FASTIDLETHERMOVALVE
INTAKE MAI{IFOLD
(cont'd)
BLK
r
11-79
Page 305 of 1413
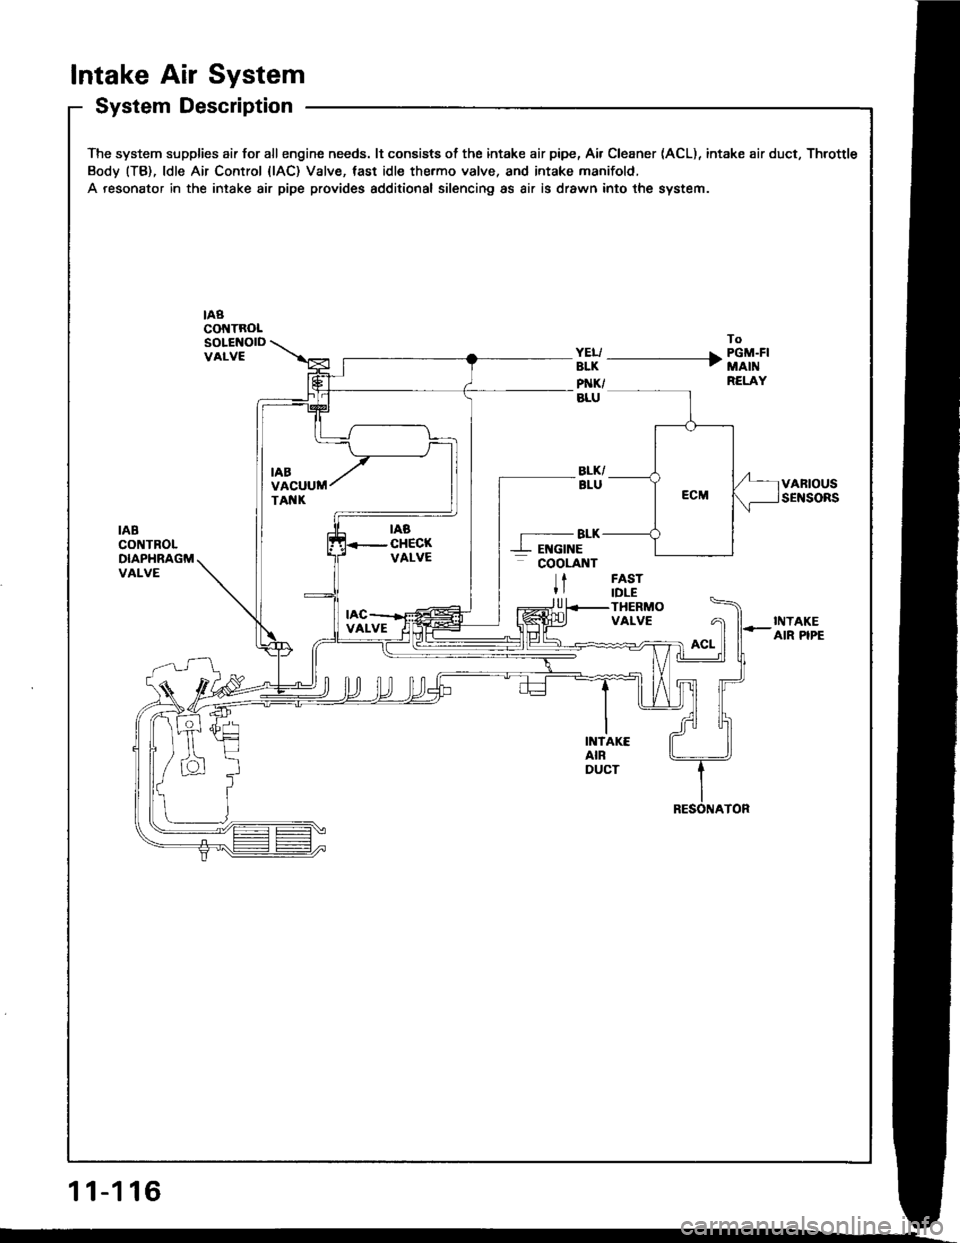
Intake Air System
System Description
The system supplies air for allengine needs. lt consists of the intake air pipe, Air Cleaner (ACL), intake air duct, Throttle
Body (TB), ldle Air Control {lAC) Valve, tast idle thermo valve, and intake manifold.
A resonator in the intake air pipe provides additional silencing as air is drawn into the system.
nacot{TRoLSOLENOIDVALVE
To
ffi -------------+ i'"ii'i''RELAY
VARIOUSSENSORS
IABCONTROLDIAPHRAGMVALVE
-BLK--L EI{GINE- cooLnnt
tFASTIDLETHERMOVALVE
U
INTAKEAIR PIPE
INTAKEAIRDUCT
11-116
Page 311 of 1413
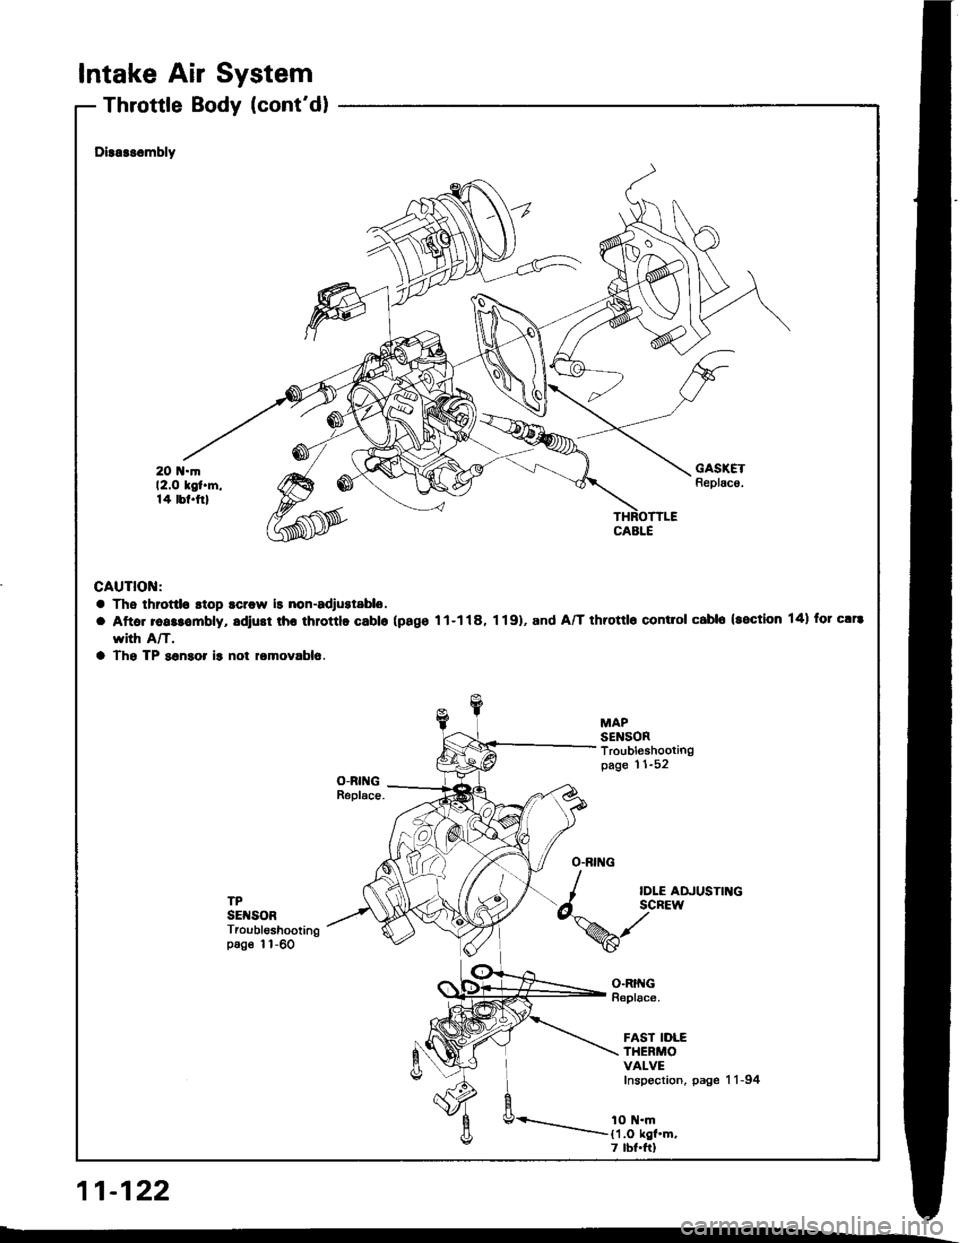
Intake Air System
Throttle Body (cont'dl
11-122
Dirarssmbly
GAUTION:
a Ths throttlo stop scrow is non-adrustablo.
a Aftar reassombly, adiust rhr throttlo Gablo (pago 11-118, 1 19). and A/T throttlo contlol cabl6 (section 14) for c!r8
rYith A/T.
a Tho TP sonaor ir not lomovablo
MAPSENSORTroubleshootingpage 11-52
TPSETSORTroubleshootingpoge 1l-60
O.BING
I
d^'%
IDLE ADJUSTINGSCREW
o-RtftGReplace.
FAST IDLETHERMOVALVEInspection, page 11-94
1O N.m11.O kgl.m.7 tbf.ftl
Page 346 of 1413
Transmission Assembly
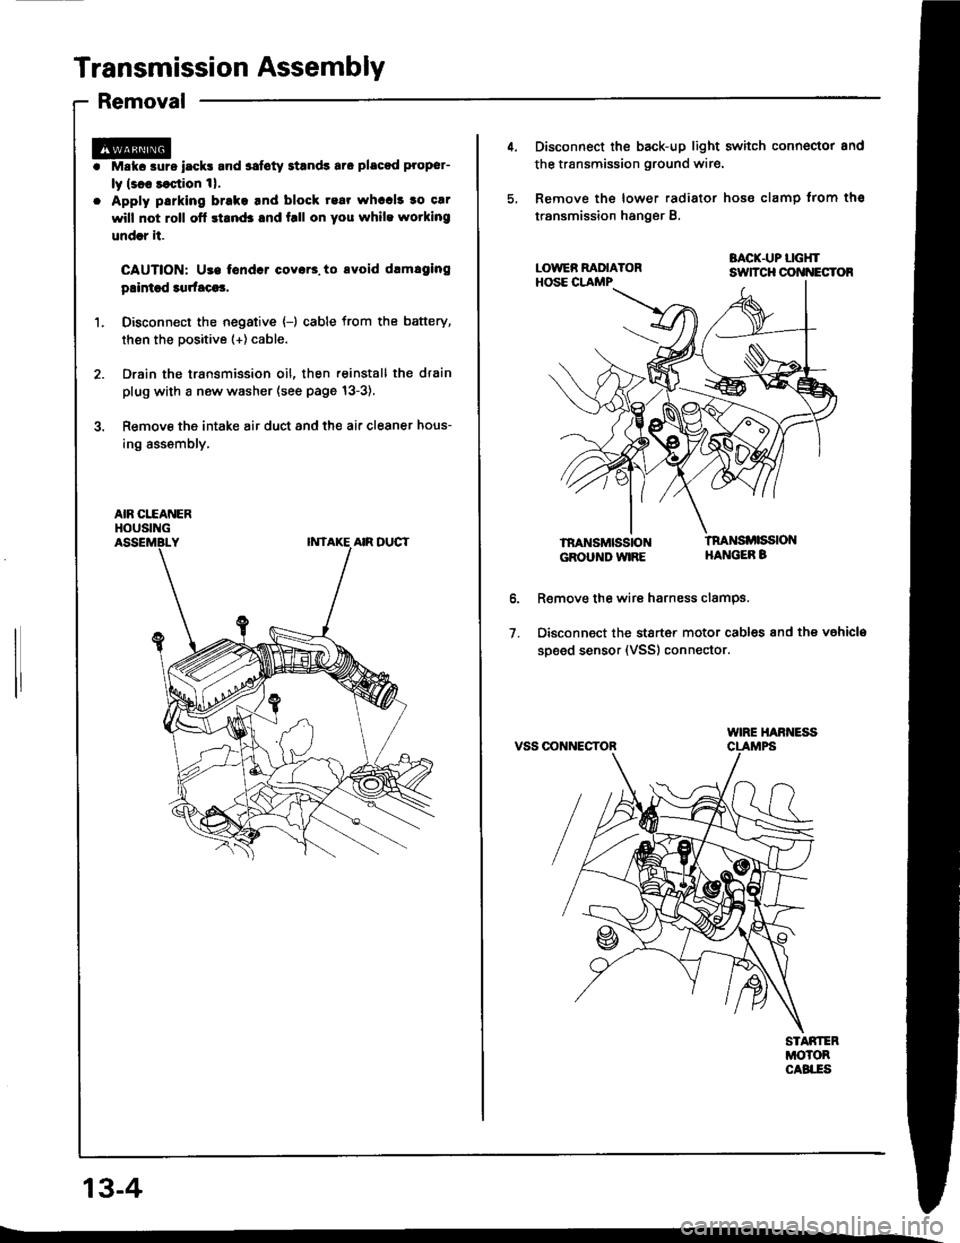
Removal
Mskc aurs iack! and safoty Etands aro placod proper-
ly lsl8 saqtion 1|.
Apply parking brake tnd block rear whccl! to car
will not roll ofl stand3 and f.ll on you while wotking
undrr it.
CAUTION: Use tondcr coyar3. to avoid drmlging
plintsd 3qrfaca3,
Disconn€ct the negative {-) cable from the battery,
then the positive (+) cable.
Drain the transmission oil, then reinstall the drain
plug with a new washer (see page 13-3),
Remove the intake air duct and the air cleaner hous-
ing assembly,
AIR CITANERHOUSING
13-4
4. Disconnect the back-up light switch connoctor and
the transmission ground wir€.
5, Remove the lower radiator hose clamp trom ths
transmission hanger B.
BACK.UP LGHTsuTcH cot{t{EcToR
lnaNsMttistoNGROUND WIRE
tnaNsi ssloNHANGEB B
o.
1.
R€move the wire harness clamPs.
Disconnect the stsrt€r motor cables and the vahicla
soeed sensor (VSS) connector.
VSS OONNECTOR