Ac belt HONDA INTEGRA 1994 4.G Repair Manual
[x] Cancel search | Manufacturer: HONDA, Model Year: 1994, Model line: INTEGRA, Model: HONDA INTEGRA 1994 4.GPages: 1413, PDF Size: 37.94 MB
Page 962 of 1413
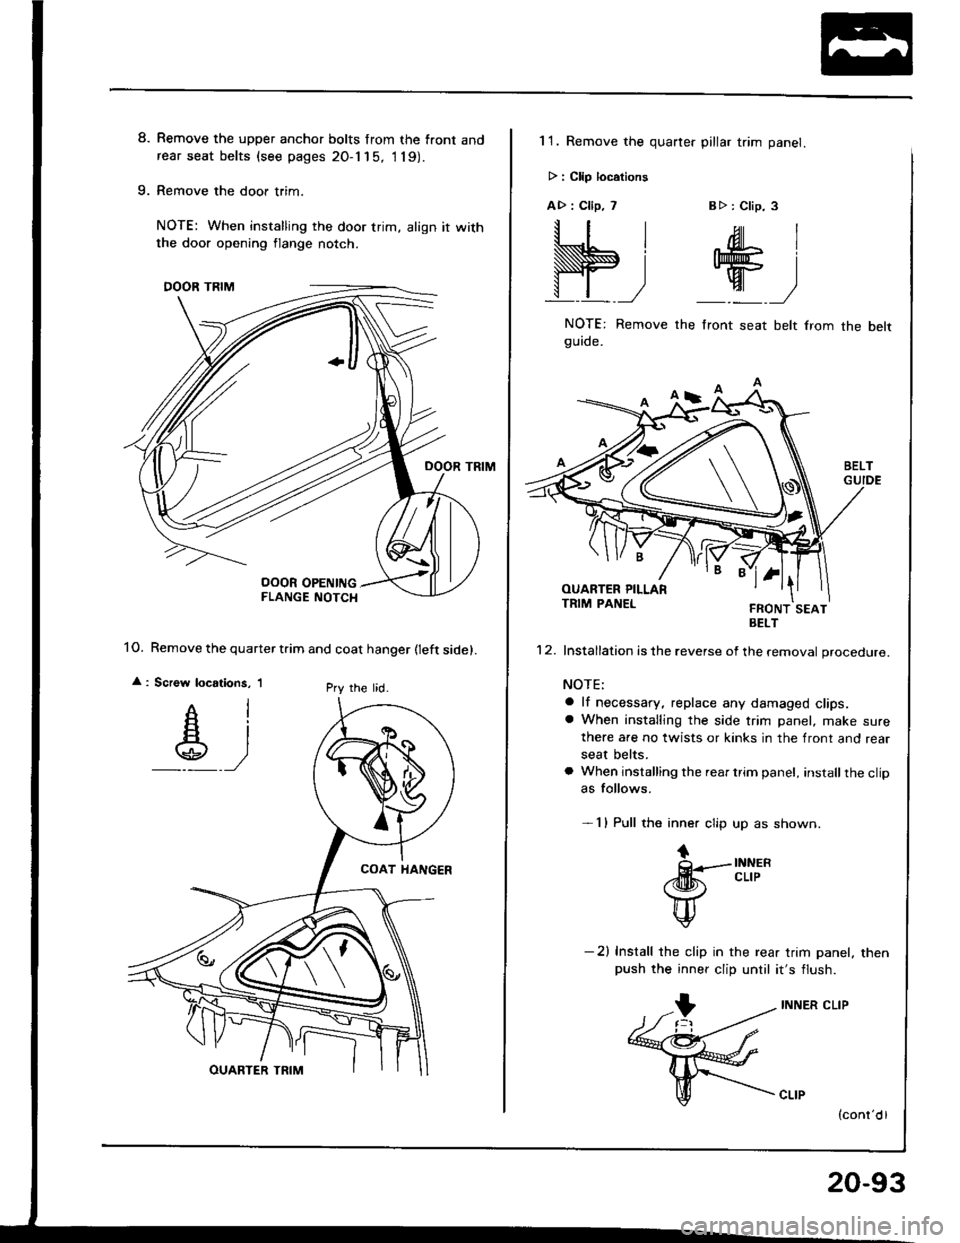
8. Remove the upper anchor bolts from the front andrear seat belts (see pages 20-1 15, 1 19).
9. Remove the door trim.
NOTE: When installing the door trim, align it with
1O. Remove the quarter tiim and coat hanger fleft sidel.
: Screw locstions, 'lPry lhe lid.
the door opening flange notch.
11. Remove the quarter pillar trim panel.
> : Clip locations
A>: Clip, 7 Btr: Clip. 3
S;+)
NOTE: Remove the front seat belt lrom
9UrOe.
the belt
BELT
'12. Installation is the reverse of the removal procedure.
NOTE:
a lf necessary, .eplace any damaged clips.a When installing the side trim panel, make sure
there are no twists or kinks in the front and rear
seat belts.
a When installing the rear trim panel, installthe clipas follows.
- 1 I Pull the inner clip up as shown.
tQ-.-INNER./ilk cLrP( \c4z )\/
tl\#
-2) Install the clip in the rear trim panel. thenpush the inner clip until it's flush.
INNER CLIP
20-93
Page 963 of 1413
lnterior Trim
Replacement lcont'dl
Sodan
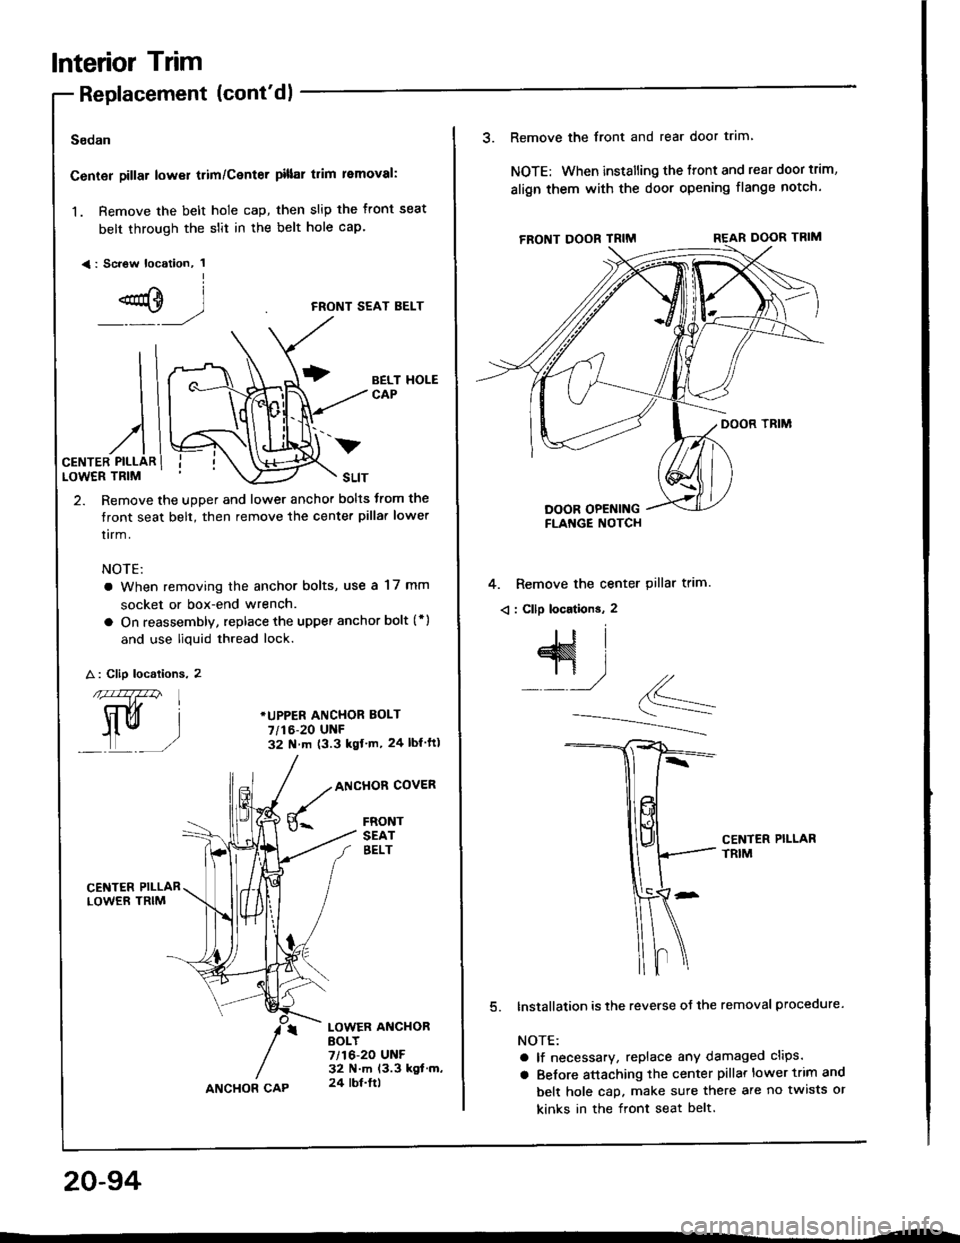
Center pillar lower trim/Center pillal trim removal:
1. Remove the belt hole cap, then slip the front seat
belt through the slit in the belt hole cap.
<: Sc.ew location, 1I
e)
)
2. Remove the upper and lower anchor bolts trom the
tront seat belt, then remove the center pilla. lower
tirm.
NOTE:
a When removing the anchor bolts, use a 17 mm
socket or box-end wrench.
a On reassembly, replace the upper anchor bolt (* )
and use liquid thread lock.
CENTER PILLARLOWER TRIM
FRONT SEAT BELT
BELT HOLECAP
*UPPER ANCHOR EOLT
7/t6-20 UNF32 N m (3.3 kgf'm, 24 lbl ft)
A : Clip localions. 2
nfa147zzn
trui
L_,)
ANCHOR COVER
FRONTSEATEELT
CENTER PILLARLOWER TRIM
LOWER ANCHORBOLY7/16-20 UNF32 N.m 13.3 kgt.m,24 lbt.ltlANCHOR CAP
20-94
v
3. Remove the front and rear door trim
NOTE: When installing the ffont and rear door trim,
align them with the door opening flange notch.
4. Remove the center pillar trim.
< : Cllp locations. 2
CENTER PILLARTRIM
lnstallation is the reverse oJ the removal procedure.
NOTE:
a lf necessary, replace any damaged clips.
a Belore attaching the center pillar lower trim and
belt hole cap. make sure there are no twists or
kinks in the front seat belt.
Page 965 of 1413
Replacement (cont'd)
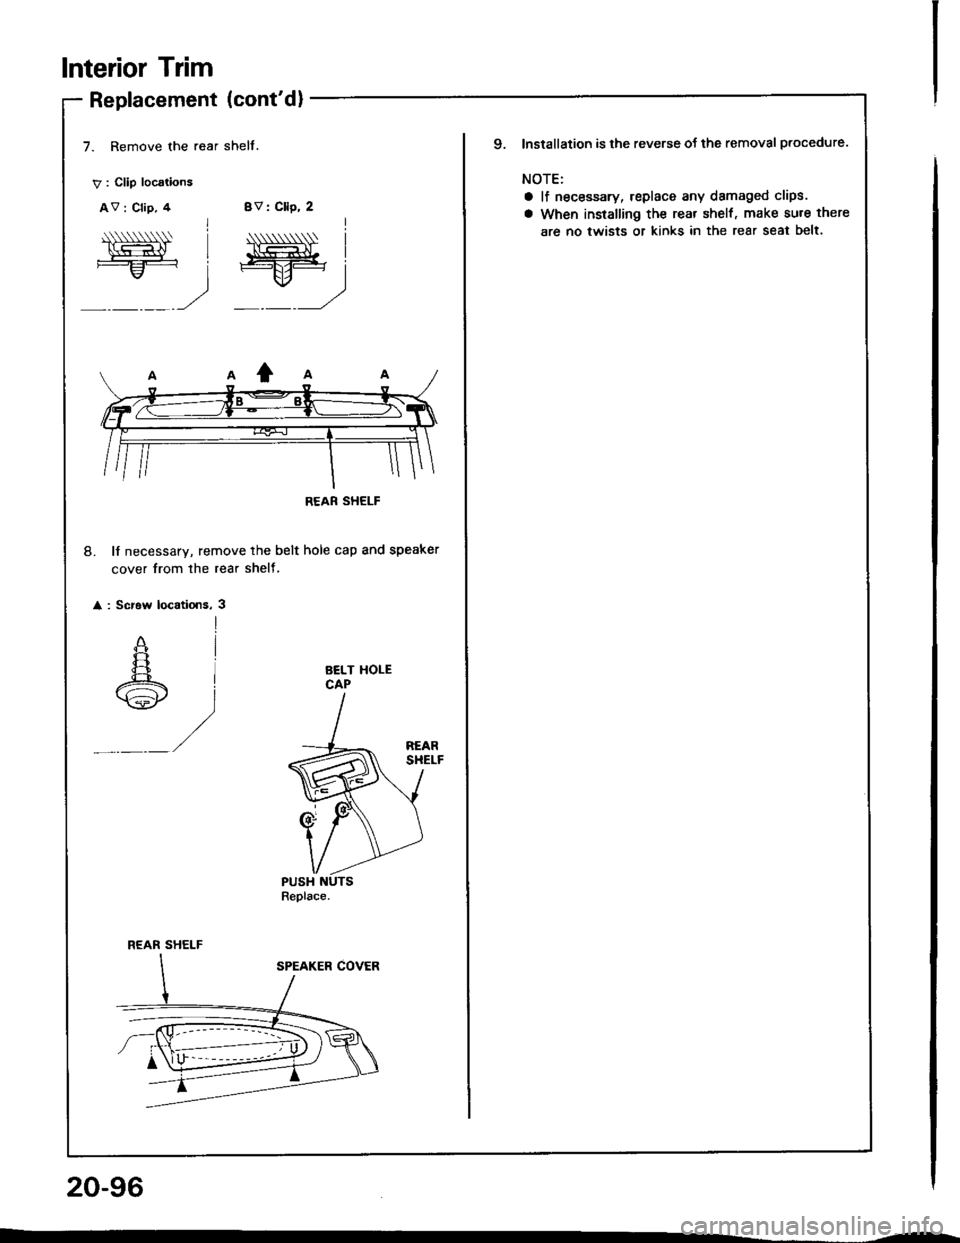
7. Remove the rear shelf.
V : Clip locations
AV : Clip, 4BV: Cllp, 2
20-96
lnterior Trim
Niwt==:
;
"ff=
_) =)
8. lf necessary, remove the belt hole cap and speaker
cover from the rear shelf,
: Screw locatlons, 3
AELT HOLECAP
REAR SHELF
lnstallation is lhe reverse of the removal plocedure.
NOTE:
a lf necessary, replace any damaged clips.
a When installing the rear shelf, make sure there
are no twists or kinks in the rear seat belt'
q
Page 968 of 1413
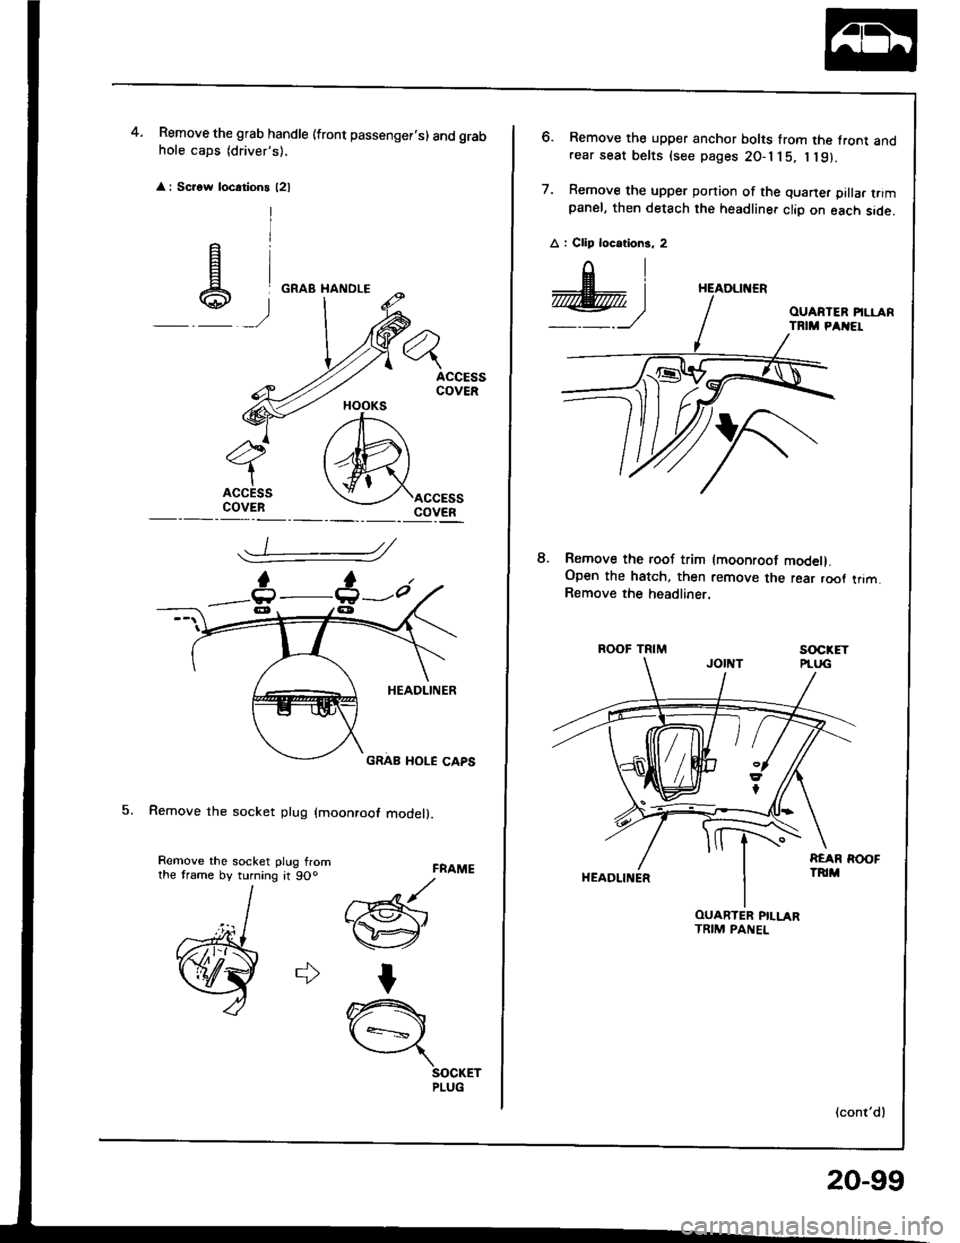
Remove the grab handle (front passenger.s) and grabhole caps (driver's),
: Scrow locations l2l
5. Remove the socket plug (moonroof model).
4.
FRAME
//Gr-@'
I
n{ +=s ,
SOCKETPLUG
HOOKS
_t :
e)
Remove the roof trim (moonroot model).Open the hatch, then remove the rear root trim.Remove the headliner.
ROOF TRIMsocxET
HEADLII{ER
(cont'dl
6. Remove the upper anchor bolts from the front andrear seat belts (see pages 2O-l j 5, I l9).
7. Remove the upper ponion of the quaner pilla. trimpanel, then detach the headliner clio on each side.
A : Clip locotions, 2
8.
HEADLINER
OUARTER PILLARTRIM PANEL
20-99
Page 973 of 1413
Seats
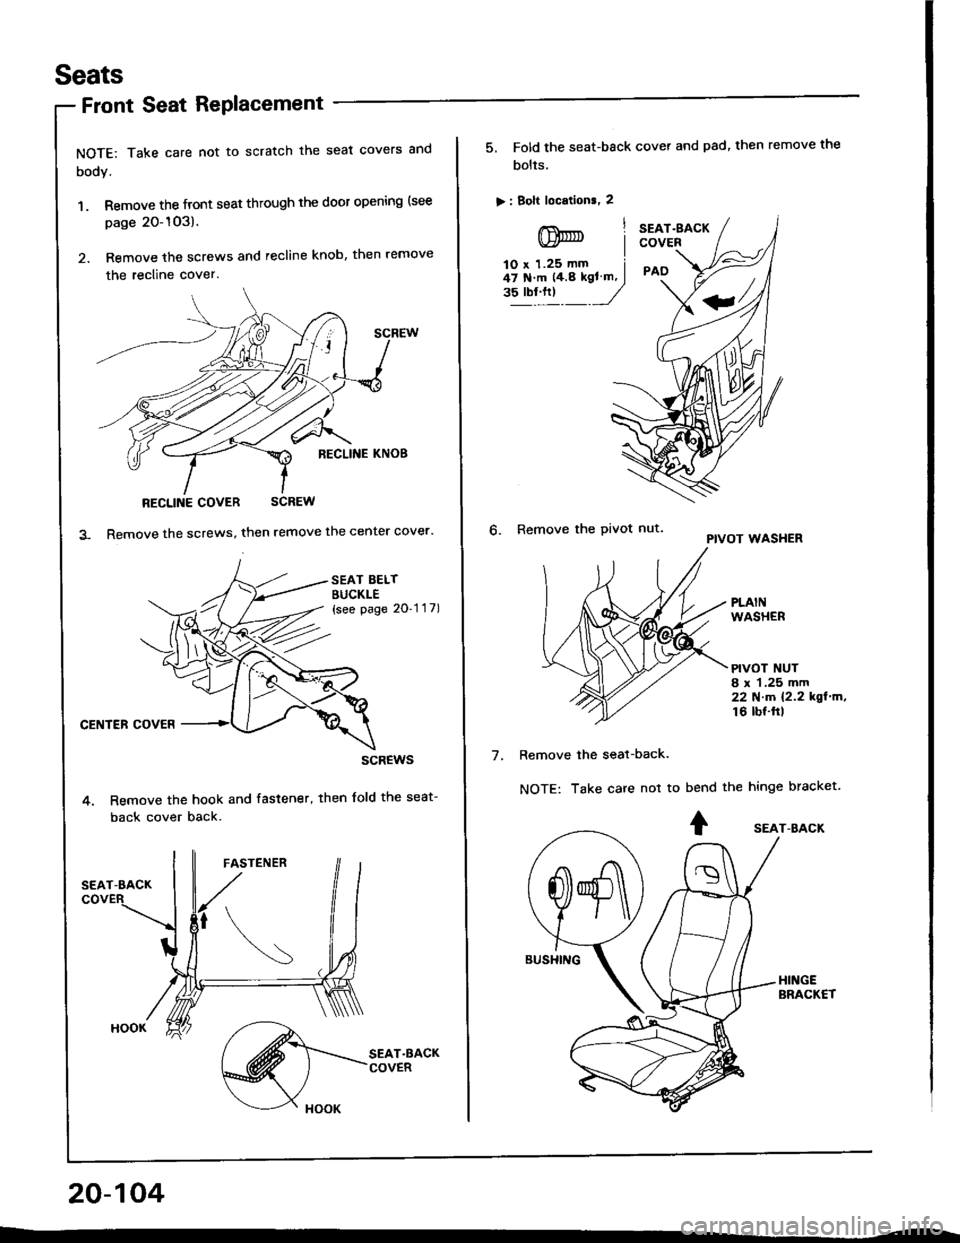
NOTE: Take care not to scratch the seat covers and
body.
1. Remove the front seat through the door opening (see
page 20-1O3).
2. Remove the screws and recline knob, then remove
the recline cover.
RECLINE COVER SCREW
Remove the screws, then remove the center cover.
SEAT BELTBUCKLE{see page 2O'1 '1 7)
CENTER COVER
scREws
Remove the hook and fastener, then lold the seat-
back cover back.
20-104
Front Seat RePlacement
5, Fold the seat-back cover and pad, then remove the
bolts.
> : Bolt location., 2
lnnrnt Iv)* |lO x 1.25 mm i47 N'm 14.8 kgl ln, I"?"!."t _J
SEAT.gACKCOVER
PAO
6. Remove the Pivot nut.PIVOT WASHER
PLAINWASHER
PIVOT NUT8 r 1.25 mm22Nm12.2kgl'm,16 lbf.ftl
7.Remove the seat-back.
NOTE: Take care not tobend the hinge bracket.
+ sEAr-BAcK
Page 978 of 1413
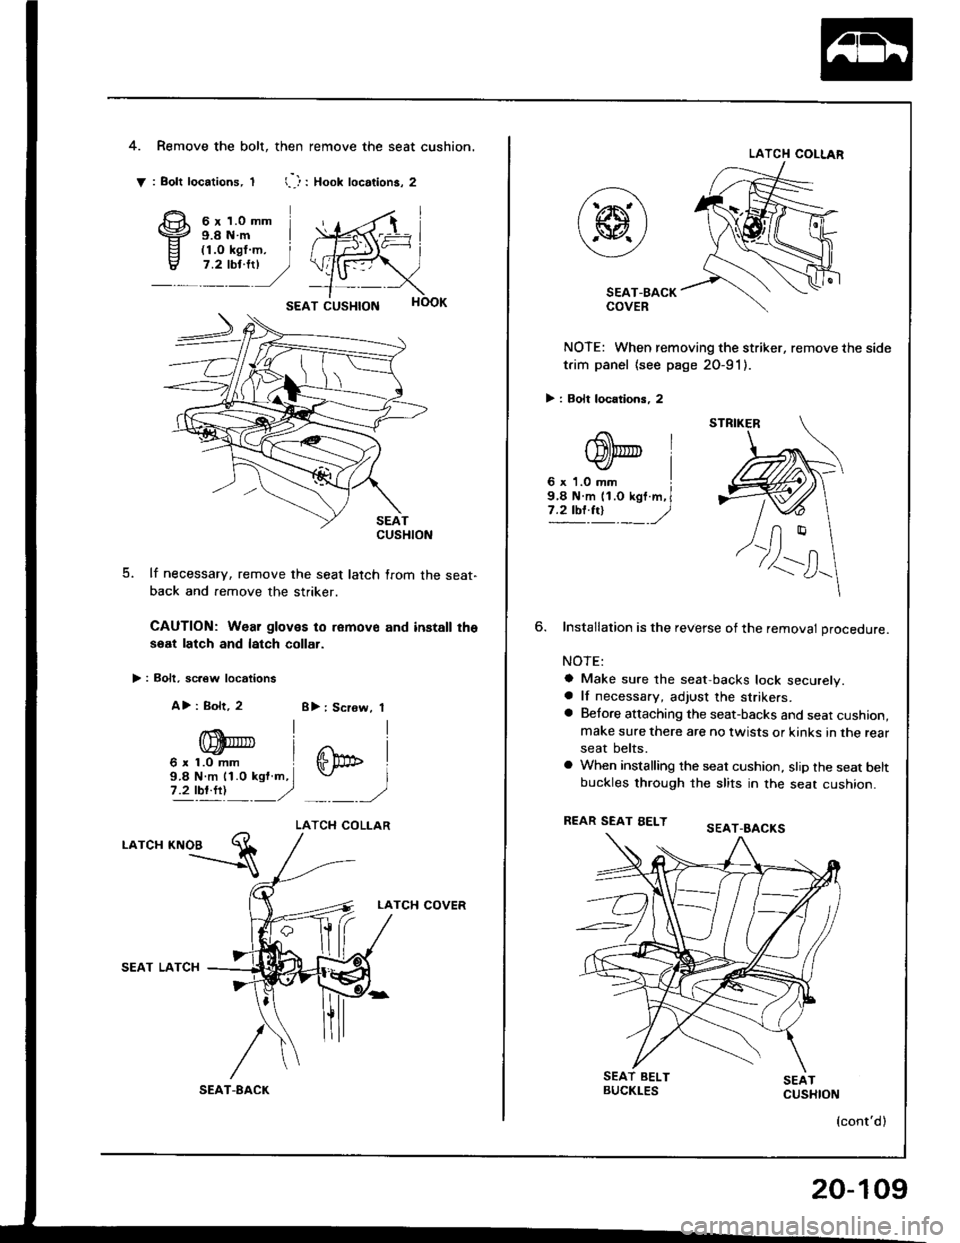
4.Remove the bolt, then remove the seat cushion.
: Bolt locations, t l--): Xoot locations, 2
6 r 1.0 mm9.8Nm I
SEAT CUSHION
5. lf necessary, remove the seat latch lrom the seat-
back and remove the striker.
CAUTION: Wear gloves to remov€ and install the
soat latch and latch collar.
> : Bolt, sc.€w locrtions
A>: Bolt, 2 8): Screw, 1
^{ll
.,,W '
Gp" I9.8 N.m 11.0 ksf m.I I7 2 tP!ft!---/'� ./
LATCH COLLAR
.otc" rtroa El
LATCH COVER
SEAT LATCH
t'
T-8ACK
CUSHION
LATCH COLIAR
SEAT-BACKCOVER
NOTE: When removing the striker, remove
t.im panel (see page 20-91).
> : Bolt locations, 2
the side
.a |tDt@ l
NOTE:
a Make sure the seat,backs lock securely.a lf necessary, adjust the strikers.a Betore attaching the seat-backs and seat cushion,make sure there are no twists or kinks in the rear
seat belts.
a When installing the seat cushion, stip the seat beltbuckles through the slits in the seat cushion.
REAR SEAT EELT
(cont'd )
STRIKER
20-109
Page 981 of 1413
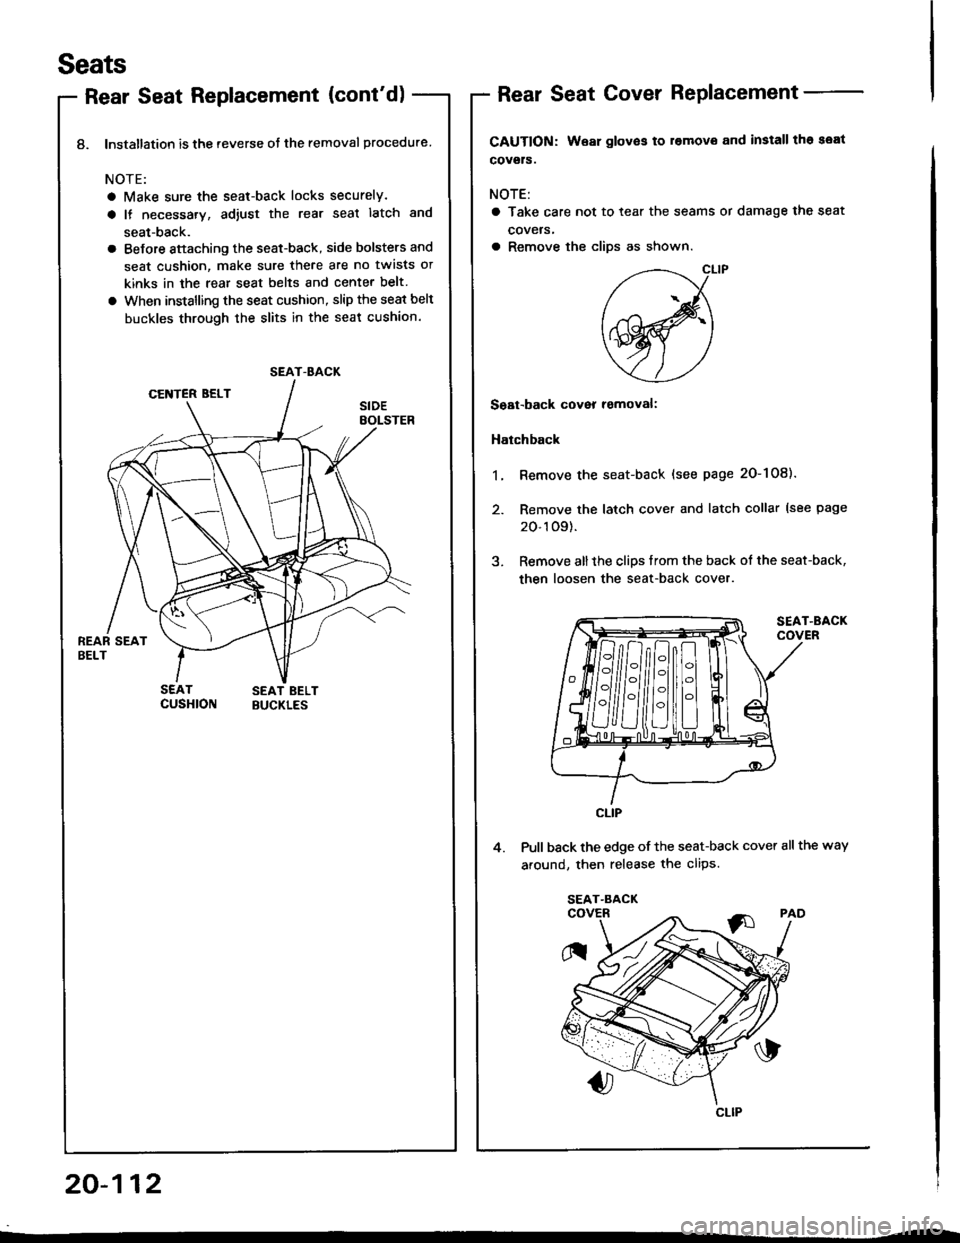
8. lnstallation is the reverse ot the removal procedure
NOTE:
a Make sure the seat-back locks securely.
a It necessary, adiust the rear seal latch and
seat-back.
a BeJore sttaching the seat-back, side bolsters and
seat cushion, make sure there are no twlsts or
kinks in the rear seat belts and center belt
a When installing the seat cushion, slip the seat belt
buckles through the slits in the seat cushion.
1.
2.
SEAT-BACK
Seats
Rear Seat Replacement (cont'd)Rear Seat Cover RePlacement
CAUTION: Wear glov€s to l€movo and install tho seat
covgls.
NOTE:
a Take care not to tear the seams or damage the seat
covels,
a Remove the cliDs as shown.
Soat-back cover romoval:
Hatchback
Remove the seat-back (see page 20-108).
Remove the latch cover and latch collar (see page
20-109).
Remove allthe clips trom the back of the seat-back,
then loosen the seat-back cover.
SEAT.BACKCOVER
4.Pull back the edge of the seat-back cover all the way
around, then release the clips.
ilg
E
F]
CLIP
SEAT-BACK
CLIP
20-112
Page 984 of 1413
Seat Belts
Front Seat Belt Replacement
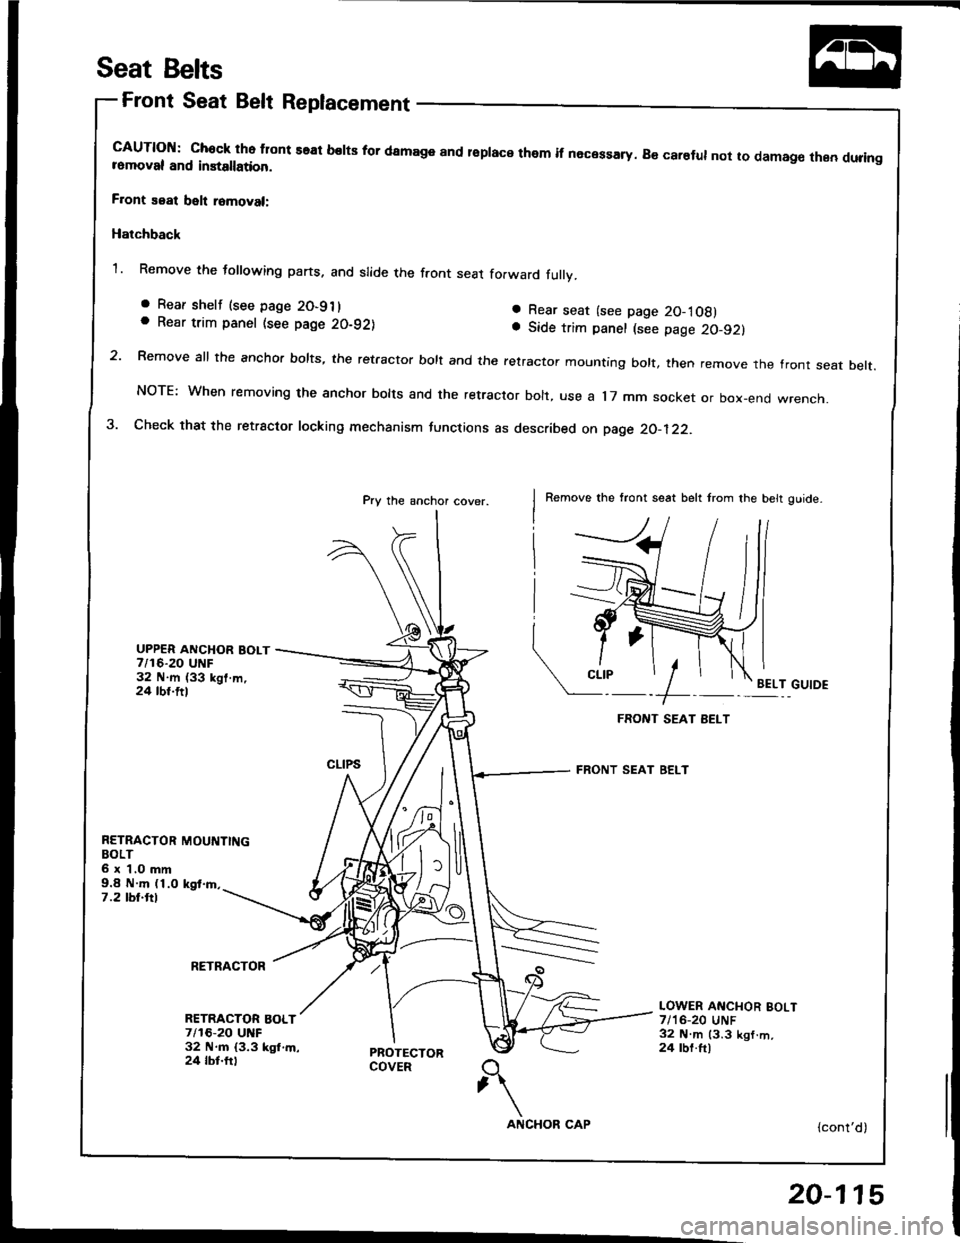
cAUTloN: chock tho tlont seal belts for damage and lsplace them if necessary. B€ carelul not to damag€ then duringromoval and installation.
F.ont seat belt romoval:
Hatchback
1. Remove the following parts, and slide the front seat fo.ward fullv.
a Rear seat (see page 20-1Og)a Side trim panel (see page 2c,-92}
2 Remove all the anchor bolts, the retractor bolt and the retractor mountrng bott, then remove the front seat belt.
NOTE: When removing the anchor bolts and the retractor bolt, use a l7 mm socket or box-end wrench.
3. Check that the retractor locking mechanism functions as described on page 20_122-
Pry the anchor cover.Remove the tront seat belt trom the belt ouide-
UPPER ANCHOR BOLT7/16-20 UNF32 N.m (33 kgl.m,24 tbt.ttlEELT GUIDE
RETRACTOR MOUNTINGBOLT6 x 1.O mm9.8 N.m (1.0 kgt.rn.7.2 tbl.ftl
RETRACTOR
. Rear shelf (see page 20-911. Rear trim panel (see page 20-921
RETRACTOR BOLT7/16-20 UNF32 ltl.m {3.3 kgl,m,24 tbt.ftl
LOWER ANCHOR BOLT7/'16-20 UNF32 N.m 13.3 kgl.m,24 rbf.ft)
{cont'd)
20-115
Page 985 of 1413
Seat Belts
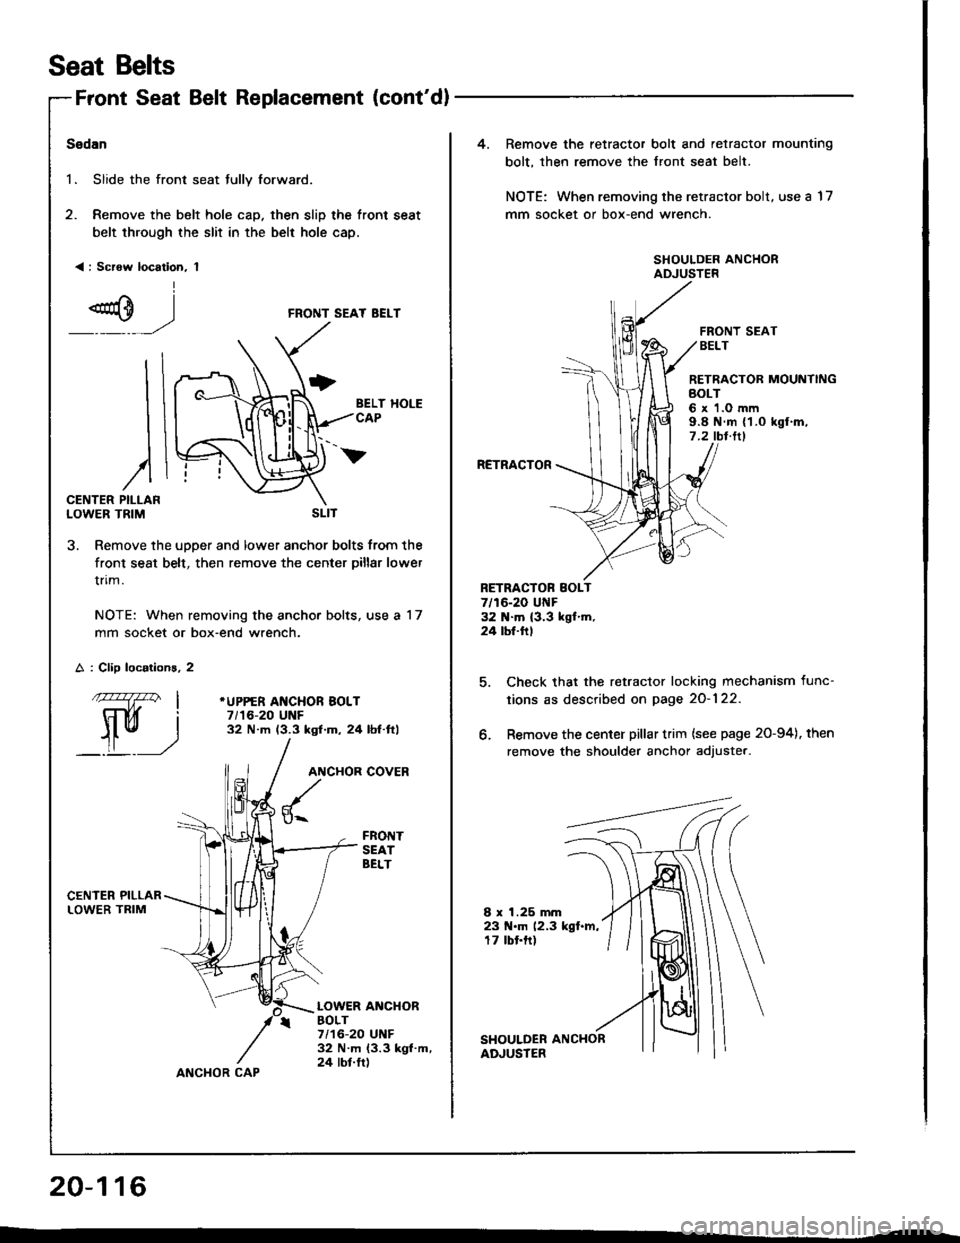
Front Seat Belt Replacement {cont'dl
Sedan
1. Slide the front seat tully forward.
2. Remove the belt hole cap. then slip the front seat
belt through the slit in the belt hole cap.
< : Screw location, 1
I
FRONT SEAT BEI.T
BELT HOLECAP
I
I
I
)PILLARTRIM
A : Clip locations, 2
ffil'" -1t'- l
rui
_.| _J
v
CENTERLOWER
3. Remove the upper and lower anchor bolts from the
front seat belt, then remove the center pillar lower
trim.
NOTE: When removing the anchor bolts, use a 17
mm socket or box-end wrench.
*UPPER ANCHOR BOLT7/16-20 UNF32 N.m (3.3 ksf'm, 24 lbf.ftl
ANCHOR
u-.
COVER
FRONTSEATBELT
LOWER ANCHORBOLT7/16-20 UNF32 N.m (3.3 kgt.m,24 tbt.ftlANCHOR CAP
20-116
SLIT
4.Remove the retractor bolt and retractor mounting
bolt, then remove the front seat belt.
NOTE: When removing the retractor bolt, use a 17
mm socket or box-end wrench.
FRONT SEATBELT
RETRACTOB MOUNTINGBOLT6 x 'l.O mm9.8 N.m {1.o kgl.m,7 .2 tbt.ltl
RCTRACTOR
RETRACTOF SOLT7/16-20 UI{F32 N.m {3.3 kgl.m.24 tbf.ftl
6.
8 x 1.25 mm23 N.m 12.3 kgl.m,17 tbt.ft)
Check that the retractor locking mechanism func-
tions as described on page 2O-122.
Remove the center pillar trim {see page 20-94}. then
remove the shoulder anchor adjuster.
Page 986 of 1413
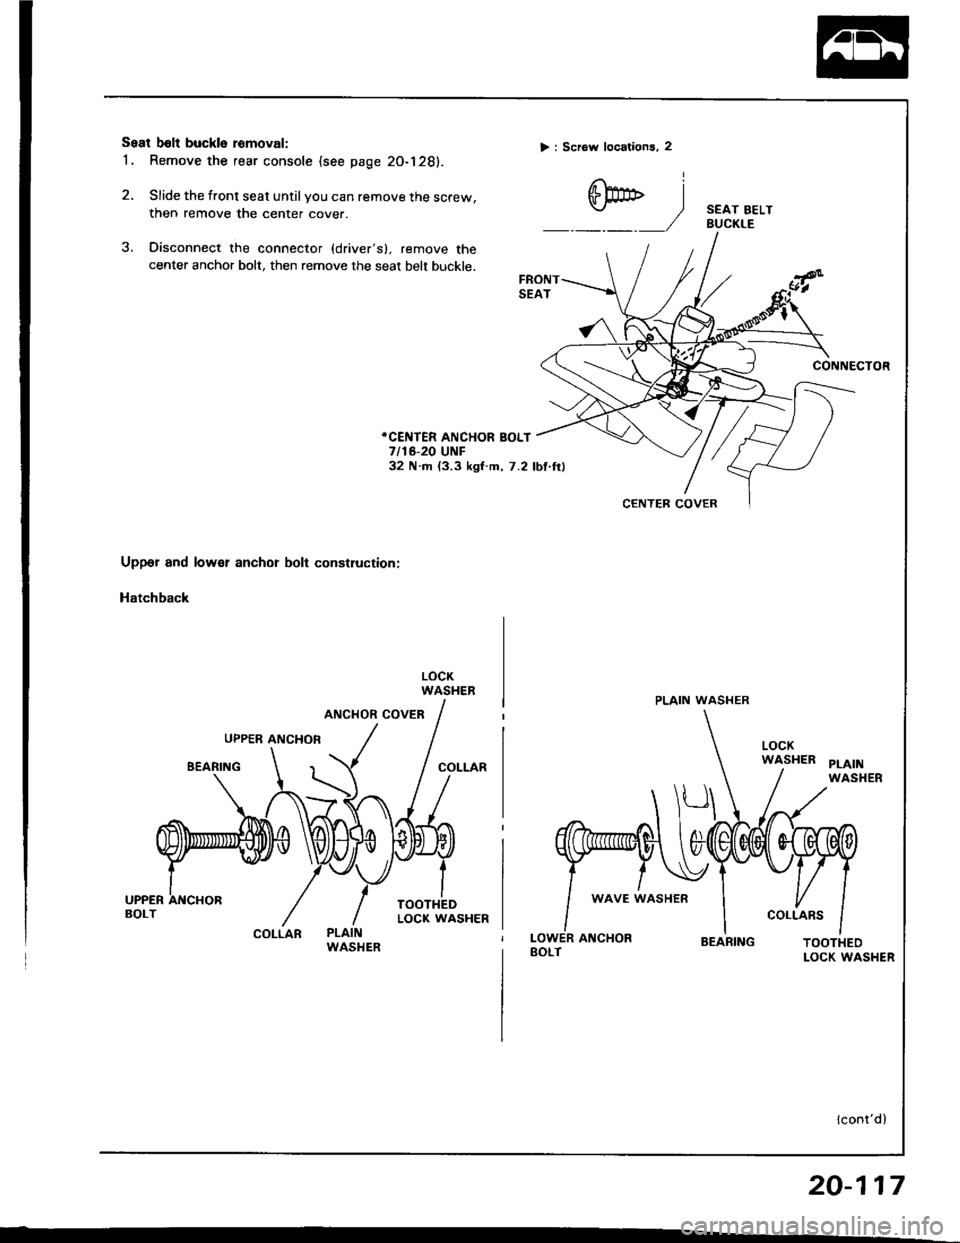
Seal b6lt buckle romoval:
1 . Remove the rear console (see page 20-128).
2. Slide the front seat until you can remove the screw.
then remove the center cover.
3. Oisconnect the connector (driver's), remove the
center anchor bolt, then remove the seat belt buckle.
> : Scrow locations, 2
CENTEB COVER
PLAIN WASHER
SEAT BELTBUCKLE
CONNECTOR
Upper and lower anchor bolt construction:
Hatchback
COLLARPLAINWASI{ER
iCENTER ANCHOR BOLT7/16-20 UNF32 N.m (3.3 ksf.m,7.2 lbf.ftl
LOCKWASHER
LOWER A CHORBOLTBEARING
lcont'd)
20-117