check oil HONDA INTEGRA 1994 4.G Repair Manual
[x] Cancel search | Manufacturer: HONDA, Model Year: 1994, Model line: INTEGRA, Model: HONDA INTEGRA 1994 4.GPages: 1413, PDF Size: 37.94 MB
Page 558 of 1413
Transmission
Cooler Flushing
S!@ ro prevent iniury to tace and eyes, always
wear safety glas$es or a tace shield when using the trans-
mission flusher.
NOTE: This procedure should be performed before rein-
stalling the transmission.
1. Check tool and hoses for wear or cracks before
using.
lf wear or cracks are found, replace the hoses be-
fore using.
2. Using the measuring cup, tillthe tank with 21 ounces
{approximately 213 lulll of biodegradable tlushing
fluid (J35944-20). Do not substitute with any other
fluid.
Follow rhe handling procedure on the fluid container.
Secure the tlusher filler cap and pressurize the tank
with compressed air to between 550-829 kPa(5.6-8.45 kgt/cm,, 80- 120 psi),
NOTE: The air line should be equipped with a water
trap to ensure a dry air system.
Hang the tool under the vehicle.
Attach the discharge hose of the tank to the return
line of the transmission cooler using a clamp.
Connect the drain hose to the inlet line of the trans-
mission cooler using a clamp. Securely clamp the op-posite end of the drain hose to a bucket or floor drain.
6.
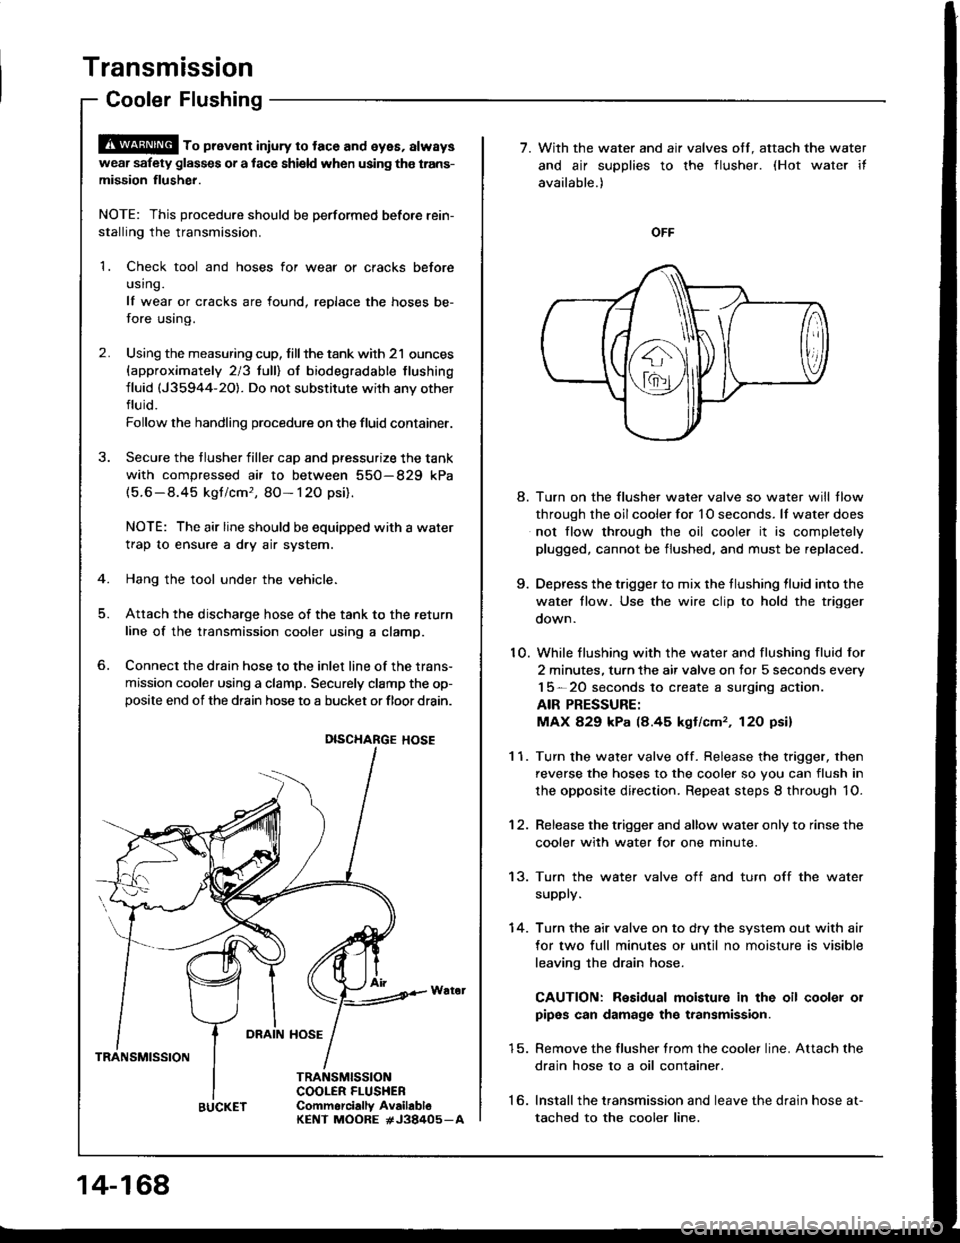
DRAIN HOSE
TRANSMISSION
TRANSMISSIONCOOLER FLUSHEBCommorcially AvailabloKENT MOORE #J38405_A
DISCHARGE HOSE
14-168
BUCKET
7. With the water and air valves off. attach the water
and air supplies to the flusher. (Hot water it
available.)
OFF
8. Turn on the flusher water valve so water will tlow
through the oil cooler for 1O seconds. lf water does
not flow through the oil cooler it is completely
plugged, cannot be flushed, and must be replaced.
9. Depress the trigger to mix the tlushing lluid into the
water tlow. Use the wire clip to hold the trigger
oown.
10. While flushing with the water and flushing fluid for
2 minutes. turn the air valve on for 5 seconds every
15-20 seconds to create a surging action.
AIR PRESSURE:
MAX 829 kPa (8.45 kgt/cm,, 12O psi)
1 1. Turn the water valve off. Release the trigger, then
reverse the hoses to the cooler so you can flush in
the opposite direction. Repeat steps 8 through 1O.
12. Release the trigger and allow water only to rinse the
cooler with water for one minute.
13. Turn the water valve off and turn off the water
supply.
14. Turn the air valve on to dry the system out with air
for two full minutes or until no moisture is visible
leaving the drain hose.
CAUTION: Residual moisture in the oil cooler 01
pipes can damage the transmission.
15. Remove the flusher trom the cooler line. Attach the
drain hose 10 a oil container.
16. lnstallthe transmission and leave the drain hose at-
tached to the cooler line.
Page 572 of 1413
NOTE: Check the ball bearings for wear and rough ro-
tation. It bearings are OK, removal is not necessary.
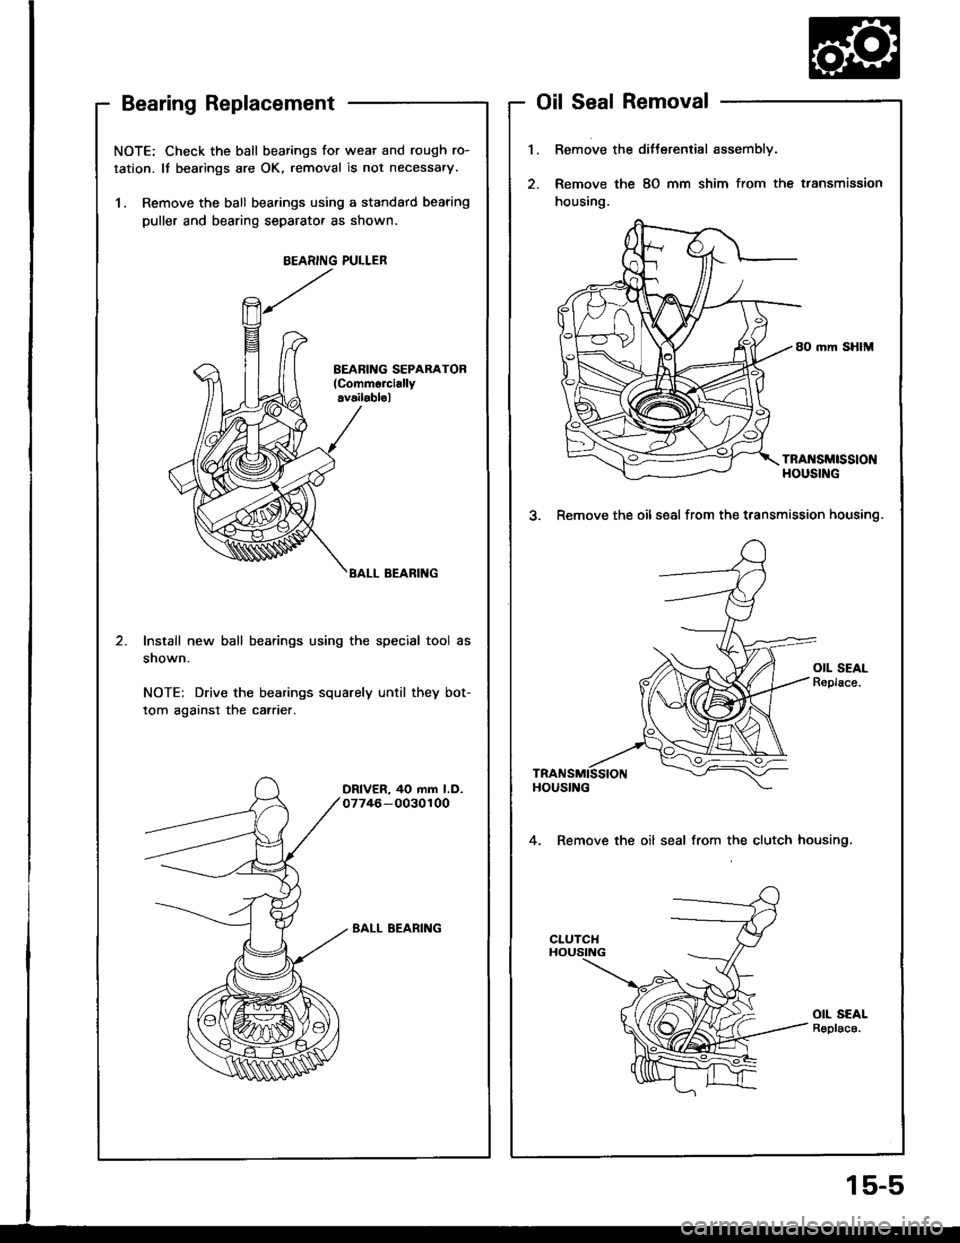
1. Remove the ball bearings using a standatd bearing
puller and bearing separator as shown.
BEARING PULLEB
BALL BEARING
Install new ball bearings using the special tool as
snown.
NOTE: Drive the bearings squarely until they bot-
tom against the carrier.
DRIVER, 40 mm l.D.07746-0030100
BALL BEARING
Bearing ReplacementOil Seal Removal
1.Remove the ditterential assembly.
Remove the 8O mm shim from the transmission
housing.
80 mm SHIM
TRA[{SMtSStONHOUSING
3. Remove the oilseal from the t.ansmission housing.
4. Remove the oil seal from the clutch housing,
OIL SEALR€plac6.
15-5
Page 580 of 1413
Tapered Roller Bearing Replacement
NOTE:
a The tapered roller bearing and bearing outer race
should be replaced as a set.
a Inspect and adjust the tapered roller bearing preload
whenevef the tapered rollef bearing is replaced.
a Check the tapered roller bearings tor wear and rough
rotation. lf tapered roller bearings are OK, removal is
not necessary.
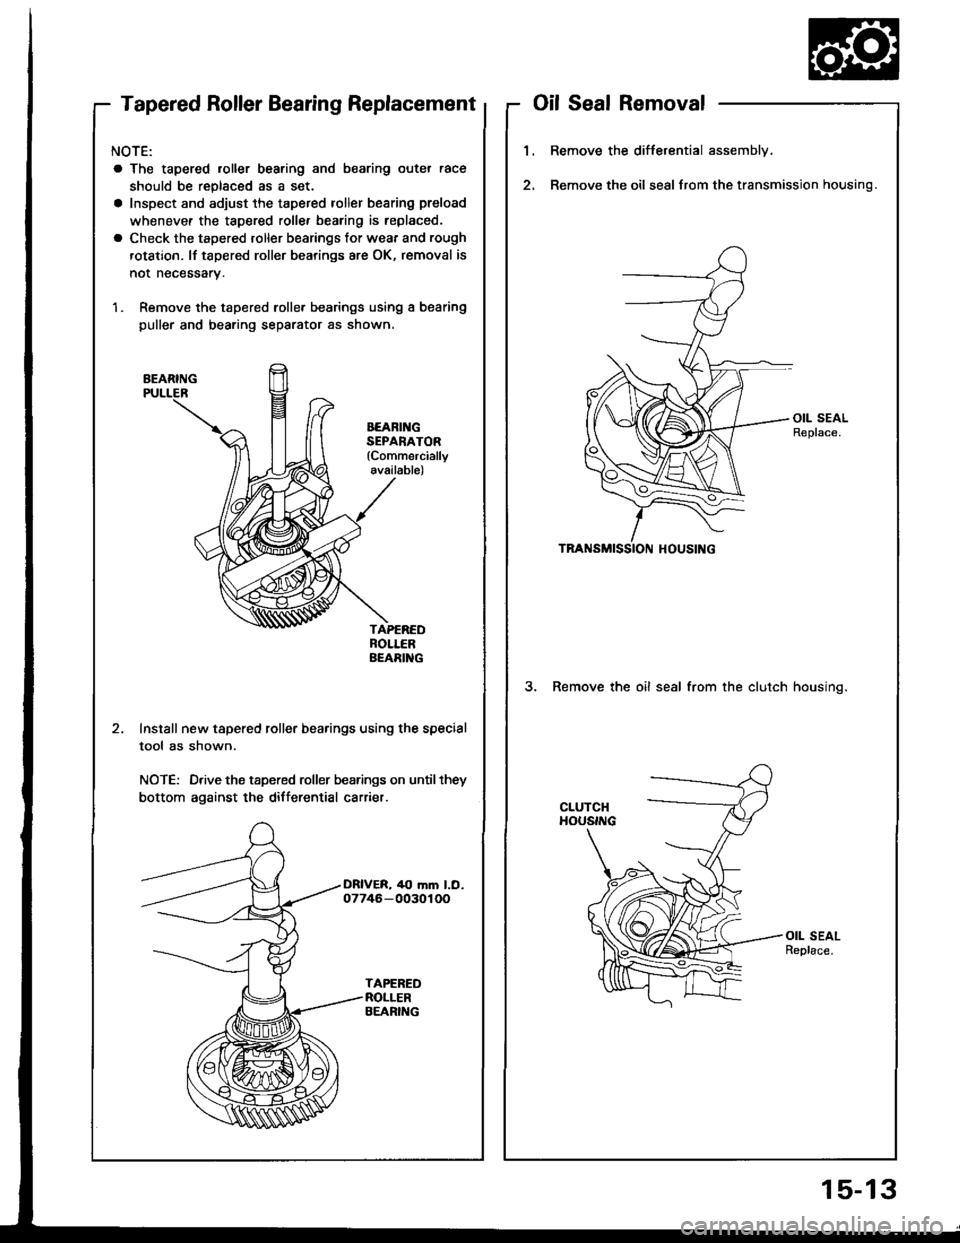
1. Remove the tapered rolle. bearings using a bearing
puller and bearing separator as shown,
BEARING
BEARII{GSEPANATOR(Commercially
available)
Install new tapered roller bearings using the special
tool as shown.
NOTE: Drive the tapered roller bearings on until they
bottom against the differential carrier.
oilSealRemoval
1.Remove the differential assembly.
Remove the oil seal from the transmission housing.
3. Remove the oil seal from the clutch housino.
15-13
Page 581 of 1413
Differential (B18c1 eng:nel
Bearing Outer Race Replacement
CAUTION: Do not rous€ the thrust lhim and tho 79.8mm shim il tho outer rac6 was ddvon out.
NOTE;
a The bearing outer race and taper€d toller bearingshould be reDlaced as a set.a Inspect and adjust the tapered roller bearing proload
whenever th€ tapered roll€f bearing is roplac€d.
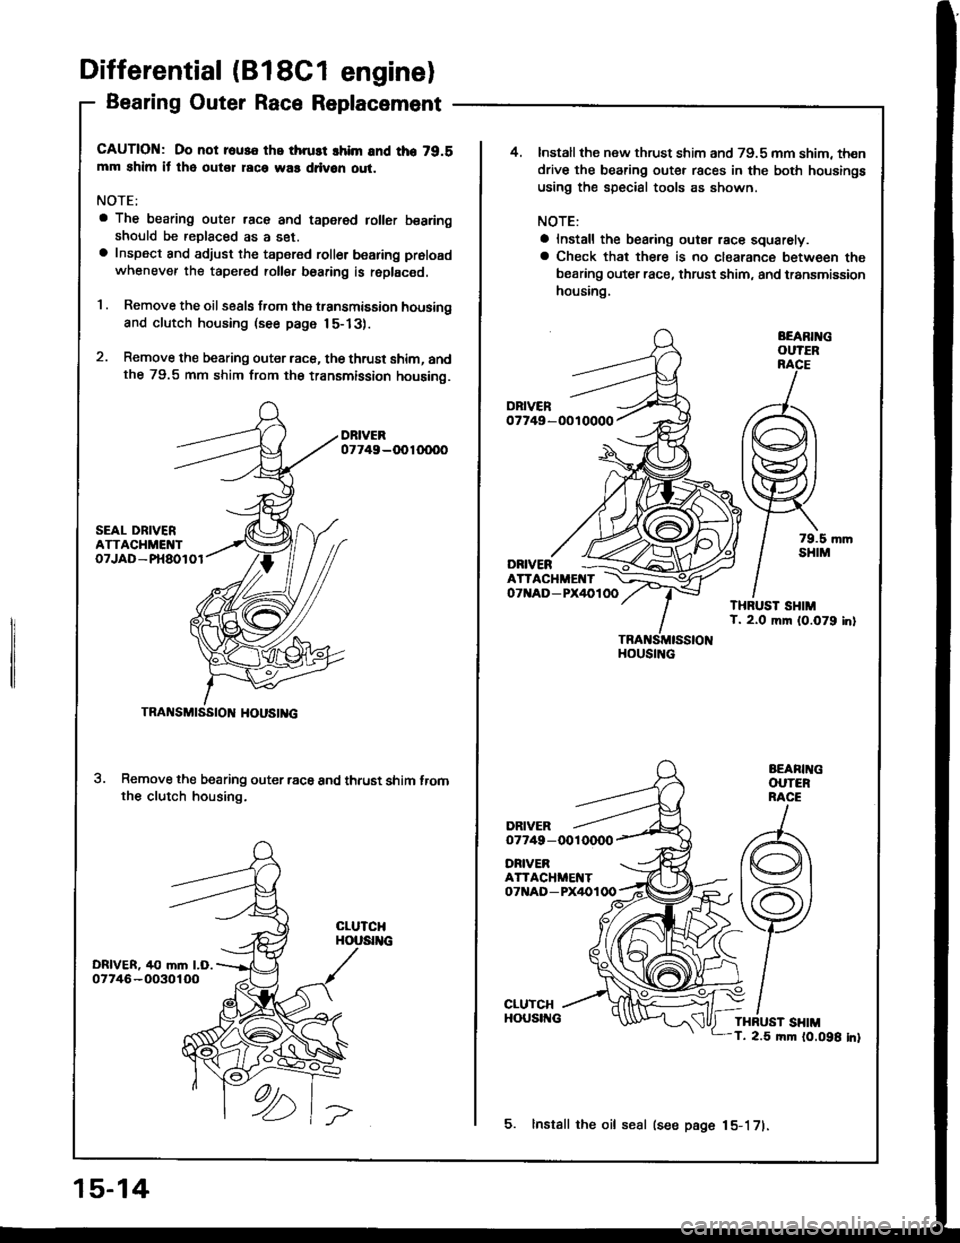
1 . Remove the oil seals from the transmission housing
and clutch housing (see page 15-13).
2. Remove the bearing outer raca, the thrust shim, andthe 79.5 mm shim from th€ transmission housing.
Remove the bearing outer racs and thrust shim tromthe clutch housing.
TRANSMtSStOl{ HOUStl{c
15-14
5. lnstall the oil sesl (see page 15-171.
4.Install the new thrust shim and 79.5 mm shim, then
drive the bearing outer races in the both housings
using the special tools as shown.
NOTE:
a Install the bearing outsr race squarely.a Check that there is no clearance between tha
bearing outer race, thrust shim, and transmission
housing.
BEARIl{GOUTER
07749-OOTOOOO
ONNERATTACHMENTOTttAD-PX/IOlOO
Page 595 of 1413
Driveshafts
Inspection
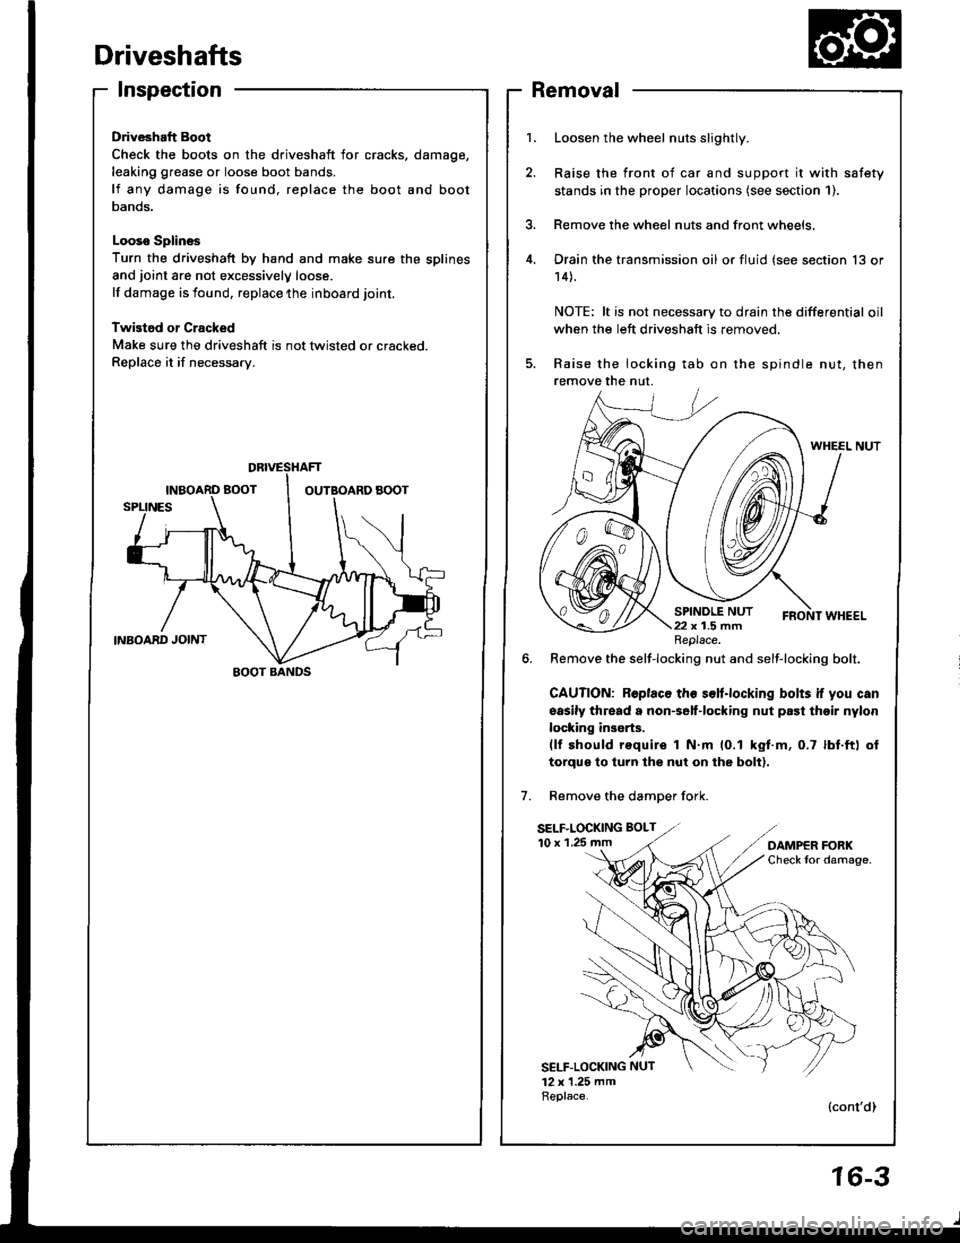
Driveshaft Boot
Check the boots on the driveshaft for cracks,
leaking grease or loose boot bands.
lf any damage is found, replace the boot
Danos.
Looso Splines
Turn the driveshaft by hand and make sure the splines
and joint are not excessivelV loose.
lf damage is found, replace the inboard joint,
Twistod or Cracked
Make sure the driveshaft is not twisted or cracked.
Replace it if necessarv.
damage,
and boot
Removal
Loosen the wheel nuts slightly.
Raise the front of car and support it with safety
stands in the proper locataons (see section 1),
Remove the wheel nuts and front wheels,
Drain the transmission oil or fluid (see section 13 or
14).
NOTE: lt is not necessary to drain the differential oil
when the left driveshaft is removed.
Raise the locking tab on the spindle nut, then
remove the nut.
WHEEL NUT
6. Remove the self-locking nut and self-locking bolt.
GAUTION: Roplaco th€ s€lt.locking bolts if you can
sasily thread a non€elf-locking nut prst thoir nylon
locking inserts.(lf should require I N.m (0.1 kgt.m, 0.7 lbf.ft) ol
torqus to turn lhs nut on the bolt).
Remove the damDer fork.
SELF.LOCKING BOLT
10 x 1.25 mm
SELF-LOCKING NUT
12 x 1.25 mmReplace.(cont'dl
DBIVESTIAFT
EOOT BANDS
Replace.
16-3
Page 603 of 1413
5.
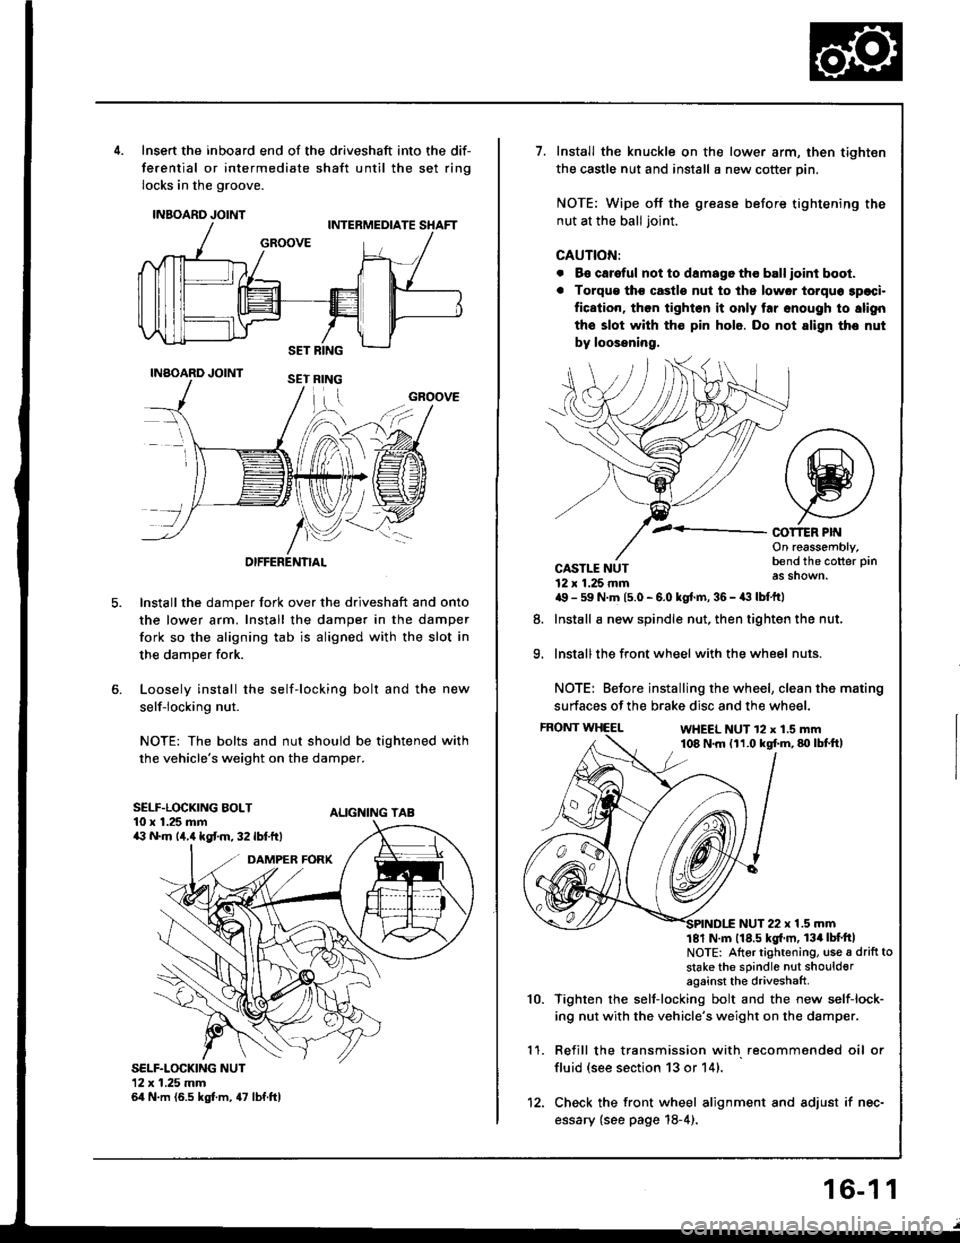
Insert the inboard end of the driveshaft into the dif-
ferential or intermediate shaft until the set ring
locks in the groove.
INBOARD JOINT
INAOARD JOINT
OIFFERENTIAL
Install the damper fork over the driveshaft and onto
the lower arm. Install the damper in the damper
fork so the aligning tab is aligned with the slot in
the damper fork.
Loosely install the self-locking bolt and the new
self-locking nut.
NOTE: The bolts and nut should be tightened with
the vehicle's weight on the damper.
ALIGNING TAB
SELF.LOCKING NUT12x 1.25 mm64 N.m (6.5 kgt m, 47 lbf.ftl
GROOVE
SELF.LOCKING BOLT10 x 1.25 mma:' N.m lir,4 kgt m, 32 lbf.ftt
1.Install the knuckle on the lower arm, then tighten
the castle nut and install a new cotter pin.
NOTE: Wipe off the grease before tightening the
nut at the ball joint.
CAUTION:
. B€ careful not to damago tho ball ioint boot.
. Torqu€ tho castle nut to ths lower torquo 3paci.
fication, then tighlon it only tar snough to slign
the slot with th€ pin hole. Do not align tho nut
by loossning,
COT1ER PIf{On reassembly,bend the cotter pin
as shown.
9.
CASTLE NUT12 x 1.25 rnma9 - 59 N.m 15.0 - 6.0 kgt.m, 36 - a:t lbtftl
Install a new spindle nut, then tighten the nut,
Install the front wheel with the wheel nuts.
NOTE: Before installing the wheel, clean the mating
surfaces of the brake disc and the wheel.
FRONT WHEELWHEEL NUT 12 x 1.5 mm108 N.m (11.0 kgf.m,80lbtft,
8.
1 '�I.
10.
NUT 22 x 1.5 mm181 N m 118.5 kgl'm, 134lbt'ftlNOTE: Altor tightening, use a drift to
stake the sPindle nut shoulderagainst the driveshaft
Tighten rhe self-locking bolt and the new self-lock-
ing nut with the vehicle's weight on the damper.
Refill the transmission with recommended oil or
fluid (see section 13 or 14).
Check the front wheel alignment and adjust if nec-
essary {see page 18-4).
12.
16-1 1
Page 620 of 1413
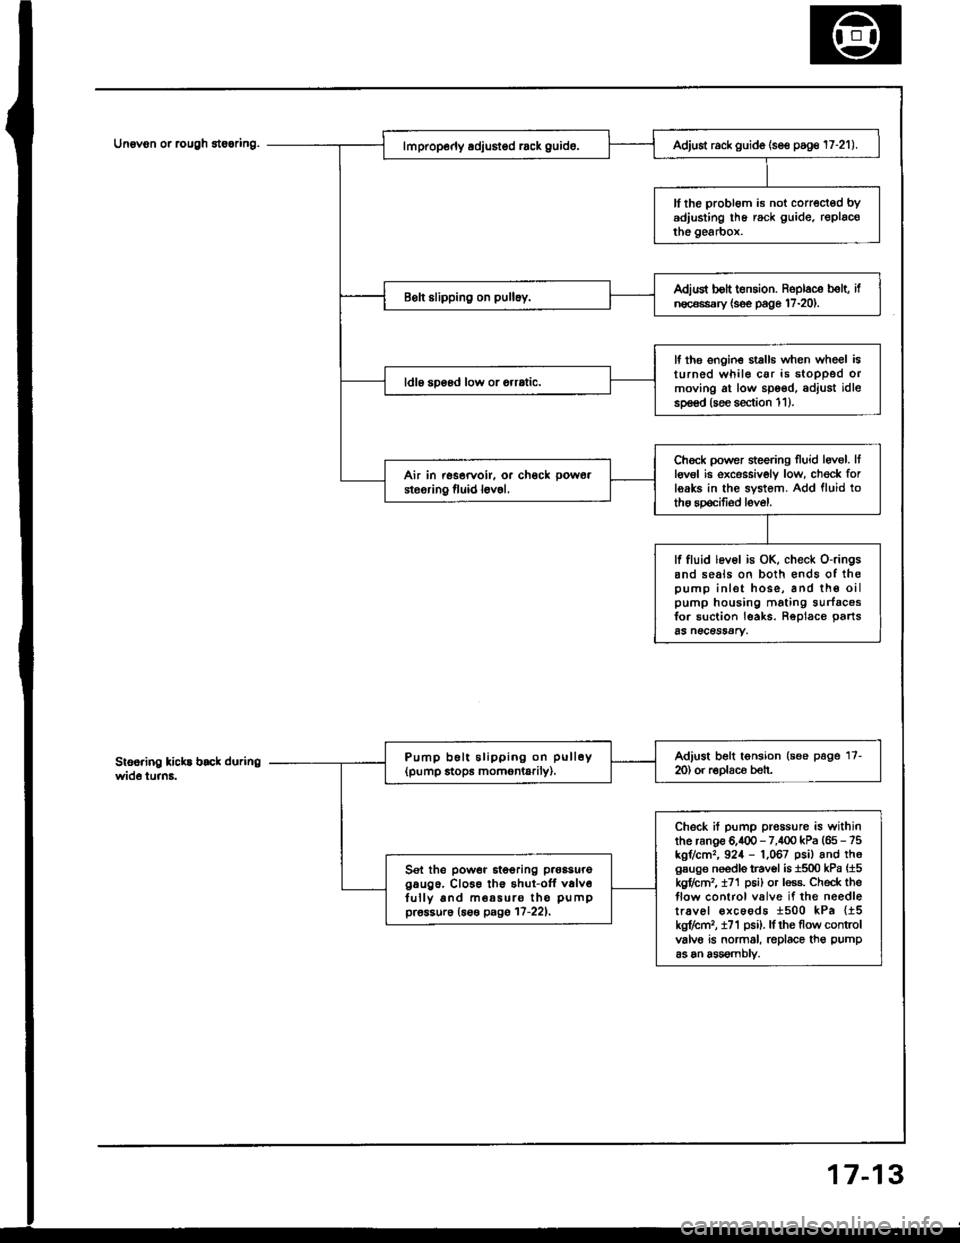
Unovon or rcugh 8te6ring.
3
Adjust rack guide (se€ poge 17-21).
ll the probl6m is not corrected bYadjusting lhe rack guide. replacothe gearbox.
Adiud bolt t€nsion. Roplace b€lt, ifn€c€ssary {s€e page 17-20).
lf the ongin€ stalls when wheel isturned whil€ car is stoDPed ormoving at low spoed, adjust idlesp€€d (soe section 1 1 ).
ldl6 soosd low or orrrtic.
Chock power sieering Iluid levol. Itlgv6l ie excessivoly low, ch€ck forleaks in the system. Add fluid totho spocifiod level.
Air in rssorvoir. or ch€ck pow6a
steoring fluid l6v6l.
lf fluid lev6l is OK, check o-ringsand seals on both €nds of ihopump inlet hose, and th€ oilpump housing mating surfacosfor suction leaks. Reolace oarts65 n€CeSSAry.
Adjust belt tonsion (see page 17-m) or r€Dlaco beh.Pump b6lt slipping on pull6y(pump stops momontarily).
Check if pump prossure is withinthe ranoe 6.400 - 7,100 kPa (65 - 75kgr/cm,, 924 - 1,067 psil and th6gsuge needls travol is 1500 kPa {15kgflctn2, t71 p6i) or less. Check theflow control valve if the needletr.vel €xcoods 1500 kPa {15kg?cm,, i71 psi). lf rhe flow controlvalvo is normal, replace th€ pump
as an assomblv.
Sel the power itooring p.oasuregaug6. Cl066 th€ shut-off v6lv6fully and m€a5uro tho pumppr6ssur6 (6s€ pagg 17-221,
7-1
Page 623 of 1413
Troubleshooting
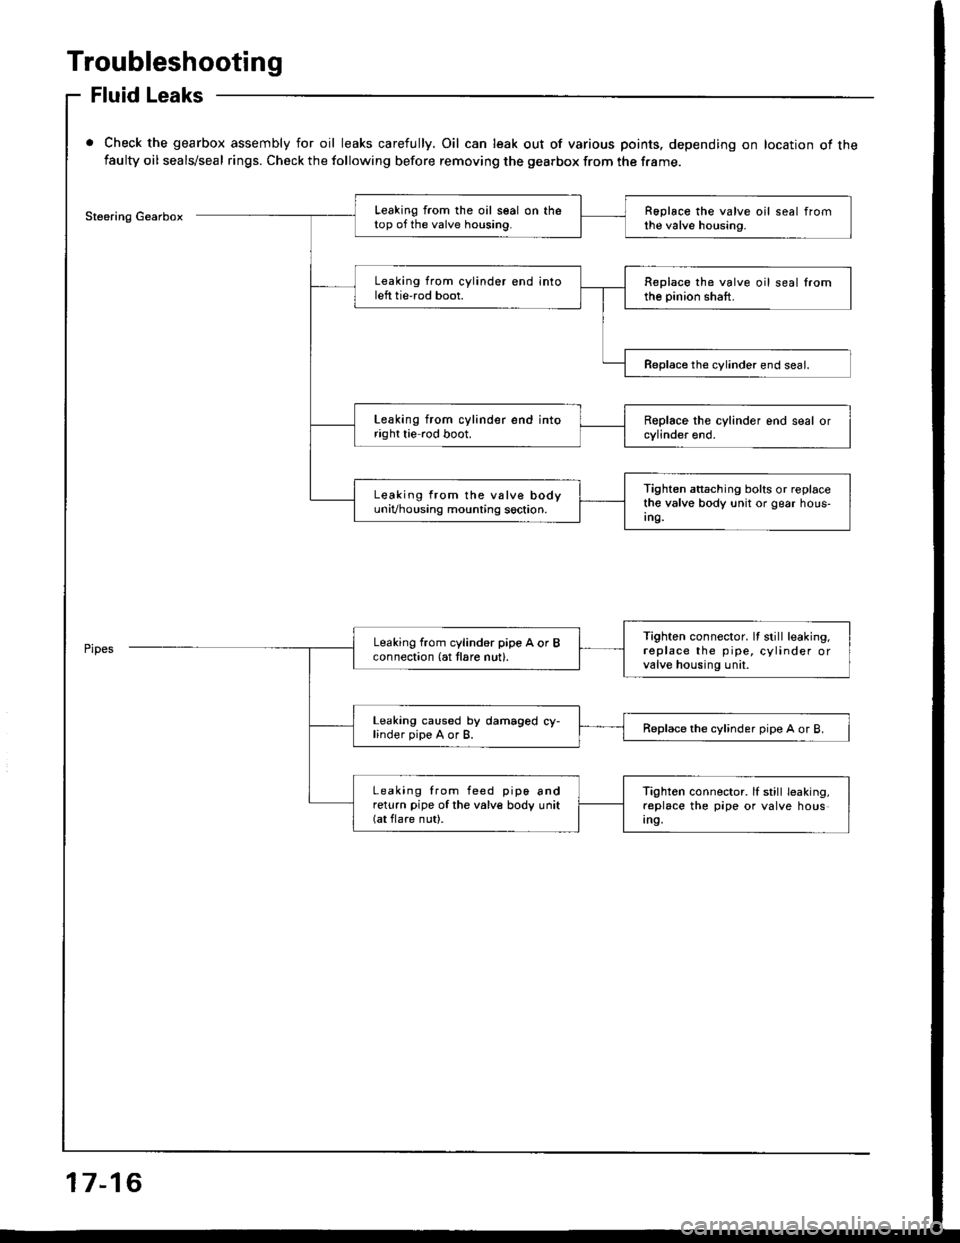
Fluid Leaks
Check the gearbox assembly for oil leaks carefully. Oil can leak out of various points. depending on location of thefaulty oil seals/seal rings. Check the following before removing the gearbox from the frame.
Steering GearboxLeaking from the oil seal on thetop of the valve housing.Roplace the valve oil seal fromthe valve housing.
Leaking from cylinder end intoleft tie'rod boot.Replace the valve oil seal lromthe pinion shaft.
Reolace the cvlinder end seal.
Leaking from cylinder end intoright tie rod boot.
Tighten attaching bolts or replacethe valve body unit or gear hous-Ing.
Leaking from the vslve bodyuniVhousing mounting soction.
Tighten connector. It still leaking.replace the pipe, cylinder orvalve housing unil.
Leaking from cylind6r pipe A or Bconnection (at tlare nut).
Leaking caused by damaged cy-linder pipe A or B.Replace the cylinder pipe A or B.
Leaking from feed pip6 andreturn pipe of the valve body unit(at flare nut).
Tighten connector. lI still leaking,replace the pipe or valve housIn9,
17-16
Page 628 of 1413
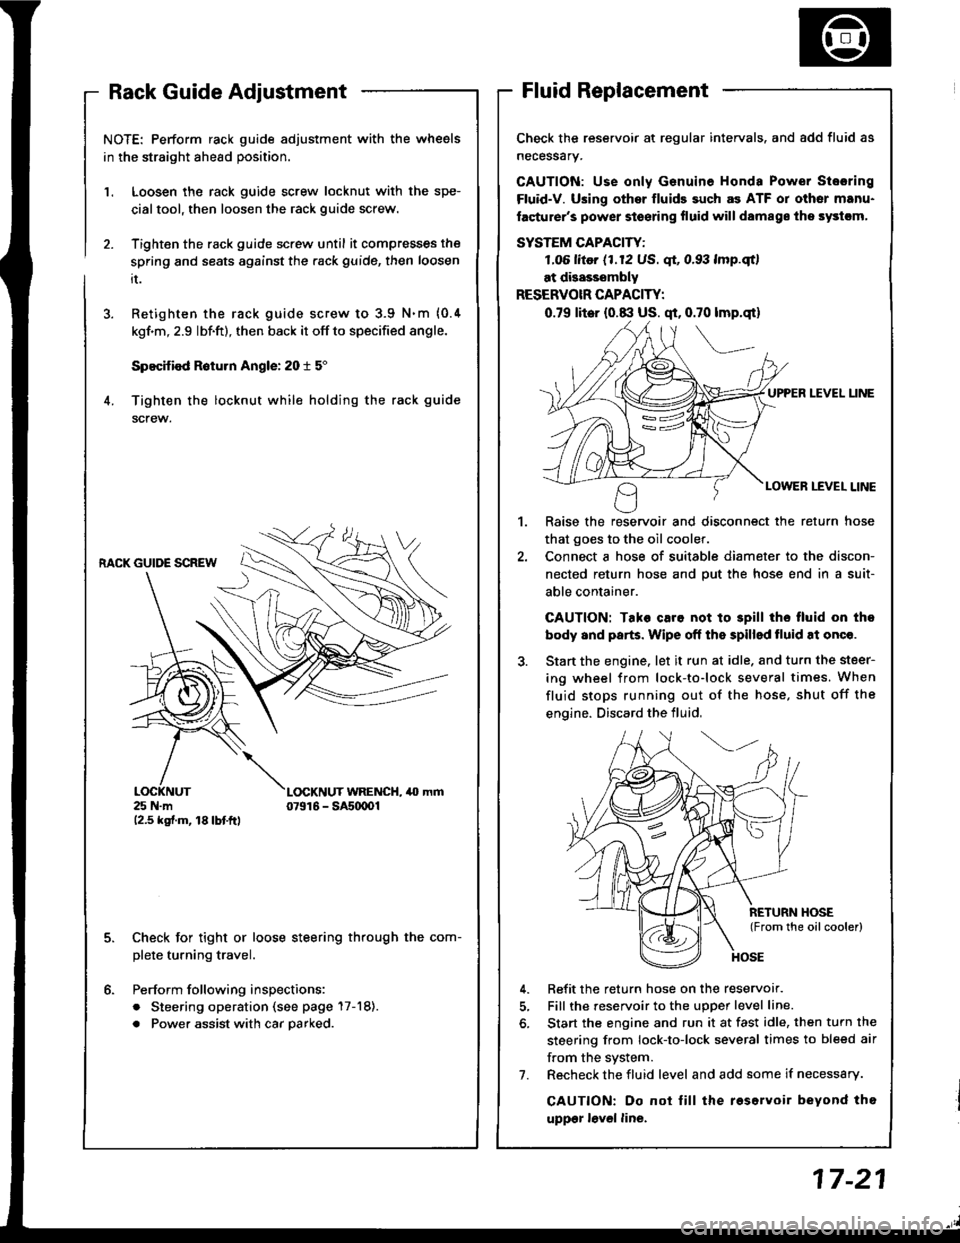
NOTE: Perform rack guide adjustment with the wheels
in the straight ahead position.
Loosen the rack guide screw locknut with the spe-
cialtool, then loosen the rack guide screw.
Tighten the rack guide screw until it compresses the
spring and seats against the .ack guide, then loosen
it.
Retighten the rack guide screw to 3.9 N.m {0.4
kgf'm, 2.9 lbf.ft), then back it off to specified angle.
Specified R6turn Angle: 20 t 5"
Tighten the locknut while holding the rack guide
screw.
1.
6.
RACK GUIDE SCREW
25 N.m12.5 kgf.m, 18lbtftl
L(rcKNUT WRENCH, 40 mm07916 - SAs(xtOl
Check for tight or loose steering through the com-
plete turning travel.
Perform following inspections:
. Steering operation (see page 17-18).
. Power assist with car parked.
Check the reservoir at regular intervals. and add fluid as
necessary.
GAUTION: Use only Genuine Honda Power Stosring
Fluid-V. Using othsr fluids such as ATF or other manu-
facturer's power stoering fluid will damags ths systcm,
SYSTEM CAPACITY:
LO6 litor (1.12 US. qt, 0.93 lmp.qtl
at disasssmbly
RESERVOIR CAPACITY:
0.79 lit6r (0.8:l US. qt, 0.70 lmp.qt)
UPPER LEVEL UNE
LOWER LEVEL LINE
,l
Raise the reservoir and disconnect the return hose
that goes to the oil cooler.
Connect a hose of suitable diameter to the discon-
nected return hose and put the hose end in a suit-
able container.
CAUTION: Tako caro not to 3pill tho tluid on tho
body and parts. Wipe off the spilled tluid at onqe.
Start the engine. let it run at idle. and turn the steer-
ing wheel from lock-to-lock several times. When
fluid stops running out of the hose, shut off the
engine. Discard the fluid,
Refit the return hose on the reservor.
Fill the reservoir to the uDoer level line.
Start the engine and run it at fast idle, then turn the
steering from lock-to-lock several times to bleed air
f.om the system.
Recheck the fluid level and add some if necessary.
CAUTION: Do not lill the roservoir beyond tho
uppgr lovel line.
7.
Page 934 of 1413
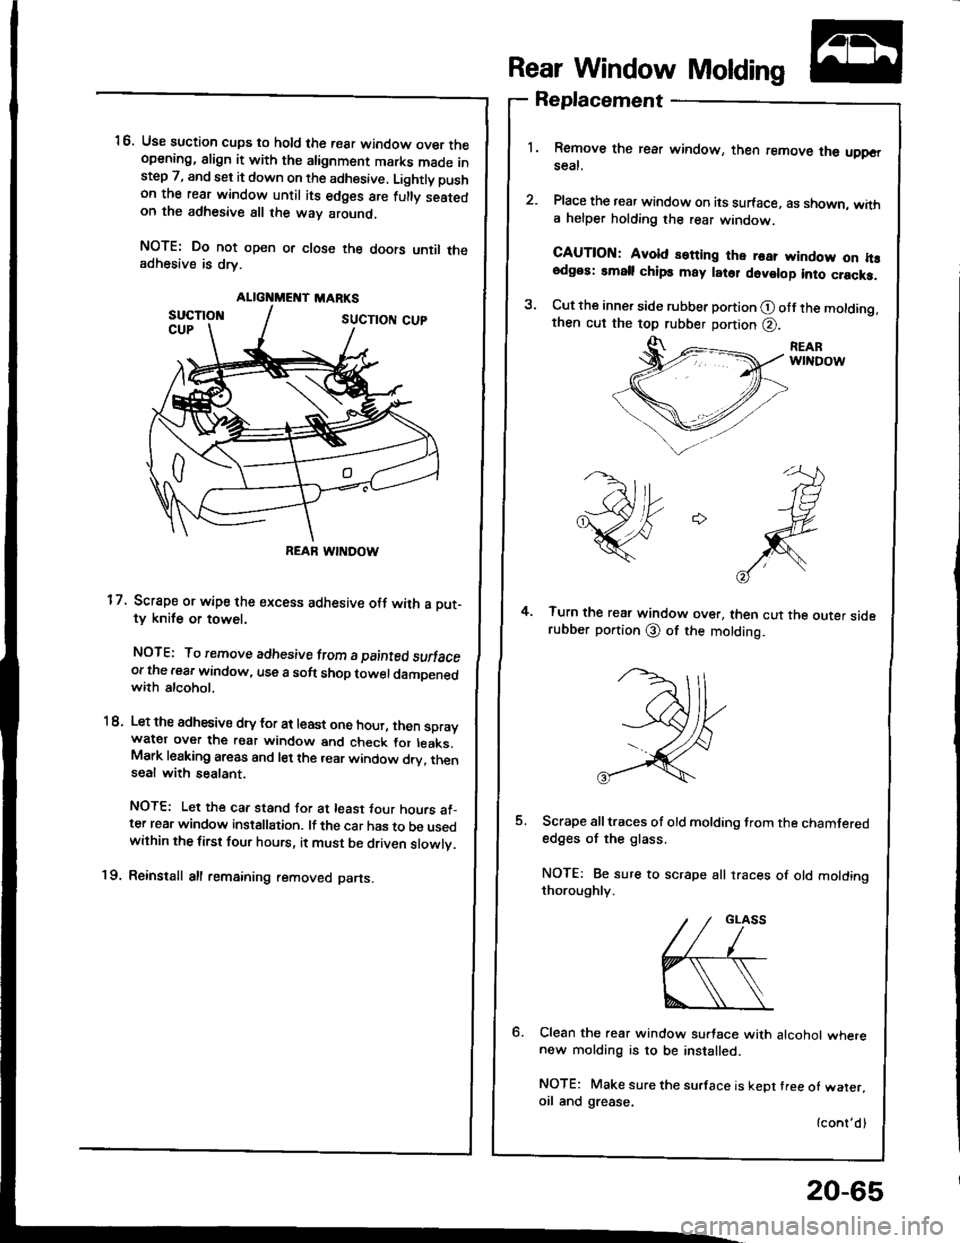
ALIGNMEI{T MARKS
REAR WINDOW
16. Use suction cups to hold the rear window over theopening, align it with the alignment marks made instep 7, and set it down on the adhesive. Lightly pushon the rear window until its edges are fulty seatedon the adhesive all the way around,
NOTE: Do not open or close the doors until theadhesive is drv.
17. Scrape or wipe the sxcess adhesive otf with a Dut-ty knife or towel,
NOTE: To remove adhesive lrcm a painted swfaceor the rear window, use a soft shop towel damDenedwith alcohol.
1 8. Let the adhesivs dry tor at least one hour, then spraywatgr over the raar window and check tor leaks.Mark leaking areas and let the rear window dry, thenseal with sealant.
NOTE: Let the car stand for at least tour hours al_ter rear window installation. lf the car has to be usedwithin the first four hours, it must be driven slowlv.
19. Reinstall all remaining removed parts.
Rear Window Molding
Replacement
1. Remove the rear window, then remove the uppGrseal.
2. Place the rear window on its surface, as shown, witha helper holding the rear window.
CAUTION: Avold setting the rea? ryindow on h!odgos: small chips may latol dovolop into cracka.
3. Cut the inner side rubber portion O olf the molding,then cut the top rubber portion @.
REARwtNDow
4. Turn the rear window over, then cut the outer siderubber portion @ of the motding.
5. Scrape all traces of old molding trom the chamterededges of the glass.
NOTE: Be sure to scrape all traces of old moldingthoroughly.
6. Clean the rear window su.tace with alcohol wherenew molding is to be installed.
NOTE: Make sure the su.face is kept tree of waler,oil and grease.
{cont'dl
20-65