light HONDA INTEGRA 1994 4.G Repair Manual
[x] Cancel search | Manufacturer: HONDA, Model Year: 1994, Model line: INTEGRA, Model: HONDA INTEGRA 1994 4.GPages: 1413, PDF Size: 37.94 MB
Page 602 of 1413
Driveshafts
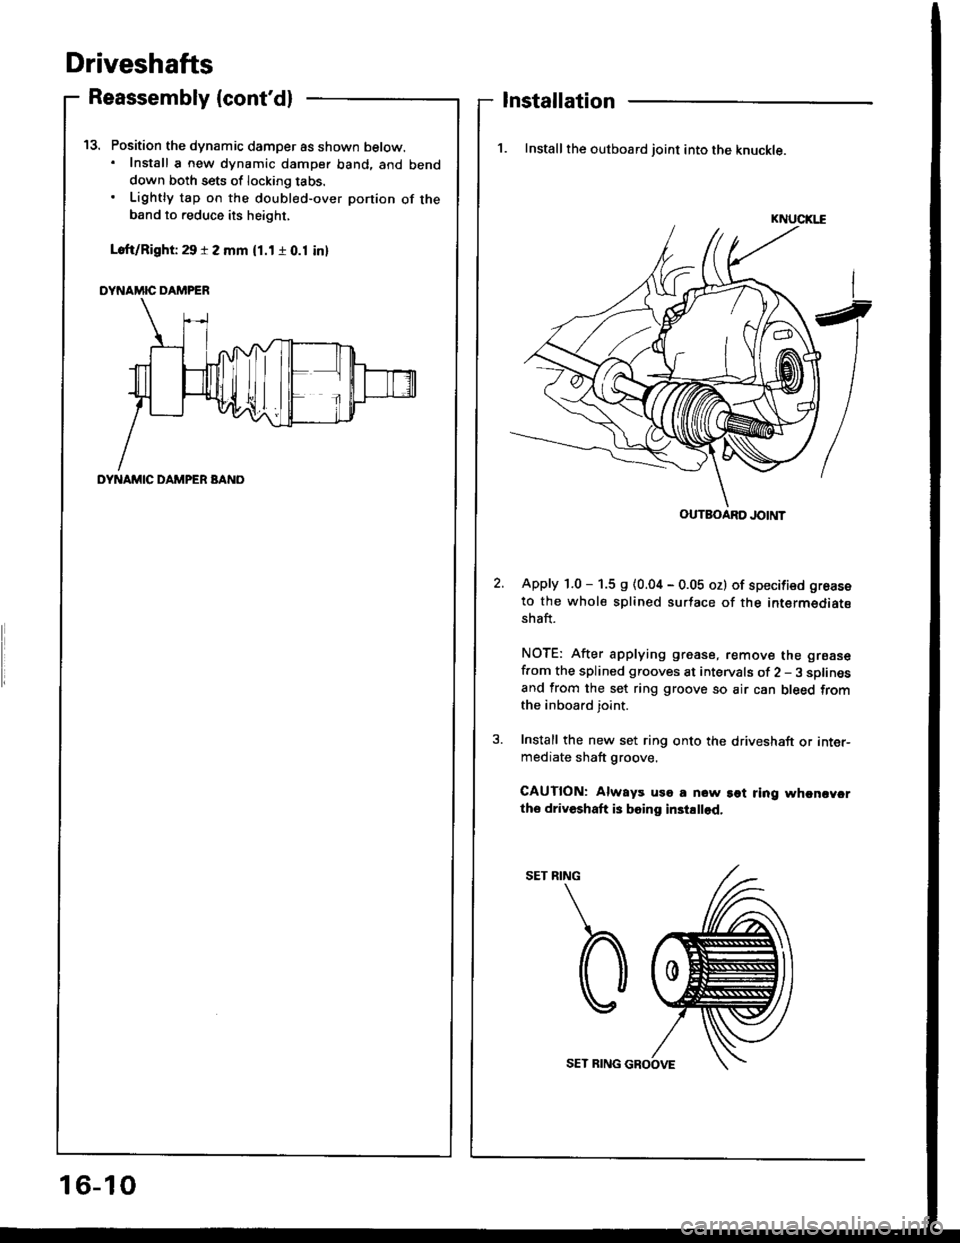
Position the dynamic damper as shown below.. Install a new dynamic damper band. and benddown both sets of locking tabs.
Lightly tap on the doubl€d-over ponion of theband to reduce its height,
Loft/Right 29 r 2 mm (1.1 r 0.1 inl
DYNAMIC DAMPER
t5.
Reassembly (cont'dl
DYNAMIC DAMPER BANO
Installation
1. Install the outboard joint into the knuckle.
KNUCIGE
Apply 1.0 - 1.5 s (0.04 - 0.05 oz) of specified groase
to the whole splined surtace of the intermediatsshaft.
NOTE: After applying grease, remove the grsase
f.om the splined grooves at intervals of 2 - 3 sDlinesand from the set ring groove so air can bleed fromthe inboard joint.
Install the new set ring onto the driveshaft or inter-mediate shaft groove.
CAUTION: Always uso a now sot ring whcncycrtho driveshaft is boing in3tallod.
RING
b
OUTBOARD JOINT
16-10
SET RING GROOVE
Page 616 of 1413
Pressure Control
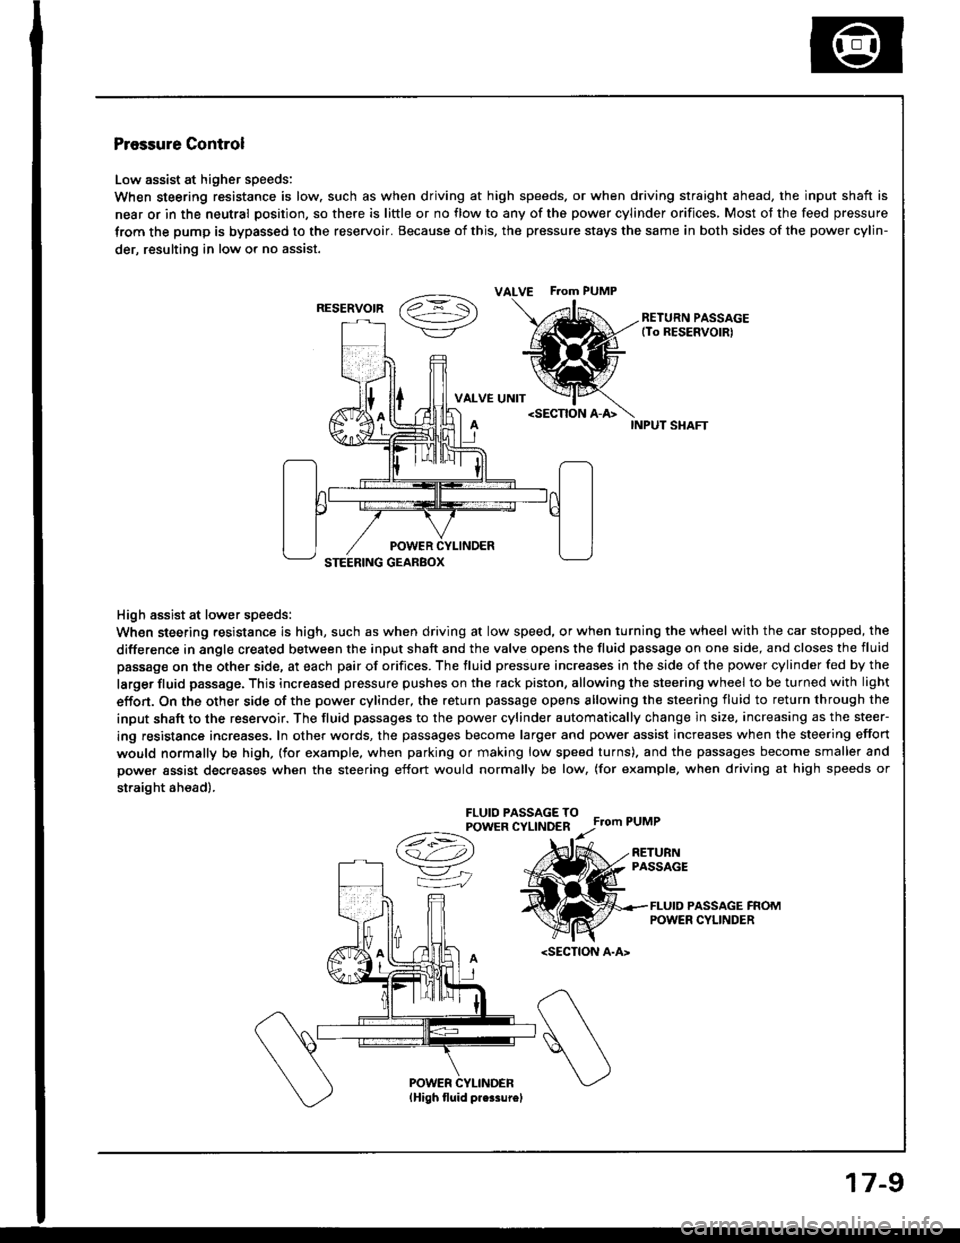
Low assist at higher speeds:
When steering resistance is low. such as when driving at high speeds. or when driving straight ahead, the input shaft is
near or in the neutral position, so there is little or no flow to any of the power cylinder orifices, Most of the feed pressure
trom the pump is bypassed to the reservoir. Because of this, the pressure stays the same in both sides of the power cylin-
der, resulting in low or no assist.
vaz =- S\->/-\7/RETURN PASSAGE(To RESERVOIRI
VALVE UNIT
High assist at lower speeds:
When steering resistance is high, such as when driving at low speed, or when turning the wheel with the car stopped, the
difference in angle created between the input shaft and the valve opens the fluid passage on one side, and closes the fluid
passage on the other side, at each pair of orifices. The fluid pressure increases in the side of the power cylinder fed by the
larger fluid passage. This increased pressure pushes on the rack piston, allowing the steering wheel to be turned with light
effon. On the other side of the power cylinder, the return passage opens allowing the steering fluid to return through the
input shaft to the reservoir. The fluid passages to the power cylinder automatically change in size, increasing as the steer-
ing resistance increases. In other words, the passages become larger and power assist increases when the steering effort
would normally be high, (for example. when parking or making low speed turns). and the passages become smaller and
power assist decreases when the steering effort would normally be low, (for example, when driving at high speeds or
straight ah€ad).
FLUIO PASSAGE TOPOWER CYLINDERFrom PUMP
A
/t-:\
v"
=iJ
RETURNPASSAGE
FLUID PASSAGE FROMPOWER CYLINDER
ALVE F.om PUMP
RESERVOIR
17-9
Page 619 of 1413
Troubleshooting
General Troubleshooting {cont'd}
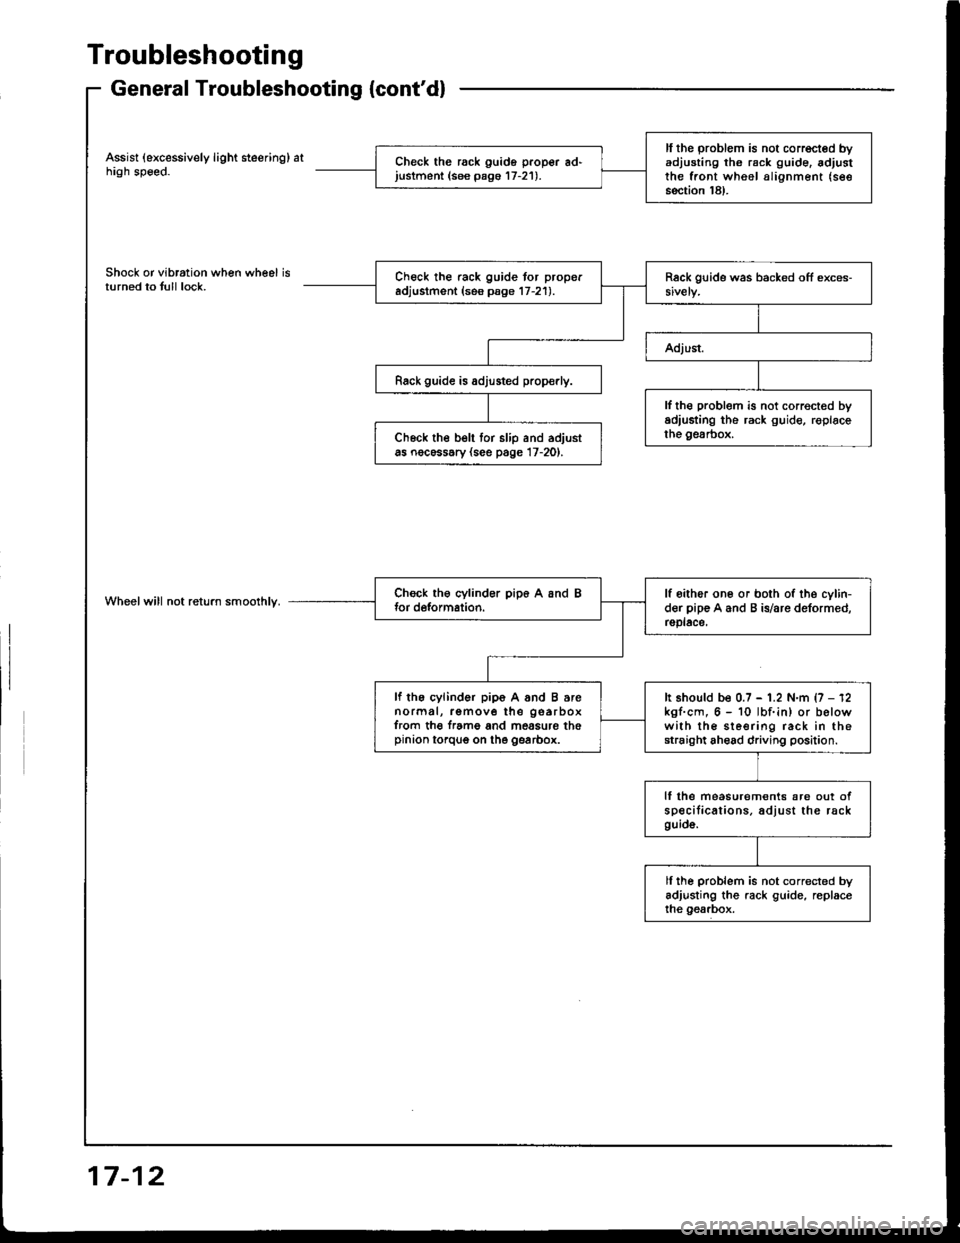
Assist (excessively light steering) athigh speed.
Shock or vibration when wheel isturned to tull lock.
Wheelwill not return smoolhly.
ll the problem is not corrected byadjusting th6 rack g!ide. adjustthe front wheel alignment (see
section 18).
Check the rack guido proper ad'justment (see pago 17-21).
Check the rack guide tor properadjustment (ses psge 17-21).
Rack guide is adjusted prop€rly.
lf th€ problem is not correct€d byadiusting the rack guide, roplacethe gesrbox.Ch6ck the belt tor slip and adjustas nocessary (see page 17-20).
lf oither one or both of the cylin-der pip€ A and B is/are deformed,rsplace,
lf the cylinder pip6 A and B arenormal, remove the gearboxfrom th€ f.ame and mossure thepinion torqug on the gearbox.
It should be 0.7 - 1.2 N.m {7 - 12kgf.cm, 6 - 10 lbf.in) or belowwith the sleering rack in thestraight ahead driving position.
lf lhe measurem€nts are out ofspecilications. adjust the rackguid6.
ll ihe problem is not corrected byadjusting the rack guide, replaceihe gearbox.
17-12
Page 632 of 1413
Removal
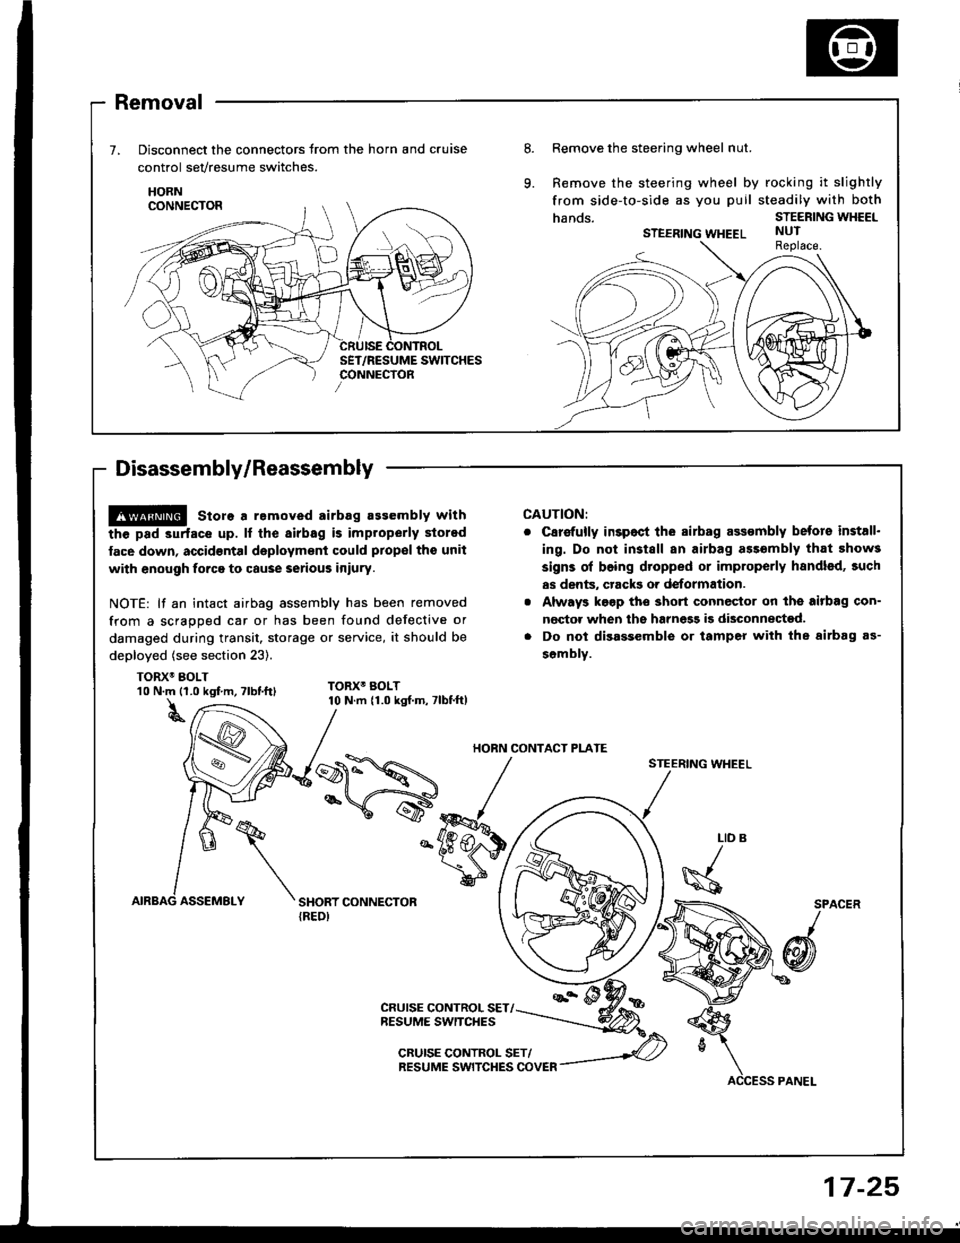
Disconnect the connectors trom the horn and cruise
control sevresume switches.
HORN
Disassembly/Reassembly
8.Remove the steering wheel nut.
Remove the steering wheel by rocking it slightly
from side-to-side as you puil steadily with both
hands.STEERING WHEEL
STEERING WHEELNUTReplace.
@ store a removed airbag assembly with
the pad 3urfacs up. lf the airbag is improperly stored
face down, accid€ntal daployment could prop€l tho unit
with enough forca to cause serious iniury.
NOTE: lf an intact airbag assembly has been removed
from a scragoed car or has been found defective or
damaged during transit. storage or service, it should be
deployed (see section 23).
TORX6 BOLT
CAUTION:
C8r€{ully inspoct ihe sirbag assombly betors install.
ing. Do not install an airbag ass6mbly that 5how3
signs ol boing dtopped or improperly handled, such
as dents, crack3 or deformation.
Always k€gp tho short connector on the aitbag con-
nector when ths harnegg i9 disconnected.
Do not disassemble or tamper with the airbag as-
sombly.
STEERING WHEEL
10 N.m {1.0 kgf m, Tlbt.ttl
t
TORX6 BOLT10 N.m {1.0 kgf.m, 7lbf.ft)
LID
\s
SPACER
/
@
CRUISE CONTROL SET/NESUME SWITCHES
CRUISE CONTROL SET/RESUME SWITCHES COVER
HORN CONTACT PI-ATE
17-25
Page 634 of 1413
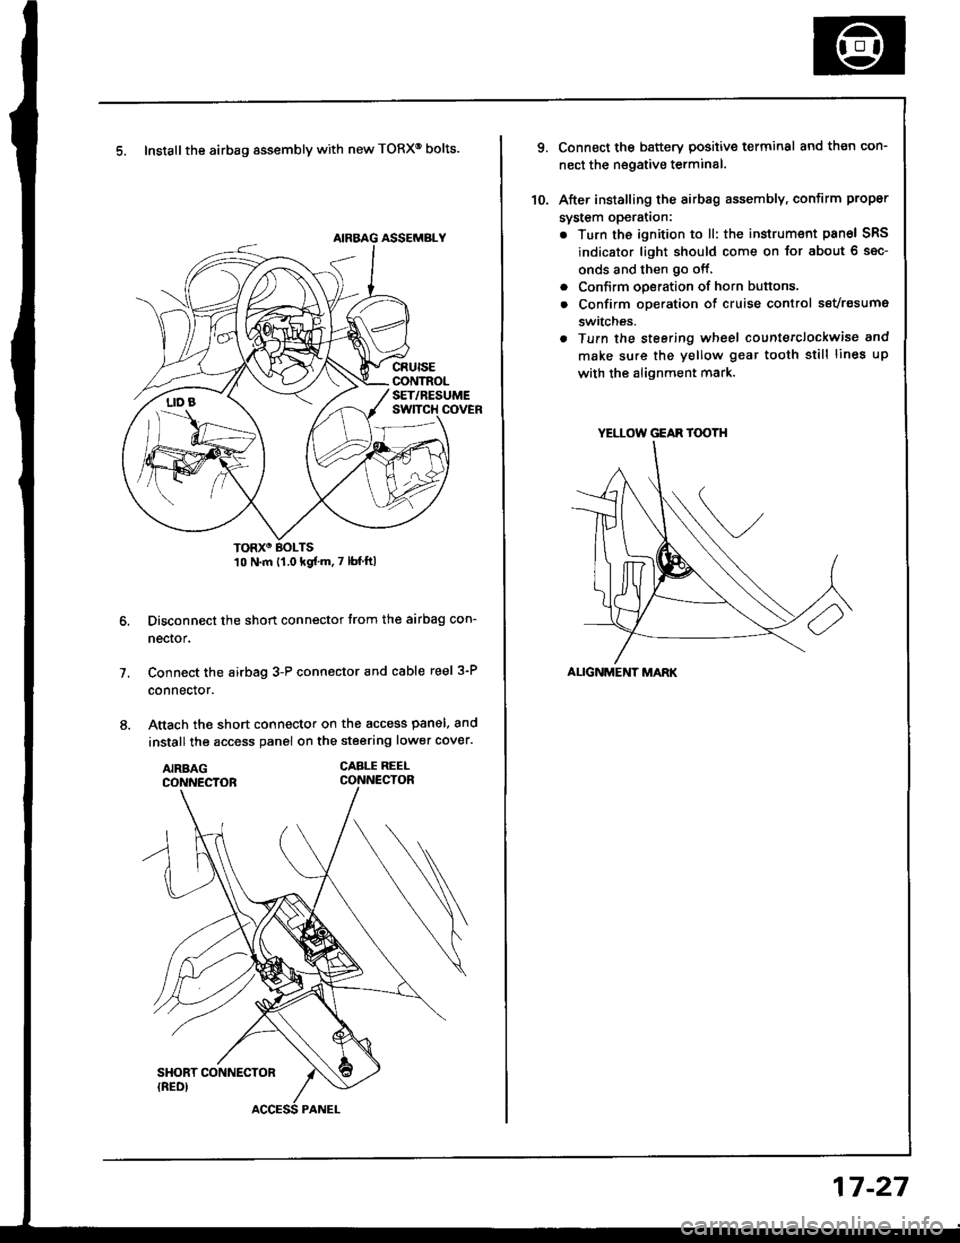
5. Install the airbag assembly with new TORXo bolts.
TORXO BOLTS10 N.m {1.0 kgf'm.7 lbf ftl
Disconnect the short connector trom the airbag con-
nector.
Connect the airbag 3-P connector and cable reel 3-P
connector.
Attach the short connector on the access panel. and
install the access panel on the steering lower cover.
CABLE REEI-CONNECTOR
7.
YELLOW GEAR TOOTH
ALIGNMENT MARK
10.
Connect the battery positive terminal and th€n con-
nect the nsgative terminal.
After installing the sirbag assembly, confirm proper
system opera(on:
. Turn the ignition to ll: the instrum€nt pan6l SRS
indicator light should come on for about 6 sec-
onds and then go off,
. Confirm operation of horn buttons.
. Confirm oDeration of cruise control sevresume
switches.
a Turn the steering wheel countetclockwise and
make su.e the yellow gear tooth still lines up
with the alignment mark.
17-27
Page 669 of 1413
Steering Gearbox
Reassembly (cont'dl
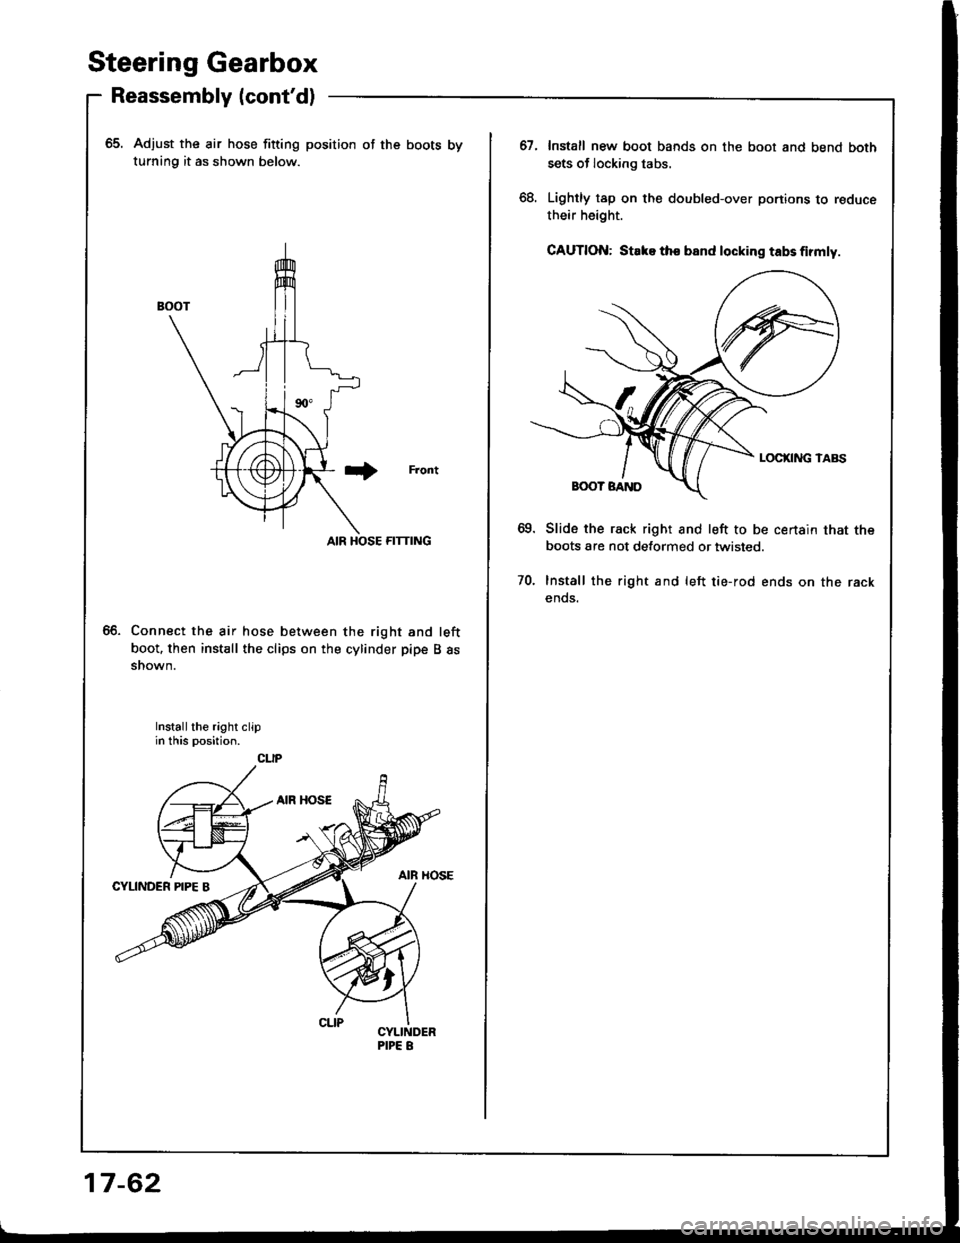
65. Adjust the air hose fitting position of the boots by
turning it as shown below.
Front
AIR HOSE FITTING
Connect the air hose between the right and left
boot. then install the clips on the cylinder pipe B assnown.
Install the right clipin this position.
CLIP
17-62
67.Install new boot bands on the boot and bend both
sets of locking tabs.
Lightly tap on the doubled-over portions to reduce
their height.
GAUTION: Stake tho band locking tabs firmly.
Slide the rack right and left to be certain that the
boots are not detormed or twisted.
Install the right and left tie-rod ends on the rack
ends.
70.
Page 915 of 1413
Doors
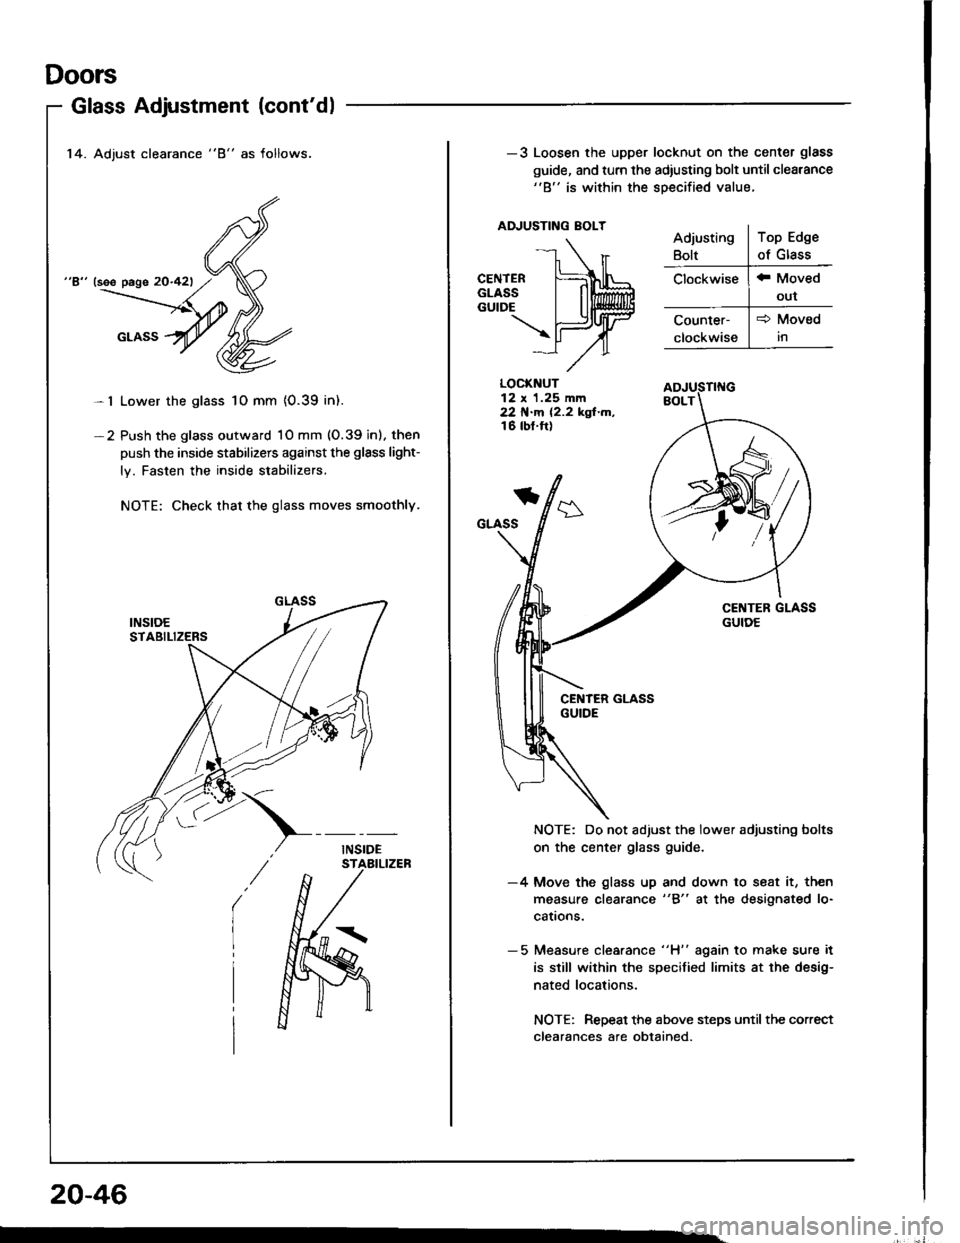
14. Adjust clearance "8" as follows.
"8" (see page 20-421
Lower the glass 1O mm {0.39 in).
Push the glass outward 1O mm (O.39 inl. then
push the inside stabilizers against the glsss light-
ly. Fasten the inside stabilizers.
NOTE: Check that the glass moves smoothly.
Glass Adjustment (cont'dl
-l
-2
20-46
-3 Loosen the upper locknut on the center glass
guide, and turn the adiusting bolt until cleatance"B" is within the soecified value.
ADJUSTING EOLT
LOCKNUT12 x 1.25 mm22 N.m 12.2 kgf.m,16 tbt.ft)
*
GLASS
NOTE: Do not adjust the lower adjusting bolts
on the center glass guide.
-4 Move the glass up and down to seat it, then
measure clearance "8" at the designated lo-
cattons.
- 5 Measure clea.ance "H" again to make sure it
is still wilhin the specified limits at the desig-
nated locations.
NOTE: Repeat the above steps until the correct
clearances afe obtained.
Page 917 of 1413
Doors
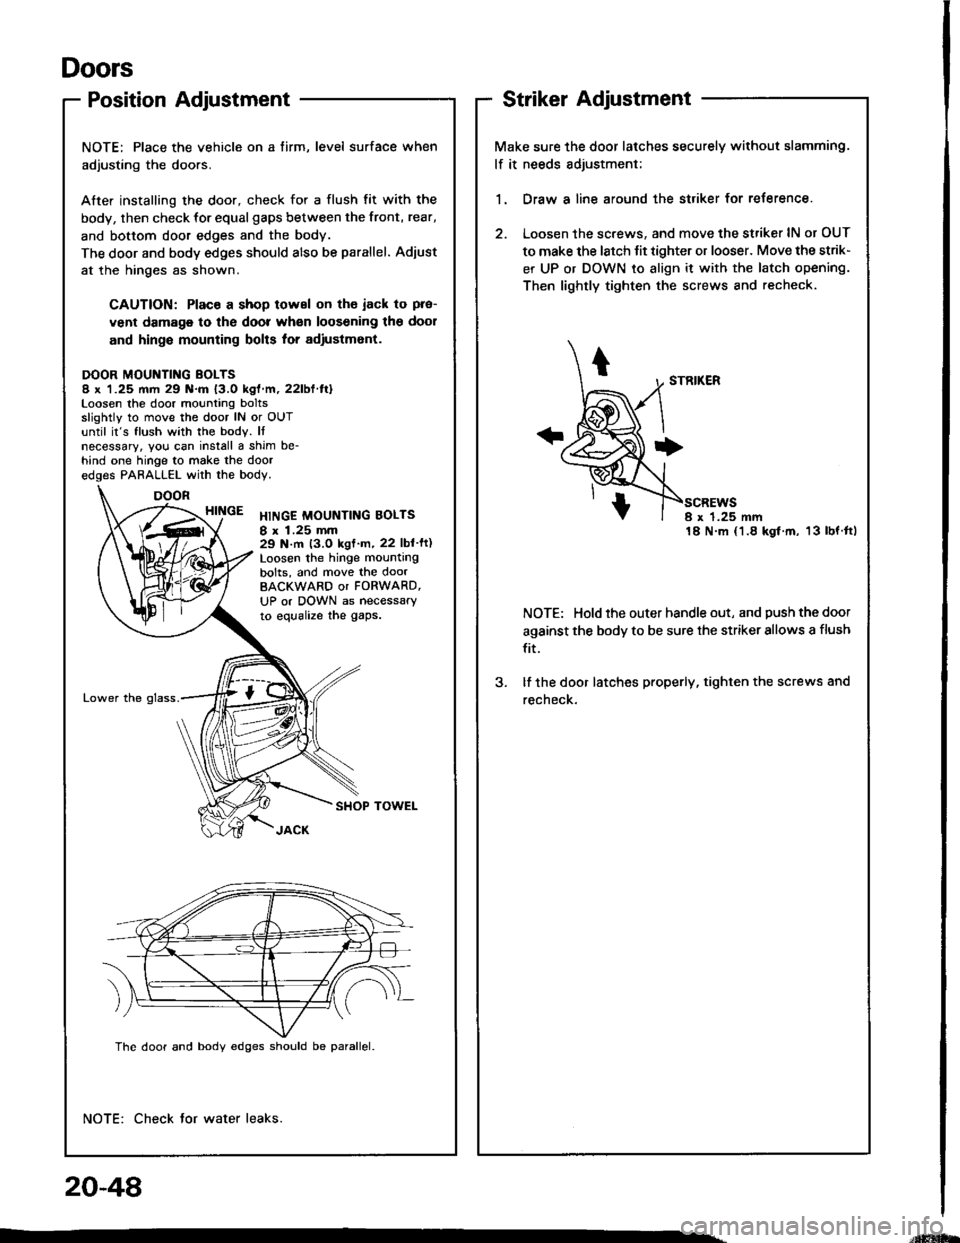
Position Adjustment
NOTE: Place the vehicle on a tirm, level surface when
adjusting the doors.
After installing the door, check for a flush fit with the
body, then check for equalgaps between the front, rear,
and bottom door edges and the body.
The door and body edges should also be parallel. Adiust
at the hinges as shown.
CAUTION: Plac€ a shop towsl on tho jack to pre-
vent damage to the door when loosening the dool
and hingo mounting bolts for adjustmont.
DOOR MOUNTING BOLTS8 x 1.25 mm 29 N.m l3.O kgl m, 22lbf trlLoosen lhe door mo!nting boltsslightly to move the door lN or OUTuntil ir's flush wath the body. Itnecessary, you can install a shim be-hind one hinge to make the door
edges PAFALLEL with the body.
HIIGE xrruce MouNTTNG BoLTs
I x 1.25 mm29 N.m l3.O kgt'm,22 lbl'ft)Loosen the hinge mounting
bolts, and move the doorBACKWARD oI FORWARD,
UP or DOWN as necessaryto equalize the gaps.
Lower the glass,
SHOP TOWEL
NOTE: Check tor water leaks.
DOOR
The door and body edges should be parallel.
Striker Adjustment
Make sure the door latches securely without slamming.
lf it needs adjustment;
1.Draw a line around the st.iker for reJerence.
Loosen the screws, and move the striker lN or OUT
to make the latch tit tighter or looser. Move the strik-
er UP or DOWN to align it with the latch opening.
Then liqhtly tighten the screws and recheck.
scREwsI x 1.25 mm18 N.m ('1.8 kgt.m, 13lbf.ttl
NOTE: Hold rhe outer handle out, and push the door
against the body to be sure the striker allows a flush
fit.
lf the door latches properly, tighten the screws and
recheck.
20-48
;dlHffi
Page 927 of 1413
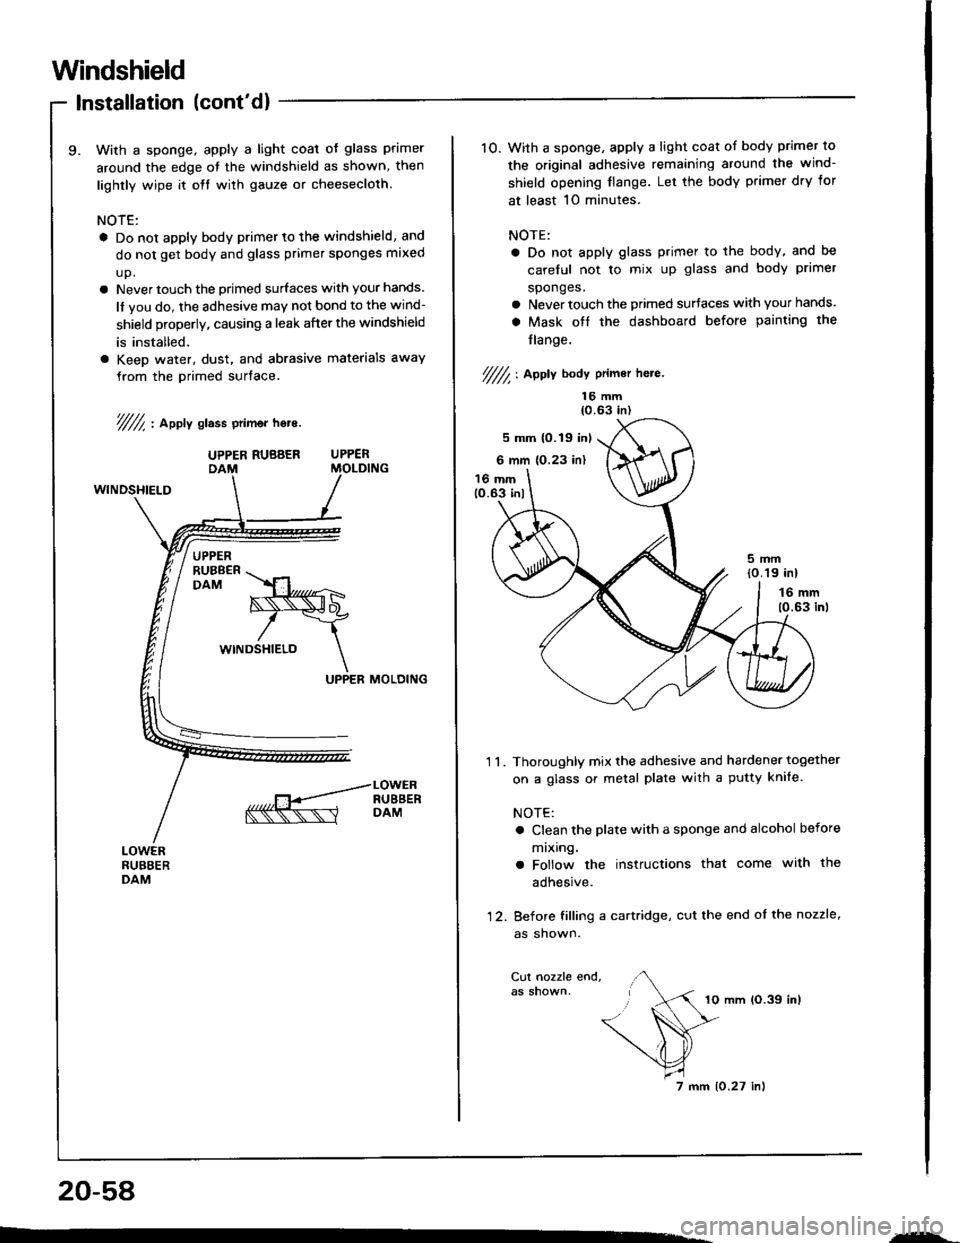
Windshield
Installation (cont'd)
With a sponge. apply a light coal oJ glass primer
around the edge ot the windshield as shown, then
lightly wipe it olt with gauze or cheesecloth.
NOTE:
a Do not apply body primer to the windshield, and
do not get body and glass primer sponges mlxed
up.
a Never touch the primed surfaces with your hands.
ll you do, the adhesive may not bond to the wind-
shield properly, causing a leak afterthe windshield
is installed.
o Keep water, dust, and abrasive materials awaY
from the primed surface.
V//f, : apptv stass ptimer hors.
WINDSHIELD
RUBBER -DAM .YJ * o
>\ast,
/\WINDSHIELD
\UPPER MOLOING
UPPER RUBBER UPPER
10. With a sponge, apply a light coat of body primer to
the original adhesive remaining around the wind-
shield opening flange. Let the bodY primer dry tor
at least 1O minutes.
NOTE:
a Do not apply glass primer to the body, and be
careful not to mix up glass and body primer
sponges,
a Never touch the primed surfaces with your hands.
a Mask otl the dashboard before painting the
flange.
//////, I Aeely bodv Primer h6te.
16 mm{0.63 in)
5 mm {0.19 inl
6 mm (0.23 in)
16 mm1O.63 inl
5mm(O.19 inl
16 mm
10.63 inl
1 1 . Thoroughly mix the adhesive and hardener together
on a glass or metal plate with a putty knife.
NOTE:
a Clean the plate with a sponge and alcohol before
mixlng.
a Follow the instructions that come with the
adhesive.
12. Before filling a cartridge, cut the end ol the nozzle,
as shown.
Cut nozzle end,
10 mm (O.39 inl
20-58
7 mm 10.27 in)
,*-
Page 928 of 1413
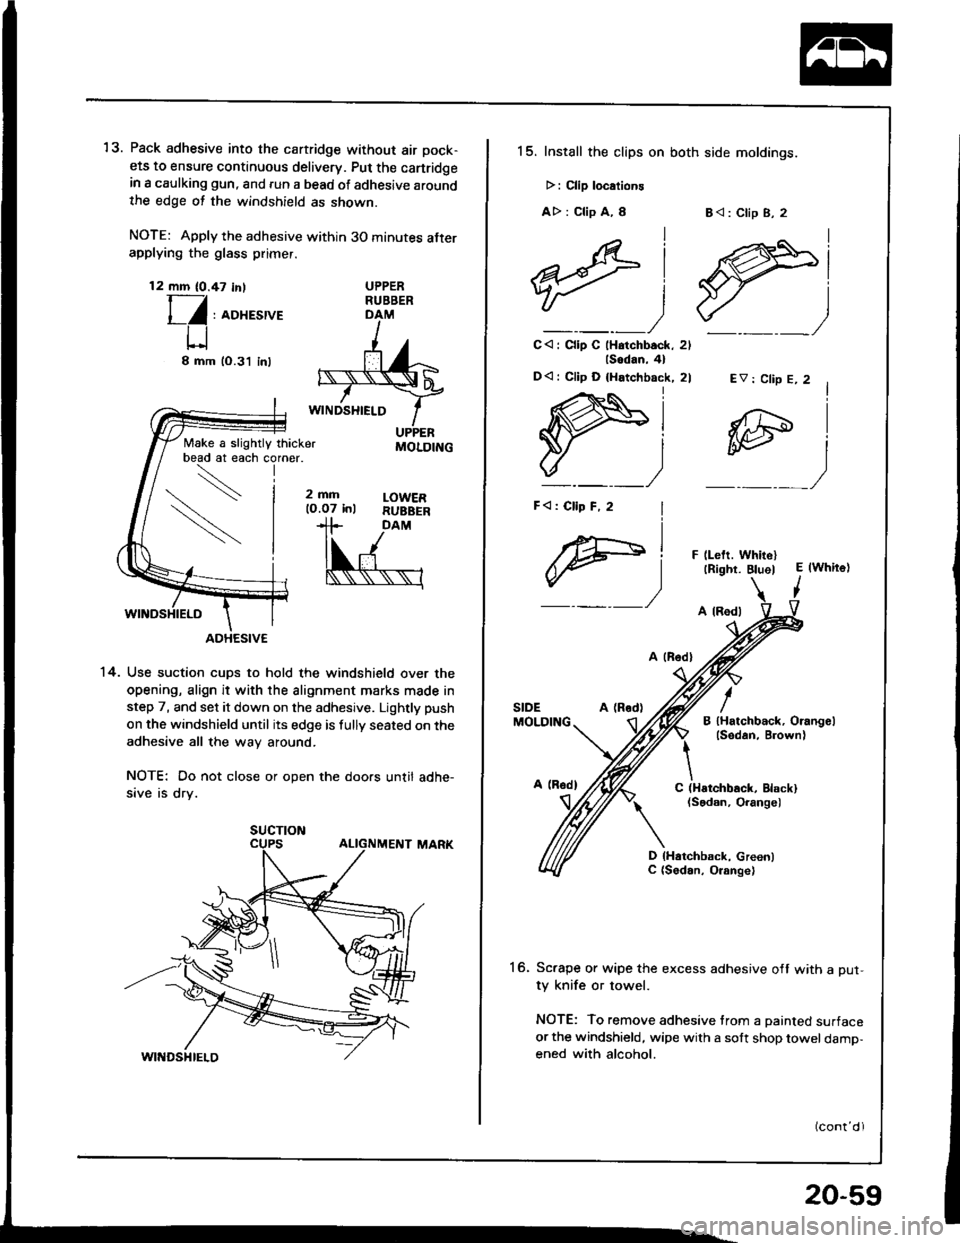
13. Pack adhesive into the cartridge without air pock-
ets to ensure continuous delivery. Put the canridgein a caulking gun, and run a bead ot adhesive aroundthe edge ot the windshield as shown.
NOTE: Apply the adhesive within 30 minutes afterapplying the glass primer.
12 mm (0.47 in,T-/
l_/ : roxesrve
U8mm
Make a slightly thicker
DAM
'14. Use suction cups to hold the windshield over the
opening, align it with the alignment marks made in
step 7, and set it down on the adhesive. Lightly push
on the windshield until its edge is fully seated on the
adhesive all the way around.
NOTE: Do not close or open the doors until adhe-
sive is dry.
UPPERRUBBER
lO.3'l inl
2mfilO.O7 inlLOWERRUBBEB
MOLDING
SUCTION
15. Install the clips on both side moldings.
>: Clip localione
A> : Clip A, I
lsodan,4l
D<: Cllp D {Hatchback, 2l
I
F)
B<: Clip B, 2
lAi
ffil"___)
C<: Clip C lHatchback, 2l_)
EV: Clip E, 2
F llelt. WhitellRight. BluelE lwhite)
I
A (Rod)
A lRodl
B lHatchback, Orangellsedan, B.own)
/SIDEMOLDING
It\C (Hstchback, Elack)(Sodan, Orangel
D lHatchback, Green)C (Sodan, O.ange)
16. Sc.ape or wipe the excess adhesive off with a Dut-ty knife or towel.
NOTE: To remove adhesive trom a painted surface
or the windshield, wipe with a solt shop towel damp-ened with alcohol.
20-59