light HONDA INTEGRA 1994 4.G Repair Manual
[x] Cancel search | Manufacturer: HONDA, Model Year: 1994, Model line: INTEGRA, Model: HONDA INTEGRA 1994 4.GPages: 1413, PDF Size: 37.94 MB
Page 460 of 1413
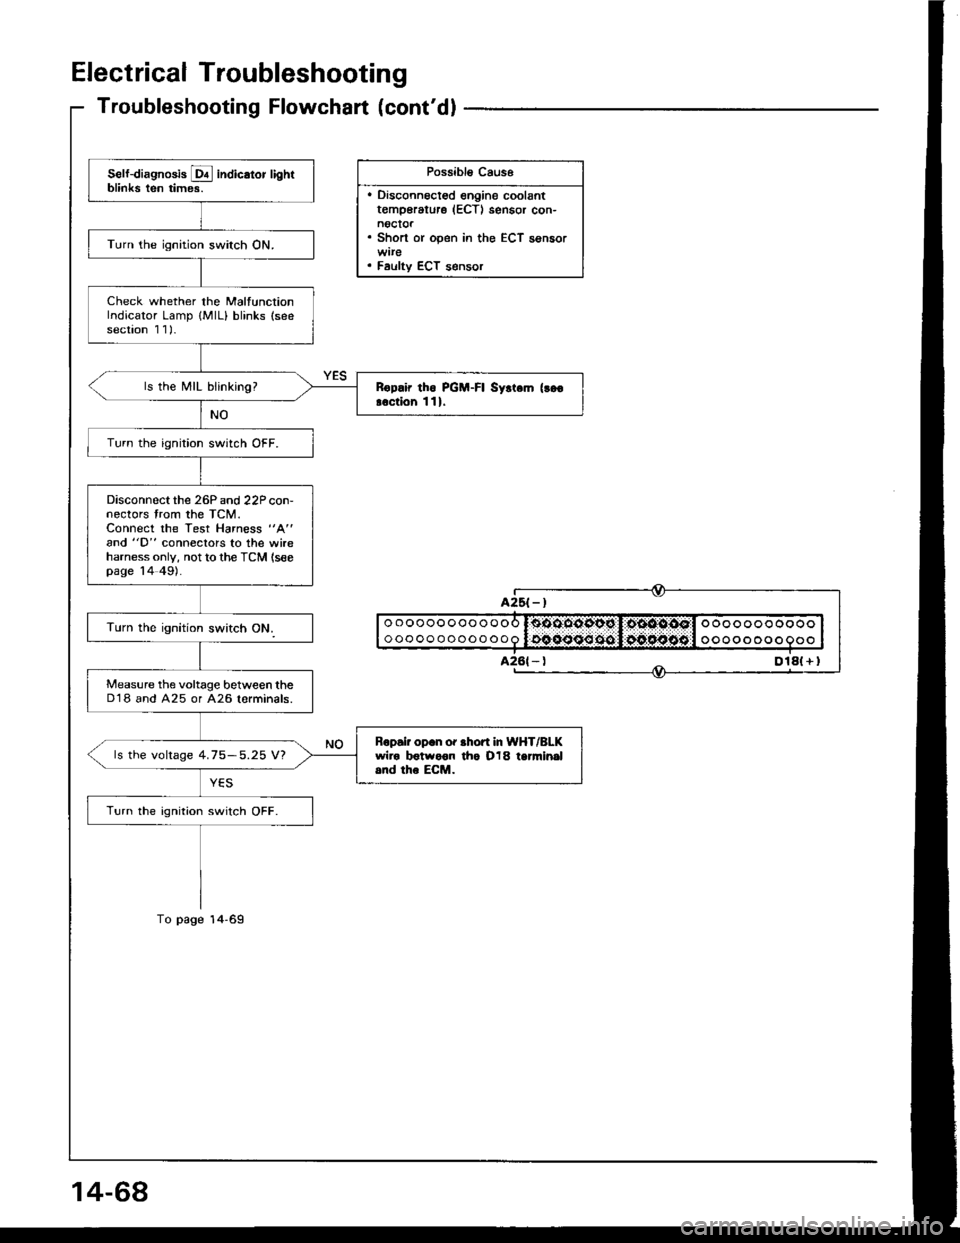
Electrical Troubleshooting
Troubleshooting Flowchart (cont'dl
Possibl€ Caus6
. Disconnoct€d engine coolantt€mp€rature (ECTI sensor con-noctor. Short or open in the ECT sensor
. Faulty ECT s€nsor
Self-diagnosis E indicator lightblinks ten times.
Turn the ignition switch ON.
Check whether the MalfunctionIndicator Lamp {MlL} blinks (seesection 1 1)-
ls the MIL blinking?Rop.ir tho PGM-FI Syrt.m (!go
!.ction 111.
Turn the ignition switch OFF.
Disconnectthe 26P and 22P con-nectors trom the TCM.Connect the Test Harness "A"
and "D" conneclors to the wireharness only, not to the TCM (seepage 14 49).
Measure the voltage between theD'18 and A25 or A26 lorminals.
Bopair op.n or .hofi In WHT/BLKwiro botwoon tho O18 tanni.|al.nd the ECM.ls the voltage 4.75-5.25 V?
Turn the ignition switch OFF.
oooooooooooo
ooooooooooooooooooooooo
oooo o oo o
Dlal + I
Page 462 of 1413
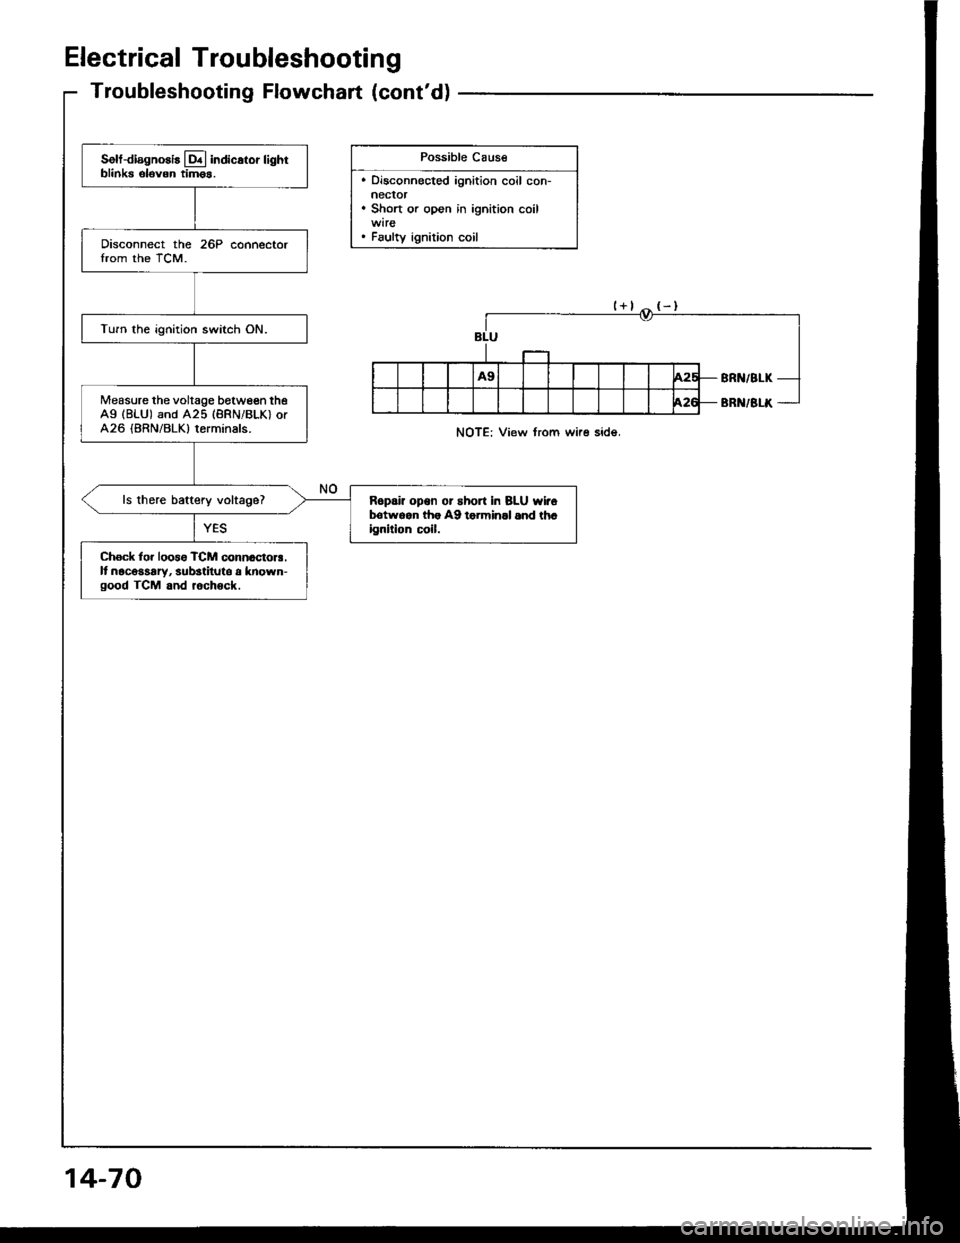
Electrical Troubleshooting
Troubleshooting Flowchart (cont'd)
Possible Cause
. Disconnected ignition coil con-neclor. Short or open in ignition coil
. Faulty ignition coil
Solt-diagnosis lq.l indicstor lightblinks elovon tim6s.
Disconnect the 26P connectorIrom the TCM.
Turn the ignition switch ON.
Measure the voltage between theAg (BLU) and A25 (BRNiBLK) orA26 (BRN/BLK) terminals.
ls there baftery voltage?R6pai? opon or short in BLU wirolrotwqan lh. A9 torminll 6nd th.ignilion c!il.
Ch6ck lor loos6 TCM connactora.It nacosaary, substituto a known-good TCM and rochock.
NOTE: View from wire side.
14-70
Page 463 of 1413
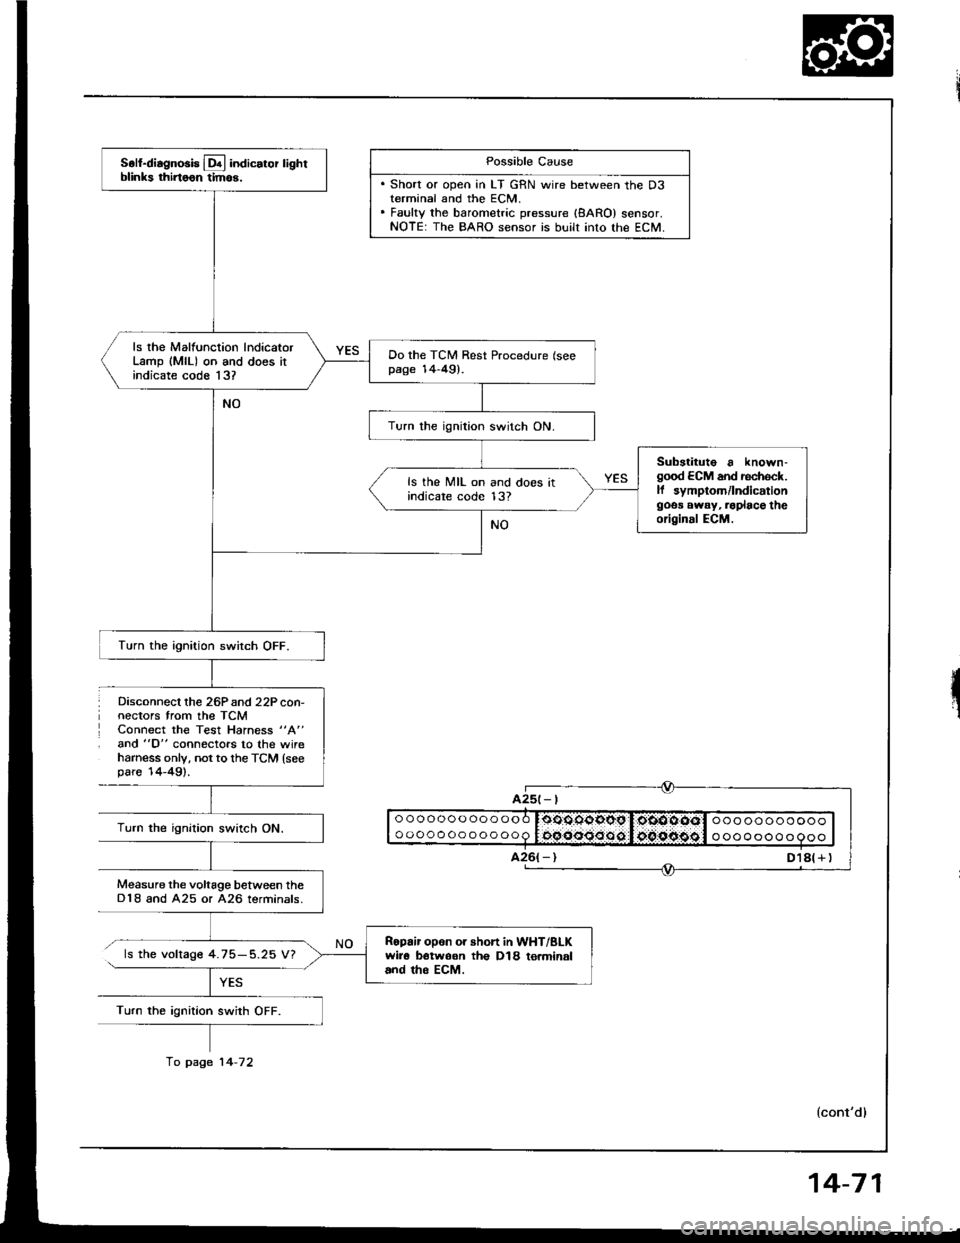
Disconnect lhe 26Pand 22P con-nectors trom the TCMConnect the Test Hahess "A"
and "D" connectors to the wireharness only, not to th€ TCM {seepare'14-49).
Possible Cause
. Short or open in LT GRN wire between the D3terminal and the ECM.. Fauky the barometric pressure {8ARO} sensor.NOTE: The BARO sensor is built into lhe ECM.
ooooooooooooo
oooooooooooo0oOOqgopg I,oiOOOOol ooo ooooooooooocqooo:Joo.oipggl o oooooo o 9ooTurn the ignition swirch ON.
Measure the voltage between theD18 and A25 or A26 terminals.
ls the voltage 4.75-5.25 V?
Turn the ignition swith OFF.
A25t- |
Soll-diagnosis Lq! indicator lightblinks thirtoon tim6.
ls rhe Malfunction lndicatorLamp (MlL) on and does itindicate code 13?
Do the TCM Rest Procedure (seepage 14-49).
Turn the ignition switch ON.
Substituto a known-good ECM and rechock.ll symptom/lndicationgoos away, .oplace theoriginal ECM.
ls the MIL on and does itindicare code 13?
Turn the ignition switch OFF.
Ropair opon or short in WHT/BLKwir6 botwoon th€ D18 to.minaland tho EcM.
fo page 14-72
14-71
Page 467 of 1413
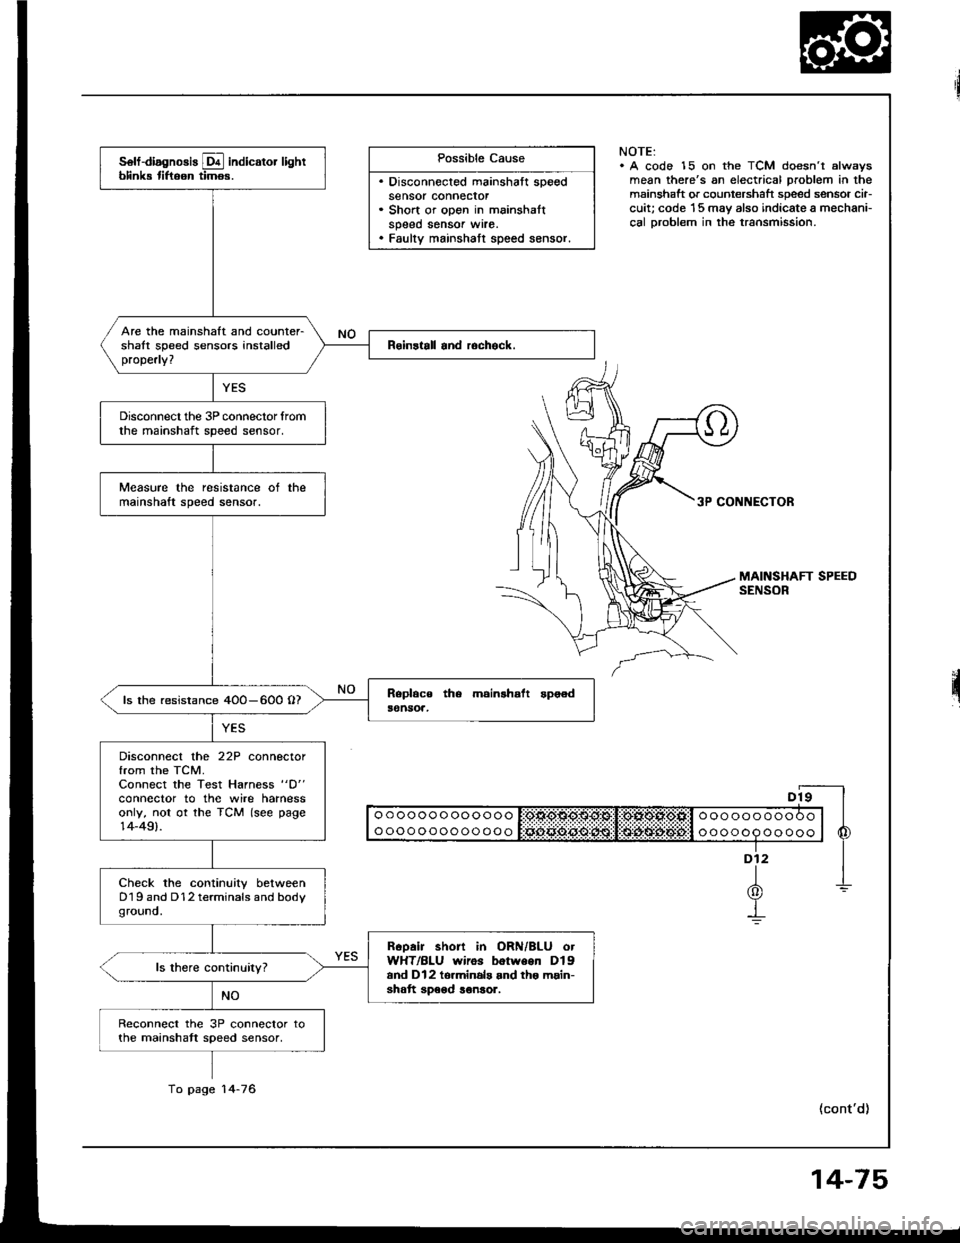
Possible Cause
. Disconnected mainshaft speedsensor connecror. Short or open in mainshaltspeed sensor wrre.. Faulty mainshatt speed sensor.
NOTE:. A code 15 on the TCM doesn't alwsysmean there's an electrical problem in themainshaft or countershaft speed sensor cir-cuit; code '15 may also indicate a mechani-cal Droblem in the transmission.
3P CONNECTOR
II o o o o o o o oo o o o o I:OtlO$O$g:Sl!:OlXOl*Ofill o o o o o o o o o O o | |
I ooooooooooooo l Sciii:ddii:ijii:l:i$idi$;d6#:l o oooop oo ooo | 6
"-f
1-L(0)Y-!
(cont'd)
solf-diagnosis E indicator lightblink tiftoon timos.
Are the mainshaft and counter-shalt speed sensors installedproperly?
Disconnect the 3P connector lromthe mainshaft speed sensor.
Measure the resistance ot themainshaft speed sensor.
ls the resistance 4OO-600 O?
Disconnect the 22P connectorfrom the TCM.Connect the Test Harness "D"
conneclor to the wire harnessonly, not ot the TCM (see page14-49).
Check the continuity betweenD19 and D12 terminals and bodyground.
Rcoair short in ORN/BLU otWHT/BLU wiros botween Dlgand Dl2 to.minals and tho main-shatt speod ronsor.
Reconnect the 3P connector tothe mainshatt speed sensor,
To page 14-76
14-75
Page 469 of 1413
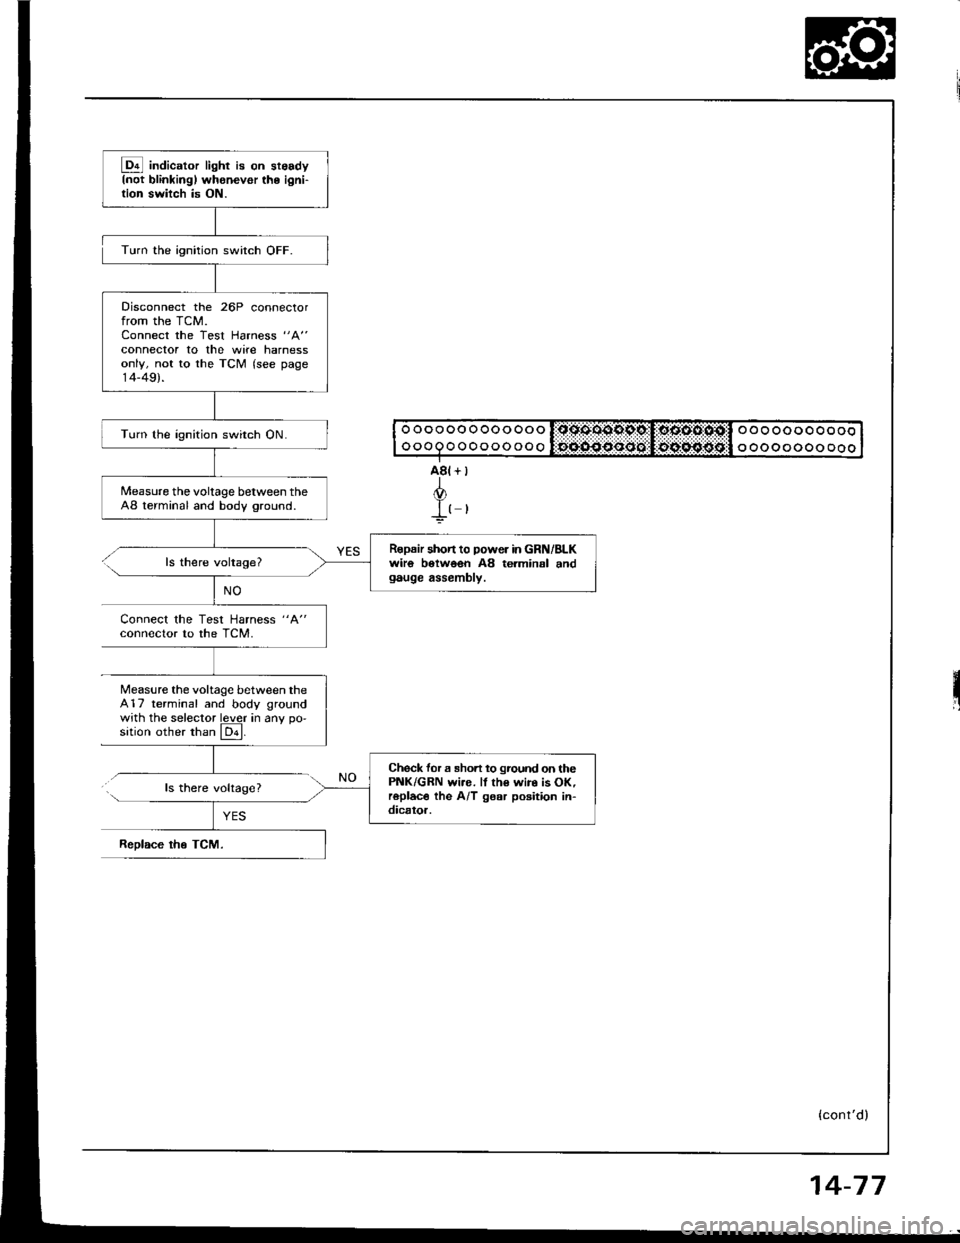
@ indic"to, light i8 on st6sdyInot blinkingl whenevor the ioni-tion switch is ON.
Disconnect the 26P connectorfrom the TCM.Connect the Test Harness "A"
connector to the wite harnessonly, not to the TCM (see page14-49).
Turn the ignition switch ON.
Measure the voltage between theA8 terminal and body ground.
Ropair shon to power in GRN/BLKwiro botwoen A8 terminal andgauge assembly.
Check for a sho.t to ground on thePNK/GRN wi.e. ll th€ wir. is OK,roplac€ the A/T gear poaition in-dicator.
Turn the ignition switch OFF.
ls there voltage?
Connect the Test Harness "A"
conneclor to the TCM.
Measure the voltage between the417 terminal and body groundwith the selector lever in anv oo'sition other than El.
ls there volrage?
ReDlace tho TCM.
o o o o oo o oo o oo o l:qssoo9pc,I:oocto:osil o o o oo o o o o oooooQoooooooooo oo o oooo ooo
{cont'd)
14-77
Page 470 of 1413
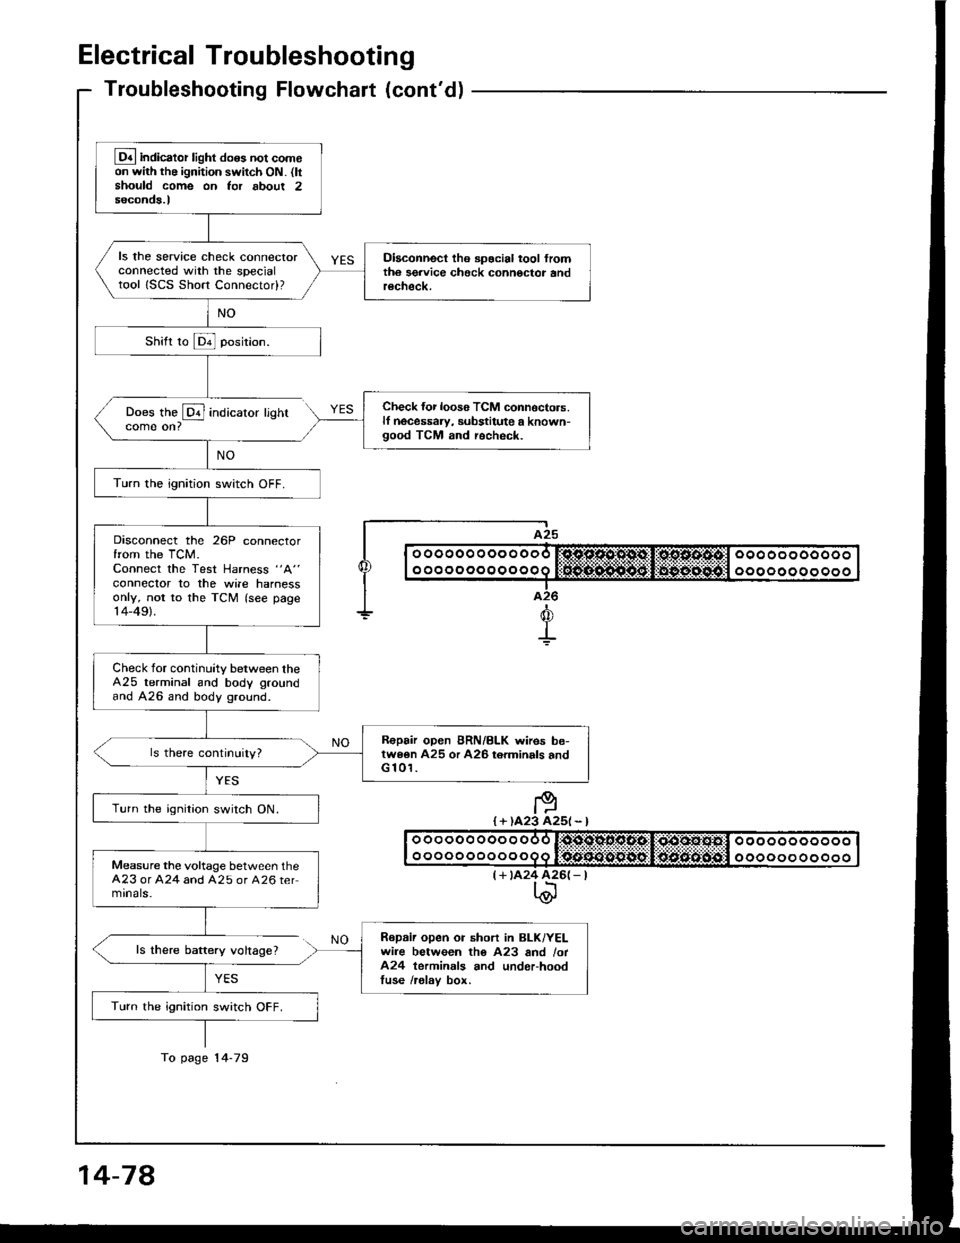
Electrical Troubleshooting
Troubleshooting Flowchaft (cont'dl
Does the @ indicatorcome on?
ls there baftery voltage?
YES
lighr
I A25
| | o ooooo o oo o ooo r:sjc.o.sl'1*st,li*os.s.4tcl ooo oo oooooo I
I I o o o o o o o o o o o o q lifrif.S..n${5git:li$gg-:aiiigitll o o o o o o o o o o o I|--.-T..-I a26
+d
+
I + )A23 A25l - l
(+ tA24 426(- |t\@
Lq4 indicator light do6s not comeon with the ignition switch ON. (ltshould come on Ior about 2seconds.l
ls the service check connectorconnected with the specialtool ISCS Short Connectod?
Diaconnect tho spocial tool fromth6 sgrvice check connoctor andrecheck.
Check {or loos6 TCM connoctors.lf necessaw, substitute a known-good TCM and recheck.
Turn the ignition switch OFF.
Disconnect the 26P connectorfrom the TCM.Connect the Test Harness "A"
conneclor to the wile harnessonly, not to the TCM (see page14-49).
Check for continuity between theA25 terminal and body groundand A26 and body ground.
R€pair open BRN/BLK wires be-twe6n A25 or A26 torminals andG 101.
Turn the ignition switch ON.
Measure the voltage between theA23 or A24 and A25 or A26 termrnals-
Repaii open or short in BLK/YELwire between tho A23 and /ot424 terminals and underhoodtuse /relav box.
Turn the ignition switch OFF.
To page 14-79
14-78
Page 473 of 1413
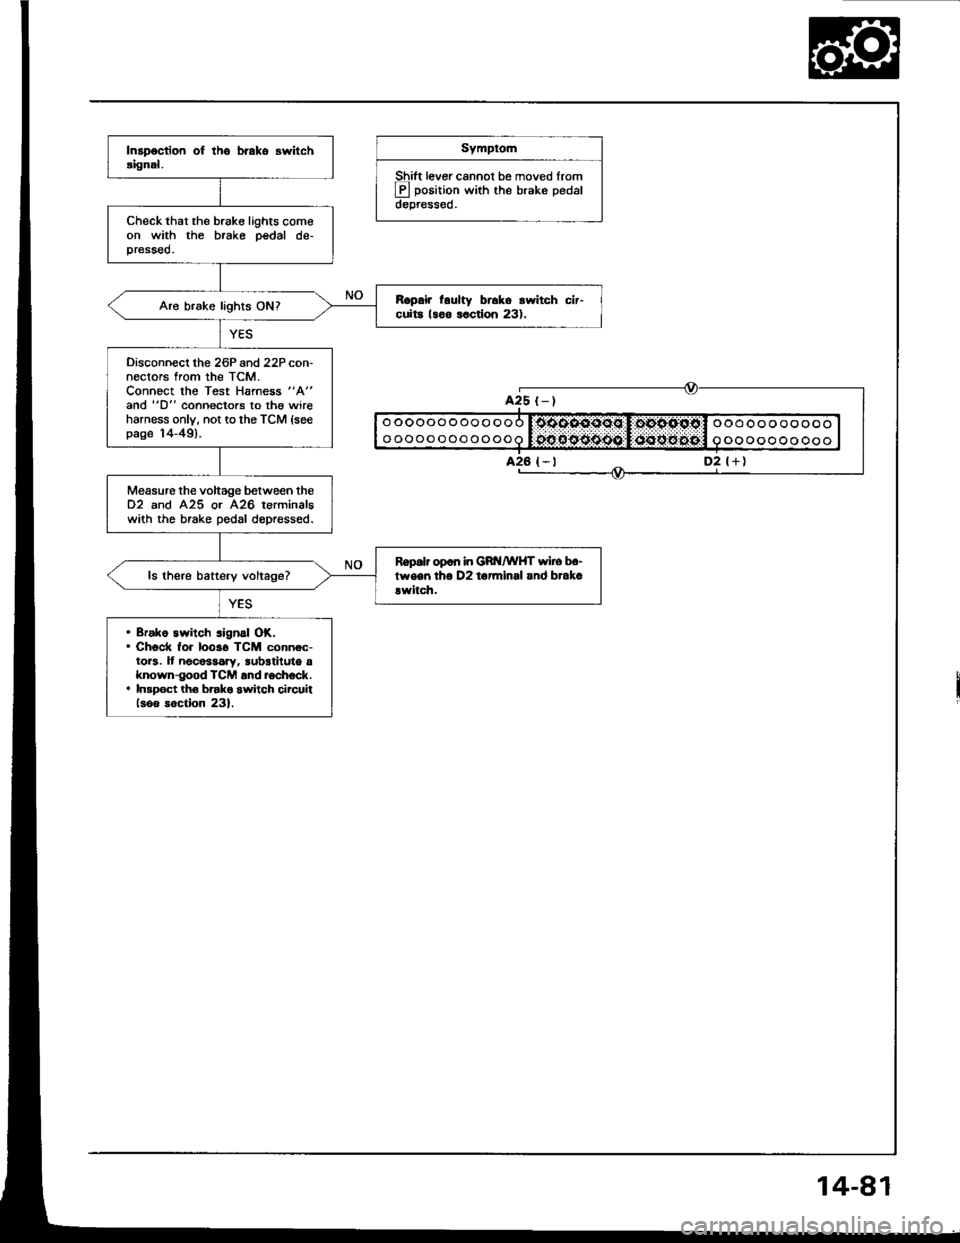
Symptom
Shift lever cannot be moved lrom
E position with the brake pedaldepressed.
Check thar the brake lights comeon with the brake pedal de-pressed.
R.prir l.ulty br6ko rwitch cir-cuita 18o6 lactlon 231.Aro brake lights ON?
Disconnecl lhe 26P and 22P con-nectors from the TCM.Connoct the Test Harness "A"
and "D" coonectors to th€ wireharness only, not to the TCM {seepage 14-49).
Measure the voltage between the02 and 425 or A26 terminalswith the brake pedal dopressed.
Ropalr op6n in GRt{/wHT wiro b.-tween tho D2 to7minsl and brak.!witch.ls there battery voltage?
. Bfako switch signal OK.. Check for 10036 TCM connec-tors. It noco$ary, sub3tiluto aknown-good TCM and ioch6ck.. Insp6ct tho brako switch circuiilsoo soction 23).
oooooooooooo
oooooooooooo
ooooooooooo
oooooooooo
A25 t-)
D2 l+)
Page 508 of 1413
Valve Body
Repair
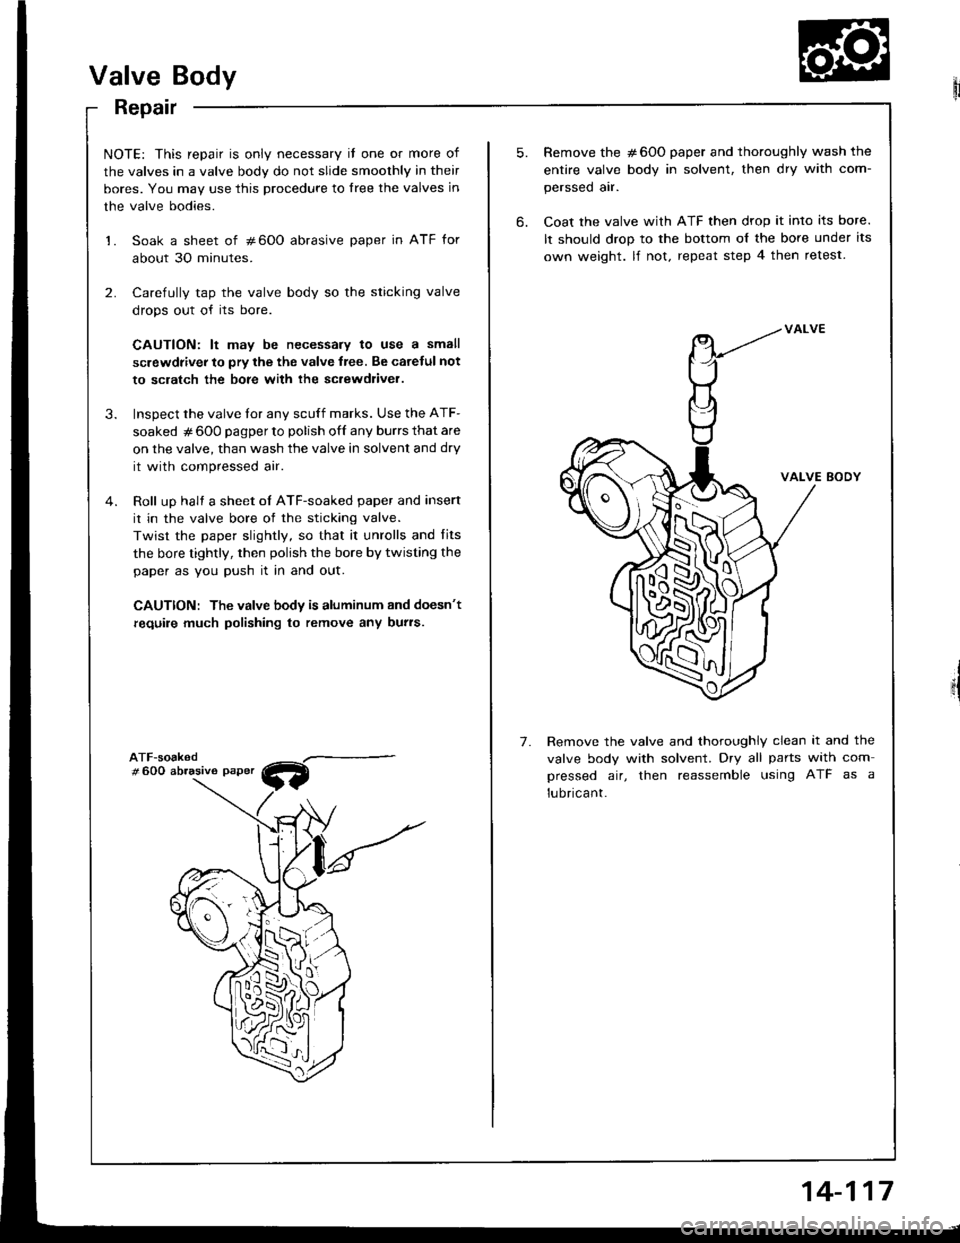
NOTE: This repair is only necessary il one or more of
the valves in a valve body do not slide smoothly in their
bores. You may use this procedure to lree the valves in
the valve bodies.
1. Soak a sheet of #600 abrasive paper in ATF for
about 30 minutes.
2. Carefully tap the valve body so the sticking valve
drops out of its bore.
CAUTION: lt may be necessary to use a small
screwdiiver to pry the the valve lree. Be carelul not
to sclatch the bore with ihe sc.ewdliver.
3. Inspect the valve tor any scuff marks. Use the ATF-
soaked # 600 pagper to polish off any burrs that are
on the valve, than wash the valve in solvent and dry
it with compressed air.
4. Roll up halt a sheet oI ATF-soaked paper and insert
it in the valve bore of the sticking valve.
Twist the paper slightly, so that it unrolls and fits
the bore tightly, then polish the bore by twisting the
paper as you push it in and out.
CAUTION: The valve body is aluminum and doesn't
require much polishing to remove any burs.
W
5.
6.
7.
Remove the #600 paper and thoroughly wash the
entire valve body in solvent, then dry with com-
perssed air.
Coat the valve with ATF then drop it into its bore.
It should drop to the bottom o{ the bore under its
own weight. lf not. repeat step 4 then retest.
VALVE BODY
Remove the valve and thoroughly clean it and the
valve body with solvent. Dry all parts with com
pressed air, then reassemble using ATF as a
lubricant.
14-117
Page 595 of 1413
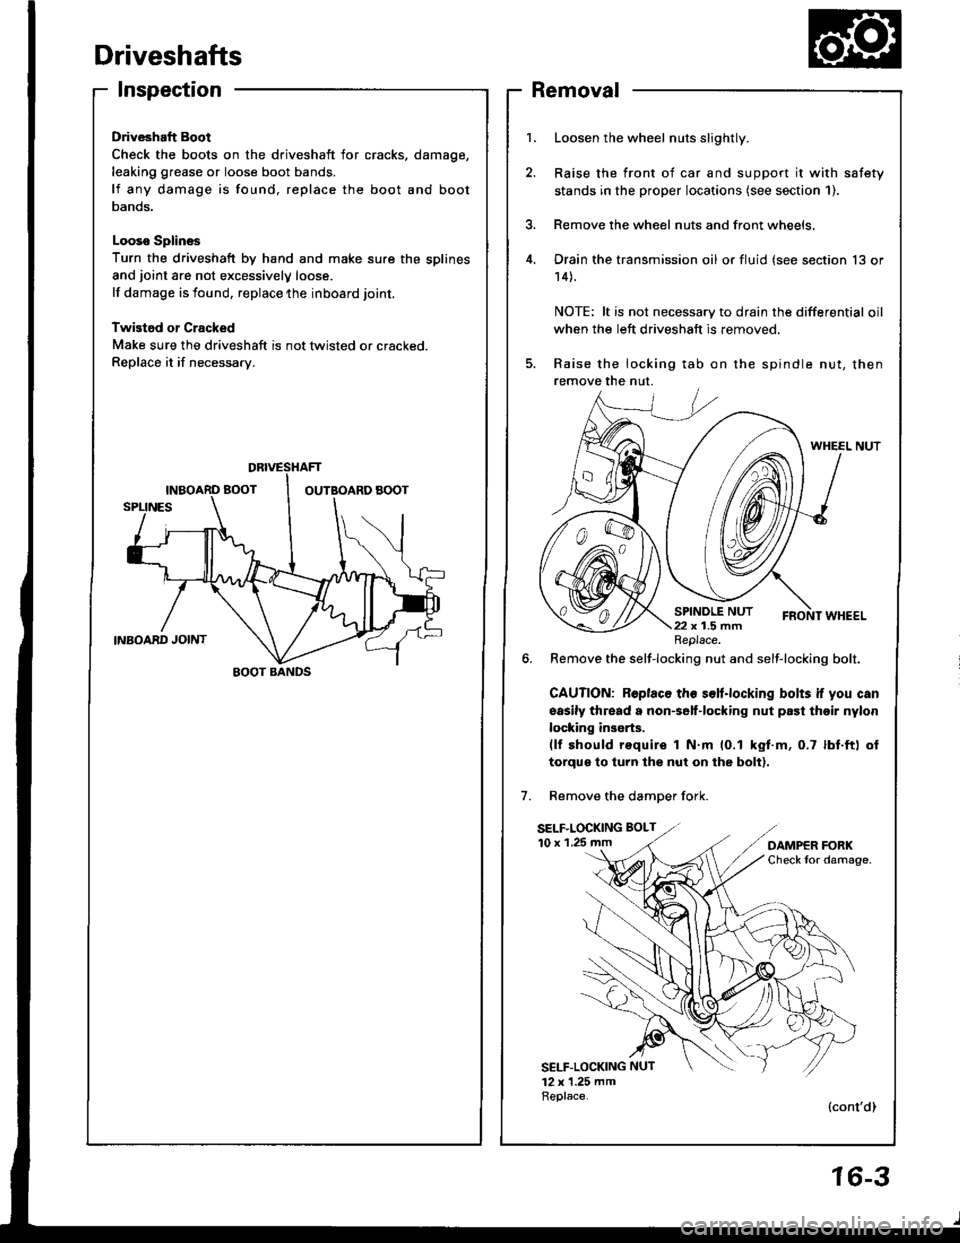
Driveshafts
Inspection
Driveshaft Boot
Check the boots on the driveshaft for cracks,
leaking grease or loose boot bands.
lf any damage is found, replace the boot
Danos.
Looso Splines
Turn the driveshaft by hand and make sure the splines
and joint are not excessivelV loose.
lf damage is found, replace the inboard joint,
Twistod or Cracked
Make sure the driveshaft is not twisted or cracked.
Replace it if necessarv.
damage,
and boot
Removal
Loosen the wheel nuts slightly.
Raise the front of car and support it with safety
stands in the proper locataons (see section 1),
Remove the wheel nuts and front wheels,
Drain the transmission oil or fluid (see section 13 or
14).
NOTE: lt is not necessary to drain the differential oil
when the left driveshaft is removed.
Raise the locking tab on the spindle nut, then
remove the nut.
WHEEL NUT
6. Remove the self-locking nut and self-locking bolt.
GAUTION: Roplaco th€ s€lt.locking bolts if you can
sasily thread a non€elf-locking nut prst thoir nylon
locking inserts.(lf should require I N.m (0.1 kgt.m, 0.7 lbf.ft) ol
torqus to turn lhs nut on the bolt).
Remove the damDer fork.
SELF.LOCKING BOLT
10 x 1.25 mm
SELF-LOCKING NUT
12 x 1.25 mmReplace.(cont'dl
DBIVESTIAFT
EOOT BANDS
Replace.
16-3
Page 601 of 1413
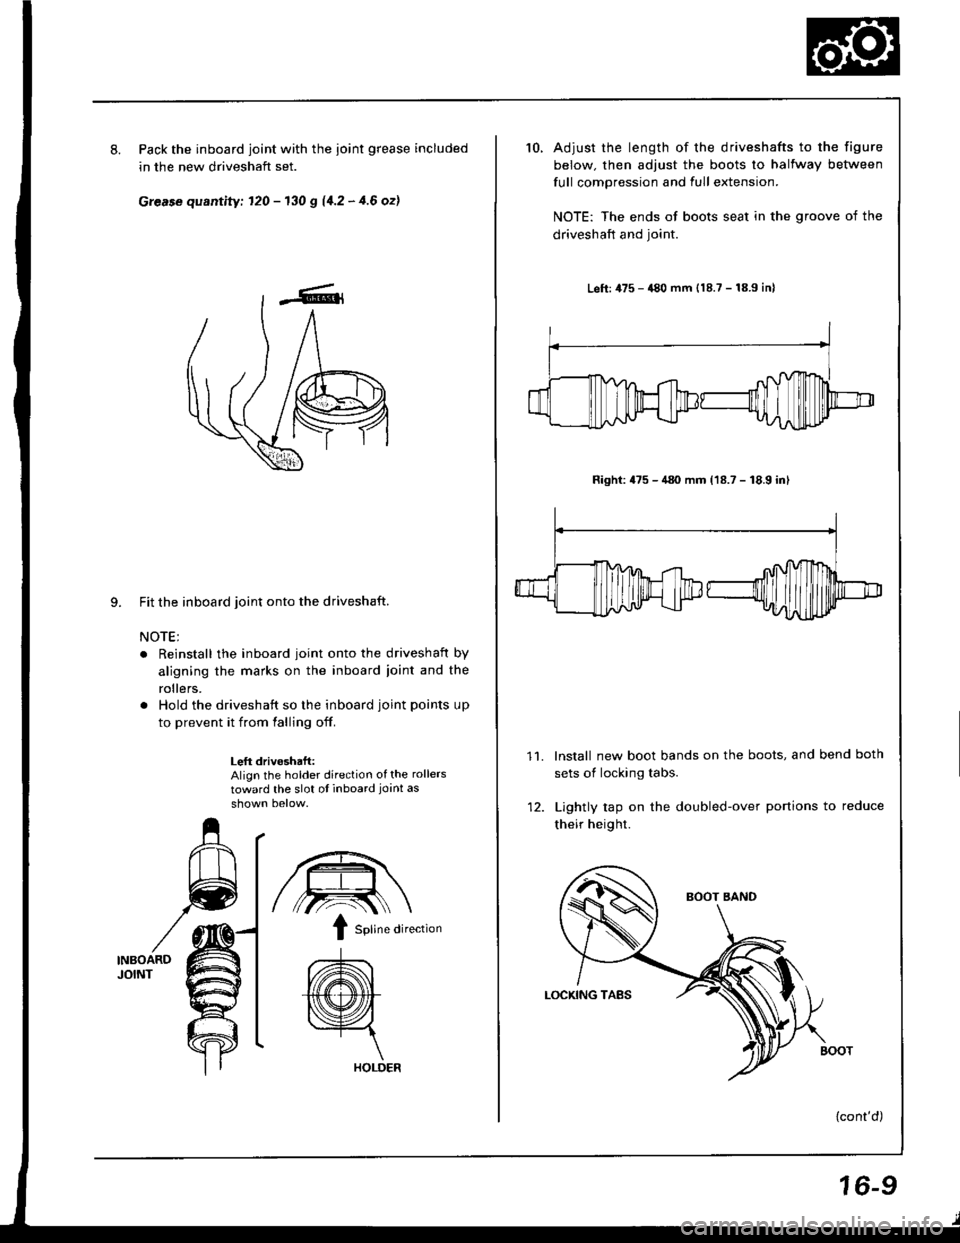
8.Pack the inboard joint with the ioint grease included
in the new driveshaft set.
Grease quantity; 120 - 130 g 11.2 - 4.6 ozl
9. Fit the inboard joint onto the driveshaft.
NOTE;
. Reinstall the inboard joint onto the driveshaft by
aligning the marks on the inboard ioint and the
rollers.
. Hold the driveshaft so the inboard joint points up
to prevent it from falling off.
Left drivoshaft:Align the holder direction of the rollers
toward the slot ot inboard joint as
INBOARDJOINT
/,.-:--\ \
I sotine di,ection
A\
{(@}
HOLDER
10.Adjust the length of the driveshafts to the figure
below. then adjust the boots to halfway between
full compression and full extension.
NOTE: The ends of boots seat in the groove of the
driveshaft and joint.
Left: 475 - 480 mm {18.7 - 18.9 inl
Right: 475 - 480 mm (18.7 - 18.9 inl
lnstall new boot bands on the boots, and bend both
sets of locking tabs.
Lightly rap on the doubled-over portions to reduce
their height.
{cont'd)
11.
16-9