HONDA INTEGRA 1994 4.G Workshop Manual
Manufacturer: HONDA, Model Year: 1994, Model line: INTEGRA, Model: HONDA INTEGRA 1994 4.GPages: 1413, PDF Size: 37.94 MB
Page 921 of 1413
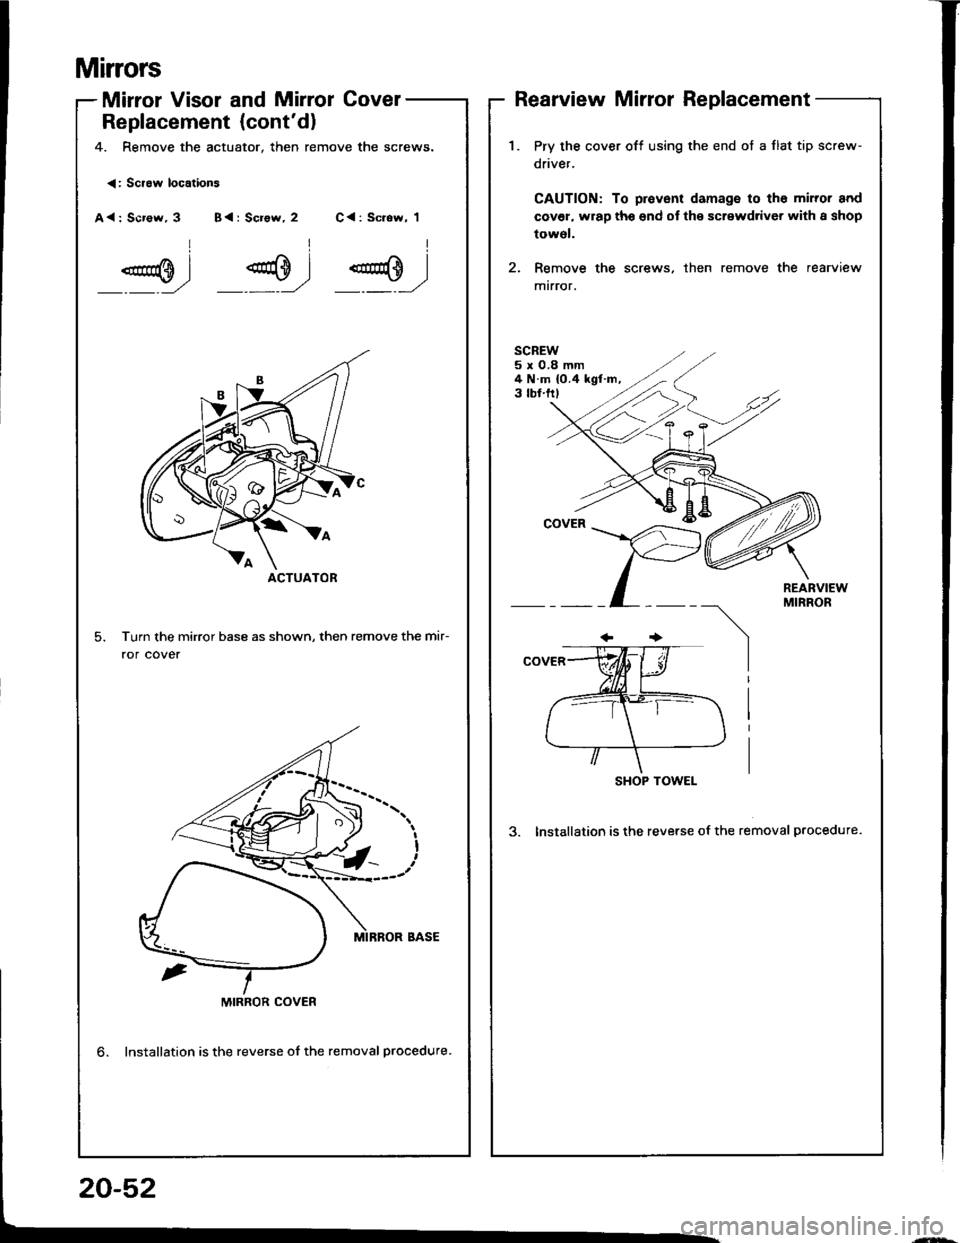
Mirrors
Mirror Visor and Mirrol Covel
Replacement {cont'd)
4. Remove the actuator, then remove the screws.
Rearview Mirror Replacement
<: Scraw locations
A<: Scr€w, 3 B{: Screw, 2 C<: Sc.ew, 1
Turn the mirror base as shown, then remove the mir-
ror cover
ACTUATOR
1.Pry the cover off using the end ot a flat tip screw-
driver.
CAUTION: To provent damage to tho miror and
cov€l, wrap tho end of the screwdriver with I shop
towol.
Remove the screws, then remove the rearview
mtrror.
SCREW5x0.8mm4 N.m {0.4 kgf.m,3 tbf.ftl
REARVIEWMIRROR
SHOP TOWEL
3. Installation is the reverse of the removal procedure.
MIRROR COVER
lnstallation is the reverse of the removal procedure.
20-52
Page 922 of 1413
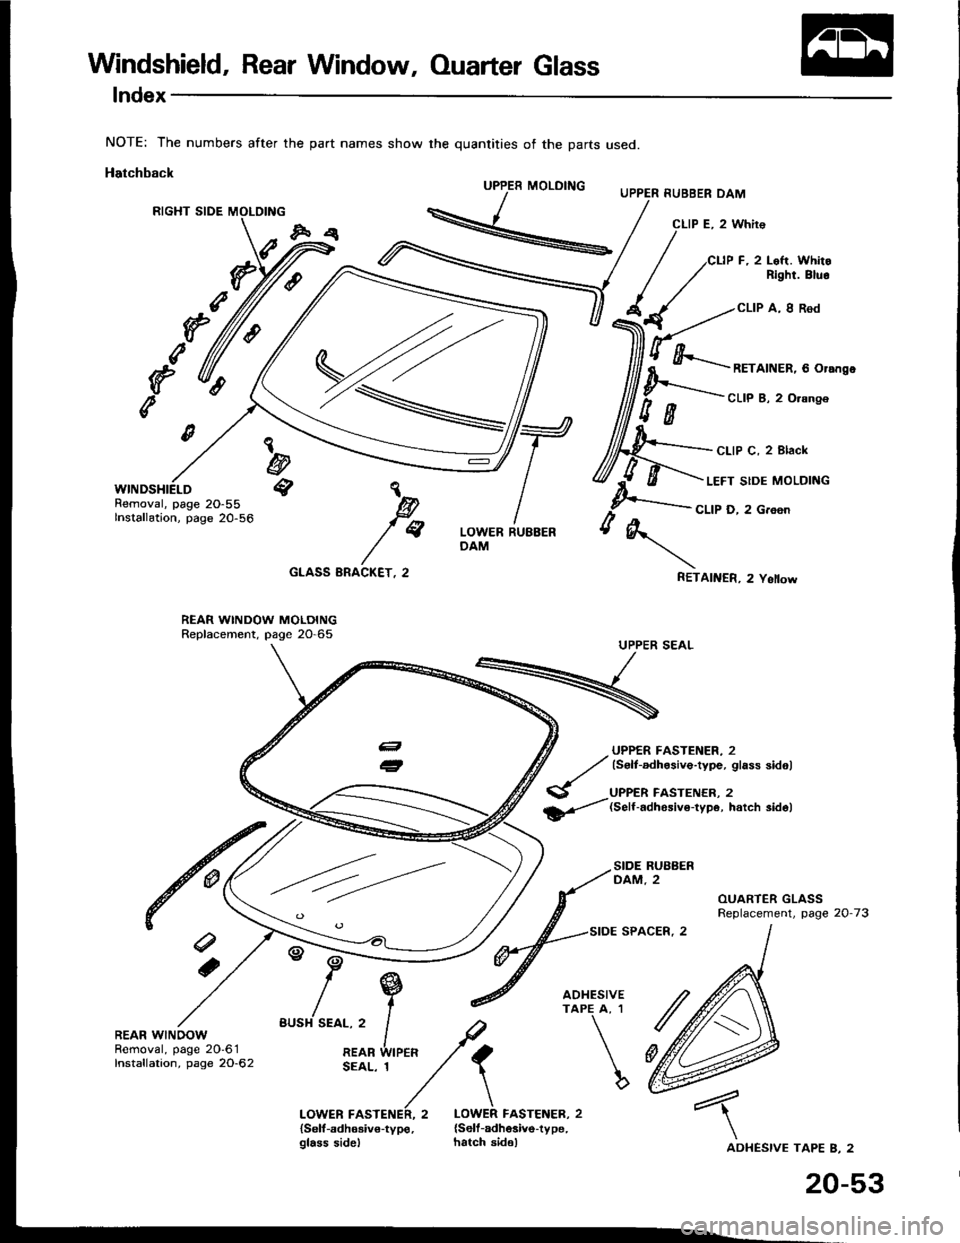
Windshield, Rear Window, Ouarter Glass
lndex
NOTE: The numbers after the part names show the quantities of the parts used.
Hatchback
RIGHT SIDE
UPPER RUBBER DAM
CLIP E. 2 Whir€
Cl-lP F, 2 Loft. WhitoRight. Bluo
CLIP A, I Rod
RETAINER, 6 Orengo
CLIP B, 2 O.an96
CLIP C, 2 Black
LEFT SIDE MOLDING
CLIP D. 2 G.6en
AINER, 2 Ysllow
UPPER SEAL
UPPER FASTENER, 2(S€lt-adh.sive-type, glass sid6l
UPPER FASTENER, 2(Self-6dhosiv6-type, hatch sidel
e.'.
RET
REAR WINDOW MOLOINGReplacement, page 2O-65
SIDE RUAAERDAM. 2
SIOE SPACER. 2
REAR WINDOWRemoval, page 20'6'1Instaflataon, page 20-62
f ? *
""'^i^r.{"'/\
LOWER FASTENER. 2{Self-adh6siv€-type,glass sidel
LOWER FASTENER, 2{Selt-adhosive-1ype,hatch sid6)TAPE B, 2
20-53
UPPER MOLOING
Removal, page 20-55Installation, page 20-56
ADHESIVE
Page 923 of 1413
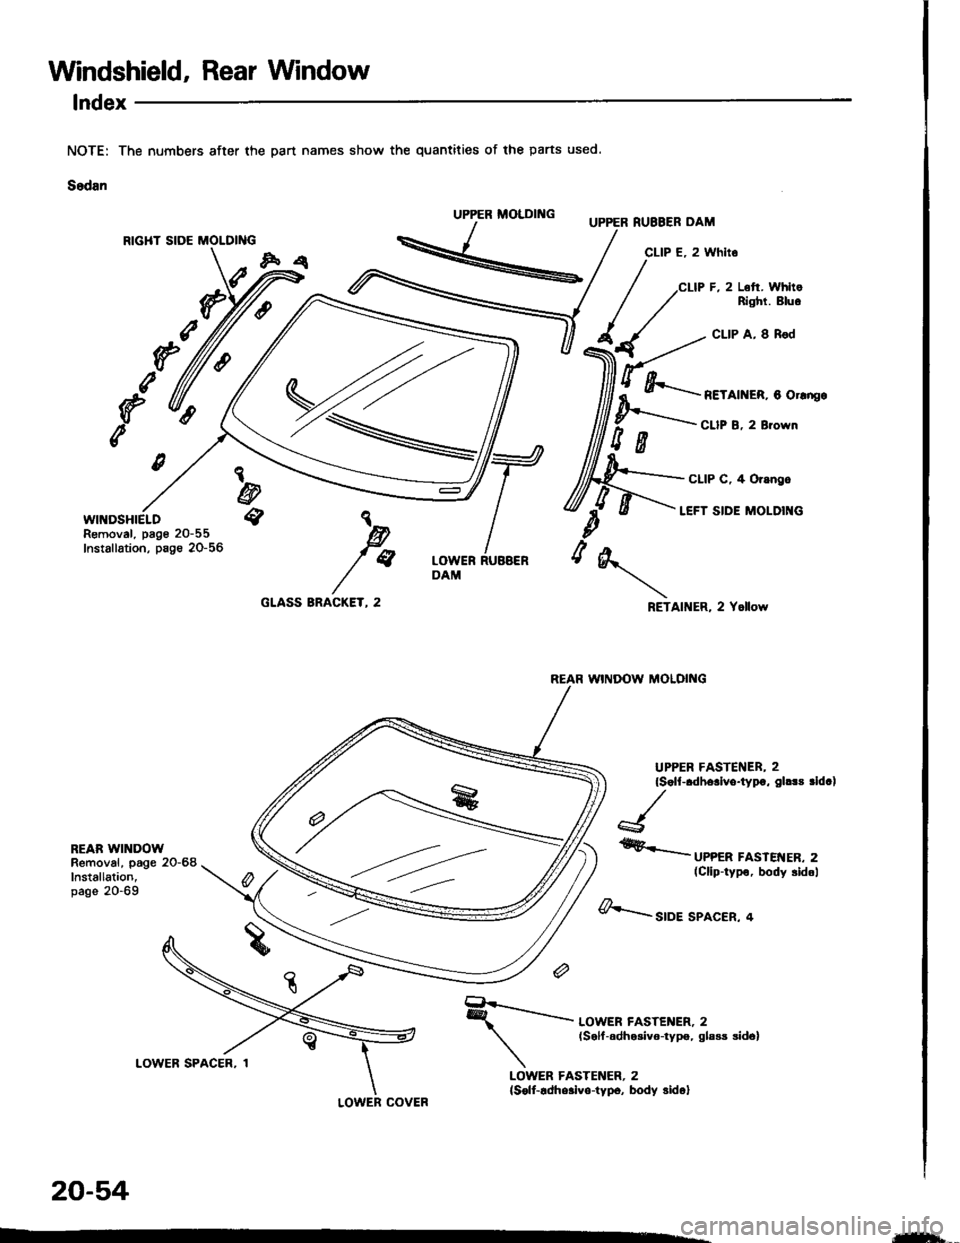
Windshield, Rear Window
lndex
part names show the quantities of the parts used.
RIGHT SIDE MOLDING
WINDSHIELDRemoval, page 20-55Installation, page 20-56
CLIP F, 2 L6ft. WhltoRighl. Bluo
CLIP A, I Rod
€
e
&...- *aro,nr*. 6 o'!.gc
CLIP B, 2 B?own
AINER. 2 Yollow
,@
/'GLASS BRACKET, 2
REAR WINDOWRemoval, page 20-68Installation,page 20-69
NOTE: The numbers after the
Sodan
bq
UPPER MOLDII{GUPPER RUEBER OAM
cLtP E, 2 Whir6
A
\
RET
REAR WINDOW MOLOING
R.-.......-"-.owER FA'TENER. 2
lsolf-.dhe3ivo-type, sla$ sidol
LOWER FASTENER, 2(Solt-rdhe.lvo-typo. body sidol
UPPER FASTENER, 2
{S.ll-.dho!lvo-typo, gh$ .ldcl
g
.qB.....--
urra" FAslEr{ER, 2(Cllp-typo, body .ld.l
&'.....- r,o, sPAcER, 4
20-54
LOWER COVER
ffit*--
Page 924 of 1413
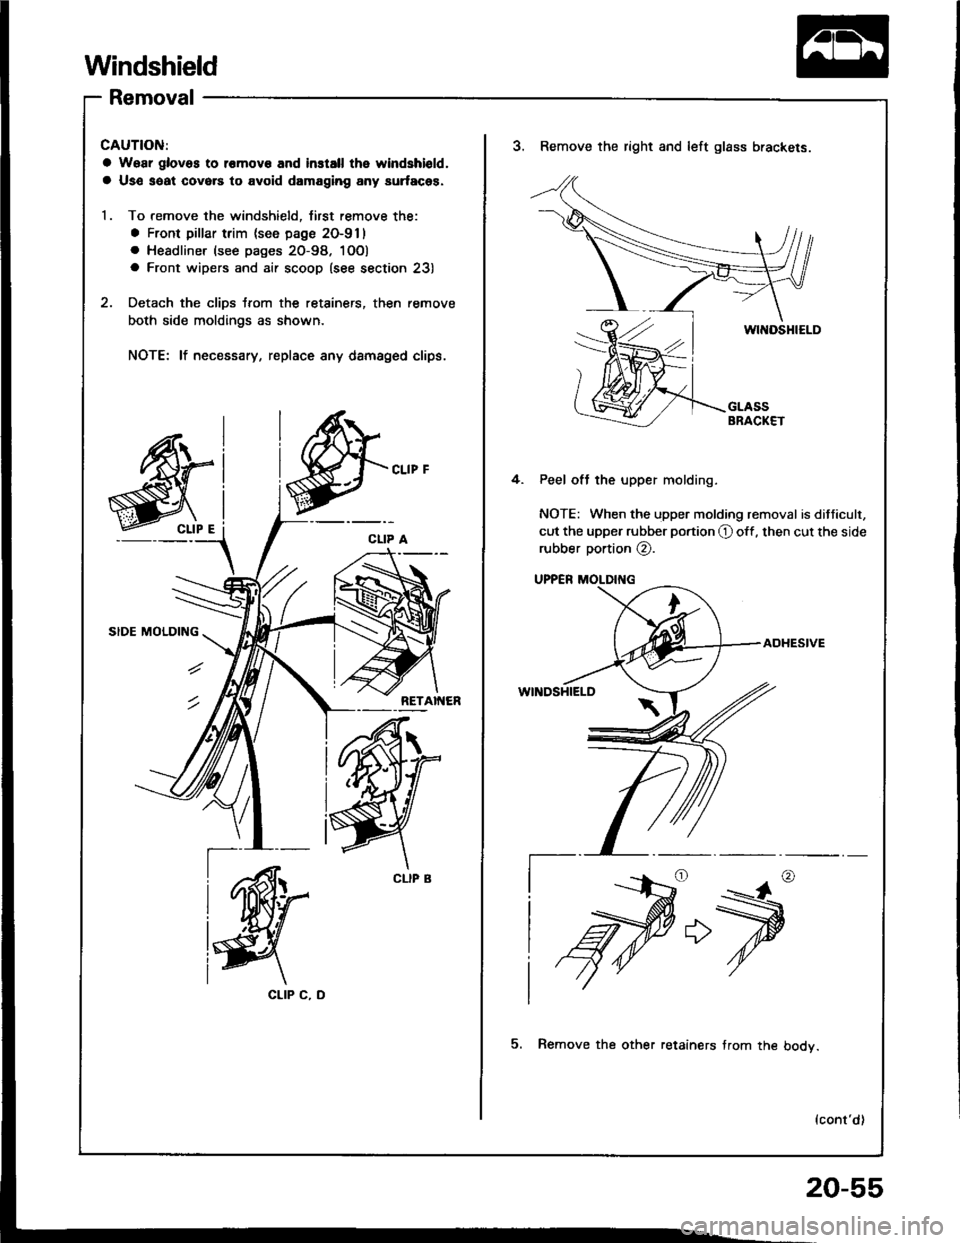
Windshield
Removal
CAUTION:
a Woar glovos to l€mov€ and install the windshiold,
a Us€ saat covers to avoid damaging any surfaces.
1. To remove the windshield, first remove the:
a Front pillar trim (see page 20-911
. Headliner (see pages 20-98. 1OO)
a Front wipers and air scoop (see section 23)
2. Detach the clips trom the retainers, then remove
both side moldings as shown.
NOTE: lf necessary, replace any dsmaged clips.
CLIP C, D
3. Remove the right and left glass brackels.
4. Peel oft the upper molding.
NOTE: When the upper molding removal is ditticult,
cut the upper rubber portion O off, then cut the side
rubber portion @.
UPPER MOLDII{G
ADHESIVE
WINDSHIELD
f--
5. Remove the other retainers trom the bodv.
lcont'd)
>
20-55
Page 925 of 1413
Windshield
Removal (cont'd)
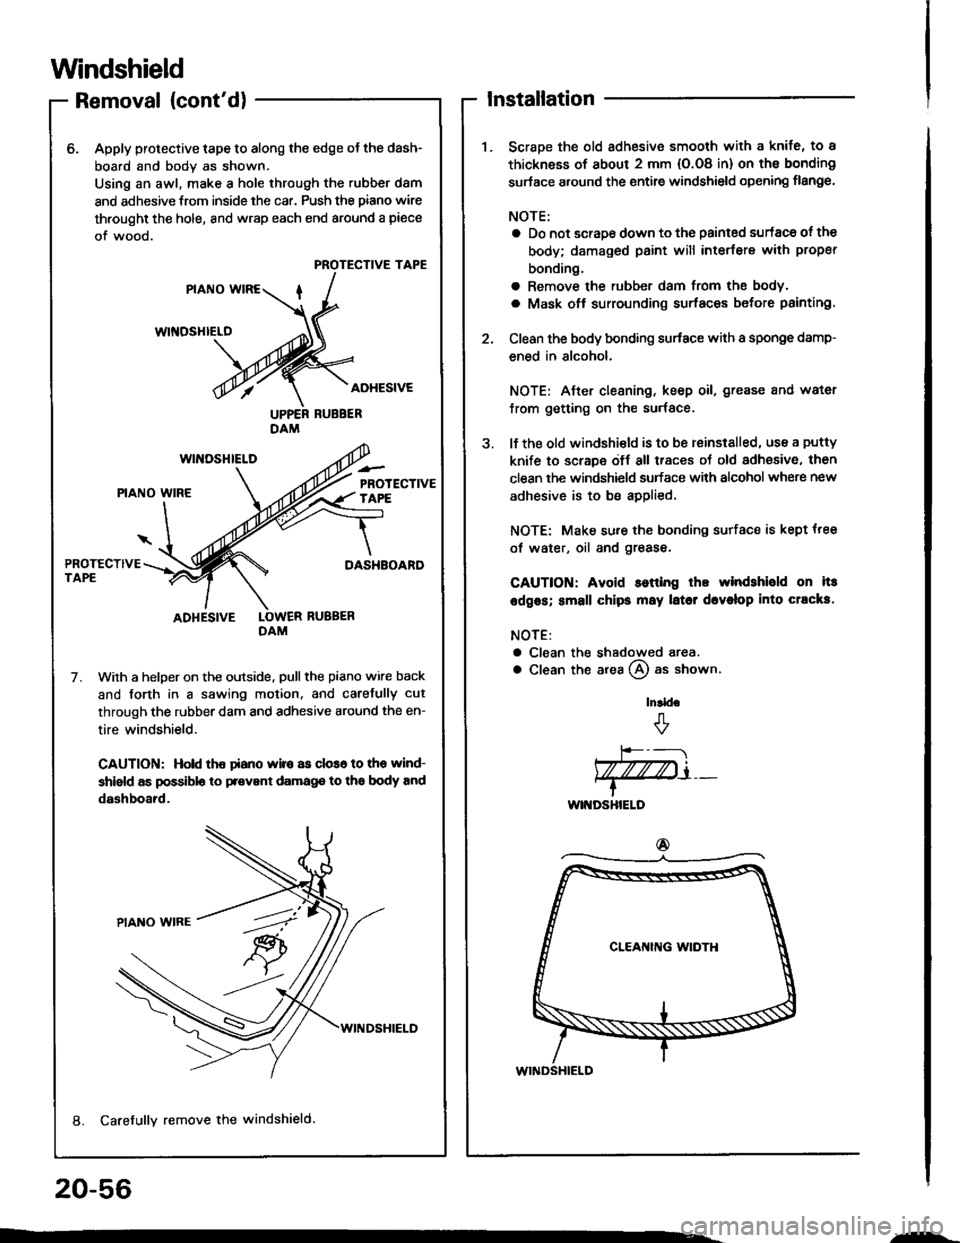
6. Apply protective tape to along the edge ot the dash-
board and body as shown.
Using an awl, make a hole through the rubber d8m
and adhesive from inside the car. Push the piano wire
th.ought the hole, 8nd wrap each end around a paece
of wood.
w|l{osHlELo
WII{DSHIELD
PIANO WIRE
ADHESIVE
Wilh a helper on the outside. pull the piano wire back
and forth in a sawing motion. and carefully cut
through the rubber dam and adhesive around the en-
tire windshield.
CAUTION: Hold tho dano vyi]o as clos6 to tho wind-
shield as possible to pr€vsnt damag€ to ths body and
dashboard.
8. Carefully remove the windshield.
lnstallation
1. ScraDe the old adhesive smooth with a knife, to a
thickness of about 2 mm (O.O8 in) on ths bonding
surtace around the entite windshield opening flange,
NOTE:
a Do not scrape down to the paintsd surfaco ot the
body; damaged paint will interfere with proper
bonding.
a Remove the rubber dam from the bodv.
a Mask off surrounding surfaces betore painting.
2. Clean the body bonding surtace with a sponge damp-
ened in alcohol.
NOTE: Atter clesning, keep oil, grease and water
from getting on the surface.
3. lf the old windshi€ld is to be reinstalled, use a putty
knife to scrape df{ all iraces oJ old adhesive, then
clean the windshield surface with alcohol where new
adhesive is to bs applied.
NOTE: Make su.e the bonding surface is kept {ree
of water, oil and grease.
CAUTION: Avoid sotllng thE wlndshiold on hs
edges; small chips may latct dcvelop into crack3'
a Clean the shadowed area.
a Clean the area @ as shown.
wtt{DsHtELo
WINDSHIELD
DAM
InCd.
+
vn77777ri _
t
20-56
.--
Page 926 of 1413
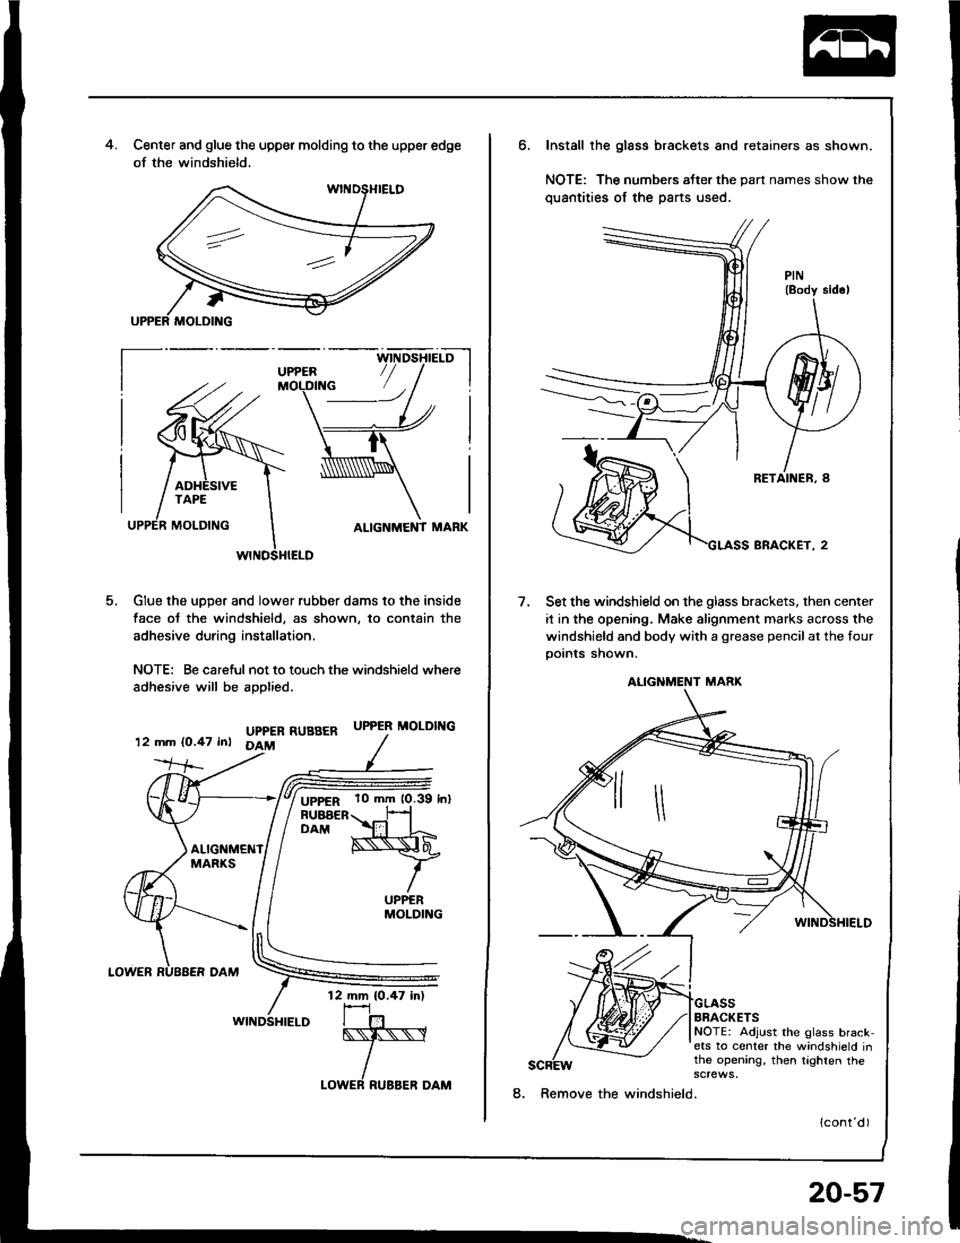
4.Center and glue the upper molding to the upper edge
of the windshield.
ALIGNMENT MARK
GIue the uDDer and lower rubber dams to the inside
face ot the windshield, as shown, to contain the
adhesive during installation,
NOTE: Be careful not to touch the windshield where
adhesive will be applied.
UPPER RUBBER UPPER MOLDING
12 mm {0.47 inl DAM
1O mm 10.39 ln)
6. Install the glsss brackets and retainers as shown.
NOTE: The numbers atter the pan names show the
quantities of the psrts used.
BRACKET, 2
7. Set the windshield on the glass brackets, then center
it in the opening. Make alignment marks across the
windshield and body with a grease pencilat the four
points shown.
ALIGNMENT MARK
8. Remove the windshield.
20-57
Page 927 of 1413
Windshield
Installation (cont'd)
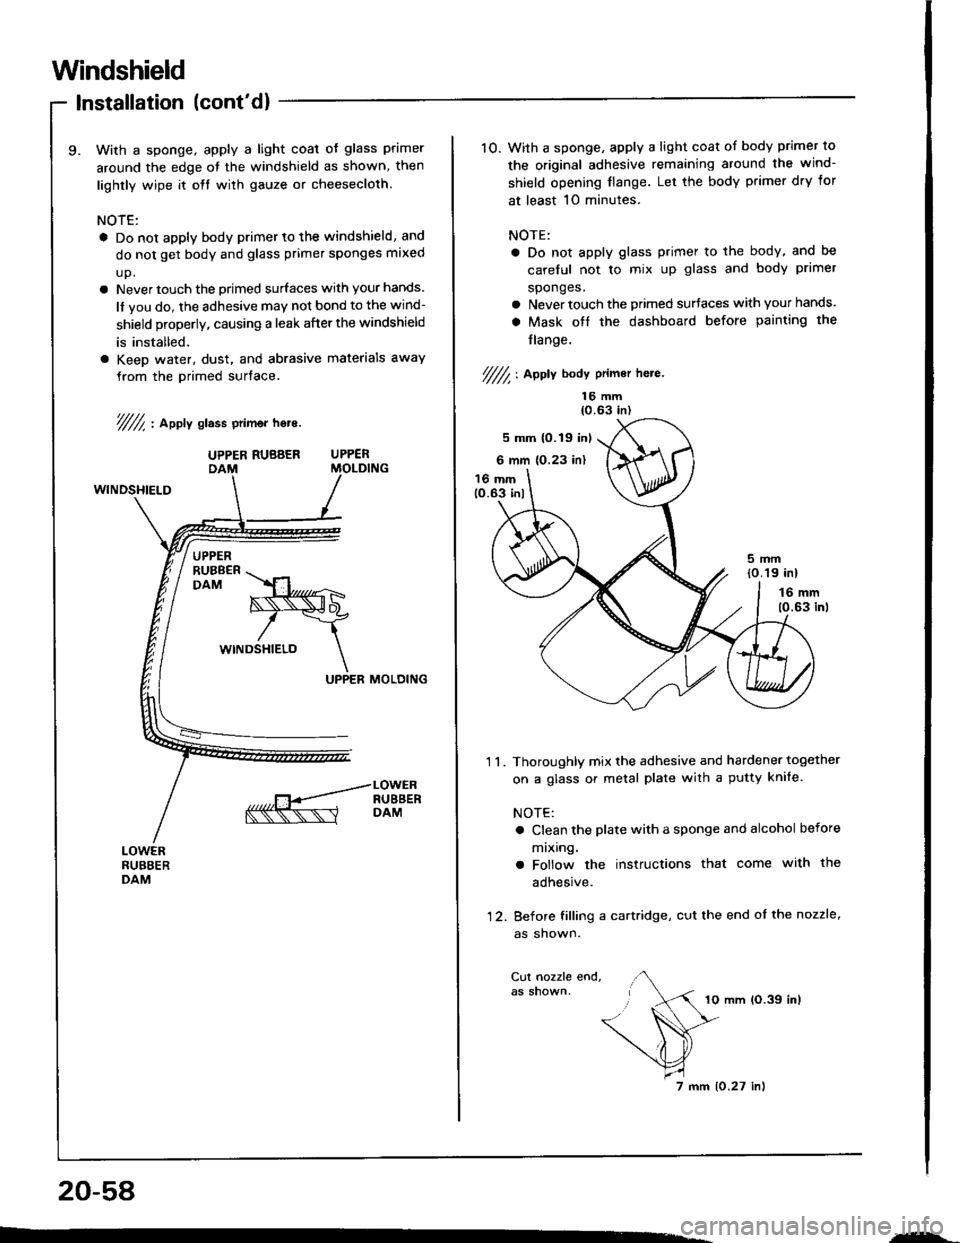
With a sponge. apply a light coal oJ glass primer
around the edge ot the windshield as shown, then
lightly wipe it olt with gauze or cheesecloth.
NOTE:
a Do not apply body primer to the windshield, and
do not get body and glass primer sponges mlxed
up.
a Never touch the primed surfaces with your hands.
ll you do, the adhesive may not bond to the wind-
shield properly, causing a leak afterthe windshield
is installed.
o Keep water, dust, and abrasive materials awaY
from the primed surface.
V//f, : apptv stass ptimer hors.
WINDSHIELD
RUBBER -DAM .YJ * o
>\ast,
/\WINDSHIELD
\UPPER MOLOING
UPPER RUBBER UPPER
10. With a sponge, apply a light coat of body primer to
the original adhesive remaining around the wind-
shield opening flange. Let the bodY primer dry tor
at least 1O minutes.
NOTE:
a Do not apply glass primer to the body, and be
careful not to mix up glass and body primer
sponges,
a Never touch the primed surfaces with your hands.
a Mask otl the dashboard before painting the
flange.
//////, I Aeely bodv Primer h6te.
16 mm{0.63 in)
5 mm {0.19 inl
6 mm (0.23 in)
16 mm1O.63 inl
5mm(O.19 inl
16 mm
10.63 inl
1 1 . Thoroughly mix the adhesive and hardener together
on a glass or metal plate with a putty knife.
NOTE:
a Clean the plate with a sponge and alcohol before
mixlng.
a Follow the instructions that come with the
adhesive.
12. Before filling a cartridge, cut the end ol the nozzle,
as shown.
Cut nozzle end,
10 mm (O.39 inl
20-58
7 mm 10.27 in)
,*-
Page 928 of 1413
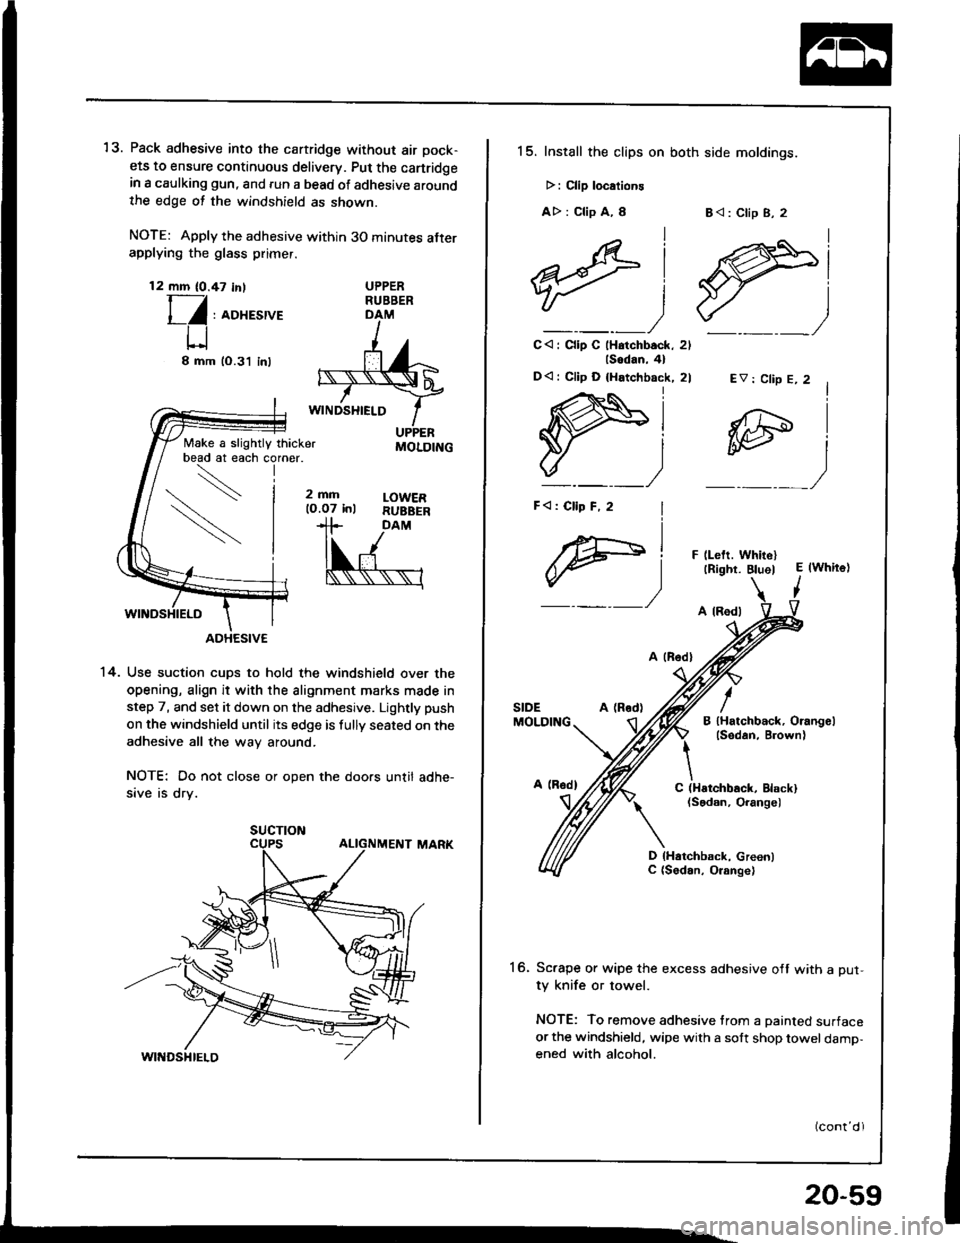
13. Pack adhesive into the cartridge without air pock-
ets to ensure continuous delivery. Put the canridgein a caulking gun, and run a bead ot adhesive aroundthe edge ot the windshield as shown.
NOTE: Apply the adhesive within 30 minutes afterapplying the glass primer.
12 mm (0.47 in,T-/
l_/ : roxesrve
U8mm
Make a slightly thicker
DAM
'14. Use suction cups to hold the windshield over the
opening, align it with the alignment marks made in
step 7, and set it down on the adhesive. Lightly push
on the windshield until its edge is fully seated on the
adhesive all the way around.
NOTE: Do not close or open the doors until adhe-
sive is dry.
UPPERRUBBER
lO.3'l inl
2mfilO.O7 inlLOWERRUBBEB
MOLDING
SUCTION
15. Install the clips on both side moldings.
>: Clip localione
A> : Clip A, I
lsodan,4l
D<: Cllp D {Hatchback, 2l
I
F)
B<: Clip B, 2
lAi
ffil"___)
C<: Clip C lHatchback, 2l_)
EV: Clip E, 2
F llelt. WhitellRight. BluelE lwhite)
I
A (Rod)
A lRodl
B lHatchback, Orangellsedan, B.own)
/SIDEMOLDING
It\C (Hstchback, Elack)(Sodan, Orangel
D lHatchback, Green)C (Sodan, O.ange)
16. Sc.ape or wipe the excess adhesive off with a Dut-ty knife or towel.
NOTE: To remove adhesive trom a painted surface
or the windshield, wipe with a solt shop towel damp-ened with alcohol.
20-59
Page 929 of 1413
Windshield
lnstallation (cont'd)
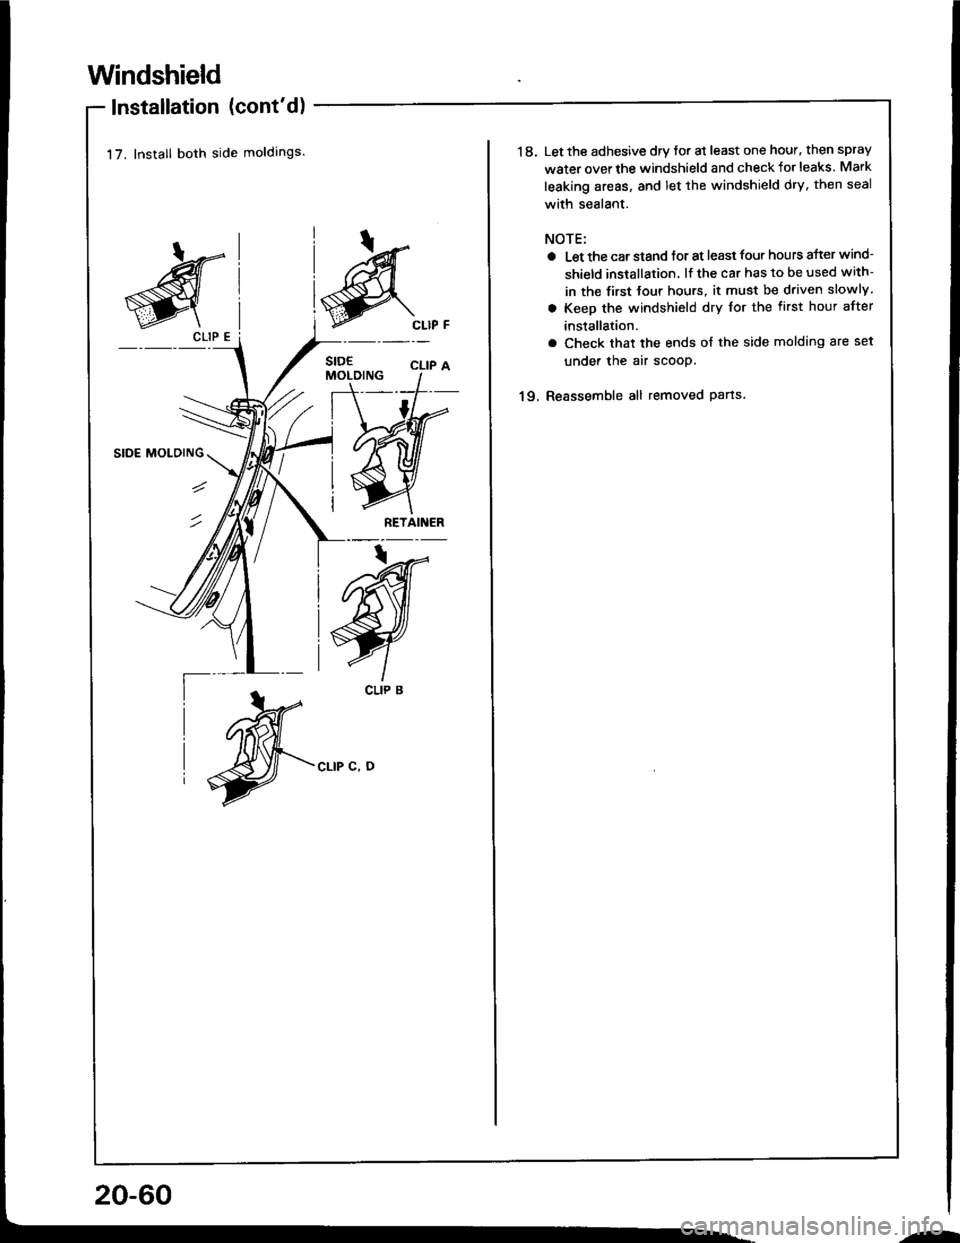
17. lnstall both side moldings.
SIDE MOLOING
CLIP C, D
RETAINER
g
CLIP E
CLIP B
20-60
--
1 8. Let the adhesive dry tor at least one hour. then spray
water overthe windshield and check for leaks. Mark
leaking areas, and let the windshield dry, then seal
with sealant.
NOTE:
a Let the car stand tor at least four hours after wind-
shield installation, lf the car has to be used with-
in the first four hours, it must be driven slowly
a KeeD the windshield dry for the first hour after
installation.
a Check that the ends of the side molding are set
under the air scooP.
19. Reassemble all removed Pans.
Page 930 of 1413
Rear Window
Removal
Hatchback
CAUTION;
a Use covsrs to avoid damaging tho interior.
a Wear gloves to romove and install the glass.
a Do not damags the defroster grid linss.
a Tako care not scratch th€ raar window molding,
1. To remove the rear window. first remove the:a Rear shelt (see page 20-91)
a Hatch side trim and hatch trim panel (see page
20-146)
. High mount brake light (see section 23)a Rear wiper and wiper motor (see section 231
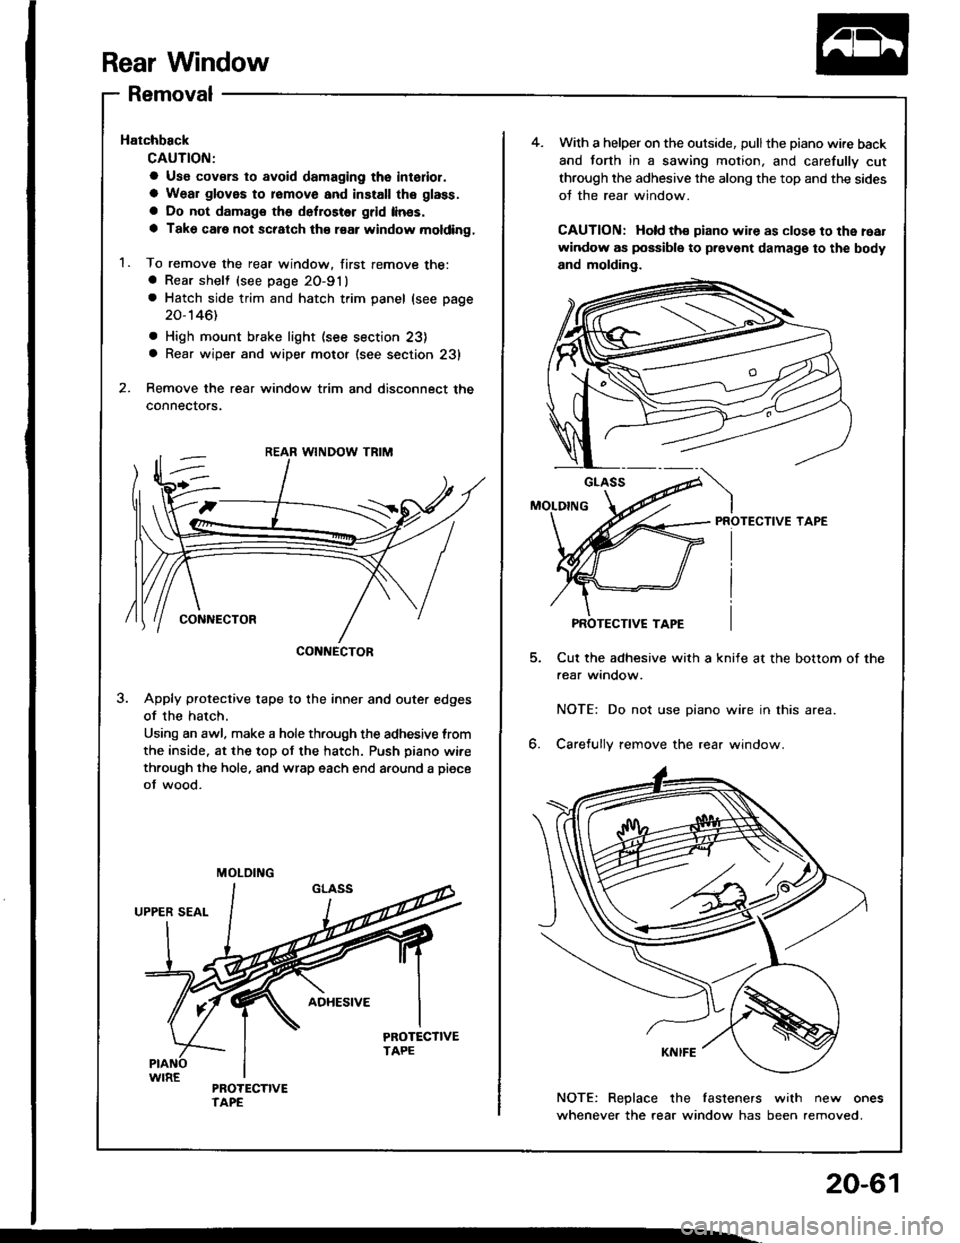
2. Remove the rear window trim and disconnect the
connectors.
3. Apply protective tape to the inner and outer edges
of the hatch.
Using an awl. make a hole th.ough the adhesive trom
the inside. at the top ot the hatch. Push piano wire
through the hole, and wrap each end a.ound a piece
of wood.
CONNECTOR
MOLOING
4.With a helper on the outside, pullthe piano wire back
and forth in a sawing motion, and carefully cut
through the adhesive the along the top and the sides
oJ the rear window.
CAUTION: Hold ths piano wire as clos€ to the roat
window as possible to prevont damage to the body
and molding.
PROTECTIVE TAPE
Cut the adhesive with a knife at the bottom of the
aear window.
NOTE: Do not use piano wire in this area.
6. Carefully remove the rear window.
NOTE: Replace the fasteners with new ones
whenever the rear window has been removed.
PROTECTIVE TAPE
20-61