trunk HONDA INTEGRA 1998 4.G User Guide
[x] Cancel search | Manufacturer: HONDA, Model Year: 1998, Model line: INTEGRA, Model: HONDA INTEGRA 1998 4.GPages: 1681, PDF Size: 54.22 MB
Page 959 of 1681
Bumpers
REAR BUMPER
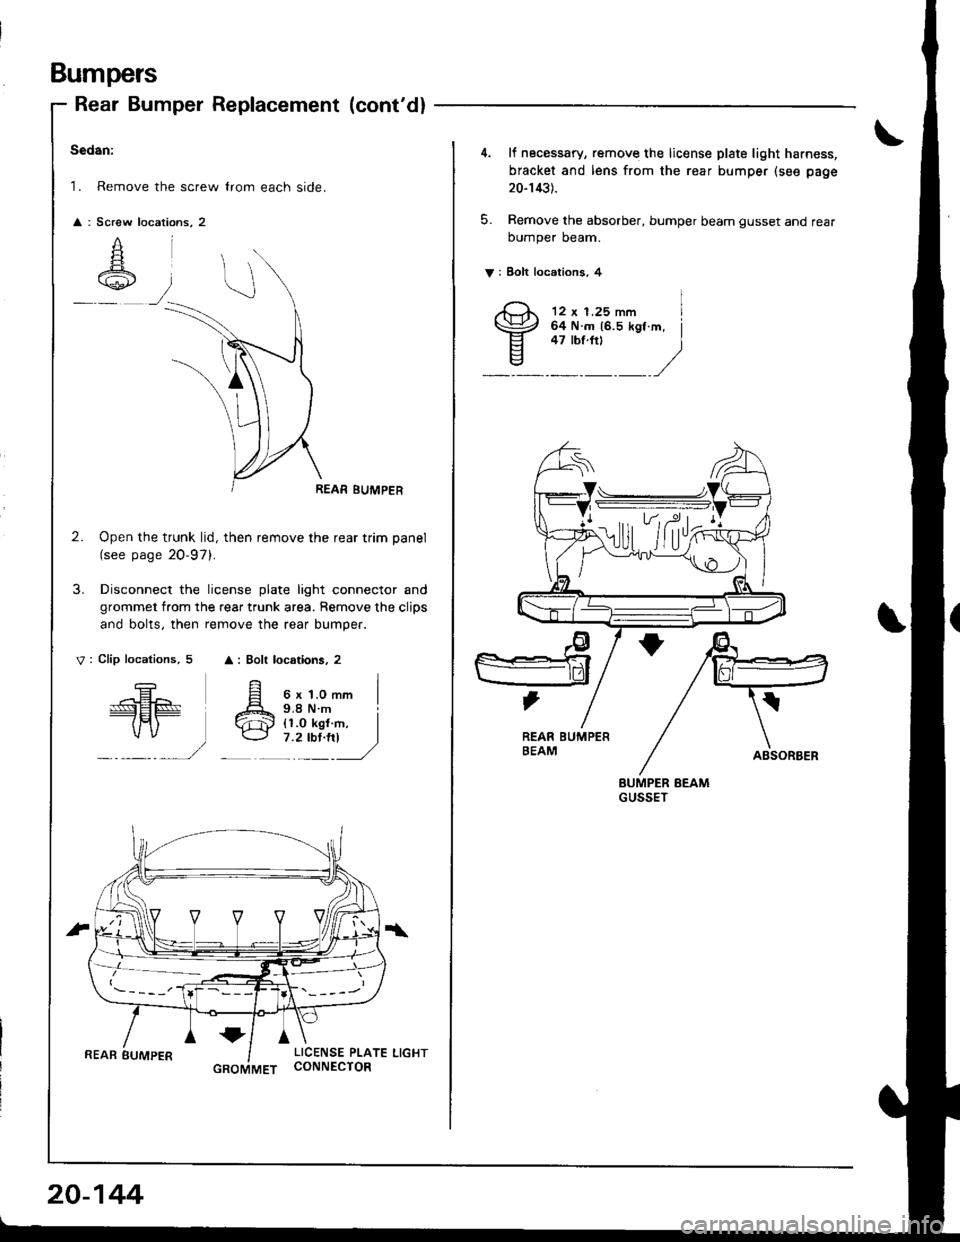
Rear Bumper Replacement (cont'd)
Sedan:
1. Remove the screw lrom each side.
Screw
A
,z::\+,1./
REAR BUMPER
2. Open the trunk lid, then remove the rear trim panel
(see page 20-97).
3. Disconnect the license plate light connector and
grommet from the rear trunk area. Remove the clips
and bolts, then remove the rear bumper.
V: Clip locations, 5 A: Bolt locations, 2
A
/.r-El^ El
=EE Atn) ('r\,
,/
*LICENSE PLATE LIGHTCONNECTOR
20-144
GROMMET
4. lf necessary, remove the license plate light harness,
bracket and lens from the rear bumper (see page
20-1431.
5. Remove the absorber, bumper beam gusset and rearoumper oeam.
V : Eolt locations, 4
12 x 1.25 mm I64 N.m 16.5 kgl.m, j
-::_:_)
fr)
Page 966 of 1681
Trunk Lid
NOTE:
a An assistant is helpful when removing the trunk lid.
a Take care not to damage the t.unk lid and body.
a Open the trunk lid.
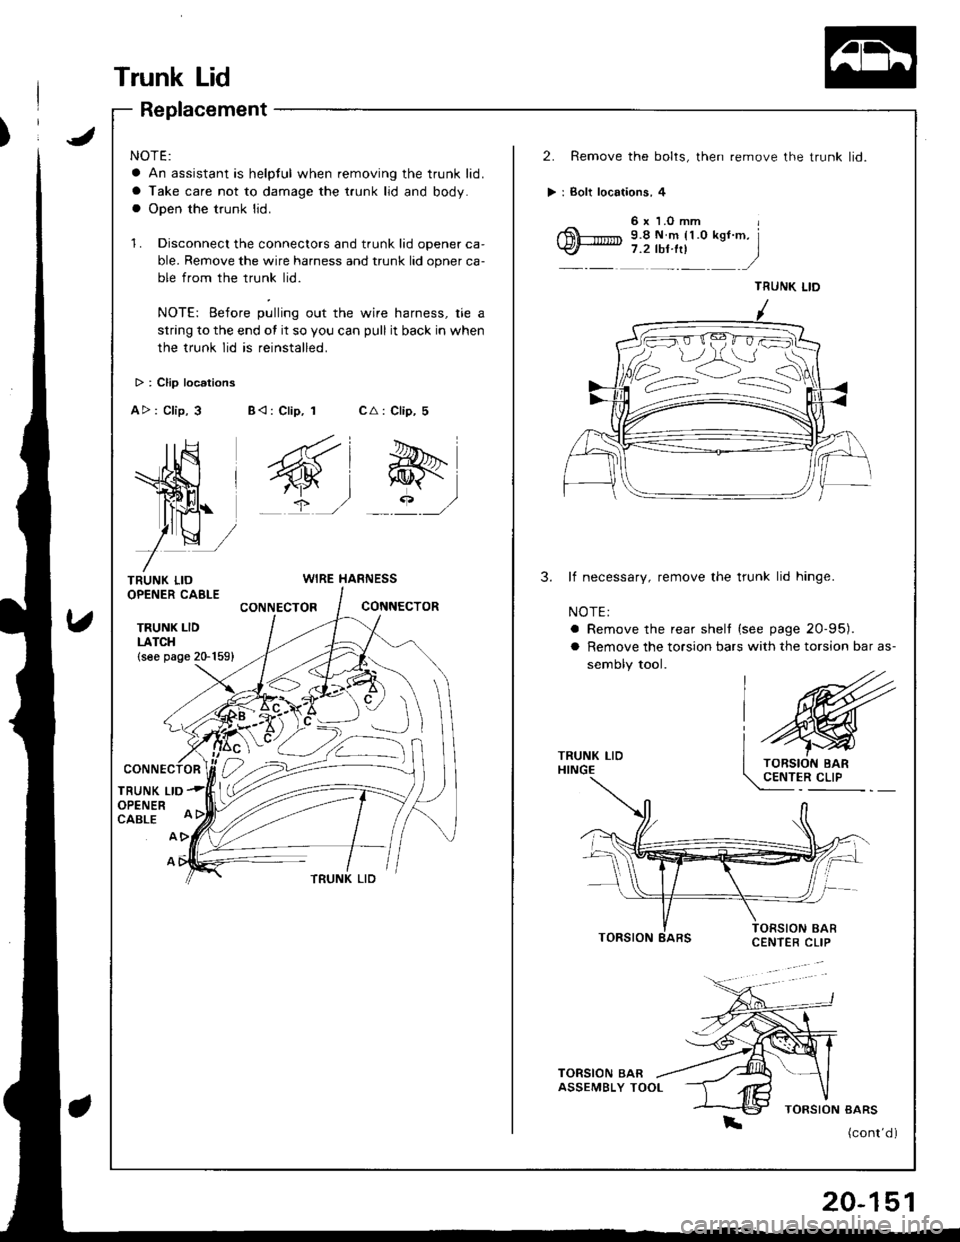
1. Disconnect the connectors and trunk lid opener ca'
ble. Remove the wire harness and trunk lid opner ca-
ble from the trunk lid.
NOTE: Before pulling out the wire harness, tie a
strang to the end ot it so you can pull it back in when
the trunk lid is reinstalled.
2. Remove the bolts, then remove the trunk lid.
> : Bolt locaiions, 4
6x LOmm
6!--'.'.'''* 9.8 N.m n.o ksf .m. l\
A> : Clip, 3B< : Clip, 1
4*i
wj?,/
CA : Clip, 5
&qr/
TRUNK LIDOPENER CAELE
TRUNK LIDLATCH(see page 20-1591
WIRE HARNESS3.lf necessary, remove the trunk lid hinge.
NOTE:
a Remove the rear shelt {see page 20-95).
CONNECTORCONNECTOR
a Remove the torsion bars with the torsion bar as-
sembly tool.
TRUNK LIDHINGE
TRUNK LIDOPENERCABLE
A
TRUNK LID
TORSION
(cont'd )
TRUNK LID
Replacement
20-151
Page 967 of 1681
Trunk Lid
Replacement (cont'dl
i
I
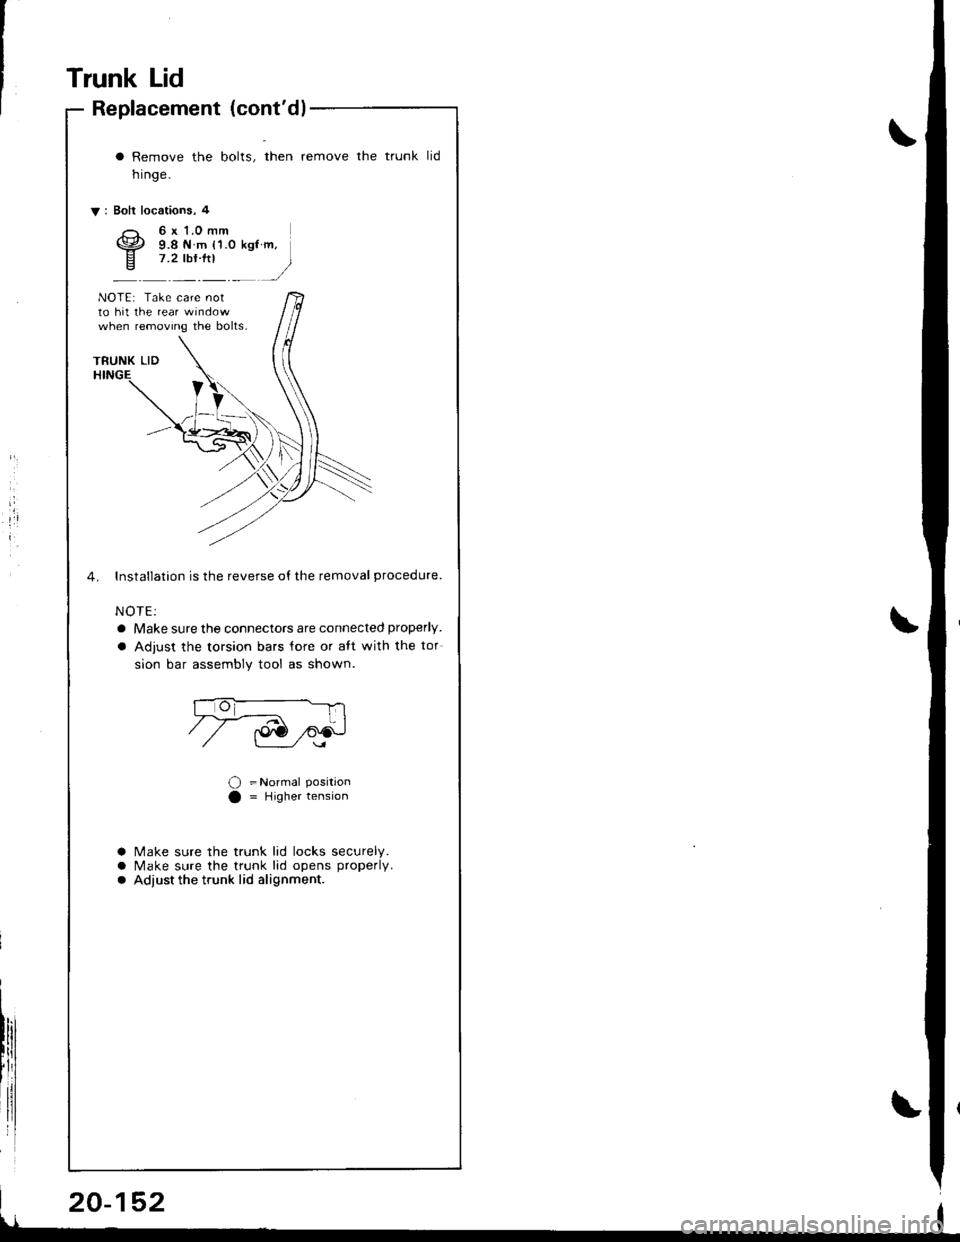
a Remove the bolts, then remove the trunk
nrnge.
V: Bolt locations, 4
tid
6x 1.0 mm9.8 N m {'1.0 kgt m,7.2 lbr'ftl
)
NOTE: Take care notto hit the rear wrndowwhen removing the bolts.
4. Installation is the reverse o{ the removal procedure.
NOTE:
a Make sure the connectors are connected properly.
a Adjust the torsion bars lore or aft with the tor
sion bar assembly tool as shown.
O =Normal PositionO = Higher tension
a Make sure the trunk lid locks securely.a Make sure the trunk lid opens properlv.a Adiust the trunk lid alignment.
Page 968 of 1681
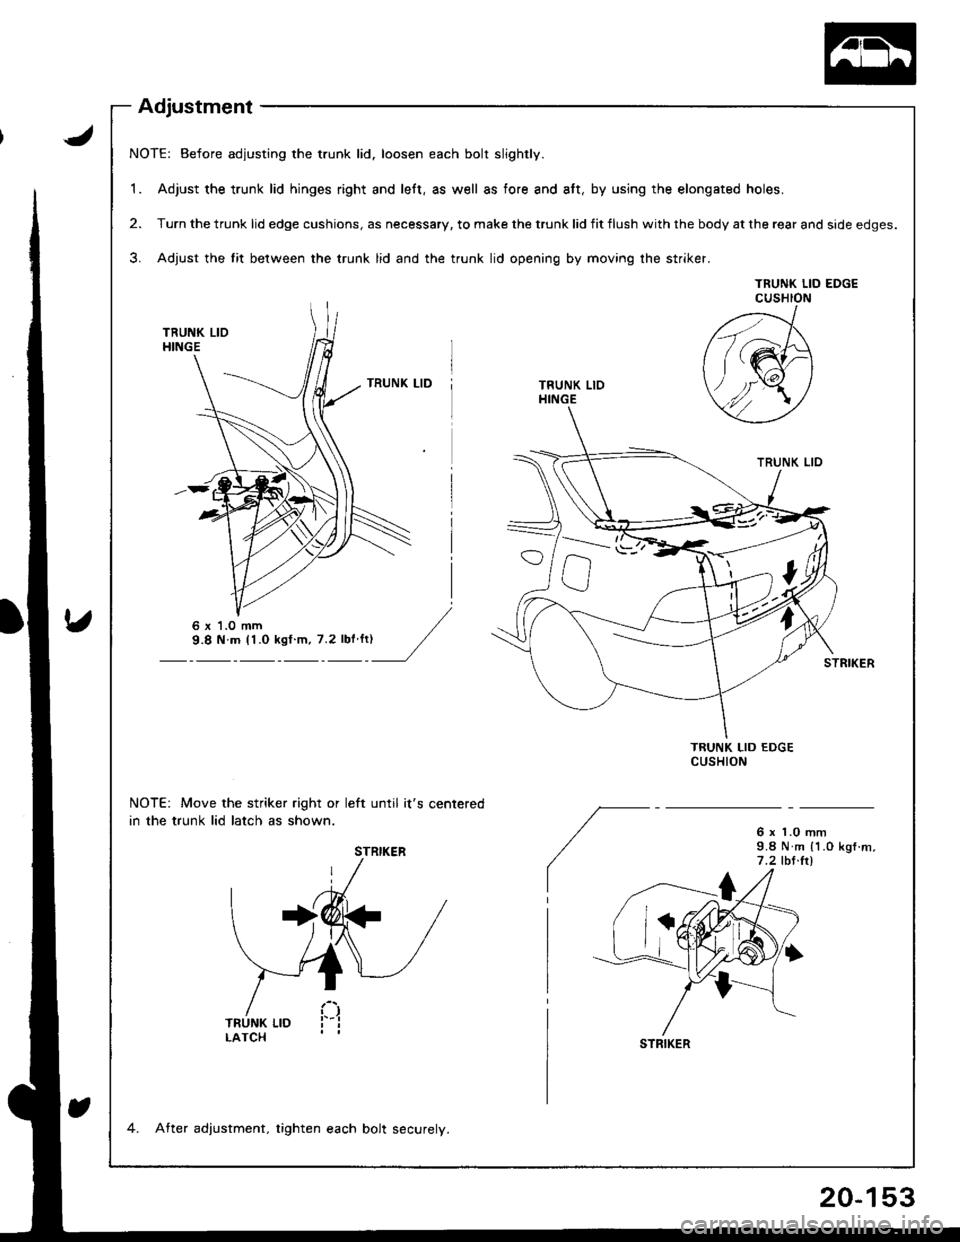
NOTE: Before adjusting the trunk lid. loosen each bolt slightly.
1. Adjust the trunk lid hinges right and left, as well as fore and att, by using the elongated holes.
2. Turn the trunk lid edge cushions, as necessary. to make the trunk lid fit flush with the body at the rear and side edges.
3. Adjust the lit between the trunk lid and the trunk lid opening by moving the striker.
TNUNK LID EDGECUSHION
TRUNK LIOHINGE
NOTE: Move the striker right or left until it's centered
in the trunk lid latch as shown.6 r 1.0 mm9.8 N m (1.O kgf .m,
7 .2 tbt.ltl
6 x '1.0 mm
STRIKER
STFIKER
4. After adjustment, tighten each bolt securely.
Adjustment
20-153
Page 970 of 1681
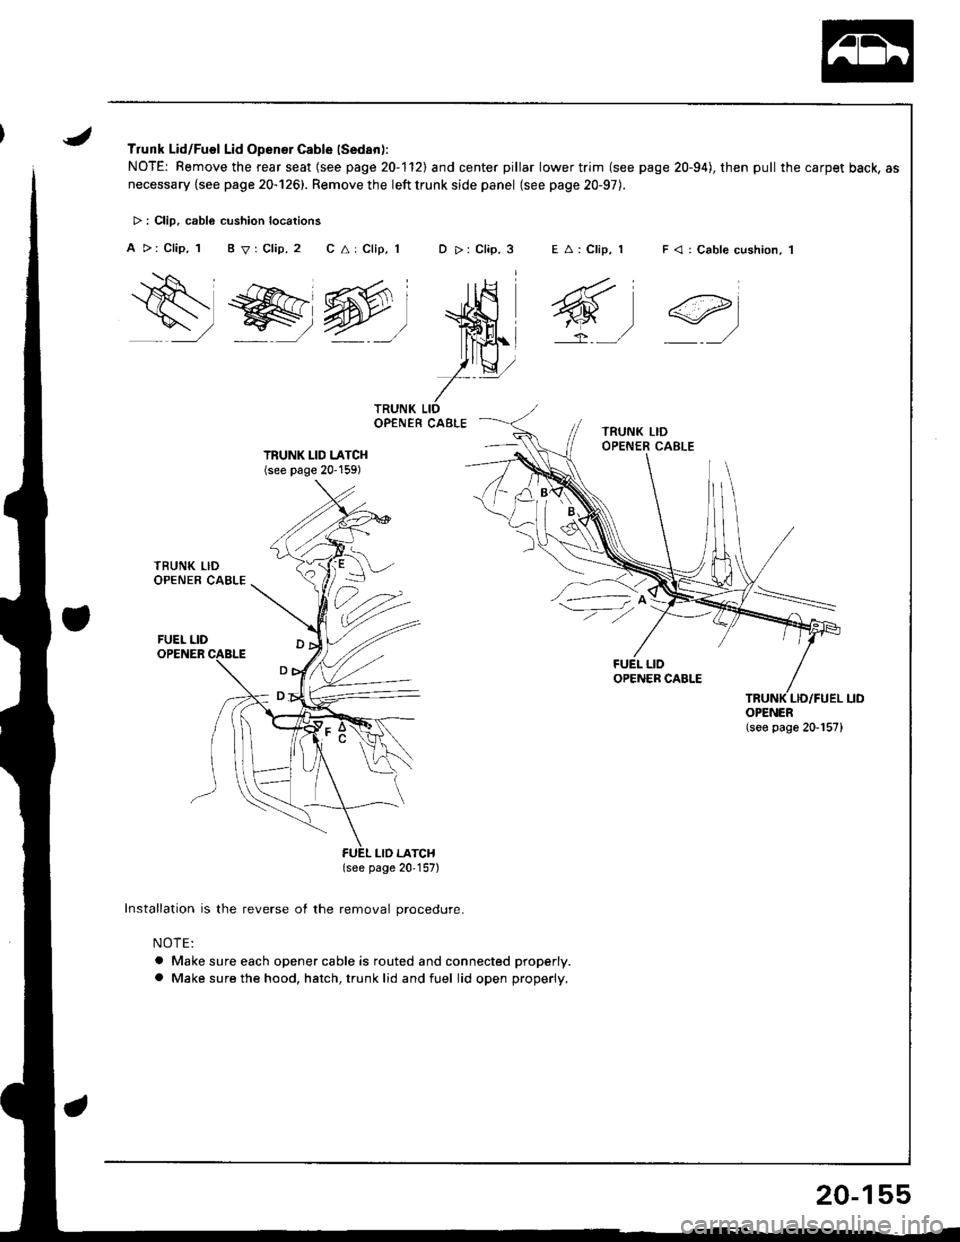
Trunk Lid/Fuel Lid Opener Cable (Sedan):
NOTE: Remove the rear seat (see page 20-1'l2l and center pillar lower trim (see page 20-94), then pull the carpet back, as
necessary {see page 20-126). Remove the left trunk side panel (see page 20-97).
C a: Clip, 1E A: Clip, 1D >: Clip, 3
w-l
)tQ,,
r-
> : Clip. cabl6 cushion locations
A >: Clip, 1 B V: Clip, 2
Qs , r>>.
lww-
F < | Cable cushion, 1
6t
ei
TRUNK LID LATCH(see page 20'159)
(see page 20,157)
Installation is the reverse of the removal procedure.
NOTE:
a Make sure each opener cable is routed and connected properly.
a Make sure the hood, hatch, trunk lid and fuel lid open properly.
OPENER(see page 20-157)
20-155
Page 972 of 1681
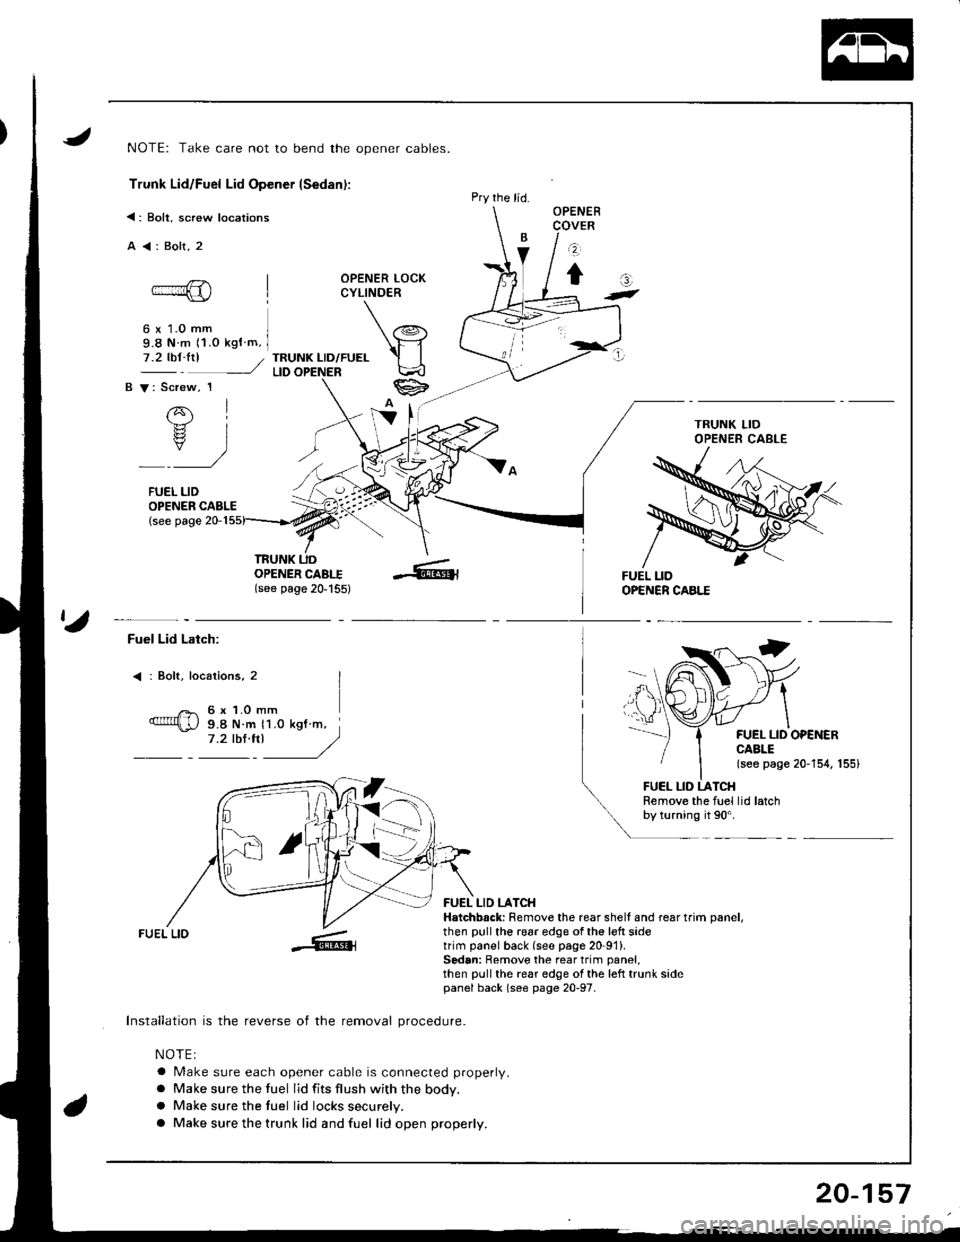
NOTE: Take care not to bend the opener cables.
Trunk Lid/Fuel Lid Opener lSedan):
<: Bolt, screw locations
A<:Bolt,2
OPENER LOCKCYLINDER
6 x 1.0 mm9.8 N m 11.o kgf m,
TRUNK LID/FUELLID
OPENER CABLE{see page 20-1
OPENERCOVER
z
tat-
7.2 tbt.trl /
B V: Screw, 1
rql.b.rz
rs? IY)
FUEL LID
TRUNK UDOPENER CABI.I(see page 20'155)
Pry the lid.
ta
Fuel Lid Latch:
: Bolt, locaiions, 2
6 x 1.O mm9.8 N.m 11.0 kgt m,7.2 tbl.trl J/)
FUEL LID OPEiIERCABLE(see page 20-154, 155)
FUEL LID LATCHRemove the fuel lid latchby turning it 90'.
FUEL LIO
Installation is the reverse of the removal procedure.
NOTEI
a Make sure each opener cable is connected properly.
a Make sure the fuel lid fits flush with the body.
a Make sure the tuel lid locks securely.
a Make sure the trunk lid and fuel lid open properly.
FUEL LID LATCHHatchbsck: Remove the rear shell and rear trim oanel,then pull the 196r edge of the left sidetrim panel back (see page 20-91).Sedan: Remove the rear trim panel,then pull the rear edge ol the left trunk sidepanel back (s€e page 20-97.
20-157
Page 974 of 1681
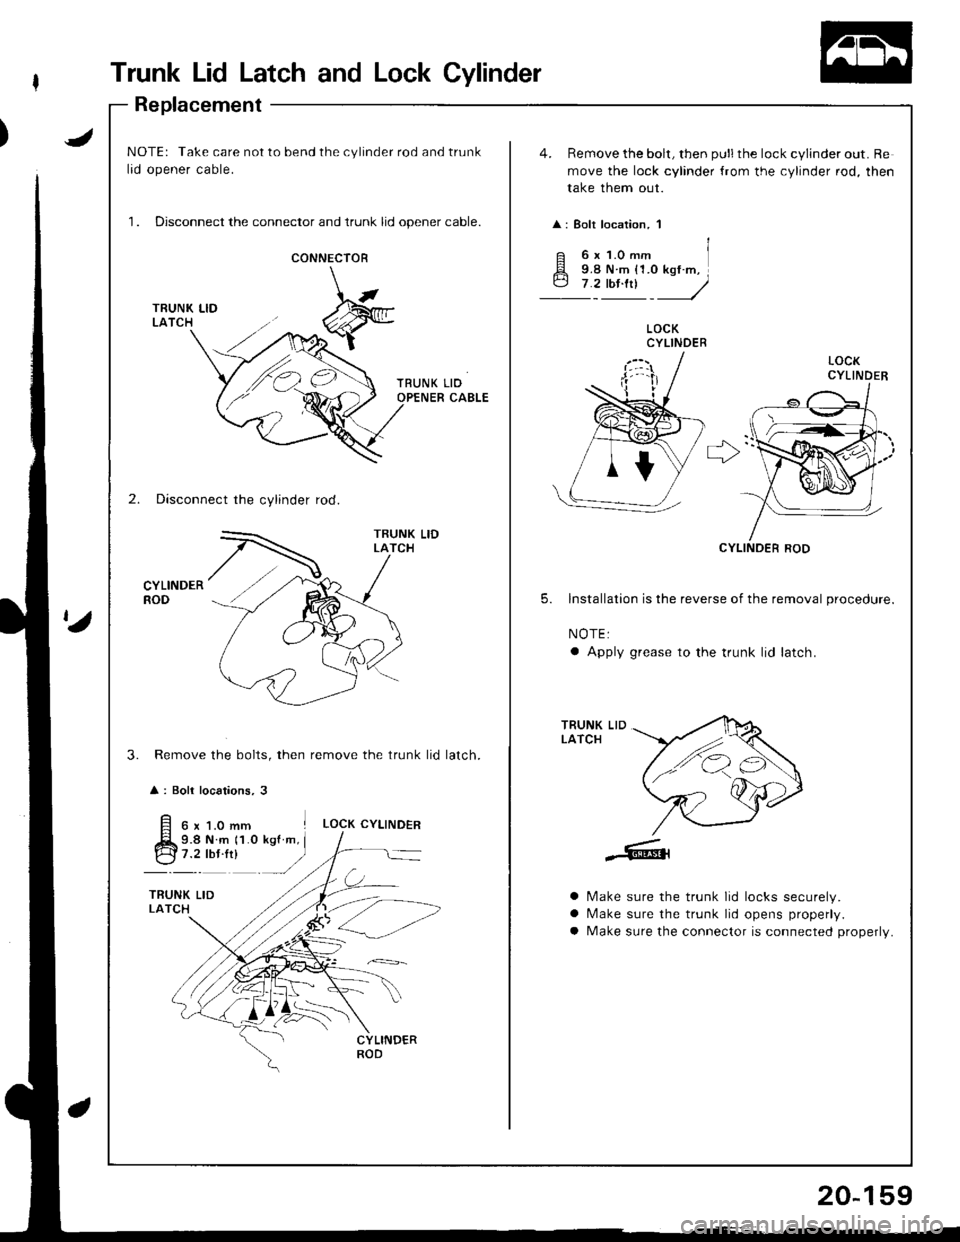
Trunk Lid Latch and Lock Cylinder
Replacement
JNOTE: Take care not to bend the cylinder rod and trunk
lid opener cable.
1. Disconnect the connector and trunk lid opener cable.
4. Remove the bolt, then pull the lock cylinder out. Re
move the lock cylinder {rom the cylinder rod, then
take them out.
: Bolt location, 1
CONNECIOR
LOCKCYLINDER
r>'
2. Disconnect the cylinder rod.
CYLINDERROD
CYLINOER ROD
5. lnstallation is the reverse of the removal procedure.
NOTE:
a Apply grease to the trunk lid latch.
Remove the bolts, then remove the trunk lid
: Boli locations, 3
TRUNK LIDLATCH
3.latch.
6x1.0mm ILOCK CYLINDER
9.8 N.m 11.0 kgf m, I
:t"r': -/
a
a
a
Make sure the trunk lid locks securely.
N/ake sure the trunk lid opens properly.
Make sure the connector is connected properly.
20-159
Page 978 of 1681
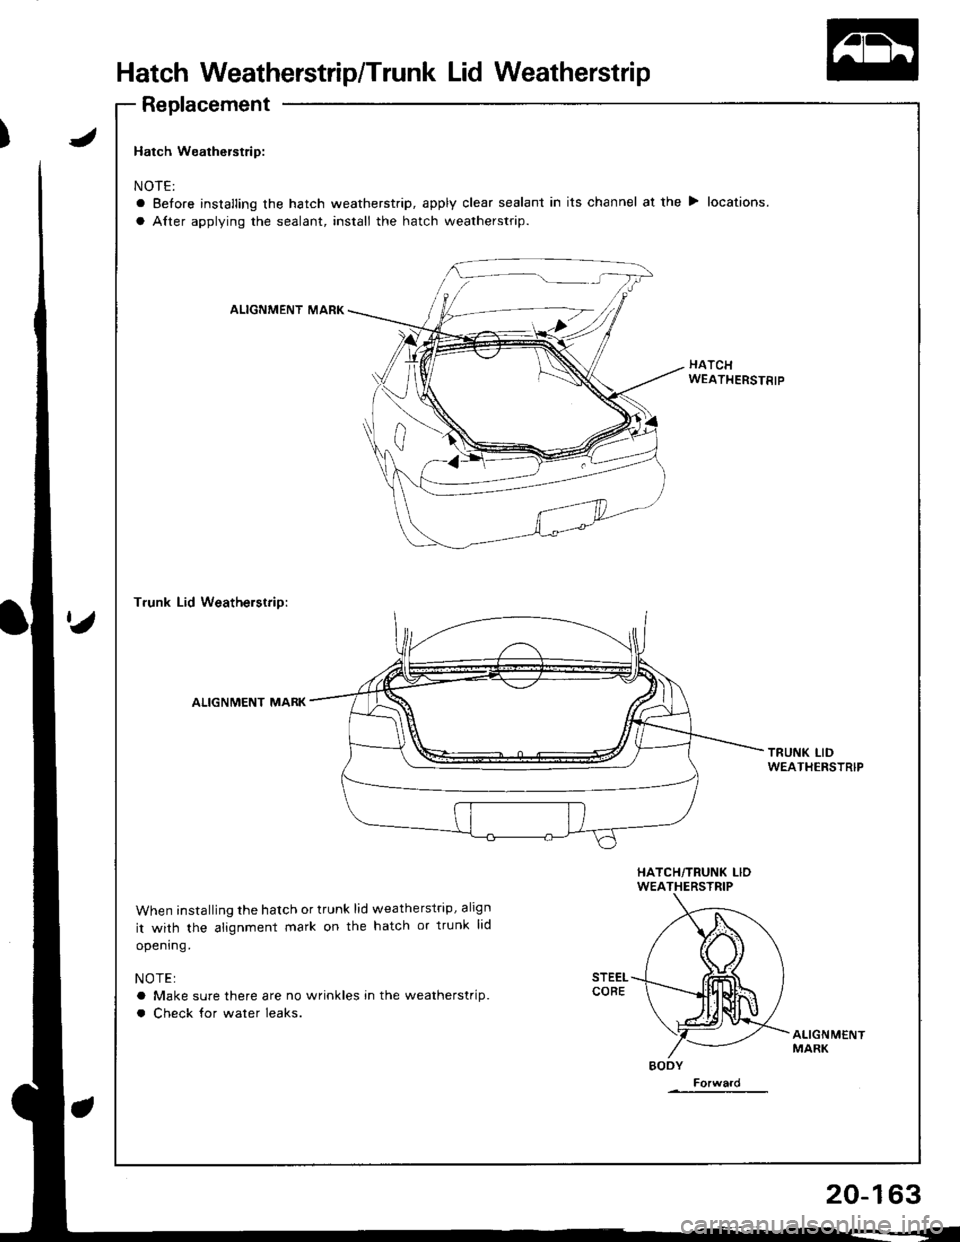
Hatch Weatherstrip/Trunk Lid Weatherstrip
Replacement
Hatch Weatherstrip:
NOTE:
a Before installing the hatch weatherstrip, apply clear sealant in its channel at the > locations.
a Alter applying the sealant, install the hatch weatherstrip.
ALIGNMENT MARK
HATCHWEATHERSTRIP
T.unk Lid Weatherstrip:
ALIGNMENT MARK
TRUNK LIDWEATIIERSTRIP
When installing the hatch or trunk lid weatherstrip, align
it with the alignment mark on the hatch or trunk lid
opening.
NOTE:
a Make sure there are no wrinkles in the weatherstrip.
a Check for water leaks.
ALIGNMENTMARK
BODY
Forward
20-163
Page 1070 of 1681
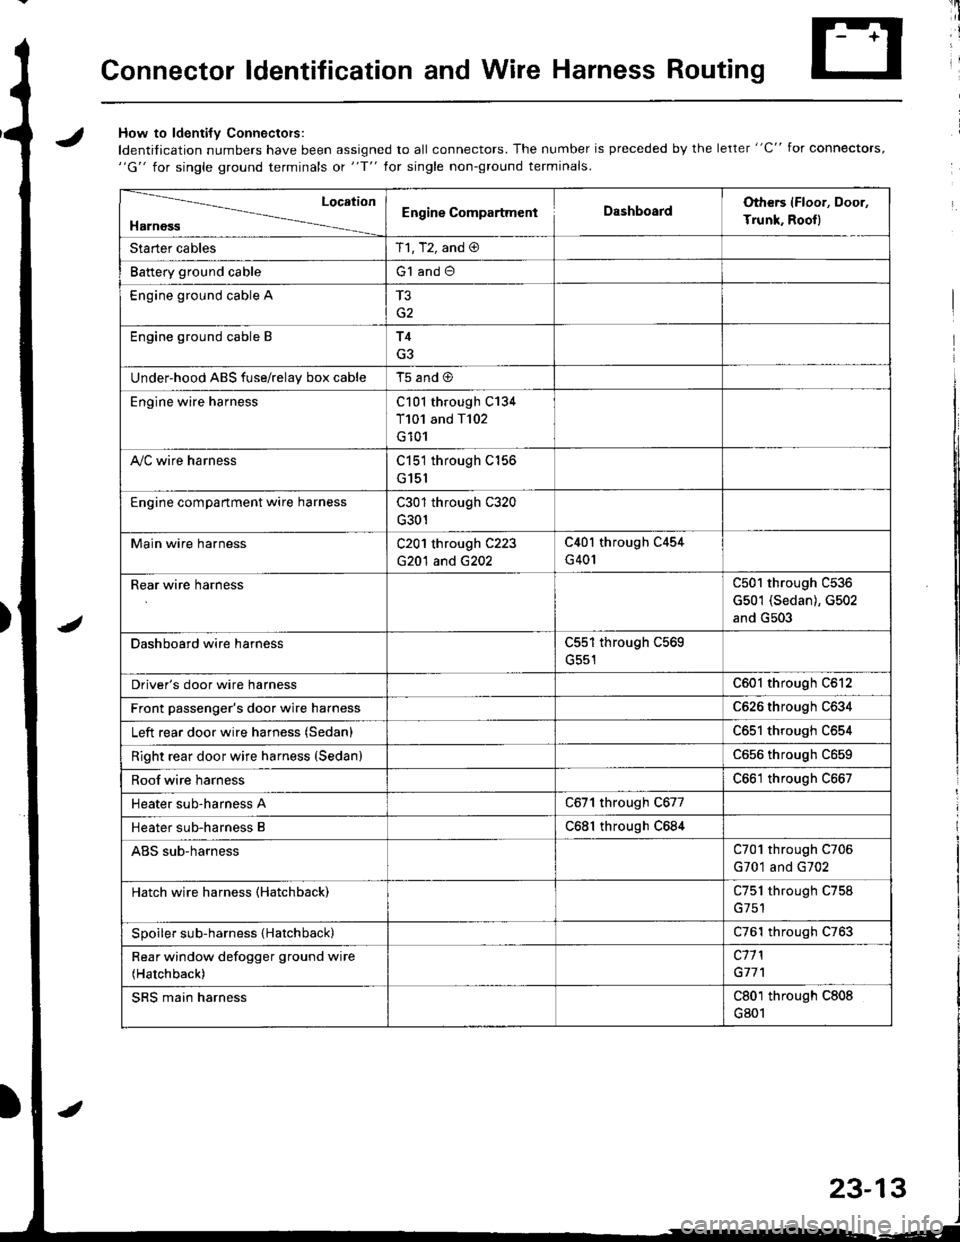
Connector ldentification and Wire Harness Routing
JHow to ldenti{v Connectors:
ldentification numbers have been assigned to all connectors. The number is preceded by the letter "C" for connectors,"G" for single ground terminals ot "f" lor single non-ground terminals.
/
Location
HarnossEngine CompartmentDashboardOthers (Floor, Door,
Trunk. Rooll
Starter cablesT1, T2, and @
Battery ground cableG1 and O
Engine ground cable A
G2
Engine ground cable BT4
G3
Under-hood ABS fuse/relav box cableT5 and @
Engine wire harnessC101 through C134
T101 and T102
G101
A,/C wire harnessC151 through C156
G151
Engine compartment wire harnessC301 through C320
G301
Main wire harnessC201 through C223
G20'l and G202
C40l through C454
G401
Rear wire harnessC501 through C536
G501 (Sedan), G502
and G503
Dashboard wire harnessC551 through C569
G551
Driver's door wire harnessC601 through C612
Front passenger's door wire harnessC626 through C634
Left rear door wire harness (Sedan)C65l through C654
Right rear door wire harness (SedanlC656 throughc659
Roof wire harnessC661 through C667
Heater sub-harness AC671 through C677
Heater sub-harness BC68l through C684
ABS sub-harnessC701 through C706
G701 and G702
Hatch wire harness (Hatchback)C751 through C758
Spoiler sub-harness {Hatchback)C761 through C763
Rear window defogger ground wire
(Hatchback)
c11 l
G77'l
SRS main harnessC801 through C808
G801
23-13
Page 1087 of 1681
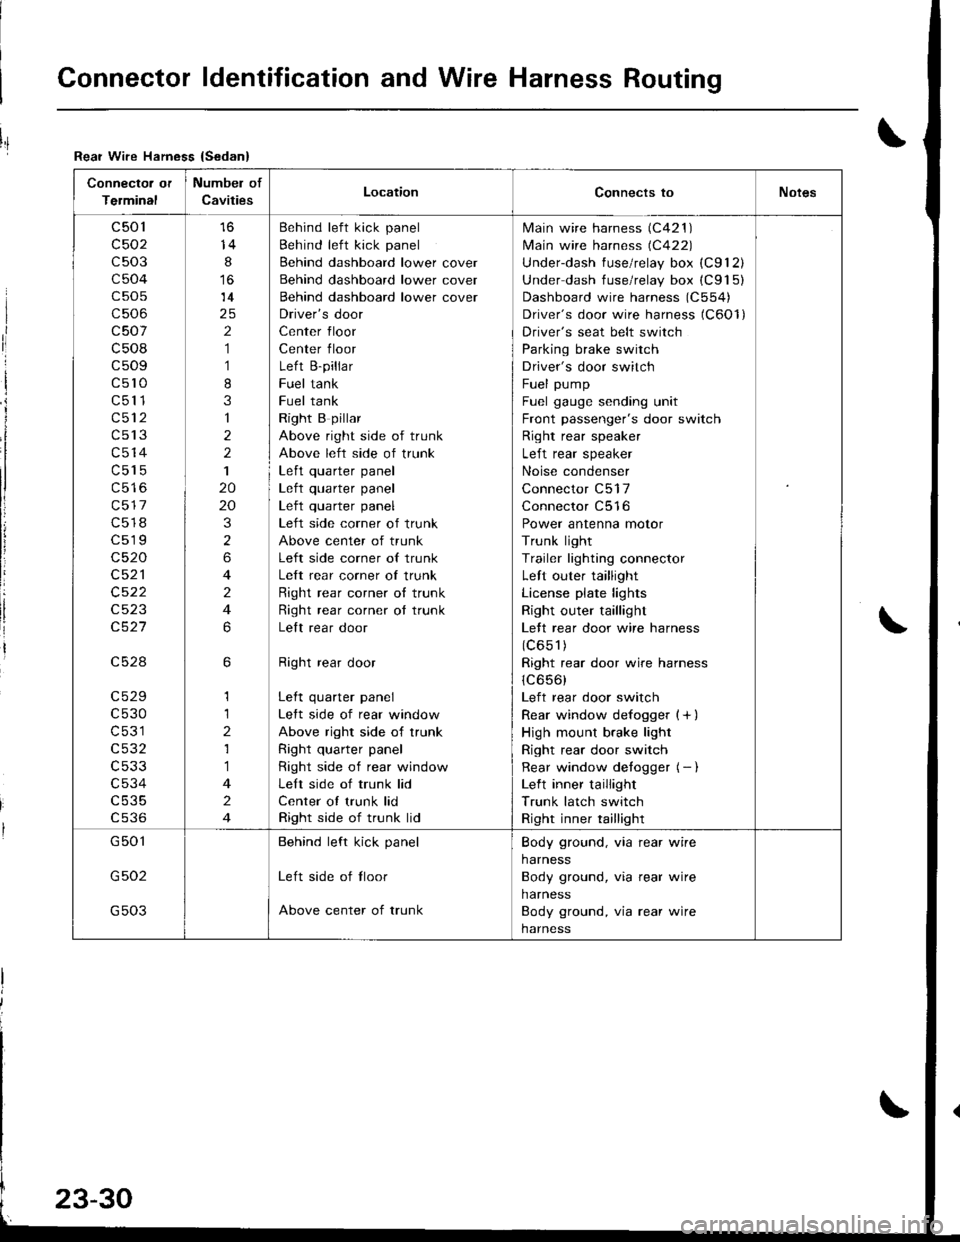
Connector ldentification and Wire Harness Routing
Connector or
Terminal
Numbel of
CavitiesLocationConnects toNotes
c501
c502
c503
c504
c505
c506
c507
c508
c509
c5l0
c511
c512
c513
c514
c515
c517
c518
c519
c520
c521
c522
c523
c527
c528
c529
c530
c531
c532
c533
c534
c535
cs36
14
8
14
2
1
1
8
3
1
2
2
1
20
20
3
2
6
4
2
4
6
6
1
1
2
1
1
4
2
4
Behind left kick panel
Behind left kick panel
Behind dashboard lower cover
Behind dashboard lower cover
Behind dashboard lower cover
Driver's door
Center floor
Center floor
Left B-pillar
Fuel tank
Fuel tank
Right B pillar
Above right side of trunk
Above left side of trunk
Left quarter panel| .{+ ^',rrrar ^rnal
Left quarter panel
Left side corner of trunk
Above center of trunk
Left side corner of trunk
Left rear corner of trunk
Right rear corner o{ trunk
Right rear corner ot trunk
Lelt rear door
Right rear door
Left quarter panel
Left side of rear window
Above right side of trunk
Right quarter panel
Right side of rear window
Left side of trunk lid
Center of trunk lid
Right side of trunk lid
lvlain wire harness (C421 )
lvlain wire harness (C422)
Underdash fuse/relay box (C912)
Under dash fuse/relay box (C915)
Dashboard wire harness (C554)
Driver's door wire harness (C6Ol)
Driver's seat belt switch
Parking brake switch
Driver's door switch
Fuel pump
Fuel gauge sending unit
Front passenger's door switch
Right rear speaker
Left rear speaker
Noise condenser
Connector C517
Connector C516
Power antenna motor
Trunk light
Trailer lighting connector
Left outer taillight
License plate lights
Right outer taillight
Lett rear door wire harness
(c651)
Right rear door wire harness
1C656)
Left rear door switch
Rear window defogger {+ )
High mount brake light
Right rear door switch
Rear window detogger (- I
Left inner taillight
Trunk latch switch
Right inner taillight
G501
G502
G503
Behind left kick panel
Left side of tloor
Above center of trunk
Body ground, via rear wire
harness
Body ground, via rear wire
harness
Body ground, via rear wire
harness
Rear Wire Hamess {Sedan}
I
ri
I
i
I
li
!