trunk HONDA INTEGRA 1998 4.G Owner's Guide
[x] Cancel search | Manufacturer: HONDA, Model Year: 1998, Model line: INTEGRA, Model: HONDA INTEGRA 1998 4.GPages: 1681, PDF Size: 54.22 MB
Page 1242 of 1681
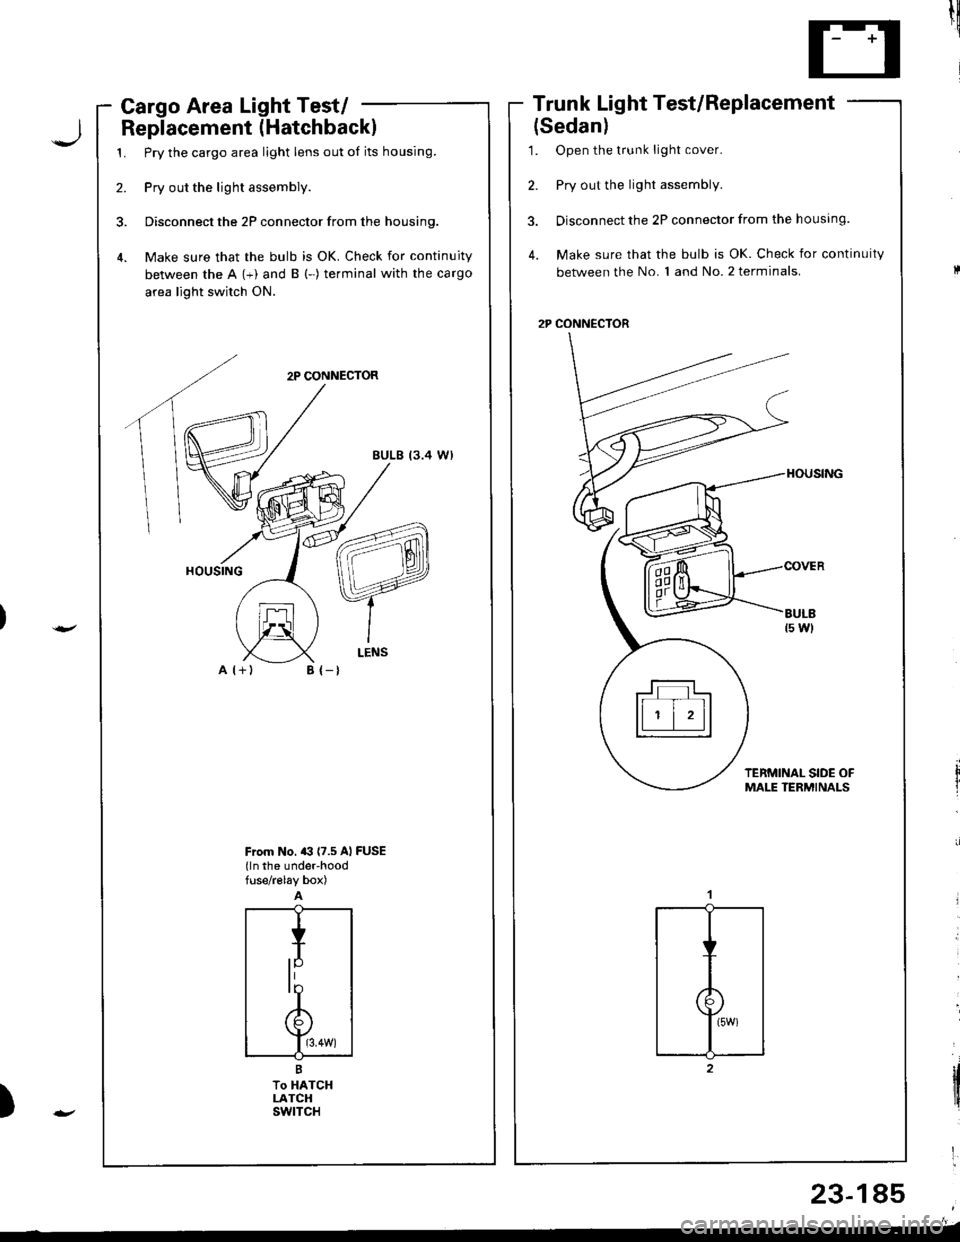
Cargo Area Light Test/ -
Replacement (Hatchbackl
1. Pry the cargo area light lens out of its housing.
2. Pry out the light assembly.
3. Disconnect the 2P connector from the housing.
4. Make sure that the bulb is OK. Check for continuity
between the A (+) and B (-) terminal with the cargo
area light switch ON.
2P CONNECTOR
EULB (3.4 W)
A l+)
Trunk Light Test/Replacement
{Sedan)
1. Open the t.unk light cover.
2. Pry out the light assembly.
3. Disconnect the 2P connector from the housing.
4. Make sure that the bulb is OK. Check for continuity
between the No. 1 and No. 2 terminals.
2P CONNECTOR
til!
'
tltirl
'
)
B {-t
From No. a3 (7.5 Al FUSE(ln the under-hoodfuse/r€lay box)
23-185
trT�tll
ll ' | 'll
Page 1243 of 1681
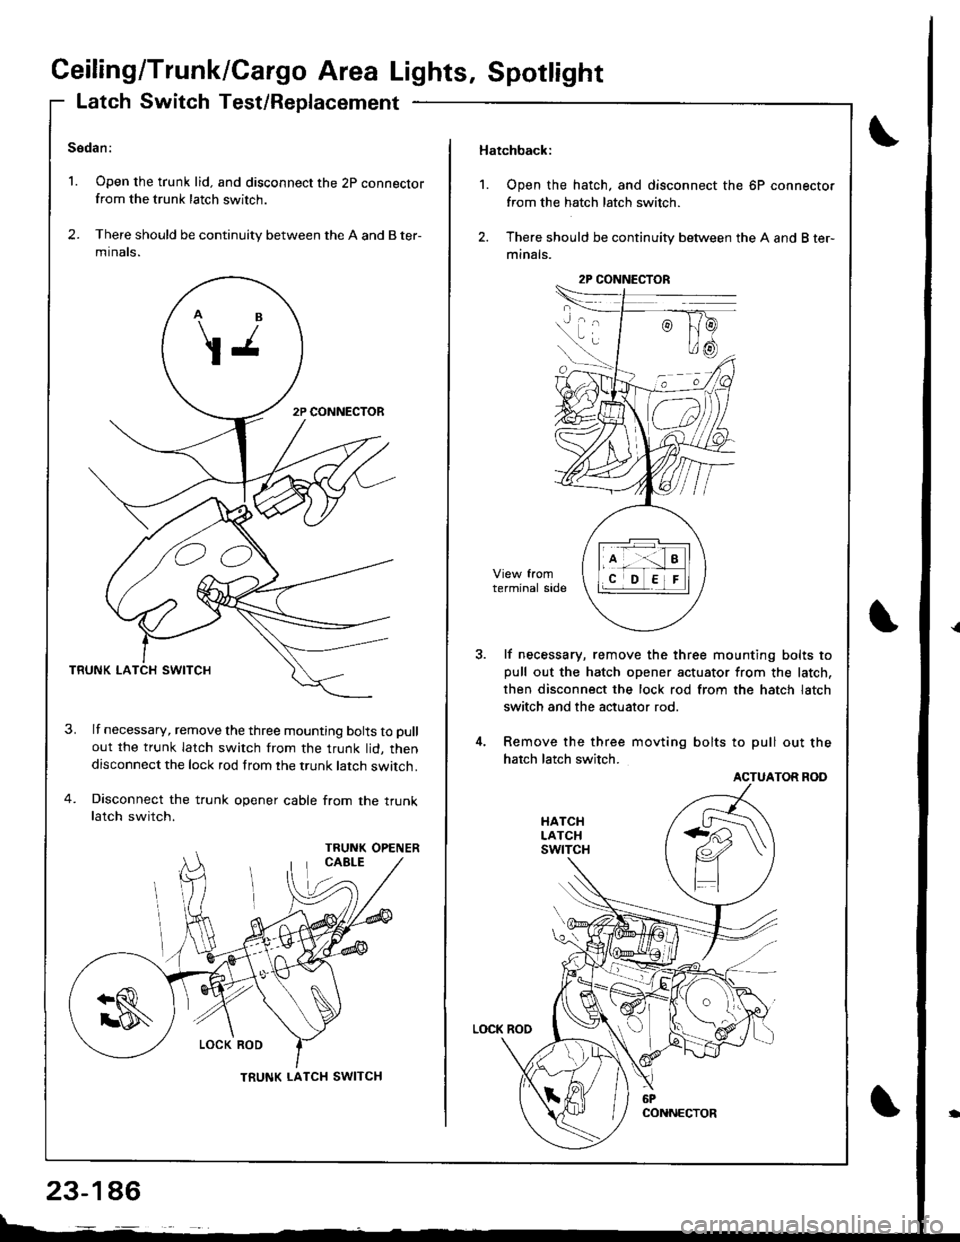
Ceiling/Trunk/Cargo Area Lights, Spotlight
Latch Switch Test/Replacement
Sedan:
1. Open the trunk lid. and disconnect the 2p connectorfrom the trunk latch switch.
2. There should be continuity between the A and B ter-
mtnats.
TRUNK LA
lf necessary, remove the three mounting bolts to pull
out the trunk latch switch from the trunk lid, thendisconnect the lock rod from the trunk latch switch.
Disconnect the trunk opener cable from the truoklatch switch.
OO
TRUNK LATCH SWITCH
23-146
Hatchback:
1. Open the hatch, and disconnect the 6P connector
from the hatch latch switch.
2. There should be continuity between the A and B ter-
minals.
lf necessary, remove the three mounting bolts topull out the hatch opener actuator from the latch,
then disconnect the lock rod from the hatch latch
switch and the actuator rod.
Remove the three movting bolts to pull out the
hatch latch switch.
ACTUATOR ROD
2P CONNECTOR
Page 1248 of 1681
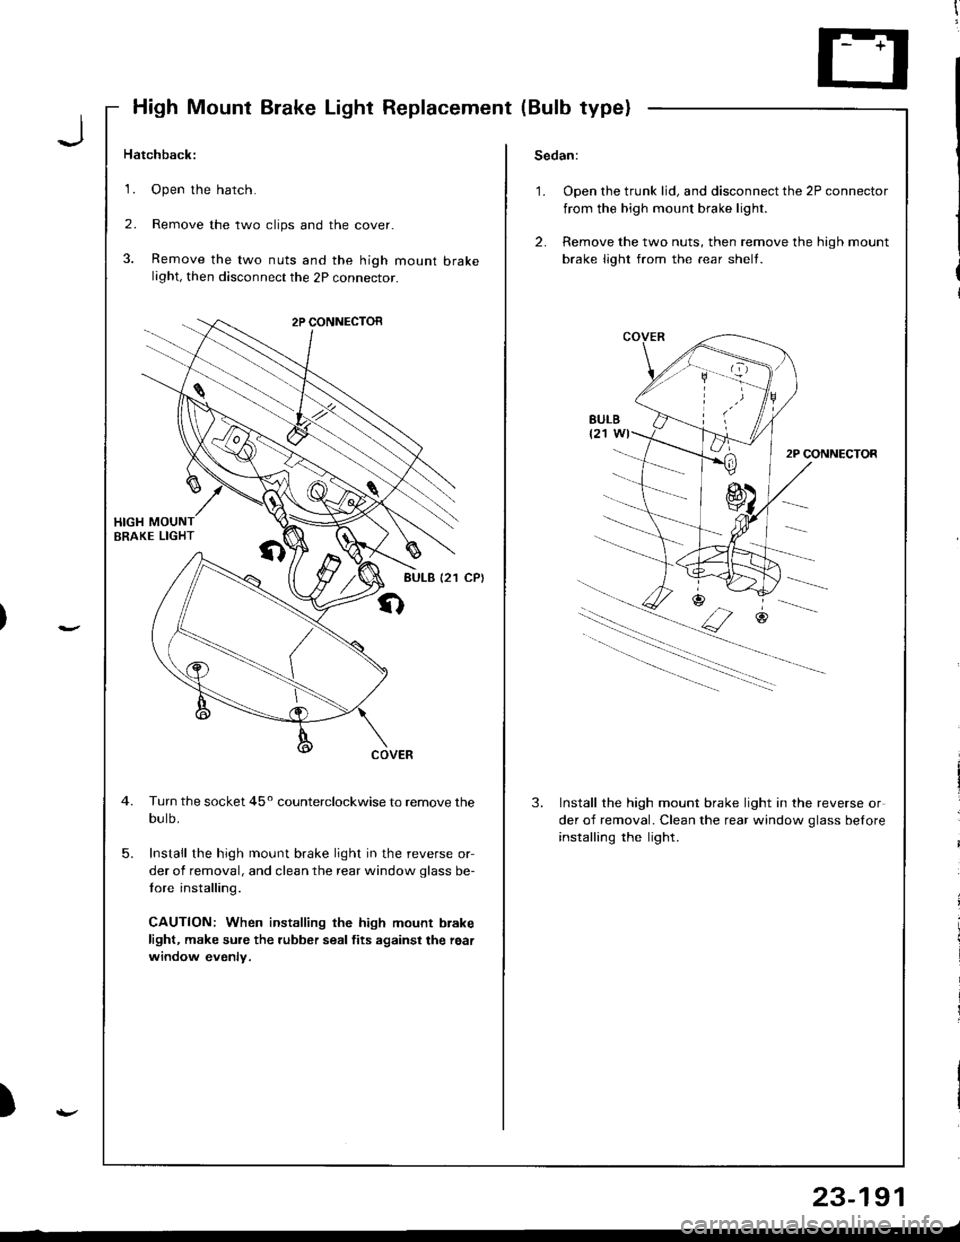
High Mount Brake Light Replacement (Bulb type)
Hatchback:Sedan:
1.Open the hatch.
Remove the two clips and the cover.
Remove the two nuts and the high mount brakelight, then disconnect the 2P connecror.
1.Open the trunk lid, and disconnect the 2P connector
from the high mount brake light.
Remove the two nuts, then remove the high mount
brake light from the rear shelt.
2.
3.
2.
2P CONNECTOR
Turn the socket 45o counterclockwise to remove the
bulb.
Install the high mount brake light in the reverse or-
der of removal, and clean the rear window glass be-
tore installing.
CAUTION: When installing the high mount brake
light, make sure the rubber seal fits against the reai
window evenly.
3.Install the high mount brake light in the reverse or
der of removal. Clean the rear window qlass belore
installing the light.
5.
)
23-191
Page 1258 of 1681
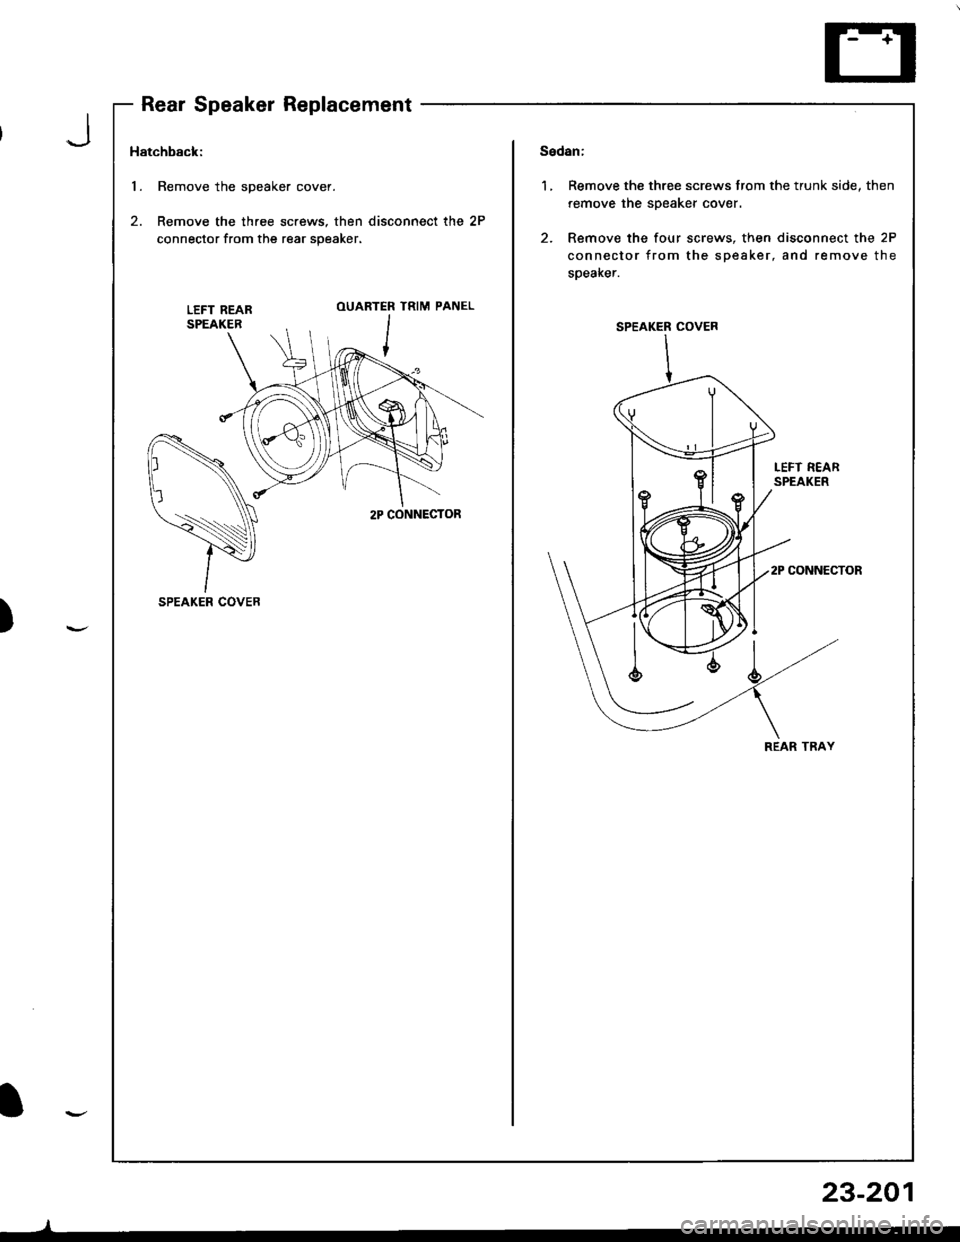
Rear Speaker Replacement
Hatchback:
l. Remove the speaker cover.
2. Remove the three screws, then disconnect the 2P
connector from the rear speaker.
Sedan:
1, Remove the three screws trom the trunk side, then
femove the speaker cover.
2. Remove the four screws, then disconnect the 2P
connector from the speaker, and remove the
speaker.
LEFT REARSPEAKER
OUARTER
IIz>- |
TRIM PANEL
I.EFT REARSPEAKER
2P CONNECTOB
2P CONNECTOR
SPEAKER COVER
REAR TRAY
SPEAKER COVES
)
I
23-201
Page 1259 of 1681
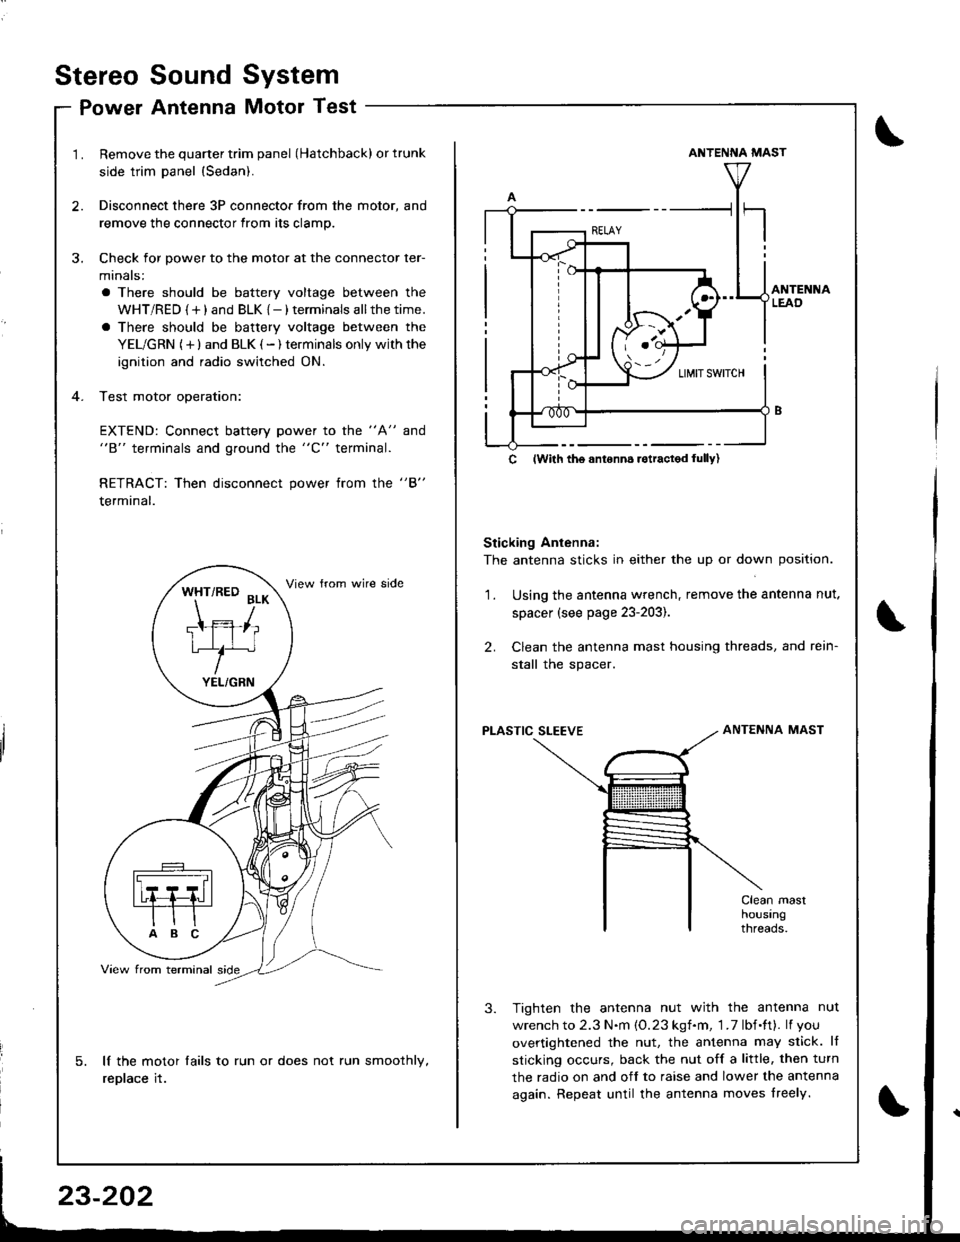
3.
1.
wel
Remove the quarter trim panel (Hatchback) or trunk
side trim panel {Sedan).
Disconnect there 3P connector from the motor, and
remove the connector from its clamp.
Check for power to the motor at the connector ler-
minals:
a There should be battery voltage between the
WHT/RED {+) and BLK {-) terminals allthetime.
a There should be battery voltage between the
YEL/GRN (+) and BLK (-) terminals only withthe
ignition and radio switched ON.
Test motor operation:
EXTEND: Connect battery power to the "A" and"B" terminals and ground the "C" terminal.
RETRACT: Then disconnect power from the "B"
terminal.
lf the motor lails to run or does not run smoothly,
replace it.
WHT/RED BLK
Ttffiliu/^
YEL/GRN
ANTENNA MAST
Sticking Antenna:
The antenna sticks in either the up or down position.
Using the antenna wrench, remove the antenna nut.
spacer (see page 23-203).
Clean the antenna mast housing threads, and rein-
stall the spacer.
2.
1.
PLASTIC SLEEVEANTENNA MAST
Tighten the antenna nut with the antenna nut
wrench to 2.3 N.m {O.23 kgf.m, 1 .7 lbf.ft}. lf you
overtightened the nut, the antenna may slick. lf
sticking occurs, back the nut off a little, then turn
the radio on and off to raise and lower the antenna
again. Repeat until the antenna moves lreely.
c lwith tho anronn6 rotractod lully)
Stereo
Po
Sound
Antenna
System
Motor Test
\
Page 1260 of 1681
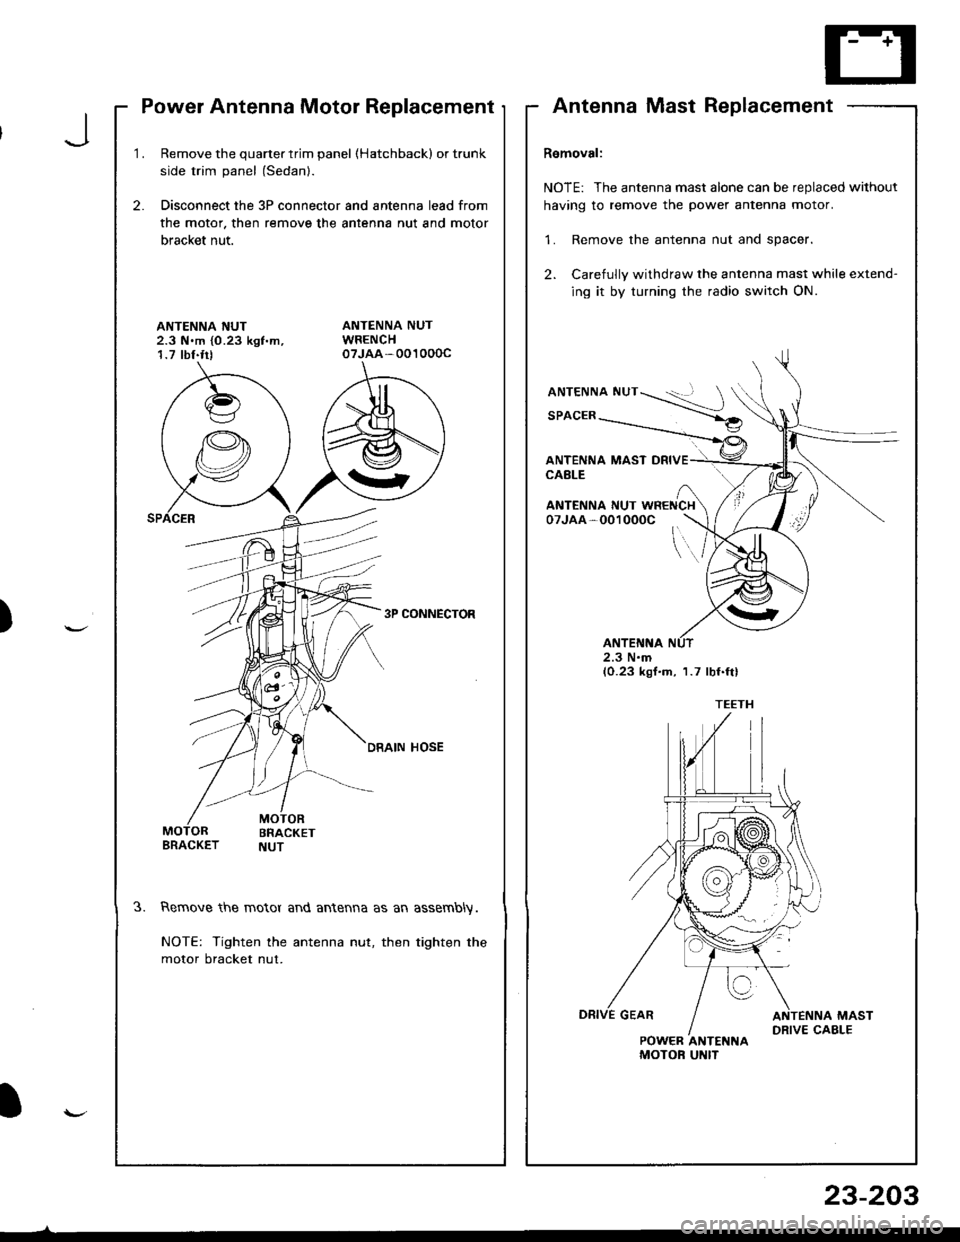
Power Antenna Motor Replacement
1.Remove the quarter trim panel (Hatchbackl or trunk
side trim panel (Sedanl.
Disconnect the 3P connector and antenna lead from
the motor. then remove the antenna nut and motor
bracket nut.
2.
ANTENNA NUT2.3 N.m {0.23 kgf'm,1.7 tbf.trt
3P CONNECTOR
DRAIN HOSE
3.Remove the motor and antenna as an assembly.
NOTE: Tighten the antenna nut, then tighten the
motor bracket nut.
AntennaMastReplacement
Removal:
NOTE: The antenna mast alone can be replaced without
having to remove the power antenna motor.
1. Remove the antenna nut and spacer.
2. Carefully withdraw the antenna mast while extend-
ing it by turning the radio switch ON.
ANTENNA NUT
SPACER
ANTENNA MAST DRIVECABLE
\..
ANTENNA NUT WRENCH07JAA-001000C
2.3 N.m(0.23 kgf.m, 1.7 lbf.ftl
POWER ANTENNAMOTOF UNIT
J
)
I
23-203
Page 1383 of 1681
).1
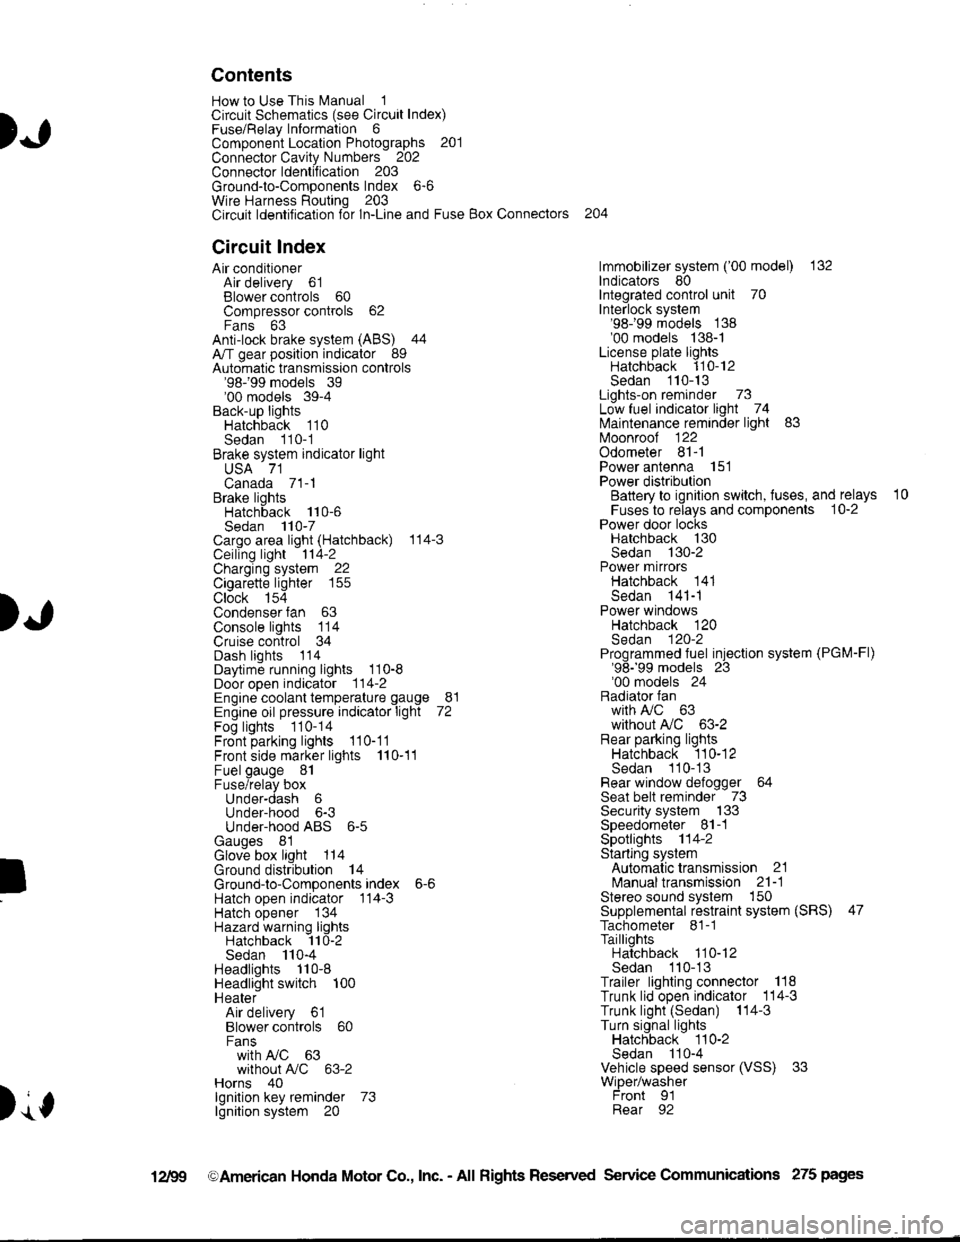
Contents
How to Use This l\.4anual 1Circuit Schematics (see Circuit Index)Fuse/Relaylnformation 6ComponentLocation Photographs 201
Connector Cavity Numbers 202Connectorldentification 203
Ground-to-Components Index 6-6Wire Harness Routing 203Circuit ldentification lor ln-Line and Fuse Box Connectors
Circuit Index
Air conditionerAir delivery 61Blower controls 60Compressor controls 62Fans 63Anti-lock brake system (ABS) 44A/T gear position indicator 89Automatic transmission controls'98199 models 39'00 models 39-4Back-up lightsHatchback 110Sedan 110- 1Brake system indicator light
USA 71Canada 71-1Brake lightsHatchback 110-6Sedan 110-7Cargo area light (Hatchback) 114-3Ceiling light 114-2Charging system 22Cigarette lighter 155
Clock 154Condenser fan 63Console lights 114Cruise control 34Dash lights 1 14Daytime running lights 110-8Door open indicator 114-2Engine coolant temperature gauge 81Engine oil pressure indicator light 72Fog lights 110-14Front parking lights 110-11Front side marker lights 110-11Fuel gauge 81Fuse/relay boxUnder-dash 6Under-hood 6-3Under-hood ABS 6-5Gauges 81Glove box light 114Ground distribution 14Ground-to-Componentsindex 6-6Hatch open indicator '114-3
Hatch opener '134
Hazard warning lightsHatchback 'l l0-2Sedan 110-4Headlights 1'10-8Headlight switch 100HeaterAir delivery 61Blower controls 60Fanswith A,/C 63without A,/C 63-2Horns 40lgnilion key reminder 73lgnition system 20
204
lmmobilizer system ('00 model) 132lndicators 80Integrated control unit 70Interlock system'98199 models 138'00 models 138-1License plate lightsHatchback 110-12Sedan 110-13Lights-on reminder 73Low fuel indicator light 74l\,4aintenance reminder light 83l\iloonroof 122Odometer 81-1Power antenna 151Power distributionBattery to ignilion switch, fuses, and relays
Fuses to relays and components 10-2Power door locksHatchback '130
Sedan 130-2Power mirrorsHatchback 141Sedan 141-1Power windowsHatchback 120Sedan 120-2Programmed fuel injection system (PGM-Fl)'98199 models 23'00 models 24Radiator fanwith tuC 63without A,/C 63-2Rear parking lightsHatchback 110-12Sedan 110- 13Rear window defogger 64Seat belt reminder 73Security system 133Speedometer Il-1Spotlights 114-2Starting syslemAutomalictransmission 21l\.4anualtransmission 21-1Stereo sound system 150Supplemental restraint system (SRS) 47Tachometer 81- 1TaillightsHatchback 110-12Sedan 110-13Trailer lighting conneclor 118Trunk lid open indicator 114-3Trunk light (Sedan) 114-3Turn signal lightsHatchback 110-2Sedan 110-4Vehicle speed sensor (VSS) 33Wiper/washerFront 91Rear 92
10
).1
I
Xr
12Fg oAmerican Honda Motor Co., Inc. - All Rights Reserved Service Communications 275 pages
Page 1404 of 1681
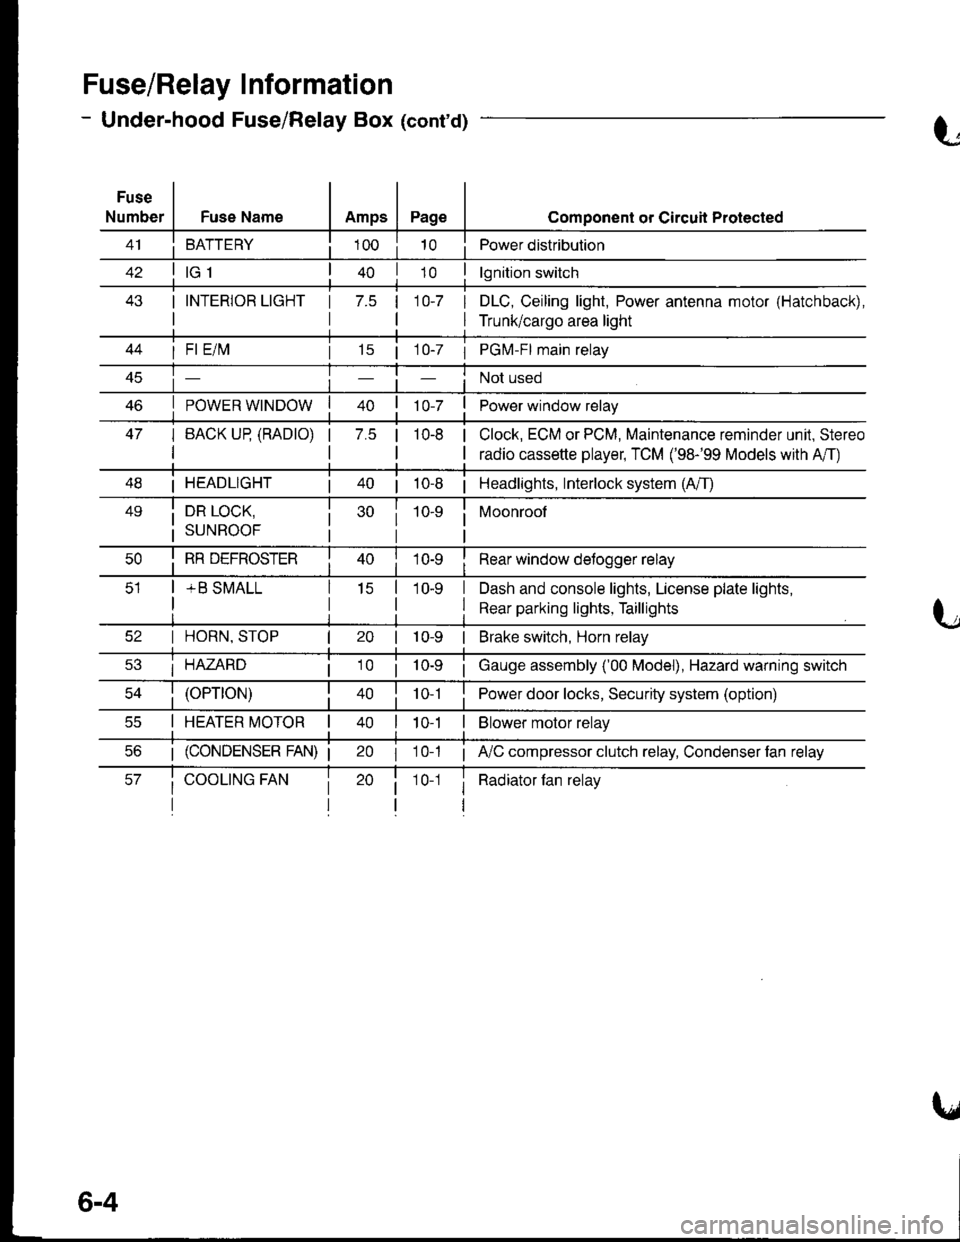
Fuse/Relay I nformation
- Under-hood Fuse/Relay Box (cont'd)
Fuse
NumberFuse NameAmpsPage
BATTERY
I INTERIOR LIGHT
I
1 7.5 110-7 I
I
Component or Circuil Protected
Power distribution
lgnition switch
DLC, Ceiling light, Power antenna motor (Hatchback),
Trunk/cargo area light
47
I Fl E/lvl
POWER WINDOW
I BACK UP (RADTO)
I
15 | 1 0-7 I PGM-FI main relay
Not used
Power window relay
Clock, ECM or PCM, Maintenance reminder unit, Stereo
radio cassette player, TCM ('98-'99 Models with A'/T)
7.5 |10-8
I HEADLIGHT| 40 | 10-8 | Headlights, Interlock system (A/T)
49i DR LOCK,
i suNRooF
10-9 i Moonroof
I
I RR DEFROSTER
+ B SMALL
I Rear window detogger relay
I Dash and console lights, License plate lights,
I Rear parking lights, Taillights
I HORN, STOP
i HAZARD
10-9 | Brake switch, Horn relay
i Gauge assembly ('00 Model), Hazard warning switch
40 | to t I Power door locks, Security system (option)
I HEATER MOTOR II t 0-1I Blower motor relay
20 I 10-1 ; A,/C compressor clutch relay, Condenser fan relay
i Radiator fan relay1 0-1
6-4
Page 1406 of 1681
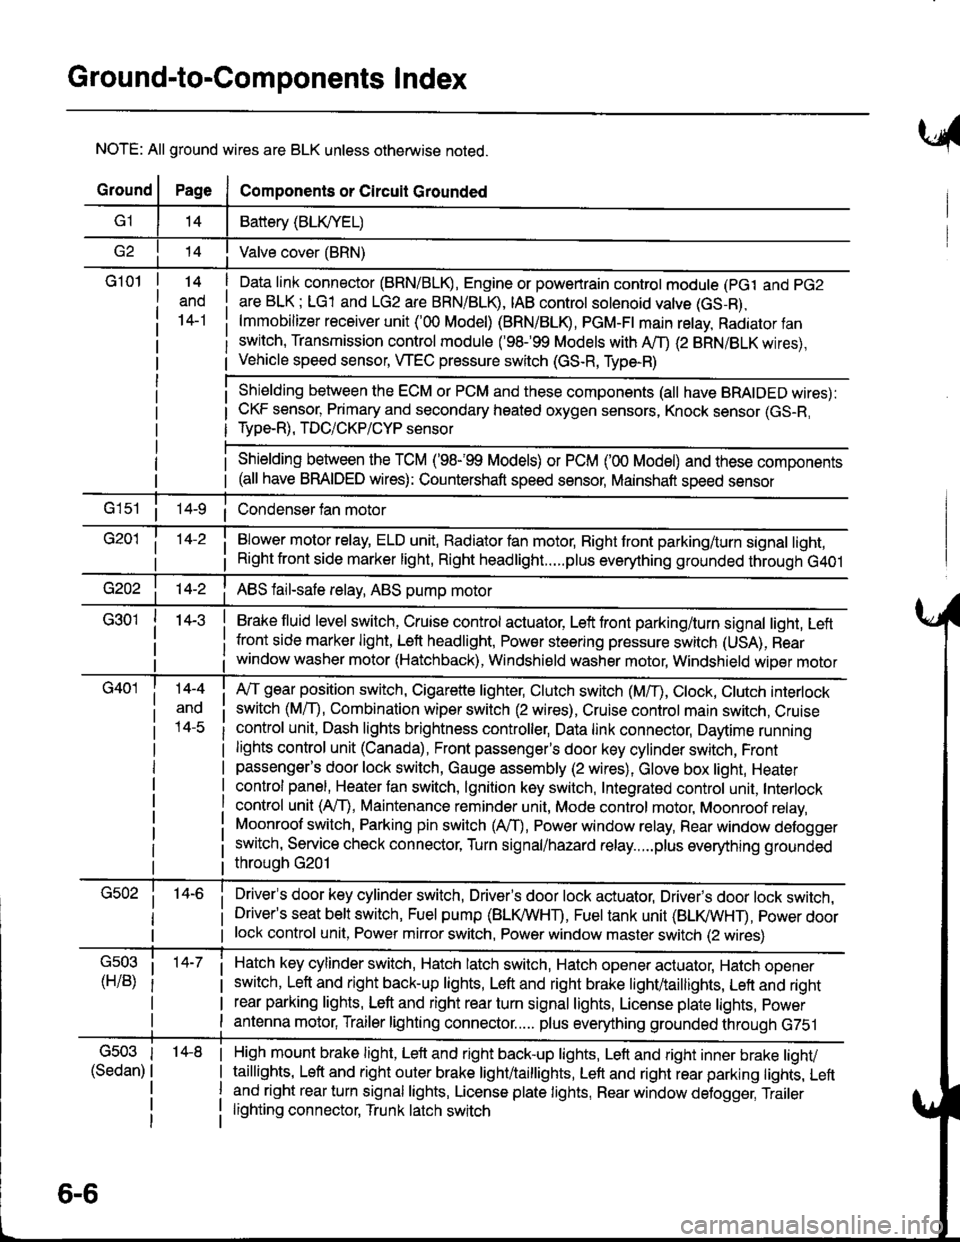
Ground-to-Components I ndex
NOTE: All ground wires are BLK unless otherwise noted.
GroundPageComponents or Circuit Grounded
Battery (BLIVYEL)
--t'I Valve cover (BRN)
G101t.+
and
14-1
Daia link connector (BRN/BLK), Engine or powertrain controt module (pct and pG2
are BLK; LG1 and LG2 are BRN/BLR, IAB controt solenoid valve (GS-B),
lmmobilizer receiver unit ('00 Model) (BRN/BLR, PGM-Ft main retay, Radiator fan
switch, Transmission control module ('98.�99 Models with MD (2 BRN/BLK wires),
Vehicle speed sensor, WEC pressure switch (GS-R, Type-R)
Shielding between the ECM or PCM and these components (all have BRAIDED wires):
CKF sensor, Primary and secondary heated oxygen sensors, Knock sensor (GS-R,
Type-R), TDC/CKP/CYP sensor
Shielding between the TCM ('98-'99 Models) or PCM ('00 Model) and these components(all have BRAIDED wires): Countershaft speed sensor, Mainshaft speed sensor
G1s1 ii Condenser fan motor
Brake fluid level switch, Cruise control actuator, Left front parking/turn signal light, Left
front side marker light, Left headlight, Power steering pressure switch (USA), Rear
window washer motor (Hatchback), Windshield washer motor, Windshield wiper motor
14-3
Blower motor relay, ELD unit, Badiator fan motor, Right front parking/turn signal light,
Right front side marker light, Right headlight.....plus everything grounded through G401
ABS fail-safe relay, ABS pump motor
G40114-4
ano
l4-c
A,/T gear position switch, Cigarette lighter, Clutch switch (M,/T), Ctock, Ctutch interlock
switch (MfD, Combination wiper switch (2 wires), Cruise control main switch, Cruise
control unit, Dash lights brightness controller, Data link connector, Daytime running
lights control unit (Canada), Front passenger's door key cylinder switch, Frontpassenger's door lock switch, Gauge assembly (2 wires), Glove box light, Heater
control panel, Heater tan switch, lgnition key switch, Integrated control unit, Interlock
control unit (AfI), Maintenance reminder unit, Mode control motor, Moonroof relay,
Moonroof switch, Parking pin switch (AfD, Power window relay, Rear window defogger
switch, Service check connector, Turn signal/hazard relay.....plus everything grounded
throuoh G201
Driver's door key cylinder switch, Driver's door lock actuator, Drivels door lock switch,Driver's seat belt switch, Fuel pump (BLI(/WHT), Fuel tank unit (BLI(/WHT), power doorlock control unit, Power mirror switch, Power window master switch (2 wires)
Hatch key cylinder switch, Hatch latch switch, Hatch opener actuator, Hatch ooener
switch, Left and right back-up lights, Left and right brake light/taillights, Lett and right
rear parking lights, Left and right rear turn signal lights, License plate lights, power
antenna motor, Trailer lighting connector..... plus everything grounded through G751
6-6
'14-8G503
(Sedan)
High mount brake light, Left and right back-up lights, Lett and right inner brake tighv
taillights, Left and right outer brake light/taittights, Left and right rear parking tights, Leftand right rear turn signal lights, License plate lights, Rear window detogger, Trailer
lighting connector, Trunk latch switch
Page 1415 of 1681
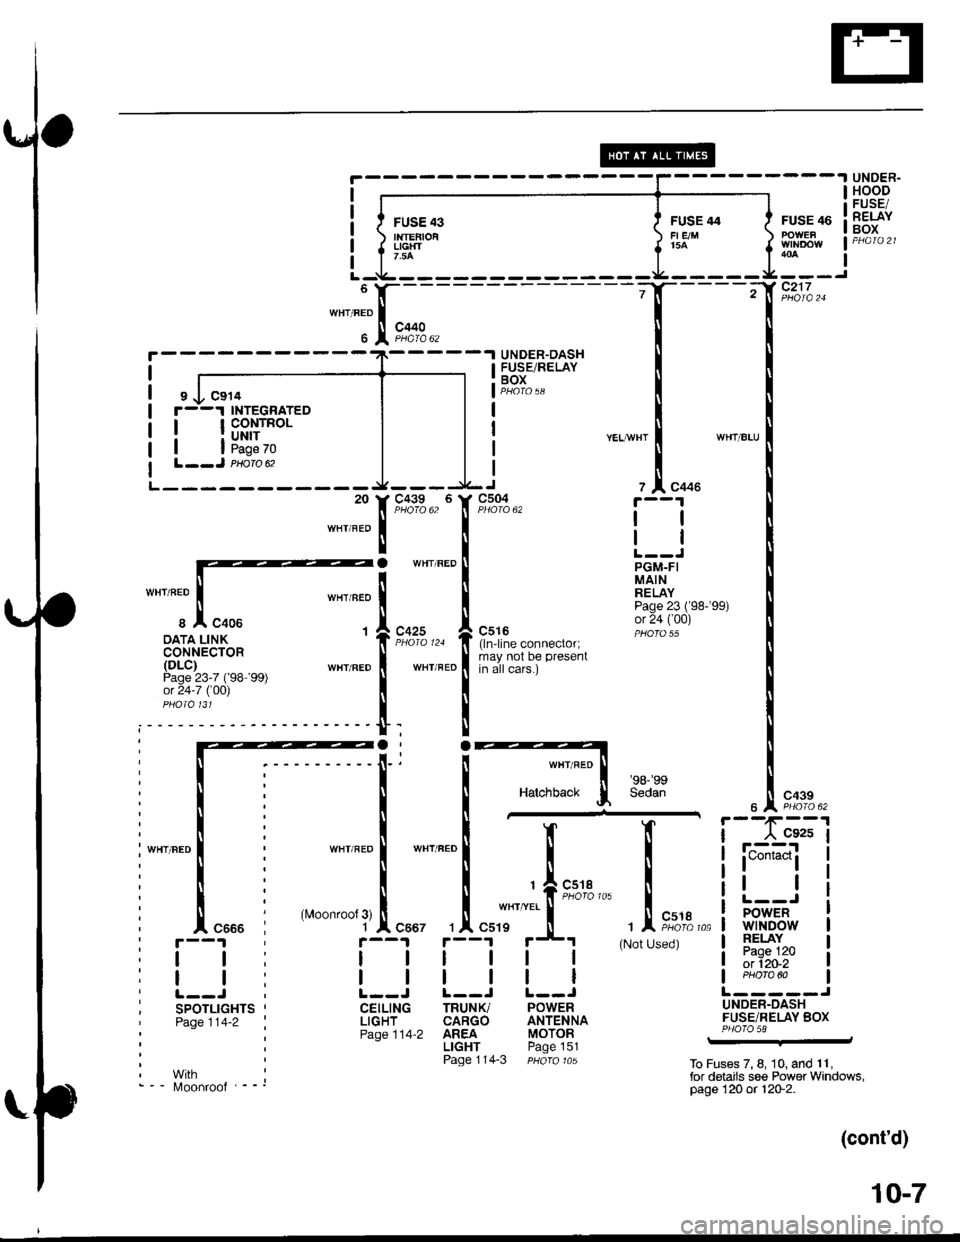
HOODI I a FUSE/
FUsE 43 I ruse +e I ruse ao I lFliYr{rEFroi S;,;; .' S "o"*-- laoxLlcrrr .( i!i,- / i,vr-,iiroirv lpHara2lLrGtfT a rsA a LlI7,5AttM
6lr----- -T---=(?:;t",'
""'"'.I!E-
- i i
t-----------1----ll[qi:".1*
| I
! "-J-E'11,.o"o,,o
LljF*ff: ] lj
-';[""..."'-'l
--'""'"f
t*""
f
n%-
'--l I
*","."|-i
.==.i '5l5j*,,,
I
,^lJr^r '
$ rx: - f ,*t,*""o"""",",, ;#,ii3J'"
"'
tcoNNEcroR ,n",".o
!
*","."!il""!,l""lroio'"*"'
I:18;?'alJ)"")
,
'::t:::-.
[, [
|
im-*,1,*,
::It*"xt*"'
***tr-i
""**
*HTFEDI ! i I
tl
i-"'"."1
i 'n*'"'ol -"'"."N
,1.,,, I i i"-""{
ffirT"-',-'lii : ll lfr-i
i-"'"."1
i 'n*'"."[ ","'"."[
[ I li#""i
i ,I*., i
'*""'*',{=.,
,'I=rTt':.
',;,["ff;,,-
i h*r*
iwnrneo l ' wHrREol wHrFEDl I I I !'i;-""t'l: ! : [ [ ll ! l r*"--l
: I : .. .^ I I *",n..
a a : a ai ti | ''-'----' a3l?3"1?.
| | : I I | | I I a PHoro^o I!--J ; !--J L--J L--J L-----J
SpOTLtcHTS ' CEIL1NG TRUNK/ pOWER UNDER-DASH
eaoe lti-z I LtcHT CARGO ANTENNA FUSE/RELAY Box', eige tt+-z AREA MoToR . PHoro 58faQe 114-2 AIIEA M(J |
rltl'cii Floil'sr -
, Page 114-3 pHoro 1as To Fuses 7, 8, iO, and 1.|,' With i tor dotails se€ Power Windows,'-- i/loonroof --' pagel2}o( 120-2.
(cont'd)
10-7