trunk HONDA INTEGRA 1998 4.G Owner's Manual
[x] Cancel search | Manufacturer: HONDA, Model Year: 1998, Model line: INTEGRA, Model: HONDA INTEGRA 1998 4.GPages: 1681, PDF Size: 54.22 MB
Page 1099 of 1681
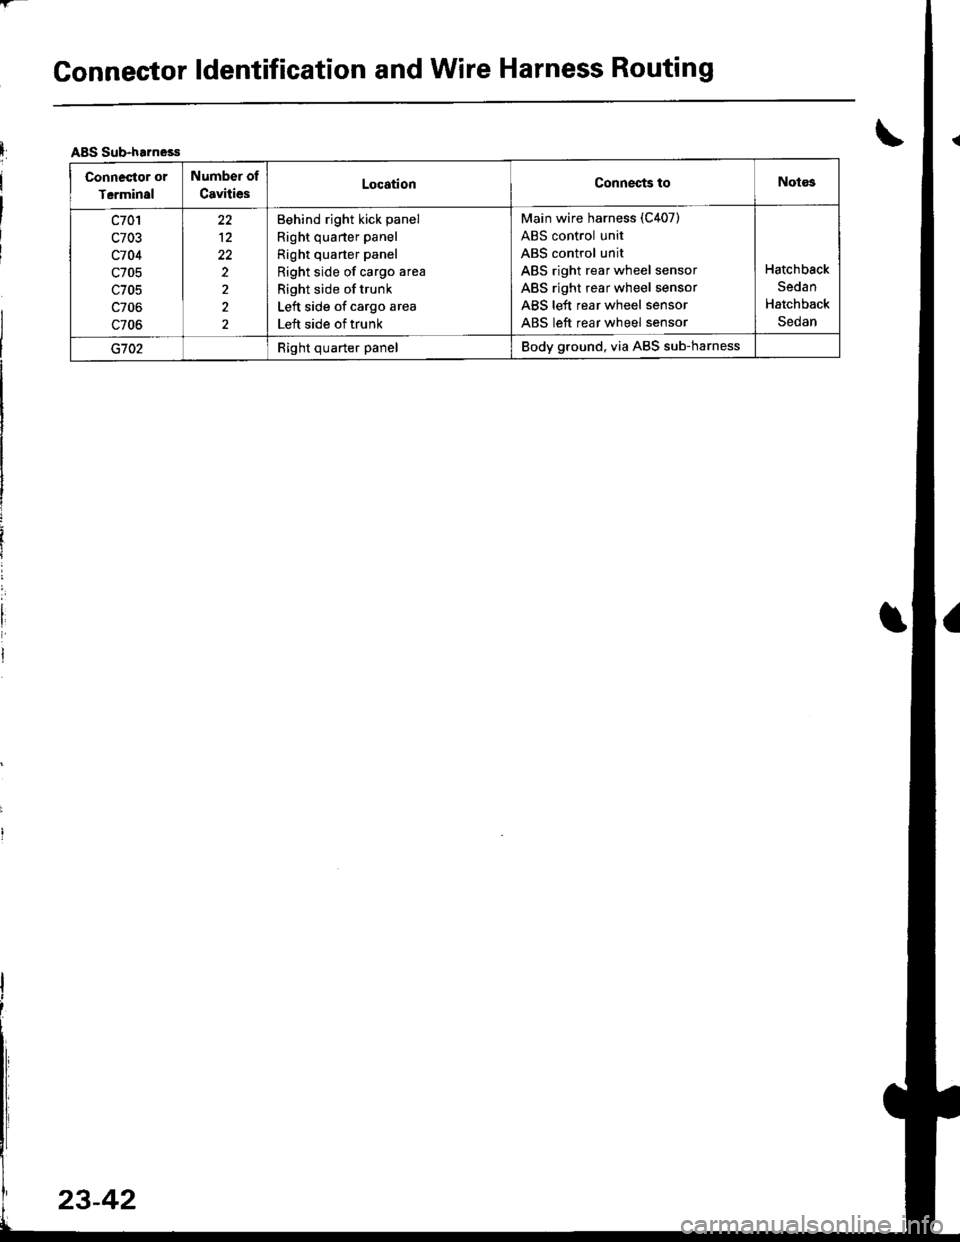
Connector ldentification and Wire Harness Routing
IABS Sub-harness
Connestor or
Tcrminsl
Number of
CavitiesLocationConneqts toNotos
c701
c703
c704
c705
c705
c706
c706
12
22
2
2
2
Behind right kick panel
Right quarter panel
Right quarter panel
Right side of cargo area
Right side of trunk
Left side of cargo area
Left side of trunk
Main wire harness (C407)
ABS control unit
ABS control unit
ABS right rear wheel sensor
ABS right rear wheel sensor
ABS left rear wheel sensor
ABS left rear wheel sensor
Hatchback
Sedan
Hatchback
Sedan
G702Right quarter panelBody ground, via ABS sub-harness
Page 1122 of 1681
I "tl
III
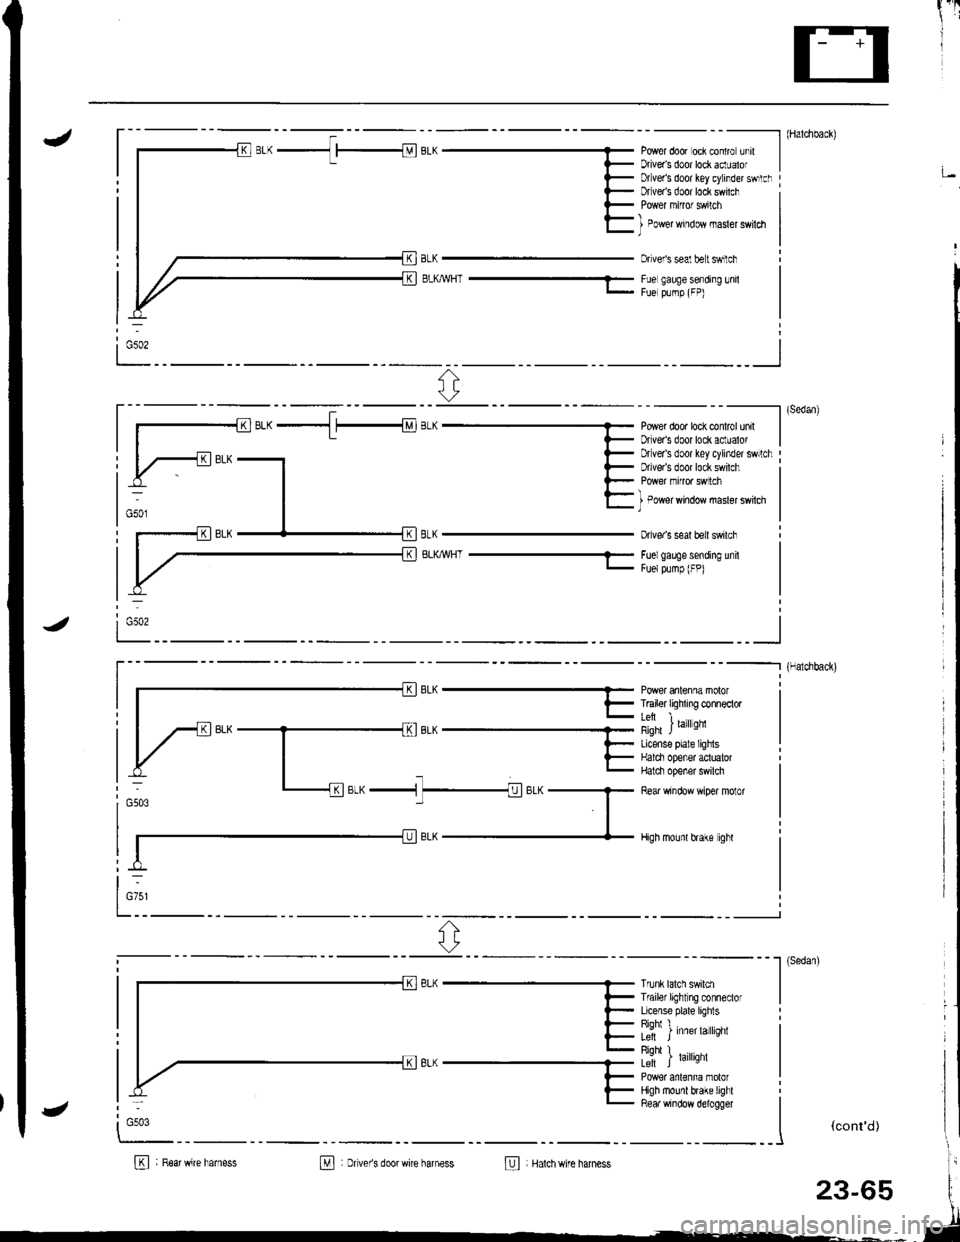
J- - - - --------- l (Haldlback)
Power door oci contro unrt IDriveas door lockaclualof I;Dtlver's door key cylinder swrtclrDfveas door lock swilch
BLKMHT ---1-
I Power window masler swildl)
Dr veis seal belt swilch
Fue gauge sending lnilFue plmp (FP)
ri:
----------l (sedan)
Power dooa lock conlrol unil IDriveas door lock aclualor I
BLKWHT-
Drlver's door key cylinder swllchDrlve/s door lock swilch
I Power window masler swilch)
Dive. s seal beit swilch
Foelgaee sending unitFuelpump (FP)
i Gso2
_ _ _--_______.] {Halchback)
r- || | F T6iler tiqhxng conneclor I
lil i ,",rror,'nqfi JLicense plale lighlsHalci opener aotualorHalci opener swilch
Rear window wiper molor
High mounl hake ighl
otw ^ -n1
t-
l_:1' ^r;-"-1 7_1;.^G503
Trunk lalch swildlTf ailer light ng conneclorLicense plate lighlsRiohl I�L; J Inner larqnr
Riohl I� .Le-ft J raflqnl
High mounl brake lighlRea. window d€logger
I
""*'�
I
(cont'd)
B : R6arwire hamessM : Dver's doorwire harness@ Hatchwire harness
:
G503
23-65
Page 1179 of 1681
I
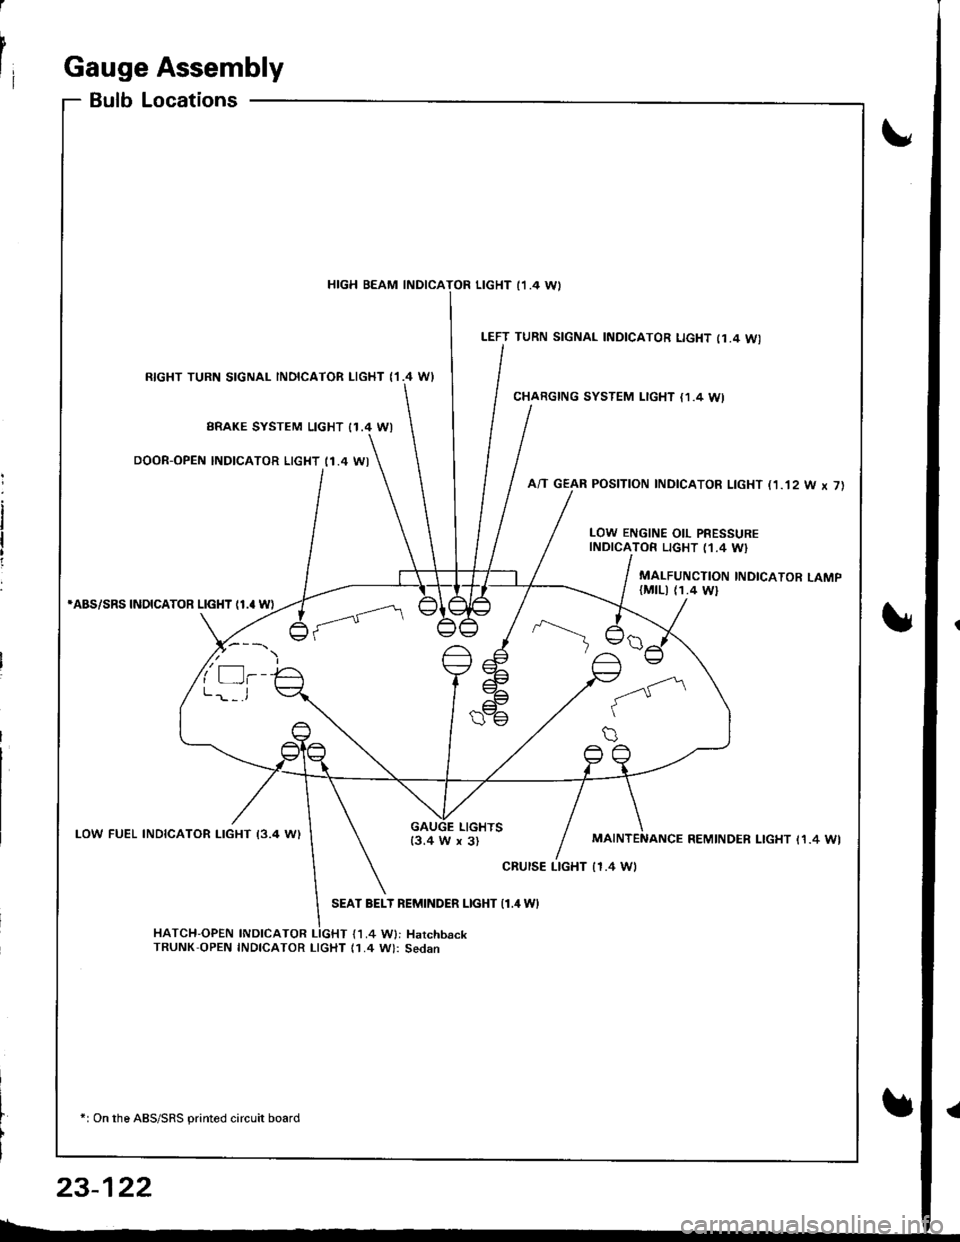
rIGauge Assembly
BulbLocations
RIGHT TURN SIGNAL INOICATOR LIGHT ('I.4 WI
BRAKE SYSTEM LIGHT I1.4 WI
DOOR-OPEN INDICATOR LIGHT (1.4 WI
*ABS/SRS INOICATOR LIGHT (1.' W)
LOW FUEL INDICATOR I-IGHT I3.4 W)
SEAT BELT REMINDER LIGHT {1.4 WI
HATCH-OPEN INDICATOR LIGHT {1.4 W}: HarchbackTRUNK'OPEN INDICATOR LIcHT (1.4 W): Sedan
+: On the ABS/SRS printed circuit board
LEFT TURN SIGNAL INDICATOR LIGHT (1.4 WI
CHARGING SYSTEM LIGHT {1,4 WI
A/T GEAR POSITION INDICATOR LIGHT (1.'t2 W x 7)
HIGH BEAM INDICATOR LIGHT I1 .4 \A,
LOW ENGINE OIL PRESSUREINDICATOR LIGHT (1.4 W}
MALFUNCTION INDICATOR LAMP(MtLl (1.4 Wl
LIGHTS13.4 W x 3)REMINDER LIGHT I1.4 WI
cRursE LTGHT | 1.4 Wt
23-122
Page 1227 of 1681
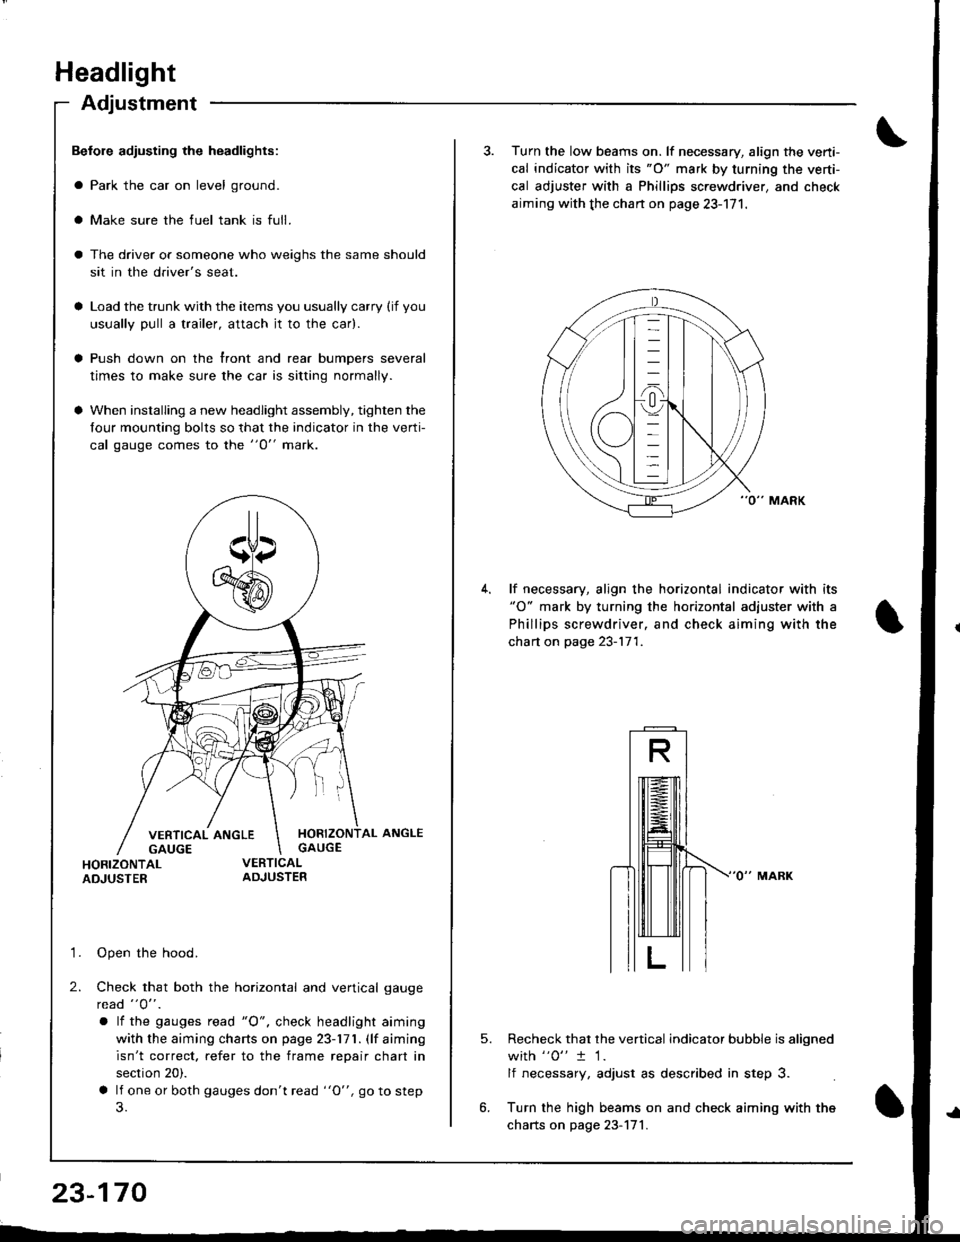
Headlight
Adjustment
Befole adiusting the headlights:
a Park the car on level ground.
a Make sure the fuel tank is full.
The driver or someone who weighs the same should
sit in the driver's seat.
Load the trunk with the items you usually carry (if you
usually pull a trailer, attach jt to the car).
Push down on the front and rear bumpers several
times to make sure the car is sitting normally.
When installing a new headlight assembly, tighten the
four mounting bolts so that the indicator in the verti-
cal gauge comes to the "O" mark.
HORIZONTAL ANGLEGAUGE
HORIZONTALADJUSTER
'1. Open the hood.
2. Check that both the horizontal and vertical gauge
rcad "O" .
a lf the gauges tead "O", check headlight aiming
with the aiming charts on page 23-171. (lf aiming
isn't correct. refer to the frame repair chart in
section 20).
a lf one or both gauges don't read "O", go to step
23-170
3. Turn the low beams on. lf necessary, align the verti-
cal indicator with its "O" mark by turning the verti-
cal adjuster with a Phillips screwdriver, and check
aiming with the chan on page 23-171.
lf necessary, align the horizontal indicator with its"O" mark by turning the horizontal adjuster with a
Phillips screwdriver, and check aiming with the
chart on page 23-171.
5.Recheck that the vertical indicator bubble is aligned
with "0" t 1.
lf necessary, adjust as described in step 3.
Turn the high beams on and check aiming with the
charts on page 23-171.
Page 1232 of 1681
I
I
1..,
23-175
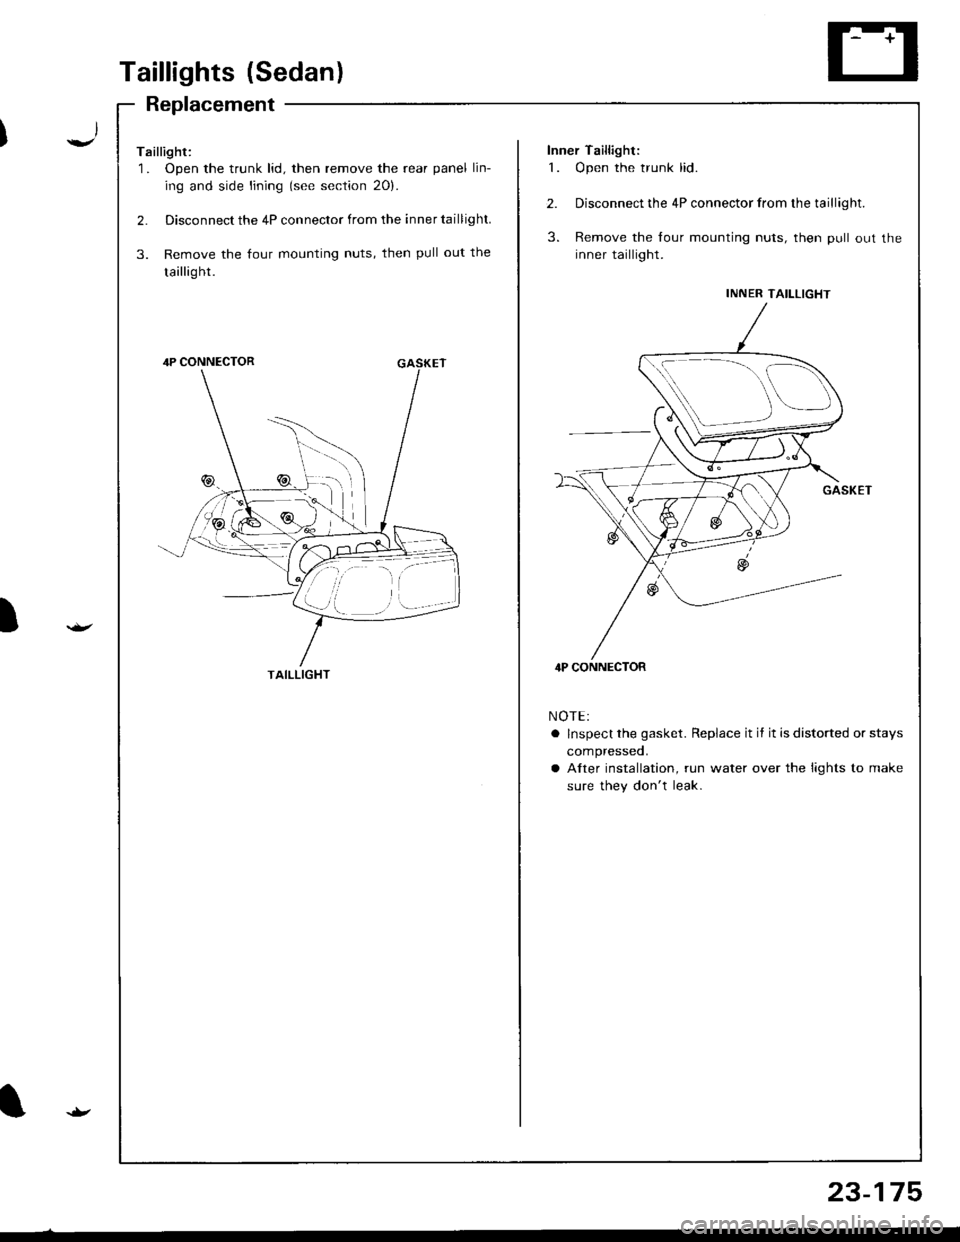
Taillights (Sedan)
Replacement
Taillight:'1 . Open the trunk lid, then remove the rear panel lin-
ing and side lining (see section 20).
2. Disconnect the 4P connector from the inner taillight.
3. Remove the four mounting nuts, then pull out the
taillight.
Inner Taillight:
1. Open the trunk lid.
2.
3.
Disconnect the 4P connector from the taillight.
Remove the lour mounting nuts, then pull out the
inner taillight.
NOTE:
a lnspect the gasket. Replace it if it is distorted or stays
compresseo.
a Alter installation, run water over the lights to make
sure they don't leak.
INNER TAILLIGHT
4P CONNECTOR
:-)
TAILLIGHT
Page 1233 of 1681
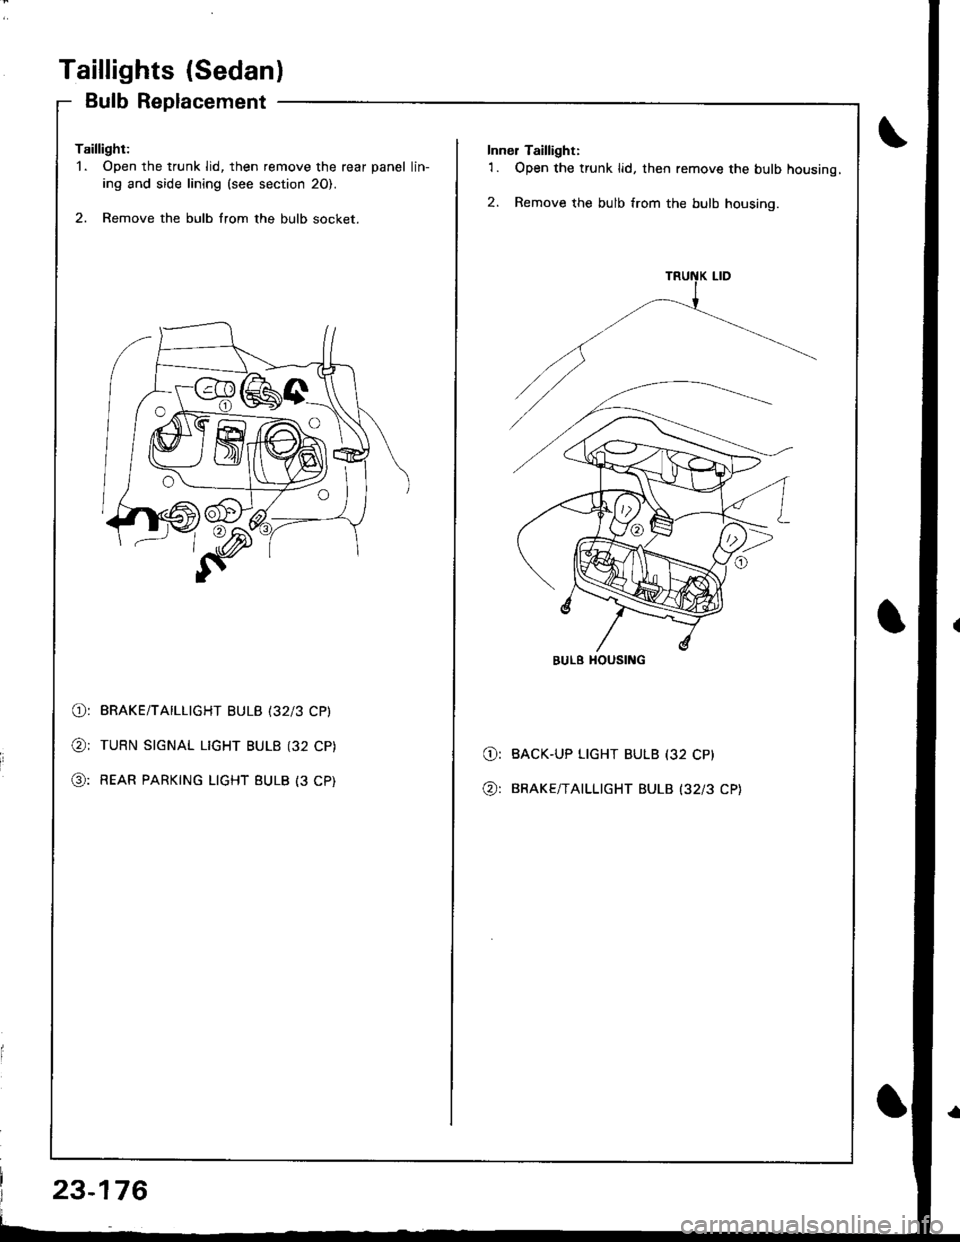
Taillights (Sedanl
Bulb Replacement
Taillight:'1. Open the trunk lid, then remove the rear panel lin-
ing and side lining (see section 20).
2. Remove the bulb from the bulb socket.
O: BRAKE/TAILLIGHT BULB 132/3 CPI
@; TURN SIGNAL LIGHT BULB (32 CP)
@: REAR PARKING LIGHT EULB (3 CP)
23-176
Inn€r Taillight:'1. Open the trunk lid, then remove the bulb housing,
2. Remove the bulb from the bulb housing.
BACK.UP LIGHT BULB (32 CP}
BRAKE/TAILLIGHT BULB {32l3 CP)
O:
/n.
EULB HOUSING
Page 1237 of 1681
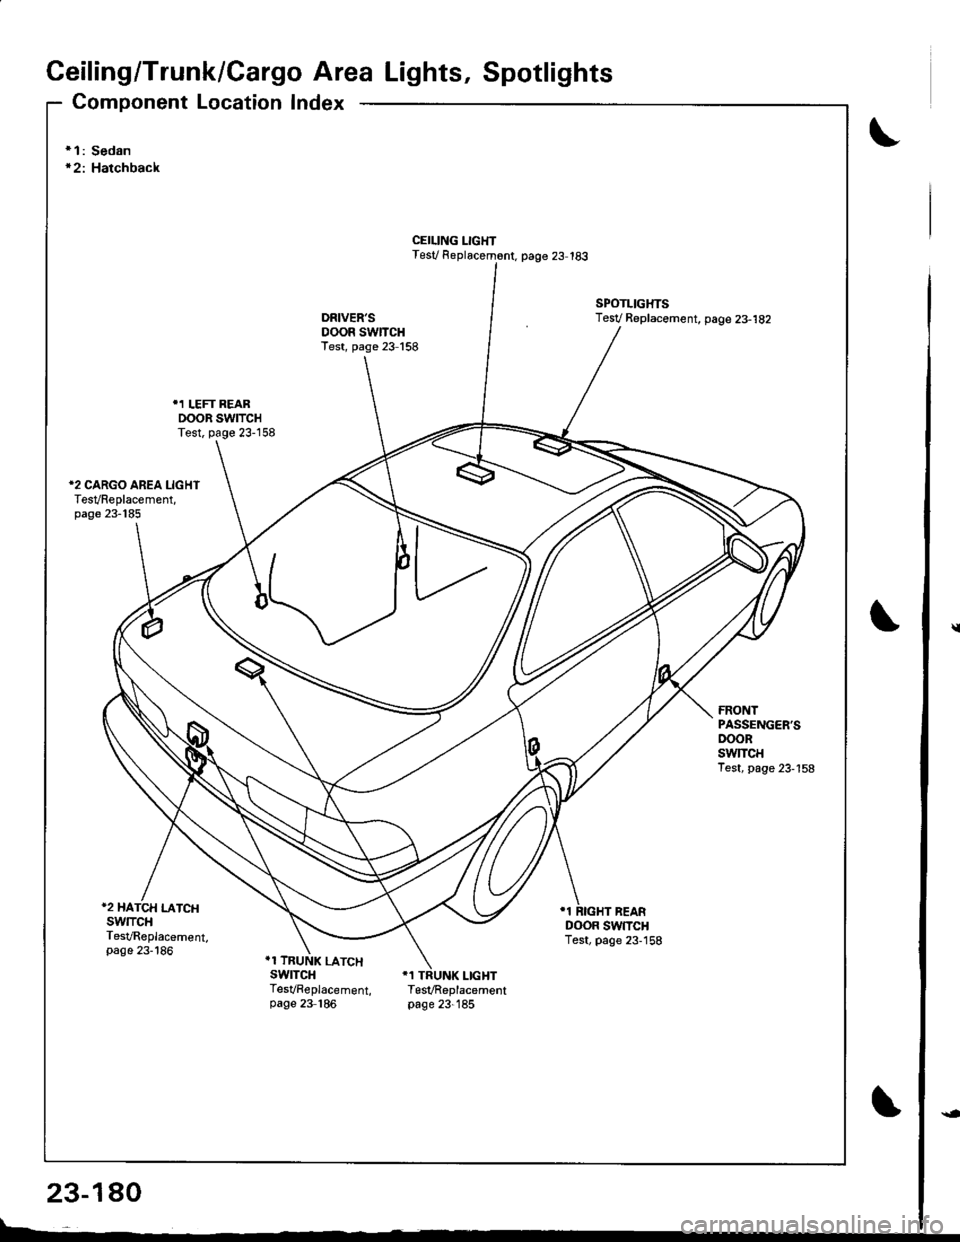
Ceiling/Trunk/Cargo Area Lights, Spotlights
Component Location Index
\* 1: Sedan'2: Hatchback
CEILING LIGHTTest/ R6placem6nt. page 23 183
SPOTLIGHTSTesV Replac€ment, page 23-182
FRONTPASSENGER'SDOORswlTcHTest, page 23-158
*2 HATCH LATCHSwlTCHTesVReplacement,page 23-186
DOOR SWTTCHTest, page 23-158
.1 TRUNK LATCHswrTcHTesVReplacement, TesVReplacementpage 23 186 page 23-185
\
23-180
l--
Page 1238 of 1681
![HONDA INTEGRA 1998 4.G Owners Manual Gircuit Diagram
UNDEF.HOOD FUS gRELAY BOX
(Wilh moonrool)-l
,,**Er
WHT/FED
LT
]NTEGRATED TCoNTROL IUNIT I
lSedan)
.-l
TRUNKL]GHT(sw)
I
lff
lh
iT
Lir -
lb
.F
23-141 HONDA INTEGRA 1998 4.G Owners Manual Gircuit Diagram
UNDEF.HOOD FUS gRELAY BOX
(Wilh moonrool)-l
,,**Er
WHT/FED
LT
]NTEGRATED TCoNTROL IUNIT I
lSedan)
.-l
TRUNKL]GHT(sw)
I
lff
lh
iT
Lir -
lb
.F
23-141](/img/13/6069/w960_6069-1237.png)
Gircuit Diagram
UNDEF.HOOD FUS gRELAY BOX
(Wilh moonrool)-l
,,**Er
WHT/FED
LT
]NTEGRATED TCoNTROL IUNIT I
lSedan)
.-l
TRUNKL]GHT(sw)
I
lff
lh
iT
Lir -
lb
.F
23-141
Page 1239 of 1681
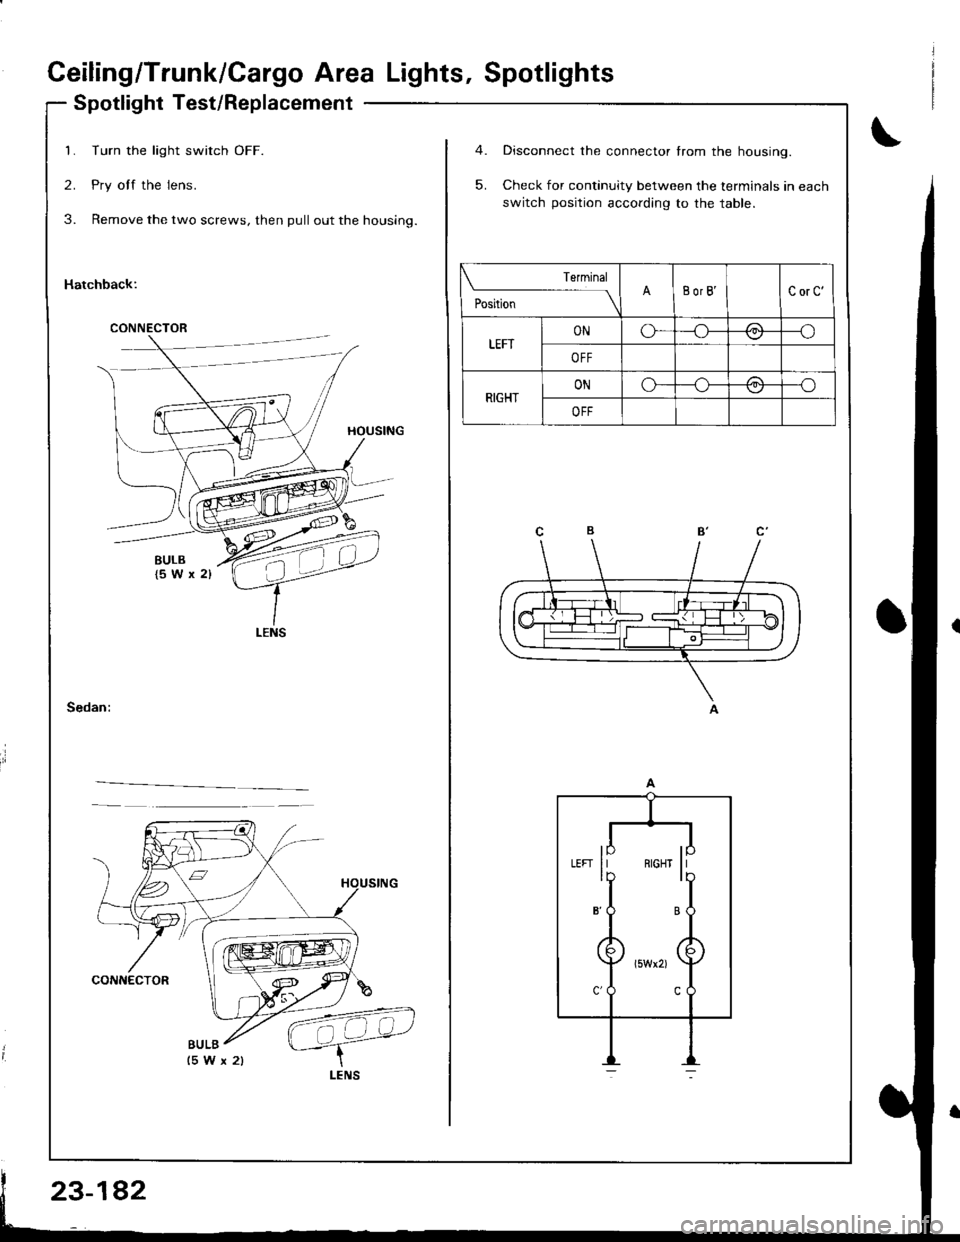
Ceiling/Trunk/Cargo Area Lights, Spotlights
Spotlight Test/Replacement
Turn the light switch OFF.
Pry off the lens.
Remove the two screws, then pull out the housing.
Hatchback:
1
2
3
CONNECTOR
BULB
5.
Disconnect the connector from the housing.
Check for continuity between the terminals in each
switch position according to the table.
Terminal
;.ttr"
----l\BorB'CorC'
LEFTONo---o\:,,/
OFF
RIGHTONo-/-\-o
OFF
lp llLEFI II RIGH] IIlb ll
8'�O B
Page 1241 of 1681
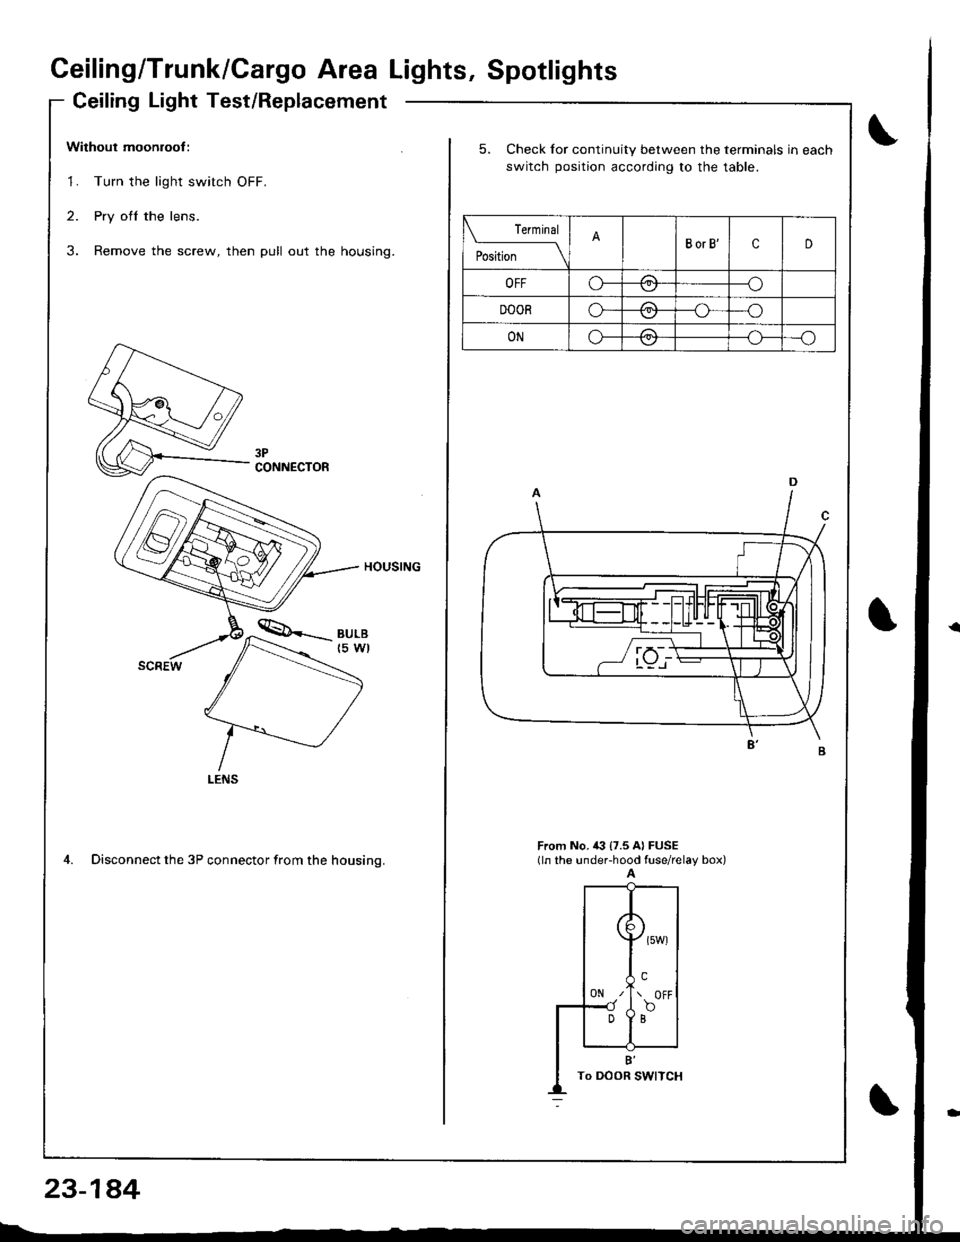
Ceiling/Trunk/Cargo Area Lights, Spotlights
Ceiling Light Test/Replacement
Without moonroof :
1. Turn the light switch OFF.
2. Pry ofl the lens.
3. Remove the screw, then pull out the housing.
HOUSING
4. Disconnect the 3P connector from the housino.
CONNECTOR
23-1a4
5. Check for continuity between the terminals in each
switch position according to the table.
rermrnal
PositionBorB'cD
OFFo-/1--o
DOORo-/A--o
ONo-/a\--o\:,,/--{.J-
From No, i(} {7.5 A} FUSE(ln the under-hood fuse/relay box)A
({
0N z'
Dl
\>l
( owt
!.\. OFF
f,o
B'To DOOR I