buttons HONDA ODYSSEY 1998 Owners Manual
[x] Cancel search | Manufacturer: HONDA, Model Year: 1998, Model line: ODYSSEY, Model: HONDA ODYSSEY 1998Pages: 272, PDF Size: 2.67 MB
Page 15 of 272
Protecting Adults
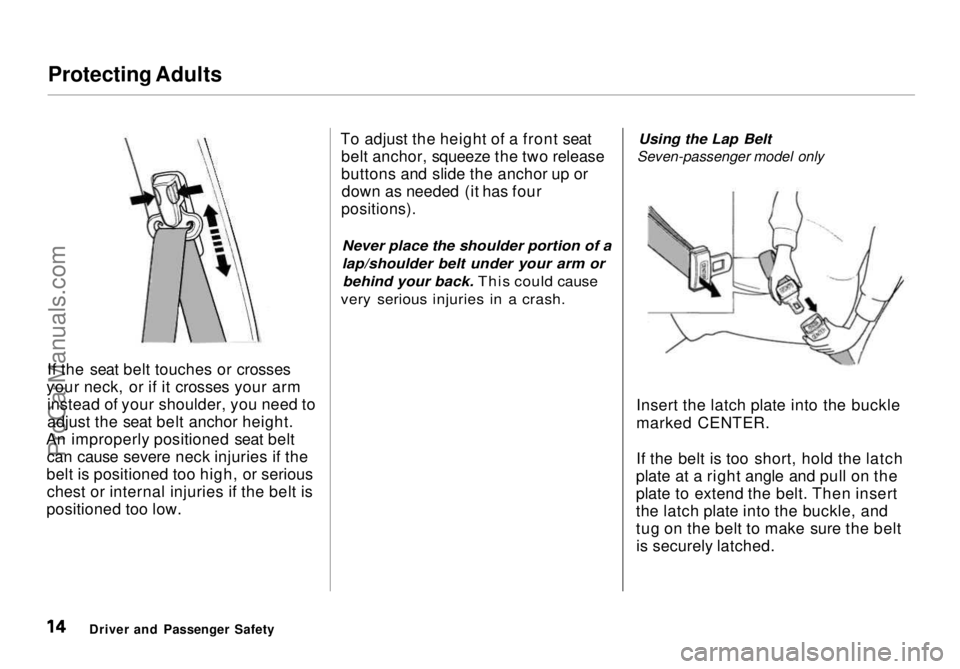
If the seat belt touches or crosses
your neck, or if it crosses your arm instead of your shoulder, you need to
adjust the seat belt anchor height.
An improperly positioned seat belt can cause severe neck injuries if the
belt is positioned too high, or serious chest or internal injuries if the belt is
positioned too low. To adjust the height of a front seat
belt anchor, squeeze the two release
buttons and slide the anchor up ordown as needed (it has four
positions).
Never place the shoulder portion of a
lap/shoulder belt under your arm orbehind your back. This could cause
very serious injuries in a crash.
Using the Lap Belt
Seven-passenger model only
Insert the latch plate into the buckle
marked CENTER.
If the belt is too short, hold the latch
plate at a right angle and pull on the
plate to extend the belt. Then insert
the latch plate into the buckle, and
tug on the belt to make sure the belt is securely latched.
Driver and Passenger SafetyProCarManuals.comMain Menu Table of Contents s t
Page 67 of 272
Steering Wheel Controls
Even with the cruise control turned
on, you can still use the accelerator
pedal to speed up for passing. After
completing the pass, take your foot
off the accelerator pedal. The vehicle
will return to the set cruising speed.
Resting your foot on the brake pedal
will cause the cruise control to
cancel.
Cancelling the Cruise Control
You can cancel the cruise control in any of these ways: Tap the brake pedal.
Press the SET/decel and RE-
SUME/accel buttons at the same
time.
Press the Cruise Control Master
Switch.
When you tap the brake or clutch
pedal, or press the SET and RE- SUME buttons at the same time, the
CRUISE CONTROL light on the
instrument panel will go out and the
vehicle will begin to slow down. You can use the accelerator pedal in the
normal way.
If you use the brake pedal to cancel
cruise control, the system
remembers the previously-set
cruising speed. To return to thatspeed, accelerate to above 25 mph (40 km/h) and press the RESUME/
accel button until the CRUISE CON-
TROL light comes on. The vehicle will accelerate to the same cruisingspeed as before.
If you cancel cruise control by
pressing the SET and RESUME
buttons at the same time, the
previously-set cruising speed is erased. To use the cruise control,accelerate to the desired cruising
speed and press the SET/decel
button.
Pressing the Cruise Control Master
Switch turns the system completelyoff and erases the previous cruising
speed from memory. To use the
system again, refer to Using the
Cruise Control
Instruments and ControlsProCarManuals.comMain Menu Table of Contents s t
Page 94 of 272
Heating and Cooling
Proper use of the Heating and
Cooling system can make the
interior dry and comfortable, and
keep the windows clear for best
visibility.
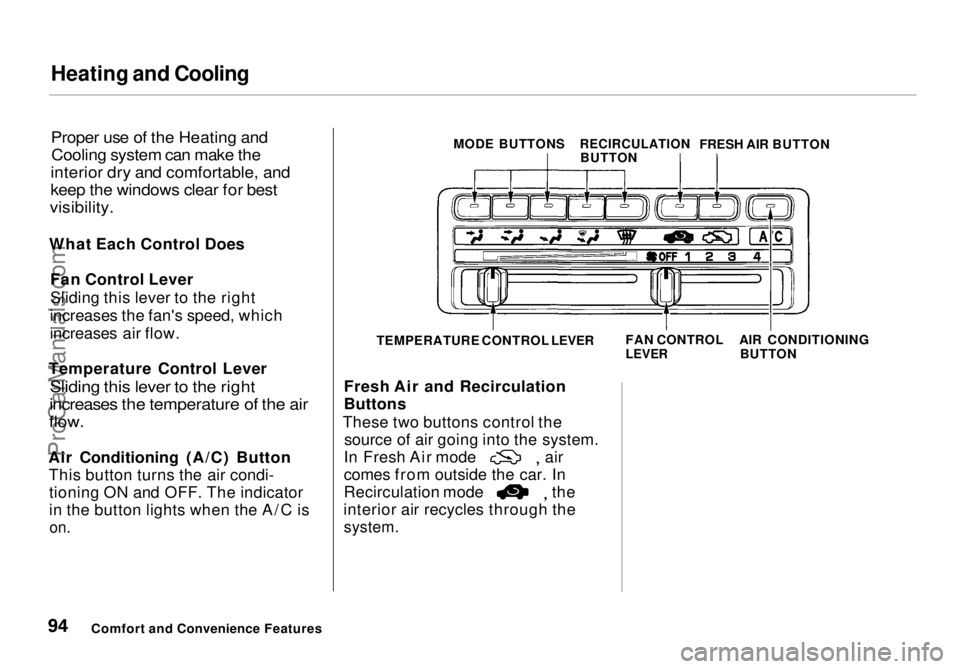
What Each Control Does Fan Control Lever
Sliding this lever to the right
increases the fan's speed, which
increases air flow.
Temperature Control Lever
Sliding this lever to the right
increases the temperature of the air
flow.
Air Conditioning (A/C) Button This button turns the air condi-tioning ON and OFF. The indicator
in the button lights when the A/C is
on.
Fresh Air and Recirculation
Buttons
These two buttons control the source of air going into the system. In Fresh Air mode air
comes from outside the car. In
Recirculation mode the
interior air recycles through the
system.
Comfort and Convenience Features MODE BUTTONS
RECIRCULATION
BUTTON FRESH AIR BUTTON
TEMPERATURE CONTROL LEVER FAN CONTROL
LEVER
AIR CONDITIONING
BUTTONProCarManuals.comMain Menu Table of Contents s t
Page 95 of 272
Heating and Cooling
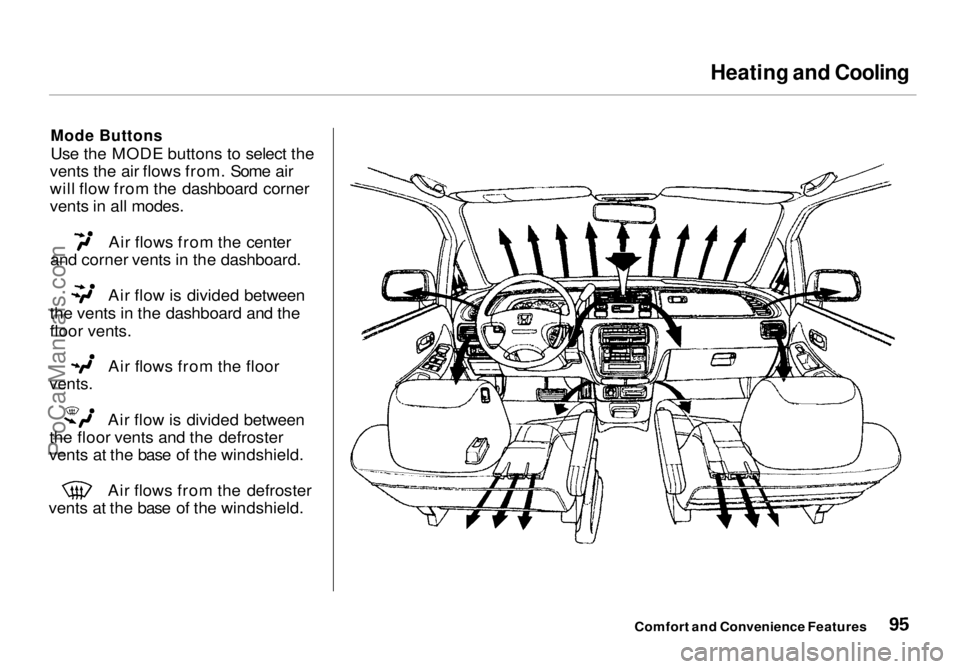
Mode Buttons
Use the MODE buttons to select the
vents the air flows from. Some air
will flow from the dashboard corner
vents in all modes. Air flows from the center
and corner vents in the dashboard. Air flow is divided between
the vents in the dashboard and the
floor vents. Air flows from the floor
vents.
Air flow is divided between
the floor vents and the defroster
vents at the base of the windshield. Air flows from the defroster
vents at the base of the windshield.
Comfort and Convenience FeaturesProCarManuals.comMain Menu Table of Contents s t
Page 97 of 272
Heating and Cooling
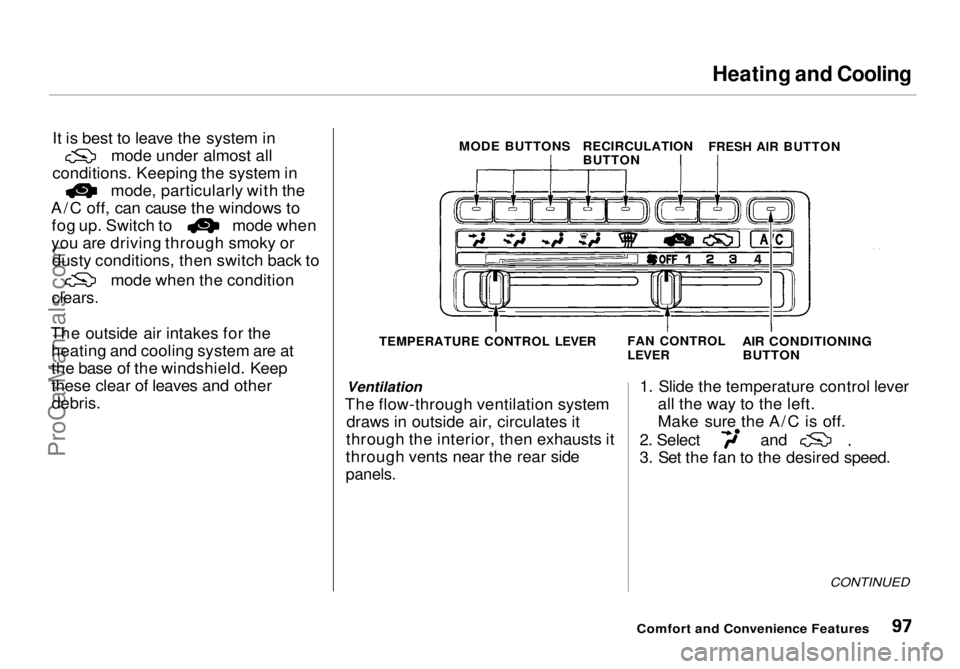
It is best to leave the system in mode under almost all
conditions. Keeping the system in mode, particularly with the
A/C off, can cause the windows to fog up. Switch to mode when
you are driving through smoky or dusty conditions, then switch back to mode when the condition
clears.
The outside air intakes for the heating and cooling system are at
the base of the windshield. Keep
these clear of leaves and other
debris.
Ventilation
The flow-through ventilation system draws in outside air, circulates it
through the interior, then exhausts it
through vents near the rear side
panels.
1. Slide the temperature control lever
all the way to the left.
Make sure the A/C is off. 2. Select and
3. Set the fan to the desired speed.
CONTINUED
Comfort and Convenience Features
MODE BUTTONS
RECIRCULATION
BUTTON
FRESH AIR BUTTON
TEMPERATURE CONTROL LEVER FAN CONTROL
LEVER
AIR CONDITIONING
BUTTONProCarManuals.comMain Menu Table of Contents s t
Page 98 of 272
Heating and Cooling
To Cool with A/C
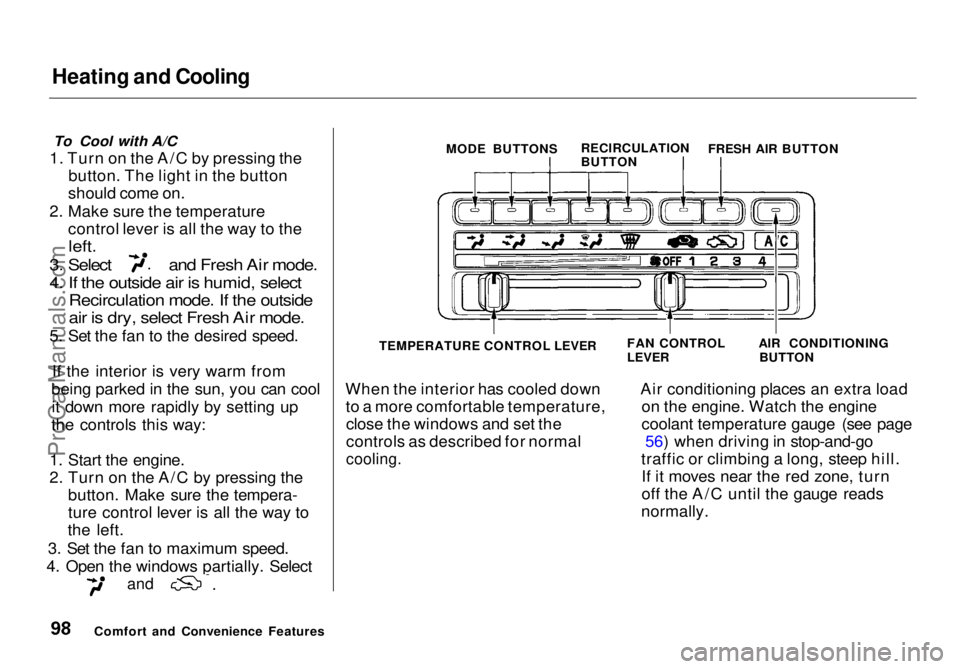
1. Turn on the A/C by pressing the button. The light in the button
should come on.
2. Make sure the temperature control lever is all the way to the
left.
3. Select and Fresh Air mode.
4. If the outside air is humid, select
Recirculation mode. If the outside
air is dry, select Fresh Air mode.
5. Set the fan to the desired speed.
If the interior is very warm from
being parked in the sun, you can cool it down more rapidly by setting up
the controls this way:
1. Start the engine.
2. Turn on the A/C by pressing the button. Make sure the tempera-
ture control lever is all the way to
the left.
3. Set the fan to maximum speed.
4. Open the windows partially. Select
and
When the interior has cooled down
to a more comfortable temperature,close the windows and set the
controls as described for normal
cooling.
Air conditioning places an extra load
on the engine. Watch the engine
coolant temperature gauge (see page 56) when driving in stop-and-go
traffic or climbing a long, steep hill. If it moves near the red zone, turn
off the A/C until the gauge reads
normally.
Comfort and Convenience Features MODE BUTTONS
RECIRCULATION
BUTTONFRESH AIR BUTTON
TEMPERATURE CONTROL LEVER
FAN CONTROL
LEVER
AIR CONDITIONING
BUTTONProCarManuals.comMain Menu Table of Contents s t
Page 100 of 272
Heating and Cooling
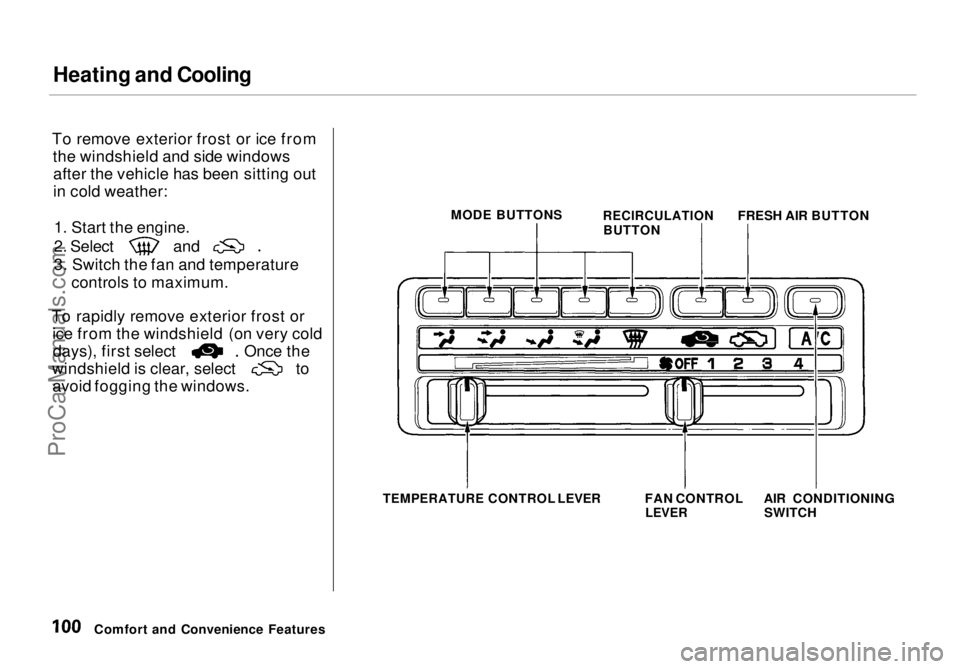
To remove exterior frost or ice from the windshield and side windowsafter the vehicle has been sitting out
in cold weather:
1. Start the engine. 2. Select and
3. Switch the fan and temperature
controls to maximum.
To rapidly remove exterior frost or ice from the windshield (on very cold days), first select Once the
windshield is clear, select to
avoid fogging the windows.
Comfort and Convenience Features MODE BUTTONS
RECIRCULATION
BUTTON FRESH AIR BUTTON
TEMPERATURE
CONTROL LEVER FAN CONTROL
LEVER
AIR CONDITIONING
SWITCHProCarManuals.comMain Menu Table of Contents s t
Page 103 of 272
Audio System
AM/FM/Cassette Stereo Audio
SystemFor U.S. LX and Canadian models
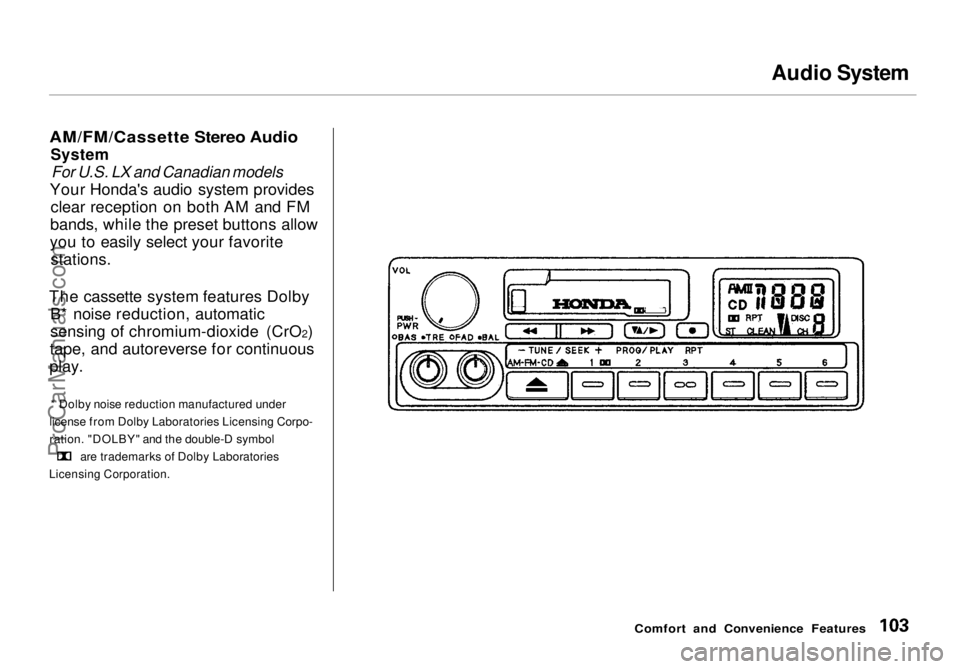
Your Honda's audio system provides clear reception on both AM and FM
bands, while the preset buttons allow
you to easily select your favorite stations.
The cassette system features Dolby B* noise reduction, automatic
sensing of chromium-dioxide (CrO 2)
tape, and autoreverse for continuous
play.
* Dolby noise reduction manufactured under
license from Dolby Laboratories Licensing Corpo-
ration. "DOLBY" and the double-D symbol are trademarks of Dolby Laboratories
Licensing Corporation.
Comfort and Convenience Features
ProCarManuals.comMain Menu Table of Contents s t
Page 104 of 272
Audio System
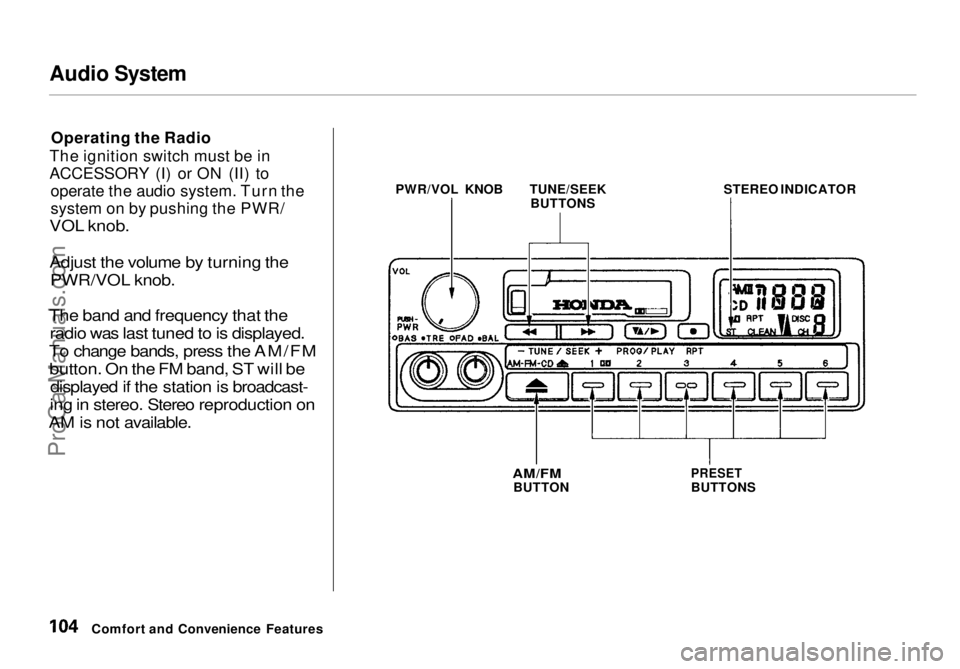
Operating the Radio
The ignition switch must be in
ACCESSORY (I) or ON (II) to operate the audio system. Turn the
system on by pushing the PWR/
VOL knob.
Adjust the volume by turning the
PWR/VOL knob.
The band and frequency that the radio was last tuned to is displayed.
To change bands, press the AM/FM button. On the FM band, ST will be displayed if the station is broadcast-
ing in stereo. Stereo reproduction on
AM is not available.
Comfort and Convenience Features PWR/VOL KNOB
TUNE/SEEK
BUTTONS STEREO INDICATOR
AM/FM
BUTTON
PRESET
BUTTONSProCarManuals.comMain Menu Table of Contents s t
Page 105 of 272
Audio System
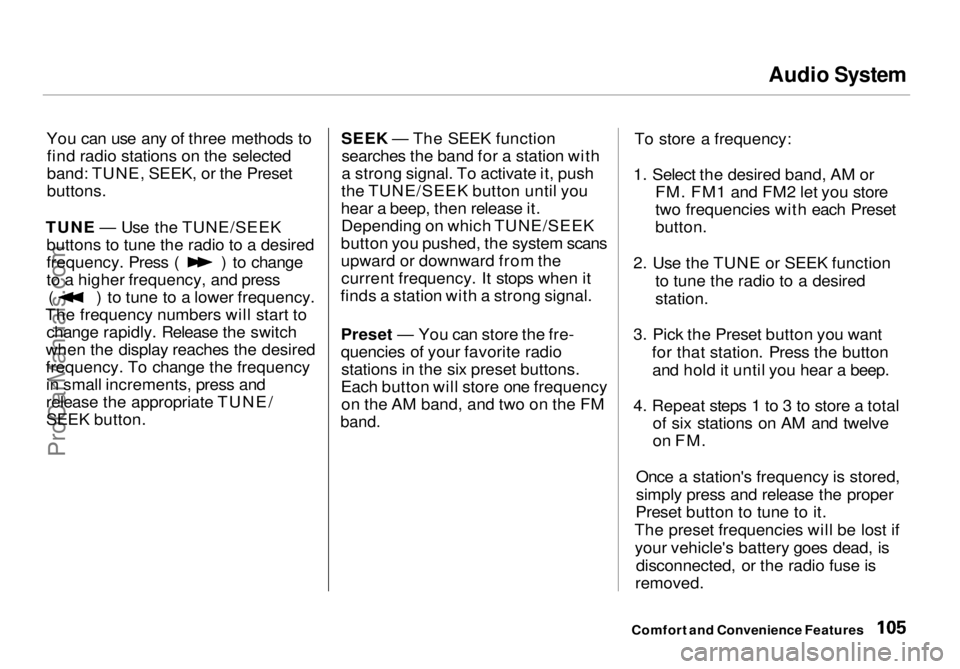
You can use any of three methods to find radio stations on the selected
band: TUNE, SEEK, or the Preset
buttons.
TUNE — Use the TUNE/SEEK buttons to tune the radio to a desired frequency. Press ( ) to change
to a higher frequency, and press
( ) to tune to a lower frequency.
The frequency numbers will start to change rapidly. Release the switch
when the display reaches the desired
frequency. To change the frequency in small increments, press and
release the appropriate TUNE/
SEEK button. SEEK — The SEEK function
searches the band for a station with
a strong signal. To activate it, push
the TUNE/SEEK button until you
hear a beep, then release it. Depending on which TUNE/SEEK
button you pushed, the system scans
upward or downward from the current frequency. It stops when it
finds a station with a strong signal.
Preset — You can store the fre-
quencies of your favorite radiostations in the six preset buttons.
Each button will store one frequency on the AM band, and two on the FM
band.
To store a frequency:
1. Select the desired band, AM or FM. FM1 and FM2 let you store
two frequencies with each Preset
button.
2. Use the TUNE or SEEK function to tune the radio to a desired
station.
3. Pick the Preset button you want for that station. Press the buttonand hold it until you hear a beep.
4. Repeat steps 1 to 3 to store a total of six stations on AM and twelve
on FM.
Once a station's frequency is stored,
simply press and release the proper
Preset button to tune to it.
The preset frequencies will be lost if your vehicle's battery goes dead, is disconnected, or the radio fuse is
removed.
Comfort and Convenience FeaturesProCarManuals.comMain Menu Table of Contents s t