ad blue HONDA ODYSSEY 2011 RB3-RB4 / 4.G Navigation Manual
[x] Cancel search | Manufacturer: HONDA, Model Year: 2011, Model line: ODYSSEY, Model: HONDA ODYSSEY 2011 RB3-RB4 / 4.GPages: 178, PDF Size: 3.97 MB
Page 1 of 178
Navigation System1
Table of Contents
Introduction ..................................... 4
Manual Overview .............................. 4
System Overview ............................... 4
Accessories Precautions .....................5
Important Safety Information ............ 5
Map Overview ................................... 6
Current Street ........................................6
Verified/Unverified Street ......................6
User Agreement ...............................8
Getting Started .............................. 10
System Controls ............................... 10
Voice Control Basics ....................... 13
Using the Voice Control System ..........14
Improving Voice Recognition ..............14
Selecting an Item (Button) on the
Screen ........................................... 15
Selecting an Item in a List ............... 15
Entering Informatio n .......................16
System Start-up ................................ 18
System Language Selection ............. 18
Bluetooth
® HandsFreeLink®........... 19
Map Screen Legend ......................... 20
Map Screen Description .................. 21
Zoom In/Out.........................................21
Map Scrolling ......................................21
Displaying Current Location ...........21
Traffic Display Legend .................... 22FM Traffic™ ...................................
23
Traffic Status Indicator........................ 23
Viewing Flow Data .............................. 24
Viewing Incident Reports .................... 25
System Function Diagram ...............27
Entering a Destination .................28
By Address ...................................... 29
Selecting the State or Province............ 29
Selecting the ZIP Code ........................ 30
Selecting the City ................................. 30
Selecting the Street .............................. 32
Entering the Street Number ................. 34
By Address Book .............................34
Adding Addresses to the Personal
Address Book ................................... 35
By Previous Destination .................. 35
By Place Name .......... ......................36
By Place Category ..... ......................37
Subcategories ...................................... 38
Place Name .......................................... 41
City Vicinity ......................................... 41
Sort by Distance to Travel ................... 41
Search by Keyword .............................. 42
By Place Phone Number..................43
By ZAGAT® 2010............. ..............43
By Coordinate .................................. 44
By Intersection................................. 46By Map Input....................................
46
Showing the Map of Current
Position ............................................ 47
Showing the Map of City ..................... 48
Showing the Map of State .................... 49
Showing the Map of Continental USA and Canada.............................. 50
By Go Home 1 or 2 .......................... 51
Driving to Your Destination ........52
Driving to Your Destination ............. 52
Calculate Route to Screen ................ 52
Changing the Route Preference...........53
Viewing the Routes .............................. 53
Viewing the Destination Map .............. 54
Map Screen .......................................54
Route Line............................................ 54
Voice Guidance Prompts ..................... 55
Map Screen Legend ............................. 56
Guidance Screen ...............................57
Guidance Screen Legend.....................57
Distance and Time to Destination .... 58
Map Menu ........................................ 58
Guidance Menu ................................ 59
Directions ............................................ 59
Exit Info. (Freeway Exit Information) ............. 60
Guidance Mode ........... ................... .....60
00X31-TK8-8000
\251 2010 American Honda Motor Co., Inc. - All Rights Reserved
2011 Odyssey
Page 3 of 178
Navigation System3
Table of Contents
Clock Adjustment ............................... 114
Clock Type ......................................... 115
Picture Setup...................................... 115
Reset Factory Default Settings ......117
Clear Personal Data ....................... 118
Multi-view Rear Camera ............... 119
Three-way Rearview Modes .............. 119
Visible Range of the Rearview Image.............................................. 120
Multi-view Rear Camera Brightness Adjustment...................................... 120
System Initialization ...................121
System Initialization ......................121
Entering the Security Code ............ 121
GPS Initialization.................. .........121
Map Matching ................................ 122
System Limitations......................123
GPS Reception Issues ........................ 123
Database Limitations ..................124
Customer Assistance ................... 126
Reporting Errors ............................ 126
Honda Automobile Customer Service ........................................ 126
Visiting Your Dealer...................... 127
Obtaining a Navigation Update DVD ........................................... 127
Coverage Areas........................... 128
Map Coverage................................ 128
U.S. Detailed Coverage Areas........... 128
Puerto Rico Detailed Coverage Areas .............................................. 133
Canada Detailed Coverage Areas ..... 134
Operation in Alaska, Hawaii, Canada,
and Puerto Rico .......................... 144
Alaska, Hawaii, Canada, and Puerto
Rico ................................................ 144
Frequently Asked Questions .....146
Troubleshooting.......................... 153
Glossary ....................................... 154
Glossary ......................................... 154
Voice Command Index...............157
Global Commands ......................... 157
Navigation Commands .................. 157
General Commands ........................... 157
Map Display Commands ................... 158
Map Scale Commands .... ...................158
Find Place Commands ...................... 159
Route Commands ............ ...................160
Climate Control Commands .......... 160
Audio Commands .......................... 161
Radio Commands...............................161
Disc Commands .... .............................162
HDD Commands ............................... 162USB Commands .................................
163
iPod Commands................................. 163
Bluetooth
® Audio Commands............ 164
AUX Commands ................................ 164
Song By Voice™ Co mmands .............164
Rear Radio Commands .. ....................164
Rear CD Commands .......................... 165
Rear DVD Commands ....................... 165
Rear HDD Commands....................... 166
Rear iPod Commands ........................ 167
Rear AUX Commands........................ 167
Phone Commands ...........................167
SETUP Screen (Main Setup) Commands................................... 167
On-Screen Commands .................... 168
On-Screen Spelling Assist ..............168
Index ............................................ 172
2011 Odyssey
Page 7 of 178
Navigation System7
Introduction
Verified streets Unverified streets
When
displayed These roads are generally found within metropolitan
areas, and include interstate freeways and major roads
connecting cities. These roads are generally found
in rural areas, and typically
include residential streets away from the center of a town.
Street color Shown as red (freeways), pink (state routes), or gray
(verified streets)
on the daytime map screen. Shown on the daytime
map screen as purple.
Map quality The database vendor has
verified these streets.
Information like turn restri ctions, average speed, and
whether it is a one-way street have been gathered and
used when creating your route to a destination. These streets have not been ve
rified by the database vendor.
The system does not contain in formation whether these are on
one-way streets, have turn rest rictions, or the road’s average
speed. They are shown on the map for reference and may have
errors in map location, naming, and address range.
Routing
differences While driving to your destin
ation, the displayed route
line is solid blue. The syst em provides voice and map
guidance to your destination. Your route line is either a pur
ple dotted “vector line,” or a
dashed pink/blue line. For inform ation on selecting this option,
and the routing differences, see Unverified Area Routing on
page 101.
Cautions There are no pop-up boxes urging extra caution during
a route. However, because roads constantly change,
you are urged to use common
sense, and always obey
posted traffic restrictions. Regardless of whether the user
chooses route guidance, there
are cautionary screens before and during the route urging the
user to be extra cautious, and obey all traffic restrictions. See
Unverified Area Routing on page101.
Guidance
voice Voice guidance issues instructions such as “In a half-
mile, make a right turn.” The phrase “if possible” is added
to each guidance instruction.
For example: “In a half-mile, ma ke a right turn, if possible.”
Time and
distance
“to go” The time and distance “to go,
” displayed while en route
to a destination, is based on the average speed and
distance for the roads used for your route. The time and distance “to go,”
displayed while en route to a
destination, is based on the aver age speed and distance for the
roads used for your route.
2011 Odyssey
Page 19 of 178
Navigation System19
Getting Started
If you have entered any Calendar
reminders, they are displayed after you
select OK. See Calendar on page81.
The Calendar reminder screen
remains displayed until you select OK
or Remind Later by rotating the
Interface Dial knob and pushing in
on the Interface Dial, or press the
CANCEL button.
If you select OK and push in on the
Interface Dial , the reminder will not
show up again. (It will be deleted from
the Calendar.) If you select
Remind Later and push
in on the Interface Dial , the reminder
will show up again the next time you
start the vehicle. If there are several
reminders, the next reminder will be
displayed.
If you press the CANCEL button, the
system will skip all the reminders. The
reminders will show up again the next
time you start the vehicle.
NOTE:
The system will display the current
message and any older or previously
unread messages, with the newest
message appearing first and the
remaining messages appearing in date
order.
If you turn off the engine during route
guidance and then restart the vehicle,
the Continue trip to screen will be
displayed. For more information, see
Continue Trip to Screen on page78.Bluetooth® HandsFreeLink®
If you have a Bluetooth-compatible cell
phone that is paired with the system,
then Call on the Calculate route to
screen will be enabled.
When you select Call, the system dials
the number shown on the screen.
For more information on Bluetooth®
HandsFreeLink®, see your Owner’s
Manual and the official website
(http://automobiles.honda.com/
handsfreelink).
2011 Odyssey
Page 24 of 178
24Navigation System
Getting Started
Viewing Flow Data
Traffic flow data is displayed as colored
bands on either side of the freeway (see
Traffic Display Legend on page22).
The different colored bands represent
the average road speeds as determined
by under-road sensor s and other probes.
While driving to your destination on a
road that has traffic flow data, your
route line color is used to display the
traffic flow data. This means that when
the map scale is set to one of the traffic
scales (1/20 through 5 mile scale), your
blue route line may appear as alternating
orange or red segments (see Traffic
Display Legend on page22).
NOTE:
A blue route line segment on a freeway
can mean one of two things:
• Under-road sensors, GPS probes, cell phone probes, and other methods
used to collect traffic speed
information.
• The road has no sensors, and traffic conditions are unknown (they could
be congested). Naturally, only roads with these sensors
will show traffic information. The
amount of flow data varies considerably
from one city to another. This map
display is refreshed continuously. You
can only view traffic information in the
city where yo
u are located.
NOTE:
Traffic flow and incident icons are displayed on the 5 miles (8 km) or
less map scale.
Not all freeways within a metropolitan area have traffic flow
data (colored bands on the side of the
freeways) - this is normal, and you
cannot assume that a lack of data
implies no traffic.
Not all cities have traffic flow information. See cities listed on
page 143.
Due to freeway maintenance and construction, traffic flow may be
available only for one side of a road,
or be missing entirely for some
portion of the freeway. The displayed traffic flow may
conflict with other audio- or Internet-
based traffic information.
If traffic flow is not showing, verify that the “TRAFFIC” selection for the
Icon Bar is ON, and that the icon
options for traffic are both ON (see
page 61).
2011 Odyssey
Page 27 of 178
Navigation System27
Getting Started
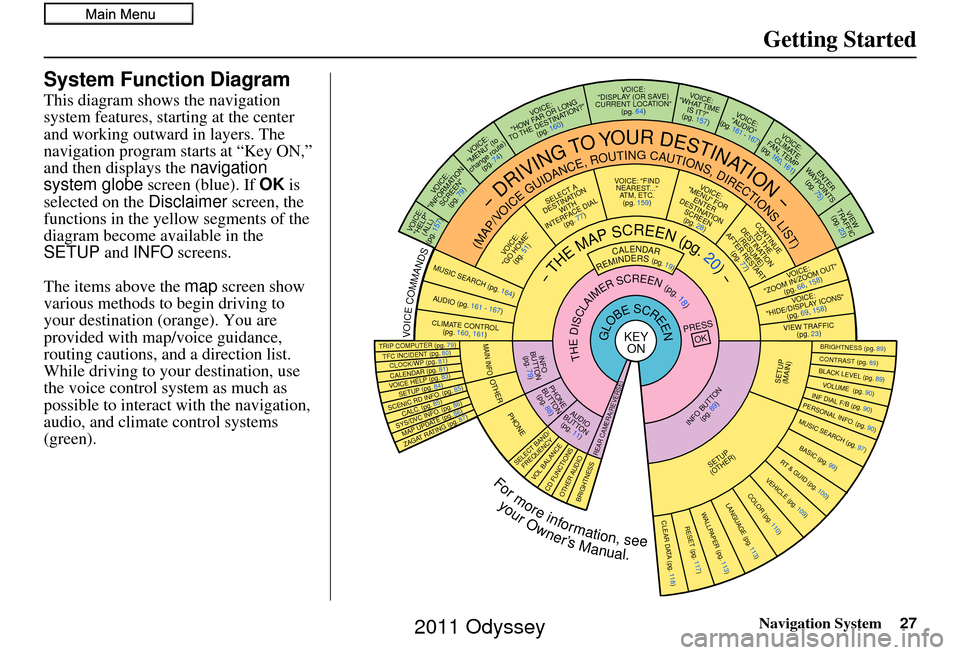
System Function Diagram
This diagram shows the navigation
system features, starting at the center
and working outward in layers. The
navigation program starts at “Key ON,”
and then displays the navigation
system globe screen (blue). If OK is
selected on the Disclaimer screen, the
functions in the yellow segments of the
diagram become available in the
SETUP and INFO screens.
The items above the map screen show
various methods to begin driving to
your destination (orange). You are
provided with map/voice guidance,
routing cautions, and a direction list.
While driving to your destination, use
the voice control system as much as
possible to interact with the navigation,
audio, and climat e control systems
(green).
REMINDERS(pg.19)CALENDAR
-THEMAPSCREEN(pg.20)-
(MAP/VOICEGUIDANCE,ROUTINGCAUTIONS,DIRECTIONSLIST)
-DRIVINGTOYOURDESTINATION-
VOICE: "HELP" (ALL)
(pg. 157)
VOICE:
"INFORMATION SCREEN"(pg. 79)
VOICE:
"MENU" (to
change route) (pg. 74)
VOICE:
"HOW FAR OR LONG
TO THE DESTINATION?" (pg. 160)
VOICE:
"DISPLAY (OR S AV E)
CURRENT LOCA TION"
(pg. 64)VOICE:
"WHAT TIME IS IT?"
(pg. 157)
VOI CE:
"AUDIO"
(pg. 161 - 167)
VOI CE:
CLIMATE
FAN, TEMP
(pg. 160, 161)
ENTER
WAY POINTS
(pg. 75)
VIEW
TRAFFIC(pg. 23)
VOICE:
"ZOOM IN/ZOOM OUT" (pg. 66, 158)
VOICE:
"HIDE/DISPLAY ICONS" (pg. 69, 158)
VIEW TRAFFIC(pg. 23)
BRIGHTN ESS (pg. 89)CONTRAST (pg. 89)BLACK LEVEL (pg. 89)VOLUME (pg. 90)INF DIAL F/B (pg. 90)PERSONAL INFO. (pg. 90)MUSIC SEARCH (pg. 97)
BASIC (pg. 99)RT & GUID (pg. 100)
VEHICLE (pg. 109)COLOR (pg. 110)LANGUAGE (pg. 113)CLEAR DATA (pg. 118)RESET (pg. 117)WALLPAPER (pg. 113)
ZAGAT RATING (pg. 87)
TFC INCIDENT (pg. 80)TRIP COMPUTER (pg. 79)
CALENDAR (pg. 81)VOICE HELP (pg. 83)SETUP (pg. 84)
SYS/DVC INFO. (pg. 86)MAP UPDATE (pg. 86)
SCENIC RD INFO . (pg. 85)
PRESS
OK
SELECT BAND/FREQUENCYVOL BALANCECD FUNCTIONSOTH ER AUDIOBRIGHTNESS
REAR CAMERA(R EVERSE)
INFO BUTTON
(pg. 89)AUD IO
BUTTON (pg. 11)
INFO
BUTTON (pg. 79)
PHONE
BUTTON (pg. 88)
PHONE
THEDISCLAIMERSCREEN(pg.18)
VOI CE: "FIND
NEARES T..."
AT M , ETC.
(pg. 159)
SELECT A
DESTINATION WITH
INTERFACE DIAL (pg. 77)
VOICE:
"GO HOME" (pg. 51)
VOICE:
"MENU" FOR ENTER
DESTINATION SCREEN(pg. 28)
CONTINUE TO THE
DESTINATION (RESUME)
AFTER RESTART (pg. 77)
GLOBESCREENKEYONVOICECOMMANDSMUSIC SEARCH
(pg. 164)AUD IO (pg. 161 - 167)
CLIMATE CONTR OL
(pg. 160, 161 )
Formoreinformation,see
yourOwner’sManual.
SETUP
(OTHER)
CLOCK/W P (pg. 81)
CALC. (pg. 85)
MAIN INFO
OTHERSETUP
(MAIN)
2011 Odyssey
Page 40 of 178
40Navigation System
Entering a Destination
Finding a restaurant
The ZAGAT SURVEY for some
restaurants is available in the system.
See the INFO screen (Other), “Key to
ZAGAT Rating” for an explanation of
these ratings (see page 87).
On the Select a place screen,
restaurants with a Zagat Rating have a icon at the end of the line. To list
only restaurants with Zagat Reviews,
say “Zagat” or select ZAGAT 2010.
You can view the complete Zagat
Review for a selected restaurant by
selecting the tab. By voice, select the tab by saying
“Zagat list number X” (where X is the
line number 1-3). Alternatively, use the
Interface Dial
to first select the line
item, and move the Interface Dial to
the right to view the survey.
Say “Read List” or push in on the
Interface Dial , and the review will be
read to you. Move the Interface Dial
down to display the Calculate route to
screen.
NOTE:
Scrolling through the Zagat Review is
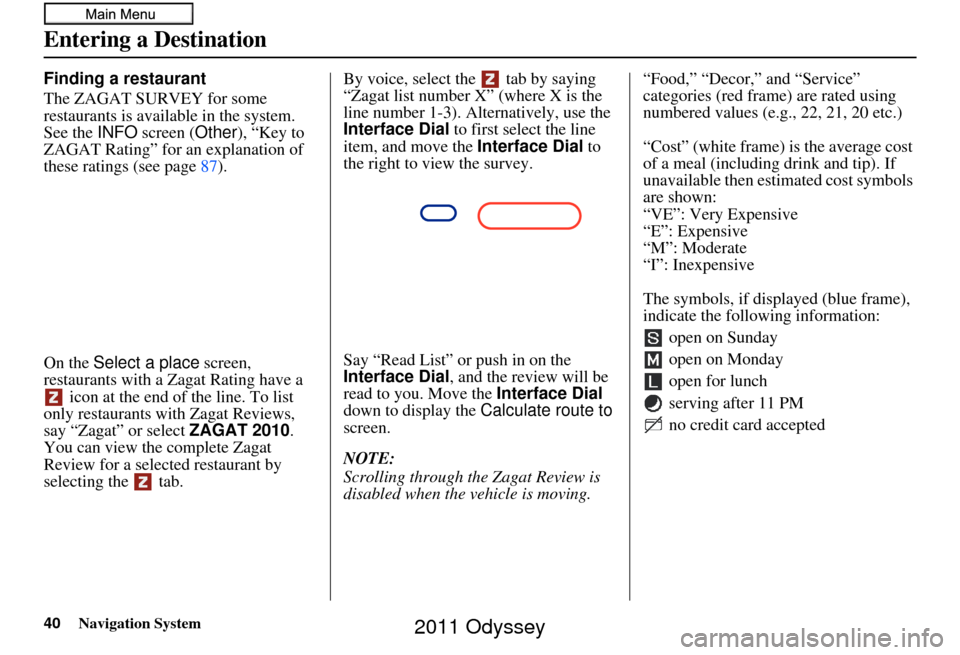
disabled when the vehicle is moving. “Food,” “Decor,” and “Service”
categories (red frame) are rated using
numbered values (e.g., 22, 21, 20 etc.)
“Cost” (white frame) is the average cost
of a meal (including drink and tip). If
unavailable then estimated cost symbols
are shown:
“VE”: Very Expensive
“E”: Expensive
“M”: Moderate
“I”: Inexpensive
The symbols, if displayed (blue frame),
indicate the following information:
open on Sunday
open on Monday
open for lunch
serving after 11 PM
no credit card accepted
2011 Odyssey
Page 52 of 178
52Navigation System
Driving to Your Destination
A route typically has three phases.
• Initial route calculation (the Calculate route to screen) (see
page 52)
• Change the route while en route (see page 73).
• Resume the route when restarting the engine (see Continue Trip to Screen
on page 78).
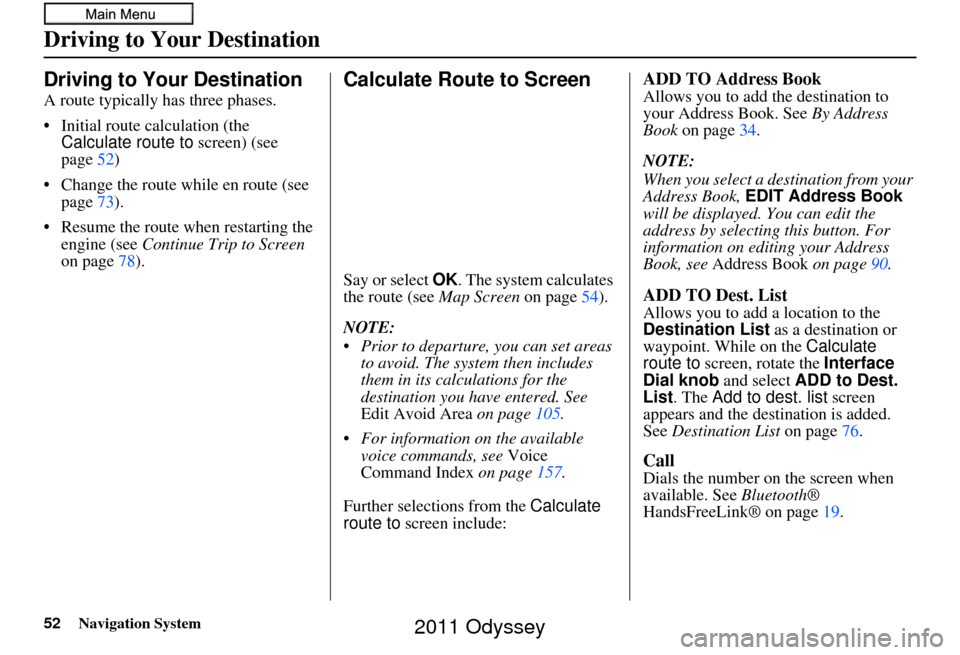
Calculate Route to Screen
Say or select OK . The system calculates
the route (see Map Screen on page54).
NOTE:
Prior to departure, you can set areas to avoid. The system then includes
them in its calculations for the
destination you have entered. See
Edit Avoid Area on page105.
For information on the available voice commands, see Voice
Command Index on page 157.
Further selections from the Calculate
route to screen include:
ADD TO Address Book
Allows you to add the destination to
your Address Book. See By Address
Book on page 34.
NOTE:
When you select a destination from your
Address Book, EDIT Address Book
will be displayed. You can edit the
address by selecting this button. For
information on editing your Address
Book, see Address Book on page90.
ADD TO Dest. List
Allows you to add a location to the
Destination List as a destination or
waypoint. While on the Calculate
route to screen, rotate the Interface
Dial knob and select ADD to Dest.
List . The Add to dest. list screen
appears and the destination is added.
See Destination List on page 76.
Call
Dials the number on the screen when
available. See Bluetooth®
HandsFreeLink® on page 19.
Driving to Your Destination
2011 Odyssey
Page 54 of 178
54Navigation System
Driving to Your Destination
Based on the route data, you can change
the routing method by rotating the
Interface Dial knob .
Once you confirm your selection, say
the number of the desired routing
method or push in on the Interface
Dial .
The calculated route will be highlighted
as a blue line, and a voice prompt will
tell you how to proceed along the
highlighted route.
Push in on the Interface Dial and
select Voice to have the guidance
repeated.Viewing the Destination Map
If you move the Interface Dial down
and select DESTINATION MAP on the
Calculate route to screen, a map of the
destination vicinity is displayed. Press
the CANCEL or BACK button, or
select Return to return to the previous
screen. You can view the destination
map anytime while en route by saying
“Display destination map.”
Map Screen
When you select OK on the Calculate
route to screen, the map screen
appears, showing your highlighted route
(blue line) in real time.
Route Line
When driving on unverified streets
(purple), the route line changes to either
a purple dotted “vector line” pointing to
your destination, or a blue-pink line. See
Unverified Area Routing on page101
for a detailed expl anation of how to
enable unverified routing, and the
related cautions and disclaimers.
NOTE:
You can always view the entire route by simply saying, “Display entire
route.”
When your route line uses streets that display traffic information, the route
line may consist of orange or red
segments. This is normal. See Traffic
Display Legend on page22, and
Viewing Flow Data on page 24.
2011 Odyssey
Page 55 of 178
Navigation System55
Driving to Your Destination
“Vector line” (unverified routing off)
Blue-pink unverified route line
(unverified routing on)
Voice Guidance Prompts
As you get near the guidance point, you
will hear a voice reminder and see a
pop-up window showing you the
guidance point. You will typically hear
three prompts:
• The first is about 1/2 mile from the
guidance point.
• The next is about 1/4 mile from the guidance point.
• The final prompt is close to your actual turn.
If the distance between the next two
guidance points is very small, both of
them are displayed on the screen in a
single window, and the voice will
remind you of them at the same time. NOTE:
You can say “Voice” at any time, or
select Voice after pushing in on the
Interface Dial to be reminded of the
next guidance point.
Typically, a pop-up guidance window shows your next turn, and a voice
guidance is heard. The timing of
guidance varies depending on the
type of road you are on and the
distance to the next guidance point.
When the guidance in unverified areas,
the phrase “if possible” is inserted
before each guidance prompts. See
Unverified Area Routing on page 101
for more detailed information on the
unverified routing.
2011 Odyssey