lock HONDA ODYSSEY 2020 Owner's Manual (in English)
[x] Cancel search | Manufacturer: HONDA, Model Year: 2020, Model line: ODYSSEY, Model: HONDA ODYSSEY 2020Pages: 767, PDF Size: 43.89 MB
Page 675 of 767
673
uuReplacing Light Bulbs uBack-Up Light Bulbs/Taillights
Maintenance
Back-Up Light Bulbs/Taillights
When replacing, use the following bulbs.
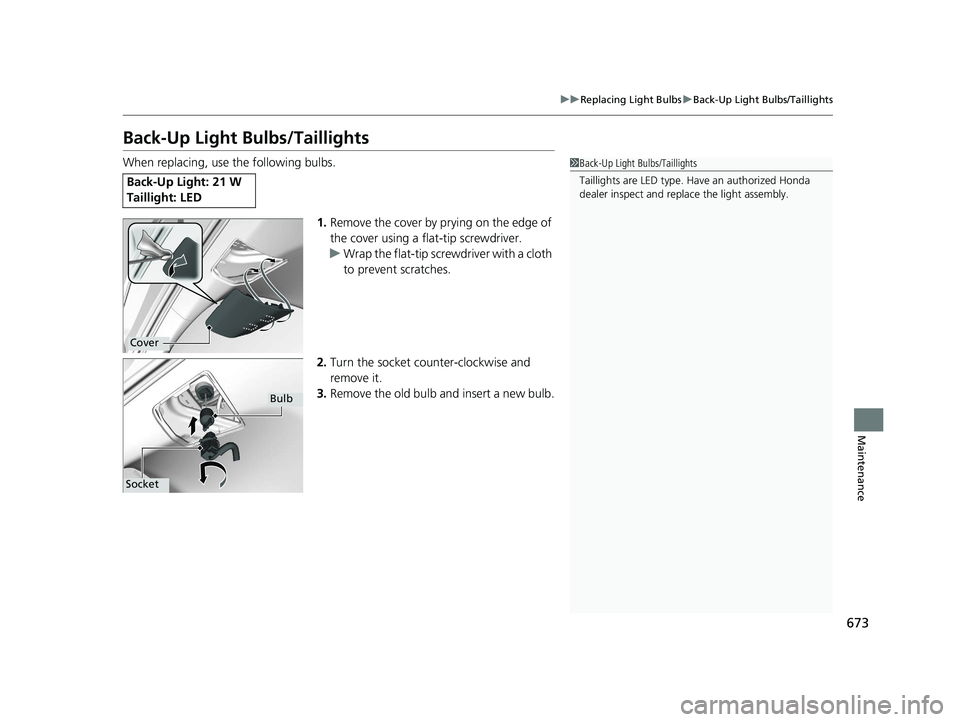
1.Remove the cover by prying on the edge of
the cover using a flat-tip screwdriver.
u Wrap the flat-tip scre wdriver with a cloth
to prevent scratches.
2. Turn the socket counter-clockwise and
remove it.
3. Remove the old bulb and insert a new bulb.
Back-Up Light: 21 W
Taillight: LED
1Back-Up Light Bulbs/Taillights
Taillights are LED type. Ha ve an authorized Honda
dealer inspect and replace the light assembly.
Cover
Bulb
Socket
20 US ODYSSEY-31THR6210.book 673 ページ 2020年2月28日 金曜日 午前7時26分
Page 679 of 767
Continued677
uuChecking and Maintaining Wiper Blades uChanging the Rear Wiper Blade Rubber
Maintenance
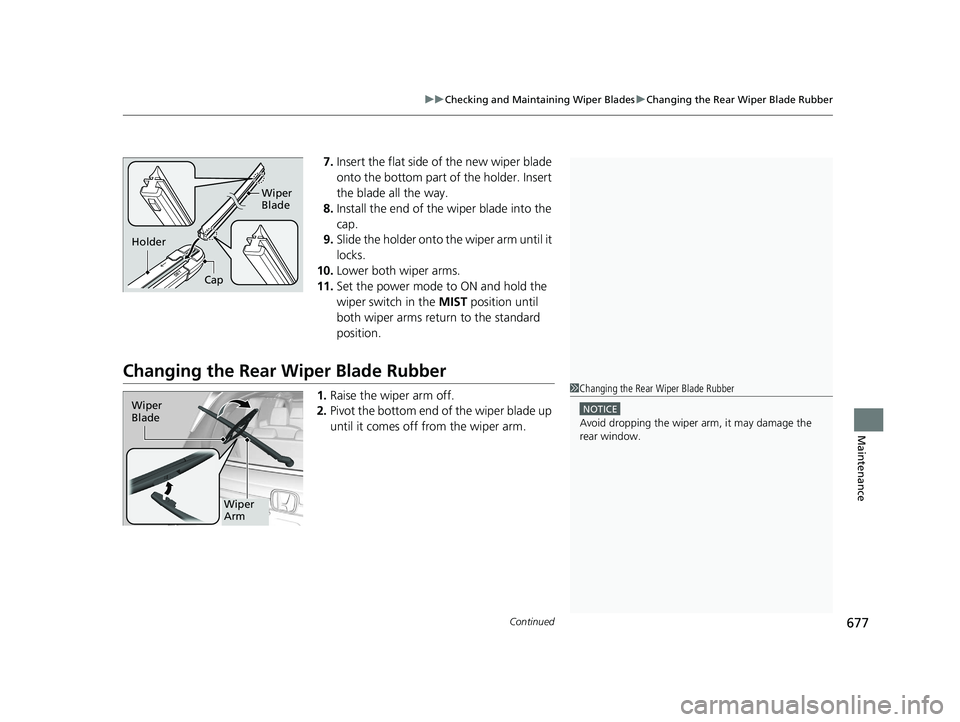
7. Insert the flat side of the new wiper blade
onto the bottom part of the holder. Insert
the blade all the way.
8. Install the end of the wiper blade into the
cap.
9. Slide the holder onto the wiper arm until it
locks.
10. Lower both wiper arms.
11. Set the power mode to ON and hold the
wiper switch in the MIST position until
both wiper arms return to the standard
position.
Changing the Rear Wiper Blade Rubber
1.Raise the wiper arm off.
2. Pivot the bottom end of the wiper blade up
until it comes off from the wiper arm.
Cap Wiper
Blade
Holder
1
Changing the Rear Wiper Blade Rubber
NOTICE
Avoid dropping the wiper ar m, it may damage the
rear window.
Wiper
Blade
Wiper
Arm
20 US ODYSSEY-31THR6210.book 677 ページ 2020年2月28日 金曜日 午前7時26分
Page 690 of 767
688
Maintenance
Battery
Checking the Battery
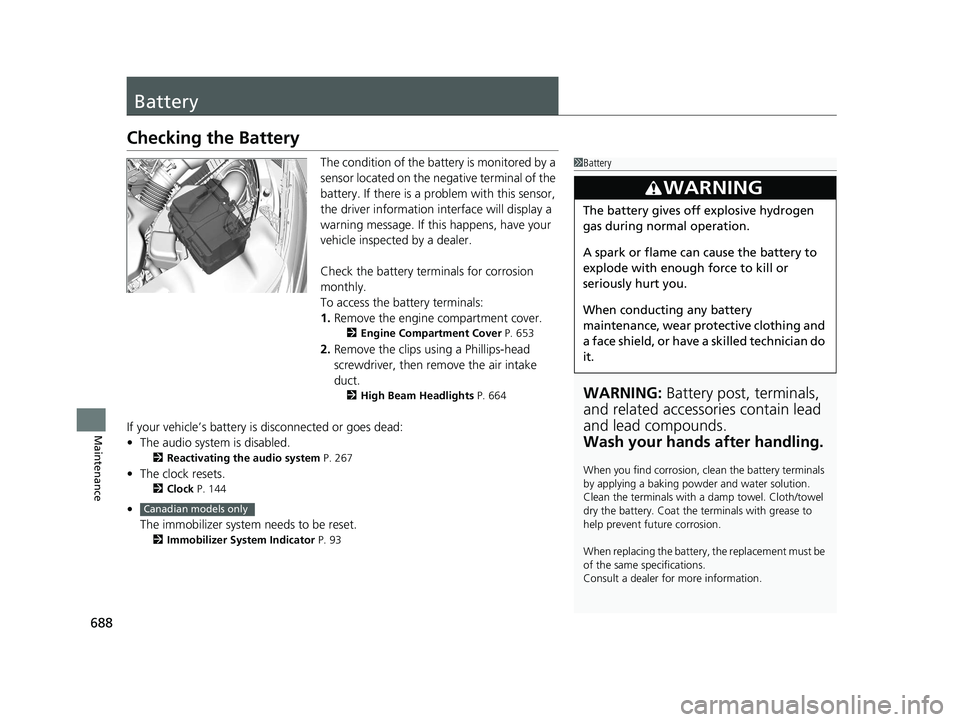
The condition of the battery is monitored by a
sensor located on the negative terminal of the
battery. If there is a problem with this sensor,
the driver information in terface will display a
warning message. If this happens, have your
vehicle inspected by a dealer.
Check the battery terminals for corrosion
monthly.
To access the battery terminals:
1. Remove the engine compartment cover.
2 Engine Compartment Cover P. 653
2.Remove the clips using a Phillips-head
screwdriver, then remove the air intake
duct.
2 High Beam Headlights P. 664
If your vehicle’s battery is disconnected or goes dead:
•The audio system is disabled.
2 Reactivating the audio system P. 267
•The clock resets.
2 Clock P. 144
•
The immobilizer system needs to be reset.
2 Immobilizer System Indicator P. 93
1Battery
WARNING: Battery post, terminals,
and related accessories contain lead
and lead compounds.
Wash your hands after handling.
When you find corrosion, cl ean the battery terminals
by applying a baking powder and water solution.
Clean the terminals with a damp towel. Cloth/towel
dry the battery. Coat the terminals with grease to
help prevent future corrosion.
When replacing the battery, the replacement must be
of the same specifications.
Consult a dealer for more information.
3WARNING
The battery gives off explosive hydrogen
gas during normal operation.
A spark or flame can cause the battery to
explode with enough force to kill or
seriously hurt you.
When conducting any battery
maintenance, wear prot ective clothing and
a face shield, or have a skilled technician do
it.
Canadian models only
20 US ODYSSEY-31THR6210.book 688 ページ 2020年2月28日 金曜日 午前7時26分
Page 697 of 767
Continued695
uuCleaning uInterior Care
Maintenance
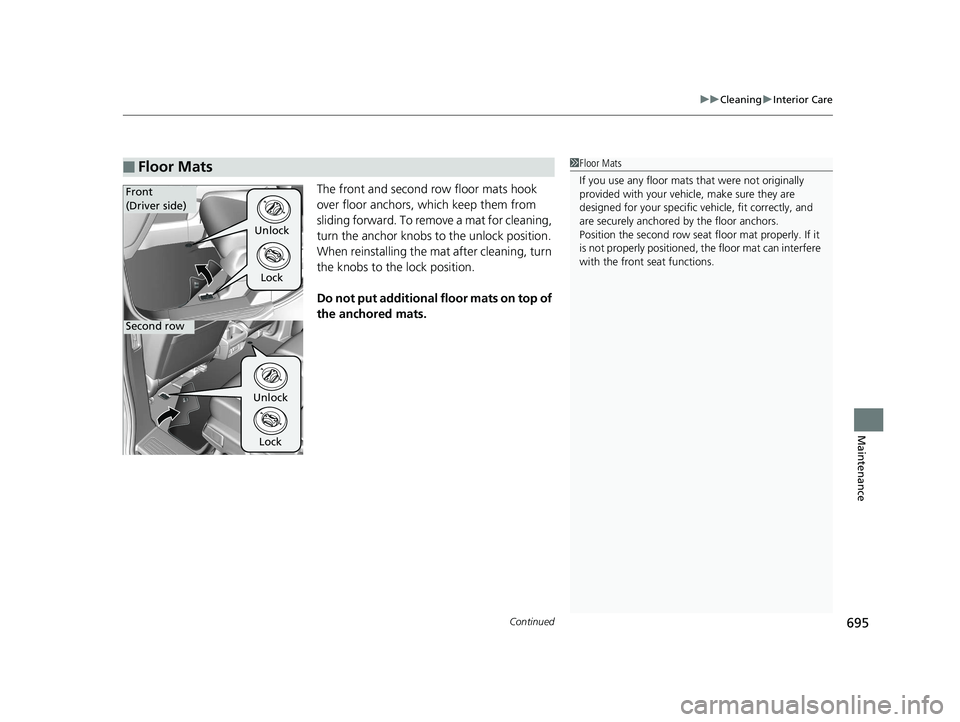
The front and second row floor mats hook
over floor anchors, which keep them from
sliding forward. To remove a mat for cleaning,
turn the anchor knobs to the unlock position.
When reinstalling the mat after cleaning, turn
the knobs to the lock position.
Do not put additional floor mats on top of
the anchored mats.
■Floor Mats1Floor Mats
If you use any floor mats that were not originally
provided with your vehicle, make sure they are
designed for your specific ve hicle, fit correctly, and
are securely anchored by the floor anchors.
Position the second row seat floor mat properly. If it
is not properly positioned, the floor mat can interfere
with the front seat functions.
Unlock
Lock
UnlockLock
Front
(Driver side)
Second row
20 US ODYSSEY-31THR6210.book 695 ページ 2020年2月28日 金曜日 午前7時26分
Page 705 of 767
703
Handling the Unexpected
This chapter explains how to handle unexpected troubles.
ToolsTypes of Tools .................................. 704
If a Tire Goes Flat Changing a Flat Tire ......................... 705
Engine Does Not Start Checking the Engine ........................ 714
If the Remote Battery is Weak .......... 715
Emergency Engine Stop ................... 716
Jump Starting .................................... 717
Overheating How to Handle Overheating ............. 719
Indicator, Coming On/Blinking
If the Low Oil Pressure Symbol Appears... 722
If the Charging System Indicator Comes
On ................................................. 722
If the Malfunction Indicator Lamp Comes On or Blinks ................................... 723
If the Brake System Indicator (Red) Comes
On or Blinks ................................... 724
If the Brake System Indicator (Red) Comes On or Blinks at the Same Time When the Brake
System Indicator (Amber) Comes On ..... 725
If the Electric Power Steering (EPS) System Indicator Comes On ....................... 726
If the Low Tire Pressure/TPMS Indicator Comes On or Blinks........................ 726 If the Transmission System Indicator Blinks
along with the Warning Message... 727
Fuses Fuse Locations ................................. 728
Inspecting and Changing Fuses ........ 734
Emergency Towing ........................... 735
When You Cannot Unlock the Fuel Fill Door ................................................. 736When You Cannot Open the Tailgate..... 737When You Cannot Close the Power
Sliding Doors*................................. 739
Refueling
Refueling From a Portable Fuel Container .... 740
* Not available on all models
20 US ODYSSEY-31THR6210.book 703 ページ 2020年2月28日 金曜日 午前7時26分
Page 708 of 767
706
uuIf a Tire Goes Flat uChanging a Flat Tire
Handling the Unexpected
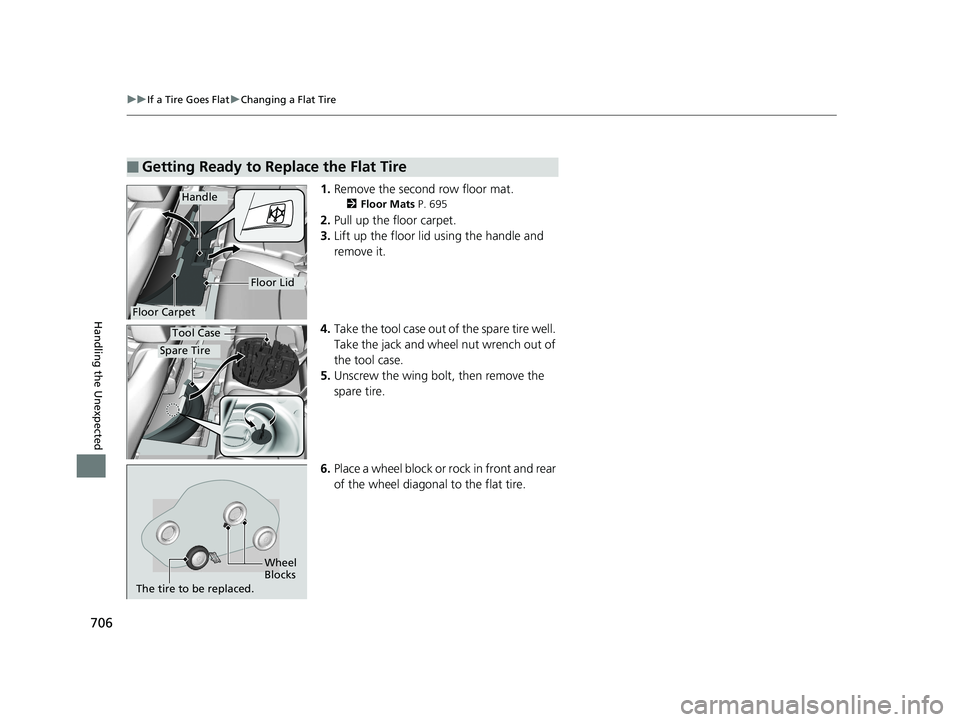
1. Remove the second row floor mat.
2 Floor Mats P. 695
2.Pull up the floor carpet.
3. Lift up the floor lid using the handle and
remove it.
4. Take the tool case out of the spare tire well.
Take the jack and wheel nut wrench out of
the tool case.
5. Unscrew the wing bolt, then remove the
spare tire.
6. Place a wheel block or ro ck in front and rear
of the wheel diagonal to the flat tire.
■Getting Ready to Replace the Flat Tire
Floor Carpet
Handle
Floor Lid
Spare Tire
Tool Case
Wheel
Blocks
The tire to be replaced.
20 US ODYSSEY-31THR6210.book 706 ページ 2020年2月28日 金曜日 午前7時26分
Page 718 of 767
716
uuEngine Does Not Start uEmergency Engine Stop
Handling the Unexpected
Emergency Engine Stop
The ENGINE START/STOP button may be used to st op the engine due to an
emergency situation even while driving. If you must stop the engine, do either of the
following operations:
• Press and hold the ENGINE START/STOP button for about two seconds.
• Firmly press the ENGINE START/STOP button three times.
The steering wheel will not lock. However, because turning off the engine disables
the power assist the engine provides to the steering and braking systems, it will
require significantly more physical effort an d time to steer and slow the vehicle. Use
both feet on the brake pedal to slow down the vehicle and stop immediately in a
safe place.
The gear position auto matically changes to
(P after the vehicle comes to a complete
stop.
Then, the power mode changes to VEHICLE OFF.
Then press the ENGINE START/STOP button twice without depressing the brake
pedal to change the mode to VEHICLE OFF.
1 Emergency Engine Stop
Do not press the button while driving unless it is
absolutely necessary for the engine to be turned off.
If you press the ENGINE START/STOP button while
driving, the beeper sounds.
U.S. models
Canadian models
20 US ODYSSEY-31THR6210.book 716 ページ 2020年2月28日 金曜日 午前7時26分
Page 732 of 767
730
uuFuses uFuse Locations
Handling the Unexpected
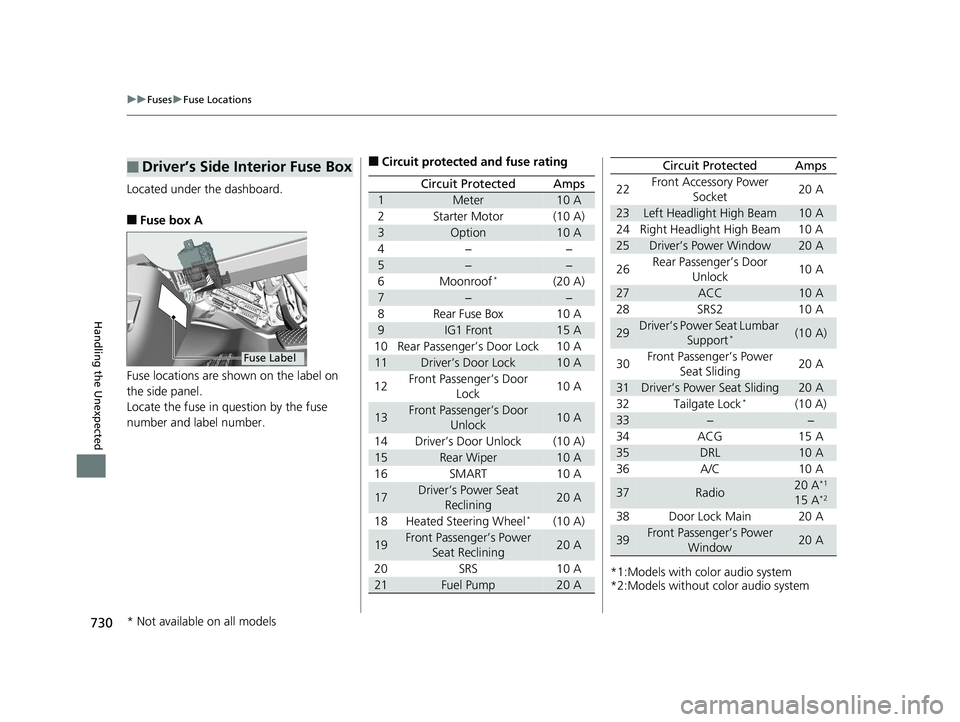
Located under the dashboard.
■Fuse box A
Fuse locations are shown on the label on
the side panel.
Locate the fuse in question by the fuse
number and label number.
■Driver’s Side Interior Fuse Box
Fuse Label
■Circuit protected and fuse rating
Circuit ProtectedAmps
1Meter10 A
2Starter Motor(10 A)
3Option10 A
4−−
5−−
6Moonroof*(20 A)
7−−
8Rear Fuse Box10 A
9IG1 Front15 A
10 Rear Passenger’s Door Lock 10 A
11Driver’s Door Lock10 A
12 Front Passenger’s Door
Lock 10 A
13Front Passenger’s Door
Unlock10 A
14 Driver’s Door Unlock (10 A)
15Rear Wiper10 A
16 SMART 10 A
17Driver’s Power Seat Reclining20 A
18 Heated Steering Wheel
*(10 A)
19Front Passenger’s Power Seat Reclining20 A
20 SRS 10 A
21Fuel Pump20 A*1:Models with color audio system
*2:Models without color audio system22
Front Accessory Power
Socket 20 A
23Left Headlight High Beam10 A
24 Right Headlight High Beam 10 A
25Driver’s Power Window20 A
26 Rear Passenger’s Door
Unlock 10 A
27ACC10 A
28 SRS2 10 A
29Driver’s Power Seat Lumbar Support*(10 A)
30 Front Passenger’s Power
Seat Sliding 20 A
31Driver’s Power Seat Sliding20 A
32 Tailgate Lock*(10 A)
33−−
34 ACG 15 A
35DRL10 A
36 A/C 10 A
37Radio20 A*1
15 A*2
38 Door Lock Main 20 A
39Front Passenger’s Power Window20 A
Circuit ProtectedAmps
* Not available on all models
20 US ODYSSEY-31THR6210.book 730 ページ 2020年2月28日 金曜日 午前7時26分
Page 735 of 767
733
uuFuses uFuse Locations
Handling the Unexpected
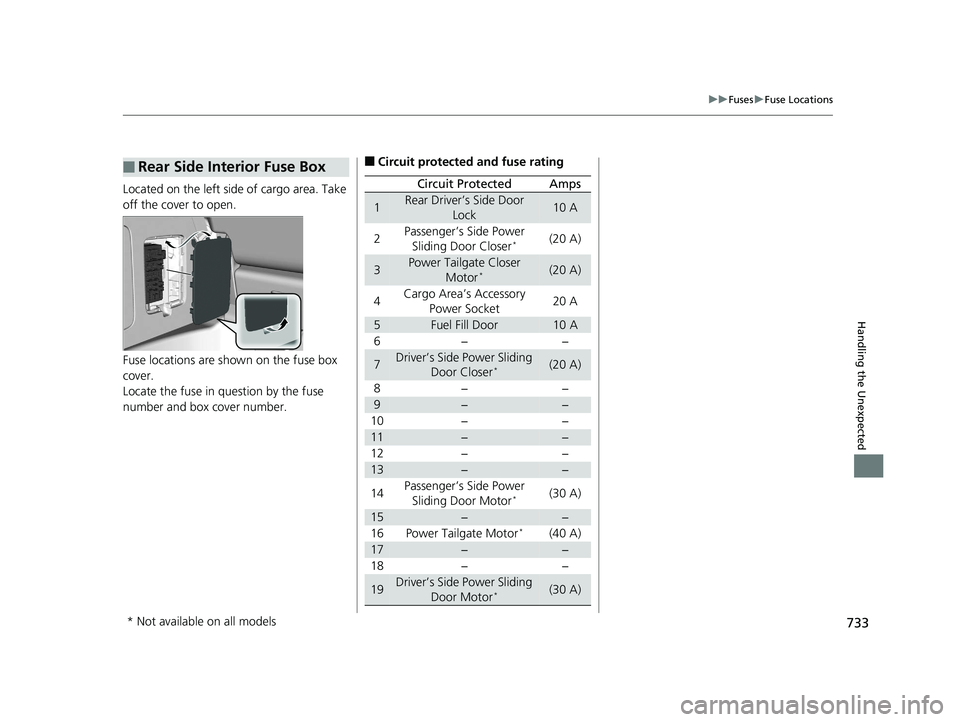
Located on the left side of cargo area. Take
off the cover to open.
Fuse locations are shown on the fuse box
cover.
Locate the fuse in question by the fuse
number and box cover number.
■Rear Side Interior Fuse Box■Circuit protected and fuse rating
Circuit ProtectedAmps
1Rear Driver’s Side Door
Lock10 A
2Passenger’s Side Power Sliding Door Closer*(20 A)
3Power Tailgate Closer Motor*(20 A)
4Cargo Area’s Accessory
Power Socket20 A
5Fuel Fill Door10 A
6−−
7Driver’s Side Power Sliding Door Closer*(20 A)
8−−
9−−
10 − −
11−−
12 − −
13−−
14 Passenger’s Side Power
Sliding Door Motor
*(30 A)
15−−
16 Power Tailgate Motor*(40 A)
17−−
18 − −
19Driver’s Side Power Sliding
Door Motor*(30 A)
* Not available on all models
20 US ODYSSEY-31THR6210.book 733 ページ 2020年2月28日 金曜日 午前7時26分
Page 738 of 767
736
Handling the Unexpected
When You Cannot Unlock the Fuel Fill Door
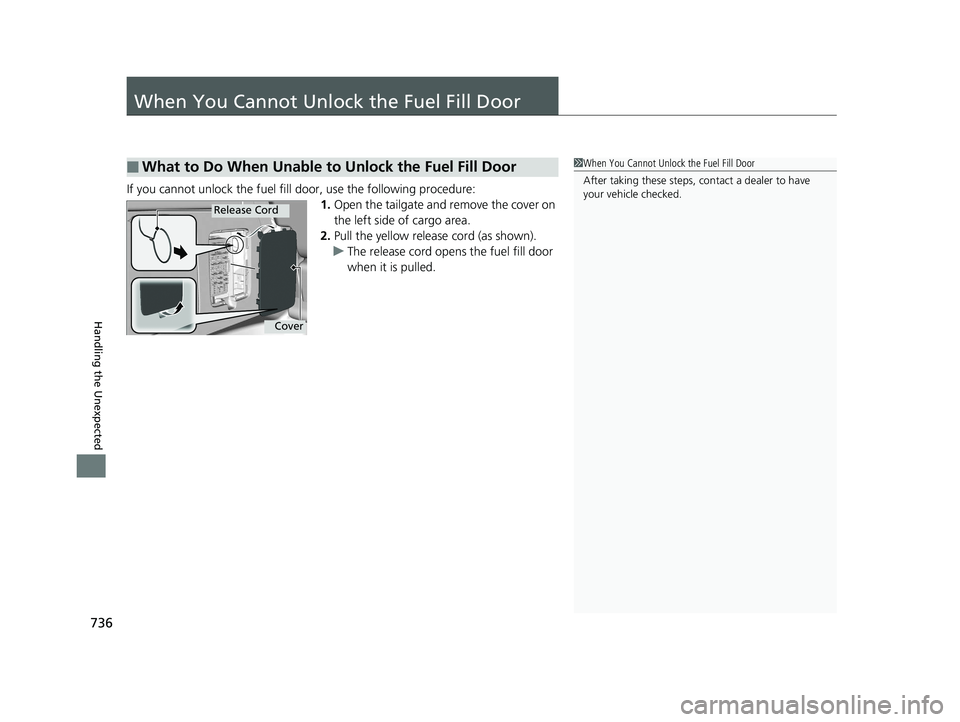
If you cannot unlock the fuel fill door, use the following procedure:1.Open the tailgate and remove the cover on
the left side of cargo area.
2. Pull the yellow releas e cord (as shown).
u The release cord opens the fuel fill door
when it is pulled.
■What to Do When Unable to Unlock the Fuel Fill Door1 When You Cannot Unlo ck the Fuel Fill Door
After taking these steps, contact a dealer to have
your vehicle checked.
Cover
Release Cord
20 US ODYSSEY-31THR6210.book 736 ページ 2020年2月28日 金曜日 午前7時26分