lock HONDA ODYSSEY 2020 Owner's Manual (in English)
[x] Cancel search | Manufacturer: HONDA, Model Year: 2020, Model line: ODYSSEY, Model: HONDA ODYSSEY 2020Pages: 767, PDF Size: 43.89 MB
Page 640 of 767
638
uuRefueling uHow to Refuel
Driving
How to Refuel
Your fuel tank is not equipped with a fuel filler cap. You can insert the filler nozzle
directly into the filler neck. The tank seal s itself again when you pull out the filler
nozzle.
1.Stop your vehicle with the service station
pump on the left side of the vehicle in the
rear.
2. Turn off the engine.
3. Unlock the driver’s door using the master
door lock switch.
u The fuel fill door on the outer side of the
vehicle will unlock.
2 Locking/Unlocking the Doors from
the Inside P. 156
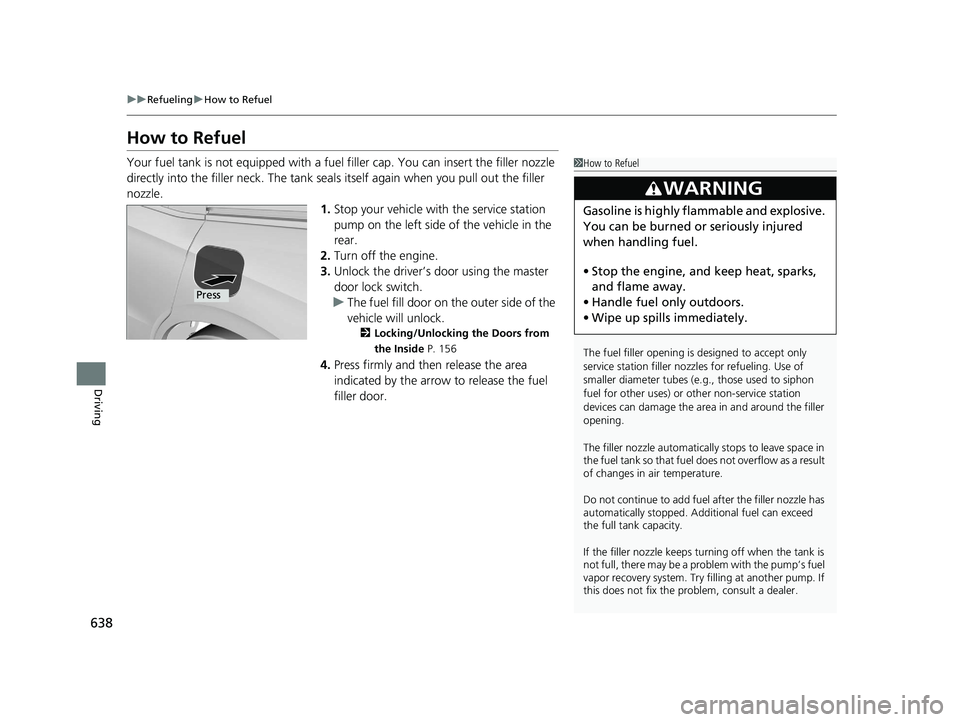
4.Press firmly and then release the area
indicated by the arrow to release the fuel
filler door.
1 How to Refuel
The fuel filler opening is designed to accept only
service station filler nozzles for refueling. Use of
smaller diamet er tubes (e.g., those used to siphon
fuel for other uses) or other non-service station
devices can damage the area in and around the filler
opening.
The filler nozzle automatically stops to leave space in
the fuel tank so that fuel does not overflow as a result
of changes in air temperature.
Do not continue to add fuel after the filler nozzle has
automatically stopped. Addi tional fuel can exceed
the full tank capacity.
If the filler nozzle keeps tu rning off when the tank is
not full, there may be a problem with the pump’s fuel
vapor recovery system. Try fi lling at another pump. If
this does not fix the problem, consult a dealer.
3WARNING
Gasoline is highly flammable and explosive.
You can be burned or seriously injured
when handling fuel.
• Stop the engine, and keep heat, sparks,
and flame away.
• Handle fuel only outdoors.
• Wipe up spills immediately.
Press
20 US ODYSSEY-31THR6210.book 638 ページ 2020年2月28日 金曜日 午前7時26分
Page 641 of 767
639
uuRefueling uHow to Refuel
Driving
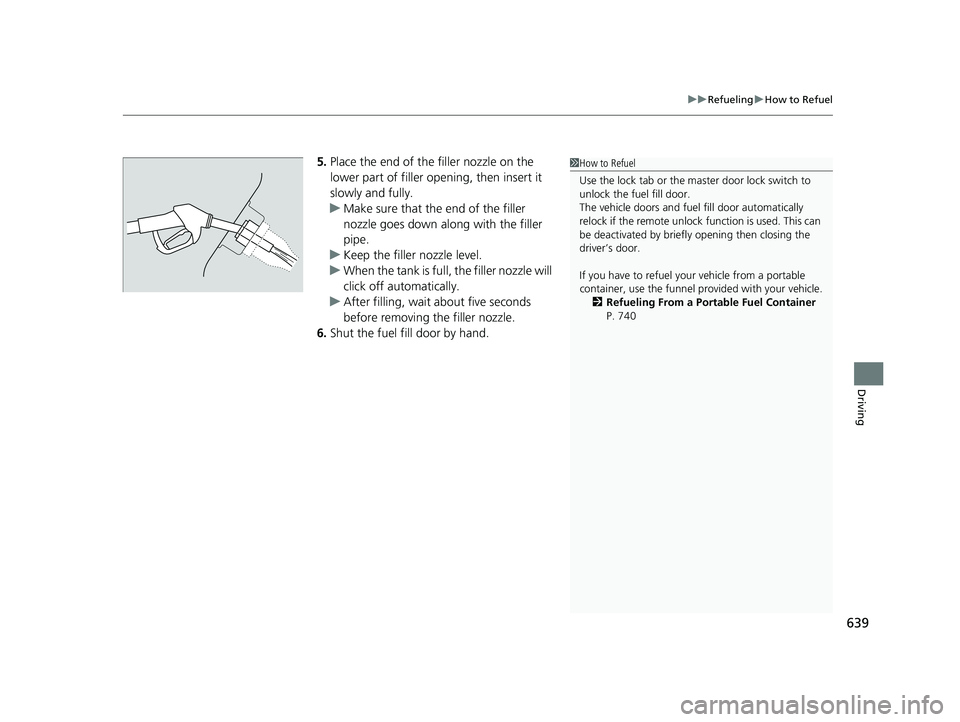
5. Place the end of the filler nozzle on the
lower part of filler opening, then insert it
slowly and fully.
u Make sure that the end of the filler
nozzle goes down along with the filler
pipe.
u Keep the filler nozzle level.
u When the tank is full, the filler nozzle will
click off automatically.
u After filling, wait about five seconds
before removing the filler nozzle.
6. Shut the fuel fill door by hand.1How to Refuel
Use the lock tab or the ma ster door lock switch to
unlock the fuel fill door.
The vehicle doors and fuel fill door automatically
relock if the remote unlock function is used. This can
be deactivated by briefl y opening then closing the
driver’s door.
If you have to refuel y our vehicle from a portable
container, use the funnel pr ovided with your vehicle.
2 Refueling From a Portable Fuel Container
P. 740
20 US ODYSSEY-31THR6210.book 639 ページ 2020年2月28日 金曜日 午前7時26分
Page 660 of 767
uuMaintenance Under the Hood uChanging the Engine Oil and Oil Filter
658
Maintenance
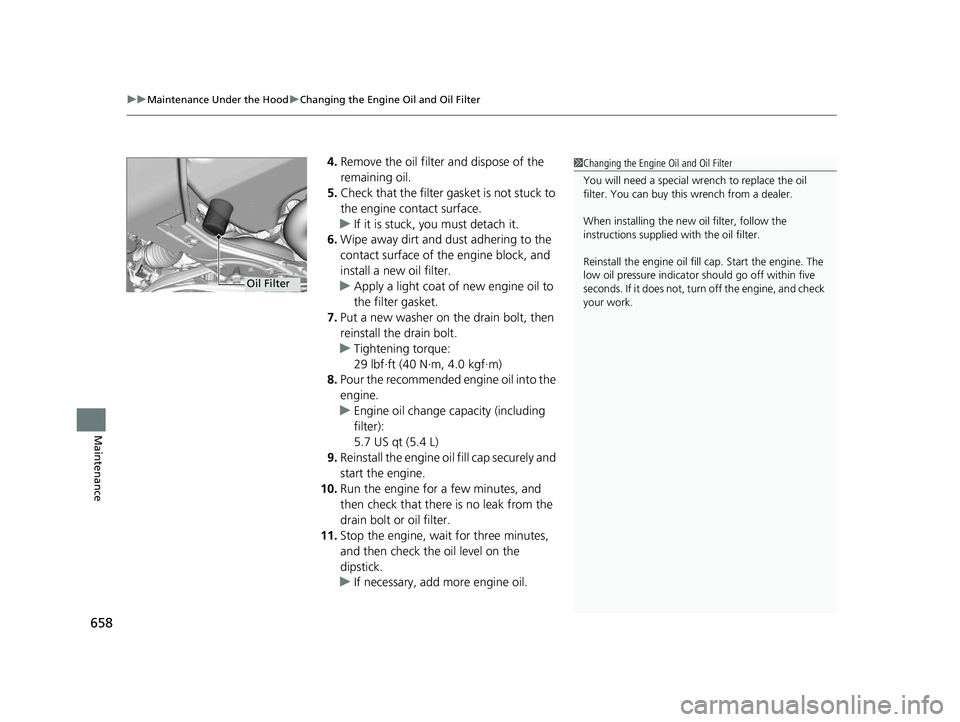
4. Remove the oil filter and dispose of the
remaining oil.
5. Check that the filter ga sket is not stuck to
the engine contact surface.
u If it is stuck, you must detach it.
6. Wipe away dirt and dust adhering to the
contact surface of the engine block, and
install a new oil filter.
u Apply a light coat of new engine oil to
the filter gasket.
7. Put a new washer on the drain bolt, then
reinstall the drain bolt.
u Tightening torque:
29 lbf∙ft (40 N∙m, 4.0 kgf∙m)
8. Pour the recommended engine oil into the
engine.
u Engine oil change capacity (including
filter):
5.7 US qt (5.4 L)
9. Reinstall the engine oil fill cap securely and
start the engine.
10. Run the engine for a few minutes, and
then check that ther e is no leak from the
drain bolt or oil filter.
11. Stop the engine, wait for three minutes,
and then check the oil level on the
dipstick.
u If necessary, add more engine oil.1Changing the Engine Oil and Oil Filter
You will need a special wrench to replace the oil
filter. You can buy this wrench from a dealer.
When installing the new oil filter, follow the
instructions supplied with the oil filter.
Reinstall the engine oil fill cap. Start the engine. The
low oil pressure indicator should go off within five
seconds. If it does not, turn off the engine, and check
your work.
Oil Filter
20 US ODYSSEY-31THR6210.book 658 ページ 2020年2月28日 金曜日 午前7時26分
Page 662 of 767
uuMaintenance Under the Hood uEngine Coolant
660
Maintenance
1. Make sure the engine and radiator are
cool.
2. Remove the engine compartment cover.
2 Engine Compartment Cover P. 653
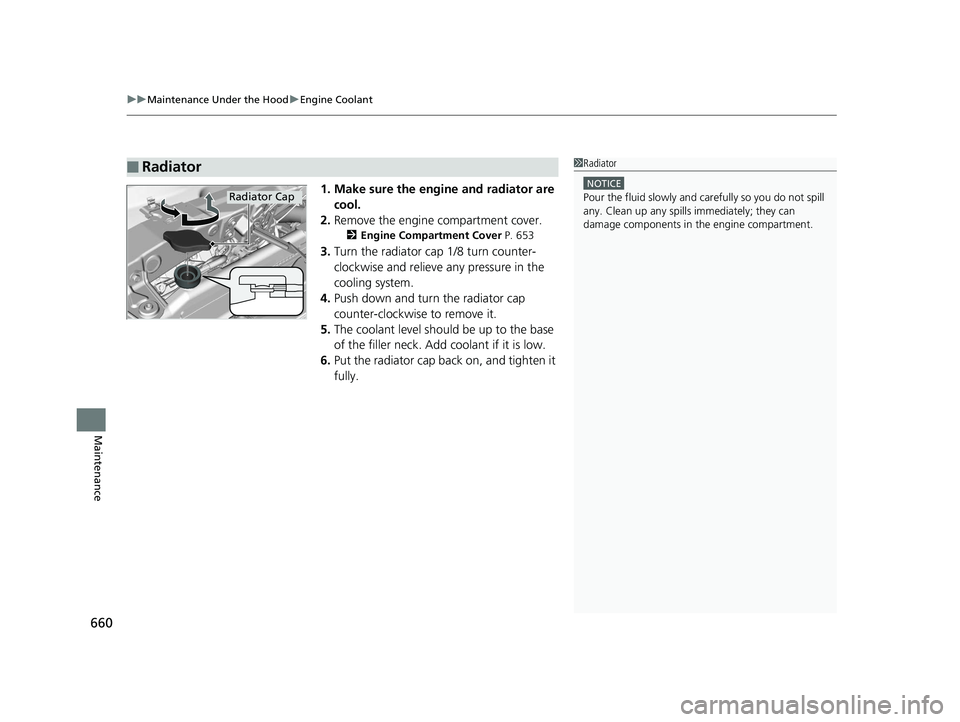
3.Turn the radiator cap 1/8 turn counter-
clockwise and relieve any pressure in the
cooling system.
4. Push down and turn the radiator cap
counter-clockwise to remove it.
5. The coolant level should be up to the base
of the filler neck. Add coolant if it is low.
6. Put the radiator cap back on, and tighten it
fully.
■Radiator1Radiator
NOTICE
Pour the fluid slowly and ca refully so you do not spill
any. Clean up any spills immediately; they can
damage components in the engine compartment.Radiator Cap
20 US ODYSSEY-31THR6210.book 660 ページ 2020年2月28日 金曜日 午前7時26分
Page 667 of 767
Continued665
uuReplacing Light Bulbs uHeadlight Bulbs
Maintenance
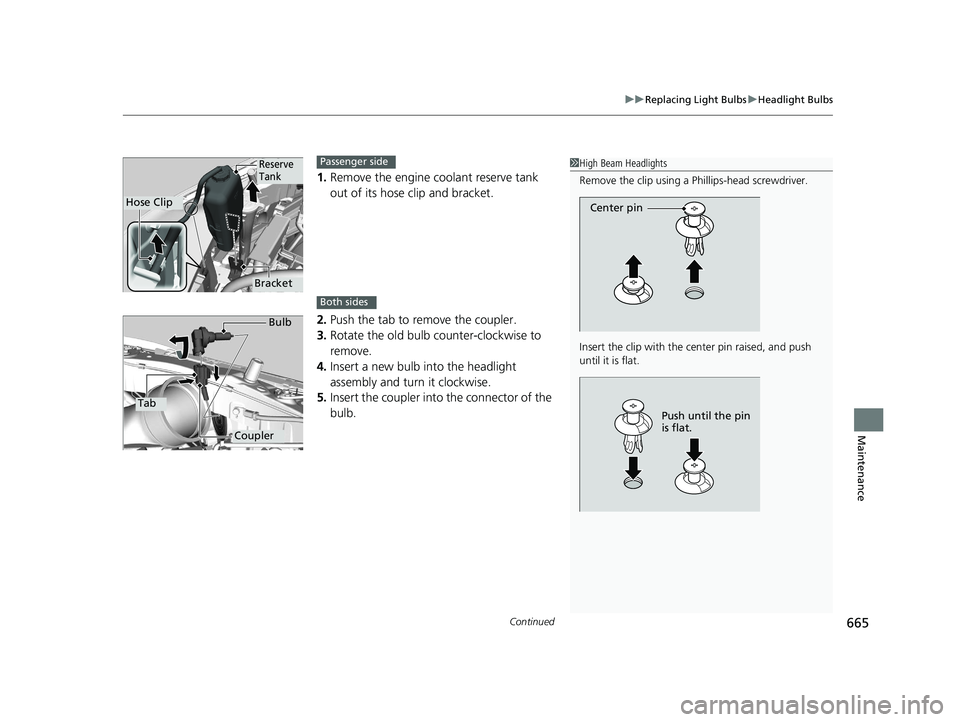
1. Remove the engine coolant reserve tank
out of its hose clip and bracket.
2. Push the tab to remove the coupler.
3. Rotate the old bulb counter-clockwise to
remove.
4. Insert a new bulb into the headlight
assembly and turn it clockwise.
5. Insert the coupler into the connector of the
bulb.
1 High Beam Headlights
Remove the clip using a Phillips-head screwdriver.
Insert the clip with the center pin raised, and push
until it is flat.
Center pin
Push until the pin
is flat.
Hose Clip
Reserve
Tank
Bracket
Passenger side
Both sides
Tab
Coupler Bulb
20 US ODYSSEY-31THR6210.book 665 ページ 2020年2月28日 金曜日 午前7時26分
Page 668 of 767
666
uuReplacing Light Bulbs uHeadlight Bulbs
Maintenance
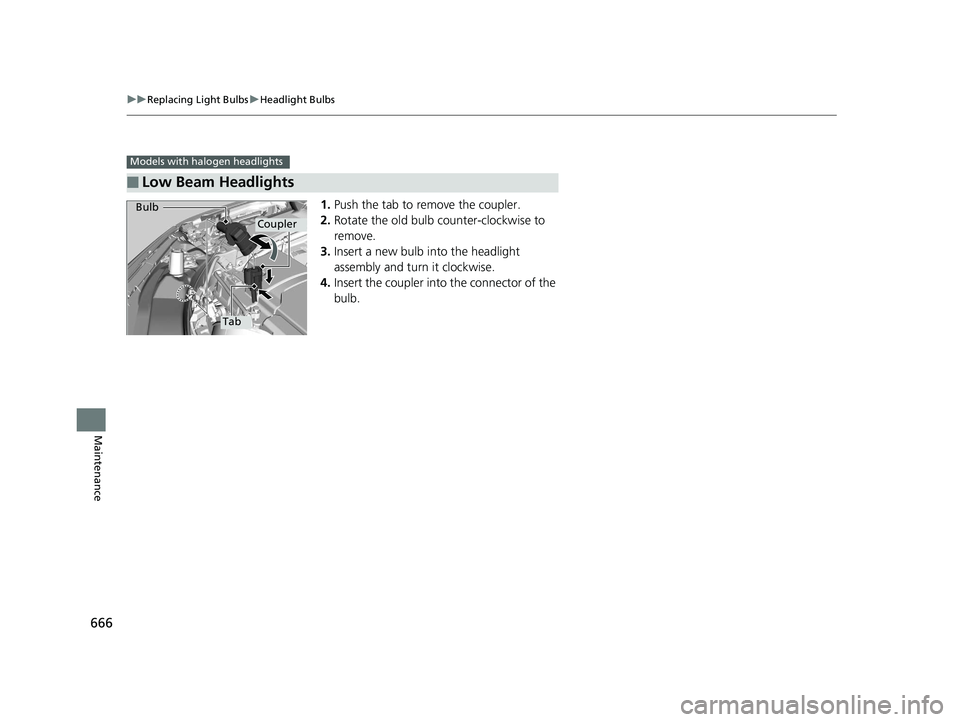
1. Push the tab to remove the coupler.
2. Rotate the old bulb counter-clockwise to
remove.
3. Insert a new bulb into the headlight
assembly and turn it clockwise.
4. Insert the coupler into the connector of the
bulb.
■Low Beam Headlights
Models with halogen headlights
Tab
Coupler
Bulb
20 US ODYSSEY-31THR6210.book 666 ページ 2020年2月28日 金曜日 午前7時26分
Page 669 of 767
667
uuReplacing Light Bulbs uFog Light Bulbs*
Maintenance
Fog Light Bulbs*
When replacing, use the following bulbs.
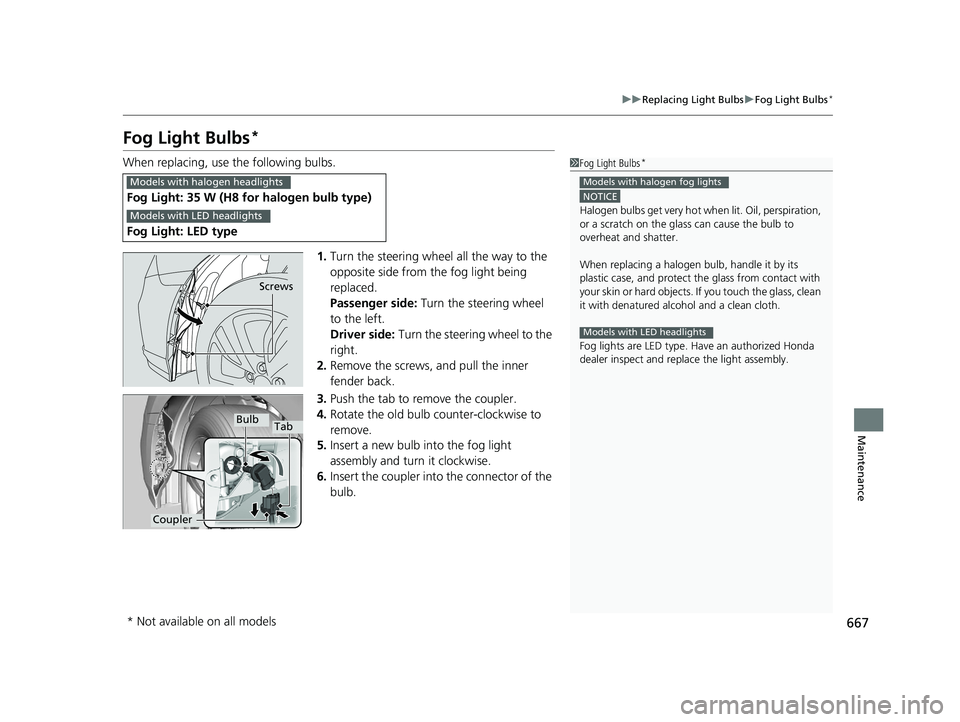
1.Turn the steering wheel all the way to the
opposite side from the fog light being
replaced.
Passenger side: Turn the steering wheel
to the left.
Driver side: Turn the steering wheel to the
right.
2. Remove the screws, and pull the inner
fender back.
3. Push the tab to remove the coupler.
4. Rotate the old bulb counter-clockwise to
remove.
5. Insert a new bulb into the fog light
assembly and turn it clockwise.
6. Insert the coupler into the connector of the
bulb.
Fog Light: 35 W (H8 for halogen bulb type)
Fog Light: LED type
1 Fog Light Bulbs*
NOTICE
Halogen bulbs get very hot wh en lit. Oil, perspiration,
or a scratch on the glass can cause the bulb to
overheat and shatter.
When replacing a halogen bulb, handle it by its
plastic case, and protect th e glass from contact with
your skin or hard objects. If you touch the glass, clean
it with denatured alc ohol and a clean cloth.
Fog lights are LED type. Ha ve an authorized Honda
dealer inspect and replace the light assembly.
Models with halogen fog lights
Models with LED headlights
Models with halogen headlights
Models with LED headlights
Screws
Bulb
Coupler
Tab
* Not available on all models
20 US ODYSSEY-31THR6210.book 667 ページ 2020年2月28日 金曜日 午前7時26分
Page 671 of 767
669
uuReplacing Light Bulbs uFront Turn Signal/Parking* Light Bulbs
Maintenance
Front Turn Signal/Parking* Light Bulbs
When replacing, use the following bulbs.
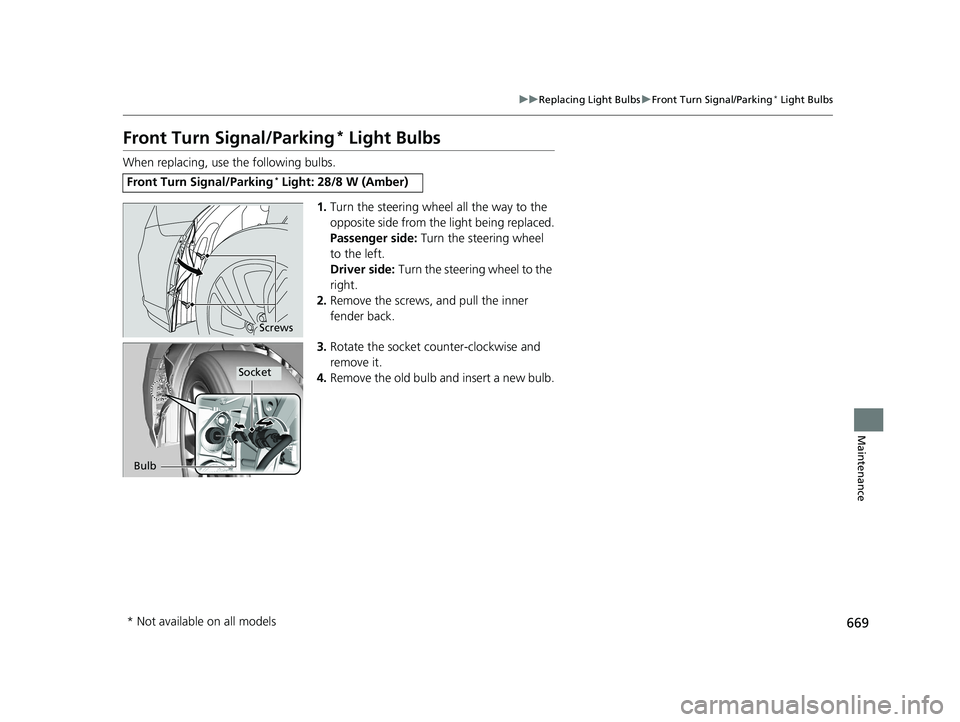
1.Turn the steering wheel all the way to the
opposite side from the light being replaced.
Passenger side: Turn the steering wheel
to the left.
Driver side: Turn the steering wheel to the
right.
2. Remove the screws, and pull the inner
fender back.
3. Rotate the socket counter-clockwise and
remove it.
4. Remove the old bulb and insert a new bulb.
Front Turn Signal/Parking* Light: 28/8 W (Amber)
Screws
Bulb
Socket
* Not available on all models
20 US ODYSSEY-31THR6210.book 669 ページ 2020年2月28日 金曜日 午前7時26分
Page 672 of 767
670
uuReplacing Light Bulbs uFront Side Marker Light Bulbs
Maintenance
Front Side Marker Light Bulbs
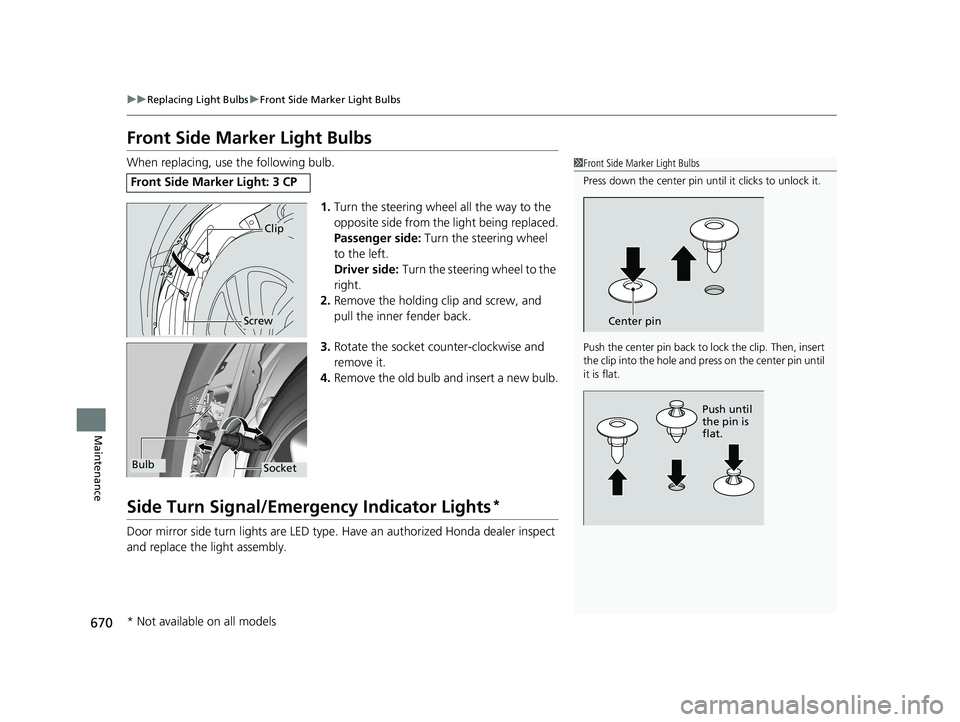
When replacing, use the following bulb.
1.Turn the steering wheel all the way to the
opposite side from the light being replaced.
Passenger side: Turn the steering wheel
to the left.
Driver side: Turn the steering wheel to the
right.
2. Remove the holding clip and screw, and
pull the inner fender back.
3. Rotate the socket co unter-clockwise and
remove it.
4. Remove the old bulb and insert a new bulb.
Side Turn Signal/Emergency Indicator Lights*
Door mirror side turn lights are LED type. Have an authorized Honda dealer inspect
and replace the light assembly.
Front Side Marker Light: 3 CP
1 Front Side Marker Light Bulbs
Press down the center pin until it clicks to unlock it.
Push the center pin back to lock the clip. Then, insert
the clip into the hole and press on the center pin until
it is flat.
Center pin
Push until
the pin is
flat.
Clip
Screw
SocketBulb
* Not available on all models
20 US ODYSSEY-31THR6210.book 670 ページ 2020年2月28日 金曜日 午前7時26分
Page 674 of 767
672
uuReplacing Light Bulbs uBrake, Rear Turn Signal Light Bulbs, and Rear Side Marker/Taillights
Maintenance
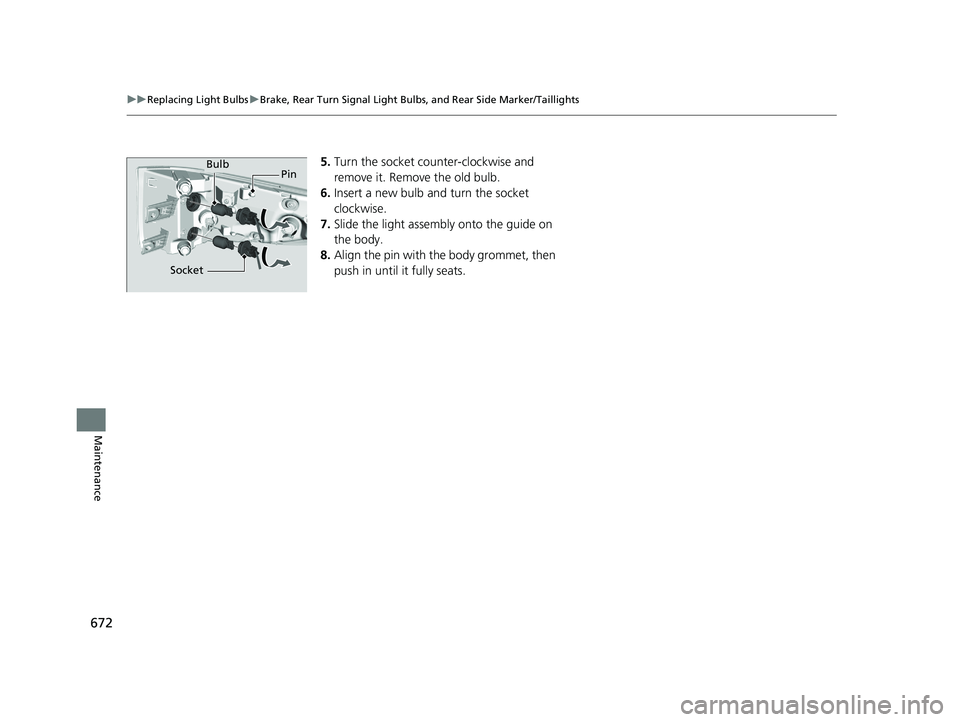
5. Turn the socket counter-clockwise and
remove it. Remove the old bulb.
6. Insert a new bulb and turn the socket
clockwise.
7. Slide the light assembly onto the guide on
the body.
8. Align the pin with the body grommet, then
push in until it fully seats.Bulb
Socket Pin
20 US ODYSSEY-31THR6210.book 672 ページ 2020年2月28日 金曜日 午前7時26分