HONDA ODYSSEY 2020 Owner's Manual (in English)
Manufacturer: HONDA, Model Year: 2020, Model line: ODYSSEY, Model: HONDA ODYSSEY 2020Pages: 767, PDF Size: 43.89 MB
Page 211 of 767
209
Controls
Adjusting the Mirrors
Interior Rearview Mirror
Adjust the angle of the rearview mirror when you are sitting in the correct driving
position.
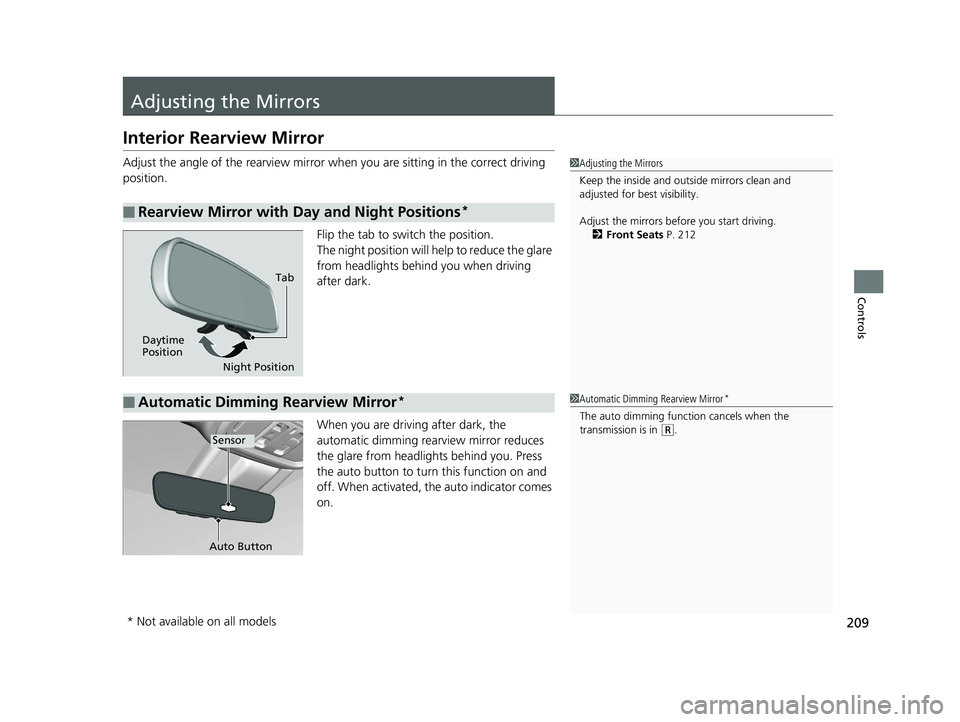
Flip the tab to switch the position.
The night position will help to reduce the glare
from headlights behind you when driving
after dark.
When you are driving after dark, the
automatic dimming rearview mirror reduces
the glare from headligh ts behind you. Press
the auto button to turn this function on and
off. When activated, th e auto indicator comes
on.
■Rearview Mirror with Day and Night Positions*
1 Adjusting the Mirrors
Keep the inside and out side mirrors clean and
adjusted for best visibility.
Adjust the mirrors befo re you start driving.
2 Front Seats P. 212
Tab
Daytime
Position Night Position
■Automatic Dimming Rearview Mirror*1Automatic Dimming Rearview Mirror*
The auto dimming function cancels when the
transmission is in
(R.Sensor
Auto Button
* Not available on all models
20 US ODYSSEY-31THR6210.book 209 ページ 2020年2月28日 金曜日 午前7時26分
Page 212 of 767
210
uuAdjusting the Mirrors uPower Door Mirrors
Controls
Power Door Mirrors
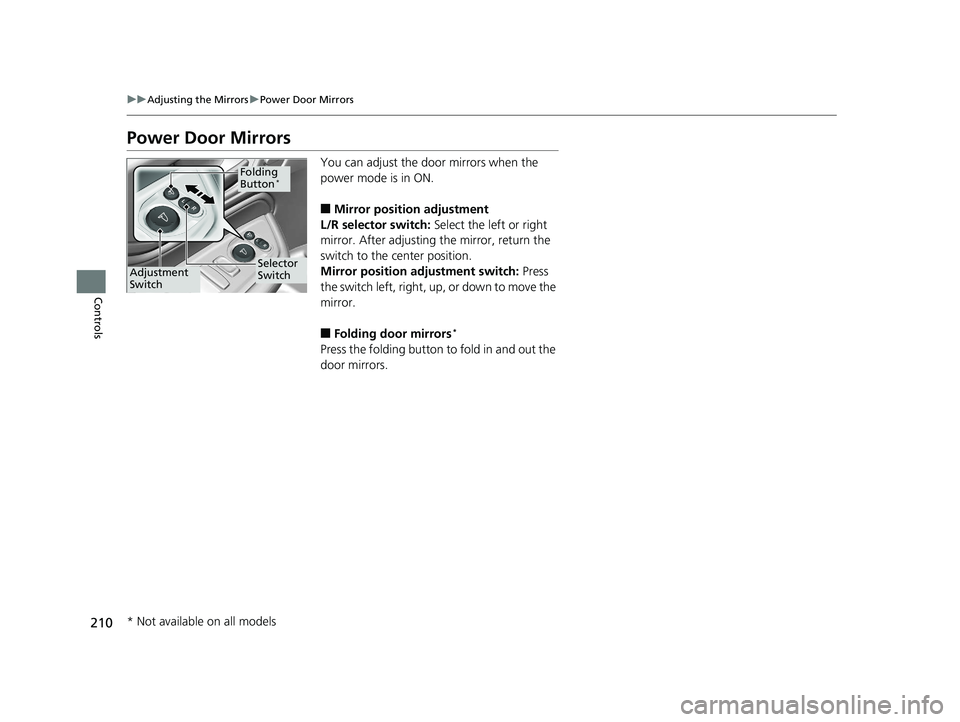
You can adjust the door mirrors when the
power mode is in ON.
■Mirror position adjustment
L/R selector switch: Select the left or right
mirror. After adjusting the mirror, return the
switch to the center position.
Mirror position adjustment switch: Press
the switch left, right, up, or down to move the
mirror.
■Folding door mirrors*
Press the folding button to fold in and out the
door mirrors.
Selector
SwitchAdjustment
Switch
Folding
Button*
* Not available on all models
20 US ODYSSEY-31THR6210.book 210 ページ 2020年2月28日 金曜日 午前7時26分
Page 213 of 767
211
uuAdjusting the Mirrors uPower Door Mirrors
Controls
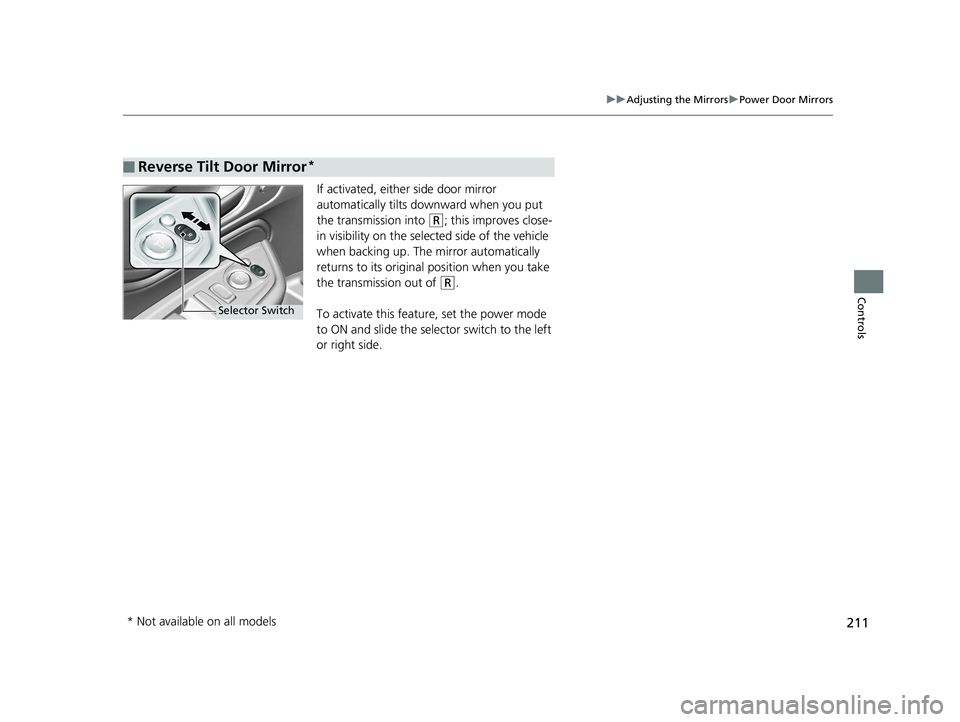
If activated, either side door mirror
automatically tilts do wnward when you put
the transmission into
(R; this improves close-
in visibility on the selected side of the vehicle
when backing up. The mirror automatically
returns to its original position when you take
the transmission out of
(R.
To activate this feature, set the power mode
to ON and slide the sele ctor switch to the left
or right side.
■Reverse Tilt Door Mirror*
Selector Switch
* Not available on all models
20 US ODYSSEY-31THR6210.book 211 ページ 2020年2月28日 金曜日 午前7時26分
Page 214 of 767
212
Controls
Adjusting the Seats
Front Seats
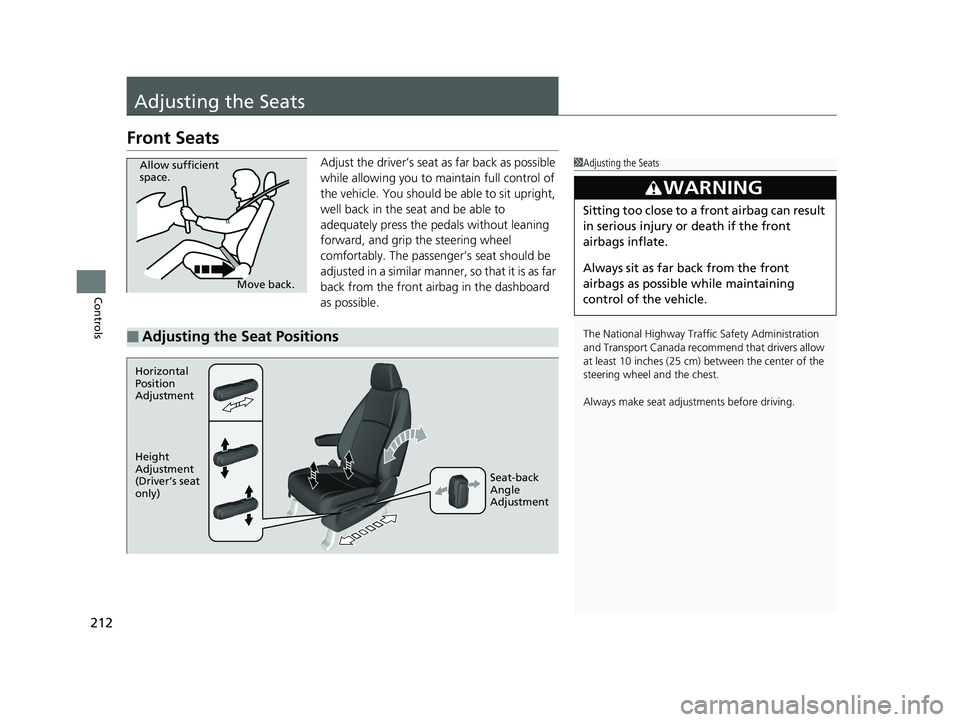
Adjust the driver’s seat as far back as possible
while allowing you to maintain full control of
the vehicle. You should be able to sit upright,
well back in the seat and be able to
adequately press the pedals without leaning
forward, and grip the steering wheel
comfortably. The passenger’s seat should be
adjusted in a similar manner, so that it is as far
back from the front airbag in the dashboard
as possible.1Adjusting the Seats
The National Highway Traffic Safety Administration
and Transport Cana da recommend that drivers allow
at least 10 inches (25 cm) between the center of the
steering wheel and the chest.
Always make seat adjustments before driving.
3WARNING
Sitting too close to a front airbag can result
in serious injury or death if the front
airbags inflate.
Always sit as far back from the front
airbags as possible while maintaining
control of the vehicle.
Move back.
Allow sufficient
space.
■Adjusting the Seat Positions
Horizontal
Position
Adjustment
Height
Adjustment
(Driver’s seat
only)
Seat-back
Angle
Adjustment
20 US ODYSSEY-31THR6210.book 212 ページ 2020年2月28日 金曜日 午前7時26分
Page 215 of 767
213
uuAdjusting the Seats uFront Seats
Continued
Controls
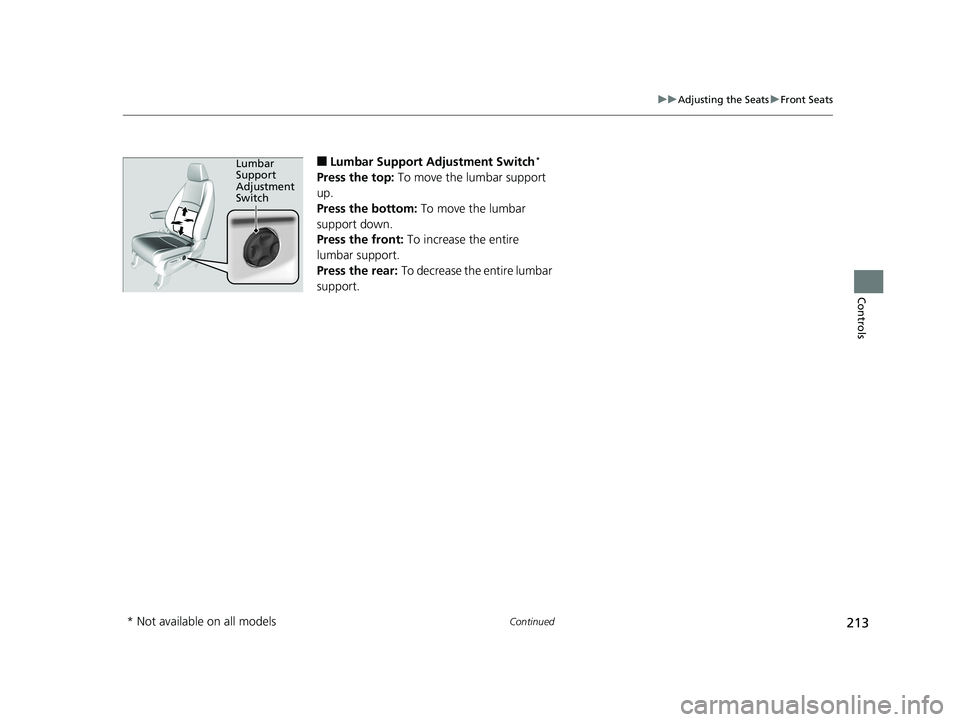
■Lumbar Support Adjustment Switch*
Press the top: To move the lumbar support
up.
Press the bottom: To move the lumbar
support down.
Press the front: To increase the entire
lumbar support.
Press the rear: To decrease the entire lumbar
support.
Lumbar
Support
Adjustment
Switch
* Not available on all models
20 US ODYSSEY-31THR6210.book 213 ページ 2020年2月28日 金曜日 午前7時26分
Page 216 of 767
uuAdjusting the Seats uFront Seats
214
Controls
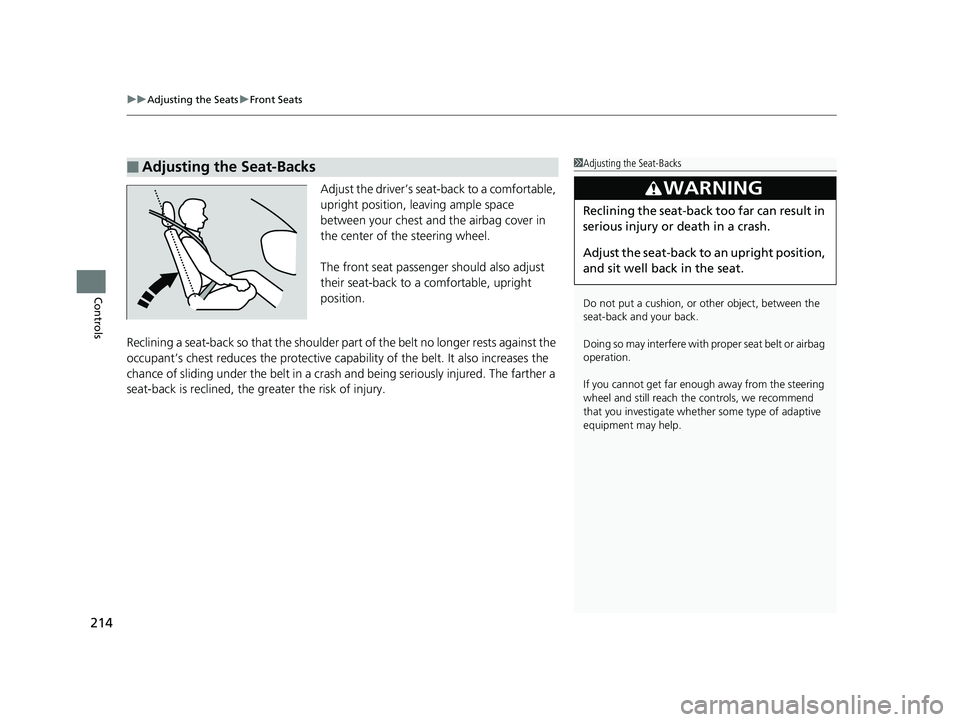
Adjust the driver’s sea t-back to a comfortable,
upright position, leaving ample space
between your chest and the airbag cover in
the center of the steering wheel.
The front seat passenger should also adjust
their seat-back to a comfortable, upright
position.
Reclining a seat-back so that the shoulder pa rt of the belt no longer rests against the
occupant’s chest reduces the protective capa bility of the belt. It also increases the
chance of sliding under the belt in a crash and being seriously injured. The farther a
seat-back is reclined, the greater the risk of injury.
■Adjusting the Seat-Backs1 Adjusting the Seat-Backs
Do not put a cushion, or other object, between the
seat-back and your back.
Doing so may interfere with proper seat belt or airbag
operation.
If you cannot get far e nough away from the steering
wheel and still reach th e controls, we recommend
that you investigate whether some type of adaptive
equipment may help.
3WARNING
Reclining the seat-back too far can result in
serious injury or death in a crash.
Adjust the seat-back to an upright position,
and sit well back in the seat.
20 US ODYSSEY-31THR6210.book 214 ページ 2020年2月28日 金曜日 午前7時26分
Page 217 of 767
215
uuAdjusting the Seats uSecond Row Seats
Continued
Controls
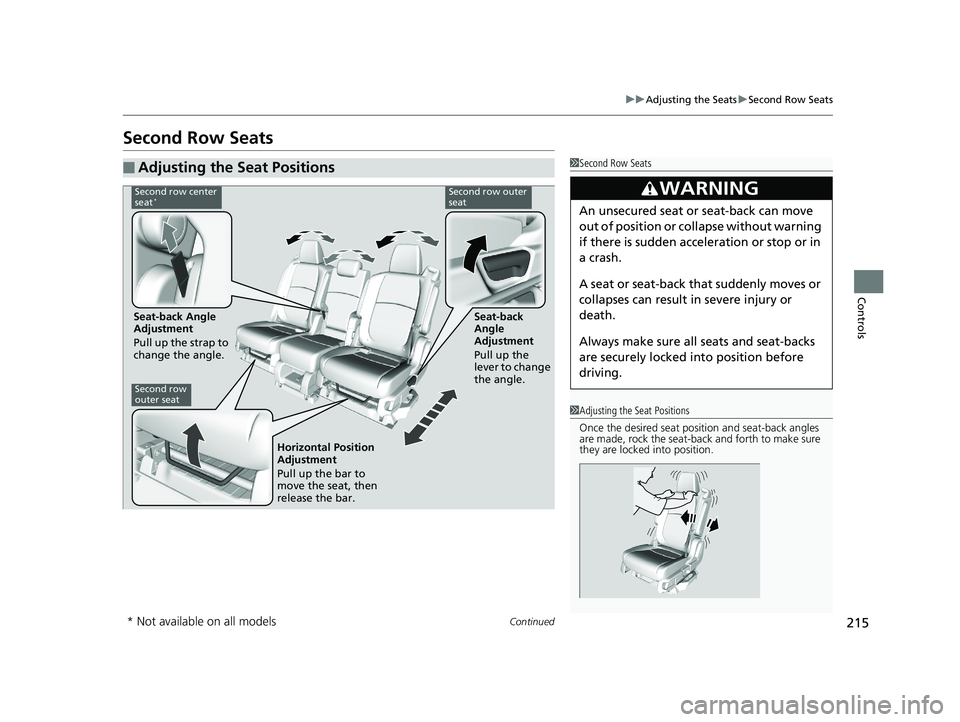
Second Row Seats
■Adjusting the Seat Positions1Second Row Seats
3WARNING
An unsecured seat or seat-back can move
out of position or collapse without warning
if there is sudden acceleration or stop or in
a crash.
A seat or seat-back that suddenly moves or
collapses can result in severe injury or
death.
Always make sure all seats and seat-backs
are securely locked in to position before
driving.
1 Adjusting the Seat Positions
Once the desired seat posit ion and seat-back angles
are made, rock the seat-back and forth to make sure
they are locked into position.
Second row center
seat*Second row outer
seat
Seat-back Angle
Adjustment
Pull up the strap to
change the angle. Seat-back
Angle
Adjustment
Pull up the
lever to change
the angle.
Second row
outer seat
Horizontal Position
Adjustment
Pull up the bar to
move the seat, then
release the bar.
* Not available on all models
20 US ODYSSEY-31THR6210.book 215 ページ 2020年2月28日 金曜日 午前7時26分
Page 218 of 767
216
uuAdjusting the Seats uSecond Row Seats
Controls
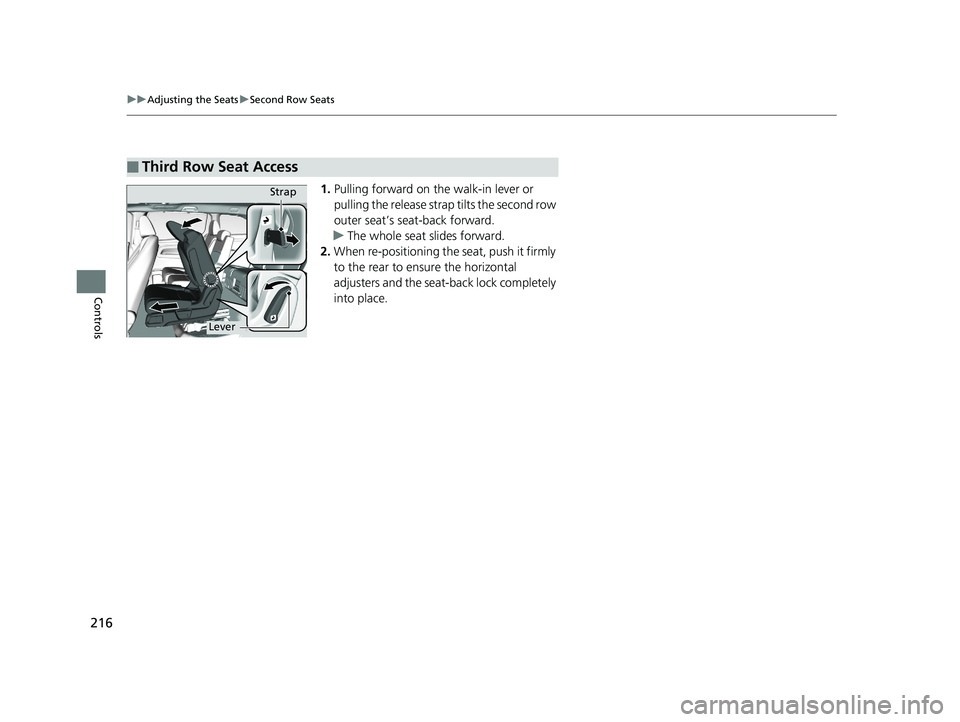
1. Pulling forward on the walk-in lever or
pulling the release strap tilts the second row
outer seat’s seat-back forward.
u The whole seat slides forward.
2. When re-positioning the seat, push it firmly
to the rear to ensure the horizontal
adjusters and the seat-b ack lock completely
into place.
■Third Row Seat Access
Lever Strap
20 US ODYSSEY-31THR6210.book 216 ページ 2020年2月28日 金曜日 午前7時26分
Page 219 of 767
Continued217
uuAdjusting the Seats uSecond Row Seats
Controls
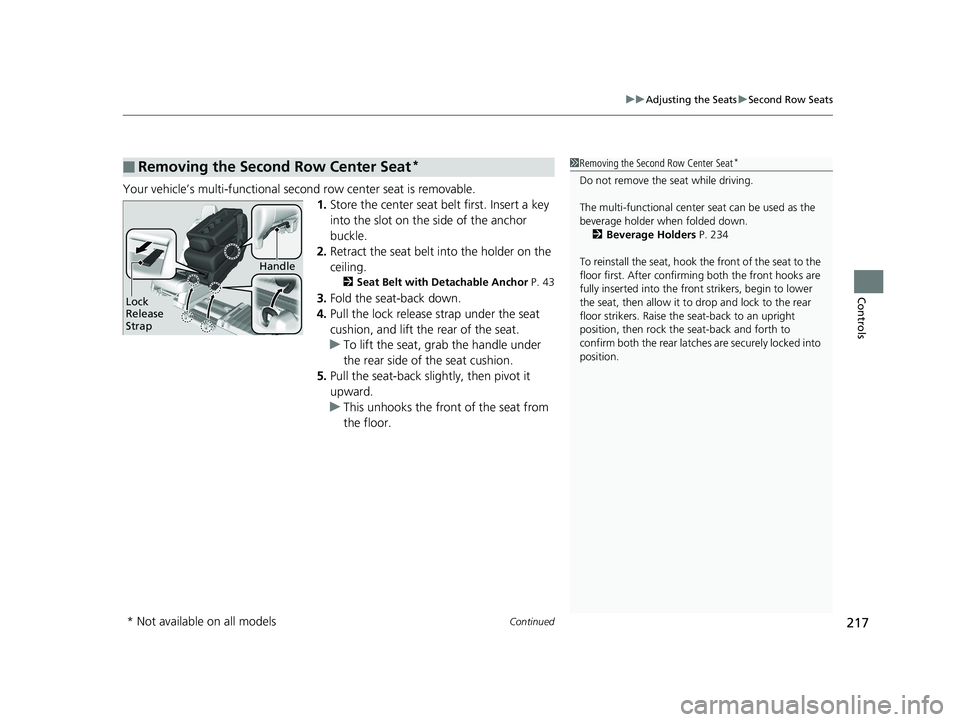
Your vehicle’s multi-functional second row center seat is removable.
1.Store the center seat belt first. Insert a key
into the slot on the side of the anchor
buckle.
2. Retract the seat belt into the holder on the
ceiling.
2 Seat Belt with Detachable Anchor P. 43
3.Fold the seat-back down.
4. Pull the lock release strap under the seat
cushion, and lift the rear of the seat.
u To lift the seat, gr ab the handle under
the rear side of the seat cushion.
5. Pull the seat-back slightly, then pivot it
upward.
u This unhooks the front of the seat from
the floor.
■Removing the Second Row Center Seat*1Removing the Second Row Center Seat*
Do not remove the seat while driving.
The multi-functional center seat can be used as the
beverage holder when folded down. 2 Beverage Holders P. 234
To reinstall the seat, hook the front of the seat to the
floor first. Afte r confirming both the front hooks are
fully inserted into the front strikers, begin to lower
the seat, then allow it to drop and lock to the rear
floor strikers. Raise the seat-back to an upright
position, then rock the seat-back and forth to
confirm both the rear latches are securely locked into
position.
Lock
Release
Strap
Handle
* Not available on all models
20 US ODYSSEY-31THR6210.book 217 ページ 2020年2月28日 金曜日 午前7時26分
Page 220 of 767
uuAdjusting the Seats uSecond Row Seats
218
Controls
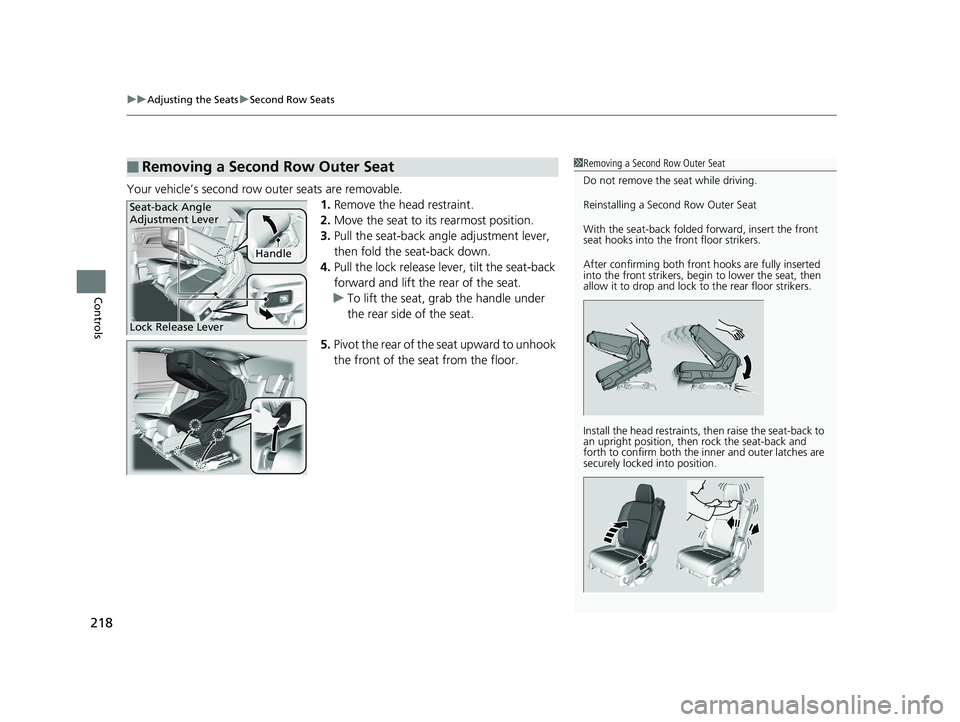
Your vehicle’s second row outer seats are removable.
1.Remove the head restraint.
2. Move the seat to it s rearmost position.
3. Pull the seat-back angle adjustment lever,
then fold the seat-back down.
4. Pull the lock release lever, tilt the seat-back
forward and lift the rear of the seat.
u To lift the seat, grab the handle under
the rear side of the seat.
5. Pivot the rear of the seat upward to unhook
the front of the seat from the floor.
■Removing a Second Row Outer Seat1Removing a Second Row Outer Seat
Do not remove the seat while driving.
Reinstalling a Sec ond Row Outer Seat
With the seat-back folded forward, insert the front
seat hooks into the front floor strikers.
After confirming both front hooks are fully inserted
into the front strikers, begin to lower the seat, then
allow it to drop and lock to the rear floor strikers.
Install the head restraints, then raise the seat-back to
an upright position, then rock the seat-back and
forth to confirm both the i nner and outer latches are
securely locked into position.
Handle
Seat-back Angle
Adjustment Lever
Lock Release Lever
20 US ODYSSEY-31THR6210.book 218 ページ 2020年2月28日 金曜日 午前7時26分