dashboard HONDA PRELUDE 1992 Owners Manual
[x] Cancel search | Manufacturer: HONDA, Model Year: 1992, Model line: PRELUDE, Model: HONDA PRELUDE 1992Pages: 225, PDF Size: 2.1 MB
Page 1 of 225

1992 Prelude Online Reference Owner's Manual
Use these links (and links throughout this manual) to navigate through\
this reference.
For a printed owner's manual, click on authorized manuals or go to www.h\
elminc.com.
Contents
Owner's Identification Form
Introduction ........................................................................\
................................................................. i
A Few Words About Safet y........................................................................\
.........................................ii
Driver and Passenger Safety ........................................................................\
......................................3
Proper use and care of your vehicle's seat belts, and Supplemental Restr\
aint System.
Instruments and Controls........................................................................\
.........................................29
Instrument panel indicator and gauge, and how to use dashboard and steering colu\
mn controls.
Comfort and Convenience Features ........................................................................\
...................... 67
How to operate the climate control system, the audio system, and other c\
onvenience features.
Before Driving........................................................................\
.......................................................... 97
What gasoline to use, how to break-in your new vehicle, and how to load luggage and other cargo.
Driving ........................................................................\
......................................................................107
The proper way to start the engine, shift the transmission, and park, pl\
us towing a trailer.
Maintenance........................................................................\
.............................................................127
The Maintenance Schedule shows you when you need to take your vehicle to the dealer.
Appearance Care........................................................................\
......................................................175
Tips on cleaning and protecting your vehicle. Things to look for if your\
vehicle ever needs body repairs.
Taking Care of the Unexpected........................................................................\
..............................183
This section covers several problems motorists sometimes experience, and how to handle them.
Technical Information........................................................................\
.............................................203
ID numbers, dimensions, capacities, and technical information.
Warranty and Customer Relations (U.S. and Canada)................................................................215
A summary of the warranties covering your new Acura, and how to contact \
us.
Authorized Manuals (U.S. only)........................................................................\
..............................221
How to order manuals and other technical literature.
Index ........................................................................\
........................ ......................................................
I
Gas Station Information
A summary of information you need when you pull up to the gas pump.
ProCarManuals.com
Page 11 of 225
Supplemental Restraint System
All Preludes sold in the U.S. are equipped with a Supplemental
Restraint System (SRS). (This
system also comes on the SR and SR 4WS models in Canada.)
The supplemental restraint system
includes an airbag to help protect
your head and chest during a se-
vere frontal collision. This system does not replace your seat belt. It
supplements, or adds to, the protec- tion offered by your seat belt.
The system on the Si 4WS model in
the U.S also includes a front
passenger's airbag.
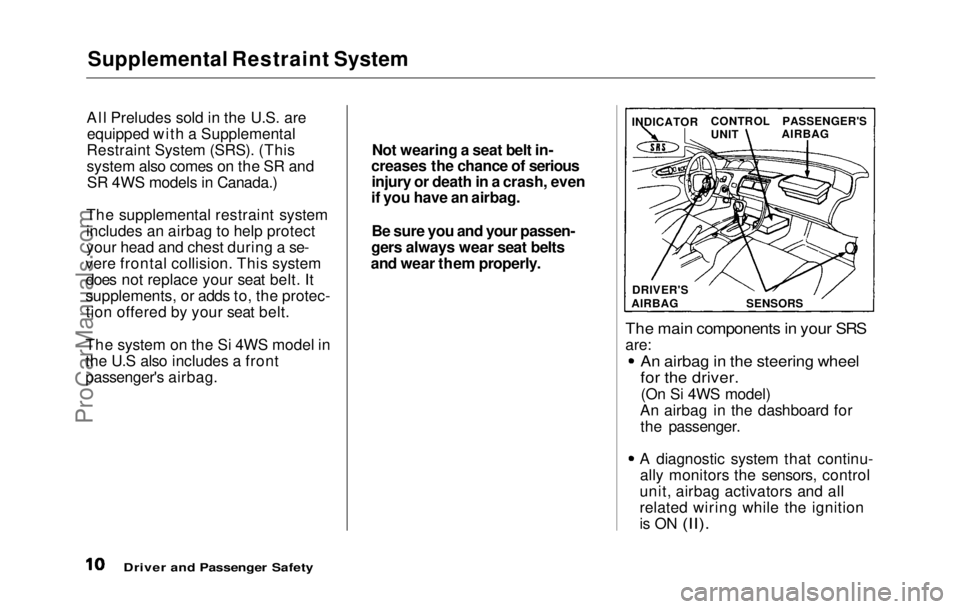
The main components in your SRS
are:
An airbag in the steering wheel
for the driver.
(On Si 4WS model)
An airbag in the dashboard for the passenger.
A diagnostic system that continu- ally monitors the sensors, control
unit, airbag activators and all
related wiring while the ignition
is ON
(II).
Driver and Passenger Safety
Not wearing a seat belt in-
creases the chance of serious injury or death in a crash, even
if you have an airbag.
Be sure you and your passen-
gers always wear seat belts
and wear them properly. INDICATOR
CONTROL
UNITPASSENGER'S
AIRBAG
DRIVER'S
AIRBAG
SENSORSProCarManuals.comMain Menu Table of Contents s t
Page 15 of 225
Supplemental Restraint System
The passenger's airbag is stored
near the top of the dashboard,
under a lid marked SRS. Do not
place any objects on top of this lid. If the airbag inflates, those objects
can be propelled inside the car and possibly hurt someone.
How the SRS
Indicator Light Works
The purpose of the SRS light on
your instrument panel is to alert
you of a potential problem with
your supplemental restraint system.
Have the system checked if:
The light does not come on when
you turn the ignition ON (II). The light stays on after the
engine starts.
The light comes on or flashes
while you are driving.
System Service
Your supplemental restraint
system is virtually maintenance-
free. There are no parts you can
safely service.
You must have the system serviced
by an authorized Honda dealer in the following situations: If your airbag ever inflates. The
bag must be replaced. Do not try
to remove or discard the airbag
by yourself. This must be done by a Honda dealer.
If the SRS indicator light alerts
you of a problem. Have the
supplemental restraint system
checked as soon as possible.
Otherwise, your airbag might not
inflate when you need it. When the car is ten years old, get
the system inspected. The
production date is on the driver's
door jamb for your convenience.
Driver and Passenger Safety
SRS
ProCarManuals.comMain Menu Table of Contents s t
Page 39 of 225
Controls Near the Steering Wheel
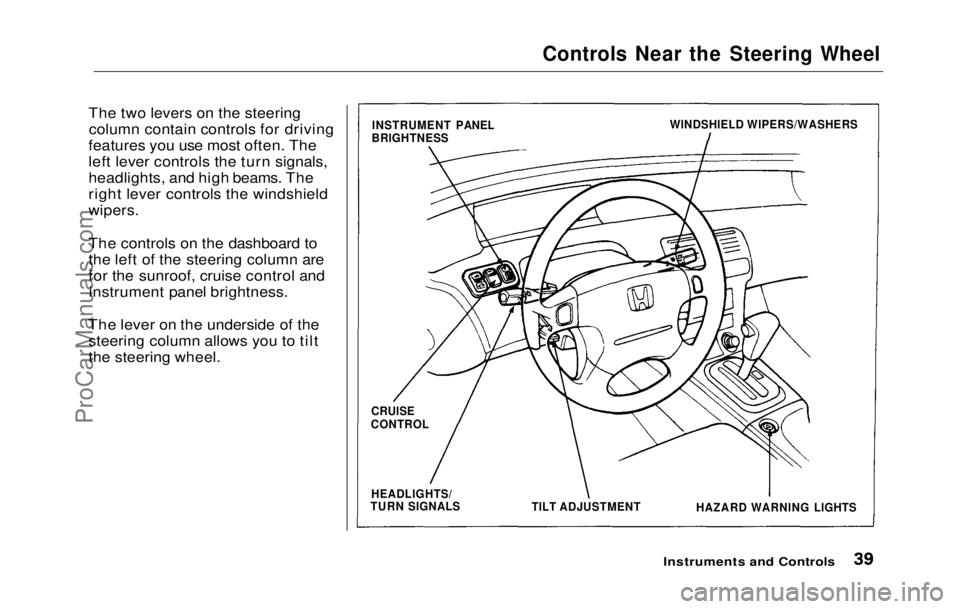
The two levers on the steering column contain controls for driving
features you use most often. The
left lever controls the turn signals,
headlights, and high beams. The
right lever controls the windshield
wipers.
The controls on the dashboard to
the left of the steering column are
for the sunroof, cruise control and instrument panel brightness.
The lever on the underside of the steering column allows you to tilt
the steering wheel.
Instruments and Controls
INSTRUMENT PANEL
BRIGHTNESS WINDSHIELD WIPERS/WASHERS
CRUISE
CONTROL
HEADLIGHTS/
TURN SIGNALS
TILT ADJUSTMENT
HAZARD WARNING LIGHTSProCarManuals.comMain Menu Table of Contents s t
Page 41 of 225
Controls Near the Steering Wheel
Instrument Panel Brightness
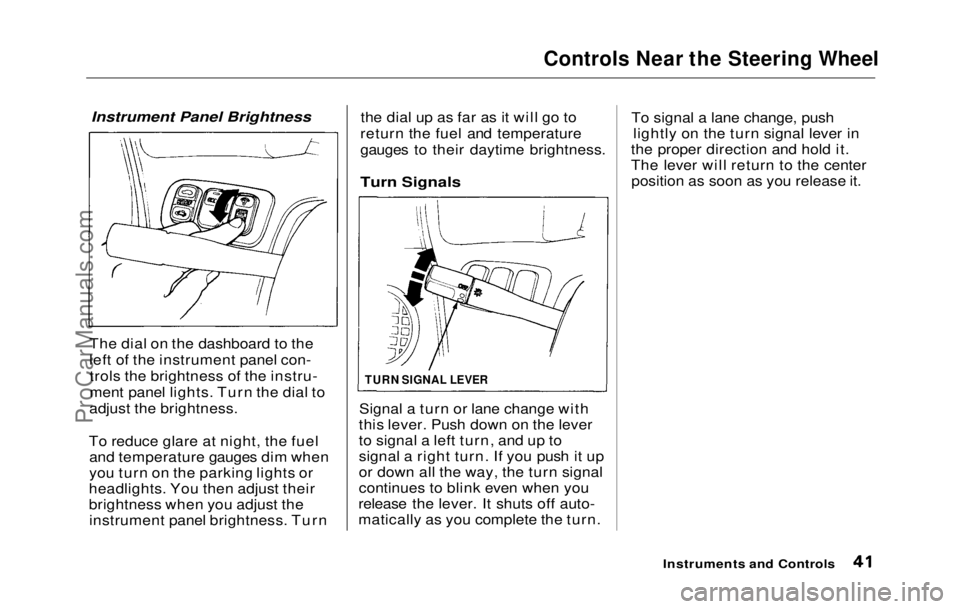
The dial
on the dashboard to the
left of the instrument panel con- trols the brightness of the instru-
ment panel lights. Turn the dial to
adjust the brightness.
To reduce glare at night, the fuel and temperature gauges dim when
you turn on the parking lights or
headlights. You then adjust their
brightness when you adjust the instrument panel brightness. Turn the dial up as far as it will go to
return the fuel and temperature
gauges to their daytime brightness.
Turn Signals
Signal a turn or lane change with
this lever. Push down on the lever
to signal a left turn, and up to
signal a right turn. If you push it up
or down all the way, the turn signal
continues to blink even when you
release the lever. It shuts off auto-
matically as you complete the turn. To signal a lane change, push
lightly on the turn signal lever in
the proper direction and hold it.
The lever will return to the center position as soon as you release it.
Instruments and Controls
TURN SIGNAL LEVERProCarManuals.comMain Menu Table of Contents s t
Page 58 of 225
Power Windows, Sunroof
The MAIN switch controls power
to the passenger's window. With
this switch off, the passenger's
window cannot be raised or lower- ed. The MAIN switch does not
affect the driver's window. Keep
the MAIN switch off when you
have childre n
in the car so they do
not injure themselves by operating
the windows unintentionally. The power window system has a
key-off delay function. The win-
dows will still operate for up to ten
minutes after you turn off the igni-
tion. Opening either front door can-
cels the delay function. You must
turn the ignition on again before
you can raise or lower the windows.
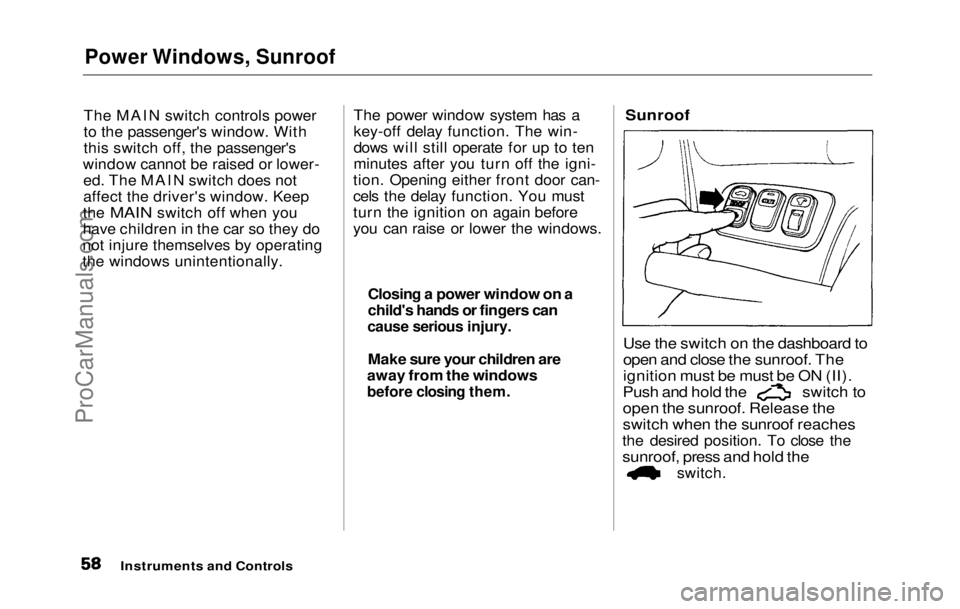
Sunroof
Use the switch on the dashboard to
open and close the sunroof. The
ignition must be must be ON (II).
Push and hold the switch to
open the sunroof. Release the
switch
when
the sunroof reaches
the desired position. To close the
sunroof, press and hold the
switch.
Instruments and Controls
Closing a power window on a
child's hands or fingers can
cause serious injury.
Make sure your children are
away from the windows
before closing them.ProCarManuals.comMain Menu Table of Contents s t
Page 94 of 225
Caring for the Cassette Player
The cassette drive picks up dirt
and oxides whenever you play a
tape. This builds up over time and
causes the sound quality to degrade.
To prevent this, you should clean
the cassette drive after every 30
hours of use. Your dealer has a cleaning kit available for this
purpose.
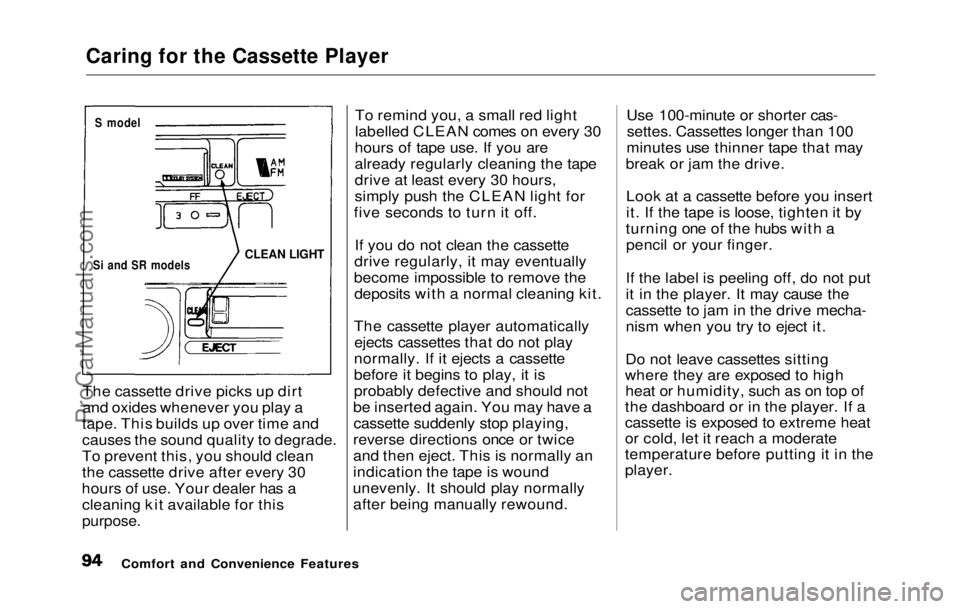
To remind you, a small red light
labelled CLEAN comes on every 30
hours of tape use. If you are
already regularly cleaning the tape
drive at least every 30 hours,
simply push the CLEAN light for
five seconds to turn it off.
If you do not clean the cassette
drive regularly, it may eventually
become impossible to remove the deposits with a normal cleaning kit.
The cassette player automatically ejects cassettes that do not play
normally. If it ejects a cassette
before it begins to play, it is
probably defective and should not
be inserted again. You may have a cassette suddenly stop playing,
reverse directions once or twice
and then eject. This is normally an
indication the tape is wound
unevenly. It should play normally after being manually rewound. Use 100-minute or shorter cas-
settes. Cassettes longer than 100
minutes use thinner tape that may
break or jam the drive.
Look at a cassette before you insert
it. If the tape is loose, tighten it by
turning one of the hubs with a pencil or your finger.
If the label is peeling off, do not put
it in the player. It may cause the
cassette to jam in the drive mecha-
nism when you try to eject it.
Do not leave cassettes sitting
where they are exposed to high heat or humidity, such as on top of
the dashboard or in the player. If a
cassette is exposed to extreme heat
or cold, let it reach a moderate
temperature before putting it in the
player.
Comfort and Convenience Features
S model
Si and SR models
CLEAN LIGHTProCarManuals.comMain Menu Table of Contents s t
Page 195 of 225
Fuses
All the electrical circuits in your
car have fuses to protect them
from a short circuit or overload.
These fuses are located in two fuse
boxes.
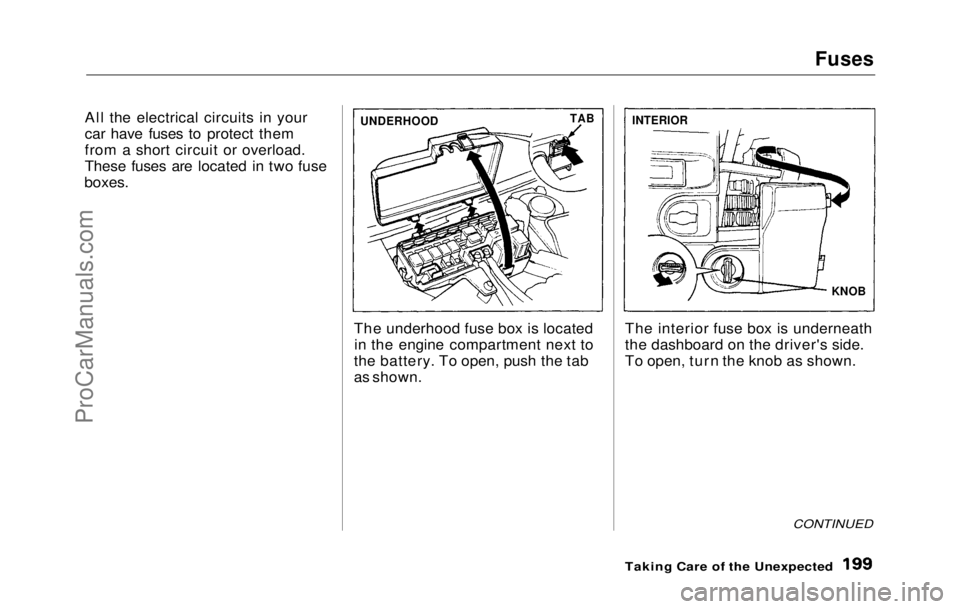
The underhood fuse box is locatedin the engine compartment next to
the battery. To open, push the tab
as shown.
The interior fuse box is underneath
the dashboard on the driver's side.
To open, turn the knob as shown.
CONTINUED
Taking Care of the Unexpected
UNDERHOOD
TAB
KNOB
INTERIORProCarManuals.comMain Menu Table of Contents s t
Page 200 of 225
Identification Numbers
Your car has several identifying numbers located in various places.
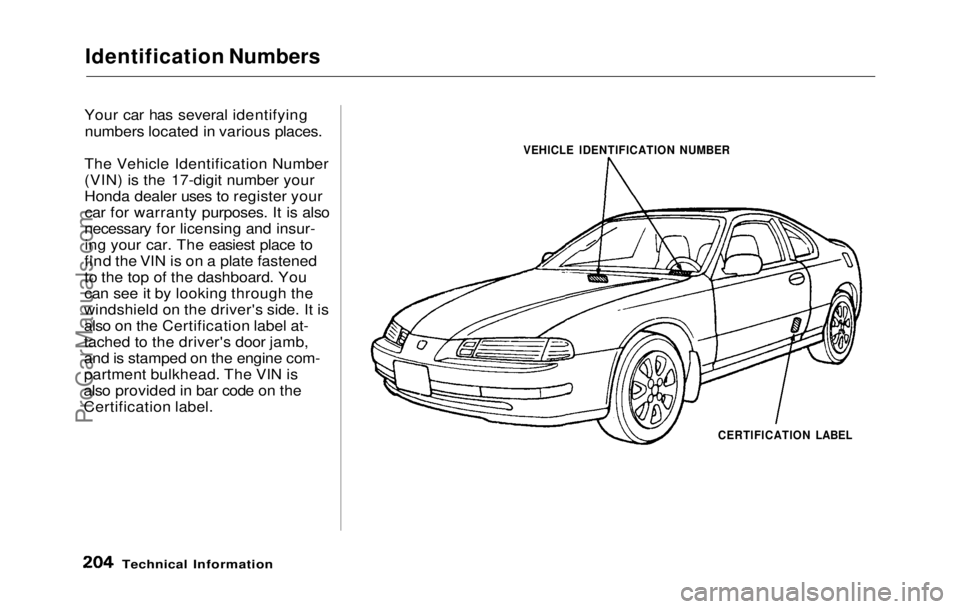
The Vehicle Identification Number
(VIN) is the 17-digit number your
Honda dealer uses to register your car for warranty purposes. It is also
necessary for licensing and insur- ing your car. The easiest place to
find the VIN is on a plate fastened
to the top of the dashboard. You
can see it by looking through the
windshield on the driver's side. It is
also on the Certification label at-
tached to the driver's door jamb,
and is stamped on the engine com-
partment bulkhead. The VIN is
also provided in bar code on the
Certification label.
Technical Information
VEHICLE IDENTIFICATION NUMBER
CERTIFICATION LABELProCarManuals.comMain Menu Table of Contents s t
Page 205 of 225

Supplemental Restraint System
The Honda
Supplemental Restraint
System (SRS) is standard on all
Preludes sold in the U.S. and the
SR, SR 4WS sold in Canada.
The SRS includes the steering
wheel airbag assembly, sensors in the dashboard, and a control unit
with sensors behind the center
console.
(On Si 4WS model)
The system also has a dashboard-
mounted airbag assembly for the
passenger.
The sensors are decelerometers,
set to trigger in a frontal impact that generates more force than a 10
mile per hour barrier crash. For the
SRS to activate, at least two sen-
sors must trigger. This duplication
is to prevent accidental activation. When the control unit receives
trigger signals from at least two
sensors, it sends voltage to the
airbag. The control unit stores this
charge in capacitors to insure
reliability even if a severe impact damages the car's battery or
electrical connections.
The electrical charge sent to the
airbag assembly ignites its propel-
lant, which burns instantaneously.
The gas produced by the burning propellant inflates the airbag in
about 40 milliseconds (1/25 of a
second).
The airbag is vented so it stays inflated for only an instant and
does not block the driver's vision.
Smoke from the burned propellant
comes out of the airbag and into
the car's interior. This is normal
and does not mean there is a fire.
The airbag collapses onto the driver's lap. The airbag unit can inflate only one
time. After use, your Honda dealer
must check the complete Supple-
mental Restraint System and re-
place the airbag assembly.
To ensure long-term reliability, the
SRS uses gold-plated electrical
connections throughout. Exposed
components are sealed with epoxy.
The control unit monitors the SRS circuitry whenever the ignition is
ON (II). If the control unit senses
any faults, it turns on the SRS
indicator light on the instrument
panel. Take the car to your Honda
dealer to diagnose and repair the system as soon as possible.
The SRS needs no regular mainte-
nance other than an inspection by
your Honda dealer ten years after
manufacture.
Technical InformationProCarManuals.comMain Menu Table of Contents s t