HONDA PRELUDE 1998 Owners Manual
Manufacturer: HONDA, Model Year: 1998, Model line: PRELUDE, Model: HONDA PRELUDE 1998Pages: 278, PDF Size: 2.61 MB
Page 171 of 278
Fluid Locations
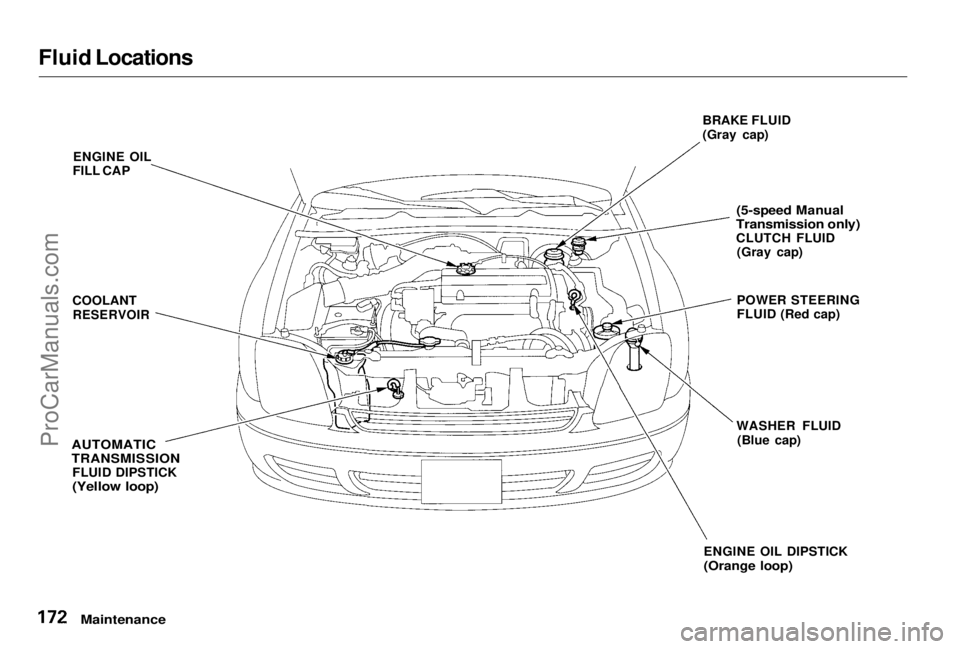
ENGINE OIL
FILL CAP
COOLANT
RESERVOIR
AUTOMATIC
TRANSMISSION
FLUID DIPSTICK
(Yellow loop)
BRAKE FLUID
(Gray cap)
(5-speed Manual
Transmission only)
CLUTCH FLUID (Gray cap)
POWER STEERING
FLUID (Red cap)
WASHER FLUID (Blue cap)
ENGINE OIL DIPSTICK
(Orange loop)
MaintenanceProCarManuals.comMain Menu Table of Contents s t
Page 172 of 278
Engine Oil
Adding Oil
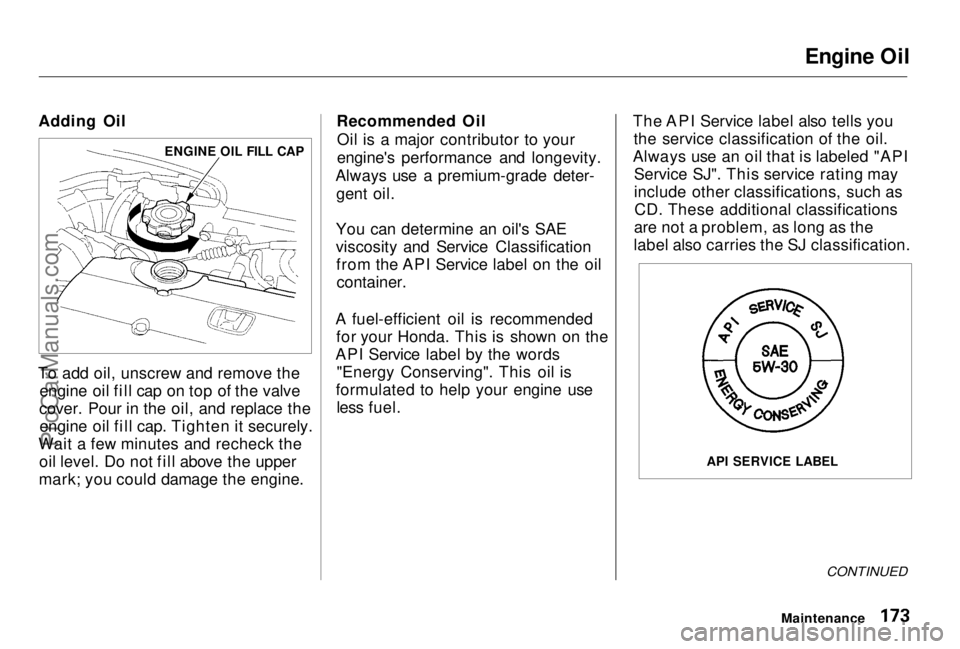
To add oil, unscrew and remove the engine oil fill cap on top of the valve
cover. Pour in the oil, and replace the engine oil fill cap. Tighten it securely.
Wait a few minutes and recheck the oil level. Do not fill above the upper
mark; you could damage the engine. Recommended Oil
Oil is a major contributor to your
engine's performance and longevity.
Always use a premium-grade deter- gent oil.
You can determine an oil's SAE
viscosity and Service Classification from the API Service label on the oilcontainer.
A fuel-efficient oil is recommended for your Honda. This is shown on the
API Service label by the words "Energy Conserving". This oil is
formulated to help your engine use less fuel. The API Service label also tells you
the service classification of the oil.
Always use an oil that is labeled "API Service SJ". This service rating may
include other classifications, such asCD. These additional classifications
are not a problem, as long as the
label also carries the SJ classification.
CONTINUED
Maintenance
ENGINE OIL FILL CAP
API SERVICE LABELProCarManuals.comMain Menu Table of Contents s t
Page 173 of 278
Engine Oil
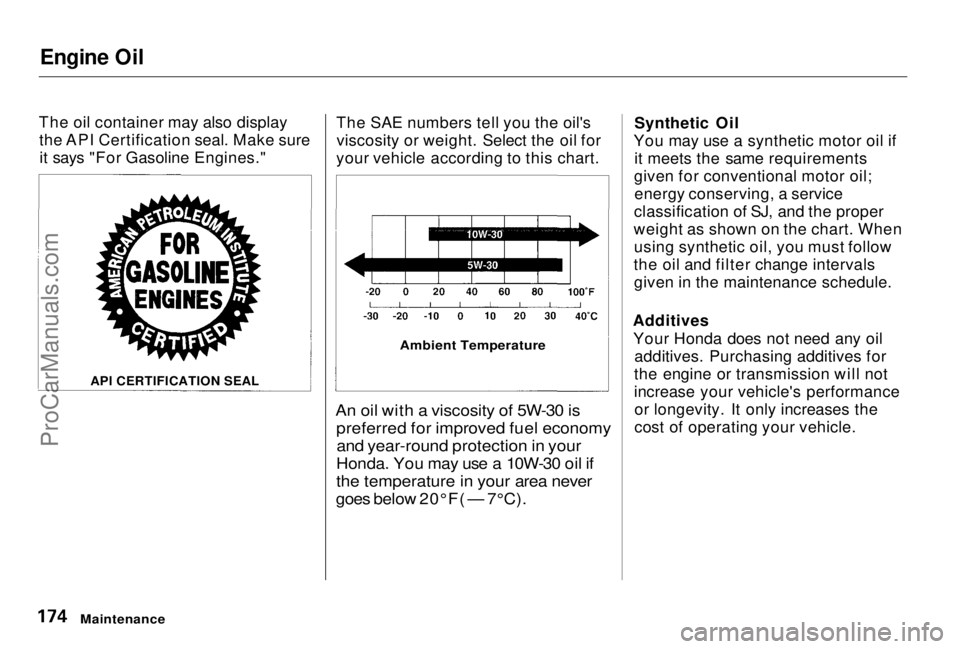
The oil container may also display the API Certification seal. Make sureit says "For Gasoline Engines." The SAE numbers tell you the oil's
viscosity or weight. Select the oil for
your vehicle according to this chart.
An oil with a viscosity of 5W-30 is
preferred for improved fuel economyand year-round protection in your
Honda. You may use a 10W-30 oil if
the temperature in your area never
goes below 20°F( — 7°C).
Synthetic Oil
You may use a synthetic motor oil if it meets the same requirements
given for conventional motor oil; energy conserving, a service
classification of SJ, and the proper
weight as shown on the chart. When using synthetic oil, you must follow
the oil and filter change intervals given in the maintenance schedule.
Additives Your Honda does not need any oil additives. Purchasing additives for
the engine or transmission will not
increase your vehicle's performance or longevity. It only increases the
cost of operating your vehicle.
Maintenance
API CERTIFICATION SEAL
Ambient TemperatureProCarManuals.comMain Menu Table of Contents s t
Page 174 of 278
Engine Oil
Changing the Oil and Filter
Always change the oil and filter according to the time and distance (miles/kilometers) recommenda-
tions in the maintenance schedule.
The oil and filter collect contami- nants that can damage your engine if
they are not removed regularly.
Changing the oil and filter requires
special tools and access from
underneath the vehicle. The vehicle should be raised on a service station-
type hydraulic lift for this service. Unless you have the knowledge and
proper equipment, you should have
this maintenance done by a skilled mechanic.
1. Run the engine until it reaches normal operating temperature,
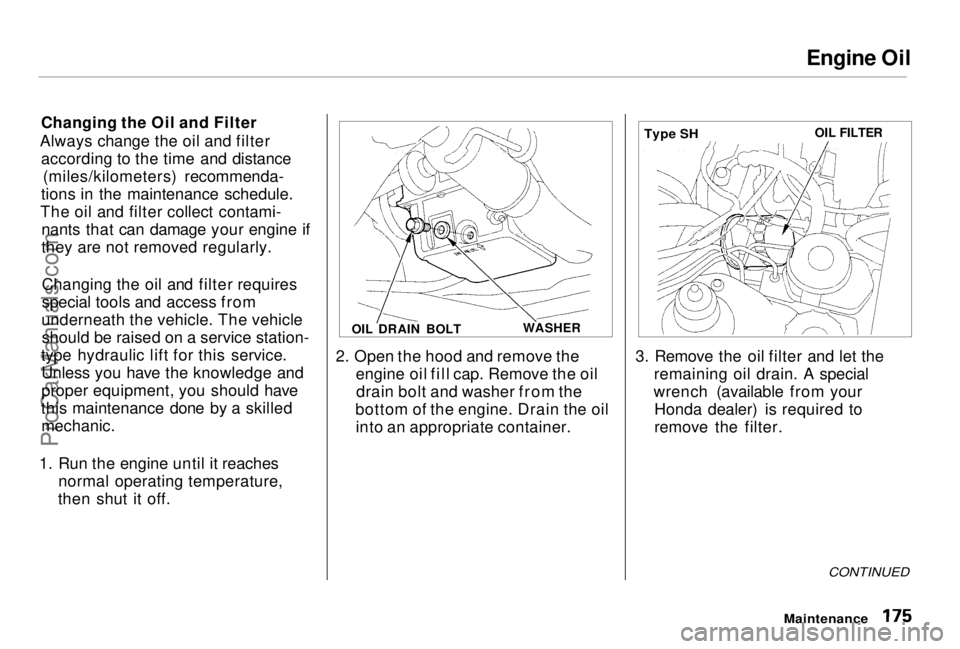
then shut it off. 2. Open the hood and remove the
engine oil fill cap. Remove the oildrain bolt and washer from the
bottom of the engine. Drain the oil into an appropriate container. 3. Remove the oil filter and let the
remaining oil drain. A special
wrench (available from your Honda dealer) is required to
remove the filter.
CONTINUED
Maintenance
OIL DRAIN BOLT
WASHER OIL FILTER
Type SHProCarManuals.comMain Menu Table of Contents s t
Page 175 of 278
Engine Oil
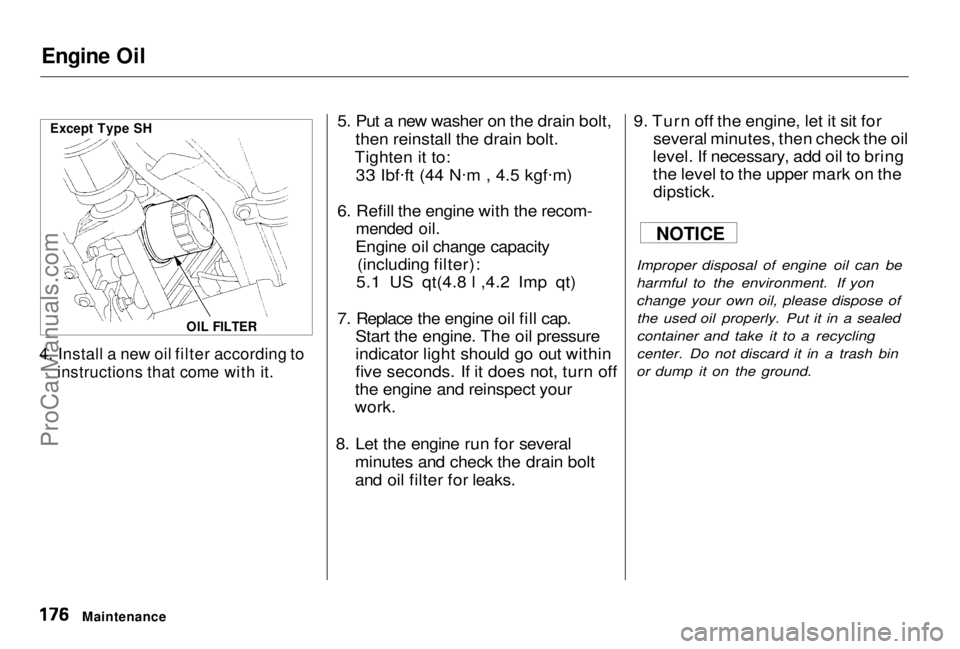
4. Install a new oil filter according to
instructions that come with it.
5. Put a new washer on the drain bolt,
then reinstall the drain bolt.
Tighten it to:
33 Ibf .
ft (44 N .
m , 4.5 kgf .
m)
6. Refill the engine with the recom-
mended oil.
Engine oil change capacity (including filter):
5.1 US qt(4.8 l ,4.2 Imp qt)
7. Replace the engine oil fill cap. Start the engine. The oil pressure
indicator light should go out within
five seconds. If it does not, turn off
the engine and reinspect your
work.
8. Let the engine run for several minutes and check the drain bolt
and oil filter for leaks. 9. Turn off the engine, let it sit for
several minutes, then check the oil
level. If necessary, add oil to bring
the level to the upper mark on the
dipstick.
Improper disposal of engine oil can be
harmful to the environment. If yon
change your own oil, please dispose of the used oil properly. Put it in a sealed
container and take it to a recycling
center. Do not discard it in a trash bin
or dump it on the ground.
Maintenance
OIL FILTER
Except Type SH
NOTICE
ProCarManuals.comMain Menu Table of Contents s t
Page 176 of 278
Cooling System
Adding Engine Coolant
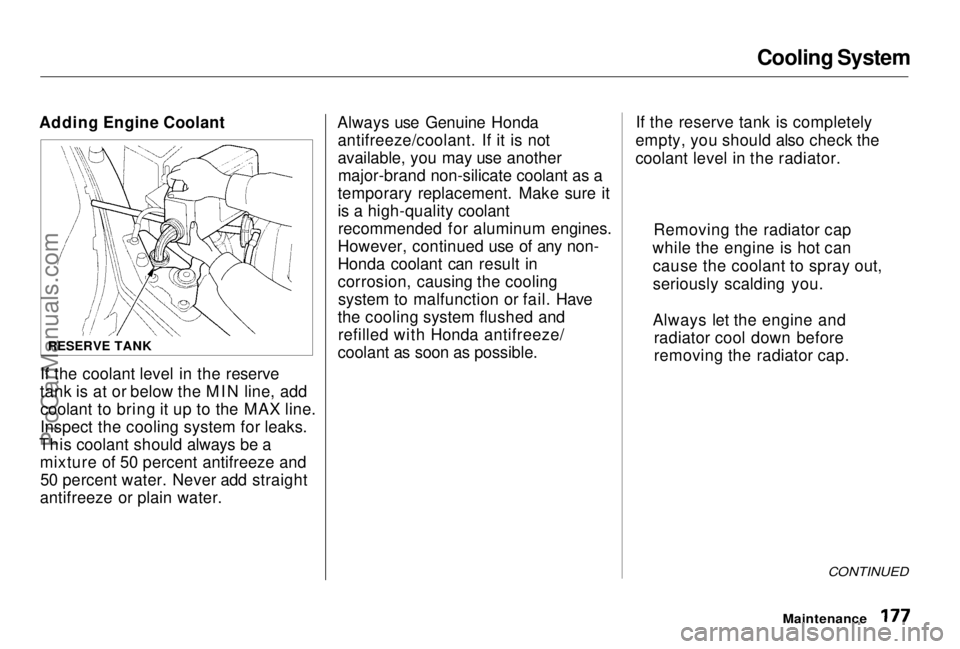
If the coolant level in the reserve
tank is at or below the MIN line, add coolant to bring it up to the MAX line.
Inspect the cooling system for leaks.
This coolant should always be a mixture of 50 percent antifreeze and50 percent water. Never add straight
antifreeze or plain water. Always use Genuine Honda
antifreeze/coolant. If it is not
available, you may use anothermajor-brand non-silicate coolant as a
temporary replacement. Make sure it
is a high-quality coolant recommended for aluminum engines.
However, continued use of any non-
Honda coolant can result in
corrosion, causing the cooling system to malfunction or fail. Have
the cooling system flushed and refilled with Honda antifreeze/
coolant as soon as possible. If the reserve tank is completely
empty, you should also check the
coolant level in the radiator.
CONTINUED
Maintenance
RESERVE TANK
Removing the radiator cap
while the engine is hot can cause the coolant to spray out,
seriously scalding you.
Always let the engine and radiator cool down before
removing the radiator cap.ProCarManuals.comMain Menu Table of Contents s t
Page 177 of 278
Cooling System
1. Make sure the engine and radiator are cool.
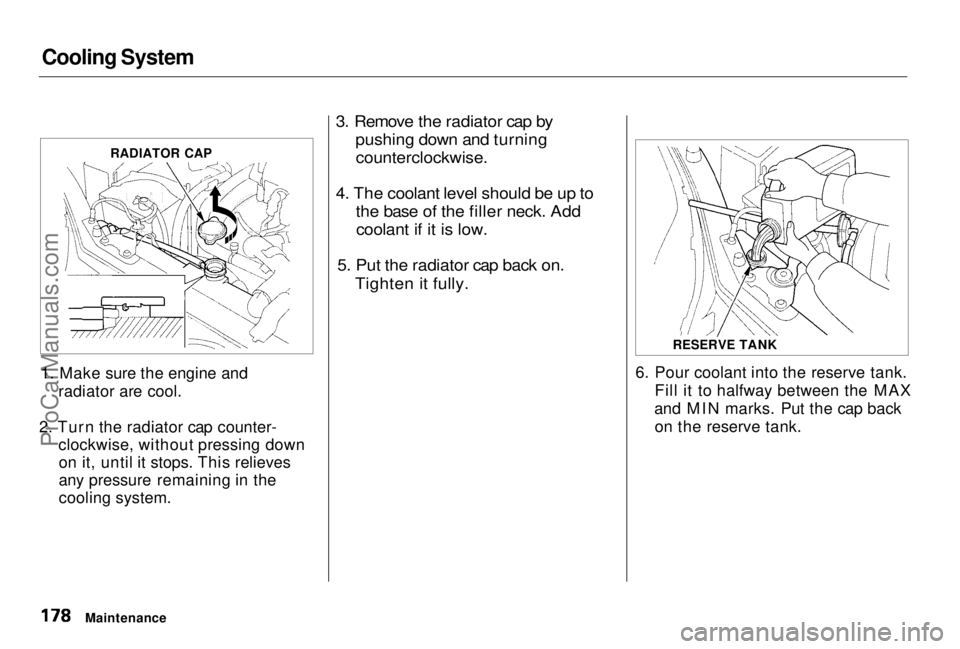
2. Turn the radiator cap counter- clockwise, without pressing downon it, until it stops. This relieves
any pressure remaining in the
cooling system.
3. Remove the radiator cap by
pushing down and turning
counterclockwise.
4. The coolant level should be up to the base of the filler neck. Addcoolant if it is low.
5. Put the radiator cap back on. Tighten it fully.
6. Pour coolant into the reserve tank.Fill it to halfway between the MAX
and MIN marks. Put the cap back on the reserve tank.
Maintenance RADIATOR CAP
RESERVE TANKProCarManuals.comMain Menu Table of Contents s t
Page 178 of 278
Cooling System
Do not add any rust inhibitors or
other additives to your vehicle's
cooling system. They may not be
compatible with the coolant or engine components.
Replacing Engine Coolant
The cooling system should be completely drained and refilled with
new coolant according to the time
and distance recommendations in
the maintenance schedule. Only useGenuine Honda antifreeze/coolant.
Draining the coolant requires access
to the underside of the vehicle. Unless you have the tools and
knowledge, you should have this maintenance done by a skilled
mechanic. 1. Slide the heater temperature
control lever to maximum heat.Open the hood. Make sure the
engine and radiator are cool to the
touch.
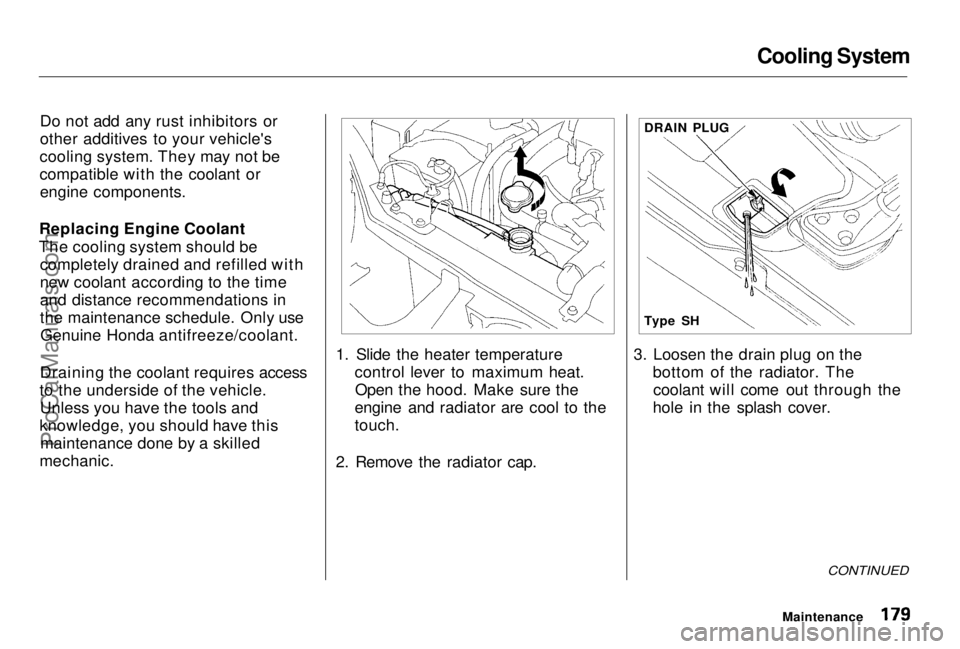
2. Remove the radiator cap. 3. Loosen the drain plug on the
bottom of the radiator. Thecoolant will come out through the
hole in the splash cover.
CONTINUED
Maintenance
DRAIN PLUG
Type SHProCarManuals.comMain Menu Table of Contents s t
Page 179 of 278
Cooling System
Except Type SH only
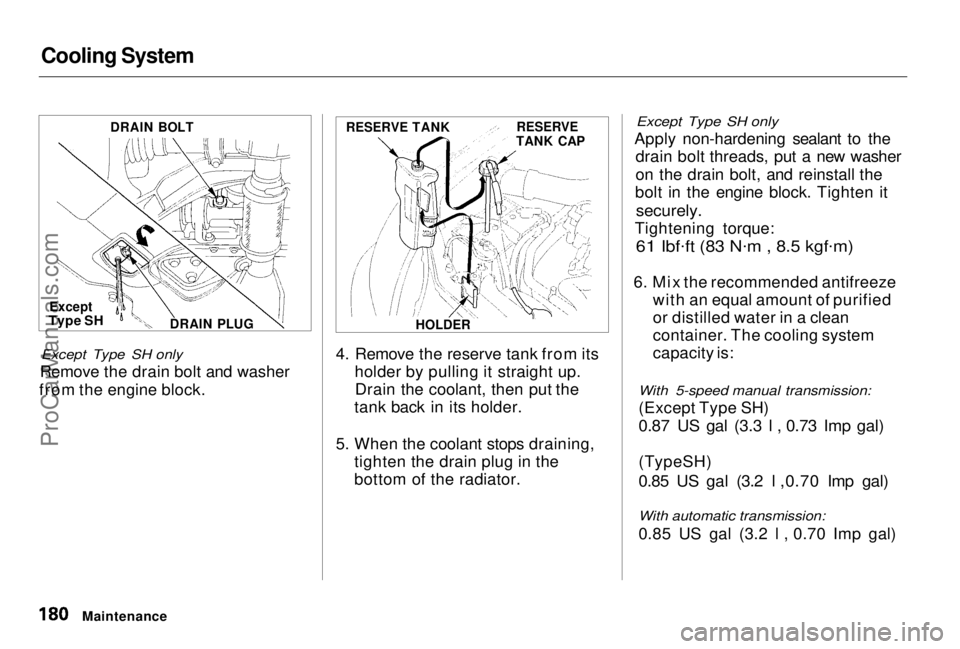
Remove the drain bolt and washer
from the engine block. 4. Remove the reserve tank from its
holder by pulling it straight up.Drain the coolant, then put the
tank back in its holder.
5. When the coolant stops draining, tighten the drain plug in the
bottom of the radiator.
Except Type SH only
Apply non-hardening sealant to the drain bolt threads, put a new washer
on the drain bolt, and reinstall the
bolt in the engine block. Tighten it
securely.
Tightening torque:
61 Ibf .
ft (83 N .
m , 8.5 kgf .
m)
6. Mix the recommended antifreeze
with an equal amount of purified
or distilled water in a clean
container. The cooling system
capacity is:
With 5-speed manual transmission:
(Except Type SH)
0.87 US gal (3.3 l , 0.73 Imp gal)
(TypeSH)
0.85 US gal (3.2 l ,0.70 Imp gal)
With automatic transmission:
0.85 US gal (3.2 l , 0.70 Imp gal)
Maintenance
DRAIN BOLT
Except
Type SH
DRAIN PLUG
HOLDERRESERVE
TANK CAP
RESERVE TANK
ProCarManuals.comMain Menu Table of Contents s t
Page 180 of 278
Cooling System
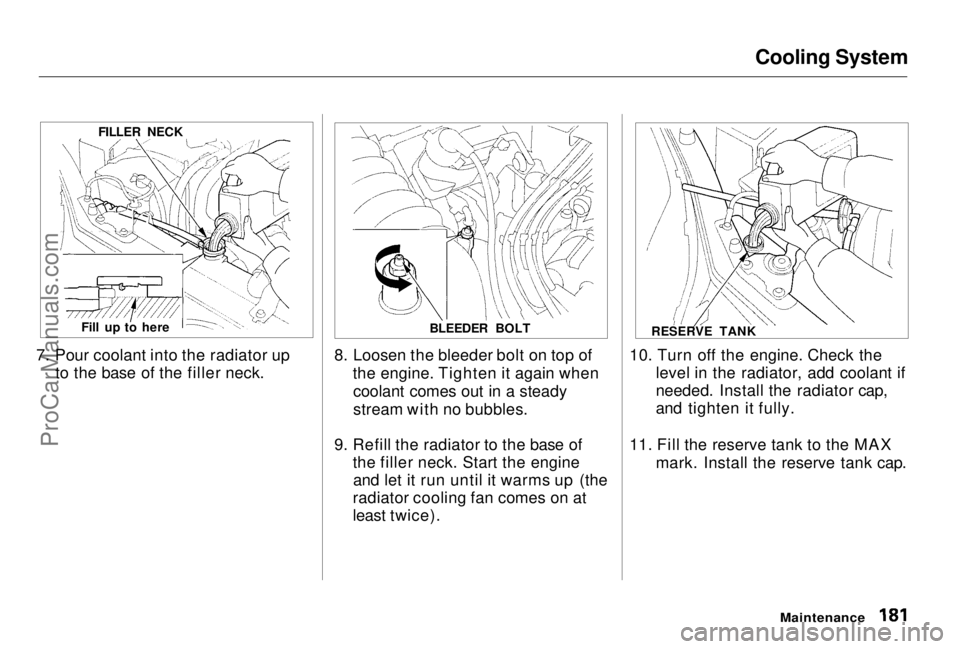
7. Pour coolant into the radiator up to the base of the filler neck. 8. Loosen the bleeder bolt on top of
the engine. Tighten it again whencoolant comes out in a steady
stream with no bubbles.
9. Refill the radiator to the base of the filler neck. Start the engineand let it run until it warms up (the
radiator cooling fan comes on at
least twice). 10. Turn off the engine. Check the
level in the radiator, add coolant if
needed. Install the radiator cap,
and tighten it fully.
11. Fill the reserve tank to the MAX mark. Install the reserve tank cap.
Maintenance
FILLER NECK
RESERVE TANK
BLEEDER BOLT
Fill up to hereProCarManuals.comMain Menu Table of Contents s t