Hyundai Coupe 2002 User Guide
Manufacturer: HYUNDAI, Model Year: 2002, Model line: Coupe, Model: Hyundai Coupe 2002Pages: 140, PDF Size: 1.45 MB
Page 11 of 140

CONTROLS AND EQUIPMENT1- 3
SB040B1-F Locking, unlocking front doors with a key
o The door can be locked or unlocked with a key.
o Lock the door by turning the key toward the
front of the vehicle and unlock it by turning thekey toward the rear.
HGK101-D
UNLOCK
LOCKHGK099-D
B040C01S-AAT Locking From the Outside The doors can be locked without a key. To lock the doors from the outside, first push the inside lock switch to the "LOCK" position, so that the red mark on the switch is not visible, then close the door. NOTE:
o When locking the door this way, be carefulnot to lock the door with the ignition keyleft in the vehicle.
o To protect against theft, always remove the ignition key, close all windows, and lock all doors when leaving your vehicle unattended.
HGK208-D
UNLOCK
LOCK
B040D01S-AAT Locking From the Inside To lock the doors from the inside, simply close the door and push the lock switch to the "LOCK" position. When this is done, neither the outside nor the inside door handle can be used. NOTE: When the door is locked, the red mark on the switch is not visible.
Page 12 of 140
CONTROLS AND EQUIPMENT
1- 4
HGK099-D
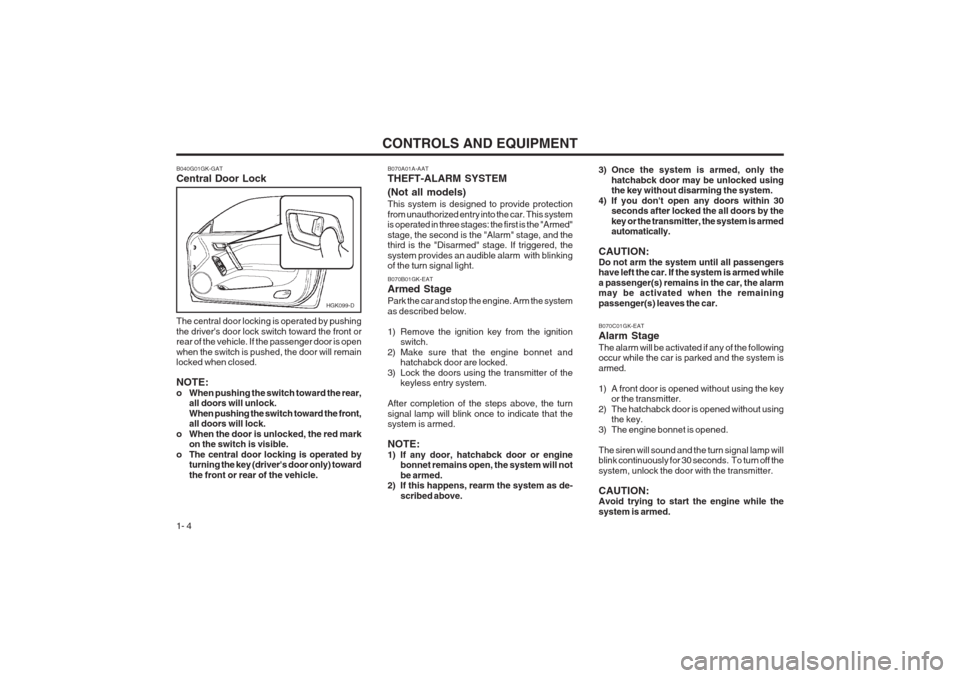
B040G01GK-GAT Central Door Lock The central door locking is operated by pushing the driver's door lock switch toward the front or rear of the vehicle. If the passenger door is open when the switch is pushed, the door will remain locked when closed. NOTE:
o When pushing the switch toward the rear, all doors will unlock.When pushing the switch toward the front, all doors will lock.
o When the door is unlocked, the red mark on the switch is visible.
o The central door locking is operated by turning the key (driver's door only) toward the front or rear of the vehicle. B070A01A-AAT THEFT-ALARM SYSTEM (Not all models) This system is designed to provide protection from unauthorized entry into the car. This system is operated in three stages: the first is the "Armed" stage, the second is the "Alarm" stage, and the third is the "Disarmed" stage. If triggered, the system provides an audible alarm with blinking of the turn signal light.
B070C01GK-EAT Alarm Stage The alarm will be activated if any of the following occur while the car is parked and the system is armed.
1) A front door is opened without using the keyor the transmitter.
2) The hatchabck door is opened without using the key.
3) The engine bonnet is opened.The siren will sound and the turn signal lamp will blink continuously for 30 seconds. To turn off the system, unlock the door with the transmitter. CAUTION: Avoid trying to start the engine while the system is armed.
B070B01GK-EAT Armed Stage Park the car and stop the engine. Arm the system as described below.
1) Remove the ignition key from the ignition
switch.
2) Make sure that the engine bonnet and hatchabck door are locked.
3) Lock the doors using the transmitter of the keyless entry system.
After completion of the steps above, the turn signal lamp will blink once to indicate that the system is armed. NOTE:
1) If any door, hatchabck door or engine bonnet remains open, the system will notbe armed.
2) If this happens, rearm the system as de-
scribed above. 3) Once the system is armed, only the
hatchabck door may be unlocked using the key without disarming the system.
4) If you don't open any doors within 30 seconds after locked the all doors by the key or the transmitter, the system is armed automatically.
CAUTION: Do not arm the system until all passengers have left the car. If the system is armed while a passenger(s) remains in the car, the alarm may be activated when the remaining passenger(s) leaves the car.
Page 13 of 140
CONTROLS AND EQUIPMENT1- 5
HGK102-D
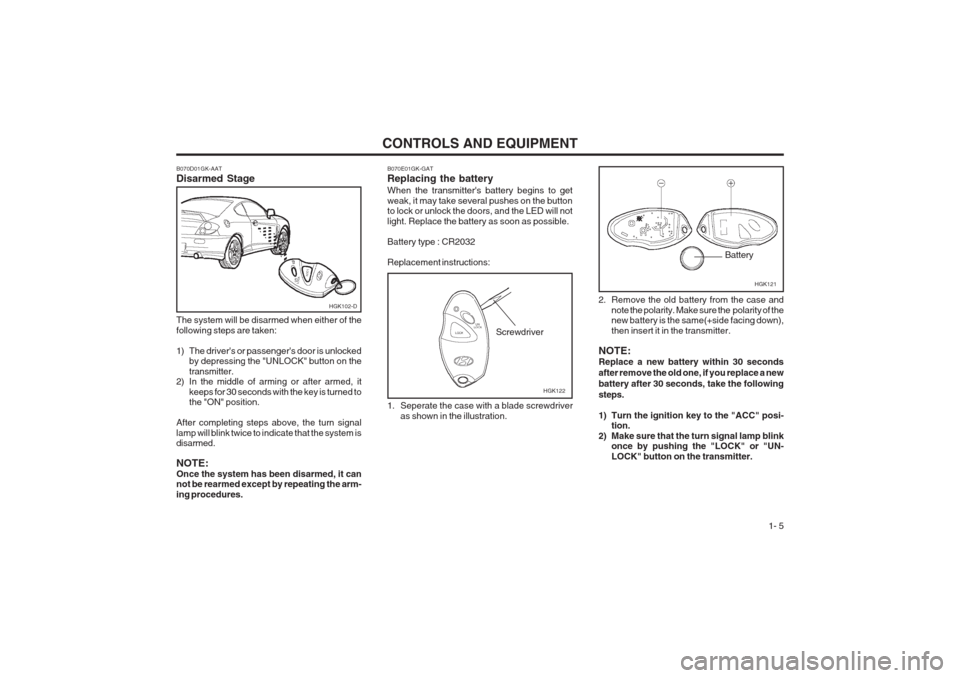
B070E01GK-GAT Replacing the battery When the transmitter's battery begins to get weak, it may take several pushes on the button to lock or unlock the doors, and the LED will not light. Replace the battery as soon as possible. Battery type : CR2032Replacement instructions:
1. Seperate the case with a blade screwdriveras shown in the illustration.
B070D01GK-AAT Disarmed Stage The system will be disarmed when either of the following steps are taken:
1) The driver's or passenger's door is unlocked
by depressing the "UNLOCK" button on the transmitter.
2) In the middle of arming or after armed, it
keeps for 30 seconds with the key is turned to the "ON" position.
After completing steps above, the turn signal lamp will blink twice to indicate that the system is disarmed. NOTE: Once the system has been disarmed, it can not be rearmed except by repeating the arm- ing procedures.
HGK122
Screwdriver 2. Remove the old battery from the case and
note the polarity. Make sure the polarity of the new battery is the same(+side facing down), then insert it in the transmitter.
NOTE: Replace a new battery within 30 seconds after remove the old one, if you replace a newbattery after 30 seconds, take the followingsteps.
1) Turn the ignition key to the "ACC" posi- tion.
2) Make sure that the turn signal lamp blink once by pushing the "LOCK" or "UN- LOCK" button on the transmitter.
HGK121
Battery
Page 14 of 140
CONTROLS AND EQUIPMENT
1- 6
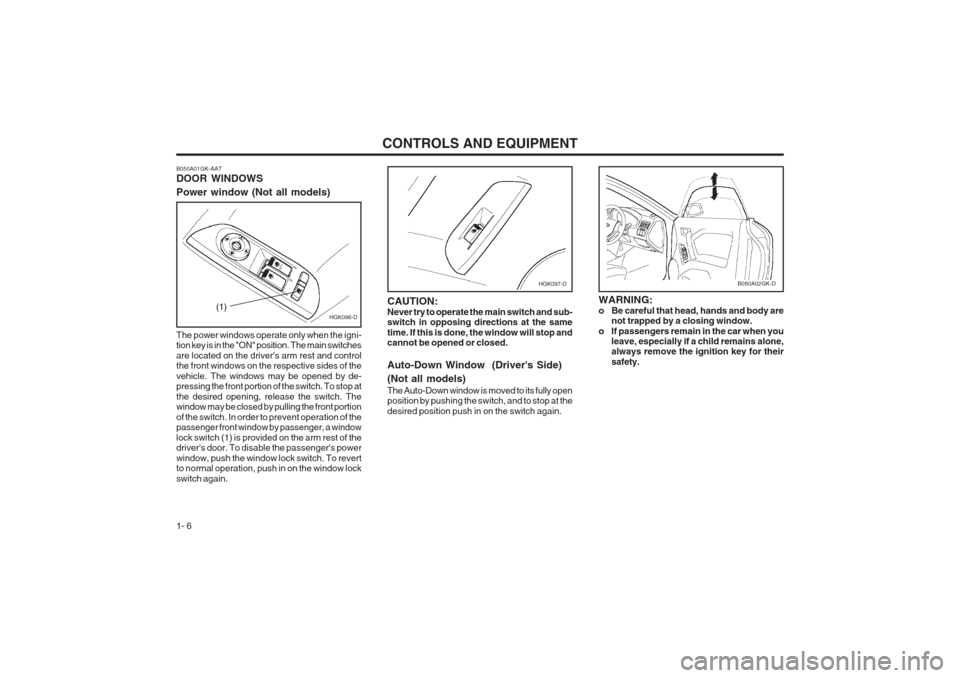
B050A01GK-AAT DOOR WINDOWS Power window (Not all models)
HGK096-D(1)
HGK097-D
The power windows operate only when the igni- tion key is in the "ON" position. The main switches are located on the driver's arm rest and control the front windows on the respective sides of the vehicle. The windows may be opened by de- pressing the front portion of the switch. To stop at the desired opening, release the switch. The window may be closed by pulling the front portion of the switch. In order to prevent operation of the passenger front window by passenger, a window lock switch (1) is provided on the arm rest of the driver's door. To disable the passenger's power window, push the window lock switch. To revert to normal operation, push in on the window lock switch again.
CAUTION:Never try to operate the main switch and sub- switch in opposing directions at the same time. If this is done, the window will stop and cannot be opened or closed. Auto-Down Window (Driver's Side) (Not all models) The Auto-Down window is moved to its fully open position by pushing the switch, and to stop at the desired position push in on the switch again.
B050A02GK-D
WARNING:
o Be careful that head, hands and body are
not trapped by a closing window.
o If passengers remain in the car when you leave, especially if a child remains alone, always remove the ignition key for their safety.
Page 15 of 140
CONTROLS AND EQUIPMENT1- 7
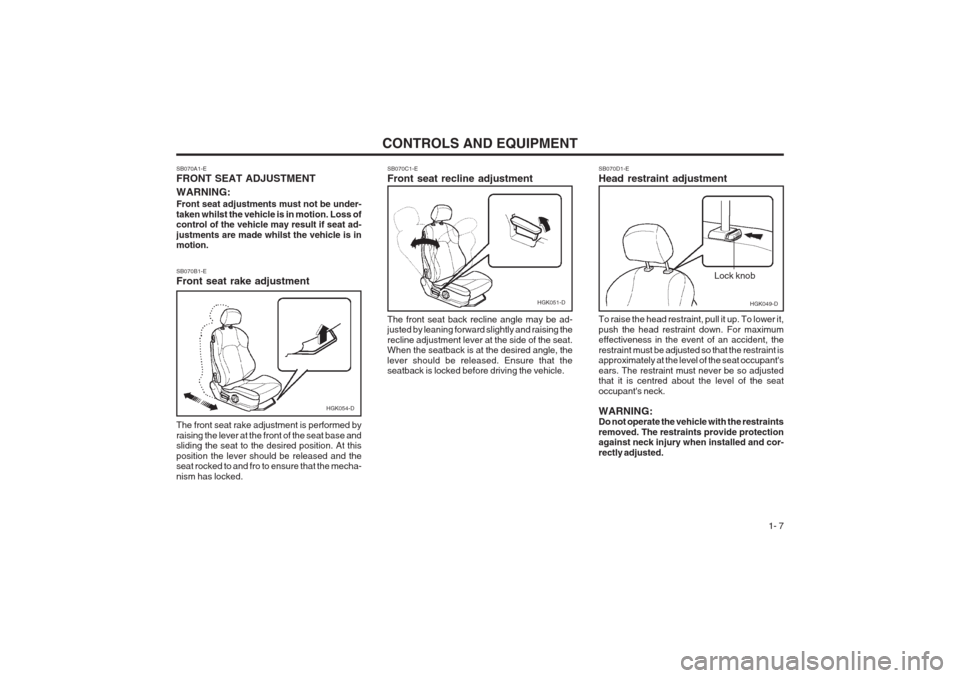
SB070A1-E FRONT SEAT ADJUSTMENT WARNING: Front seat adjustments must not be under- taken whilst the vehicle is in motion. Loss of control of the vehicle may result if seat ad- justments are made whilst the vehicle is in motion. SB070B1-E Front seat rake adjustment The front seat rake adjustment is performed by raising the lever at the front of the seat base and sliding the seat to the desired position. At this position the lever should be released and the seat rocked to and fro to ensure that the mecha- nism has locked.
HGK054-D
SB070C1-E Front seat recline adjustment The front seat back recline angle may be ad- justed by leaning forward slightly and raising the recline adjustment lever at the side of the seat. When the seatback is at the desired angle, the lever should be released. Ensure that the seatback is locked before driving the vehicle.
HGK051-D
SB070D1-E Head restraint adjustment To raise the head restraint, pull it up. To lower it, push the head restraint down. For maximum effectiveness in the event of an accident, the restraint must be adjusted so that the restraint is approximately at the level of the seat occupant's ears. The restraint must never be so adjusted that it is centred about the level of the seat occupant's neck. WARNING: Do not operate the vehicle with the restraints removed. The restraints provide protection against neck injury when installed and cor- rectly adjusted.
HGK049-D
Lock knob
Page 16 of 140
CONTROLS AND EQUIPMENT
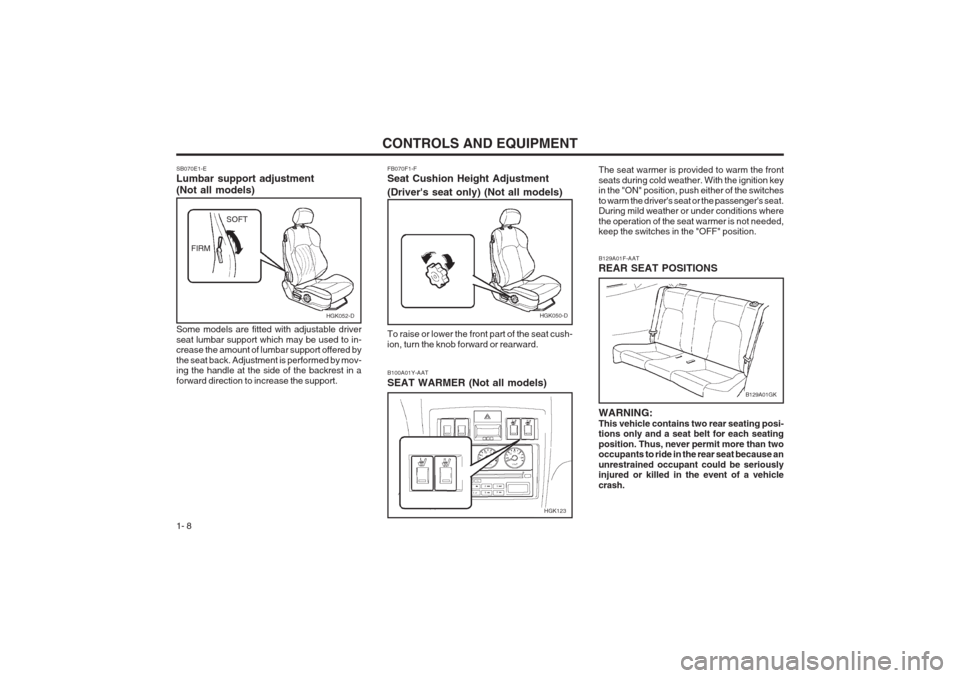
1- 8 FB070F1-F Seat Cushion Height Adjustment (Driver's seat only) (Not all models) To raise or lower the front part of the seat cush- ion, turn the knob forward or rearward.
B129A01F-AAT REAR SEAT POSITIONS WARNING: This vehicle contains two rear seating posi- tions only and a seat belt for each seating position. Thus, never permit more than two occupants to ride in the rear seat because an unrestrained occupant could be seriously injured or killed in the event of a vehicle crash.
SB070E1-E Lumbar support adjustment (Not all models) Some models are fitted with adjustable driver seat lumbar support which may be used to in- crease the amount of lumbar support offered by the seat back. Adjustment is performed by mov- ing the handle at the side of the backrest in a forward direction to increase the support.
HGK052-D
FIRM
SOFT
HGK050-D
B129A01GK
B100A01Y-AAT SEAT WARMER (Not all models) The seat warmer is provided to warm the front seats during cold weather. With the ignition key in the "ON" position, push either of the switches to warm the driver's seat or the passenger's seat. During mild weather or under conditions where the operation of the seat warmer is not needed, keep the switches in the "OFF" position.
HGK123
Page 17 of 140

CONTROLS AND EQUIPMENT1- 9
B099A01F-AAT BEFORE FOLDING THE REAR SEATS In order to prevent the shoulder belt from being damaged, the shoulder belt must be passed through the hanger. And then fold the rear seat downwards. CAUTION: Seat belt must be removed from the hanger when seat belt is in use.
B130A01GK-DAT REAR SEAT ENTRY (Walk in device) The driver and front passenger's seatback should be tilted to enter the rear seat.
HGK053-D
(2)
(1)
By pulling up the walk in device lever (1) at the right-up side of the driver side seatback, the seatback will tilt forward. And then pull the lock release lever (2) up with moving the seat forward.
HGK240-D
(1)
By pulling up the walk in device lever (1) at the left-up side of the passenger side seatback, the seatback will tilt forward. And then push the seat forward to enter the occupants. Recliner Memory By pulling up the walk in device lever (1) seatback is reclined and return to the memorized original position. WARNING: Don't drive with reclining of the passenger side seatback. It is dangerous to move it. Be sure the seatback is fix firmly or not before driving.
B099A01GK
Page 18 of 140
CONTROLS AND EQUIPMENT
1- 10 SB090E1-E Injured Persons A seat belt should be used when an injured person is being transported. For specific recom- mendations, the advice of a qualified Medical Practioner should be sought.
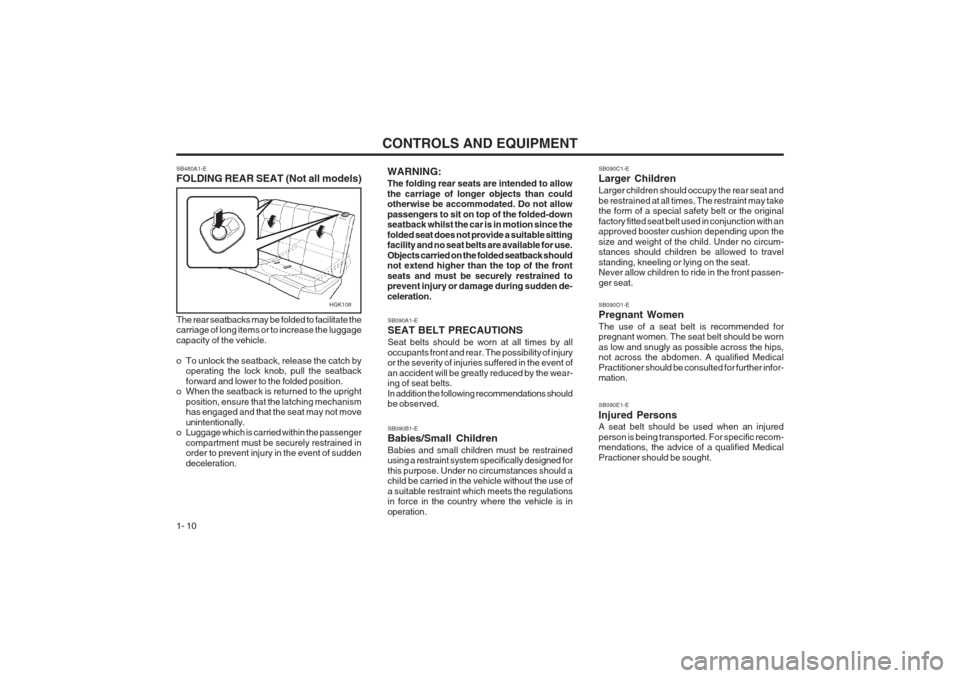
SB480A1-E FOLDING REAR SEAT (Not all models) The rear seatbacks may be folded to facilitate the carriage of long items or to increase the luggage capacity of the vehicle.
o To unlock the seatback, release the catch by
operating the lock knob, pull the seatback forward and lower to the folded position.
o When the seatback is returned to the upright
position, ensure that the latching mechanism has engaged and that the seat may not move unintentionally.
o Luggage which is carried within the passenger
compartment must be securely restrained in order to prevent injury in the event of sudden deceleration. WARNING: The folding rear seats are intended to allow the carriage of longer objects than could otherwise be accommodated. Do not allow passengers to sit on top of the folded-down seatback whilst the car is in motion since the folded seat does not provide a suitable sitting facility and no seat belts are available for use. Objects carried on the folded seatback should not extend higher than the top of the front seats and must be securely restrained to prevent injury or damage during sudden de- celeration.
SB090A1-E SEAT BELT PRECAUTIONS Seat belts should be worn at all times by all occupants front and rear. The possibility of injury or the severity of injuries suffered in the event of an accident will be greatly reduced by the wear- ing of seat belts. In addition the following recommendations should be observed. SB090B1-E Babies/Small Children Babies and small children must be restrained using a restraint system specifically designed for this purpose. Under no circumstances should a child be carried in the vehicle without the use of a suitable restraint which meets the regulations in force in the country where the vehicle is in operation. SB090C1-E Larger Children Larger children should occupy the rear seat and be restrained at all times. The restraint may take the form of a special safety belt or the original factory fitted seat belt used in conjunction with an approved booster cushion depending upon the size and weight of the child. Under no circum- stances should children be allowed to travel standing, kneeling or lying on the seat. Never allow children to ride in the front passen- ger seat. SB090O1-E Pregnant Women The use of a seat belt is recommended for pregnant women. The seat belt should be worn as low and snugly as possible across the hips, not across the abdomen. A qualified Medical Practitioner should be consulted for further infor- mation.
HGK108
Page 19 of 140
CONTROLS AND EQUIPMENT1- 11
SB090F1-E Seat Belt Occupancy The seat belts are designed to be used by one seat occupant only. The use of a seat belt by more than one person increases the levels of injury which may be sustained in the event of an accident. SE090G1-E Do Not Lie Down To ensure that the maximum level of protection may be afforded by the seat belt system, all passengers should be sitting in an upright posi- tion throughout the journey. The seat belt will be unable to afford maximum protection if the front seats are at or near the fully reclined position. SB090H1-E CARE OF SEAT BELTS Seat belt assemblies must never be disassembled or modified in any way. In addition, care should be exercised to ensure that the belt assemblies do not become damaged by being trapped in seat mechanisms, door shuts etc. SB090I-E Periodic Inspection It is recommended that all seat belts be inspected periodically for wear or damage of any kind. Parts of the system that are damaged should be replaced as soon as possible. Under no circum- stances must any part of the seat belt assem- blies be dismantled or repaired.
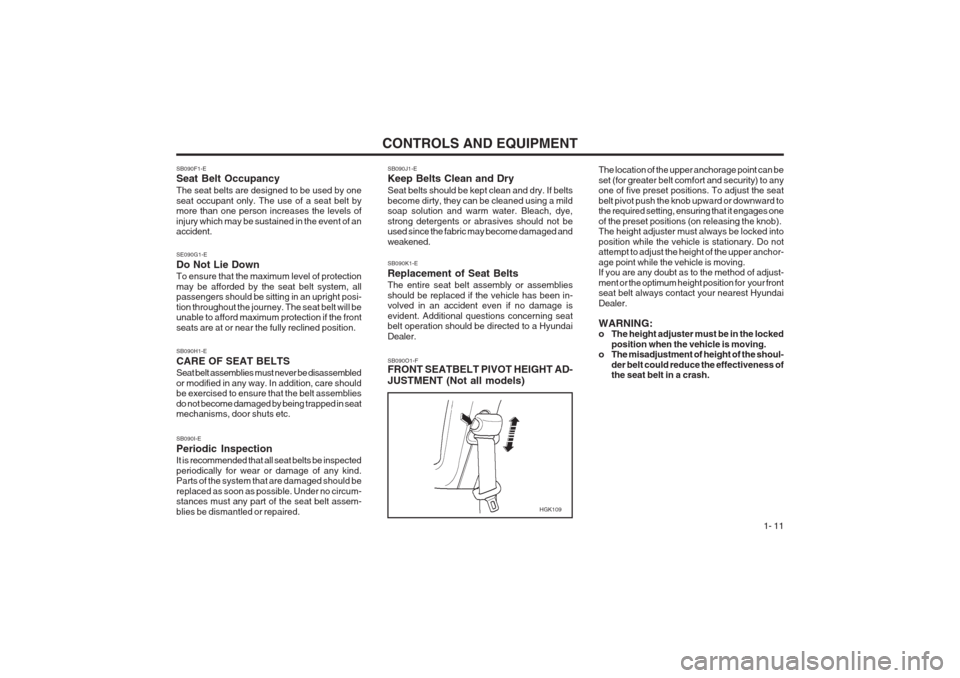
SB090J1-E Keep Belts Clean and Dry Seat belts should be kept clean and dry. If belts become dirty, they can be cleaned using a mild soap solution and warm water. Bleach, dye, strong detergents or abrasives should not be used since the fabric may become damaged and weakened. SB090K1-E Replacement of Seat Belts The entire seat belt assembly or assemblies should be replaced if the vehicle has been in- volved in an accident even if no damage is evident. Additional questions concerning seat belt operation should be directed to a Hyundai Dealer. SB090O1-F FRONT SEATBELT PIVOT HEIGHT AD- JUSTMENT (Not all models)
The location of the upper anchorage point can be set (for greater belt comfort and security) to any one of five preset positions. To adjust the seat belt pivot push the knob upward or downward to the required setting, ensuring that it engages one of the preset positions (on releasing the knob). The height adjuster must always be locked into position while the vehicle is stationary. Do not attempt to adjust the height of the upper anchor- age point while the vehicle is moving. If you are any doubt as to the method of adjust- ment or the optimum height position for your front seat belt always contact your nearest Hyundai Dealer. WARNING:
o The height adjuster must be in the locked
position when the vehicle is moving.
o The misadjustment of height of the shoul-
der belt could reduce the effectiveness ofthe seat belt in a crash.
HGK109
Page 20 of 140
CONTROLS AND EQUIPMENT
1- 12 SB090R1-F To Release the Seat Belt
FUD1090R
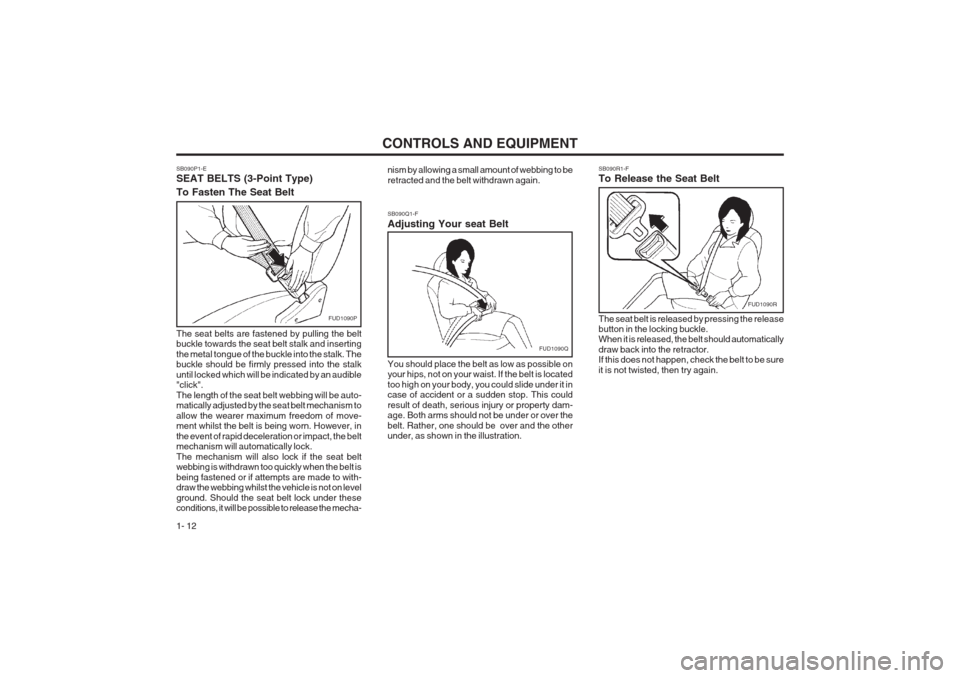
The seat belt is released by pressing the release button in the locking buckle.When it is released, the belt should automatically draw back into the retractor. If this does not happen, check the belt to be sure it is not twisted, then try again.
SB090P1-E SEAT BELTS (3-Point Type) To Fasten The Seat Belt
SB090Q1-F Adjusting Your seat BeltFUD1090P
The seat belts are fastened by pulling the belt buckle towards the seat belt stalk and inserting the metal tongue of the buckle into the stalk. The buckle should be firmly pressed into the stalk until locked which will be indicated by an audible "click". The length of the seat belt webbing will be auto- matically adjusted by the seat belt mechanism to allow the wearer maximum freedom of move- ment whilst the belt is being worn. However, in the event of rapid deceleration or impact, the belt mechanism will automatically lock. The mechanism will also lock if the seat belt webbing is withdrawn too quickly when the belt is being fastened or if attempts are made to with- draw the webbing whilst the vehicle is not on level ground. Should the seat belt lock under these conditions, it will be possible to release the mecha-
FUD1090Q
You should place the belt as low as possible on your hips, not on your waist. If the belt is located too high on your body, you could slide under it in case of accident or a sudden stop. This could result of death, serious injury or property dam- age. Both arms should not be under or over the belt. Rather, one should be over and the other under, as shown in the illustration.
nism by allowing a small amount of webbing to be retracted and the belt withdrawn again.