Hyundai Coupe 2005 Owner's Manual
Manufacturer: HYUNDAI, Model Year: 2005, Model line: Coupe, Model: Hyundai Coupe 2005Pages: 478, PDF Size: 13.44 MB
Page 431 of 478
6
OWNER MAINTENANCE
13
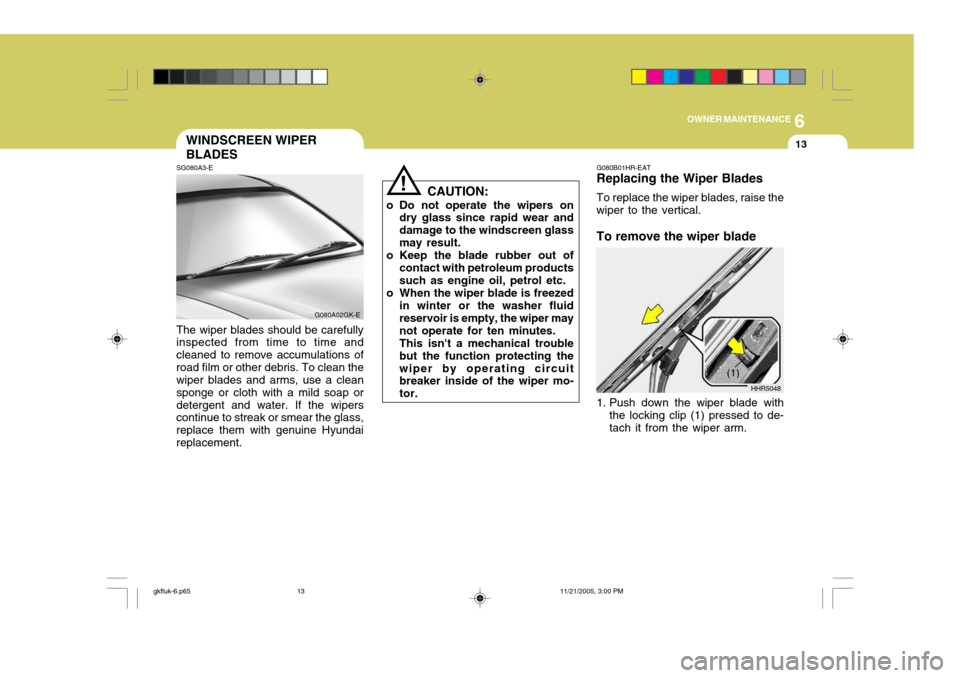
G080A02GK-E G080B01HR-EAT Replacing the Wiper Blades To replace the wiper blades, raise the wiper to the vertical. To remove the wiper blade
1. Push down the wiper blade with
the locking clip (1) pressed to de- tach it from the wiper arm. HHR5048
(1)
!
SG080A3-E
WINDSCREEN WIPER BLADES
The wiper blades should be carefully inspected from time to time and cleaned to remove accumulations ofroad film or other debris. To clean the wiper blades and arms, use a clean sponge or cloth with a mild soap ordetergent and water. If the wipers continue to streak or smear the glass, replace them with genuine Hyundaireplacement. CAUTION:
o Do not operate the wipers on dry glass since rapid wear anddamage to the windscreen glassmay result.
o Keep the blade rubber out of contact with petroleum products such as engine oil, petrol etc.
o When the wiper blade is freezed in winter or the washer fluidreservoir is empty, the wiper may not operate for ten minutes.This isn't a mechanical troublebut the function protecting thewiper by operating circuit breaker inside of the wiper mo- tor.
gkfluk-6.p65 11/21/2005, 3:00 PM
13
Page 432 of 478
6OWNER MAINTENANCE
14
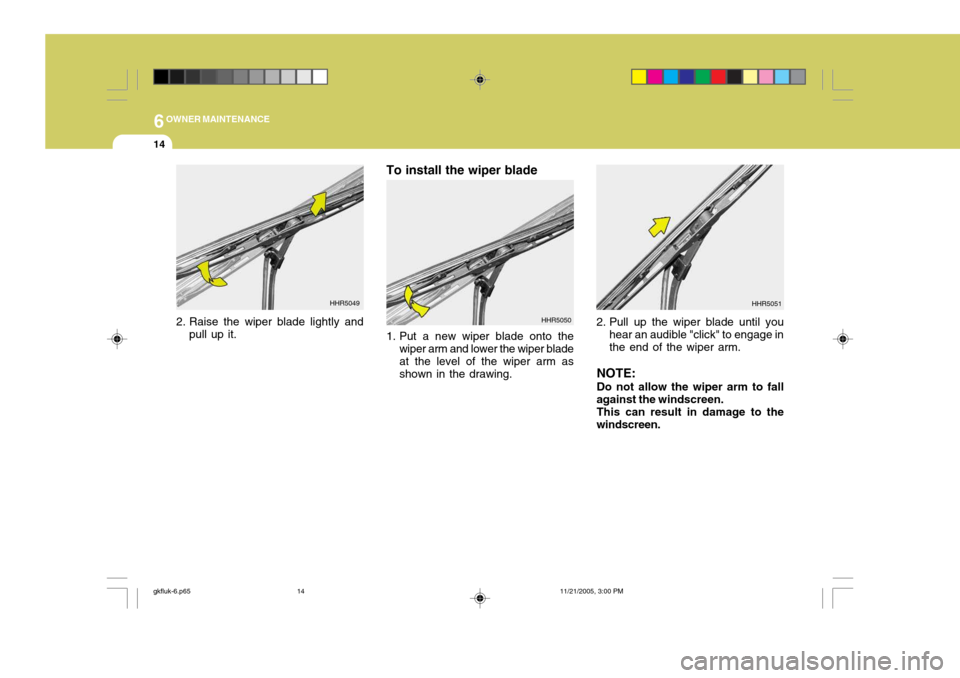
2. Raise the wiper blade lightly and
pull up it. To install the wiper blade
1. Put a new wiper blade onto the
wiper arm and lower the wiper blade at the level of the wiper arm asshown in the drawing.
HHR5049
HHR50502. Pull up the wiper blade until you
hear an audible "click" to engage in the end of the wiper arm.
NOTE: Do not allow the wiper arm to fall
against the windscreen. This can result in damage to the
windscreen. HHR5051
gkfluk-6.p65
11/21/2005, 3:00 PM
14
Page 433 of 478
6
OWNER MAINTENANCE
15MANUAL TRANSAXLE LUBRICANT
HGK5009
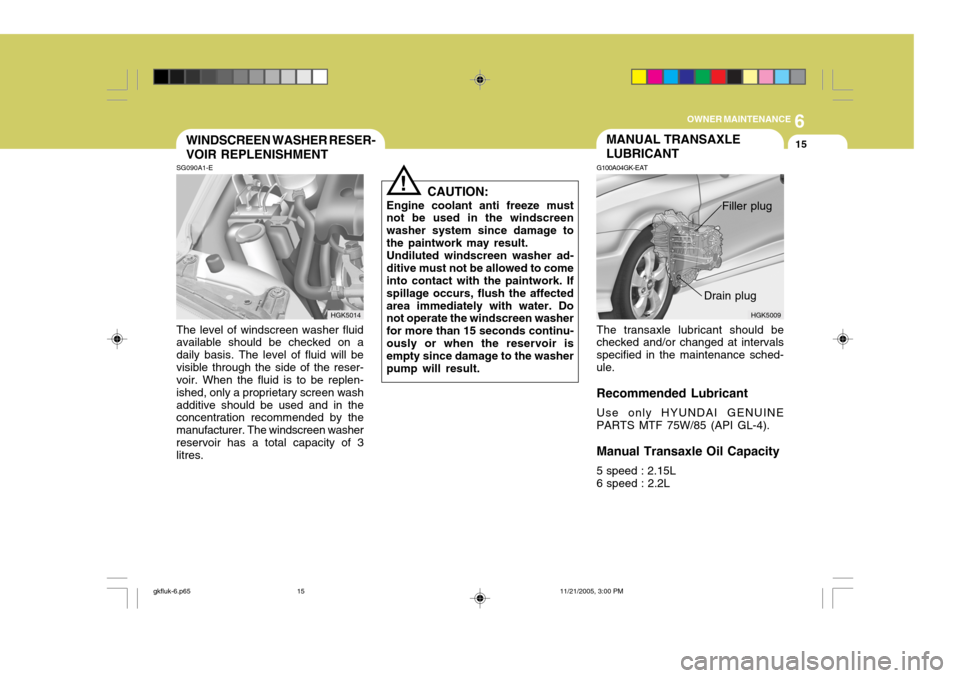
G100A04GK-EAT The transaxle lubricant should be checked and/or changed at intervals specified in the maintenance sched-ule. Recommended Lubricant Use only HYUNDAI GENUINE PARTS MTF 75W/85 (API GL-4). Manual Transaxle Oil Capacity 5 speed : 2.15L 6 speed : 2.2L Drain plugSG090A1-E The level of windscreen washer fluid available should be checked on a daily basis. The level of fluid will bevisible through the side of the reser- voir. When the fluid is to be replen- ished, only a proprietary screen washadditive should be used and in the concentration recommended by the manufacturer. The windscreen washerreservoir has a total capacity of 3 litres. CAUTION:
Engine coolant anti freeze mustnot be used in the windscreen washer system since damage tothe paintwork may result.Undiluted windscreen washer ad-ditive must not be allowed to come into contact with the paintwork. If spillage occurs, flush the affectedarea immediately with water. Do not operate the windscreen washer for more than 15 seconds continu-ously or when the reservoir is empty since damage to the washer pump will result.
WINDSCREEN WASHER RESER- VOIR REPLENISHMENT
!
HGK5014
Filler plug
gkfluk-6.p65
11/21/2005, 3:00 PM
15
Page 434 of 478
6OWNER MAINTENANCE
16
!
G100B01L
WARNING:
The transaxle lubricant level should only be checked when the engineis cold to prelude the possibility of personal injury by contact with hot components. NOTE: It is recommended that the manual transaxle lubricant should bechecked by Hyundai authorised re- pairer.
1. To check the transaxle lubricant level, the vehicle should be placed on level ground and the level plug removed with a suitable spanner.
2. If the level is correct, lubricant should begin to drip from the plug orifice. In this case the plug shouldbe replaced.If the level is incorrect, lubricantshould be added until it begins todrip from the plug orifice at which time the plug should be replaced. To Check the Transaxle Oil Level
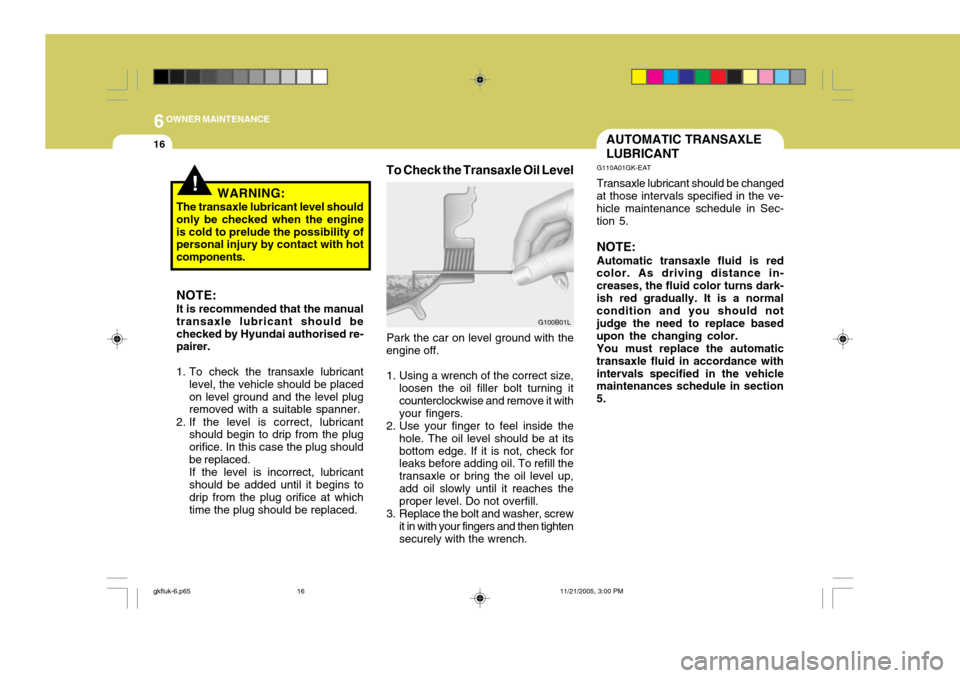
Park the car on level ground with the
engine off.
1. Using a wrench of the correct size, loosen the oil filler bolt turning it counterclockwise and remove it with your fingers.
2. Use your finger to feel inside the
hole. The oil level should be at itsbottom edge. If it is not, check for leaks before adding oil. To refill the transaxle or bring the oil level up,add oil slowly until it reaches the proper level. Do not overfill.
3. Replace the bolt and washer, screw it in with your fingers and then tightensecurely with the wrench.
AUTOMATIC TRANSAXLE LUBRICANT
G110A01GK-EAT Transaxle lubricant should be changed
at those intervals specified in the ve- hicle maintenance schedule in Sec-tion 5.
NOTE: Automatic transaxle fluid is red
color. As driving distance in- creases, the fluid color turns dark-ish red gradually. It is a normal condition and you should not judge the need to replace basedupon the changing color.
You must replace the automatic
transaxle fluid in accordance withintervals specified in the vehicle maintenances schedule in section 5.
gkfluk-6.p65 11/21/2005, 3:00 PM
16
Page 435 of 478
6
OWNER MAINTENANCE
17
HGK5007
HGK3025-E 1.6/2.0L
2.7L!
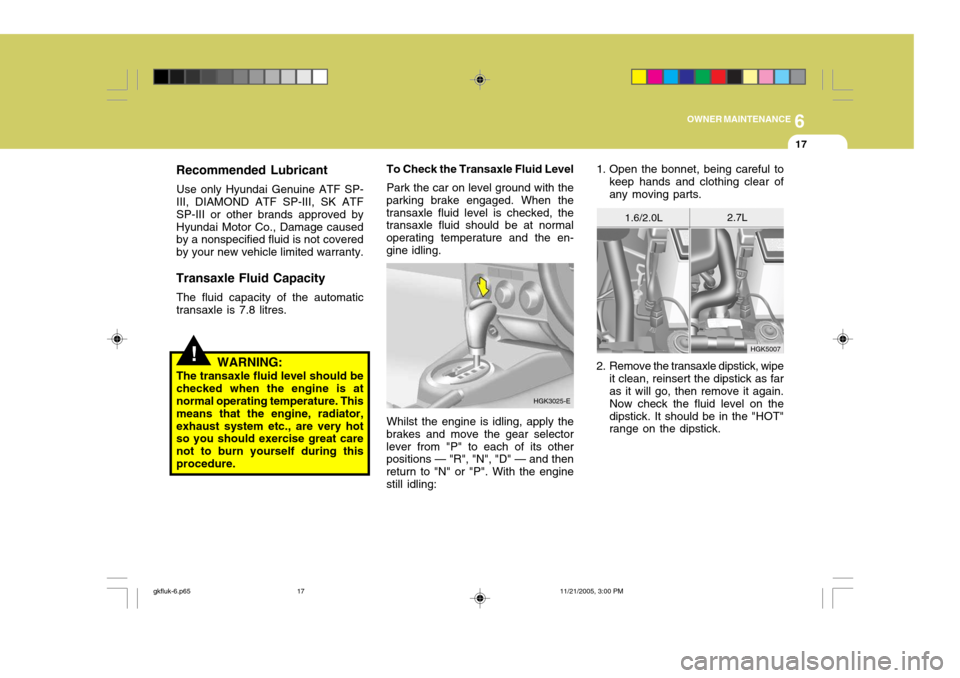
To Check the Transaxle Fluid Level Park the car on level ground with the
parking brake engaged. When the transaxle fluid level is checked, the transaxle fluid should be at normal operating temperature and the en-gine idling.
Whilst the engine is idling, apply the
brakes and move the gear selectorlever from "P" to each of its other positions — "R", "N", "D" — and then return to "N" or "P". With the enginestill idling:
Recommended Lubricant
Use only Hyundai Genuine ATF SP- III, DIAMOND ATF SP-III, SK ATF SP-III or other brands approved byHyundai Motor Co., Damage caused by a nonspecified fluid is not covered by your new vehicle limited warranty.
Transaxle Fluid Capacity The fluid capacity of the automatic transaxle is 7.8 litres.
WARNING:
The transaxle fluid level should be checked when the engine is at normal operating temperature. This means that the engine, radiator,exhaust system etc., are very hot so you should exercise great care not to burn yourself during thisprocedure. 1. Open the bonnet, being careful to
keep hands and clothing clear ofany moving parts.
2. Remove the transaxle dipstick, wipe it clean, reinsert the dipstick as far as it will go, then remove it again. Now check the fluid level on thedipstick. It should be in the "HOT" range on the dipstick.
gkfluk-6.p65 11/21/2005, 3:00 PM
17
Page 436 of 478
6OWNER MAINTENANCE
18
HGK5008
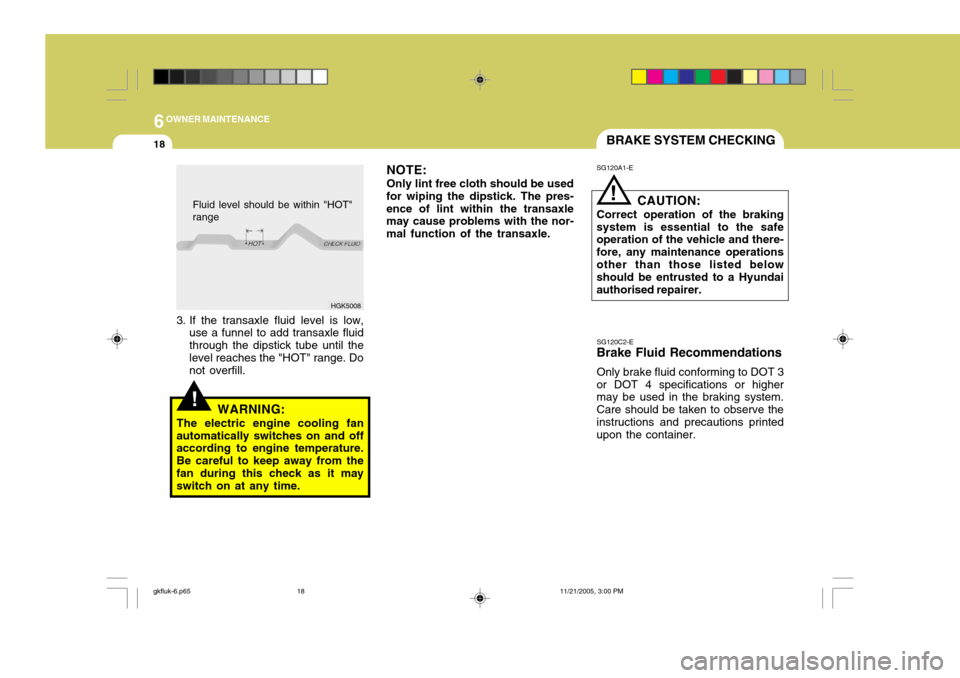
Fluid level should be within "HOT"
range
!
SG120A1-E BRAKE SYSTEM CHECKING
CAUTION:
Correct operation of the braking system is essential to the safe operation of the vehicle and there- fore, any maintenance operationsother than those listed below should be entrusted to a Hyundai authorised repairer.
NOTE: Only lint free cloth should be used
for wiping the dipstick. The pres- ence of lint within the transaxle may cause problems with the nor- mal function of the transaxle.
3. If the transaxle fluid level is low, use a funnel to add transaxle fluidthrough the dipstick tube until thelevel reaches the "HOT" range. Do not overfill.
!WARNING:
The electric engine cooling fan
automatically switches on and off according to engine temperature. Be careful to keep away from thefan during this check as it may switch on at any time. SG120C2-E
Brake Fluid Recommendations
Only brake fluid conforming to DOT 3
or DOT 4 specifications or highermay be used in the braking system. Care should be taken to observe theinstructions and precautions printed upon the container.
gkfluk-6.p65 11/21/2005, 3:00 PM
18
Page 437 of 478
6
OWNER MAINTENANCE
19
HGK5013-E
CHECKING THE CLUTCH FLUID
SG130A1-C
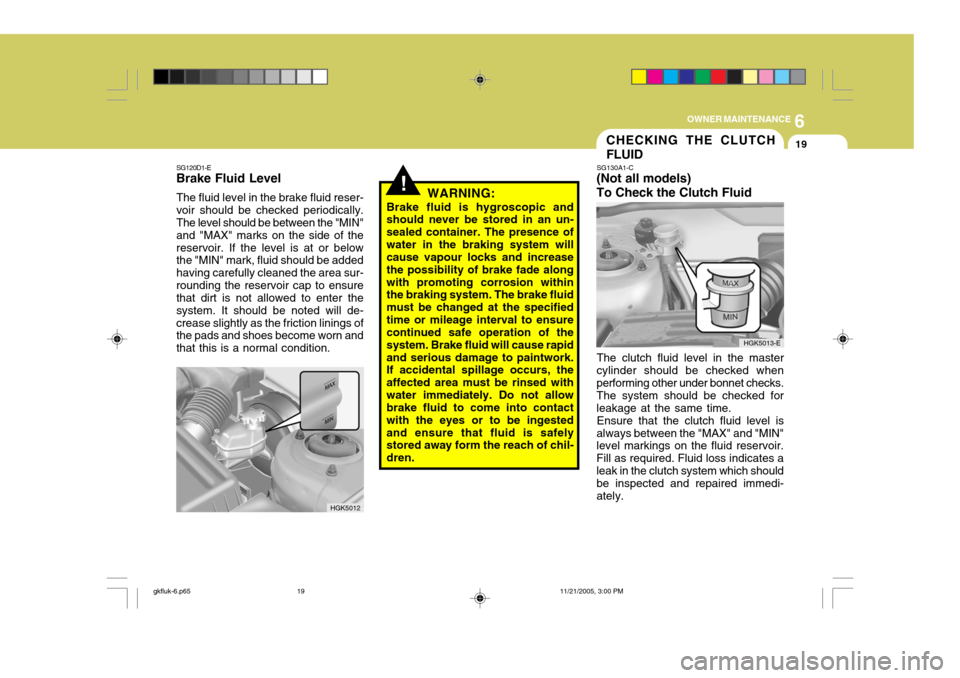
(Not all models)To Check the Clutch Fluid
The clutch fluid level in the master
cylinder should be checked when performing other under bonnet checks. The system should be checked forleakage at the same time.
Ensure that the clutch fluid level is
always between the "MAX" and "MIN" level markings on the fluid reservoir. Fill as required. Fluid loss indicates aleak in the clutch system which should be inspected and repaired immedi- ately.
HGK5012
SG120D1-E
Brake Fluid Level
The fluid level in the brake fluid reser- voir should be checked periodically. The level should be between the "MIN" and "MAX" marks on the side of thereservoir. If the level is at or below the "MIN" mark, fluid should be added having carefully cleaned the area sur-rounding the reservoir cap to ensure that dirt is not allowed to enter the system. It should be noted will de-crease slightly as the friction linings of the pads and shoes become worn and that this is a normal condition. WARNING:
Brake fluid is hygroscopic and should never be stored in an un- sealed container. The presence ofwater in the braking system will cause vapour locks and increase the possibility of brake fade alongwith promoting corrosion within the braking system. The brake fluid must be changed at the specifiedtime or mileage interval to ensure continued safe operation of the system. Brake fluid will cause rapidand serious damage to paintwork. If accidental spillage occurs, the affected area must be rinsed withwater immediately. Do not allow brake fluid to come into contact with the eyes or to be ingestedand ensure that fluid is safely stored away form the reach of chil- dren.
!
gkfluk-6.p65 11/21/2005, 3:00 PM
19
Page 438 of 478
6OWNER MAINTENANCE
20
!
SG130B2-E
Adding Fluid
Recommended brake fluid conform-
ing to DOT 3 or DOT 4 should be used. The reservoir cap must be fully tightened to avoid contamination fromforeign matter or moisture.
WARNING:
Brake fluid will cause rapid and
serious damage to paintwork. Ifaccidental spillage occurs, the af-fected area must be rinsed with water immediately. Do not allow brake fluid to come into contactwith the eyes or to be ingested and ensure that fluid is safely stored away form the reach of children. SG140A1-E
Condenser
Ensure that the condenser is periodi-cally inspected and that accumula- tions of dirt, dead insects and leaves etc, are removed to ensure that theefficiency of the system is not im- paired. Care must be exercised to ensure that the condenser fins arenot damaged during cleaning. AIR CONDITIONING SYSTEM MAINTENANCE
!
SG140C2-E
Checking the Refrigerant
1. Start the engine and run at idle for
several minutes with the refrigera- tion system running at the coldest setting.
2. If the air coming out of the in-dash vents is not cold, have the air con-ditioning system inspected by your Hyundai authorised repairer.
CAUTION:
Running the air conditioning sys-tem for extended periods of time with a low refrigerant level maydamage the compressor.
CAUTION:
Brake fluid is hygroscopic andshould never be stored in an un-sealed container. Do not allow petroleum base fluid to contami- nate the brake fluid since damageto the rubber seals of the system may result.
!
gkfluk-6.p65 11/21/2005, 3:00 PM
20
Page 439 of 478
6
OWNER MAINTENANCE
21
SG140D1-E
Off Season Maintenance
The air conditioning must be run for ten minutes or so weekly during peri- ods when the system would not nor- mally be used to ensure that thecompressor and seals are lubricated. If this precaution is not observed the compressor seals may become stuckto the compressor shaft and dam- aged when the system is next used resulting in a loss of refrigerant anddamage to the compressor. SG140B1-E
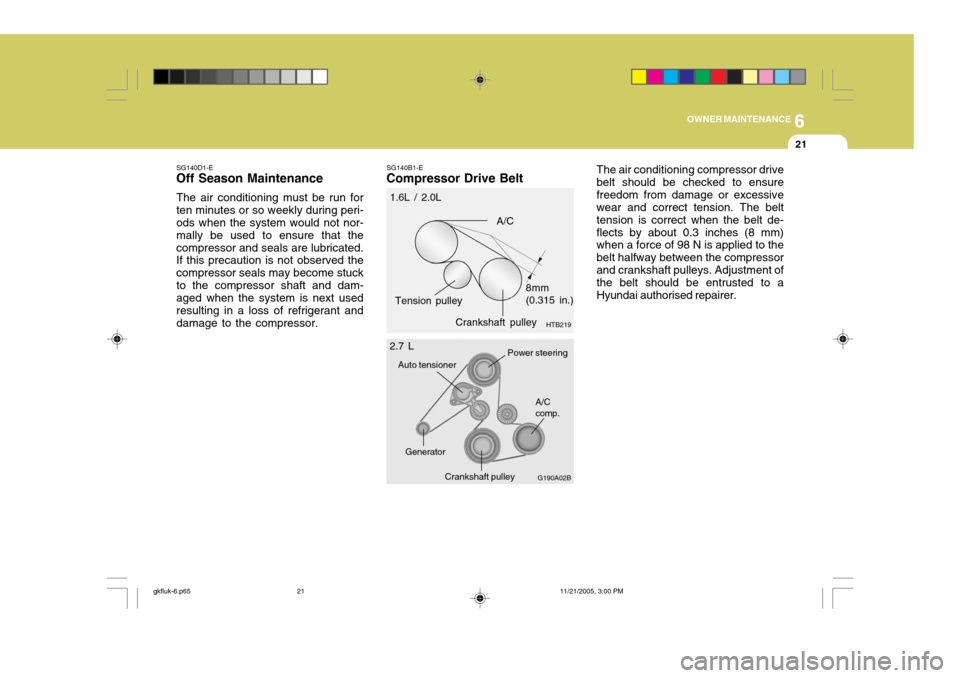
Compressor Drive Belt The air conditioning compressor drivebelt should be checked to ensurefreedom from damage or excessive wear and correct tension. The belt tension is correct when the belt de-flects by about 0.3 inches (8 mm) when a force of 98 N is applied to the belt halfway between the compressorand crankshaft pulleys. Adjustment of the belt should be entrusted to a Hyundai authorised repairer.
Crankshaft pulley HTB219
A/C
Tension pulley 8mm (0.315 in.)
1.6L / 2.0L
G190A02B
A/C comp.
Crankshaft pulley
Power steering
Auto tensioner
Generator
2.7 L
gkfluk-6.p65
11/21/2005, 3:00 PM
21
Page 440 of 478
6OWNER MAINTENANCE
22
!
CHANGING THE POLLEN FILTER
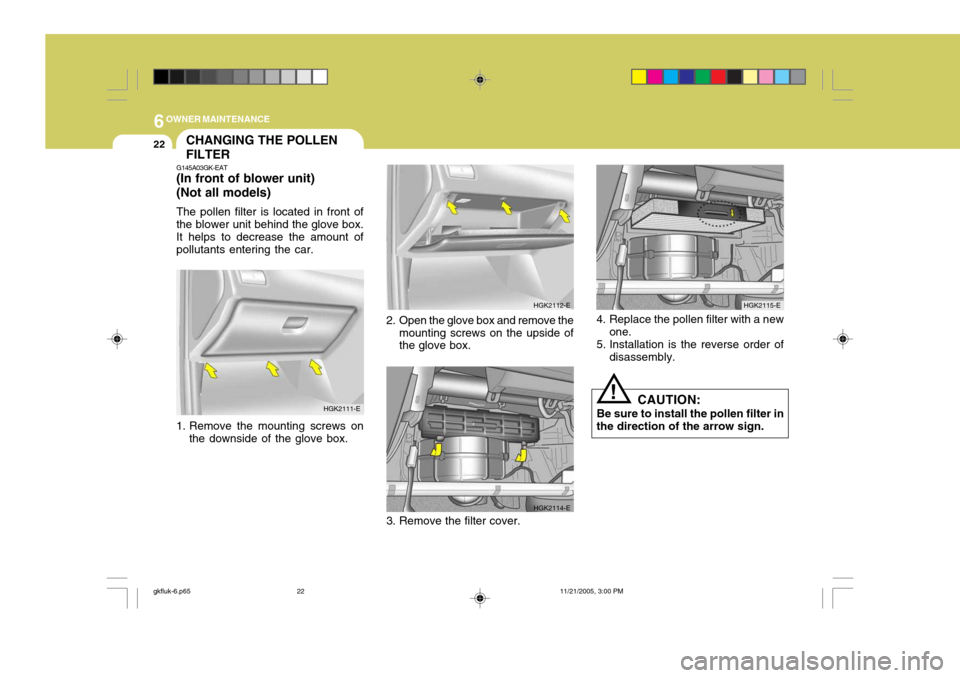
G145A03GK-EAT (In front of blower unit) (Not all models) The pollen filter is located in front of the blower unit behind the glove box.It helps to decrease the amount ofpollutants entering the car.
2. Open the glove box and remove themounting screws on the upside of the glove box.
1. Remove the mounting screws on the downside of the glove box. 4. Replace the pollen filter with a new
one.
5. Installation is the reverse order of disassembly.
CAUTION:
Be sure to install the pollen filter in
the direction of the arrow sign.
HGK2111-E HGK2112-E HGK2114-E
HGK2115-E
3. Remove the filter cover.
gkfluk-6.p65 11/21/2005, 3:00 PM
22