Hyundai Coupe 2006 Owner's Manual
Manufacturer: HYUNDAI, Model Year: 2006, Model line: Coupe, Model: Hyundai Coupe 2006Pages: 483, PDF Size: 12.73 MB
Page 131 of 483
1
FEATURES OF YOUR HYUNDAI
119
10. Information Display Screen (LCD)
Various status of the CD will be dis- played on the screen while listening tothe CD such as "CD" while playing the CD, the track title and number and RPT. 11. SCAN Button If you press this button, the player will play 10 seconds of each track. Press it again to cancel scanning. CAUTION:
o Do not insert warped or poor qual- ity discs into the CD player asdamage to the unit may occur.
o Do not insert anything like coins
into the player slot as damage tothe unit may occur.
o Do not place beverages close to the audio system. The playbackmechanism may be damaged if you spill them.
o Do not strike or allow anything to impact the audio system, damageto the system mechanisms couldoccur.
o Off-road or rough surface driving
may cause the compact disc toskip. Do not use the compact disc when driving in such conditions as damage to the compact discface could occur.
o Do not attempt to grab or pull the
compact disc out while the disc isbeing pulled into the audio unit by the self-loading mechanism. Dam- age to the audio unit and compactdisc could occur.
!
o Avoid using recorded compactdiscs in your audio unit. Original compact discs are recommended.
Page 132 of 483
1FEATURES OF YOUR HYUNDAI
120
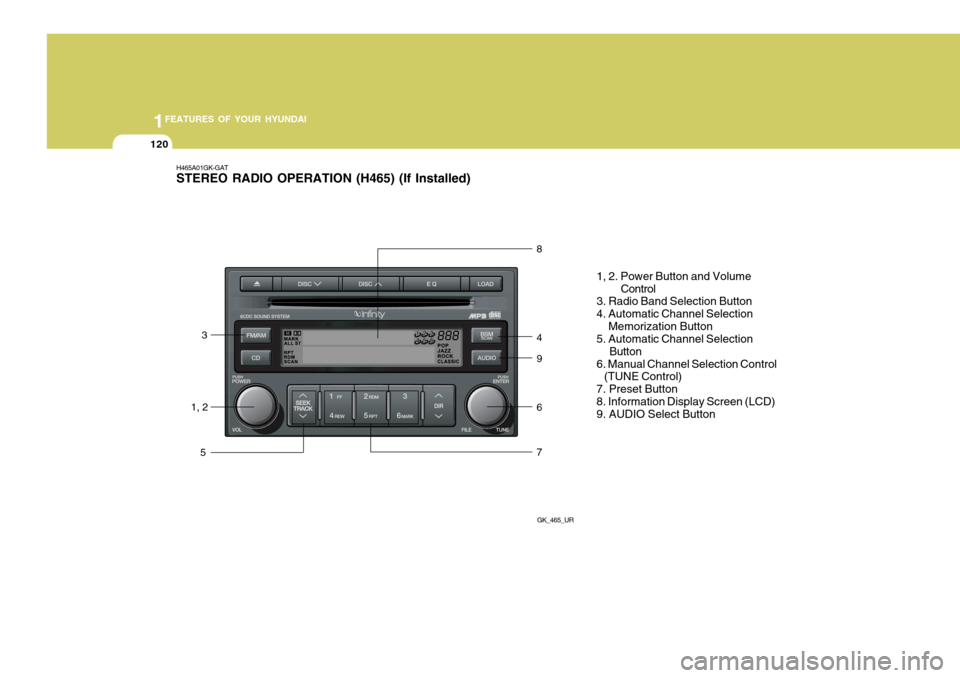
H465A01GK-GAT STEREO RADIO OPERATION (H465) (If Installed)
GK_465_UR
1, 23
5 8 4 9 6 7
1, 2. Power Button and Volume
Control
3. Radio Band Selection Button 4. Automatic Channel Selection Memorization Button 5. Automatic Channel Selection
Button
6. Manual Channel Selection Control (TUNE Control) 7. Preset Button8. Information Display Screen (LCD) 9. AUDIO Select Button
Page 133 of 483
1
FEATURES OF YOUR HYUNDAI
121
H465B01GK-GAT
1. Power Button (POWER ON) Press this button when the ignition switch of the automobile is set to ACC(1st notch) or ON (2nd notch) to turn on the power and the audio system. Press once again when the audio system is onto turn off the power. 2. Volume Control (VOLUME) Turn the volume control clockwise to increase volume and counterclockwise to reduce. The volume level will bedisplayed on the screen when you ad- just the volume. 3. Radio Band Selection Button (FM/AM)
o Press this button to listen to either FM or AM.
o The radio will be set to each of the
following modes each time you press the button. FM1 ➟ FM2 ➟ AM NOTE: Push this button when the power is off to turn on the power automati- cally. 4. Automatic Channel Selection
Memorization Button (BSM: Best Station Memory)
Press this button once to automatically select channels starting from the cur-rent channel and memorize into the preset buttons (1~6) in the selected order and turn to the channel memo-rized in preset button 1. 5. Automatic Channel Selection Button (SEEK)
Press the [SEEK
] button to auto-
matically increase frequency and press the [TRACK
] button to automati-
cally decrease frequency to select and play the next available channel. If the received channel is memorized in thepreset buttons then the screen will dis- play the memorized channel. 6. Manual Channel Selection
Control (TUNE)
Turn the TUNE control clockwise to increase frequency and counterclock-wise to reduce frequency by 1 step for each click.
7. Preset Button (1~6) Press this button to listen to the chan- nels memorized to each button. If you want to memorize the current channelto the preset button, press the button for more than 1.5 seconds then the channel will be memorized to the buttonwith a beep.
8. Information Display Screen (LCD)
A variety of information will be dis- played on the screen including the radiobands (FM1/FM2/AM) while listening to the radio, frequency of each channel, the number of preset channel and "ST"for FM stereo broadcasting.
Page 134 of 483
1FEATURES OF YOUR HYUNDAI
122
!
9. AUDIO Select Button Press this button to control tone. Each time you press the button, the mode willswitch from BASS
➟MIDDLE
➟ TREBLE ➟FADER ➟BALANCE and
the mode will be displayed on the screen.
CAUTION:
o Do not place beverages close to the audio system. The audio sys-tem mechanism may be damaged if you spill them.
o Do not strike or allow anything to impact the audio system, damageto the system mechanisms could occur.
BASS MIDDLE TREBLE BALANCE Turn the TUNE Controller clockwise to increase basstone and counterclockwise to decrease. Turn the TUNE Controller clockwise to increase middle tone and counter-clockwise to decrease. Turn the TUNE Controller clockwise to increasetreble tone and counter- clockwise to decrease. Turn the TUNE Controller clockwise to increase right speaker volume and coun-terclockwise to increase left speaker volume.
FADER Turn the
TUNE Controller
clockwise to increase rear speaker volume and coun-terclockwise to increase front speaker volume.
Page 135 of 483
1
FEATURES OF YOUR HYUNDAI
123
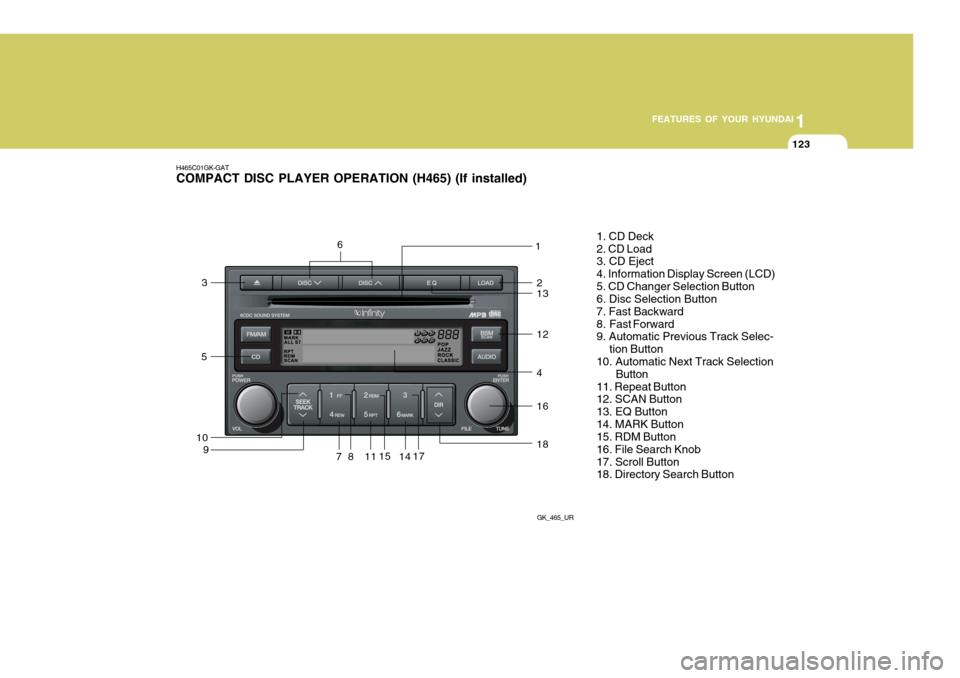
H465C01GK-GAT COMPACT DISC PLAYER OPERATION (H465) (If installed)
GK_465_UR
109 1
8 1. CD Deck 2. CD Load 3. CD Eject 4. Information Display Screen (LCD)5. CD Changer Selection Button 6. Disc Selection Button 7. Fast Backward
8. Fast Forward 9. Automatic Previous Track Selec-
tion Button
10. Automatic Next Track Selection
Button
11. Repeat Button12. SCAN Button 13. EQ Button14. MARK Button 15. RDM Button 16. File Search Knob17. Scroll Button 18. Directory Search Button
71 1 17
4
16
18
1415
5
3
12
132
6
Page 136 of 483
![Hyundai Coupe 2006 Owners Manual 1FEATURES OF YOUR HYUNDAI
124
H465D01GK-GAT 1.CD Deck The deck will open only when you press [LOAD] button. Make sure the printedside of the disk faces upward when you insert the disk. The CD changer Hyundai Coupe 2006 Owners Manual 1FEATURES OF YOUR HYUNDAI
124
H465D01GK-GAT 1.CD Deck The deck will open only when you press [LOAD] button. Make sure the printedside of the disk faces upward when you insert the disk. The CD changer](/img/35/14503/w960_14503-135.png)
1FEATURES OF YOUR HYUNDAI
124
H465D01GK-GAT 1.CD Deck The deck will open only when you press [LOAD] button. Make sure the printedside of the disk faces upward when you insert the disk. The CD changer can only play 12cm disks. If you insertvideo CD or DATA CD, then the screen will display "ERROR DISC," eject the disk and return to the previous mode.
2. CD Load Button When you press [LOAD] button, the empty lots of the CD Changer will beopened in the order of 1, 2, 3, 4, 5 and 6. When you insert CD, you can listen to the corresponding CD. In this case,the last CD you inserted will be played. If you do not take any actions after pressing (LOAD) then the (LOAD) willbe cancelled.
3. CD Eject Button When you press [
] button, the cur-
rently played CD will be ejected. If you press the button for more than 2 sec- onds, you will be able to eject all CDs.If currently played CD is in the 3rd slot, the ejection order will be 3, 4, 5, 6, 1 and 2. 4. Information Display Screen
(LCD)
This shows the location of disk insidethe CD Changer and the correspondingCD deck number will flicker when you load or eject the CD.
5. CD Changer Selection Button If the power was turned off when the CD is inside the CD changer or if you press "CD" button when radio was on, thesystem will play CD. If you press [CD] button when there is no CD in the changer then the system will display"NO DISK" for 2 seconds and return to the previous mode. NOTE: If you press this button when the power is off and CD is inside the deck, the power will be automati-cally turned on.
6. Disc Selection Button If you press [DISC
] button while
using CD Changer, the next disc will be played (If you press the button when you are listening to CD 1, the CD 2 will be played). If you wish to listen to the previous CD, then press [DISC
] button then the
previous disc will be played (If you press the button when you are listening to CD 2, the CD 1 will be played). If the CD Changer is not fully loaded, this willmove to the next available deck. When the player moves from deck to deck, the screen will display the selecteddeck number.
7. Fast Backward (REW) Press and hold [REW] button while playing CD then the player will play the disk backwards 5 times the regular speed for first 5 seconds and 15 timesfaster after that. The sound will be reduced by 12dB while you are holding the button.
8. Fast Forward (FF) Press and hold [FF] button while play- ing CD then the player will play the disk forward 5 times the regular speed for first 5 seconds and 15 times faster afterthat. The sound will be reduced by 12dB while you are holding the button.
Page 137 of 483
![Hyundai Coupe 2006 Owners Manual 1
FEATURES OF YOUR HYUNDAI
125
9. Automatic Previous Track Se- lection Button
Press [TRACK
] button to go to the
beginning of the song you are listening to while playing the CD. Press thebutton agai Hyundai Coupe 2006 Owners Manual 1
FEATURES OF YOUR HYUNDAI
125
9. Automatic Previous Track Se- lection Button
Press [TRACK
] button to go to the
beginning of the song you are listening to while playing the CD. Press thebutton agai](/img/35/14503/w960_14503-136.png)
1
FEATURES OF YOUR HYUNDAI
125
9. Automatic Previous Track Se- lection Button
Press [TRACK
] button to go to the
beginning of the song you are listening to while playing the CD. Press thebutton again to go to the beginning of the song before the song you were listening to. 10. Automatic Next Track Selec-
tion Button
Press [SEEK
] button to go to the
beginning of the song next to the song you are listening to while playing theCD. 11. Section Repeat Button (RPT) Press [RPT] button to repeat the song you are listening to. Press this button again to cancel repetition. 12. SCAN Button If you press this button, the player will play 10 seconds of each track. Press itagain to cancel scanning. 13. EQ Button Each time you press this button the sound equalizer setting will switch fromPOP
➟JAZZ ➟ROCK ➟CLASSIC ➟OFF
(Not displayed). 14. BOOKMARK Button This button lets you select the songs you want to listen to in the CD. Move tothe track and press (MARK) for more than 1 second then the screen will display " M " and select the track. Pressthe button less than 1 second to play the songs you selected and the system will display " M " 15. RDM (Random) Button Press [RDM] button to play the songs in random order. NOTE: When you use CD-R or CD-RW, the CD may not be played due to the manufacturing method of CD mak-ers and the recording method of the user. In this case, change CD unless the continuous use of such CDs maycause damage to the system. 16. FILE Search Knob Turn this knob to the left and right while listening to CD to change track number.If you press the button within 5 seconds then the selected track will be played. If you do not press the button within 5seconds then it will display the cur- rently played track. 17. SCROLL Button If the title of MP3 or WMA file is too long, press this button to scroll theentire song title on the LCD screen. 18. Directory Search Button In case the MP3/WMA CD contains more than 2 folders, press this button up and down to search each directory. You can move to the directory and turnthe search knob to search through the tracks. If you do not press the knob within 5 seconds after you select atrack then the system will automati- cally return to the current track.
Page 138 of 483
1FEATURES OF YOUR HYUNDAI
126
CAUTION:
o Do not insert warped or poor qual- ity discs into the CD player as damage to the unit may occur.
o Do not insert anything like coins
into the player slot as damage tothe unit may occur.
o Do not place beverages close to the audio system. The playbackmechanism may be damaged if you spill them.
o Do not strike or allow anything to impact the audio system, damageto the system mechanisms couldoccur.
o Off-road or rough surface driving
may cause the compact disc toskip. Do not use the compact disc when driving in such conditions as damage to the compact discface could occur.
o Do not attempt to grab or pull the
compact disc out while the disc isbeing pulled into the audio unit by the self-loading mechanism. Dam- age to the audio unit and compactdisc could occur.
!o Avoid using recorded compactdiscs in your audio unit. Original compact discs are recommended.
Page 139 of 483
1
FEATURES OF YOUR HYUNDAI
127
Damaged Disc Do not attempt to play damaged, warped or cracked discs. These could severelydamage the playback mechanism. Storage When not in use, place your discs in their individual cases and store them in a cool place away from the sun, heat,and dust. Do not grip or pull out the disc with your hand while the disc is being pulled intothe unit by the self loading mechanism.
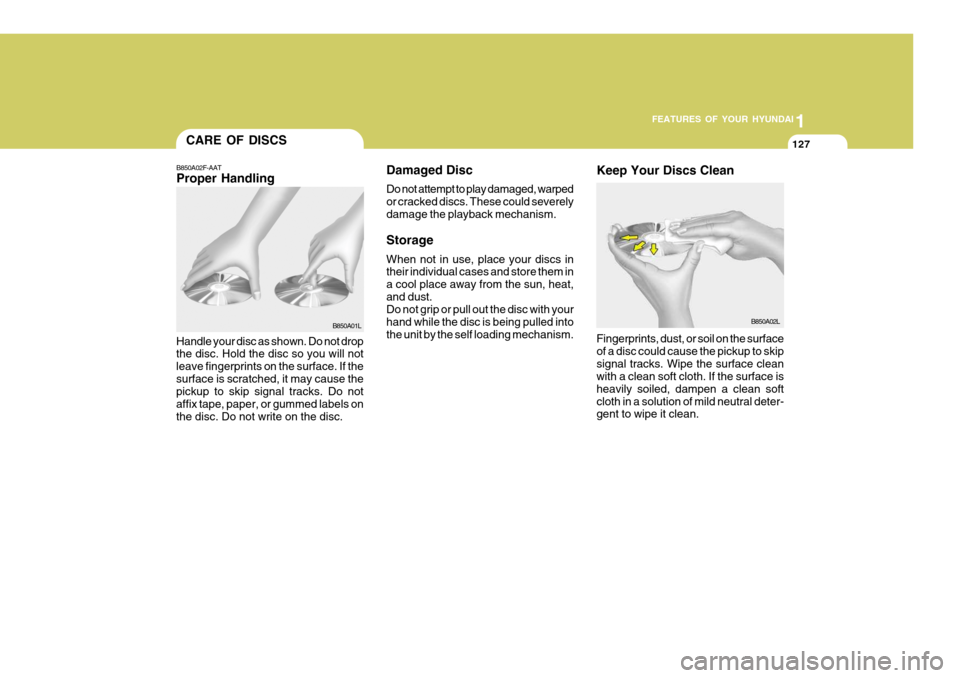
B850A02F-AAT Proper Handling
Handle your disc as shown. Do not drop the disc. Hold the disc so you will not leave fingerprints on the surface. If thesurface is scratched, it may cause the pickup to skip signal tracks. Do not affix tape, paper, or gummed labels onthe disc. Do not write on the disc. B850A01L
B850A02L
Keep Your Discs Clean
CARE OF DISCS
Fingerprints, dust, or soil on the surfaceof a disc could cause the pickup to skipsignal tracks. Wipe the surface clean with a clean soft cloth. If the surface is heavily soiled, dampen a clean softcloth in a solution of mild neutral deter- gent to wipe it clean.
Page 140 of 483
1FEATURES OF YOUR HYUNDAI
128CARE OF CASSETTE TAPES
OGK016062
o Never leave a cassette inserted in
the player when not being played. This could damage the tape player unit and the cassette tape.
o We strongly recommend against the
use of tapes longer than C-60 (60minutes total). Tapes such as C-120 or C-180 are very thin and do notperform as well in the automotive environment. o Be sure that the cassette label is not
loose or peeling off or tape ejection may be difficult.
o Never touch or soil the actual audio
tape surfaces.
o Keep all magnetized objects, such as electric motors, speakers or trans-formers away from your cassettetapes and tape player unit.
o Store cassettes in a cool, dry place
with the open side facing down toprevent dust from setting in the cas- sette body.
o Avoid repeated fast reverse usage to replay one given tune or tape sec-tion. This can cause poor tape wind- ing to occur, and eventually causeexcessive internal drag and poor audio quality in the cassette. If this occurs, it can sometimes be cor-rected by fast winding the tape from end to end several times. If this does not correct the problem, do not con-tinue to use the tape in your vehicle.
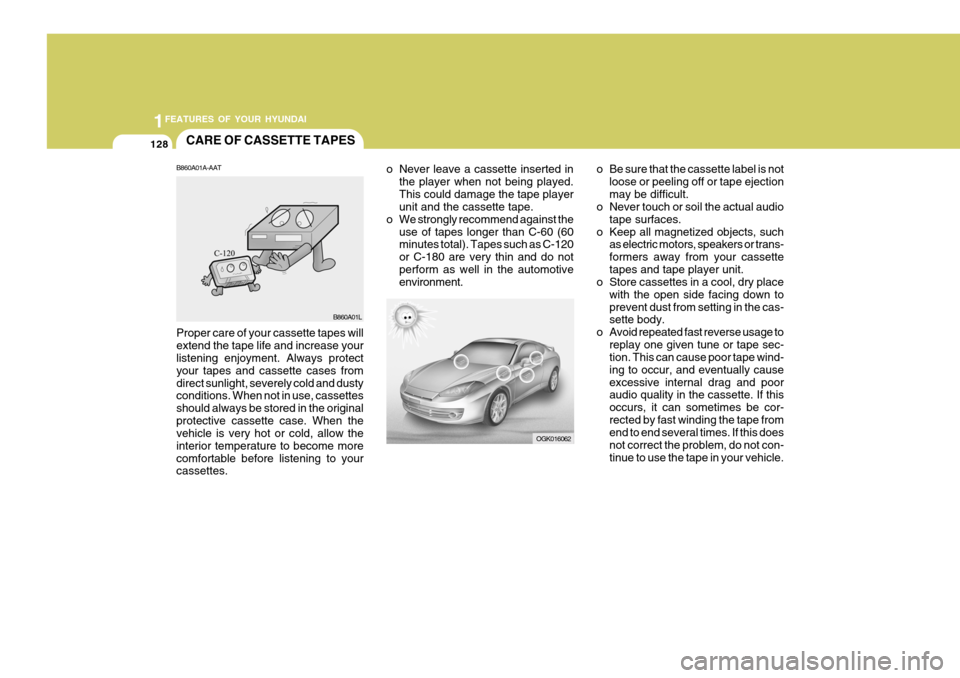
B860A01A-AAT Proper care of your cassette tapes will extend the tape life and increase your listening enjoyment. Always protect your tapes and cassette cases fromdirect sunlight, severely cold and dusty conditions. When not in use, cassettes should always be stored in the originalprotective cassette case. When the vehicle is very hot or cold, allow the interior temperature to become morecomfortable before listening to your cassettes. B860A01L