clock Hyundai Elantra 2009 Инструкция по эксплуатации (in Russian)
[x] Cancel search | Manufacturer: HYUNDAI, Model Year: 2009, Model line: Elantra, Model: Hyundai Elantra 2009Pages: 308, PDF Size: 15.03 MB
Page 9 of 308
23
Your vehicle at a glance
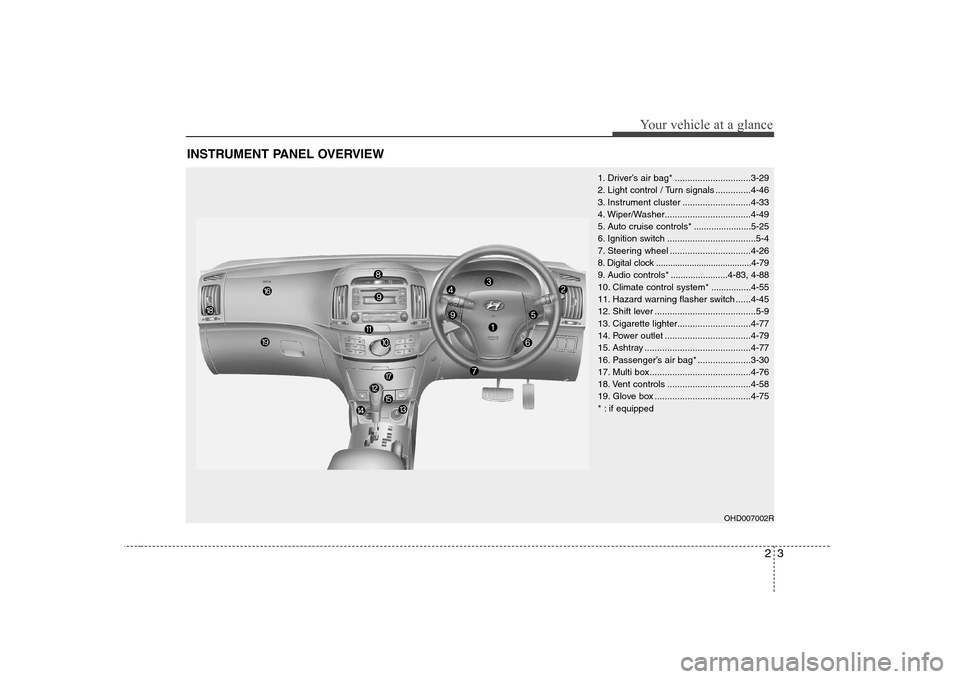
INSTRUMENT PANEL OVERVIEW
1. Driver’s air bag* ..............................3-29
2. Light control / Turn signals ..............4-46
3. Instrument cluster ...........................4-33
4. Wiper/Washer..................................4-49
5. Auto cruise controls * .......................5-25
6. Ignition switch ...................................5-4
7. Steering wheel ................................4-26
8. Digital clock ........................................4-79
9. Audio controls * .......................4-83, 4-88
10. Climate control system*................4-55
11. Hazard warning flasher switch ......4-45
12. Shift lever ........................................5-9
13. Cigarette lighter.............................4-77
14. Power outlet ..................................4-79
15. Ashtray ..........................................4-77
16. Passenger’s air bag* .....................3-30
17. Multi box........................................4-76
18. Vent controls .................................4-58
19. Glove box ......................................4-75
* : if equipped
OHD007002R
Page 67 of 308
Features of your vehicle
12
4
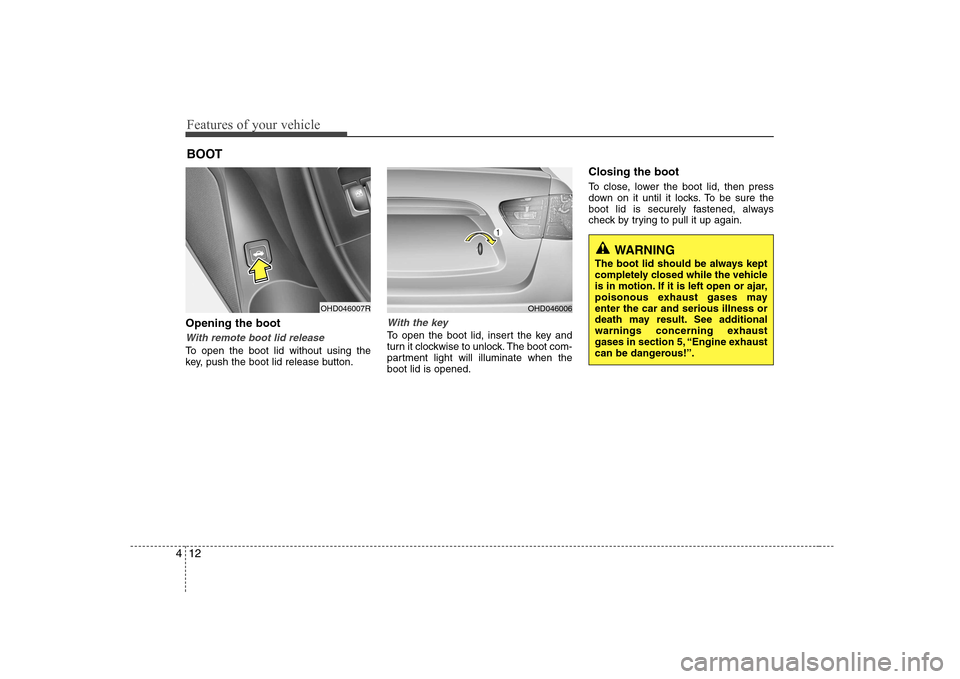
Opening the boot
With remote boot lid release
To open the boot lid without using the
key, push the boot lid release button.
With the key
To open the boot lid, insert the key and
turn it clockwise to unlock. The boot com-
partment light will illuminate when theboot lid is opened. Closing the boot
To close, lower the boot lid, then press
down on it until it locks. To be sure the
boot lid is securely fastened, always
check by trying to pull it up again.
BOOT
OHD046007ROHD046006
WARNING
The boot lid should be always kept
completely closed while the vehicle
is in motion. If it is left open or ajar,
poisonous exhaust gases mayenter the car and serious illness or
death may result. See additional
warnings concerning exhaust
gases in section 5, “Engine exhaust
can be dangerous!”.
Page 71 of 308
Features of your vehicle
16
4
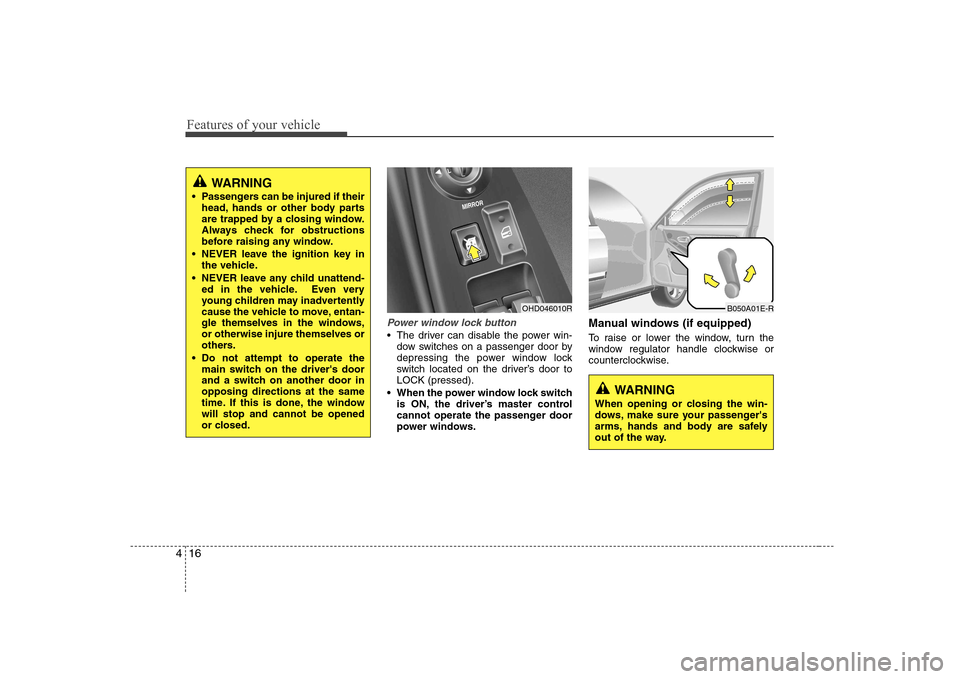
Power window lock button
The driver can disable the power win-
dow switches on a passenger door by
depressing the power window lock
switch located on the driver’s door toLOCK (pressed).
When the power window lock switch is ON, the driver’s master control
cannot operate the passenger door
power windows. Manual windows (if equipped)
To raise or lower the window, turn the
window regulator handle clockwise or
counterclockwise.
OHD046010R
WARNING
When opening or closing the win-
dows, make sure your passenger's
arms, hands and body are safely
out of the way.
B050A01E-R
WARNING
Passengers can be injured if their head, hands or other body parts
are trapped by a closing window.
Always check for obstructions
before raising any window.
NEVER leave the ignition key in the vehicle.
NEVER leave any child unattend- ed in the vehicle. Even very
young children may inadvertently
cause the vehicle to move, entan-
gle themselves in the windows,or otherwise injure themselves or
others.
Do not attempt to operate the main switch on the driver's door
and a switch on another door inopposing directions at the same
time. If this is done, the windowwill stop and cannot be opened
or closed.
Page 74 of 308
419
Features of your vehicle
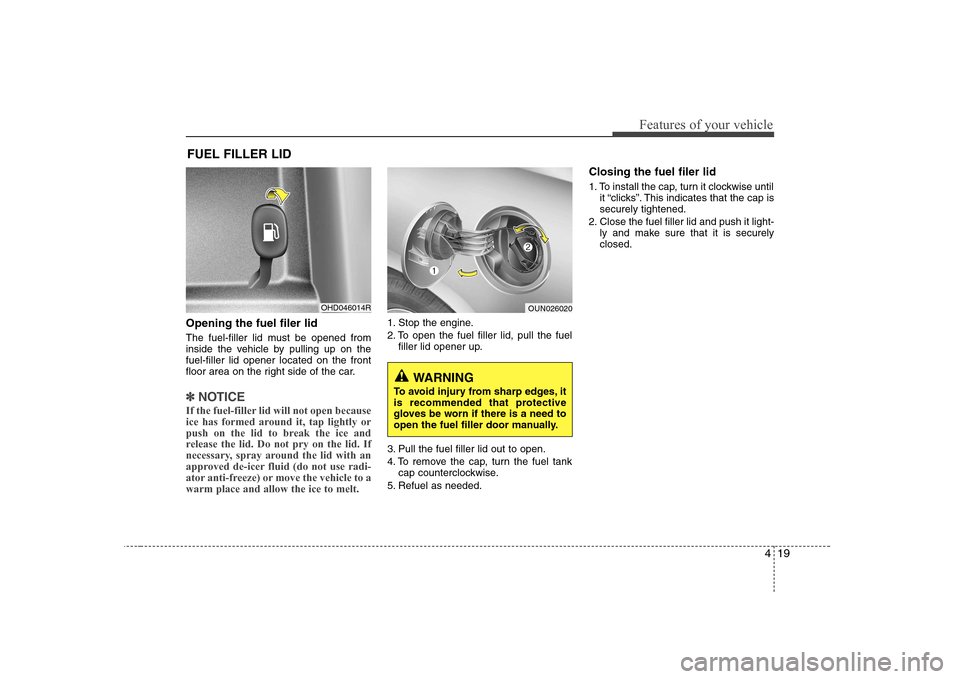
Opening the fuel filer lid
The fuel-filler lid must be opened from
inside the vehicle by pulling up on thefuel-filler lid opener located on the front
floor area on the right side of the car.
✽✽NOTICE
If the fuel-filler lid will not open because
ice has formed around it, tap lightly or
push on the lid to break the ice and
release the lid. Do not pry on the lid. If
necessary, spray around the lid with an
approved de-icer fluid (do not use radi-
ator anti-freeze) or move the vehicle to awarm place and allow the ice to melt.
1. Stop the engine.
2. To open the fuel filler lid, pull the fuel filler lid opener up.
3. Pull the fuel filler lid out to open.
4. To remove the cap, turn the fuel tank cap counterclockwise.
5. Refuel as needed. Closing the fuel filer lid
1. To install the cap, turn it clockwise until
it “clicks”. This indicates that the cap is securely tightened.
2. Close the fuel filler lid and push it light- ly and make sure that it is securelyclosed.
FUEL FILLER LID
OHD046014ROUN026020
WARNING
To avoid injury from sharp edges, it
is recommended that protective
gloves be worn if there is a need to
open the fuel filler door manually.
Page 134 of 308
479
Features of your vehicle
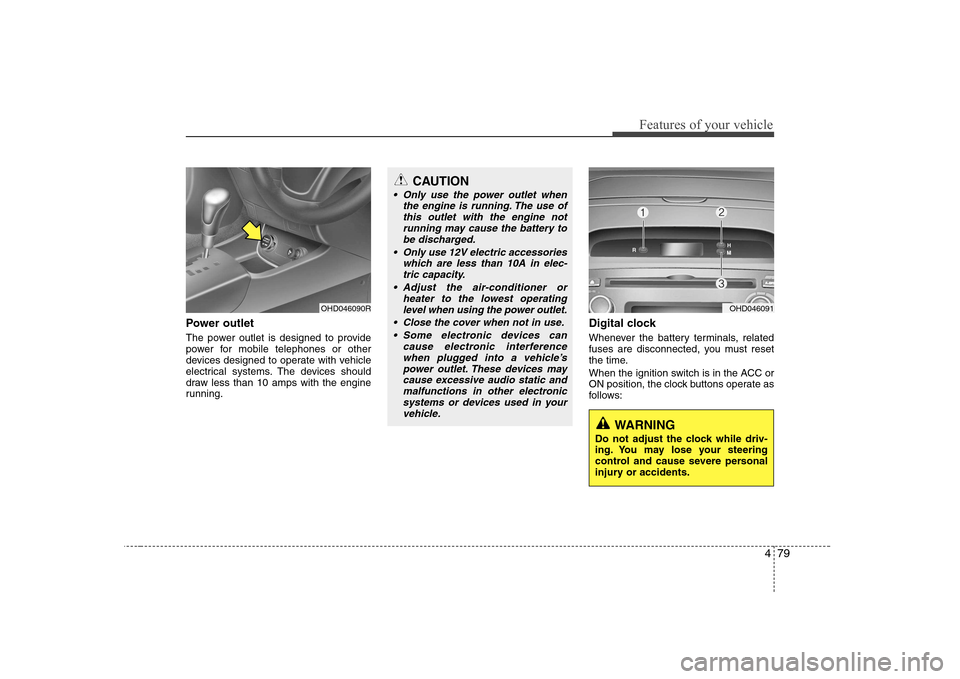
Power outlet
The power outlet is designed to provide
power for mobile telephones or other
devices designed to operate with vehicle
electrical systems. The devices should
draw less than 10 amps with the engine
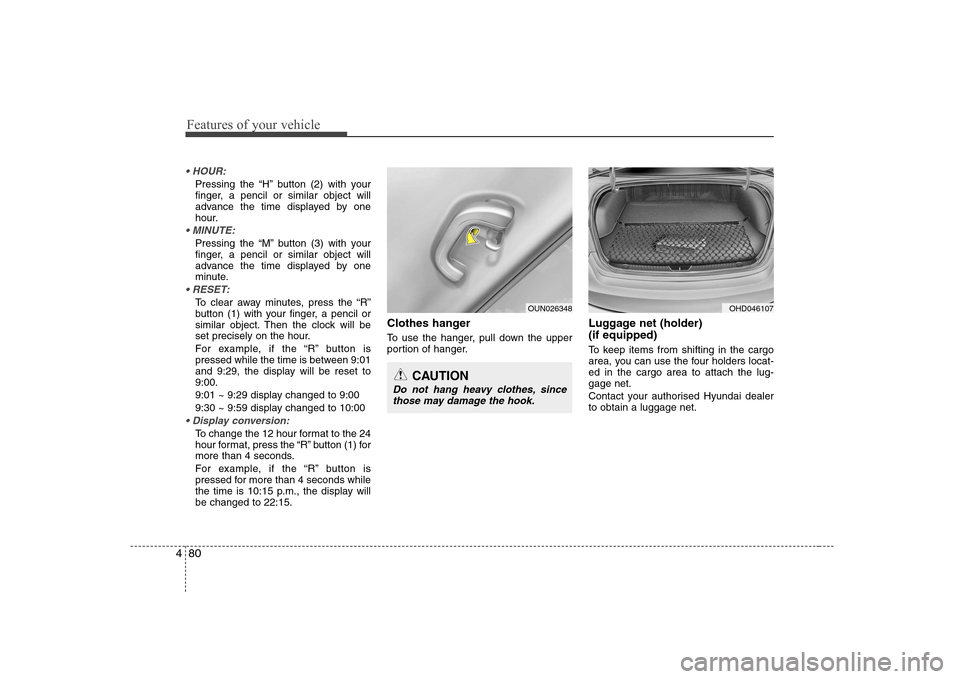
running.Digital clock
Whenever the battery terminals, related
fuses are disconnected, you must reset
the time.
When the ignition switch is in the ACC or
ON position, the clock buttons operate as
follows:
OHD046090R
CAUTION
Only use the power outlet when
the engine is running. The use ofthis outlet with the engine notrunning may cause the battery to
be discharged.
Only use 12V electric accessories which are less than 10A in elec-tric capacity.
Adjust the air-conditioner or heater to the lowest operating
level when using the power outlet.
Close the cover when not in use. Some electronic devices can cause electronic interferencewhen plugged into a vehicle’s
power outlet. These devices maycause excessive audio static and malfunctions in other electronicsystems or devices used in your
vehicle.
OHD046091
WARNING
Do not adjust the clock while driv-
ing. You may lose your steering
control and cause severe personal
injury or accidents.
Page 135 of 308
Features of your vehicle
80
4
Pressing the “H” button (2) with your
finger, a pencil or similar object will
advance the time displayed by one
hour.
Pressing the “M” button (3) with your
finger, a pencil or similar object will
advance the time displayed by one
minute.
To clear away minutes, press the “R”
button (1) with your finger, a pencil or
similar object. Then the clock will be
set precisely on the hour.
For example, if the “R” button is
pressed while the time is between 9:01
and 9:29, the display will be reset to9:00.
9:01 ~ 9:29 display changed to 9:00
9:30 ~ 9:59 display changed to 10:00
To change the 12 hour format to the 24
hour format, press the “R” button (1) for
more than 4 seconds.
For example, if the “R” button is
pressed for more than 4 seconds while
the time is 10:15 p.m., the display willbe changed to 22:15. Clothes hanger
To use the hanger, pull down the upper
portion of hanger.
Luggage net (holder) (if equipped)
To keep items from shifting in the cargo
area, you can use the four holders locat-ed in the cargo area to attach the lug-gage net.
Contact your authorised Hyundai dealer to obtain a luggage net.
OUN026348
CAUTION
Do not hang heavy clothes, since
those may damage the hook.
OHD046107
Page 146 of 308
491
Features of your vehicle
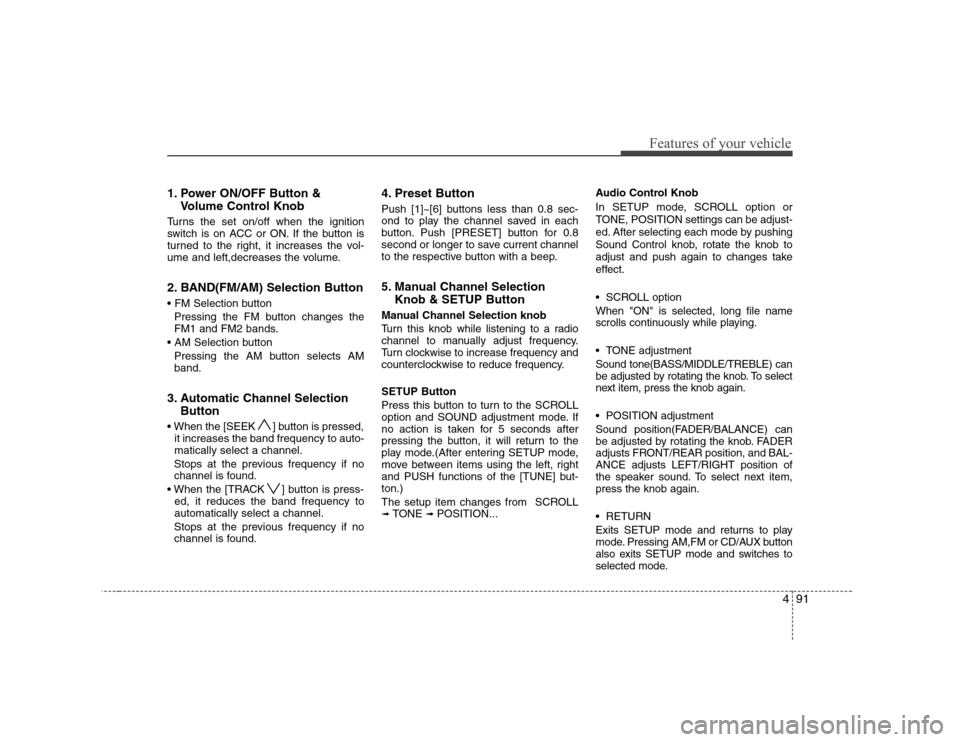
1. Power ON/OFF Button &Volume Control Knob
Turns the set on/off when the ignition
switch is on ACC or ON. If the button is
turned to the right, it increases the vol-
ume and left,decreases the volume.
2. BAND(FM/AM) Selection Button
Pressing the FM button changes the
FM1 and FM2 bands.
Pressing the AM button selects AMband.
3. Automatic Channel Selection Button
] button is pressed, it increases the band frequency to auto-matically select a channel.
Stops at the previous frequency if no
channel is found.
] button is press- ed, it reduces the band frequency toautomatically select a channel.
Stops at the previous frequency if no
channel is found. 4. Preset Button
Push [1]~[6] buttons less than 0.8 sec-
ond to play the channel saved in each
button. Push [PRESET] button for 0.8
second or longer to save current channel
to the respective button with a beep.
5. Manual Channel Selection
Knob & SETUP Button
Manual Channel Selection knob
Turn this knob while listening to a radio
channel to manually adjust frequency.
Turn clockwise to increase frequency and
counterclockwise to reduce frequency. SETUP Button
Press this button to turn to the SCROLL
option and SOUND adjustment mode. If
no action is taken for 5 seconds after
pressing the button, it will return to the
play mode.(After entering SETUP mode,
move between items using the left, right
and PUSH functions of the [TUNE] but-ton.)
The setup item changes from SCROLL ➟ TONE ➟ POSITION... Audio Control Knob
In SETUP mode, SCROLL option or
TONE, POSITION settings can be adjust-
ed. After selecting each mode by pushing
Sound Control knob, rotate the knob to
adjust and push again to changes take
effect.
SCROLL option When "ON" is selected, long file name
scrolls continuously while playing.
TONE adjustment Sound tone(BASS/MIDDLE/TREBLE) can
be adjusted by rotating the knob. To select
next item, press the knob again.
POSITION adjustment
Sound position(FADER/BALANCE) can
be adjusted by rotating the knob. FADER
adjusts FRONT/REAR position, and BAL-ANCE adjusts LEFT/RIGHT position of
the speaker sound. To select next item,press the knob again.
RETURN
Exits SETUP mode and returns to play
mode. Pressing AM,FM or CD/AUX button
also exits SETUP mode and switches to
selected mode.
Page 152 of 308
497
Features of your vehicle
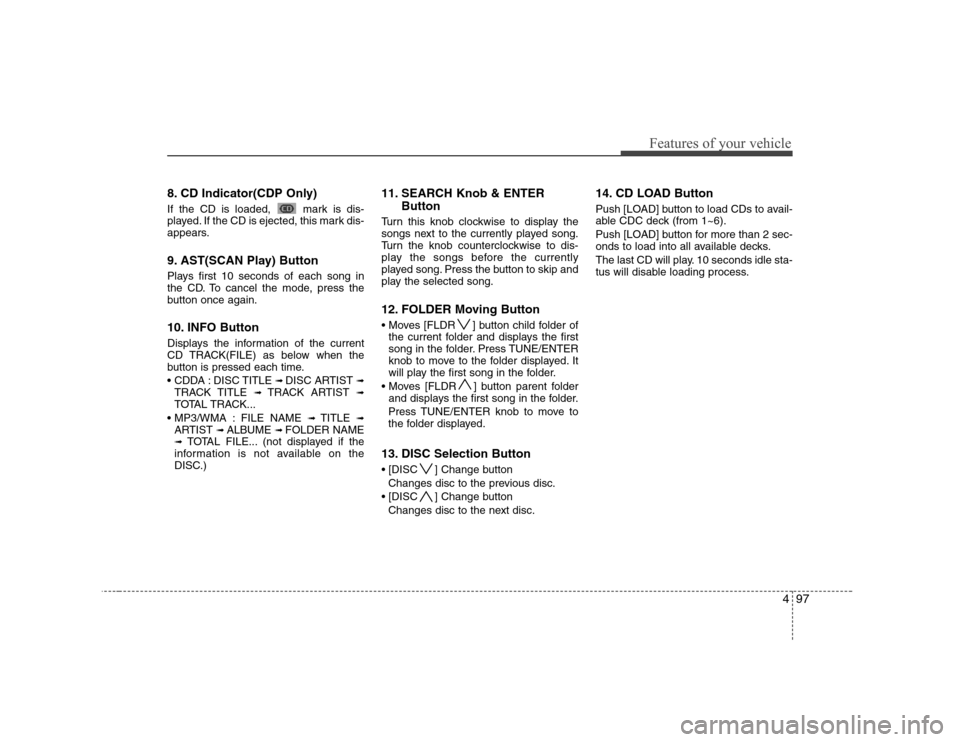
8. CD Indicator(CDP Only)
If the CD is loaded, mark is dis-
played. If the CD is ejected, this mark dis-
appears.
9. AST(SCAN Play) Button
Plays first 10 seconds of each song in
the CD. To cancel the mode, press the
button once again.
10. INFO Button
Displays the information of the current
CD TRACK(FILE) as below when the
button is pressed each time.
DISC TITLE ➟ DISC ARTIST ➟
TRACK TITLE ➟ TRACK ARTIST ➟
TOTAL TRACK...
FILE NAME ➟ TITLE ➟
ARTIST ➟ ALBUME ➟ FOLDER NAME
➟ TOTAL FILE... (not displayed if the
information is not available on the
DISC.) 11. SEARCH Knob & ENTER
Button
Turn this knob clockwise to display the
songs next to the currently played song.
Turn the knob counterclockwise to dis-
play the songs before the currently
played song. Press the button to skip and
play the selected song.
12. FOLDER Moving Button
] button child folder of the current folder and displays the first
song in the folder. Press TUNE/ENTER
knob to move to the folder displayed. It
will play the first song in the folder.
] button parent folder and displays the first song in the folder.
Press TUNE/ENTER knob to move to
the folder displayed.
13. DISC Selection Button
] Change button Changes disc to the previous disc.
] Change button Changes disc to the next disc. 14. CD LOAD Button
Push [LOAD] button to load CDs to avail-
able CDC deck (from 1~6).
Push [LOAD] button for more than 2 sec-
onds to load into all available decks.
The last CD will play. 10 seconds idle sta-
tus will disable loading process.
Page 155 of 308

Features of your vehicle
100
4
1. INFO Selection Button
Displays the information of the file cur-
rently played in the order of FILE NAME➟ TITLE ➟ ARTIST ➟ ALBUM ➟ FOLD-
ER ➟ TOTAL FILE ➟ NORMAL DISPLAY
➟ FILE NAME ➟... (Displays no informa-
tion if the file has no song information.)
2. TRACK Moving Button
] button for less
than 0.8 second to play from the begin-
ning of the song currently played. Press
the button for less than 0.8 second and
press it again within 1 second to move
and play the previous track.
] button for less than 0.8 second to move to the next-
track.
3. RANDOM Playback Button
Press this button for less than 0.8 second
to activate 'RDM' mode and more than
0.8 second to activate 'ALL RDM' mode.
Only files in a folder are played back in a random sequence.
ALL RDM : All files in a USB memory are played back in the random sequence. 4. REPEAT Button
Press this button for less than 0.8 second
to activate 'RPT' mode and more than
0.8 second to activate 'FLD RPT' mode.
Only a file is repeatedly played
back.
Only files in a folder are repeatedly played back.
5. USB Selection Button
If USB is connected, it switches to the
USB mode from the other mode to play
the song files stored in the USB.
If no CD and auxiliary device is not con-
nected, it displays "No Media" for 3 sec-
onds and returns to the previous mode.
6. FOLDER Moving Button
] button sub folder of the current folder and displays the first
song in the folder.
Press TUNE/ENTER knob to move to
the folder displayed. It will play the first
song in the folder.
] button main folder and displays the first song in the folder.
Press TUNE/ENTER knob to move to
the folder displayed. 7. SEARCH Knob & ENTER
Button
Turn this knob clockwise to display the
songs next to the currently played song.
Turn the button counterclockwise to dis-
play the songs before the currently
played song.
Press the knob to skip and play the selected song.
8. AST(SCAN Play) Button
Plays 10 seconds of each song in the
USB device.
Press the button once again to cancel scanning.
9. Fast Search Button
Push [FF] button for 0.8 second or longer to initiate high speed sound search ofcurrent song.
Push [REW] button for 0.8 second or
longer to initiate reverse direction highspeed sound search of current song.
Page 160 of 308
4105
Features of your vehicle
Using an iPod when the exclusive cable is
connected to the multimedia terminal
inside the console on the right hand side
of the driver's seat.
When the iPod is connected, the 'iPod'
icon will be displayed on the top left cor-
ner of the display screen.
1. INFO Selection Button
Displays the information of the file cur-
rently played in the order of TITLE ➟
ARTIST ➟ ALBUM ➟ NORMAL DISPLAY
➟ TITLE ➟... (Displays no information if
the file has no song information.)
2. TRACK Moving Button
] button for less than 0.8 second to play from the begin-
ning of the song currently played. Press
the button for less than 0.8 second and
press it again within 1 seconds to move
and play the previous track.
] button for less than 0.8 second to move to the next
track. 3. RANDOM Playback Button
Press the button for less than 0.8 second
to activate or deactivate the random play-
back of the songs within the current cat-
egory. Press the button for longer than
0.8 second to randomly play all songs in
the entire album of the iPod.
Press the button once again to cancel
the mode.
4. REPEAT Button
Repeats the song currently played.
5. iPod Selection Button
If iPod is connected, it switches to the
iPod mode from the CD mode to play the
song files stored in the iPod. If no CD and
auxiliary device is connected, it displays
"No Media" for 3 seconds and returns to
the previous mode.
6. CATEGORY Selection Button
Moves to the upper category from cur-
rentlyplayed category of the iPod.
To move to the category displayed, press
SEARCH/ENTER knob. You will be able
to search through the lower category of
the selected category.
The order of iPod's category is SONG,
ALBUMS, ARTISTS, GENRES, and iPod.
7. SEARCH Knob & ENTER
Button
When you turn the knob clockwise, it will
display the songs(category) next to the
song currently played(category in the
same level).
Also, when you turn the knob counter-
clockwise, it will display the songs(cate-
gory) before the song currently played
(category in the same level).
If you want to listen to the song displayed
in the song category, press the button,then it will skip to the selected song and
play.