speed on Hyundai Elantra 2018 Owner's Manual
[x] Cancel search | Manufacturer: HYUNDAI, Model Year: 2018, Model line: Elantra, Model: Hyundai Elantra 2018Pages: 526, PDF Size: 17.2 MB
Page 413 of 526
6-32
What to do in an emergency
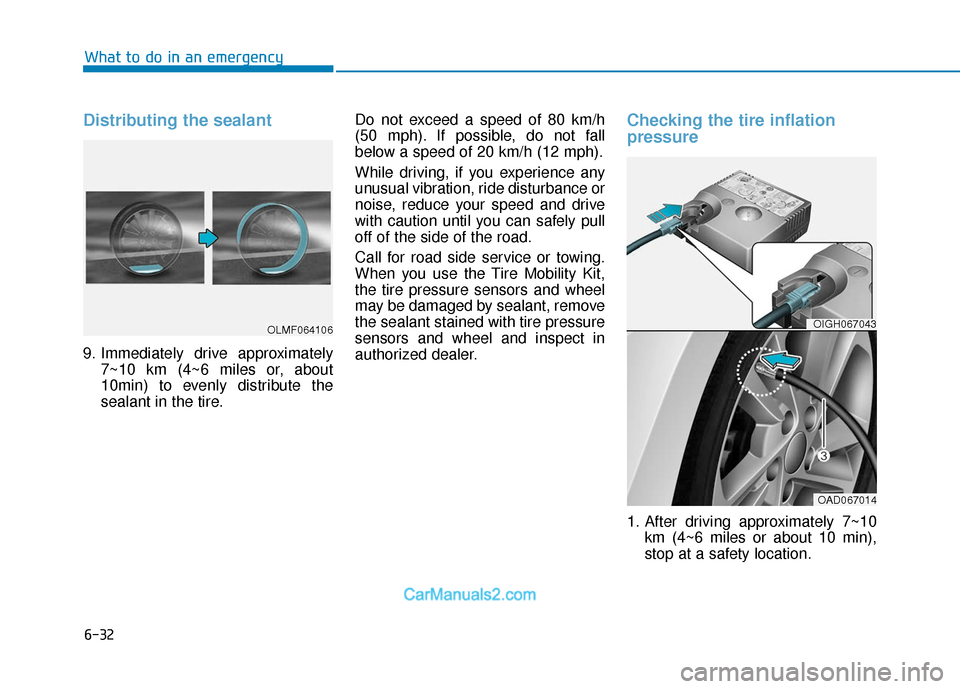
Distributing the sealant
9. Immediately drive approximately7~10 km (4~6 miles or, about
10min) to evenly distribute the
sealant in the tire. Do not exceed a speed of 80 km/h
(50 mph). If possible, do not fall
below a speed of 20 km/h (12 mph).
While driving, if you experience any
unusual vibration, ride disturbance or
noise, reduce your speed and drive
with caution until you can safely pull
off of the side of the road.
Call for road side service or towing.
When you use the Tire Mobility Kit,
the tire pressure sensors and wheel
may be damaged by sealant, remove
the sealant stained with tire pressure
sensors and wheel and inspect in
authorized dealer.
Checking the tire inflation
pressure
1. After driving approximately 7~10
km (4~6 miles or about 10 min),
stop at a safety location.
OIGH067043
OAD067014
OLMF064106
Page 417 of 526
6-36
What to do in an emergency
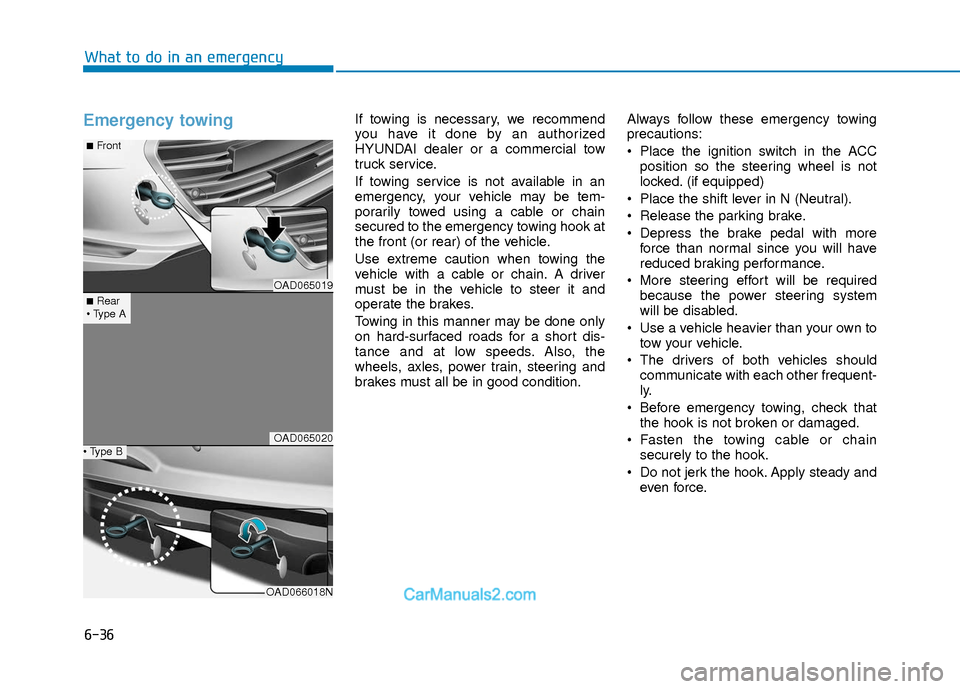
Emergency towing If towing is necessary, we recommend
you have it done by an authorized
HYUNDAI dealer or a commercial tow
truck service.
If towing service is not available in an
emergency, your vehicle may be tem-
porarily towed using a cable or chain
secured to the emergency towing hook at
the front (or rear) of the vehicle.
Use extreme caution when towing the
vehicle with a cable or chain. A driver
must be in the vehicle to steer it and
operate the brakes.
Towing in this manner may be done only
on hard-surfaced roads for a short dis-
tance and at low speeds. Also, the
wheels, axles, power train, steering and
brakes must all be in good condition.Always follow these emergency towing
precautions:
Place the ignition switch in the ACC
position so the steering wheel is not
locked. (if equipped)
Place the shift lever in N (Neutral).
Release the parking brake.
Depress the brake pedal with more force than normal since you will have
reduced braking performance.
More steering effort will be required because the power steering system
will be disabled.
Use a vehicle heavier than your own to tow your vehicle.
The drivers of both vehicles should communicate with each other frequent-
ly.
Before emergency towing, check that the hook is not broken or damaged.
Fasten the towing cable or chain securely to the hook.
Do not jerk the hook. Apply steady and even force.
OAD065019
OAD065020
OAD066018N
■Rear
■Front
Page 418 of 526
6-37
What to do in an emergency
6
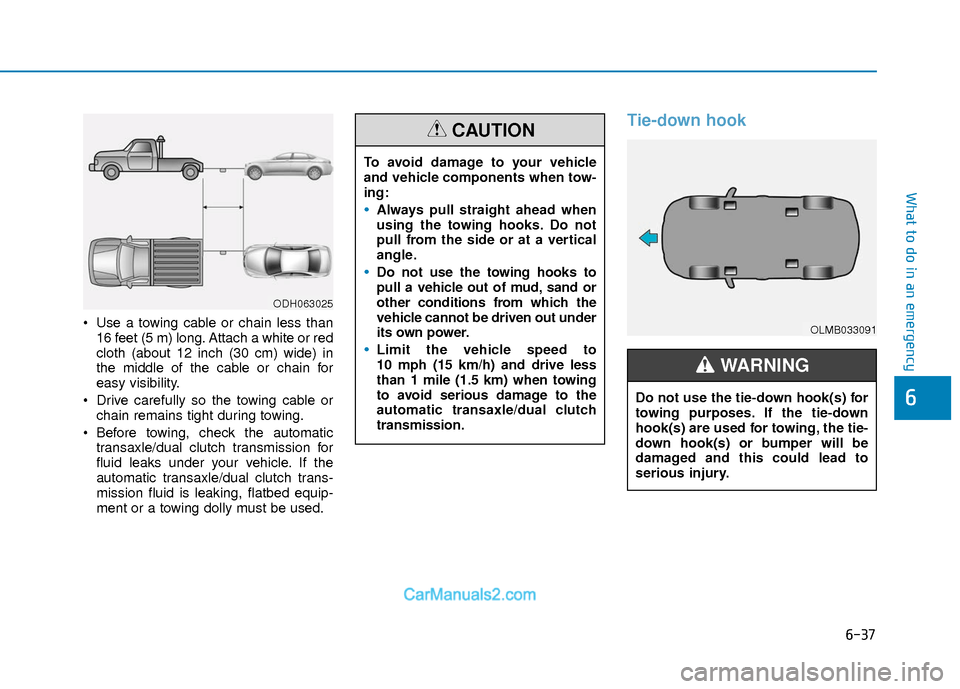
Use a towing cable or chain less than16 feet (5 m) long. Attach a white or red
cloth (about 12 inch (30 cm) wide) in
the middle of the cable or chain for
easy visibility.
Drive carefully so the towing cable or chain remains tight during towing.
Before towing, check the automatic transaxle/dual clutch transmission for
fluid leaks under your vehicle. If the
automatic transaxle/dual clutch trans-
mission fluid is leaking, flatbed equip-
ment or a towing dolly must be used.
Tie-down hook
ODH063025
To avoid damage to your vehicle
and vehicle components when tow-
ing:
Always pull straight ahead when
using the towing hooks. Do not
pull from the side or at a vertical
angle.
Do not use the towing hooks to
pull a vehicle out of mud, sand or
other conditions from which the
vehicle cannot be driven out under
its own power.
Limit the vehicle speed to
10 mph (15 km/h) and drive less
than 1 mile (1.5 km) when towing
to avoid serious damage to the
automatic transaxle/dual clutch
transmission.
CAUTION
OLMB033091
Do not use the tie-down hook(s) for
towing purposes. If the tie-down
hook(s) are used for towing, the tie-
down hook(s) or bumper will be
damaged and this could lead to
serious injury.
WARNING
Page 424 of 526
7-6
Maintenance
At least monthly:
Check coolant level in the enginecoolant reservoir.
Check the operation of all exterior lights, including the brake lights, turn
signals and hazard warning flashers.
Check the inflation pressures of all tires including the spare for tires that
are worn, show uneven wear, or are
damaged.
Check for loose wheel lug nuts.
At least twice a year: (i.e., every Spring and Fall)
Check radiator, heater and air condi-
tioning hoses for leaks or damage.
Check windshield washer spray and wiper operation. Clean wiper blades
with clean cloth dampened with wash-
er fluid.
Check headlamp alignment.
Check muffler, exhaust pipes, shields and clamps.
Check the seat belts for wear and func- tion.
At least once a year:
Clean body and door drain holes.
Lubricate door hinges and hoodhinges.
Lubricate door and hood locks and latches.
Lubricate door rubber weather strips.
Lubricate door checker.
Check the air conditioning system.
Inspect and lubricate automatic trans- mission linkage and controls.
Clean the battery and terminals.
Check the brake fluid level. Follow Normal Maintenance Schedule if
the vehicle is usually operated where
none of the following conditions apply. If
any of the following conditions apply, you
must follow the Maintenance Under
Severe Usage Conditions.
Repeated short distance driving.
Driving in dusty conditions or sandy
areas.
Extensive use of brakes.
Driving in areas where salt or other corrosive materials are used.
Driving on rough or muddy roads.
Driving in mountainous areas.
Extended periods of idling or low speed operation.
Driving for a prolonged period in cold temperatures and/or extremely humid
climates.
More than 50% driving in heavy city traffic during hot weather above 90°F
(32°C).
For additional information or assistance
see your authorized HYUNDAI dealer.
S S C
C H
H E
ED
D U
U L
LE
E D
D
M
M A
AI
IN
N T
TE
EN
N A
AN
N C
CE
E
S
S E
E R
R V
V I
IC
C E
E S
S
Page 429 of 526
7-11
7
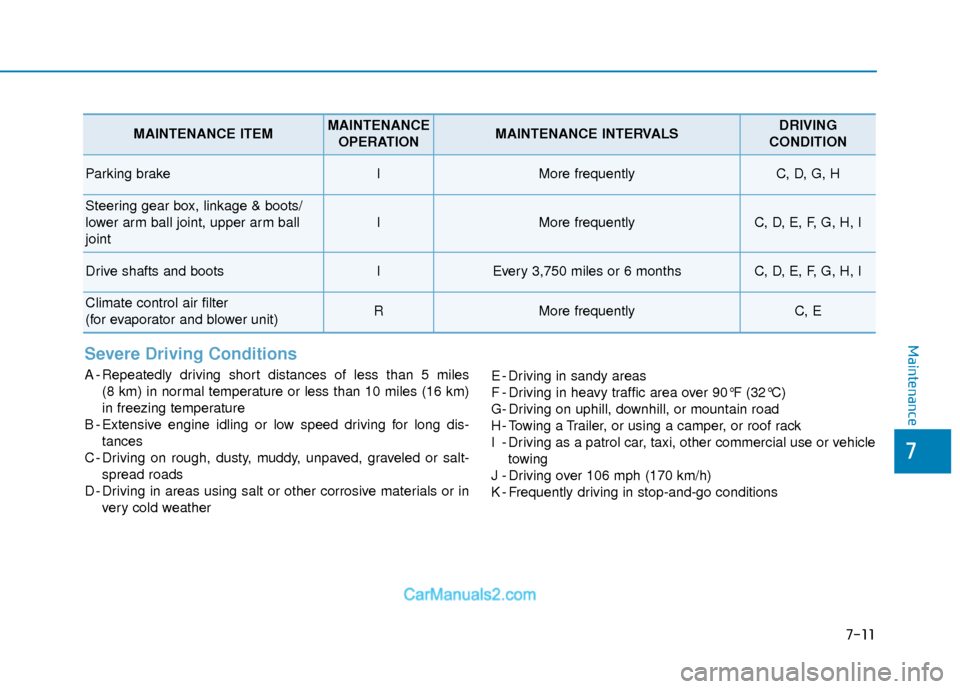
MaintenanceSevere Driving Conditions
A - Repeatedly driving short distances of less than 5 miles (8 km) in normal temperature or less than 10 miles (16 km)
in freezing temperature
B - Extensive engine idling or low speed driving for long dis- tances
C - Driving on rough, dusty, muddy, unpaved, graveled or salt- spread roads
D - Driving in areas using salt or other corrosive materials or in very cold weather E - Driving in sandy areas
F - Driving in heavy traffic area over 90°F (32°C)
G- Driving on uphill, downhill, or mountain road
H - Towing a Trailer, or using a camper, or roof rack
I - Driving as a patrol car, taxi, other commercial use or vehicle
towing
J - Driving over 106 mph (170 km/h)
K - Frequently driving in stop-and-go conditions
MAINTENANCE ITEMMAINTENANCE OPERATIONMAINTENANCE INTERVALSDRIVING
CONDITION
Parking brakeIMore frequentlyC, D, G, H
Steering gear box, linkage & boots/
lower arm ball joint, upper arm ball
joint
IMore frequentlyC, D, E, F, G, H, I
Drive shafts and bootsIEvery 3,750 miles or 6 monthsC, D, E, F, G, H, I
Climate control air filter
(for evaporator and blower unit)RMore frequentlyC, E
Page 434 of 526
7-16
Maintenance
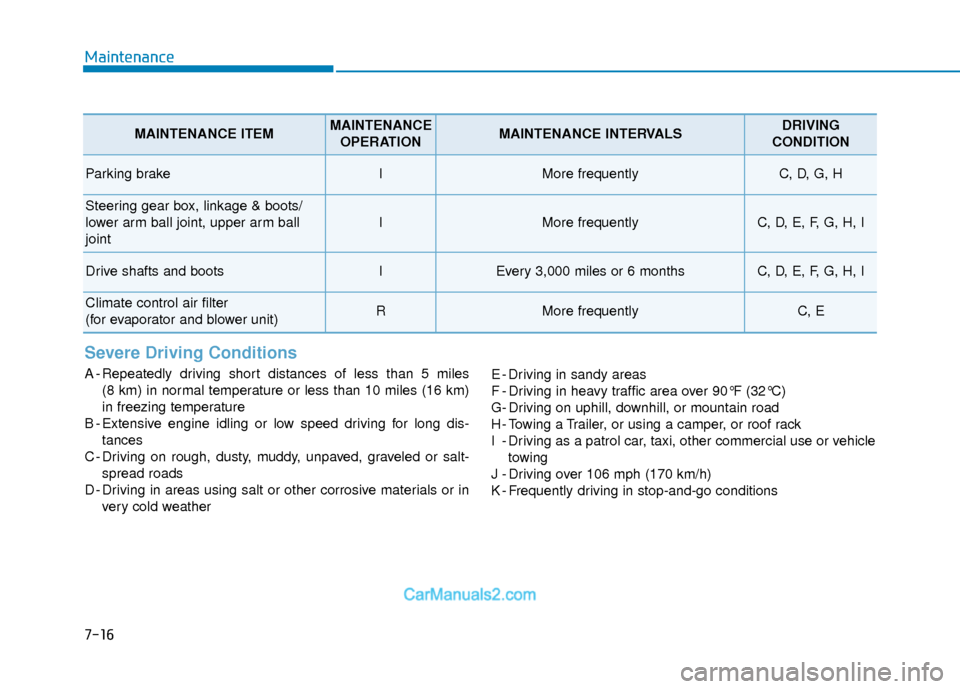
Severe Driving Conditions
A - Repeatedly driving short distances of less than 5 miles (8 km) in normal temperature or less than 10 miles (16 km)
in freezing temperature
B - Extensive engine idling or low speed driving for long dis- tances
C - Driving on rough, dusty, muddy, unpaved, graveled or salt- spread roads
D - Driving in areas using salt or other corrosive materials or in very cold weather E - Driving in sandy areas
F - Driving in heavy traffic area over 90°F (32°C)
G- Driving on uphill, downhill, or mountain road
H - Towing a Trailer, or using a camper, or roof rack
I - Driving as a patrol car, taxi, other commercial use or vehicle
towing
J - Driving over 106 mph (170 km/h)
K - Frequently driving in stop-and-go conditions
MAINTENANCE ITEMMAINTENANCE OPERATIONMAINTENANCE INTERVALSDRIVING
CONDITION
Parking brakeIMore frequentlyC, D, G, H
Steering gear box, linkage & boots/
lower arm ball joint, upper arm ball
joint
IMore frequentlyC, D, E, F, G, H, I
Drive shafts and bootsIEvery 3,000 miles or 6 monthsC, D, E, F, G, H, I
Climate control air filter
(for evaporator and blower unit)RMore frequentlyC, E
Page 435 of 526
7-17
7
Maintenance
E
EX
X P
PL
LA
A N
N A
AT
TI
IO
O N
N
O
O F
F
S
S C
C H
H E
ED
D U
U L
LE
E D
D
M
M A
AI
IN
N T
TE
EN
N A
AN
N C
CE
E
I
IT
T E
EM
M S
S
Engine Oil and Filter
The engine oil and filter should be
changed at the intervals specified in the
maintenance schedule. If the car is being
driven in severe conditions, more fre-
quent oil and filter changes are required.
Drive Belts
Inspect all drive belts for evidence of
cuts, cracks, excessive wear or oil satu-
ration and replace if necessary. Drive
belts should be checked periodically for
proper tension and adjusted as neces-
sary.
Fuel Filter
A clogged-up fuel filter may limit the vehi-
cle driving speed, damage the emission
system, and cause the hard starting.
When a considerable amount of foreign
substances are accumulated in the fuel
tank, the fuel filter should be replaced.
Upon installing a new fuel filter, operate
the engine for several minutes, and
check the connections for any leakages.
Fuel filters should be installed by an
authorized HYUNDAI dealer.
Fuel Lines, Fuel Hoses and
Connections
Check the fuel lines, fuel hoses and con-
nections for leakage and damage. Have
an authorized HYUNDAI dealer replace
any damaged or leaking parts immedi-
ately.
Vapor Hose and Fuel Filler
Cap
The vapor hose and fuel filler cap should
be inspected at those intervals specified
in the maintenance schedule. Make sure
a new vapor hose or fuel filler cap is cor-
rectly replaced.
Vacuum Crankcase Ventilation
Hoses (if equipped)
Inspect the surface of hoses for evidence
of heat and/or mechanical damage. Hard
and brittle rubber, cracking, tears, cuts,
abrasions, and excessive swelling indi-
cate deterioration. Particular attention
should be paid to examine those hose
surfaces nearest to high heat sources,
such as the exhaust manifold.
Inspect the hose routing to assure that
the hoses do not come in contact with
any heat source, sharp edges or moving
component which might cause heat dam-
age or mechanical wear. Inspect all hose connections, such as
clamps and couplings, to make sure they
are secure, and that no leaks are pres-
ent. Hoses should be replaced immedi-
ately if there is any evidence of deterio-
ration or damage.
Air Cleaner Filter
A genuine HYUNDAI air cleaner filter is
recommended when the filter is
replaced.
Spark Plugs
Make sure to install new spark plugs of
the correct heat range.
Cooling System
Check cooling system components, such
as radiator, coolant reservoir, hoses and
connections for leakage and damage.
Replace any damaged parts.
Engine Coolant
The coolant should be changed at the
intervals specified in the maintenance
schedule.
Page 440 of 526
7-22
Maintenance
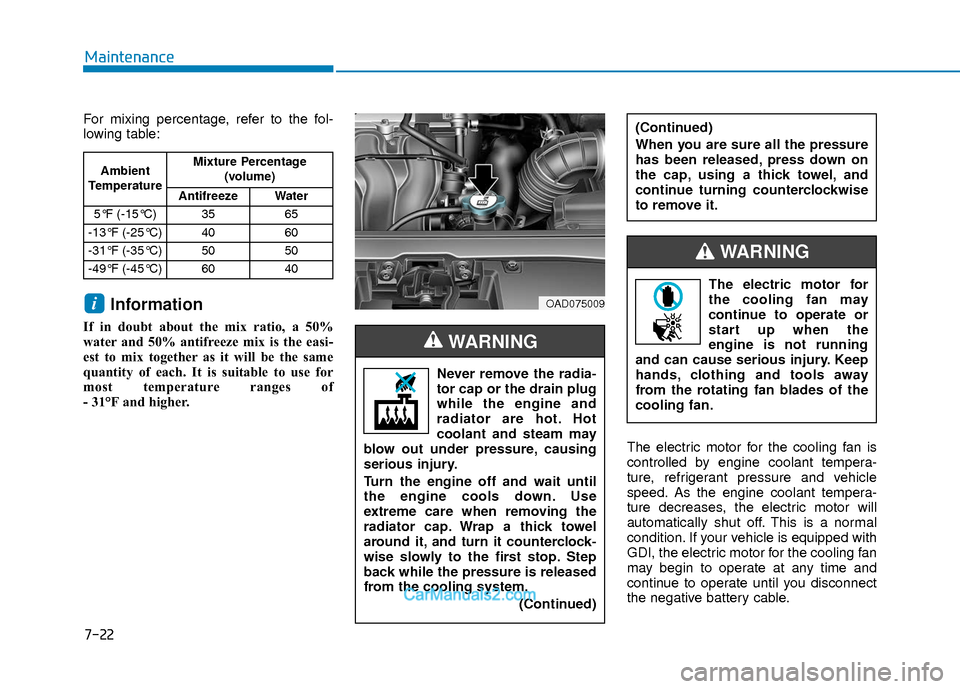
For mixing percentage, refer to the fol-
lowing table:
Information
If in doubt about the mix ratio, a 50%
water and 50% antifreeze mix is the easi-
est to mix together as it will be the same
quantity of each. It is suitable to use for
most temperature ranges of
- 31°F and higher.The electric motor for the cooling fan is
controlled by engine coolant tempera-
ture, refrigerant pressure and vehicle
speed. As the engine coolant tempera-
ture decreases, the electric motor will
automatically shut off. This is a normal
condition. If your vehicle is equipped with
GDI, the electric motor for the cooling fan
may begin to operate at any time and
continue to operate until you disconnect
the negative battery cable.
i
Ambient
Temperature Mixture Percentage
(volume)
Antifreeze Water
5°F (-15°C) 35 65
-13°F (-25°C) 40 60
-31°F (-35°C) 50 50
-49°F (-45°C) 60 40
Never remove the radia-
tor cap or the drain plug
while the engine and
radiator are hot. Hot
coolant and steam may
blow out under pressure, causing
serious injury.
Turn the engine off and wait until
the engine cools down. Use
extreme care when removing the
radiator cap. Wrap a thick towel
around it, and turn it counterclock-
wise slowly to the first stop. Step
back while the pressure is released
from the cooling system.
(Continued)
WARNING
(Continued)
When you are sure all the pressure
has been released, press down on
the cap, using a thick towel, and
continue turning counterclockwise
to remove it.
OAD075009
The electric motor for
the cooling fan may
continue to operate or
start up when the
engine is not running
and can cause serious injury. Keep
hands, clothing and tools away
from the rotating fan blades of the
cooling fan.
WARNING
Page 452 of 526
7-34
Maintenance
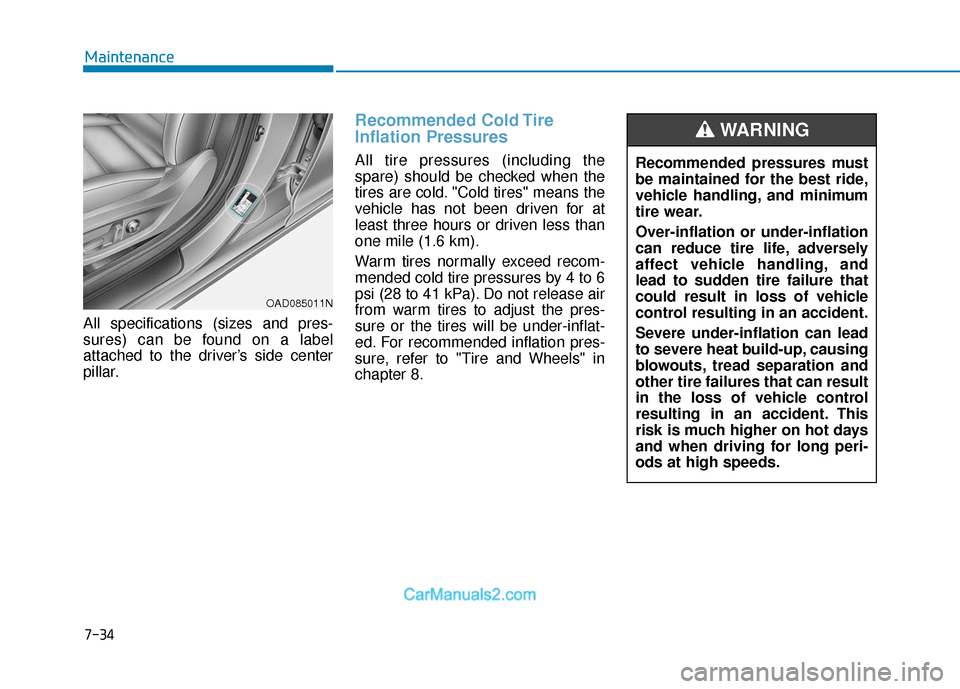
All specifications (sizes and pres-
sures) can be found on a label
attached to the driver’s side center
pillar.
Recommended Cold Tire
Inflation Pressures
All tire pressures (including the
spare) should be checked when the
tires are cold. "Cold tires" means the
vehicle has not been driven for at
least three hours or driven less than
one mile (1.6 km).
Warm tires normally exceed recom-
mended cold tire pressures by 4 to 6
psi (28 to 41 kPa). Do not release air
from warm tires to adjust the pres-
sure or the tires will be under-inflat-
ed. For recommended inflation pres-
sure, refer to "Tire and Wheels" in
chapter 8. Recommended pressures must
be maintained for the best ride,
vehicle handling, and minimum
tire wear.
Over-inflation or under-inflation
can reduce tire life, adversely
affect vehicle handling, and
lead to sudden tire failure that
could result in loss of vehicle
control resulting in an accident.
Severe under-inflation can lead
to severe heat build-up, causing
blowouts, tread separation and
other tire failures that can result
in the loss of vehicle control
resulting in an accident. This
risk is much higher on hot days
and when driving for long peri-
ods at high speeds.
WARNING
OAD085011N
Page 457 of 526
7-39
7
Maintenance
Tire Maintenance
In addition to proper inflation, correct
wheel alignment helps to decrease
tire wear. If you find a tire is worn
unevenly, have your dealer check the
wheel alignment.
When you have new tires installed,
make sure they are balanced. This
will increase vehicle ride comfort and
tire life. Additionally, a tire should
always be rebalanced if it is removed
from the wheel.
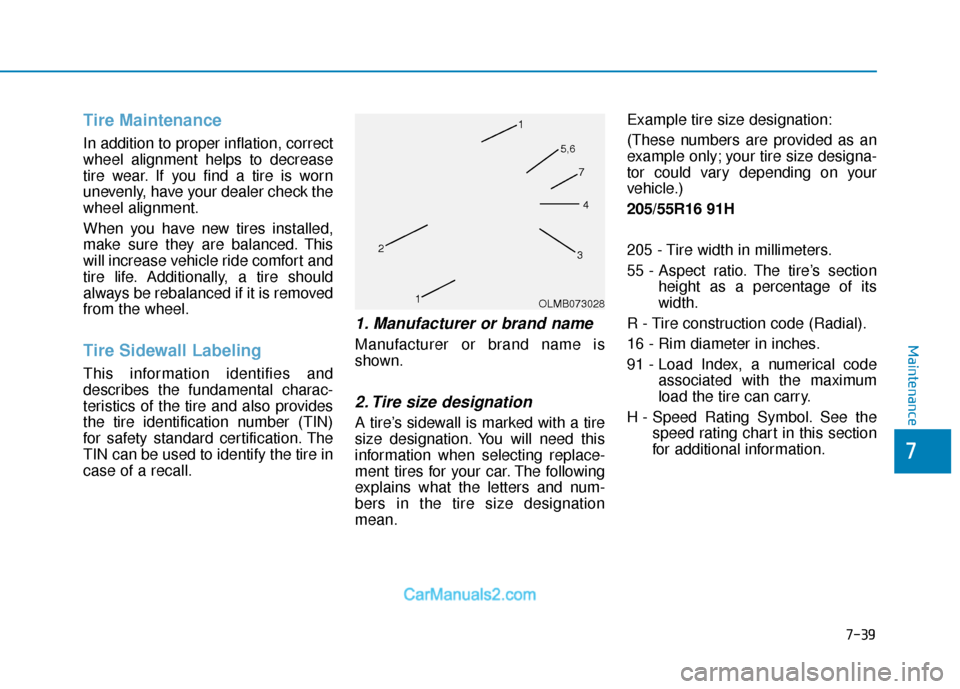
Tire Sidewall Labeling
This information identifies and
describes the fundamental charac-
teristics of the tire and also provides
the tire identification number (TIN)
for safety standard certification. The
TIN can be used to identify the tire in
case of a recall.
1. Manufacturer or brand name
Manufacturer or brand name is
shown.
2. Tire size designation
A tire’s sidewall is marked with a tire
size designation. You will need this
information when selecting replace-
ment tires for your car. The following
explains what the letters and num-
bers in the tire size designation
mean.Example tire size designation:
(These numbers are provided as an
example only; your tire size designa-
tor could vary depending on your
vehicle.)
205/55R16 91H
205 - Tire width in millimeters.
55 - Aspect ratio. The tire’s section
height as a percentage of its
width.
R - Tire construction code (Radial).
16 - Rim diameter in inches.
91 - Load Index, a numerical code associated with the maximum
load the tire can carry.
H - Speed Rating Symbol. See the speed rating chart in this section
for additional information.
OLMB073028
1
1
2
34
5,6
7