speed on Hyundai Elantra 2018 Owner's Manual
[x] Cancel search | Manufacturer: HYUNDAI, Model Year: 2018, Model line: Elantra, Model: Hyundai Elantra 2018Pages: 526, PDF Size: 17.2 MB
Page 390 of 526
6-9
What to do in an emergency
6
If any of the below happens, have
the system checked by an author-
ized HYUNDAI dealer.
1. The Low Tire Pressure TPMSMalfunction Indicator does not
illuminate for 3 seconds when
the ignition switch is placed to
the ON position or engine is
running.
2. The TPMS Malfunction Indicator remains illuminated after blink-
ing for approximately 1 minute.
3. The Low Tire Pressure LCD dis- play remains illuminated.
Low Tire Pressure
Telltale
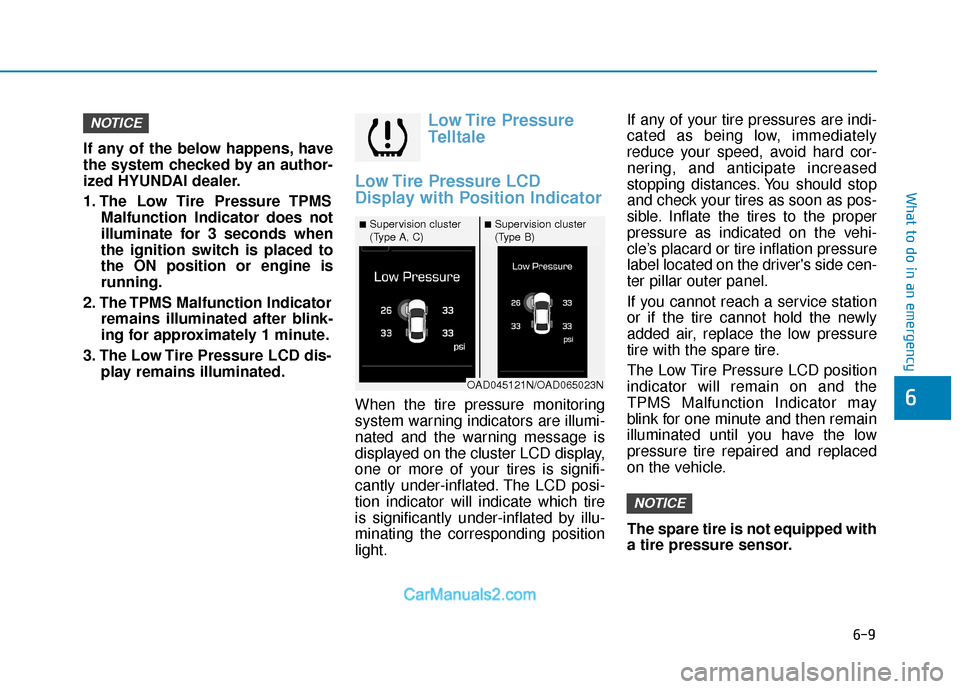
Low Tire Pressure LCD
Display with Position Indicator
When the tire pressure monitoring
system warning indicators are illumi-
nated and the warning message is
displayed on the cluster LCD display,
one or more of your tires is signifi-
cantly under-inflated. The LCD posi-
tion indicator will indicate which tire
is significantly under-inflated by illu-
minating the corresponding position
light. If any of your tire pressures are indi-
cated as being low, immediately
reduce your speed, avoid hard cor-
nering, and anticipate increased
stopping distances. You should stop
and check your tires as soon as pos-
sible. Inflate the tires to the proper
pressure as indicated on the vehi-
cle’s placard or tire inflation pressure
label located on the driver's side cen-
ter pillar outer panel.
If you cannot reach a service station
or if the tire cannot hold the newly
added air, replace the low pressure
tire with the spare tire.
The Low Tire Pressure LCD position
indicator will remain on and the
TPMS Malfunction Indicator may
blink for one minute and then remain
illuminated until you have the low
pressure tire repaired and replaced
on the vehicle.
The spare tire is not equipped with
a tire pressure sensor.
NOTICE
NOTICE
■Supervision cluster
(Type A, C)■Supervision cluster
(Type B)
OAD045121N/OAD065023N
Page 392 of 526
6-11
What to do in an emergency
6
The TPMS Malfunction Indicator
may illuminate after blinking for
one minute if the vehicle is near
electric power supply cables or
radio transmitters such as police
stations, government and public
offices, broadcasting stations,
military installations, airports,
transmitting towers, etc.
Additionally, the TPMS
Malfunction Indicator may illumi-
nate if snow chains are used or
electronic devices such as com-
puters, chargers, remote starters,
navigation, etc. This may interfere
with normal operation of the
TPMS.
Changing a Tire with TPMS
If you have a flat tire, the Low Tire
Pressure and LCD position indicator
will come on. Have the flat tire
repaired by an authorized HYUNDAI
dealer as soon as possible or
replace the flat tire with the spare
tire.
The spare tire does not come with a
tire pressure monitoring sensor.
When the low pressure tire or the flat
tire is replaced with the spare tire,
the Low Tire Pressure LCD position
indicator will remain on. Also, the
TPMS Malfunction Indicator will illu-
minate after blinking for one minute if
the vehicle is driven at speed above
15.5 mph (25 km/h) for approximate-
ly 20 minutes.Once the original tire equipped with
a tire pressure monitoring sensor is
reinflated to the recommended pres-
sure and reinstalled on the vehicle,
the Low Tire Pressure LCD position
indicator and TPMS Malfunction
Indicator will go off within a few min-
utes of driving.
If the indicators do not disappear
after a few minutes, please visit an
authorized HYUNDAI dealer.
Each wheel is equipped with a tire
pressure sensor mounted inside the
tire behind the valve stem (except for
the spare tire). You must use TPMS
specific wheels. It is recommended
that you always have your tires serv-
iced by an authorized HYUNDAI
dealer.
NOTICE
It is recommended that you do
not use a puncture-repairing
agent not approved by
HYUNDAI dealer to repair
and/or inflate a low pressure
tire. Tire sealant not approved
by HYUNDAI dealer may dam-
age the tire pressure sensor.
CAUTION
Page 401 of 526
6-20
What to do in an emergency
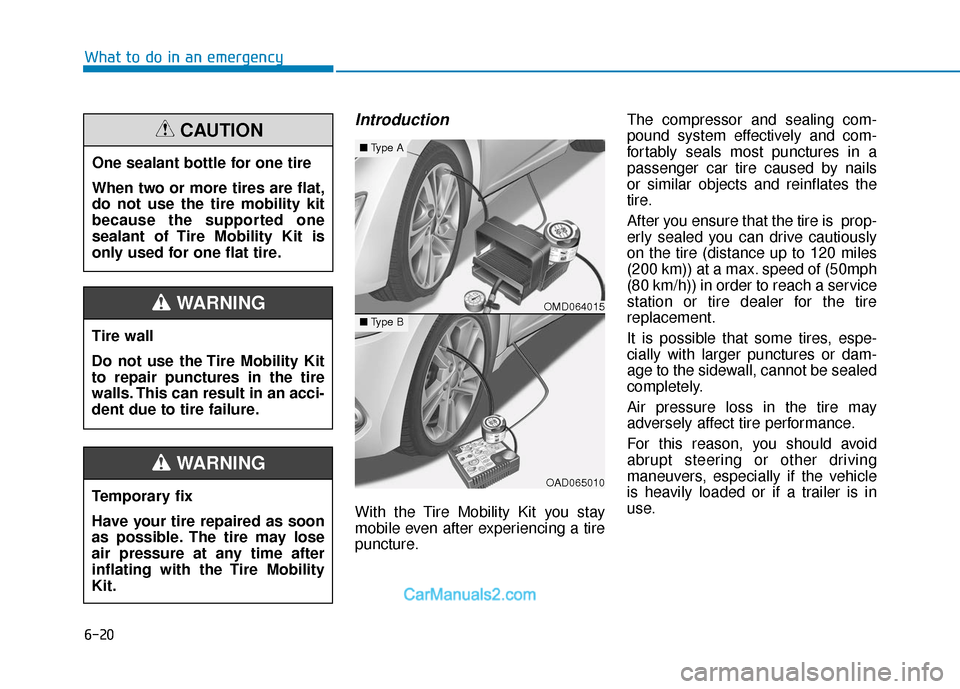
Introduction
With the Tire Mobility Kit you stay
mobile even after experiencing a tire
puncture.The compressor and sealing com-
pound system effectively and com-
fortably seals most punctures in a
passenger car tire caused by nails
or similar objects and reinflates the
tire.
After you ensure that the tire is prop-
erly sealed you can drive cautiously
on the tire (distance up to 120 miles
(200 km)) at a max. speed of (50mph
(80 km/h)) in order to reach a service
station or tire dealer for the tire
replacement.
It is possible that some tires, espe-
cially with larger punctures or dam-
age to the sidewall, cannot be sealed
completely.
Air pressure loss in the tire may
adversely affect tire performance.
For this reason, you should avoid
abrupt steering or other driving
maneuvers, especially if the vehicle
is heavily loaded or if a trailer is in
use.
One sealant bottle for one tire
When two or more tires are flat,
do not use the tire mobility kit
because the supported one
sealant of Tire Mobility Kit is
only used for one flat tire.
CAUTION
Tire wall
Do not use the Tire Mobility Kit
to repair punctures in the tire
walls. This can result in an acci-
dent due to tire failure.
WARNING
Temporary fix
Have your tire repaired as soon
as possible. The tire may lose
air pressure at any time after
inflating with the Tire Mobility
Kit.
WARNING
OMD064015
OAD065010
■
Type A
■Type B
Page 403 of 526
6-22
What to do in an emergency
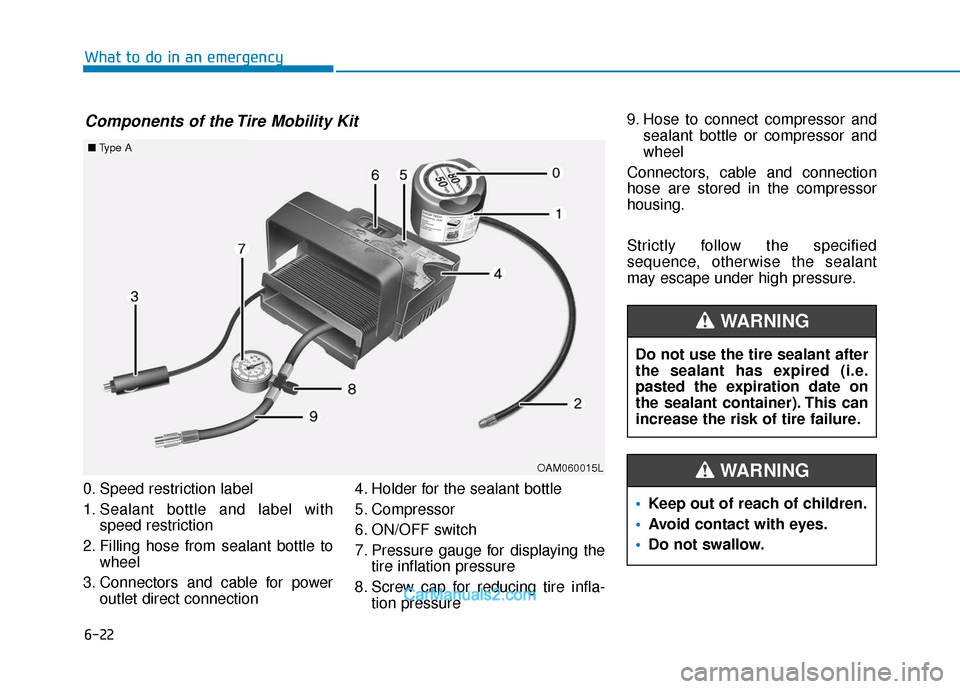
0. Speed restriction label
1. Sealant bottle and label with speed restriction
2. Filling hose from sealant bottle to wheel
3. Connectors and cable for power outlet direct connection 4. Holder for the sealant bottle
5. Compressor
6. ON/OFF switch
7. Pressure gauge for displaying the
tire inflation pressure
8. Screw cap for reducing tire infla- tion pressure 9. Hose to connect compressor and
sealant bottle or compressor and
wheel
Connectors, cable and connection
hose are stored in the compressor
housing.
Strictly follow the specified
sequence, otherwise the sealant
may escape under high pressure.
Components of the Tire Mobility Kit
OAM060015L
■ Type A
Do not use the tire sealant after
the sealant has expired (i.e.
pasted the expiration date on
the sealant container). This can
increase the risk of tire failure.
WARNING
Keep out of reach of children.
Avoid contact with eyes.
Do not swallow.
WARNING
Page 404 of 526
6-23
What to do in an emergency
6
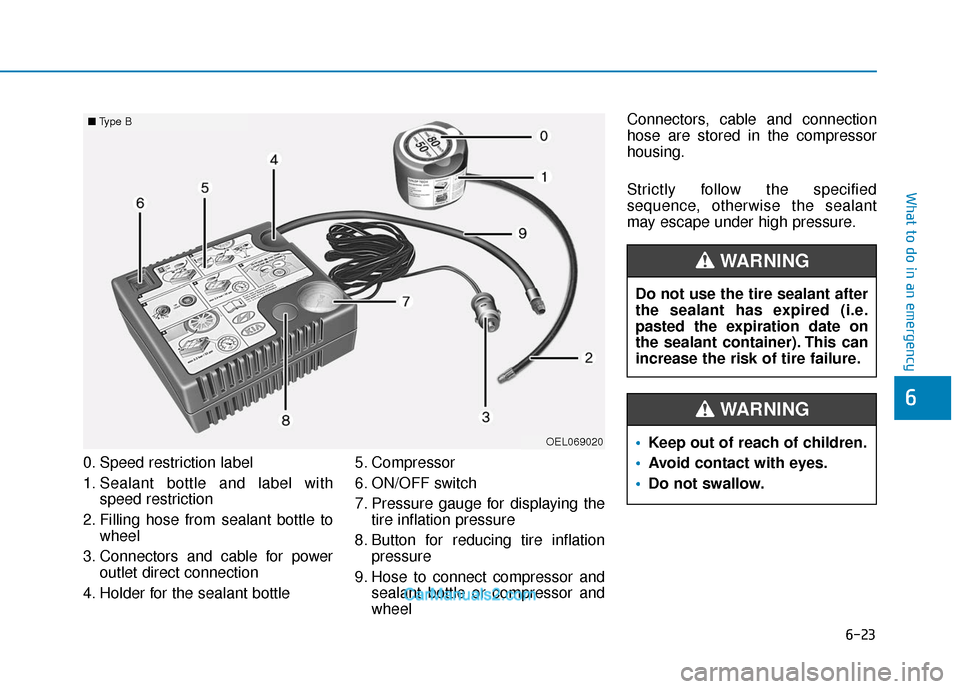
0. Speed restriction label
1. Sealant bottle and label withspeed restriction
2. Filling hose from sealant bottle to wheel
3. Connectors and cable for power outlet direct connection
4. Holder for the sealant bottle 5. Compressor
6. ON/OFF switch
7. Pressure gauge for displaying the
tire inflation pressure
8. Button for reducing tire inflation pressure
9. Hose to connect compressor and sealant bottle or compressor and
wheel Connectors, cable and connection
hose are stored in the compressor
housing.
Strictly follow the specified
sequence, otherwise the sealant
may escape under high pressure.
OEL069020
■
Type B
Do not use the tire sealant after
the sealant has expired (i.e.
pasted the expiration date on
the sealant container). This can
increase the risk of tire failure.
WARNING
Keep out of reach of children.
Avoid contact with eyes.
Do not swallow.
WARNING
Page 405 of 526
6-24
What to do in an emergency
Using the Tire Mobility Kit
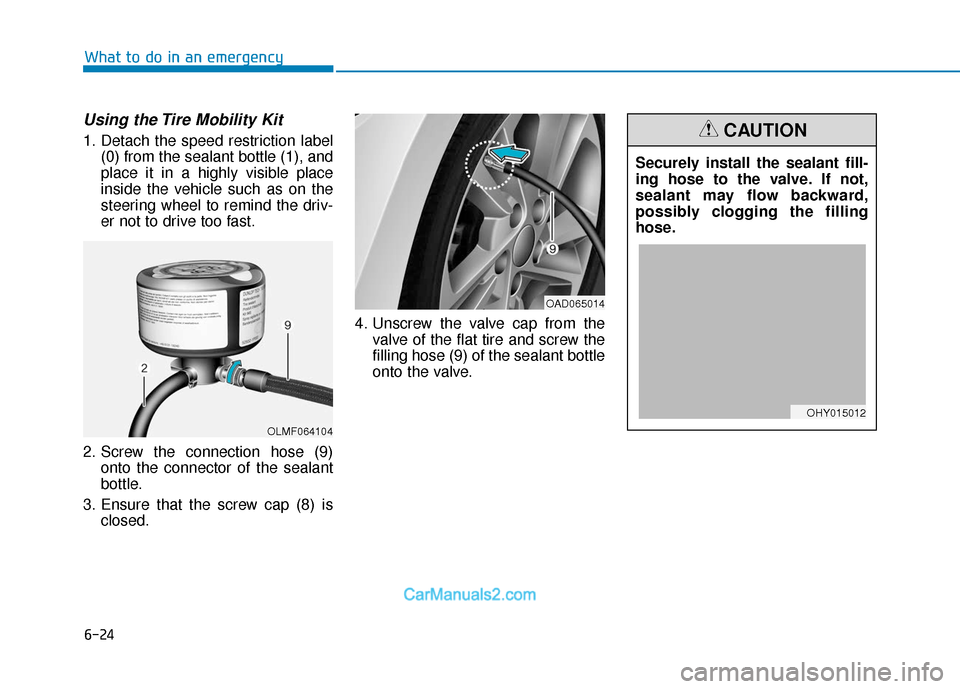
1. Detach the speed restriction label(0) from the sealant bottle (1), and
place it in a highly visible place
inside the vehicle such as on the
steering wheel to remind the driv-
er not to drive too fast.
2. Screw the connection hose (9) onto the connector of the sealant
bottle.
3. Ensure that the screw cap (8) is closed. 4. Unscrew the valve cap from the
valve of the flat tire and screw the
filling hose (9) of the sealant bottle
onto the valve.
OLMF064104
OAD065014
Securely install the sealant fill-
ing hose to the valve. If not,
sealant may flow backward,
possibly clogging the filling
hose.
CAUTION
OHY015012
Page 407 of 526
6-26
What to do in an emergency
Distributing the sealant
11. Immediately drive approximately4~6miles (7~10km or about 10
minutes) to evenly distribute the
sealant in the tire.
Do not exceed a speed of 50 mph
(80 km/h). If possible, do not fall
below a speed of 12 mph (20 km/h).
While driving, if you experience any
unusual vibration, ride disturbance or
noise, reduce your speed and drive
with caution until you can safely pull
off of the side of the road.
Call for road side service or towing.
When you use the Tire Mobility Kit,
the tire pressure sensors and wheel
may be damaged by sealant, have it
inspected at an authorized dealer.
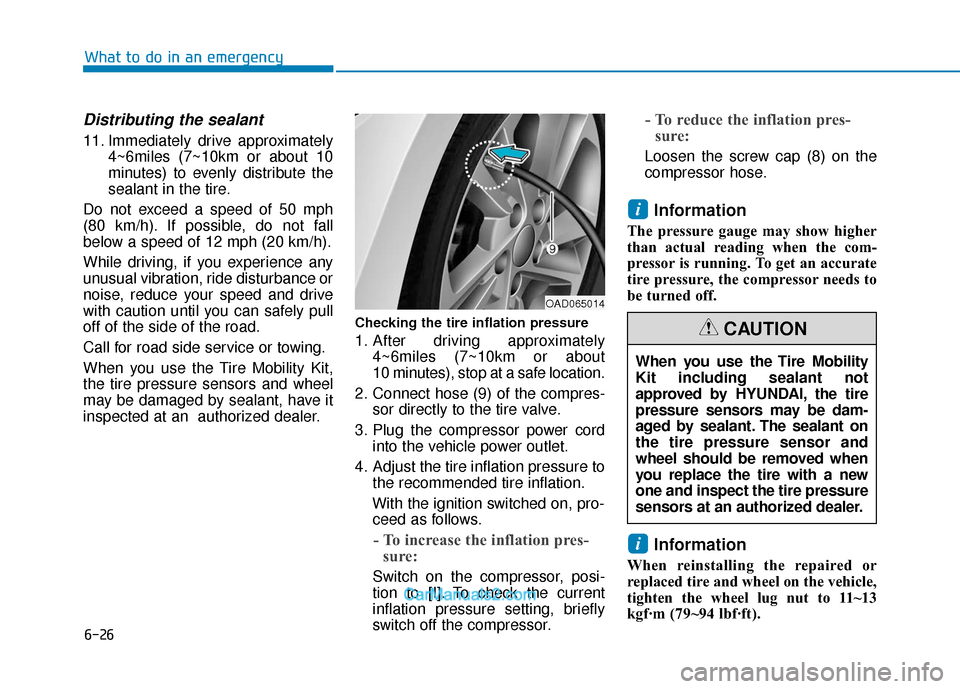
Checking the tire inflation pressure
1. After driving approximately 4~6miles (7~10km or about
10 minutes), stop at a safe location.
2. Connect hose (9) of the compres- sor directly to the tire valve.
3. Plug the compressor power cord into the vehicle power outlet.
4. Adjust the tire inflation pressure to the recommended tire inflation.
With the ignition switched on, pro- ceed as follows.
- To increase the inflation pres- sure:
Switch on the compressor, posi-
tion to [I]. To check the current
inflation pressure setting, briefly
switch off the compressor.
- To reduce the inflation pres-sure:
Loosen the screw cap (8) on the
compressor hose.
Information
The pressure gauge may show higher
than actual reading when the com-
pressor is running. To get an accurate
tire pressure, the compressor needs to
be turned off.
Information
When reinstalling the repaired or
replaced tire and wheel on the vehicle,
tighten the wheel lug nut to 11~13
kgf·m (79~94 lbf·ft).
i
i
OAD065014
When you use the Tire Mobility
Kit including sealant not
approved by HYUNDAI, the tire
pressure sensors may be dam-
aged by sealant. The sealant on
the tire pressure sensor and
wheel should be removed when
you replace the tire with a new
one and inspect the tire pressure
sensors at an authorized dealer.
CAUTION
Page 408 of 526
6-27
What to do in an emergency
6
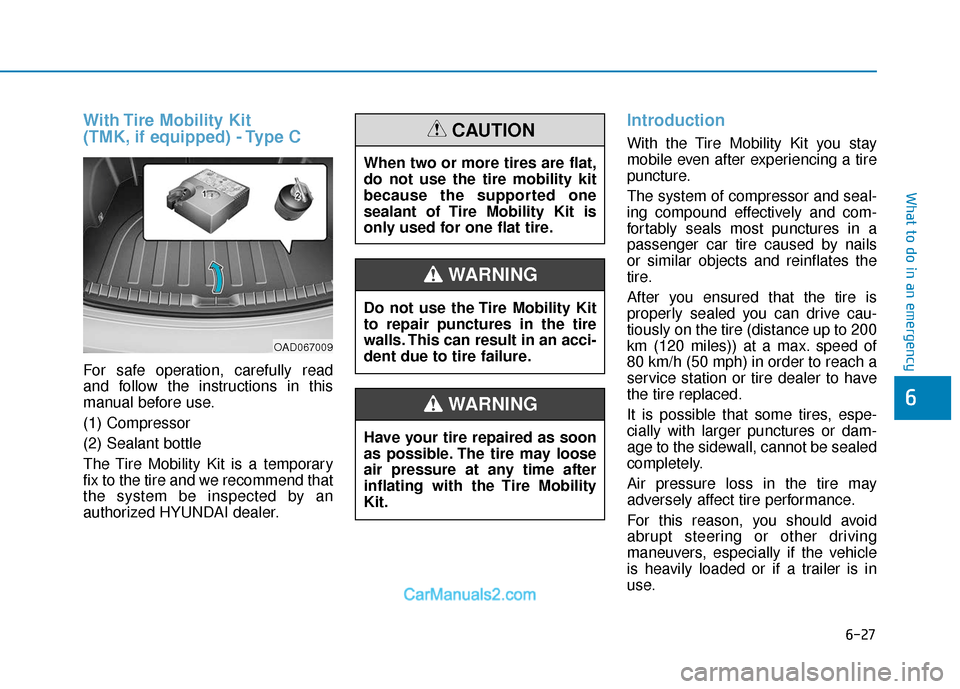
With Tire Mobility Kit
(TMK, if equipped) - Type C
For safe operation, carefully read
and follow the instructions in this
manual before use.
(1) Compressor
(2) Sealant bottle
The Tire Mobility Kit is a temporary
fix to the tire and we recommend that
the system be inspected by an
authorized HYUNDAI dealer.
Introduction
With the Tire Mobility Kit you stay
mobile even after experiencing a tire
puncture.
The system of compressor and seal-
ing compound effectively and com-
fortably seals most punctures in a
passenger car tire caused by nails
or similar objects and reinflates the
tire.
After you ensured that the tire is
properly sealed you can drive cau-
tiously on the tire (distance up to 200
km (120 miles)) at a max. speed of
80 km/h (50 mph) in order to reach a
service station or tire dealer to have
the tire replaced.
It is possible that some tires, espe-
cially with larger punctures or dam-
age to the sidewall, cannot be sealed
completely.
Air pressure loss in the tire may
adversely affect tire performance.
For this reason, you should avoid
abrupt steering or other driving
maneuvers, especially if the vehicle
is heavily loaded or if a trailer is in
use.
OAD067009
Do not use the Tire Mobility Kit
to repair punctures in the tire
walls. This can result in an acci-
dent due to tire failure.
WARNING
Have your tire repaired as soon
as possible. The tire may loose
air pressure at any time after
inflating with the Tire Mobility
Kit.
WARNING
When two or more tires are flat,
do not use the tire mobility kit
because the supported one
sealant of Tire Mobility Kit is
only used for one flat tire.
CAUTION
Page 410 of 526
6-29
What to do in an emergency
6
Connectors, cable and connection
hose are stored in the compressor
housing.
Strictly follow the specified
sequence, otherwise the sealant
may escape under high pressure.
ODE067044
Expired sealant
Do not use the Tire sealant after
the sealant has expired (i.e.
pasted the expiration date on
the sealant container). This can
increase the risk of tire failure.
WARNING
Sealant
Keep out of reach of children.
Avoid contact with eyes.
Do not swallow.
WARNING
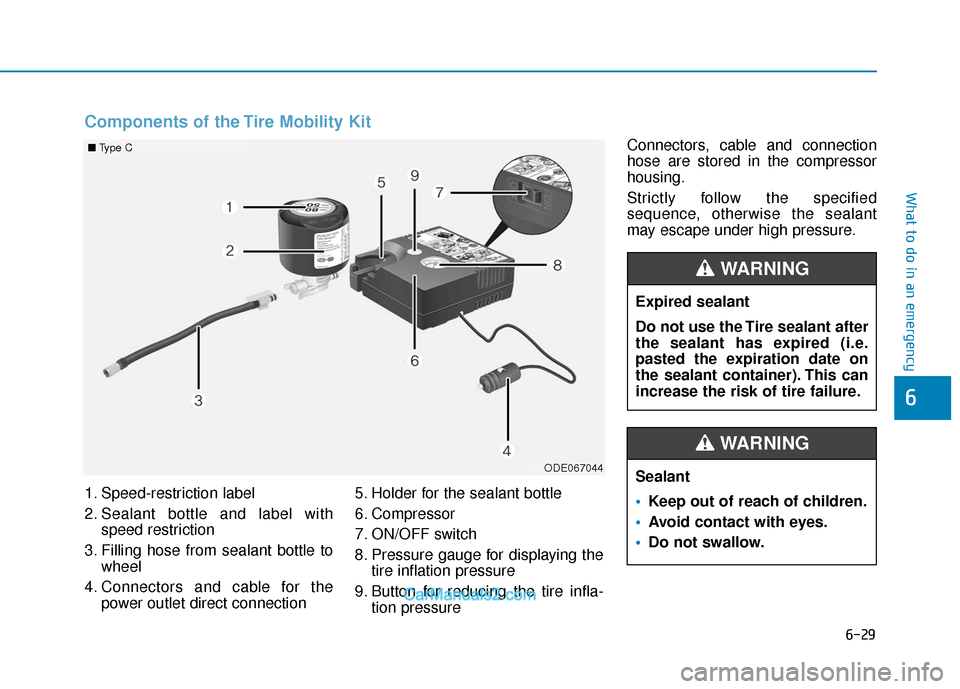
Components of the Tire Mobility Kit
1. Speed-restriction label
2. Sealant bottle and label with
speed restriction
3. Filling hose from sealant bottle to wheel
4. Connectors and cable for the power outlet direct connection 5. Holder for the sealant bottle
6. Compressor
7. ON/OFF switch
8. Pressure gauge for displaying the
tire inflation pressure
9. Button for reducing the tire infla- tion pressure
■Type C
Page 411 of 526
6-30
What to do in an emergency
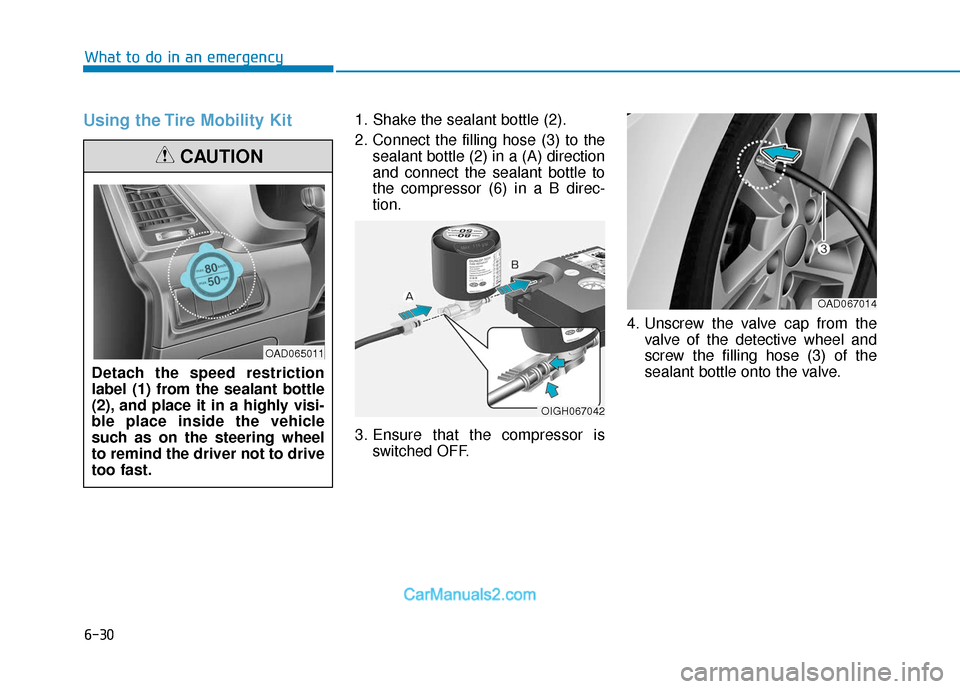
Using the Tire Mobility Kit1. Shake the sealant bottle (2).
2. Connect the filling hose (3) to thesealant bottle (2) in a (A) direction
and connect the sealant bottle to
the compressor (6) in a B direc-
tion.
3. Ensure that the compressor is switched OFF. 4. Unscrew the valve cap from the
valve of the detective wheel and
screw the filling hose (3) of the
sealant bottle onto the valve.
Detach the speed restriction
label (1) from the sealant bottle
(2), and place it in a highly visi-
ble place inside the vehicle
such as on the steering wheel
to remind the driver not to drive
too fast.
CAUTION
OIGH067042
OAD067014
OAD065011