HYUNDAI ELANTRA GT 2019 Owners Manual
Manufacturer: HYUNDAI, Model Year: 2019, Model line: ELANTRA GT, Model: HYUNDAI ELANTRA GT 2019Pages: 486, PDF Size: 78.59 MB
Page 161 of 486
3-76
Convenient features of your vehicle
Forward Collision-AvoidanceAssist (FCA) system
To activate or deactivate the Forward
Collision-Avoidance Assist (FCA)system.
For more information, refer to
"Forward Collision-Avoidance
Assist (FCA) system" in chapter 5.
Forward Collision Warning
- Late/Normal/Early
To adjust the initial warning alert
time for Automatic Emergency
Braking system.
For more information, refer to
"Forward Collision-Avoidance
Assist (FCA) system" in chapter 5.
Rear Cross-Traffic Collision Warning (RCCW)
To activate or deactivate the Rear
Cross-Traffic Collision Warning(RCCW) system.
For more information, refer to
"Blind-spot Collision Warning
(BCW) system" in chapter 5. 2. Door
Auto Lock
- Disable: The auto door lock opera-
tion will be canceled.
- Enable on Speed: All doors will be automatically locked when the
vehicle speed exceeds 15 km/h(9.3 mph).
- Enable on Shift: All doors will be automatically locked if the auto-
matic transmission shift lever is
shifted from the P (Park) position to
the R (Reverse), N (Neutral), or D
(Drive) position.
Auto Unlock
- Disable: The auto door unlock operation will be canceled.
- On Key Out: All doors will be auto- matically unlocked when the igni-
tion key is removed from the key
ignition switch (if equipped with
remote key).
- Vehicle Off: All doors will be auto- matically unlocked when the
Engine Start/Stop button is set tothe OFF position (if equipped with
smart key). - On Shift to P: All doors will be auto-
matically unlocked if the automatic
transmission/dual clutch transmis-
sion shift lever is shifted to the P
(Park) position.
Two Press Unlock
- Off: The two press unlock function will be deactivated. Therefore, all
doors will unlock if the door unlock
button is pressed.
- On: Only the driver's door will unlock if the door unlock button is
pressed. When the door unlock
button is pressed again within 4
seconds, the remaining doors will
unlock.
Horn Feedback
To activate or deactivate the horn
feedback.
If the horn feedback is activated,
after locking the door by pressing the
lock button on the remote key, and
pressing it again within 4 seconds,
the horn feedback sound will operateonce to indicate that all doors are
locked (if equipped with remote key).
Page 162 of 486
3-77
Convenient features of your vehicle
3
3. Lights
One Touch Turn Signal
- Off: The one touch turn signal func-tion will be deactivated.
- 3, 5, 7 Flashes: The turn signal indicator will blink 3, 5, or 7 times
when the turn signal lever is moved
slightly.
For more information, refer to
"Lighting" in this chapter.
Head Lamp Delay
To activate or deactivate the head-
light delay function.
For more information, refer to
"Lighting" in this chapter
4. Sound
Blind-spot Collision Warning Sound
To activate or deactivate the Blind-
spot Collision Warning sound.
For more information, refer to
"Blind-spot Collision Warning" in
chapter 5.
Welcome Sound
To activate or deactivate the wel- come sound function. 5. Convenience
Wireless Charging System
To activate or deactivate the wireless charging system in the front seat.
For more information, refer to
"Wireless Charging System" in
this chapter.
Wiper/Lights Display
To activate or deactivate the Wiper/
Light mode.
When activated, the LCD display
shows the selected Wiper/Light
mode whenever you change the
mode.
Auto Rear Wiper (reverse)
To activate or deactivate the rear
wiper while the vehicle is in reversewith the front wiper ON.
Gear Position Pop-up
To activate or deactivate the gear
position pop-up.
When activated, the gear position
will be displayed on the LCD display.
(if equipped with automatic transmis-
sion/dual clutch transmission)
6. Service
Service Interval
To activate or deactivate the service
interval function.
Adjust Interval
If the service interval menu is acti-
vated, you may adjust the time and
distance.
Information
To use the service interval menu, con-
sult an authorized HYUNDAI dealer.
If the service interval is activated and the time and distance is adjusted,
messages are displayed in the fol-
lowing situations each time the vehi-
cle is turned on.
- Service in : Displayed to inform the driver theremaining mileage and days to
service.
- Service required : Displayed when the mileage anddays to service has been reachedor passed.
i
Page 163 of 486
3-78
Convenient features of your vehicle
Information
If any of the following conditions
occur, the mileage and number of days
to service may be incorrect.
- The battery cable is disconnected.
- The fuse switch is turned off.
- The battery is discharged. 7. Other
Fuel Economy Auto Reset
- Off: The average fuel economy will
not reset automatically whenever refueling.
- After Ignition: When the engine has been OFF for 4 hours or longer the
average fuel economy will reset
automatically.
- After Refueling: The average fuel economy will reset automaticallyafter adding 6 liters (1.6 gallons) of
fuel or more and after driving
speed exceeds 1 km/h (1 mph).
For more information, refer to
"Trip Computer" in this chapter.
Fuel Economy Unit
To select the fuel economy unit. (km/L, L/100 km)
Temperature Unit
To select the temperature unit.
(°C,°F)
Tire Pressure Unit
To select the tire pressure unit.
(psi, kPa, bar) Language
To select language.
8. Reset
You can reset the menus in the User
Settings Mode. All menus in the User
Settings Mode are reset to factory
settings, except language and serv-
ice interval.i
Page 164 of 486
3-79
Convenient features of your vehicle
3
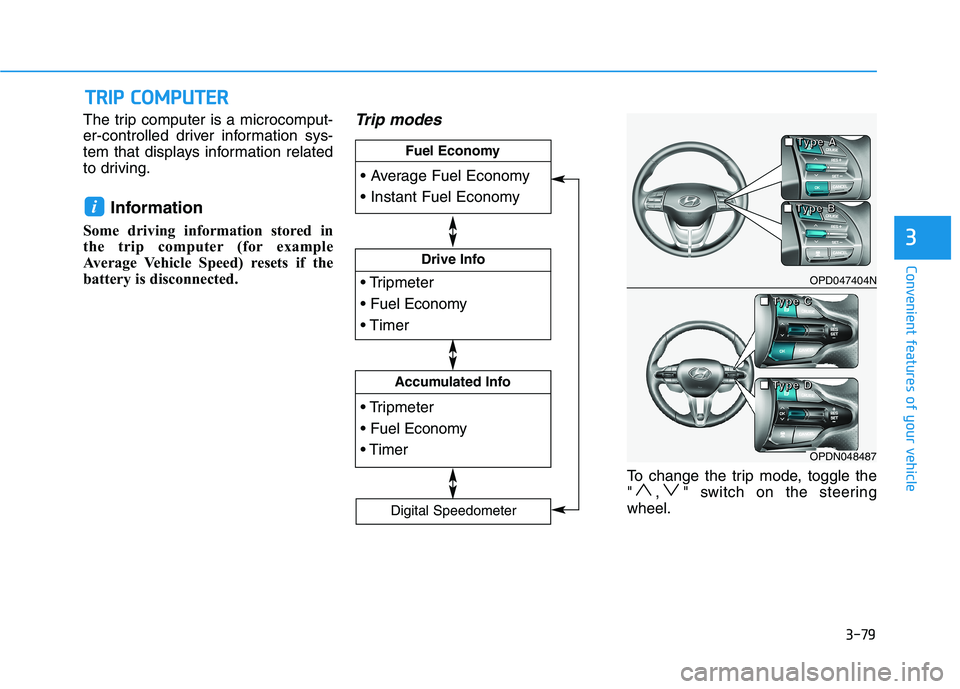
The trip computer is a microcomput-
er-controlled driver information sys-
tem that displays information related
to driving.Information
Some driving information stored in
the trip computer (for example
Average Vehicle Speed) resets if the
battery is disconnected.Trip modes
To change the trip mode, toggle the
" , " switch on the steeringwheel.
i
TT RR IIPP CC OO MM PPUU TTEERR
Drive Info
Accumulated Info
Fuel Economy
Digital Speedometer
OPD047404N
OPDN048487
■
■■■TTTTyyyyppppeeee AAAA
■■■■TTTTyyyyppppeeee CCCC
■■■■TTTTyyyyppppeeee DDDD
■■■■TTTTyyyyppppeeee BBBB
Page 165 of 486
3-80
Convenient features of your vehicle
Average fuel economy/Instant fuel economy
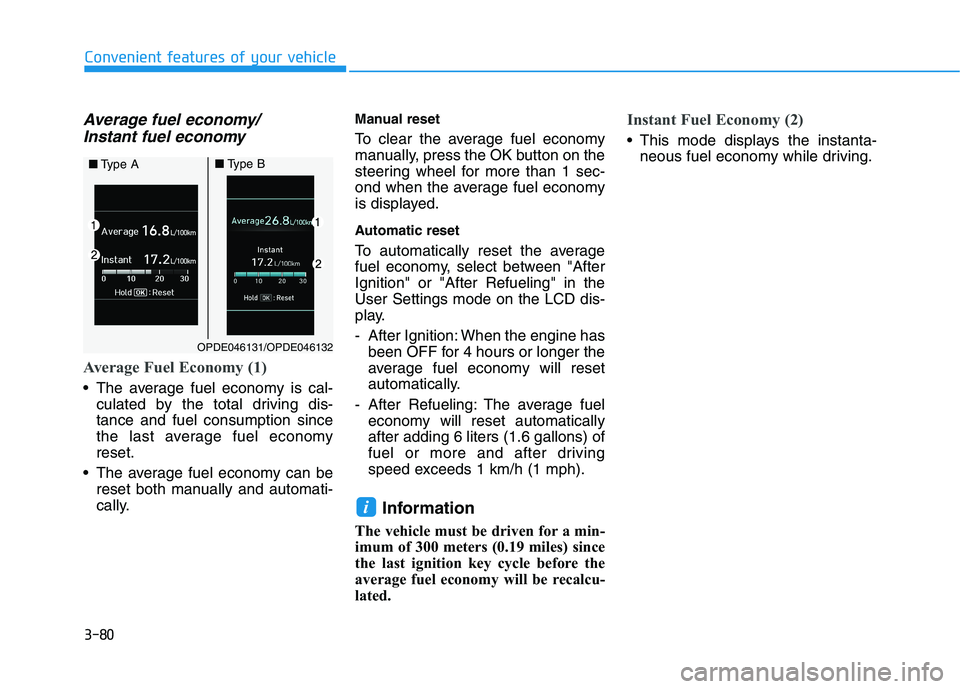
Average Fuel Economy (1)
The average fuel economy is cal- culated by the total driving dis- tance and fuel consumption since
the last average fuel economyreset.
The average fuel economy can be reset both manually and automati-
cally. Manual reset
To clear the average fuel economy
manually, press the OK button on the
steering wheel for more than 1 sec-
ond when the average fuel economy
is displayed.
Automatic reset
To automatically reset the average
fuel economy, select between "AfterIgnition" or "After Refueling" in theUser Settings mode on the LCD dis-
play.
- After Ignition: When the engine has
been OFF for 4 hours or longer the
average fuel economy will reset
automatically.
- After Refueling: The average fuel economy will reset automaticallyafter adding 6 liters (1.6 gallons) of
fuel or more and after driving
speed exceeds 1 km/h (1 mph).
Information
The vehicle must be driven for a min-
imum of 300 meters (0.19 miles) since
the last ignition key cycle before the
average fuel economy will be recalcu-
lated.
Instant Fuel Economy (2)
This mode displays the instanta- neous fuel economy while driving.
i
OPDE046131/OPDE046132
■Type A■Type B
Page 166 of 486
3-81
Convenient features of your vehicle
3
Accumulated Info display
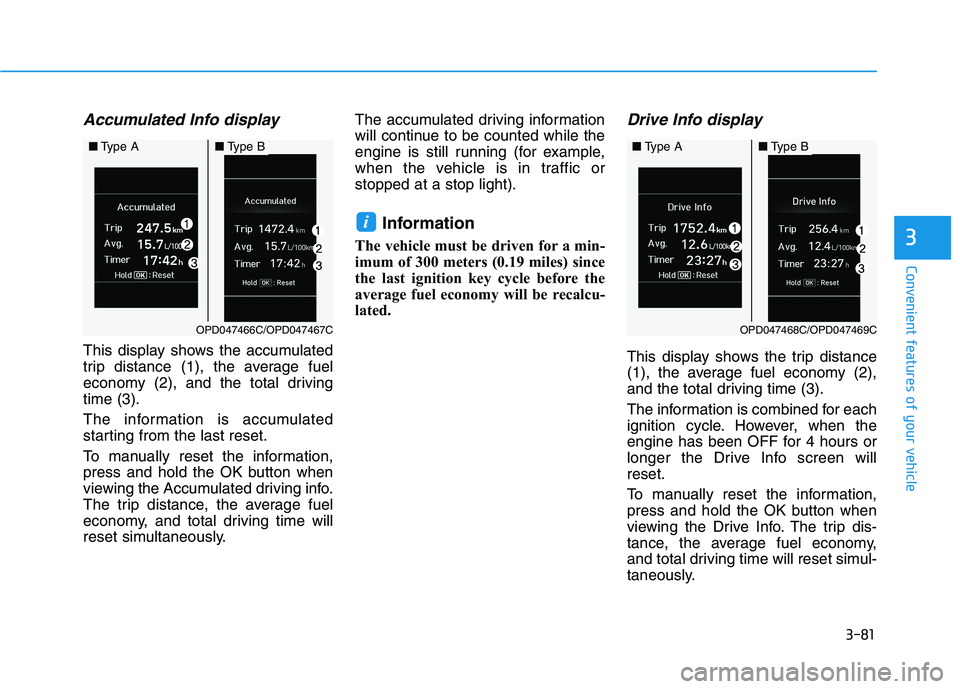
This display shows the accumulated
trip distance (1), the average fuel
economy (2), and the total drivingtime (3).
The information is accumulated
starting from the last reset.
To manually reset the information,
press and hold the OK button when
viewing the Accumulated driving info.
The trip distance, the average fuel
economy, and total driving time will
reset simultaneously.The accumulated driving information
will continue to be counted while the
engine is still running (for example,
when the vehicle is in traffic orstopped at a stop light).
Information
The vehicle must be driven for a min-
imum of 300 meters (0.19 miles) since
the last ignition key cycle before the
average fuel economy will be recalcu-
lated.
Drive Info display
This display shows the trip distance
(1), the average fuel economy (2),
and the total driving time (3).
The information is combined for each
ignition cycle. However, when the
engine has been OFF for 4 hours or
longer the Drive Info screen willreset.
To manually reset the information,
press and hold the OK button when
viewing the Drive Info. The trip dis-
tance, the average fuel economy,
and total driving time will reset simul-
taneously.
i
OPD047468C/OPD047469C
■ Type A■Type B
OPD047466C/OPD047467C
■Type A■Type B
Page 167 of 486
The driving information will continue to be counted while the engine is still
running (for example, when the vehi-
cle is in traffic or stopped at a stoplight).Information
The vehicle must be driven for a min-
imum of 300 meters (0.19 miles) since
the last ignition key cycle before the
average fuel economy will be recalcu-
lated.Digital speedometer
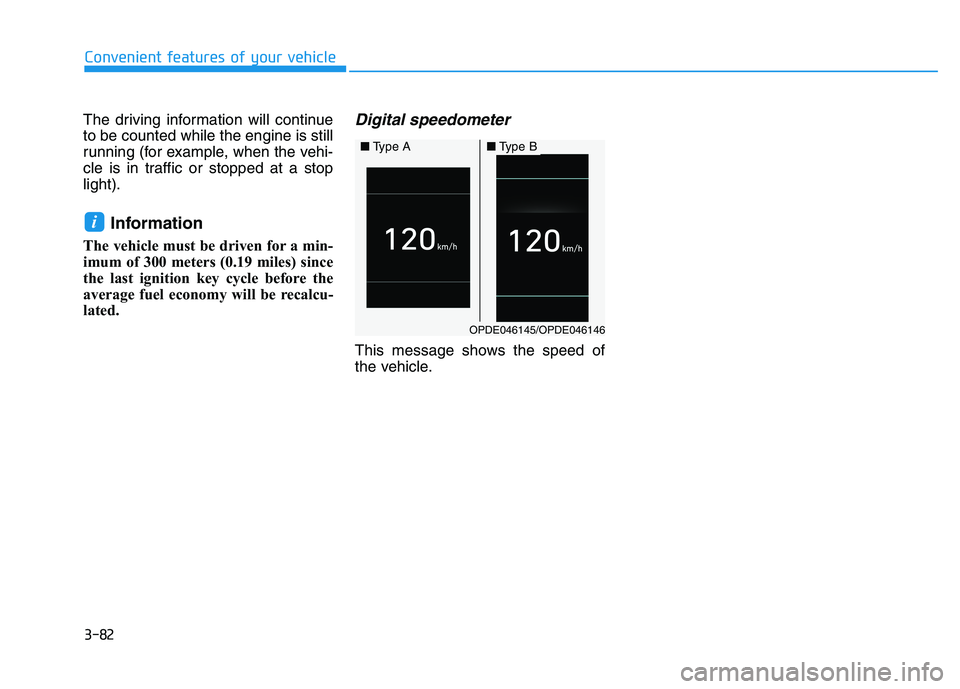
This message shows the speed of
the vehicle.
i
Convenient features of your vehicle
3-82
OPDE046145/OPDE046146
■ Type A■Type B
Page 168 of 486
3-83
Convenient features of your vehicle
3
LLIIGG HH TTIINN GG
Exterior Lights
Lighting control
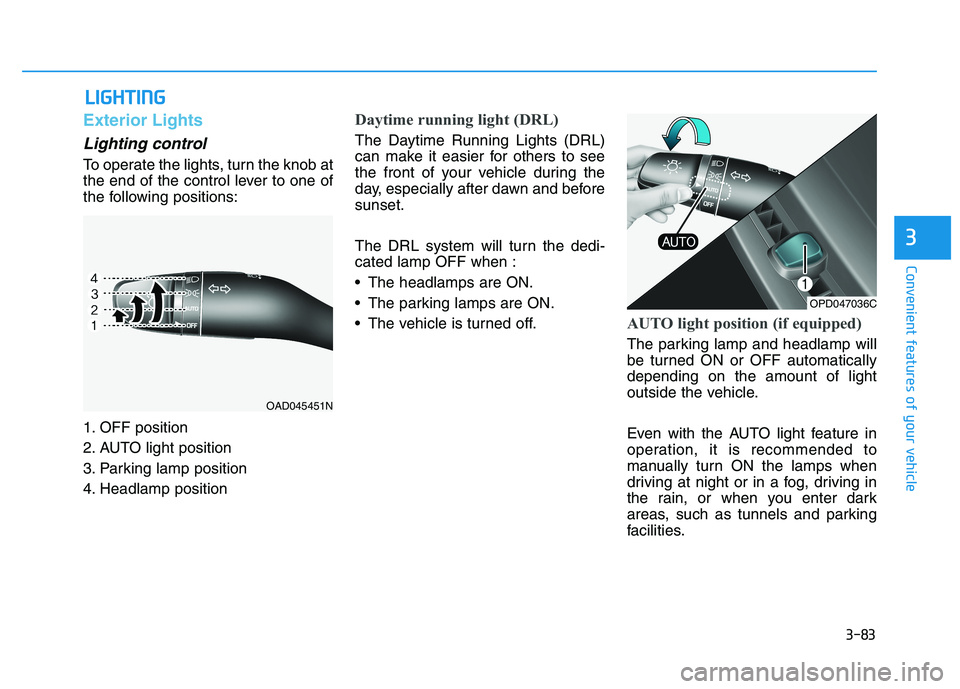
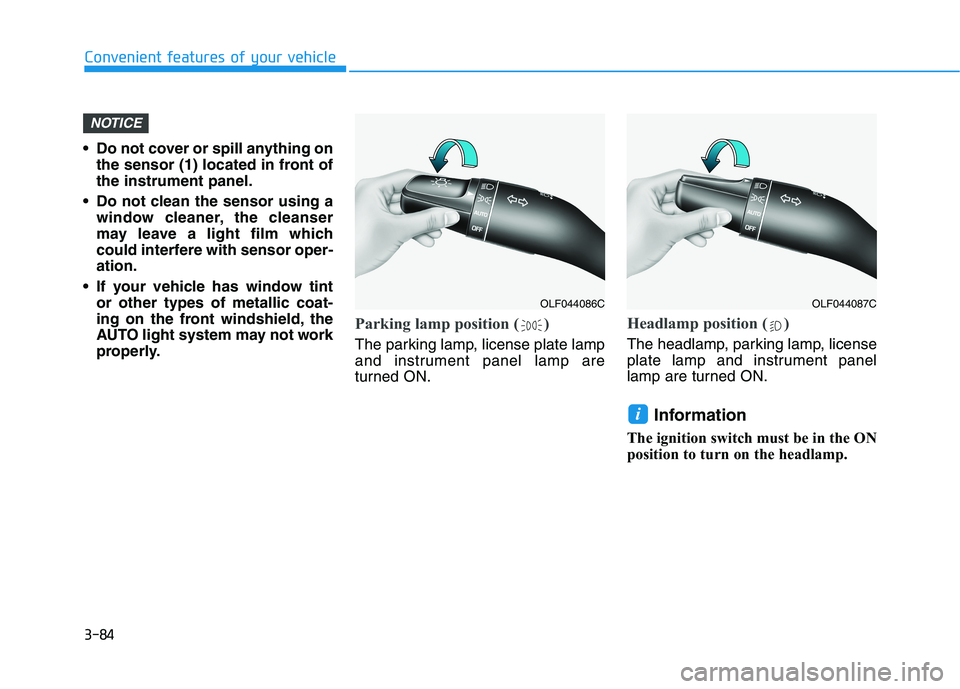
To operate the lights, turn the knob at
the end of the control lever to one of
the following positions:
1. OFF position
2. AUTO light position
3. Parking lamp position
4. Headlamp position
Daytime running light (DRL)
The Daytime Running Lights (DRL)
can make it easier for others to see
the front of your vehicle during the
day, especially after dawn and beforesunset.
The DRL system will turn the dedi- cated lamp OFF when :
• The headlamps are ON.
The parking lamps are ON.
The vehicle is turned off.
AUTO light position (if equipped)
The parking lamp and headlamp will
be turned ON or OFF automaticallydepending on the amount of light
outside the vehicle.
Even with the AUTO light feature in
operation, it is recommended to
manually turn ON the lamps when
driving at night or in a fog, driving in
the rain, or when you enter dark
areas, such as tunnels and parking
facilities.
OAD045451N
OPD047036C
Page 169 of 486
3-84
Convenient features of your vehicle
• Do not cover or spill anything onthe sensor (1) located in front of the instrument panel.
Do not clean the sensor using a window cleaner, the cleanser
may leave a light film which
could interfere with sensor oper-ation.
If your vehicle has window tint or other types of metallic coat-
ing on the front windshield, the
AUTO light system may not work
properly.
Parking lamp position ( )
The parking lamp, license plate lamp
and instrument panel lamp are
turned ON.
Headlamp position ( )
The headlamp, parking lamp, license
plate lamp and instrument panel
lamp are turned ON.
Information
The ignition switch must be in the ON
position to turn on the headlamp.
i
NOTICE
OLF044086COLF044087C
Page 170 of 486
3-85
Convenient features of your vehicle
3
High beam operation
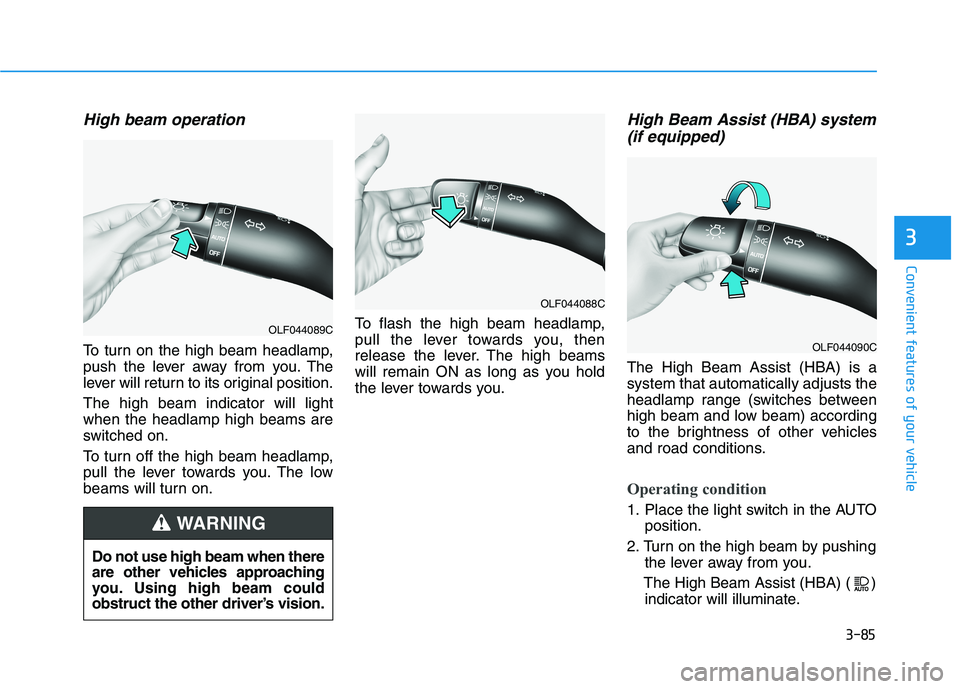
To turn on the high beam headlamp,
push the lever away from you. The
lever will return to its original position. The high beam indicator will light when the headlamp high beams are
switched on.
To turn off the high beam headlamp,
pull the lever towards you. The low
beams will turn on.To flash the high beam headlamp,
pull the lever towards you, then
release the lever. The high beams
will remain ON as long as you hold
the lever towards you.
High Beam Assist (HBA) system
(if equipped)
The High Beam Assist (HBA) is asystem that automatically adjusts the
headlamp range (switches between
high beam and low beam) according
to the brightness of other vehicles
and road conditions.
Operating condition
1. Place the light switch in the AUTO position.
2. Turn on the high beam by pushing the lever away from you.
The High Beam Assist (HBA) ( ) indicator will illuminate.
Do not use high beam when there
are other vehicles approaching
you. Using high beam could
obstruct the other driver’s vision.
WARNING
OLF044089C
OLF044088C
OLF044090C