brake light HYUNDAI ELANTRA HYBRID 2021 User Guide
[x] Cancel search | Manufacturer: HYUNDAI, Model Year: 2021, Model line: ELANTRA HYBRID, Model: HYUNDAI ELANTRA HYBRID 2021Pages: 555, PDF Size: 56.08 MB
Page 124 of 555
04
4-23
Low fuel
This warning message is displayed if the
fuel tank is almost out of fuel.
When this message is displayed, the low
fuel level warning light in the cluster will
come on.
It is recommended to look for the nearest
fueling station and refuel as soon as
possible.
Engine Overheated (if equipped)
This warning message is displayed
when the engine coolant temperature
is above 248°F (120°C). This means that
the engine is overheated and may be
damaged.
If your vehicle is overheated, refer to
“Overheating” in chapter 8.
Check headlight (if equipped)
This warning message is displayed if the
headlamps are not operating
properly.
In addition, if a specific lamp(turn signal
lamp etc.) is not operating properly, the
warning message according to a specific
lamp (turn signal lamp etc.) is displayed.
A corresponding bulb may need to be
replaced.
Make sure to replace the burned out
bulb with a new one of the same wattage
rating.
Check headlight (Low) (if equipped)
This warning message is displayed if
the headlamp (Low) are not operating
properly.
In addition, if a specific lamp(turn signal
lamp etc.) is not operating properly, the
warning message according to a specific
lamp (turn signal lamp etc.) is displayed.
A corresponding bulb may need to be
replaced.
Make sure to replace the burned out
bulb with a new one of the same wattage
rating
Check turn signal (if equipped)
This warning message is displayed if the
turn signal lamps are not operat-
ing properly. A lamp may need to be
replaced.
Make sure to replace the burned out
bulb with a new one of the same wattage
rating.
Check brake light (if equipped)
This warning message is displayed if the
stop lamps are not operating properly. A
lamp may need to be replaced.
Make sure to replace the burned out
bulb with a new one of the same wattage
rating.
Page 132 of 555
04
4-31
User settings mode
OCN7040038N
In this mode, you can change the
settings of the instrument cluster, doors,
lamps, etc.
1. Driver Assistance
2. Door
3. Lights
4. Sound
5. Convenience
6. Service interval
7. Theme selection
8. Other
9. ECO vehicle
10. Language
11. Reset
The information provided may differ
depending on which functions are
applicable to your vehicle. Shift to P to edit settings / Engage parking
brake to edit settings
This warning message illuminates if
you try to select an item from the User
Settings mode while driving.
•
Intelligent variable transmission
For your safety, change the User
Settings after parking the vehicle,
applying the parking brake and
moving the shift level to P(Park).
• Manual transmission
For your safety, change the User
Settings after engaging the parking
brake.
Quick guide (Help)
This mode provides quick guides for the
systems in the User Settings mode.
Select an item, press and hold the OK
button.
For more details about each system,
refer to this Owner’s Manual.
Page 147 of 555
Instrument Cluster
4-46
Warning message group
When the warning message light
appears, check the detailed information
in warning message group.
User settings mode
In this mode, you can change the
settings of the instrument cluster, doors,
lamps, etc.
1. Driver Assistance
2. Door
3. Lights
4. Sound
5. Convenience
6. Service interval
7. Theme selection
8. Other
9. ECO vehicle
10. Language
11. Reset
The information provided may differ
depending on which functions are
applicable to your vehicle. Shift to P to edit settings / Engage parking
brake to edit settings
This warning message illuminates if
you try to select an item from the User
Settings mode while driving.
•
Intelligent variable transmission
For your safety, change the User
Settings after parking the vehicle,
applying the parking brake and
moving the shift level to P(Park).
• Manual transmission
For your safety, change the User
Settings after engaging the parking
brake.
Quick guide (Help)
This mode provides quick guides for the
systems in the User Settings mode.
Select an item, press and hold the OK
button.
For more details about each system,
refer to this Owner’s Manual.
Page 179 of 555
Convenient Features
5-26
If the digital key (card key) does not work,
please move the card 4 inches (0.1m)
away from the handle authentication
pad and retry to touch. If the card key is
damaged by impact, it may not operate
properly or at all. You should buy a new
card and register again. Long-time
exposure to high temperature may cause
the card key to malfunction. Please be
careful not to expose the key to direct
sunlight or high temperature.Start-up with Card key
After placing your registered card key
onto the interior authentication pad
(wireless charger), step on the brake and
press the Engine Start/Stop button.
WARNING
•
If you do not place the digital key
(card key) onto the center of the
interior authentication pad (wireless
charger) exactly, the card key may
not be recognized. If the engine is
not turned on, adjust and place the
key again.
• If you overlap and use the key
with NFC-enabled cards such as
transportation card or credit card,
the card key may not be recognized.
• If the digital key (card key) does
not work, please move the card 4
inches (0.1m) away from the handle
authentication pad and retry to
touch.
• If the card key is damaged by impact,
it may not operate properly or at
all. You should buy a new card and
register again.
For more information, refer to the
Engine Start/Stop button in chapter 6.
Page 215 of 555
Convenient Features5-62
HOOD
Opening the hood
OCN7050033
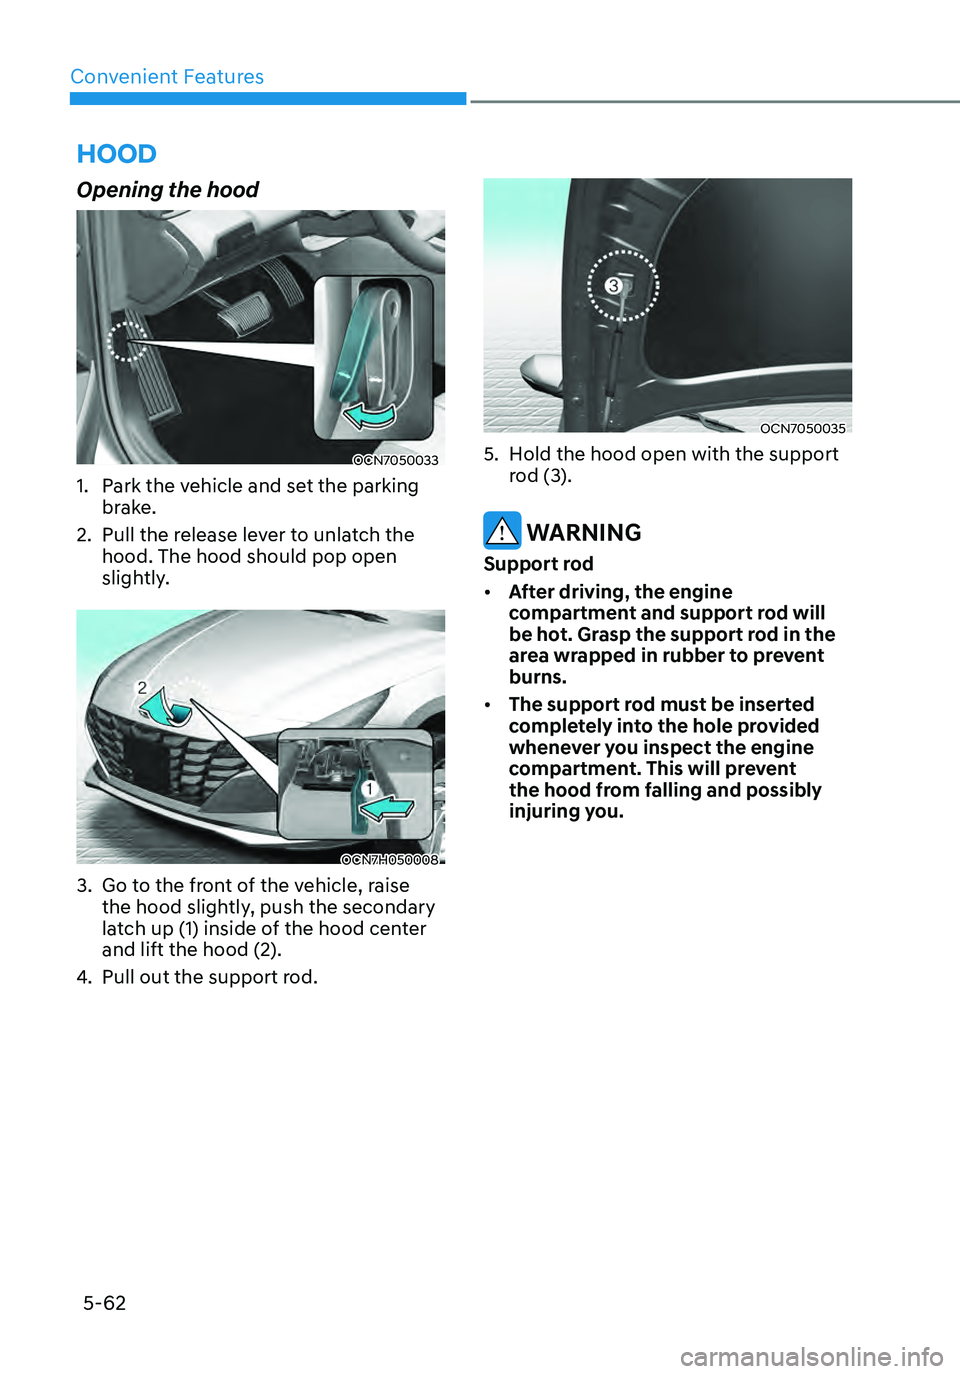
1. Park the vehicle and set the parking
brake.
2. Pull the release lever to unlatch the
hood. The hood should pop open
slightly.
OCN7H050008
3. Go to the front of the vehicle, raise
the hood slightly, push the secondary
latch up (1) inside of the hood center
and lift the hood (2).
4. Pull out the support rod.
OCN7050035
5. Hold the hood open with the support
rod (3).
WARNING
Support rod
• After driving, the engine
compartment and support rod will
be hot. Grasp the support rod in the
area wrapped in rubber to prevent
burns.
• The support rod must be inserted
completely into the hole provided
whenever you inspect the engine
compartment. This will prevent
the hood from falling and possibly
injuring you.
Page 224 of 555
05
5-71
• When refueling, always move the
shift lever to the P (Park) position,
set the parking brake, and place the
ignition switch to the LOCK/OFF
position.
• Sparks produced by electrical
components related to the engine
can ignite fuel vapors causing a fire.
• When using an approved portable
fuel container, be sure to place the
container on the ground prior to
refueling. Static electricity discharge
from the container can ignite fuel
vapors causing a fire. Once refueling
has begun, contact between your
bare hand and the vehicle should
be maintained until the filling is
complete.
• Use only approved portable plastic
fuel containers designed to carry and
store gasoline.
• Do not use matches or a lighter and
do not smoke or leave a lit cigarette
in your vehicle while at a gas station,
especially during refueling.
• Do not over-fill or top-off your
vehicle tank, which can cause
gasoline spillage.
• If a fire breaks out during refueling,
leave the vicinity of the vehicle, and
immediately contact the manager
of the gas station and then contact
the local fire department. Follow any
safety instructions they provide.• If pressurized fuel sprays out, it can
cover your clothes or skin and thus
subject you to the risk of fire and
burns. Always remove the fuel cap
carefully and slowly. If the cap is
venting fuel or if you hear a hissing
sound, wait until the condition stops
before completely removing the cap.
• Always check that the fuel cap is
installed securely to prevent fuel
spillage in the event of an accident.
Information
Make sure to refuel your vehicle according
to the “Fuel Requirements” suggested in
the Introduction chapter.
NOTICE
• Do not spill fuel on the exterior
surfaces of the vehicle. Any type of
fuel spilled on painted surfaces may
damage the paint.
• If the fuel filler cap requires
replacement, use only a genuine
HYUNDAI cap or the equivalent
specified for your vehicle. An
incorrect fuel filler cap can result
in a serious malfunction of the fuel
system or emission control system.
Page 225 of 555
Convenient Features5-72
EXTERIOR LIGHTS
Lighting control
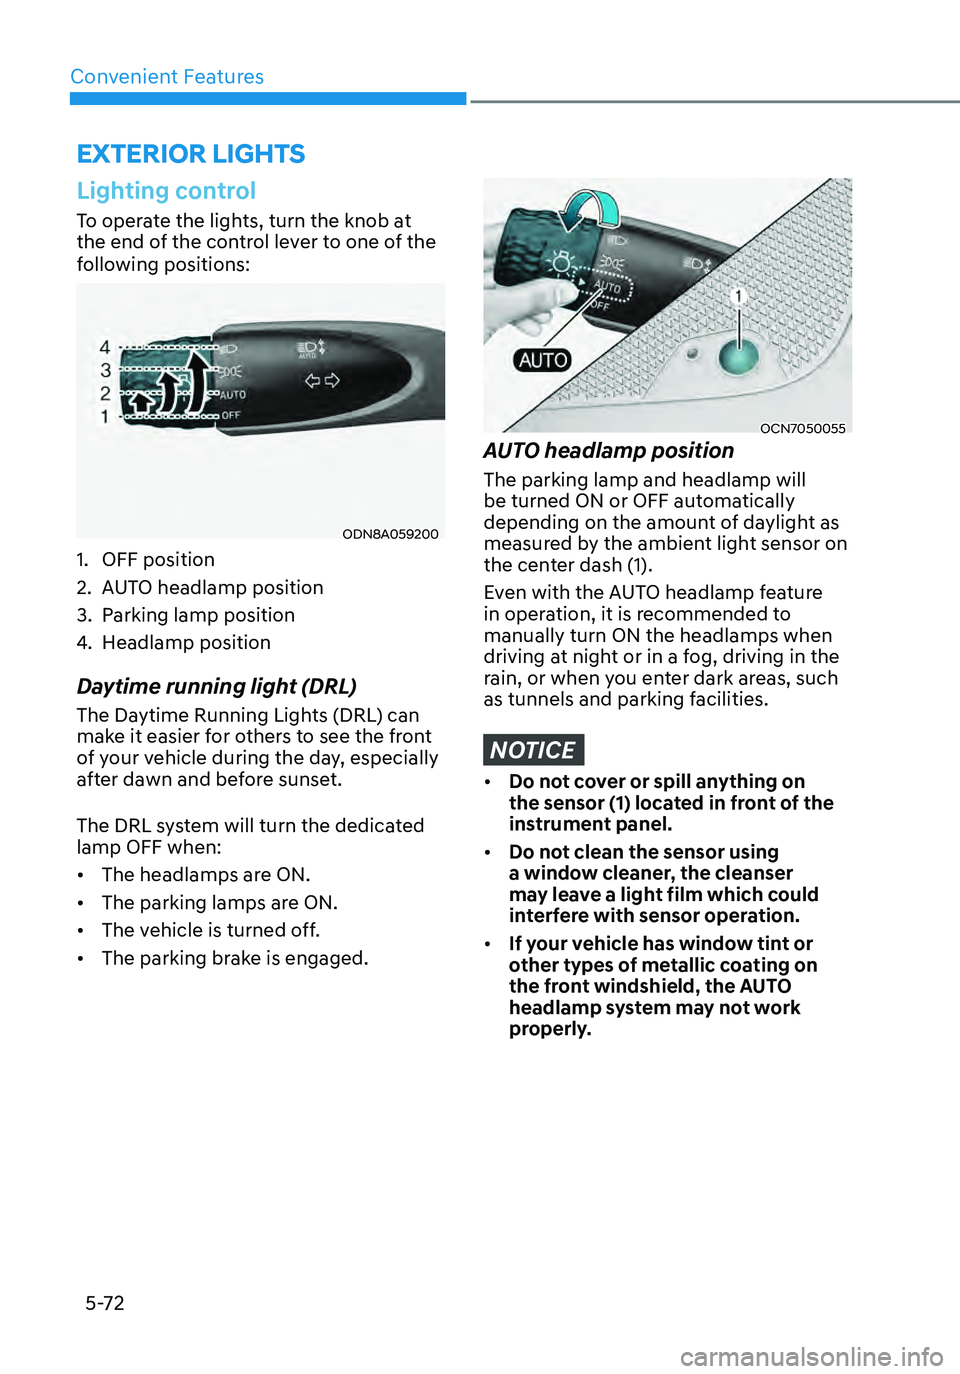
To operate the lights, turn the knob at
the end of the control lever to one of the
following positions:
ODN8A059200
1. OFF position
2. AUTO headlamp position
3. Parking lamp position
4. Headlamp position
Daytime running light (DRL)
The Daytime Running Lights (DRL) can
make it easier for others to see the front
of your vehicle during the day, especially
after dawn and before sunset.
The DRL system will turn the dedicated
lamp OFF when:
• The headlamps are ON.
• The parking lamps are ON.
• The vehicle is turned off.
• The parking brake is engaged.
OCN7050055
AUTO headlamp position
The parking lamp and headlamp will
be turned ON or OFF automatically
depending on the amount of daylight as
measured by the ambient light sensor on
the center dash (1).
Even with the AUTO headlamp feature
in operation, it is recommended to
manually turn ON the headlamps when
driving at night or in a fog, driving in the
rain, or when you enter dark areas, such
as tunnels and parking facilities.
NOTICE
• Do not cover or spill anything on
the sensor (1) located in front of the
instrument panel.
• Do not clean the sensor using
a window cleaner, the cleanser
may leave a light film which could
interfere with sensor operation.
• If your vehicle has window tint or
other types of metallic coating on
the front windshield, the AUTO
headlamp system may not work
properly.
Page 272 of 555
6-4
Key Ignition Switch (if equipped)
WARNING
To reduce the risk of SERIOUS INJURY or
DEATH, take the following precautions:
• NEVER allow children or any person
who is unfamiliar with the vehicle to
touch the ignition switch or related
parts. Unexpected and sudden
vehicle movement can occur.
• NEVER reach through the steering
wheel for the ignition switch, or any
other control, while the vehicle is in
motion. The presence of your hand
or arm in this area may cause a loss
of vehicle control resulting in an
accident.
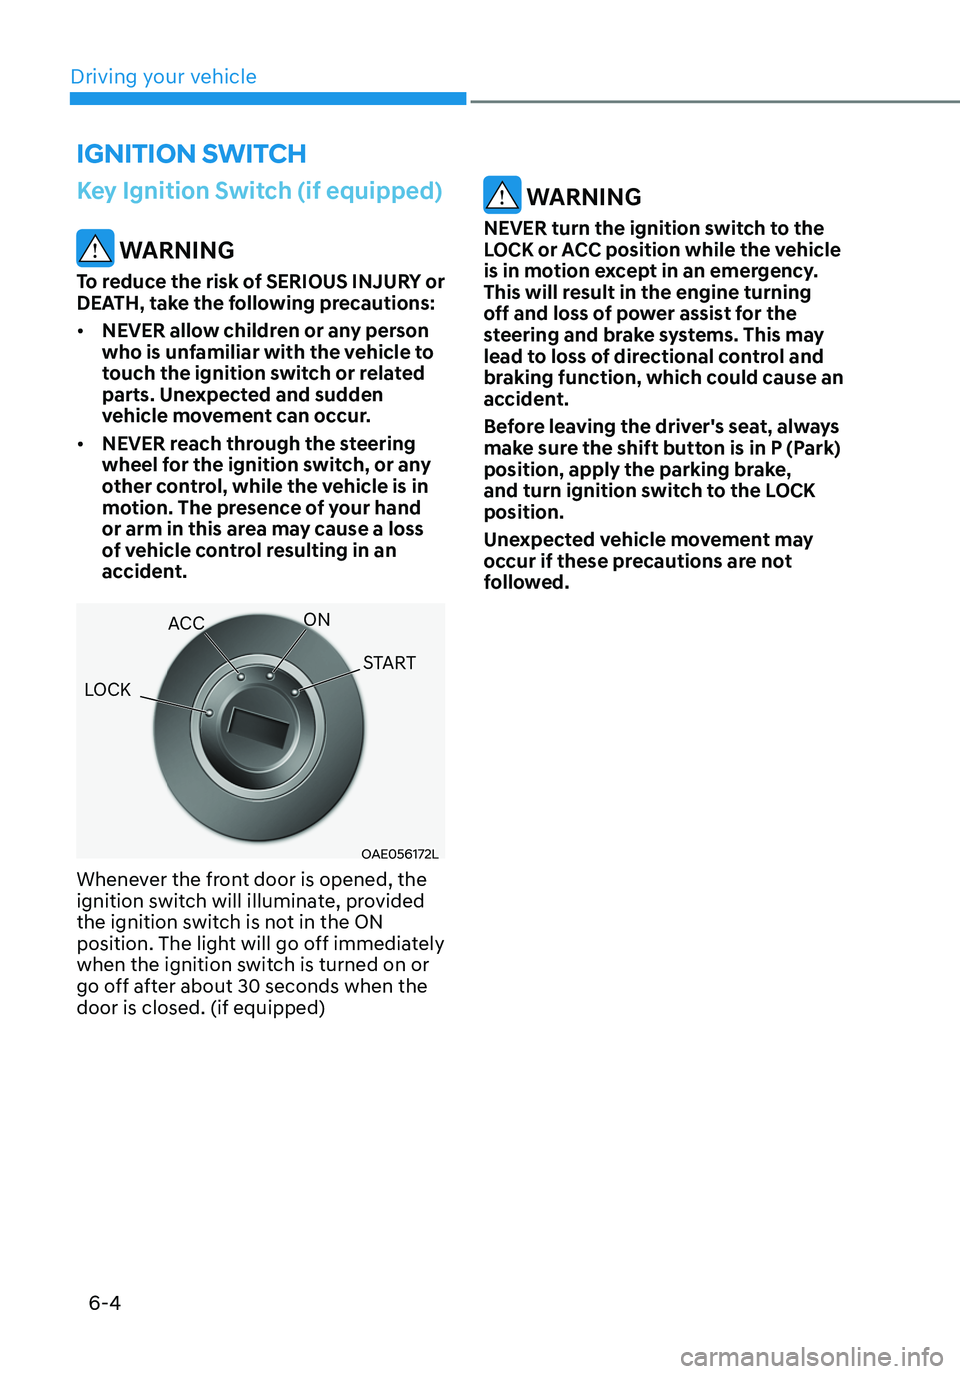
OAE056172L
Whenever the front door is opened, the
ignition switch will illuminate, provided
the ignition switch is not in the ON
position. The light will go off immediately
when the ignition switch is turned on or
go off after about 30 seconds when the
door is closed. (if equipped)
WARNING
NEVER turn the ignition switch to the
LOCK or ACC position while the vehicle
is in motion except in an emergency.
This will result in the engine turning
off and loss of power assist for the
steering and brake systems. This may
lead to loss of directional control and
braking function, which could cause an
accident.
Before leaving the driver's seat, always
make sure the shift button is in P (Park)
position, apply the parking brake,
and turn ignition switch to the LOCK
position.
Unexpected vehicle movement may
occur if these precautions are not
followed.
IGNITION SWITCH
LOCK ACC
ON
START
Driving your vehicle
Page 276 of 555
6-8
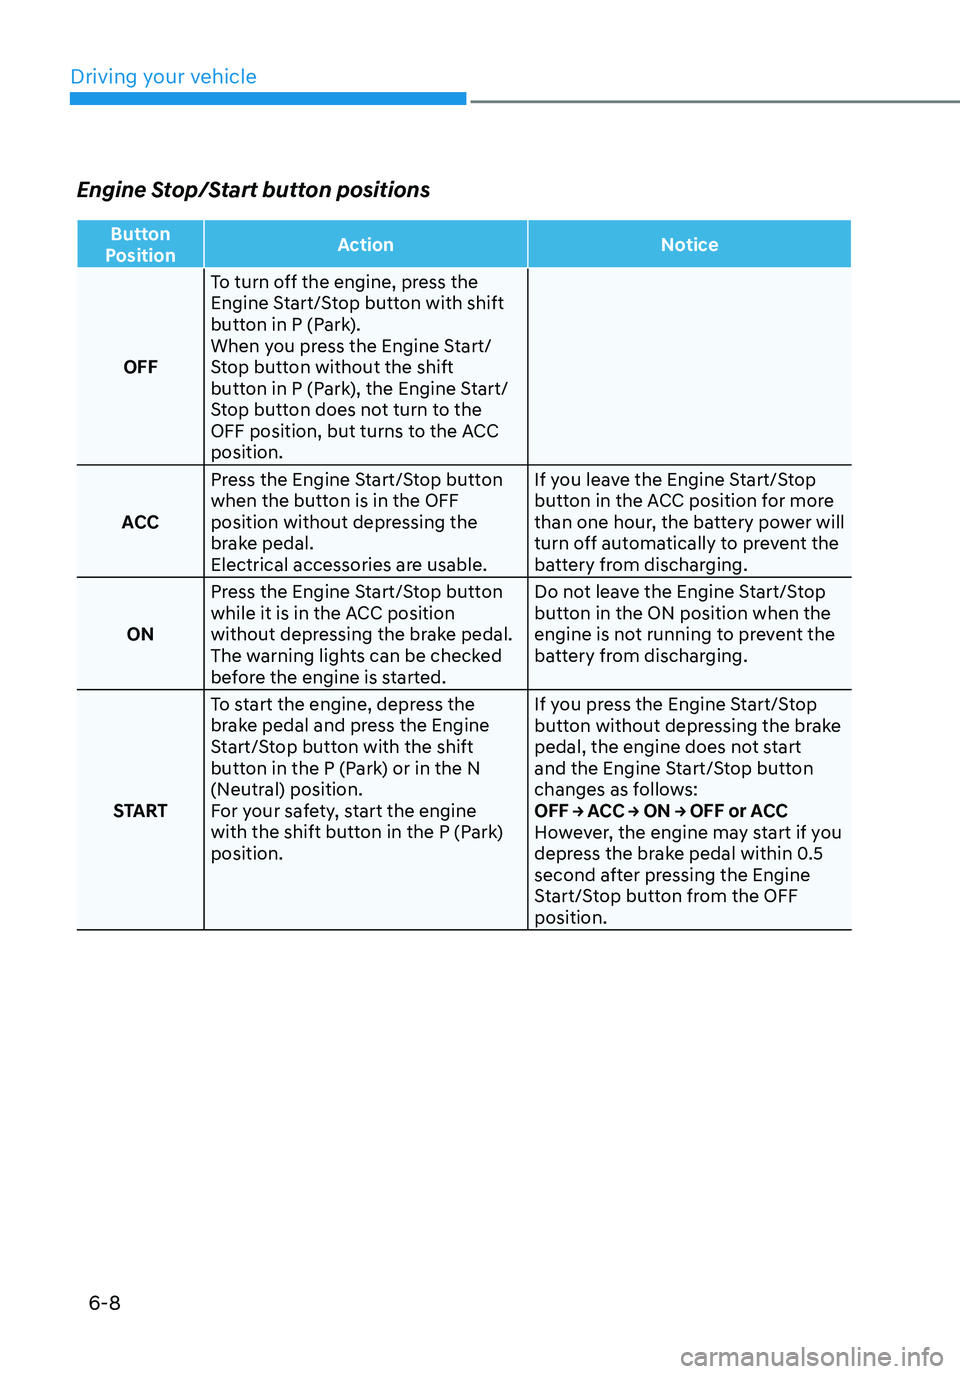
Engine Stop/Start button positions
Button
Position Action
Notice
OFF To turn off the engine, press the
Engine Start/Stop button with shift
button in P (Park).
When you press the Engine Start/
Stop button without the shift
button in P (Park), the Engine Start/
Stop button does not turn to the
OFF position, but turns to the ACC
position.
ACC Press the Engine Start/Stop button
when the button is in the OFF
position without depressing the
brake pedal.
Electrical accessories are usable. If you leave the Engine Start/Stop
button in the ACC position for more
than one hour, the battery power will
turn off automatically to prevent the
battery from discharging.
ON Press the Engine Start/Stop button
while it is in the ACC position
without depressing the brake pedal.
The warning lights can be checked
before the engine is started. Do not leave the Engine Start/Stop
button in the ON position when the
engine is not running to prevent the
battery from discharging.
START To start the engine, depress the
brake pedal and press the Engine
Start/Stop button with the shift
button in the P (Park) or in the N
(Neutral) position.
For your safety, start the engine
with the shift button in the P (Park)
position. If you press the Engine Start/Stop
button without depressing the brake
pedal, the engine does not start
and the Engine Start/Stop button
changes as follows:
OFF → ACC → ON → OFF or ACC
However, the engine may start if you
depress the brake pedal within 0.5
second after pressing the Engine
Start/Stop button from the OFF
position.
Driving your vehicle
Page 281 of 555
06
6-13
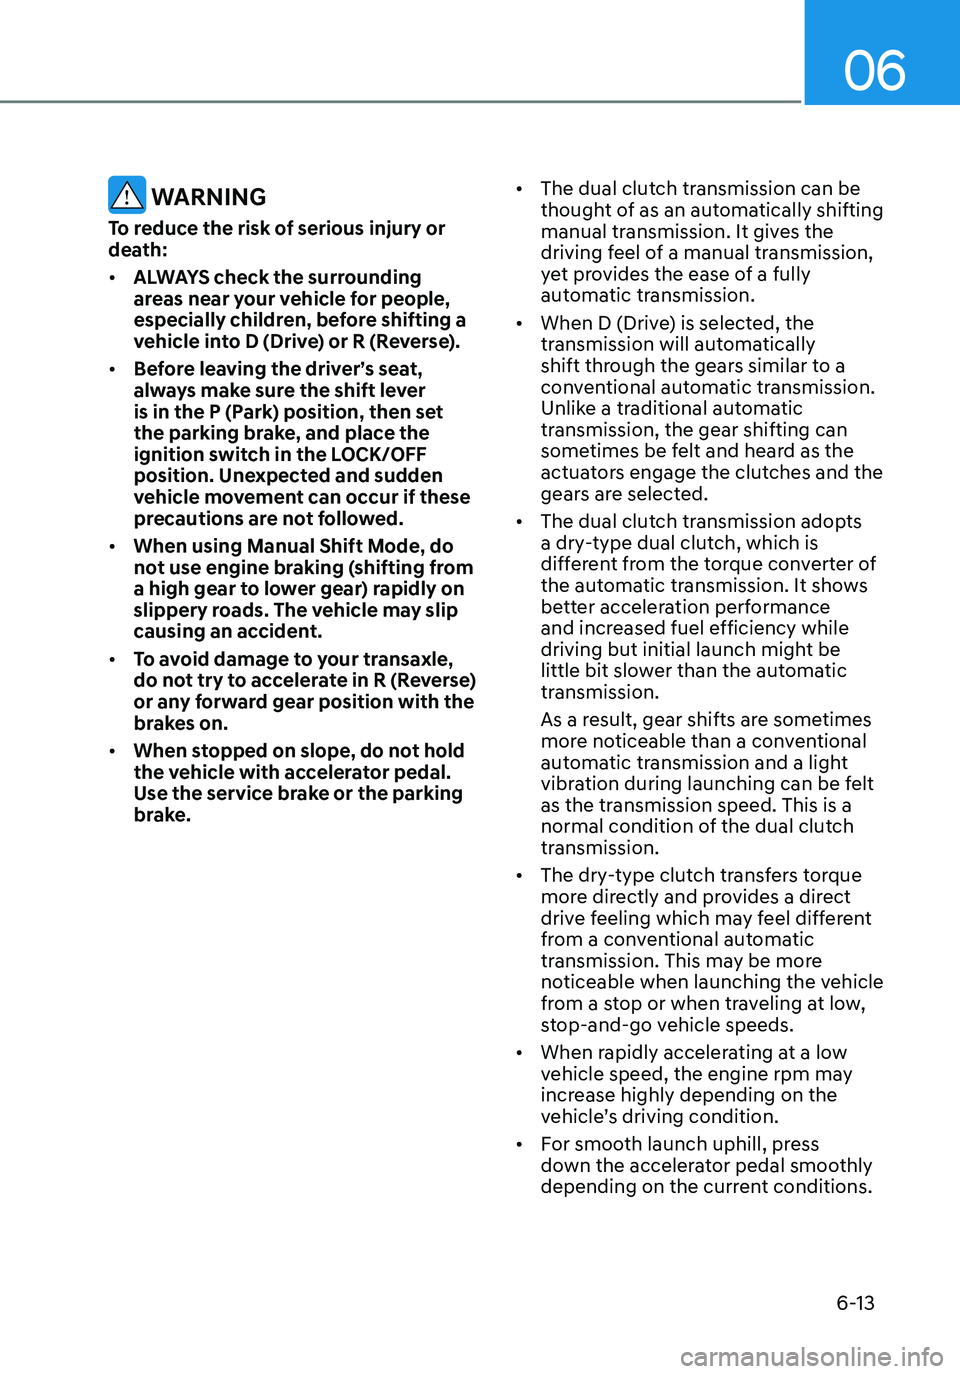
WARNING
To reduce the risk of serious injury or
death:
• ALWAYS check the surrounding
areas near your vehicle for people,
especially children, before shifting a
vehicle into D (Drive) or R (Reverse).
• Before leaving the driver’s seat,
always make sure the shift lever
is in the P (Park) position, then set
the parking brake, and place the
ignition switch in the LOCK/OFF
position. Unexpected and sudden
vehicle movement can occur if these
precautions are not followed.
• When using Manual Shift Mode, do
not use engine braking (shifting from
a high gear to lower gear) rapidly on
slippery roads. The vehicle may slip
causing an accident.
• To avoid damage to your transaxle,
do not try to accelerate in R (Reverse)
or any forward gear position with the
brakes on.
• When stopped on slope, do not hold
the vehicle with accelerator pedal.
Use the service brake or the parking
brake. •
The dual clutch transmission can be
thought of as an automatically shifting
manual transmission. It gives the
driving feel of a manual transmission,
yet provides the ease of a fully
automatic transmission.
• When D (Drive) is selected, the
transmission will automatically
shift through the gears similar to a
conventional automatic transmission.
Unlike a traditional automatic
transmission, the gear shifting can
sometimes be felt and heard as the
actuators engage the clutches and the
gears are selected.
• The dual clutch transmission adopts
a dry-type dual clutch, which is
different from the torque converter of
the automatic transmission. It shows
better acceleration performance
and increased fuel efficiency while
driving but initial launch might be
little bit slower than the automatic
transmission.
As a result, gear shifts are sometimes
more noticeable than a conventional
automatic transmission and a light
vibration during launching can be felt
as the transmission speed. This is a
normal condition of the dual clutch
transmission.
• The dry-type clutch transfers torque
more directly and provides a direct
drive feeling which may feel different
from a conventional automatic
transmission. This may be more
noticeable when launching the vehicle
from a stop or when traveling at low,
stop-and-go vehicle speeds.
• When rapidly accelerating at a low
vehicle speed, the engine rpm may
increase highly depending on the
vehicle’s driving condition.
• For smooth launch uphill, press
down the accelerator pedal smoothly
depending on the current conditions.