Hyundai Equus 2010 Owner's Manual
Manufacturer: HYUNDAI, Model Year: 2010, Model line: Equus, Model: Hyundai Equus 2010Pages: 374, PDF Size: 41.29 MB
Page 111 of 374
433
Features of your vehicle
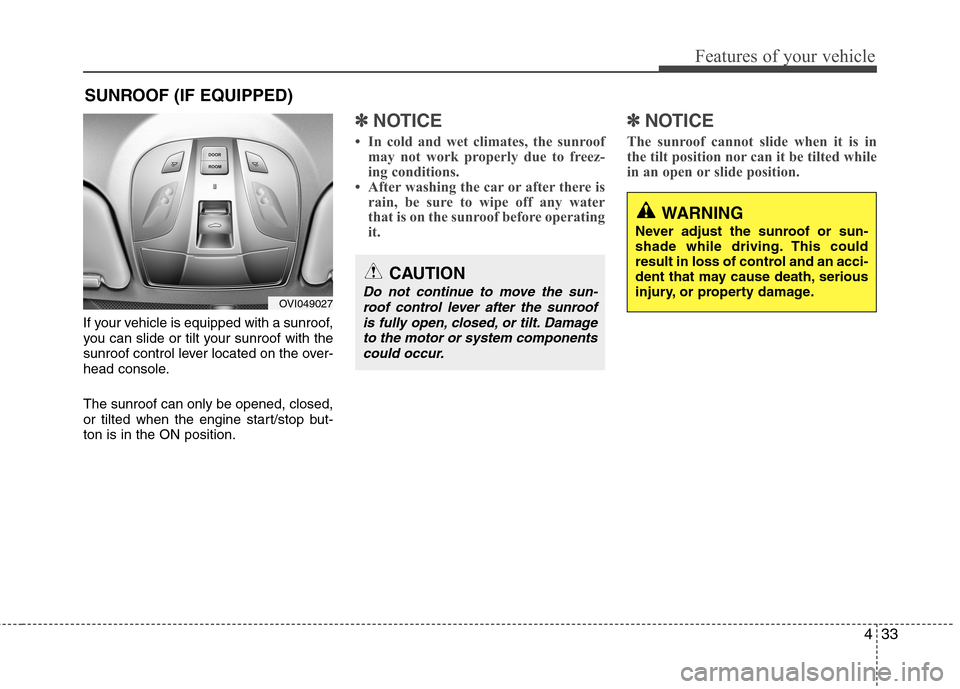
If your vehicle is equipped with a sunroof,
you can slide or tilt your sunroof with the
sunroof control lever located on the over-
head console. The sunroof can only be opened, closed,
or tilted when the engine start/stop but-ton is in the ON position.
✽✽NOTICE
In cold and wet climates, the sunroof may not work properly due to freez-
ing conditions.
After washing the car or after there is
rain, be sure to wipe off any water
that is on the sunroof before operating
it. ✽✽
NOTICE
The sunroof cannot slide when it is in
the tilt position nor can it be tilted while
in an open or slide position.
SUNROOF (IF EQUIPPED)
OVI049027
CAUTION
Do not continue to move the sun- roof control lever after the sunroof is fully open, closed, or tilt. Damage
to the motor or system componentscould occur.
WARNING
Never adjust the sunroof or sun-
shade while driving. This could
result in loss of control and an acci-
dent that may cause death, serious
injury, or property damage.
Page 112 of 374
Features of your vehicle
34
4
Sliding the sunroof
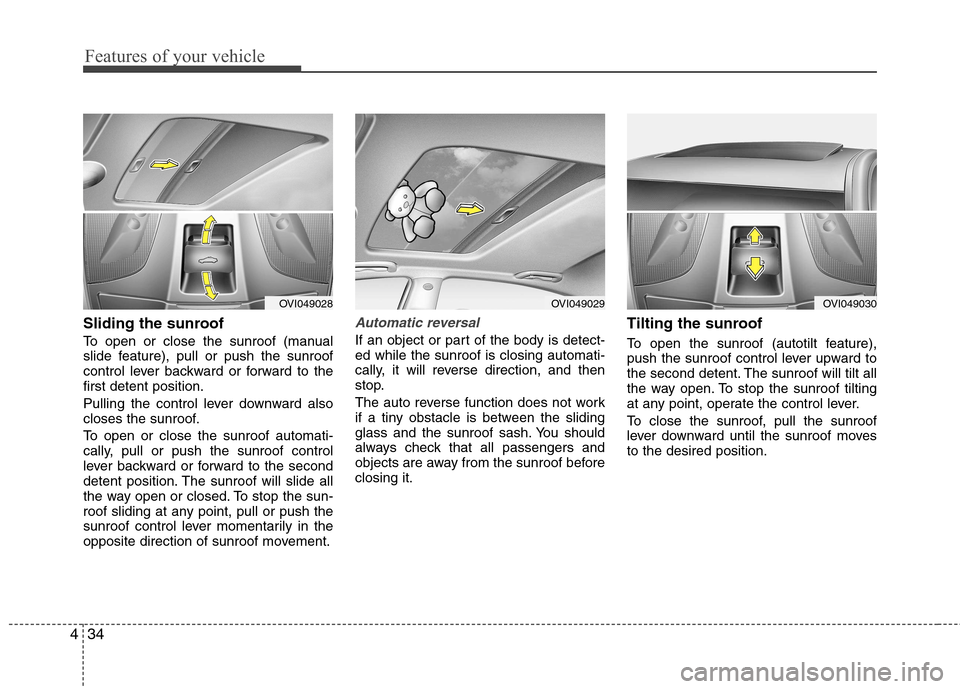
To open or close the sunroof (manual
slide feature), pull or push the sunroof
control lever backward or forward to thefirst detent position.
Pulling the control lever downward also
closes the sunroof.
To open or close the sunroof automati-
cally, pull or push the sunroof control
lever backward or forward to the second
detent position. The sunroof will slide all
the way open or closed. To stop the sun-
roof sliding at any point, pull or push the
sunroof control lever momentarily in the
opposite direction of sunroof movement.Automatic reversal
If an object or part of the body is detect- ed while the sunroof is closing automati-
cally, it will reverse direction, and then
stop.
The auto reverse function does not work
if a tiny obstacle is between the sliding
glass and the sunroof sash. You should
always check that all passengers and
objects are away from the sunroof beforeclosing it. Tilting the sunroof
To open the sunroof (autotilt feature),
push the sunroof control lever upward to
the second detent. The sunroof will tilt all
the way open. To stop the sunroof tilting
at any point, operate the control lever.
To close the sunroof, pull the sunroof
lever downward until the sunroof movesto the desired position.
OVI049030OVI049028OVI049029
Page 113 of 374
435
Features of your vehicle
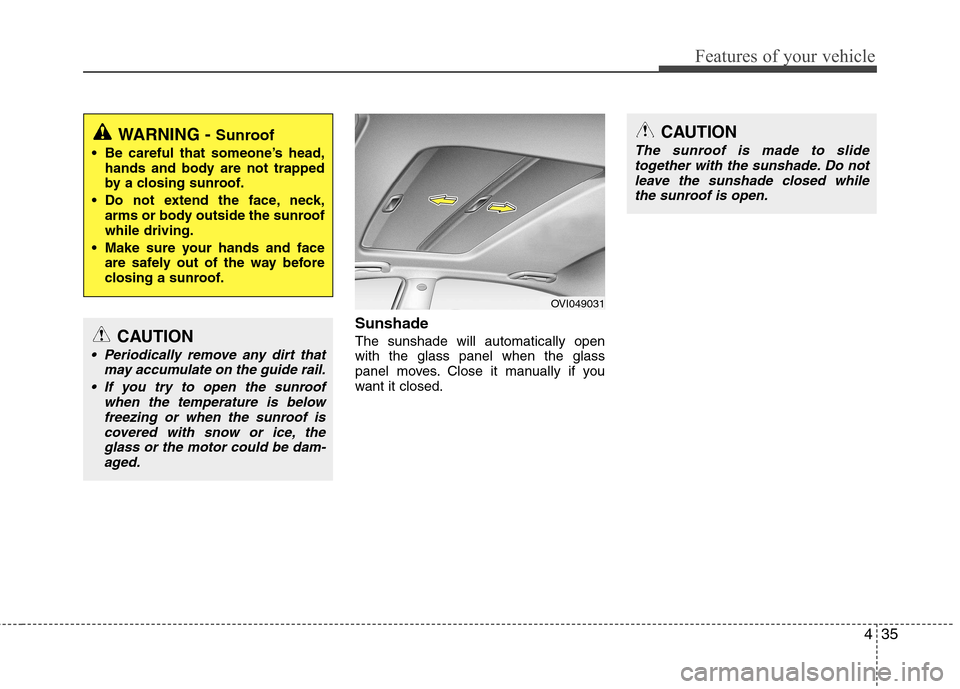
Sunshade The sunshade will automatically open with the glass panel when the glass
panel moves. Close it manually if you
want it closed.
WARNING - Sunroof
Be careful that someone’s head, hands and body are not trapped
by a closing sunroof.
Do not extend the face, neck, arms or body outside the sunroofwhile driving.
Make sure your hands and face are safely out of the way before
closing a sunroof.
CAUTION
Periodically remove any dirt that
may accumulate on the guide rail.
If you try to open the sunroof when the temperature is belowfreezing or when the sunroof iscovered with snow or ice, the glass or the motor could be dam-aged.
CAUTION
The sunroof is made to slidetogether with the sunshade. Do not
leave the sunshade closed while the sunroof is open.
OVI049031
Page 114 of 374
Features of your vehicle
36
4
Resetting the sunroof
Whenever the vehicle battery is discon- nected or discharged, or related fuse is
blown, you must reset your sunroof sys-
tem as follows:
1. Turn the engine start/stop button to
the ON position and close the sunroof
completely.
2. Release the control lever.
3. Pull and hold the control lever down- ward until the sunroof tilts and slightly
moves up and down. Then, release
the lever. 4. Pull and hold the control lever down-
ward until the sunroof is operated as
follows;
TILT DOWN �SLIDE OPEN �
SLIDE CLOSE
Then, release the control lever.
When this is complete, the sunroof sys- tem is reset. ❈ For more detailed information, contact
an authorized HYUNDAI dealer.
CAUTION
If the sunroof is not reset when the
vehicle battery is disconnected or
discharged, or related fuse isblown, the sunroof may operateimproperly.
Page 115 of 374
437
Features of your vehicle
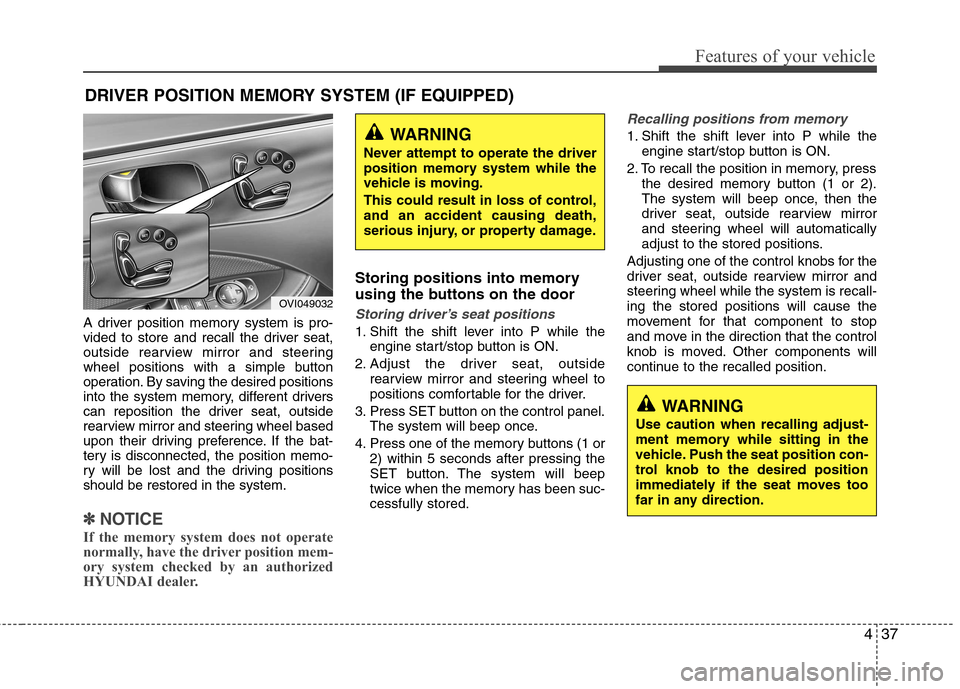
A driver position memory system is pro-
vided to store and recall the driver seat,
outside rearview mirror and steering
wheel positions with a simple button
operation. By saving the desired positions
into the system memory, different drivers
can reposition the driver seat, outside
rearview mirror and steering wheel based
upon their driving preference. If the bat-
tery is disconnected, the position memo-
ry will be lost and the driving positionsshould be restored in the system.
✽✽NOTICE
If the memory system does not operate
normally, have the driver position mem-
ory system checked by an authorized
HYUNDAI dealer.
Storing positions into memory
using the buttons on the door
Storing driver’s seat positions
1. Shift the shift lever into P while the engine start/stop button is ON.
2. Adjust the driver seat, outside rearview mirror and steering wheel to
positions comfortable for the driver.
3. Press SET button on the control panel. The system will beep once.
4. Press one of the memory buttons (1 or 2) within 5 seconds after pressing the
SET button. The system will beep
twice when the memory has been suc-cessfully stored.
Recalling positions from memory
1. Shift the shift lever into P while theengine start/stop button is ON.
2. To recall the position in memory, press the desired memory button (1 or 2).
The system will beep once, then the
driver seat, outside rearview mirror
and steering wheel will automatically
adjust to the stored positions.
Adjusting one of the control knobs for the
driver seat, outside rearview mirror and
steering wheel while the system is recall-ing the stored positions will cause the
movement for that component to stop
and move in the direction that the control
knob is moved. Other components will
continue to the recalled position.
DRIVER POSITION MEMORY SYSTEM (IF EQUIPPED)WARNING
Never attempt to operate the driver
position memory system while the
vehicle is moving.
This could result in loss of control, and an accident causing death,
serious injury, or property damage.
WARNING
Use caution when recalling adjust-
ment memory while sitting in the
vehicle. Push the seat position con-
trol knob to the desired position
immediately if the seat moves too
far in any direction.
OVI049032
Page 116 of 374
Features of your vehicle
38
4
Easy access function (if equipped)
The steering wheel will move away from
the driver and the seat will move rear-
ward, when the engine start/stop button
is turned to the OFF position or when you
pull out the smart key from the smart key
holder with the shift lever in the P posi-tion.
The steering wheel will move toward the
driver and the seat will move forward,
when the engine start/stop button is
turned to the ACC position or when you
insert the smart key into the smart key
holder with the shift lever in the P posi-tion.✽✽
NOTICE
You can activate or deactivate the easy
access function in the INFO menu of
DIS (Driver Information System, if
equipped) as follows (if equipped);
Seat easy access
Steering easy access
If you want detailed informations, refer
to the DIS manual (if equipped) sup-
plied separately.
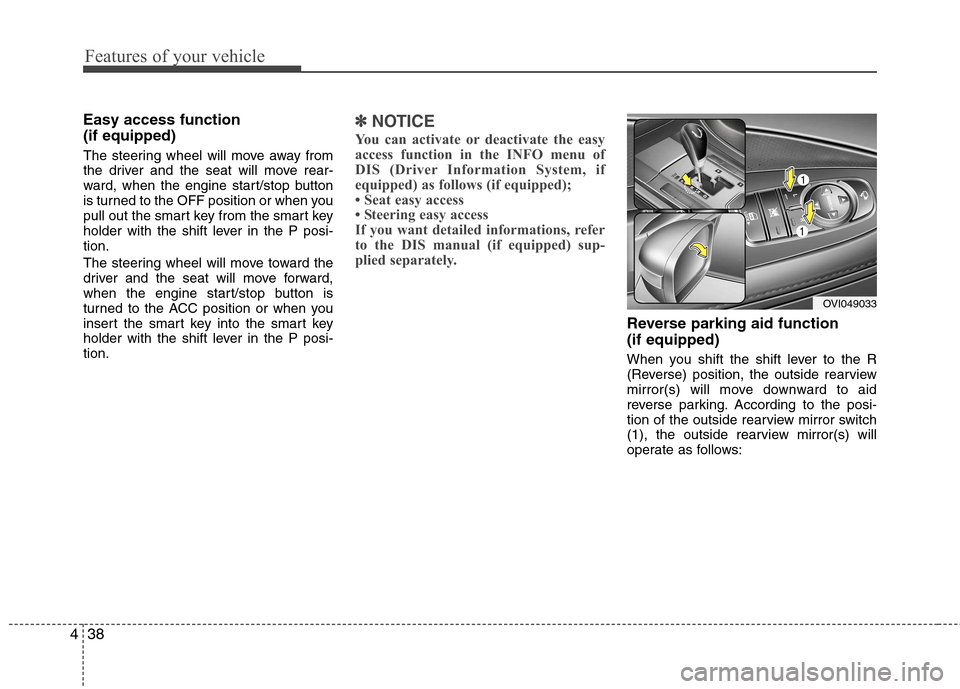
Reverse parking aid function (if equipped)
When you shift the shift lever to the R
(Reverse) position, the outside rearview
mirror(s) will move downward to aid
reverse parking. According to the posi-
tion of the outside rearview mirror switch
(1), the outside rearview mirror(s) will
operate as follows:
OVI049033
Page 117 of 374
439
Features of your vehicle
Left or Right: When the remote control
outside rearview mirror
switch is in the left or
right position, both out-
side rearview mirrors will
move downward.
Neutral : When the remote control out-
side rearview mirror switch is inthe middle position, the outside
rearview mirrors will not oper-
ate.
✽✽ NOTICE
The outside rearview mirrors will auto-
matically revert to their original posi-
tions under the following conditions:
1. Engine start/stop button is turned to the ACC or OFF position.
2. Shift lever is moved to any position except R.
3. Remote control outside rearview mir- ror switch is placed in the middle
position.
Power steering
Power steering uses energy from the
engine to assist you in steering the vehi-
cle. If the engine is off or if the power
steering system becomes inoperative,
the vehicle may still be steered, but it will
require increased steering effort.
Should you notice any change in the
effort required to steer during normal
vehicle operation, have the power steer-
ing checked by an authorized HYUNDAI
dealer.Electronic Hydraulic Power Steering
(EHPS)
EHPS uses an electromotor to assist you
in steering the vehicle. It senses the vehi-cle speed and road condition.
If the engine is off or if the power steer-
ing system becomes inoperative, the
vehicle may still be steered, but it will
require increased steering effort.
Should you notice any change in the
effort required to steer during normal
vehicle operation, have the power steer-
ing checked by an authorized HYUNDAI
dealer.
STEERING WHEEL
CAUTION
Never hold the steering wheel
against a stop (extreme right or left turn) for more than 5 seconds withthe engine running. Holding the
steering wheel for more than 5 sec-onds in either position may cause damage to the power steeringpump.
Page 118 of 374
Features of your vehicle
40
4
✽✽
NOTICE
If the power steering drive belt breaks
or if the power steering pump malfunc-
tions, the steering effort will greatly
increase.
✽
✽ NOTICE
If the vehicle is parked for extended
periods outside in cold weather (below -
10°C/14°F), the power steering may
require increased effort when the engine
is first started. This is caused by
increased fluid viscosity due to the cold
weather and does not indicate a mal-
function.
When this happens, increase the engine
RPM by depressing accelerator until the
RPM reaches 1,500 rpm then release or
let the engine idle for two or three min-
utes to warm up the fluid.
Tilt steering
Tilt steering allows you to adjust the
steering wheel before you drive. You can
also raise it to give your legs more room
when you exit and enter the vehicle.
The steering wheel should be positioned
so that it is comfortable for you to drive,
while permitting you to see the instru-
ment panel warning lights and gauges.
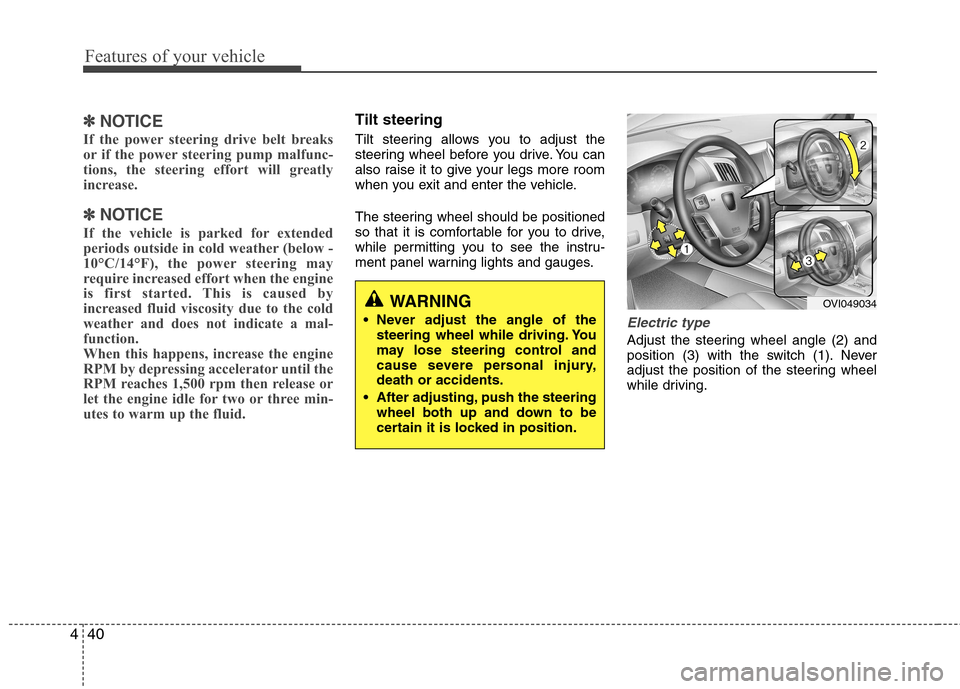
Electric type
Adjust the steering wheel angle (2) and
position (3) with the switch (1). Never
adjust the position of the steering wheel
while driving.
WARNING
Never adjust the angle of the steering wheel while driving. You
may lose steering control and
cause severe personal injury,death or accidents.
After adjusting, push the steering wheel both up and down to be
certain it is locked in position.OVI049034
Page 119 of 374
441
Features of your vehicle
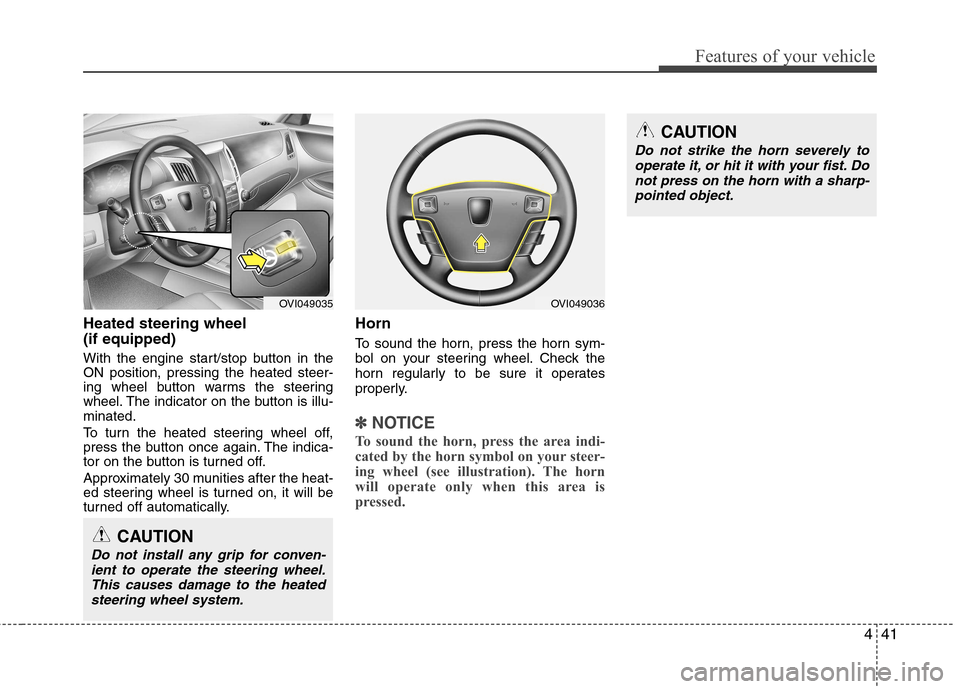
Heated steering wheel (if equipped)
With the engine start/stop button in the ON position, pressing the heated steer-
ing wheel button warms the steering
wheel. The indicator on the button is illu-minated.
To turn the heated steering wheel off,
press the button once again. The indica-
tor on the button is turned off.
Approximately 30 munities after the heat-
ed steering wheel is turned on, it will be
turned off automatically.Horn
To sound the horn, press the horn sym-
bol on your steering wheel. Check the
horn regularly to be sure it operates
properly.
✽✽
NOTICE
To sound the horn, press the area indi-
cated by the horn symbol on your steer-
ing wheel (see illustration). The horn
will operate only when this area is
pressed.
OVI049036
CAUTION
Do not strike the horn severely to operate it, or hit it with your fist. Do
not press on the horn with a sharp- pointed object.
CAUTION
Do not install any grip for conven-
ient to operate the steering wheel.This causes damage to the heatedsteering wheel system.
OVI049035
Page 120 of 374
Features of your vehicle
42
4
Inside rearview mirror
Adjust the rearview mirror so that the
center view through the rear window is
seen. Make this adjustment before you
start driving.
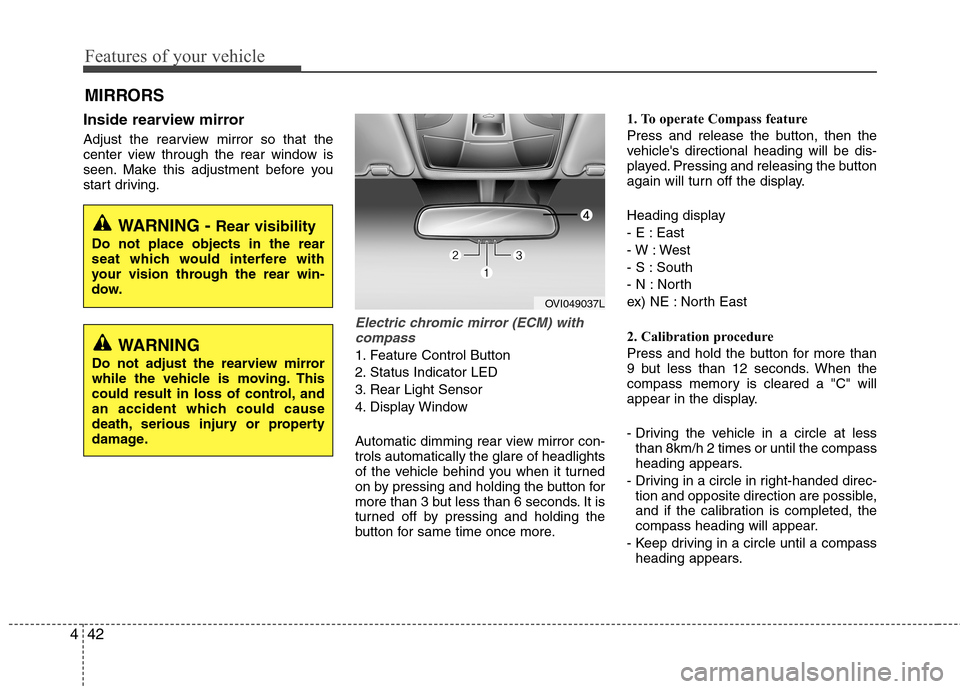
Electric chromic mirror (ECM) with
compass
1. Feature Control Button
2. Status Indicator LED
3. Rear Light Sensor
4. Display Window
Automatic dimming rear view mirror con- trols automatically the glare of headlights
of the vehicle behind you when it turned
on by pressing and holding the button for
more than 3 but less than 6 seconds. It is
turned off by pressing and holding the
button for same time once more. 1. To operate Compass feature
Press and release the button, then the
vehicle's directional heading will be dis-
played. Pressing and releasing the button
again will turn off the display.
Heading display
- E : East
- W : West
- S : South
- N : North
ex) NE : North East
2. Calibration procedure
Press and hold the button for more than
9 but less than 12 seconds. When the
compass memory is cleared a "C" will
appear in the display.
- Driving the vehicle in a circle at less
than 8km/h 2 times or until the compass
heading appears.
- Driving in a circle in right-handed direc- tion and opposite direction are possible,
and if the calibration is completed, the
compass heading will appear.
- Keep driving in a circle until a compass heading appears.
MIRRORS
WARNING -
Rear visibility
Do not place objects in the rear
seat which would interfere with
your vision through the rear win-
dow.
WARNING
Do not adjust the rearview mirror
while the vehicle is moving. This
could result in loss of control, and
an accident which could cause
death, serious injury or property
damage.
OVI049037L