Hyundai Equus 2010 Owner's Manual
Manufacturer: HYUNDAI, Model Year: 2010, Model line: Equus, Model: Hyundai Equus 2010Pages: 374, PDF Size: 41.29 MB
Page 151 of 374
473
Features of your vehicle
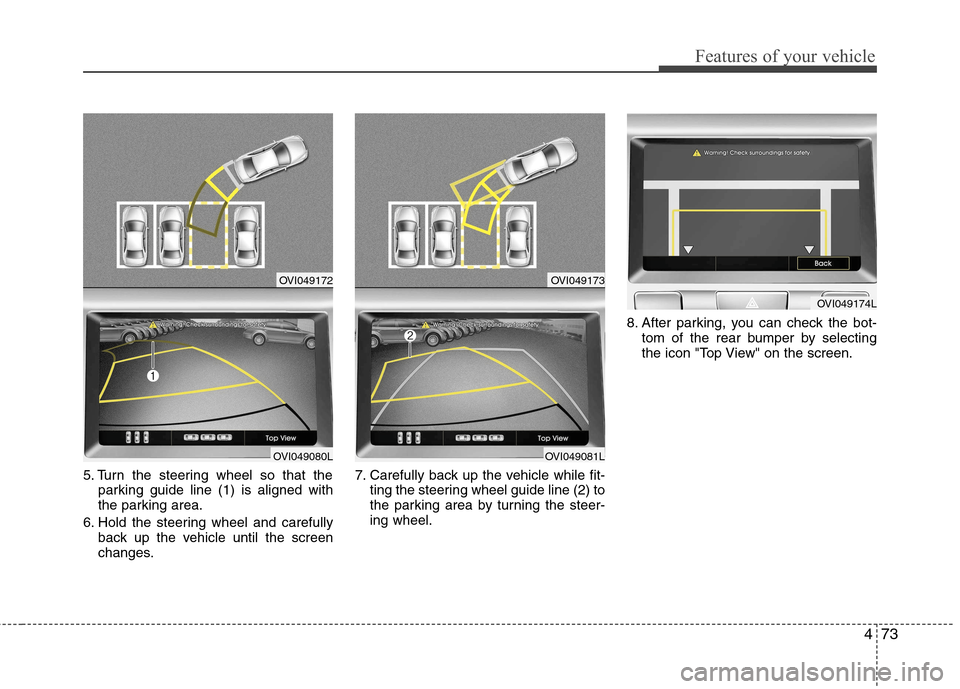
5. Turn the steering wheel so that theparking guide line (1) is aligned with
the parking area.
6. Hold the steering wheel and carefully back up the vehicle until the screen
changes. 7. Carefully back up the vehicle while fit-
ting the steering wheel guide line (2) to
the parking area by turning the steer-ing wheel. 8. After parking, you can check the bot-
tom of the rear bumper by selecting
the icon "Top View" on the screen.
OVI049172
OVI049080L
OVI049173
OVI049081L
OVI049174L
Page 152 of 374
Features of your vehicle
74
4
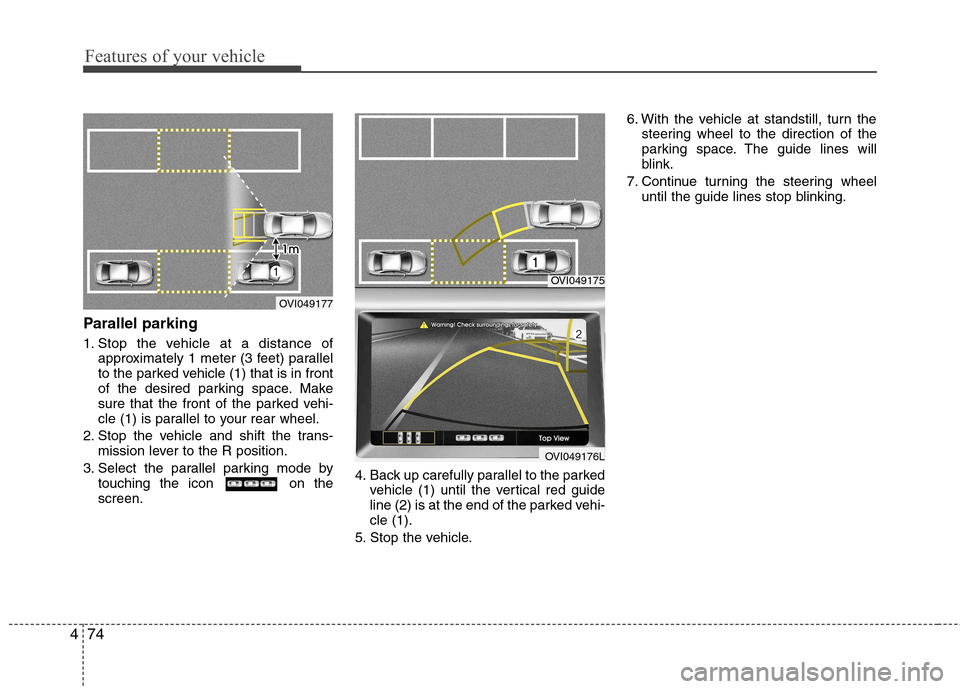
Parallel parking
1. Stop the vehicle at a distance of
approximately 1 meter (3 feet) parallel
to the parked vehicle (1) that is in front
of the desired parking space. Make
sure that the front of the parked vehi-
cle (1) is parallel to your rear wheel.
2. Stop the vehicle and shift the trans- mission lever to the R position.
3. Select the parallel parking mode by touching the icon on thescreen. 4. Back up carefully parallel to the parked
vehicle (1) until the vertical red guide
line (2) is at the end of the parked vehi-cle (1).
5. Stop the vehicle. 6. With the vehicle at standstill, turn the
steering wheel to the direction of the
parking space. The guide lines will
blink.
7. Continue turning the steering wheel until the guide lines stop blinking.
OVI049175
OVI049176L
OVI049177
Page 153 of 374
475
Features of your vehicle
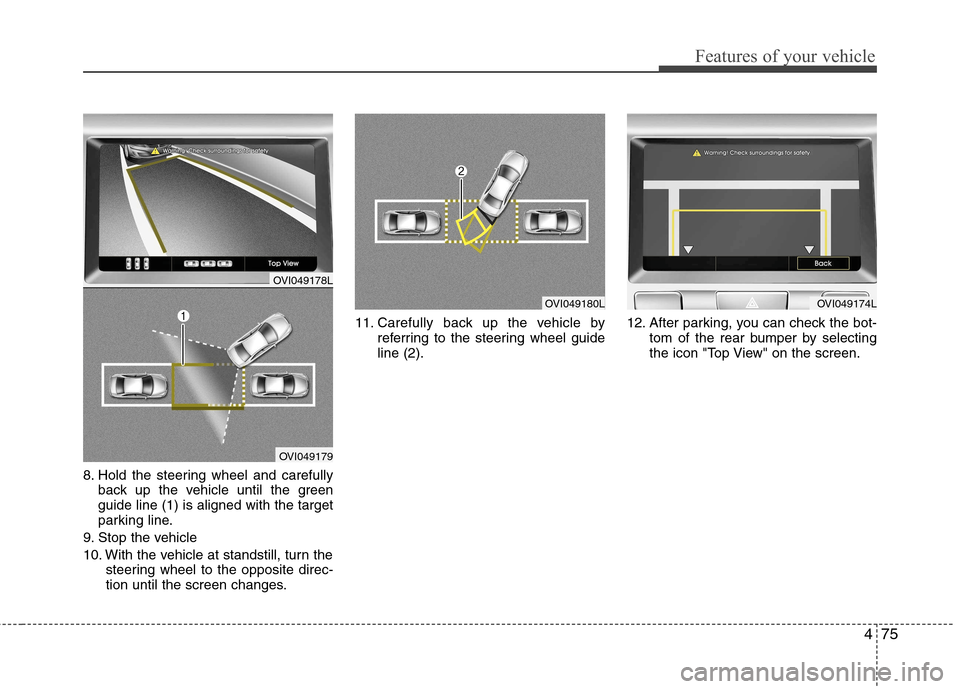
8. Hold the steering wheel and carefullyback up the vehicle until the green guide line (1) is aligned with the target
parking line.
9. Stop the vehicle
10. With the vehicle at standstill, turn the steering wheel to the opposite direc-
tion until the screen changes. 11. Carefully back up the vehicle by
referring to the steering wheel guideline (2). 12. After parking, you can check the bot-
tom of the rear bumper by selecting
the icon "Top View" on the screen.
OVI049180LOVI049174L
OVI049178L
OVI049179
Page 154 of 374
Features of your vehicle
76
4
FRONT BLIND SPOT MONITORING SYSTEM (IF EQUIPPED)
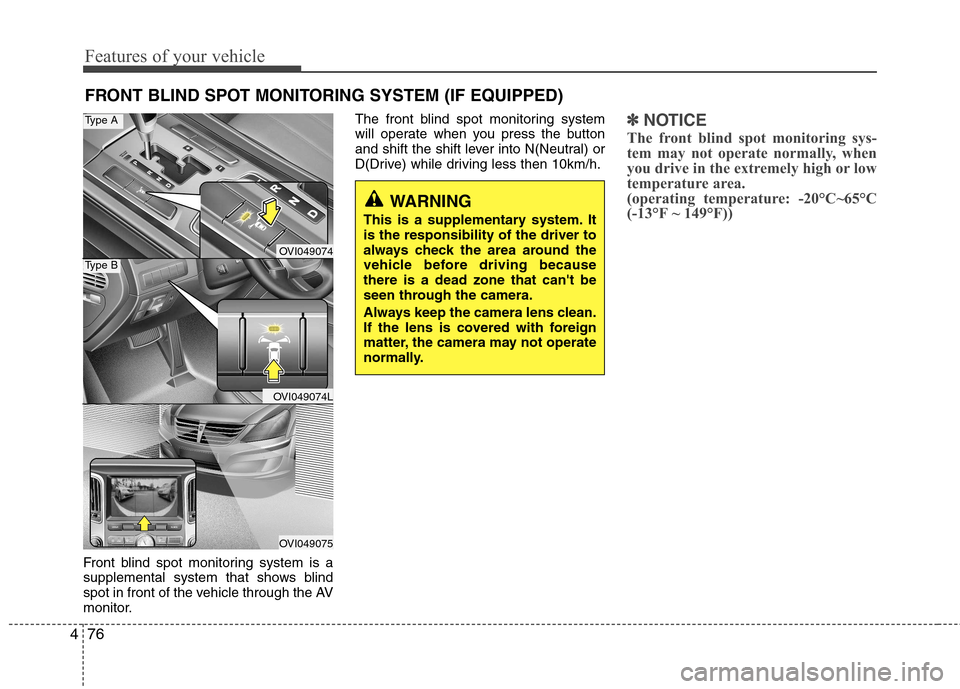
Front blind spot monitoring system is a
supplemental system that shows blind
spot in front of the vehicle through the AV
monitor. The front blind spot monitoring system
will operate when you press the buttonand shift the
shift lever into N(Neutral) or
D(Drive) while driving less then 10km/h.
✽✽ NOTICE
The front blind spot monitoring sys-
tem may not operate normally, when
you drive in the extremely high or low
temperature area.
(operating temperature: -20°C~65°C
(-13°F ~ 149°F))
WARNING
This is a supplementary system. It is the responsibility of the driver to
always check the area around the
vehicle before driving becausethere is a dead zone that can't be
seen through the camera.
Always keep the camera lens clean.
If the lens is covered with foreign
matter, the camera may not operate
normally.
OVI049074
OVI049074L
OVI049075
Type A
Type B
Page 155 of 374
477
Features of your vehicle
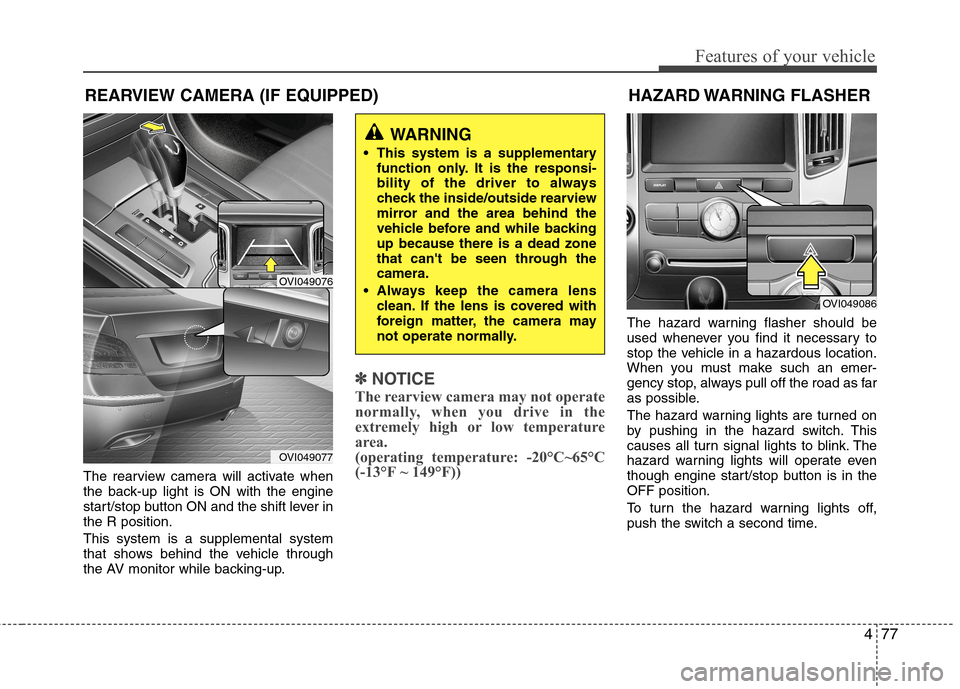
The rearview camera will activate when
the back-up light is ON with the engine
start/stop button ON and the shift lever inthe R position. This system is a supplemental system
that shows behind the vehicle through
the AV monitor while backing-up.
✽✽NOTICE
The rearview camera may not operate
normally, when you drive in the
extremely high or low temperature
area.
(operating temperature: -20°C~65°C
(-13°F ~ 149°F))
The hazard warning flasher should be
used whenever you find it necessary to
stop the vehicle in a hazardous location.
When you must make such an emer-
gency stop, always pull off the road as far
as possible.
The hazard warning lights are turned on
by pushing in the hazard switch. This
causes all turn signal lights to blink. The
hazard warning lights will operate even
though engine start/stop button is in theOFF position.
To turn the hazard warning lights off,
push the switch a second time.
WARNING
This system is a supplementary function only. It is the responsi-
bility of the driver to always
check the inside/outside rearview
mirror and the area behind the
vehicle before and while backingup because there is a dead zone
that can't be seen through thecamera.
Always keep the camera lens clean. If the lens is covered with
foreign matter, the camera may
not operate normally.
OVI049086
REARVIEW CAMERA (IF EQUIPPED)
OVI049076
OVI049077
HAZARD WARNING FLASHER
Page 156 of 374
Features of your vehicle
78
4
Battery saver function
The purpose of this feature is to pre-
vent the battery from being dis-
charged. The system automatically
turns off the exterior lights when the
driver turns off the engine and opens
the driver-side door.
With this feature, the parking lights will be turned off automatically if the driver
parks on the side of road at night.
If necessary, to keep the lights on
when the engine start/stop button is
turned to the OFF position, perform the
following:
1) Open the driver-side door.
2) Turn the parking lights OFF and ON again using the light switch on the
steering column. Headlight escort function (if equipped)
If you turn the engine start/stop button to
the ACC or OFF position with the head-lights ON, the headlights (and/or tail
lights) remain on for about 20 minutes.
However, if the driver’s door is opened
and closed, the headlights are turned off
after 30 seconds.
The headlights can be turned off by
pressing the door lock button on the
smart key twice or turning the light switch
to the OFF or Auto position.
However, if you turn the light switch to the
Auto position when it is dark outside, the
headlights will not be turned off.
Rescue mode function (if equipped)
If your vehicle has any problem on the
vehicle network system, the headlights
(low beam) turn on automatically with the
engine start/stop button in the ON posi-
tion even though the headlight switch is
not turned on. At this time, the emer-
gency lighting is not turned off when the
headlight switch is turned off.
LIGHTING
CAUTION
If the rescue mode occurs, have
your vehicle checked by an author-
ized HYUNDAI dealer as soon aspossible.
Page 157 of 374
479
Features of your vehicle
Lighting control
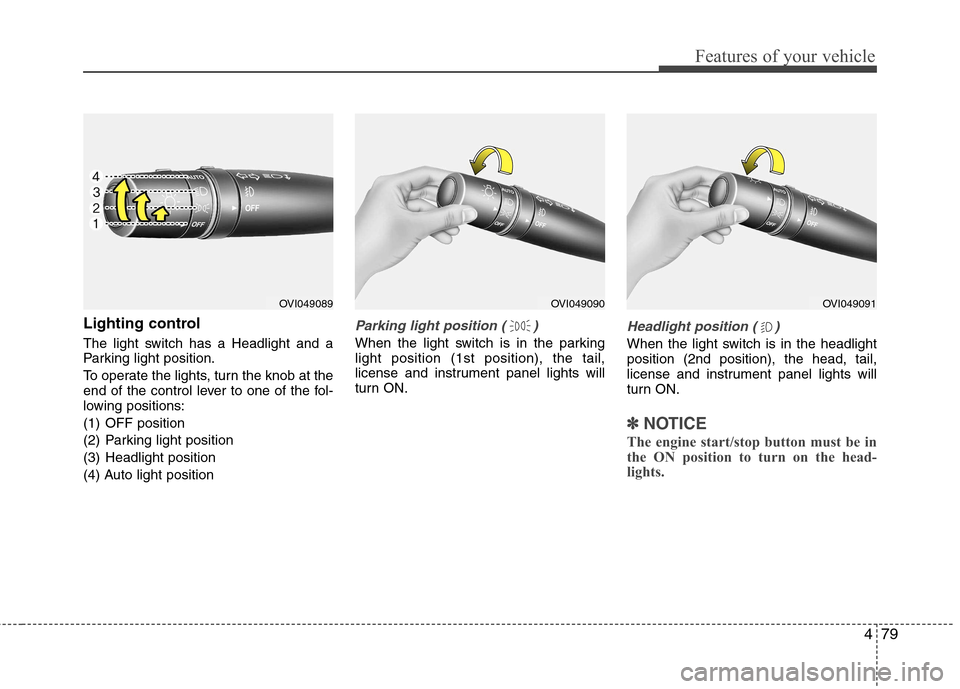
The light switch has a Headlight and a
Parking light position.
To operate the lights, turn the knob at the
end of the control lever to one of the fol-
lowing positions:
(1) OFF position
(2) Parking light position
(3) Headlight position
(4) Auto light positionParking light position ( )
When the light switch is in the parking light position (1st position), the tail,
license and instrument panel lights will
turn ON.
Headlight position ( )
When the light switch is in the headlight position (2nd position), the head, tail,
license and instrument panel lights will
turn ON.
✽✽NOTICE
The engine start/stop button must be in
the ON position to turn on the head-
lights.
OVI049089OVI049091OVI049090
Page 158 of 374
Features of your vehicle
80
4
Auto light position
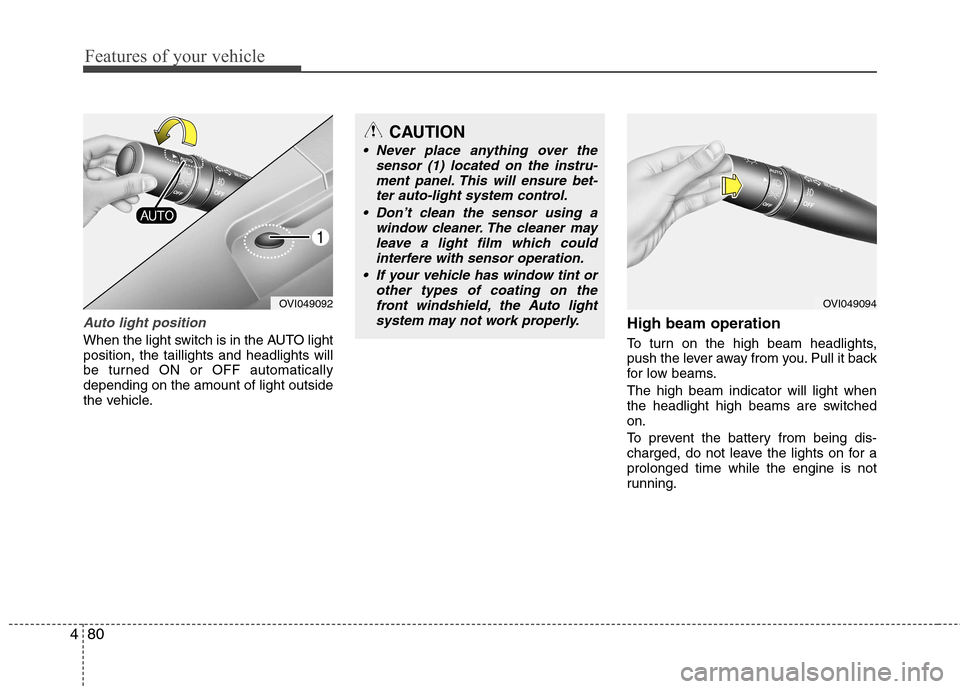
When the light switch is in the AUTO light position, the taillights and headlights will
be turned ON or OFF automaticallydepending on the amount of light outside
the vehicle. High beam operation
To turn on the high beam headlights,
push the lever away from you. Pull it back
for low beams. The high beam indicator will light when
the headlight high beams are switchedon.
To prevent the battery from being dis-
charged, do not leave the lights on for aprolonged time while the engine is not
running.
OVI049092
CAUTION
Never place anything over the
sensor (1) located on the instru-
ment panel. This will ensure bet-ter auto-light system control.
Don’t clean the sensor using a window cleaner. The cleaner may
leave a light film which could interfere with sensor operation.
If your vehicle has window tint or other types of coating on thefront windshield, the Auto light
system may not work properly.
OVI049094
Page 159 of 374
481
Features of your vehicle
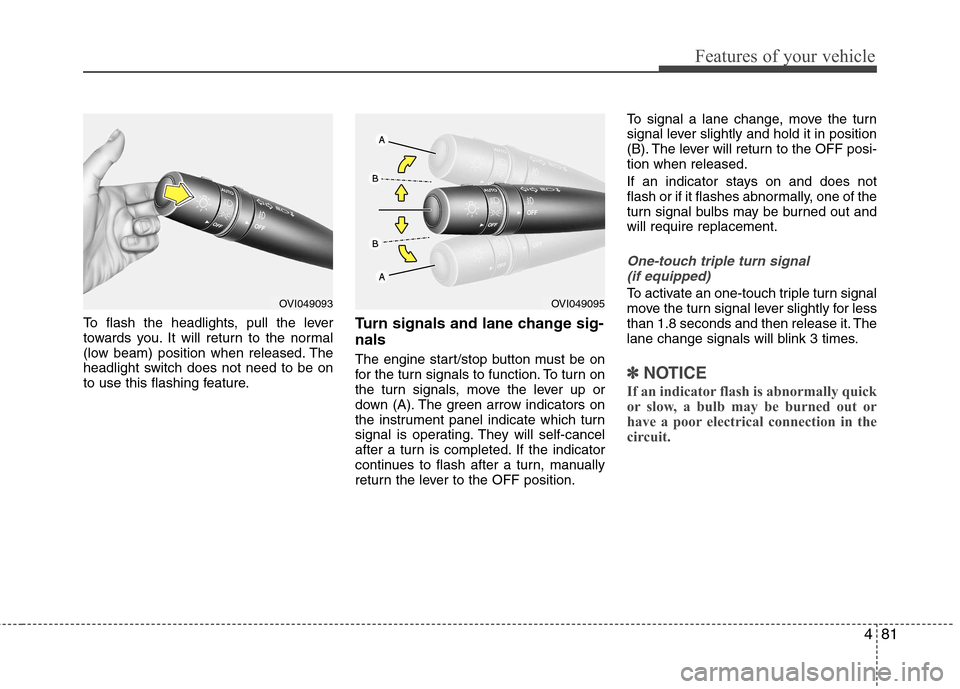
To flash the headlights, pull the lever
towards you. It will return to the normal
(low beam) position when released. The
headlight switch does not need to be on
to use this flashing feature.Turn signals and lane change sig- nals
The engine start/stop button must be on
for the turn signals to function. To turn on
the turn signals, move the lever up or
down (A). The green arrow indicators on
the instrument panel indicate which turn
signal is operating. They will self-cancel
after a turn is completed. If the indicator
continues to flash after a turn, manually
return the lever to the OFF position.To signal a lane change, move the turn
signal lever slightly and hold it in position
(B). The lever will return to the OFF posi-tion when released.
If an indicator stays on and does not
flash or if it flashes abnormally, one of the
turn signal bulbs may be burned out andwill require replacement.
One-touch triple turn signal
(if equipped)
To activate an one-touch triple turn signal
move the turn signal lever slightly for less
than 1.8 seconds and then release it. The
lane change signals will blink 3 times.
✽✽ NOTICE
If an indicator flash is abnormally quick
or slow, a bulb may be burned out or
have a poor electrical connection in the
circuit.
OVI049093OVI049095
Page 160 of 374
Features of your vehicle
82
4
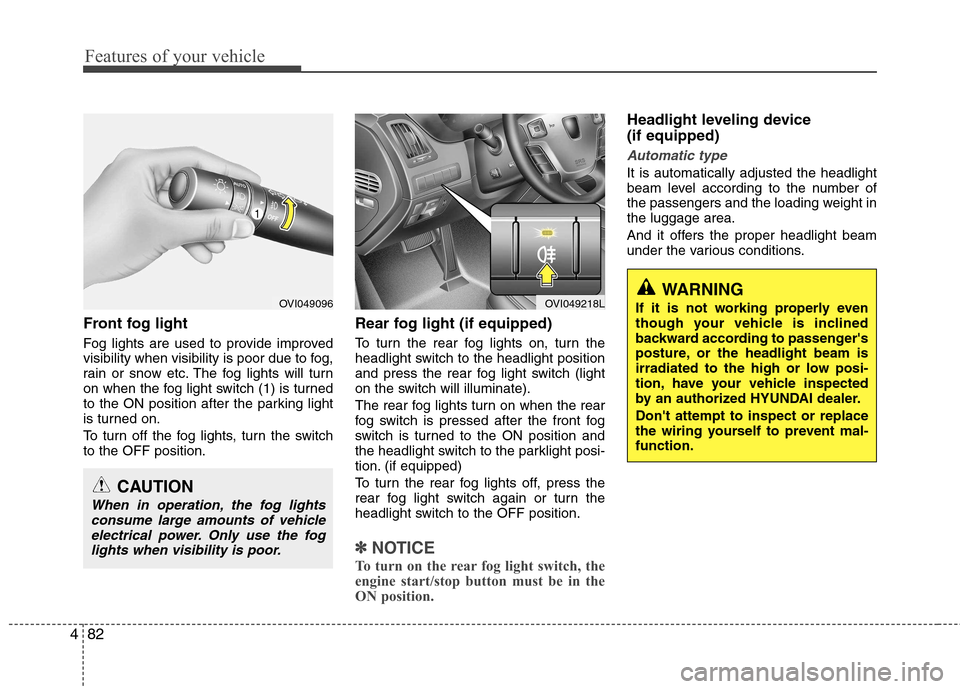
Front fog light
Fog lights are used to provide improved
visibility when visibility is poor due to fog,
rain or snow etc. The fog lights will turn
on when the fog light switch (1) is turned
to the ON position after the parking light
is turned on.
To turn off the fog lights, turn the switch to the OFF position. Rear fog light (if equipped)
To turn the rear fog lights on, turn the
headlight switch to the headlight position
and press the rear fog light switch (light
on the switch will illuminate).
The rear fog lights turn on when the rear
fog switch is pressed after the front fog
switch is turned to the ON position and
the headlight switch to the parklight posi-
tion. (if equipped)
To turn the rear fog lights off, press the
rear fog light switch again or turn the
headlight switch to the OFF position.
✽✽
NOTICE
To turn on the rear fog light switch, the
engine start/stop button must be in the
ON position.
Headlight leveling device (if equipped)
Automatic type
It is automatically adjusted the headlight
beam level according to the number of
the passengers and the loading weight inthe luggage area.
And it offers the proper headlight beam
under the various conditions.
OVI049096
CAUTION
When in operation, the fog lights consume large amounts of vehicle
electrical power. Only use the foglights when visibility is poor.
OVI049218LWARNING
If it is not working properly even
though your vehicle is inclined
backward according to passenger's
posture, or the headlight beam is
irradiated to the high or low posi-
tion, have your vehicle inspected
by an authorized HYUNDAI dealer. Don't attempt to inspect or replace
the wiring yourself to prevent mal-function.