Hyundai Equus 2016 Owner's Manual
Manufacturer: HYUNDAI, Model Year: 2016, Model line: Equus, Model: Hyundai Equus 2016Pages: 477, PDF Size: 16.25 MB
Page 281 of 477
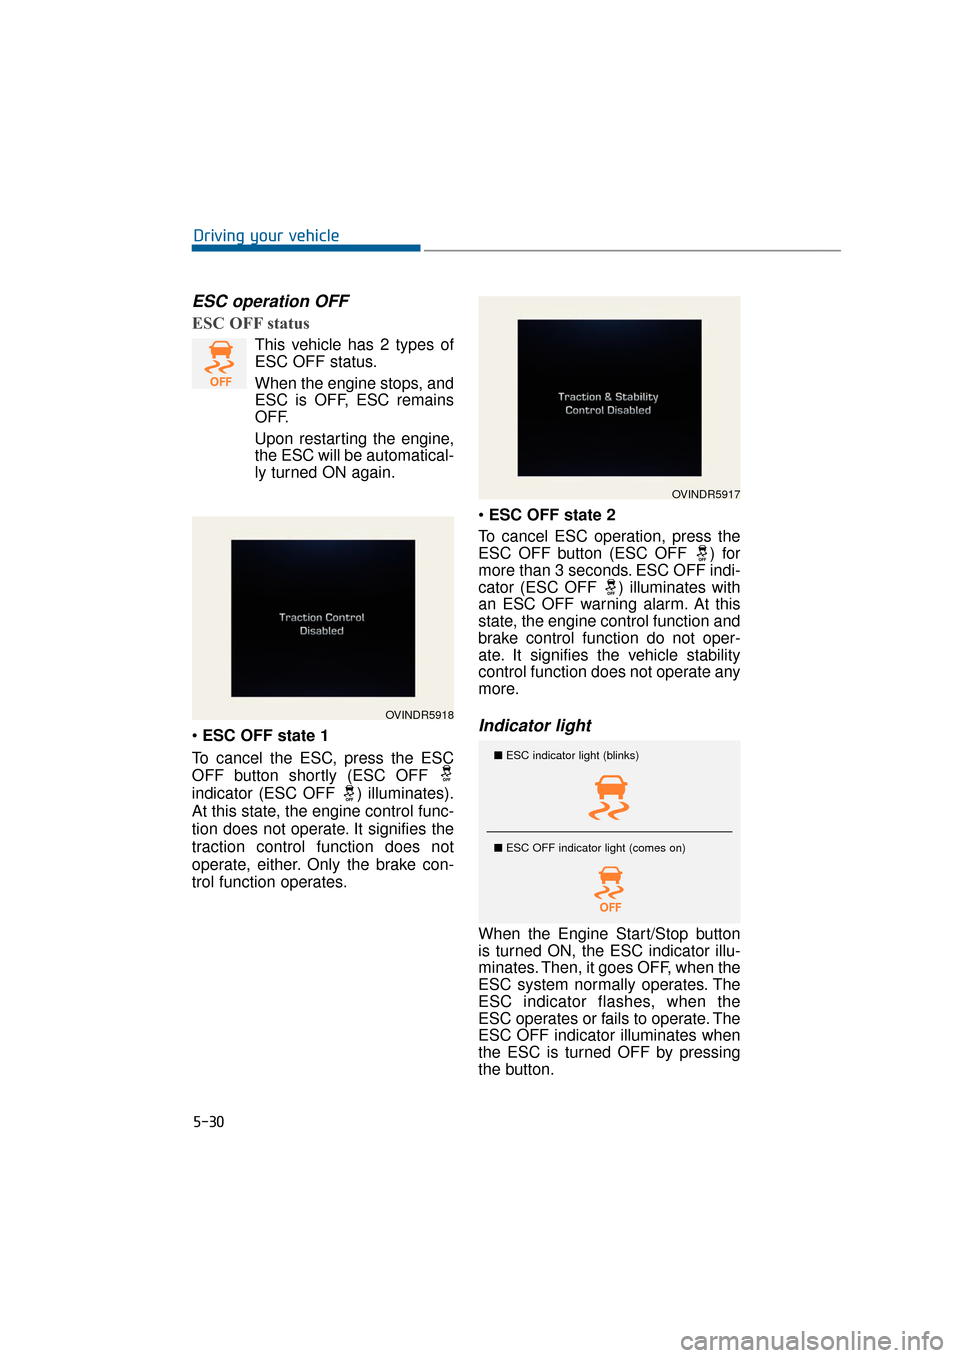
ESC operation OFF
ESC OFF status
This vehicle has 2 types of
ESC OFF status.
When the engine stops, and
ESC is OFF, ESC remains
OFF.
Upon restarting the engine,
the ESC will be automatical-
ly turned ON again.
ESC OFF state 1
To cancel the ESC, press the ESC
OFF button shortly (ESC OFF
indicator (ESC OFF ) illuminates).
At this state, the engine control func-
tion does not operate. It signifies the
traction control function does not
operate, either. Only the brake con-
trol function operates.
ESC OFF state 2
To cancel ESC operation, press the
ESC OFF button (ESC OFF ) for
more than 3 seconds. ESC OFF indi-
cator (ESC OFF ) illuminates with
an ESC OFF warning alarm. At this
state, the engine control function and
brake control function do not oper-
ate. It signifies the vehicle stability
control function does not operate any
more.
Indicator light
When the Engine Start/Stop button
is turned ON, the ESC indicator illu-
minates. Then, it goes OFF, when the
ESC system normally operates. The
ESC indicator flashes, when the
ESC operates or fails to operate. The
ESC OFF indicator illuminates when
the ESC is turned OFF by pressing
the button.
5-30
Driving your vehicle
OVINDR5917
OVINDR5918
■ ESC indicator light (blinks)
■ ESC OFF indicator light (comes on)
Page 282 of 477
Driving with tires or wheels in var-
ious sizes may cause the ESC
system to malfunction. When
replacing tires, make sure they are
the same size as others. Never
drive the vehicle, which is
installed with the tires of different
diameters.
ESC OFF usage
When driving
ESC should be turned ON for dailydriving whenever possible.
To turn ESC OFF while driving, press the ESC OFF button while
driving on a flat road. Even if you turn OFF the ESC by
pressing the button, the ESC func-
tion may be operated. It is normal
condition for safety driving.
Information
• When driving the vehicle on a
dynamometer, make sure that the
ESC is turned OFF (ESC OFF indi-
cator illuminates with an alarm) by
pressing the button for 3 seconds.
When the ESC is left ON, it may
prevent the vehicle from increasing
the driving speed, resulting in false
diagnosis.
• Turning the ESC OFF does not affect the operation of ABS or brake
systems.
i
NOTICENOTICE
5-31
Driving your vehicle05
The ESC system is only a driv-
ing aid. Take precautions for
safe driving, such as slowing
down on curved, snowy, or icy
roads. Drive slowly and do not
attempt to accelerate when the
ESC indicator light flashes, or
when a road surface is slippery.
WARNING
Never press the ESC OFF but-
ton while ESC operates. If the
ESC is turned OFF while the
ESC operates, the vehicle may
go out of control.
To turn ESC OFF while driving,
press the ESC OFF button on a
flat road.
WARNING
Never press the ESC OFF but-
ton while the ESC operates
(ESC indicator flashes).
When the ESC is turned OFF
while the ESC operates, the
vehicle may go out of control.
WARNING
Page 283 of 477
Hill-start assist control (HAC)
A vehicle has the tendency to slide
backwards on a steep slope, when the
driver begins to accelerate after a
stop. The HAC prevents the vehicle
from sliding backwards by automati-
cally operating the brake systems for
about 2 seconds. The brake systems
are automatically released, when the
accelerator pedal is depressed or after
about 2 seconds.
Information
• The HAC does not operate when theshift lever is in P(Park) or
N(Neutral).
• The HAC activates, even when the ESC is OFF. However, it does not
activate, when the ESC malfunc-
tions.
Good braking practices
Make sure the parking brake isreleased and that the parking
brake indicator goes OFF before
driving.
Driving through water may get the brakes wet. The brakes may also
get wet after washing the vehicle.
Wet brakes can be dangerous!
Your vehicle may not quickly stop,
when the brakes are wet. Wet
brakes may cause the vehicle to
slide to one side.
To dry the brake, lightly depress
the brake pedal until the braking
operation returns to normal, taking
care to keep the vehicle under con-
trol at all times. When the braking
operation does not return to nor-
mal, immediately and safely stop
the vehicle and call an authorized
EQUUS dealer for assistance.i
5-32
Driving your vehicle
The HAC is activated only for
about 2 seconds, so always
depress the accelerator pedal
to begin driving upwards after a
stop.
WARNING
Whenever parking or leaving the vehicle, always securely
set the parking brake and
locate the vehicle's shift lever
in P(Park). A vehicle, of which
the shift lever is not in P(Park)
with the parking brake set ON,
is at risk of inadvertently mov-
ing and injuring you or others.
All vehicles should always set the parking brake, when park-
ing, to avoid inadvertent
movement, which may injure
occupants or pedestrians.
WARNING
Page 284 of 477
Do not slide down (or coast down)the vehicle on a slope out of gear.
This is extremely hazardous. Keep
the vehicle in gear at all times,
depress the brake pedal to slow
down, and then shift to a lower
gear so that engine braking will
help you maintain a safe speed.
Do not "ride" the brake pedal. Resting your foot on the brake
pedal, while driving, is dangerous
because it may result brake over-
heating or lose braking effects. It
also wears out the brake compo-
nents.
If a tire goes flat while driving, gen- tly depress the brake pedal. Keep
the driving direction straight ahead
while slowing down the speed.
When the speed is lowered
enough to be safe, pull off and stop
the vehicle in a safe place.
When your vehicle is equipped with an automatic transmission, do
not let your car creep forward. To
avoid creeping forward, firmly
depress the brake pedal when
stopping the vehicle.
Be careful when parking on a slope. Firmly set the parking brake
and place the shift lever in P(Park).
When parking the vehicle on a
downward slope, steer the front
wheels sideways (into the curbs) to
prevent the vehicle from rolling.
When parking the vehicle on an
upwards, turn the front wheels
sideways (away from the curb) to
prevent the vehicle from rolling.
If there is no curb, or if it is required
by other conditions, block the
wheels with obstacles to keep the
vehicle from rolling. Under some conditions, your park-
ing brake may freeze in the
engaged position. This is most like-
ly to happen, when there is an
accumulation of snow or ice
around or near the rear brakes, or
when the brake is wet. When there
is a risk that the parking brake may
freeze, temporarily depress the
brake pedal while locating the shift
lever(automatic transmission) in
P(Park) and block the rear wheels.
Thus, the vehicle may not roll.
Then, release the parking brake.
Do not hold the vehicle on a slope by depressing the accelerator. This
may overheat the transmission.
Always use the brake pedal or
parking brake.
5-33
Driving your vehicle05
Page 285 of 477
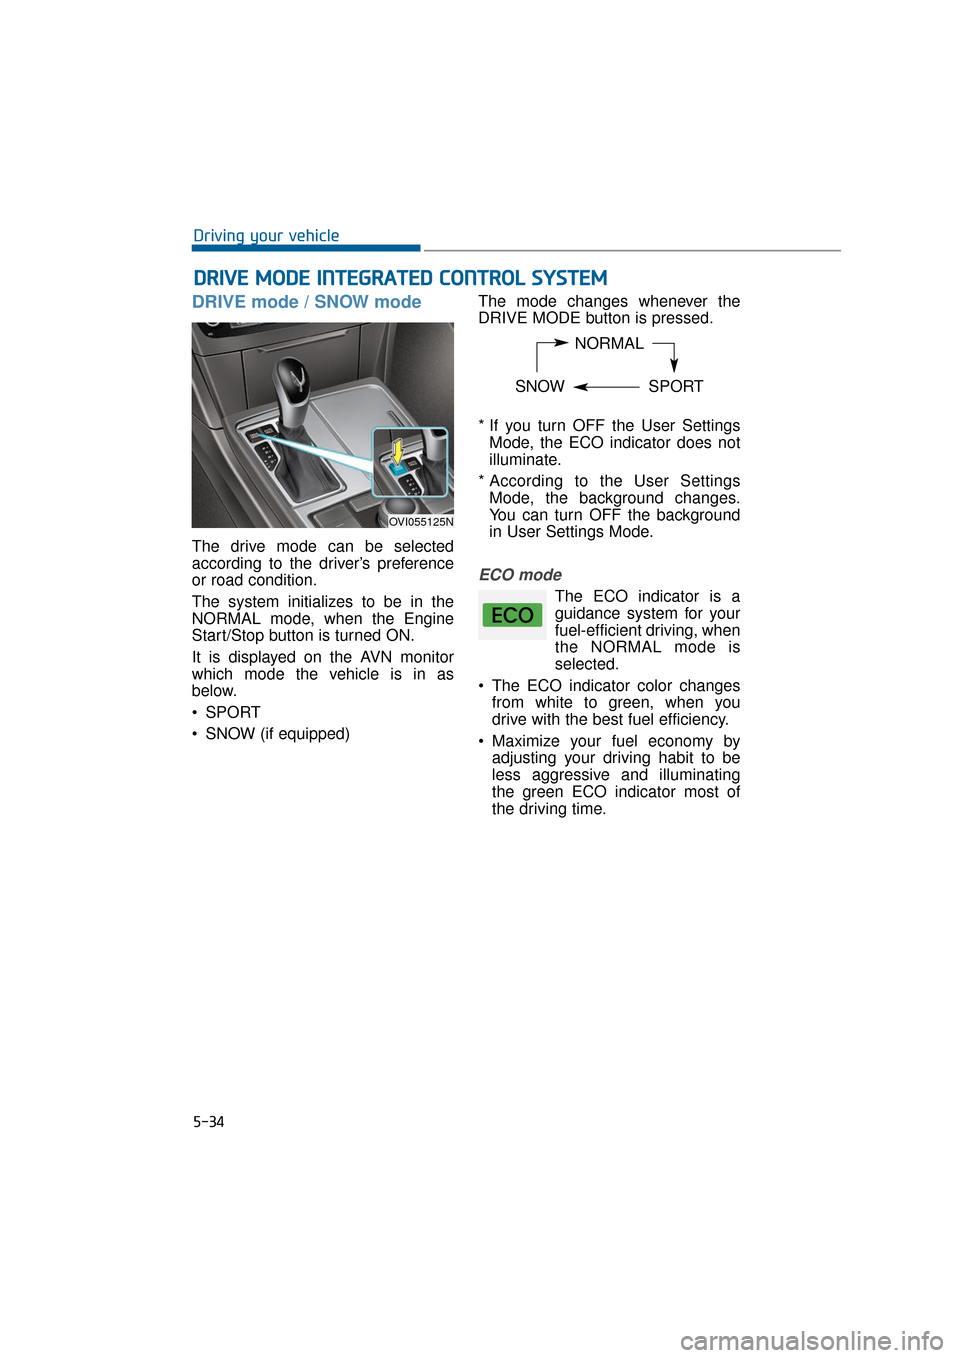
DRIVE mode / SNOW mode
The drive mode can be selected
according to the driver’s preference
or road condition.
The system initializes to be in the
NORMAL mode, when the Engine
Start/Stop button is turned ON.
It is displayed on the AVN monitor
which mode the vehicle is in as
below.
SPORT
SNOW (if equipped)The mode changes whenever the
DRIVE MODE button is pressed.
* If you turn OFF the User Settings
Mode, the ECO indicator does not
illuminate.
* According to the User Settings Mode, the background changes.
You can turn OFF the background
in User Settings Mode.
ECO mode
The ECO indicator is a
guidance system for your
fuel-efficient driving, when
the NORMAL mode is
selected.
The ECO indicator color changes from white to green, when you
drive with the best fuel efficiency.
Maximize your fuel economy by adjusting your driving habit to be
less aggressive and illuminating
the green ECO indicator most of
the driving time.
D DR
RI
IV
V E
E
M
M O
OD
DE
E
I
IN
N T
TE
EG
G R
RA
A T
TE
ED
D
C
C O
O N
NT
TR
R O
O L
L
S
S Y
Y S
ST
T E
EM
M
5-34
Driving your vehicle
NORMAL
SNOW SPORT
OVI055125N
Page 286 of 477
SPORT mode
The SPORT mode focuses on the
driving dynamics by automatically
adjusting the steering wheel, sus-
pension (where the ECS is
equipped), engine and transmission
system.is selected by pressing
the DRIVE MODE but-
ton, the SPORT indica-
tor will illuminate.
Even after the SPORT mode is acti- vated, restarting of the engine
resets the DRIVE mode to be in the
NORMAL mode. Thus, when nec-
essary, re-select the SPORT mode.
ed:
- The RPM(revolutions per minutes) level is maintained over a certain
length of time, even when the
accelerator is released.
- Up-shifting timing is delayed, when accelerating.
Information
In the Sport mode, the fuel efficiency
may decrease.
Information
When a Driving Mode theme is select-
ed in the User Settings Mode of the
LCD display (if equipped), the
SPORT and SNOW indicators will not
illuminate on the instrument cluster.
SNOW mode (if equipped)
Snow mode helps the driver to more
effectively drive a vehicle on slippery
roads, such as snowy or muddy
roads.
is selected by pressing
the DRIVE MODE but-
ton, the SNOW indicator
will illuminate.
i
i
5-35
Driving your vehicle05
Page 287 of 477
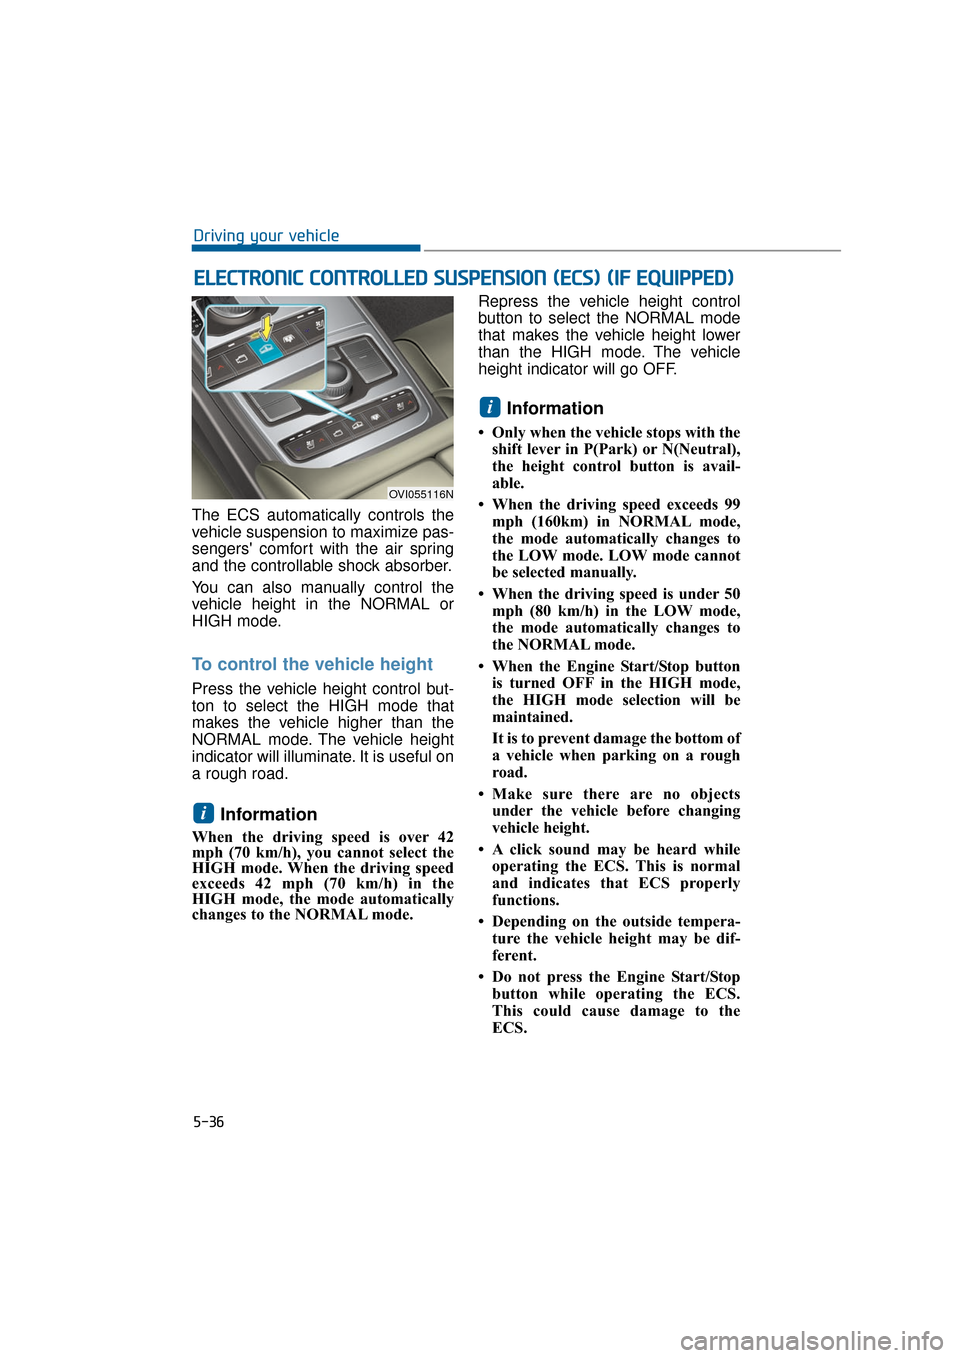
The ECS automatically controls the
vehicle suspension to maximize pas-
sengers' comfort with the air spring
and the controllable shock absorber.
You can also manually control the
vehicle height in the NORMAL or
HIGH mode.
To control the vehicle height
Press the vehicle height control but-
ton to select the HIGH mode that
makes the vehicle higher than the
NORMAL mode. The vehicle height
indicator will illuminate. It is useful on
a rough road.
Information
When the driving speed is over 42
mph (70 km/h), you cannot select the
HIGH mode. When the driving speed
exceeds 42 mph (70 km/h) in the
HIGH mode, the mode automatically
changes to the NORMAL mode. Repress the vehicle height control
button to select the NORMAL mode
that makes the vehicle height lower
than the HIGH mode. The vehicle
height indicator will go OFF.
Information
• Only when the vehicle stops with the
shift lever in P(Park) or N(Neutral),
the height control button is avail-
able.
• When the driving speed exceeds 99 mph (160km) in NORMAL mode,
the mode automatically changes to
the LOW mode. LOW mode cannot
be selected manually.
• When the driving speed is under 50 mph (80 km/h) in the LOW mode,
the mode automatically changes to
the NORMAL mode.
• When the Engine Start/Stop button is turned OFF in the HIGH mode,
the HIGH mode selection will be
maintained.
It is to prevent damage the bottom of
a vehicle when parking on a rough
road.
• Make sure there are no objects under the vehicle before changing
vehicle height.
• A click sound may be heard while operating the ECS. This is normal
and indicates that ECS properly
functions.
• Depending on the outside tempera- ture the vehicle height may be dif-
ferent.
• Do not press the Engine Start/Stop button while operating the ECS.
This could cause damage to the
ECS.
i
i
E EL
LE
E C
CT
T R
R O
O N
NI
IC
C
C
C O
O N
NT
TR
R O
O L
LL
LE
E D
D
S
S U
U S
SP
P E
EN
N S
SI
IO
O N
N
(
( E
E C
CS
S)
)
(
( I
IF
F
E
E Q
Q U
UI
IP
P P
PE
ED
D )
)
5-36
Driving your vehicle
OVI055116N
Page 288 of 477
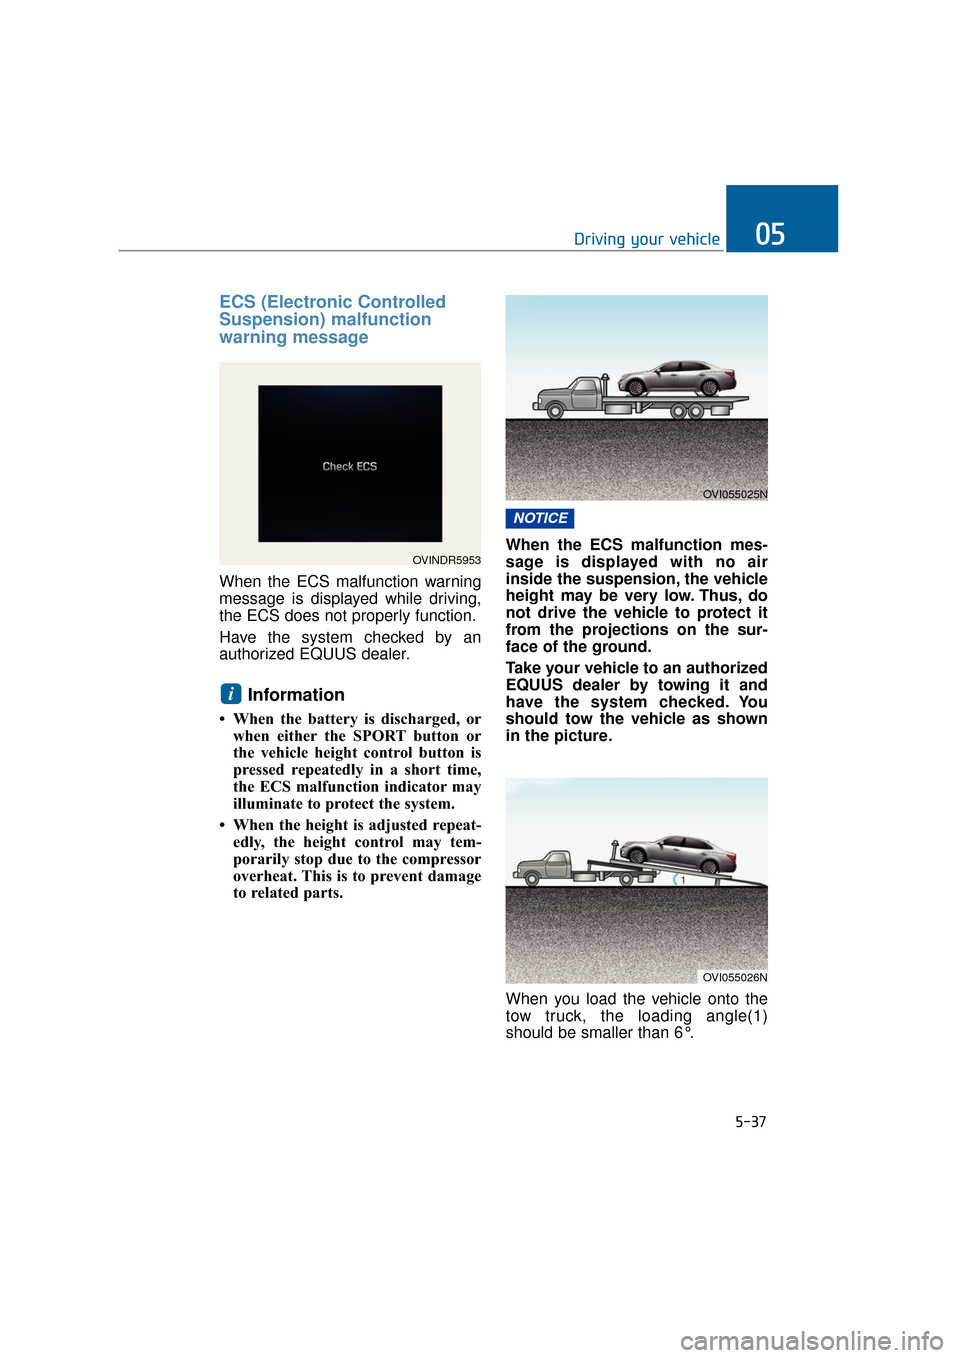
ECS (Electronic Controlled
Suspension) malfunction
warning message
When the ECS malfunction warning
message is displayed while driving,
the ECS does not properly function.
Have the system checked by an
authorized EQUUS dealer.
Information
• When the battery is discharged, orwhen either the SPORT button or
the vehicle height control button is
pressed repeatedly in a short time,
the ECS malfunction indicator may
illuminate to protect the system.
• When the height is adjusted repeat- edly, the height control may tem-
porarily stop due to the compressor
overheat. This is to prevent damage
to related parts. When the ECS malfunction mes-
sage is displayed with no air
inside the suspension, the vehicle
height may be very low. Thus, do
not drive the vehicle to protect it
from the projections on the sur-
face of the ground.
Take your vehicle to an authorized
EQUUS dealer by towing it and
have the system checked. You
should tow the vehicle as shown
in the picture.
When you load the vehicle onto the
tow truck, the loading angle(1)
should be smaller than 6°.
NOTICE
i
5-37
Driving your vehicle05
OVINDR5953
OVI055025N
OVI055026N
Page 289 of 477
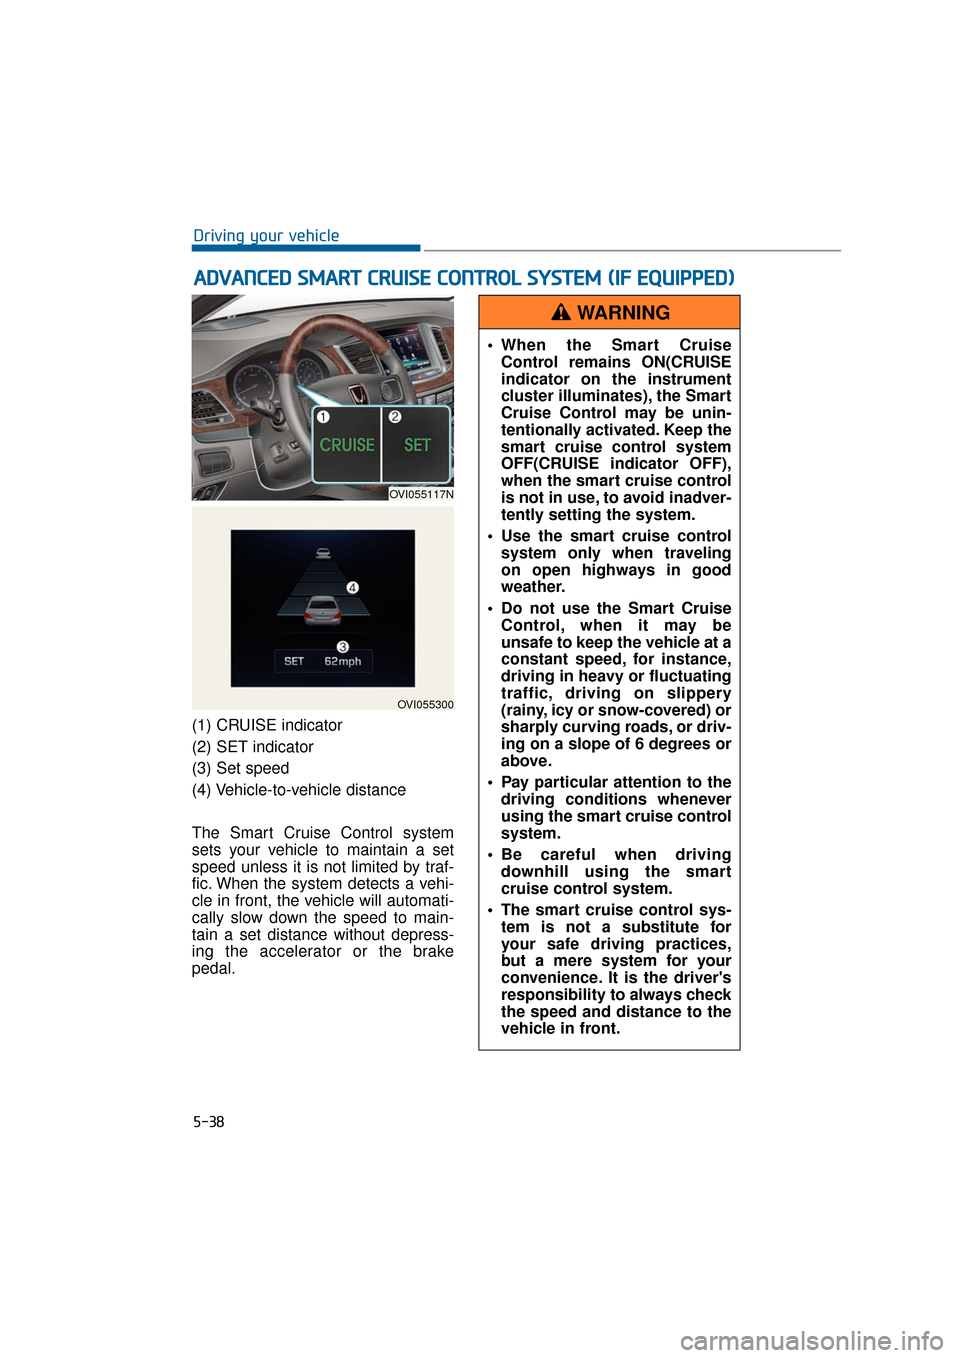
(1) CRUISE indicator
(2) SET indicator
(3) Set speed
(4) Vehicle-to-vehicle distance
The Smart Cruise Control system
sets your vehicle to maintain a set
speed unless it is not limited by traf-
fic. When the system detects a vehi-
cle in front, the vehicle will automati-
cally slow down the speed to main-
tain a set distance without depress-
ing the accelerator or the brake
pedal.
A AD
DV
VA
A N
N C
CE
E D
D
S
S M
M A
AR
RT
T
C
C R
R U
U I
IS
S E
E
C
C O
O N
NT
TR
R O
O L
L
S
S Y
Y S
ST
T E
EM
M
(
( I
IF
F
E
E Q
Q U
UI
IP
P P
PE
ED
D )
)
5-38
Driving your vehicle
OVI055117N
OVI055300
When the Smart Cruise
Control remains ON(CRUISE
indicator on the instrument
cluster illuminates), the Smart
Cruise Control may be unin-
tentionally activated. Keep the
smart cruise control system
OFF(CRUISE indicator OFF),
when the smart cruise control
is not in use, to avoid inadver-
tently setting the system.
Use the smart cruise control system only when traveling
on open highways in good
weather.
Do not use the Smart Cruise Control, when it may be
unsafe to keep the vehicle at a
constant speed, for instance,
driving in heavy or fluctuating
traffic, driving on slippery
(rainy, icy or snow-covered) or
sharply curving roads, or driv-
ing on a slope of 6 degrees or
above.
Pay particular attention to the driving conditions whenever
using the smart cruise control
system.
Be careful when driving downhill using the smart
cruise control system.
The smart cruise control sys- tem is not a substitute for
your safe driving practices,
but a mere system for your
convenience. It is the driver's
responsibility to always check
the speed and distance to the
vehicle in front.
WARNING
Page 290 of 477
Information
During the normal operation of the
Smart Cruise Control, with the SET
switch activated or reactivated after
applying brakes, the Smart Cruise
Control will energize after approxi-
mately 3 seconds. This delay is nor-
mal.
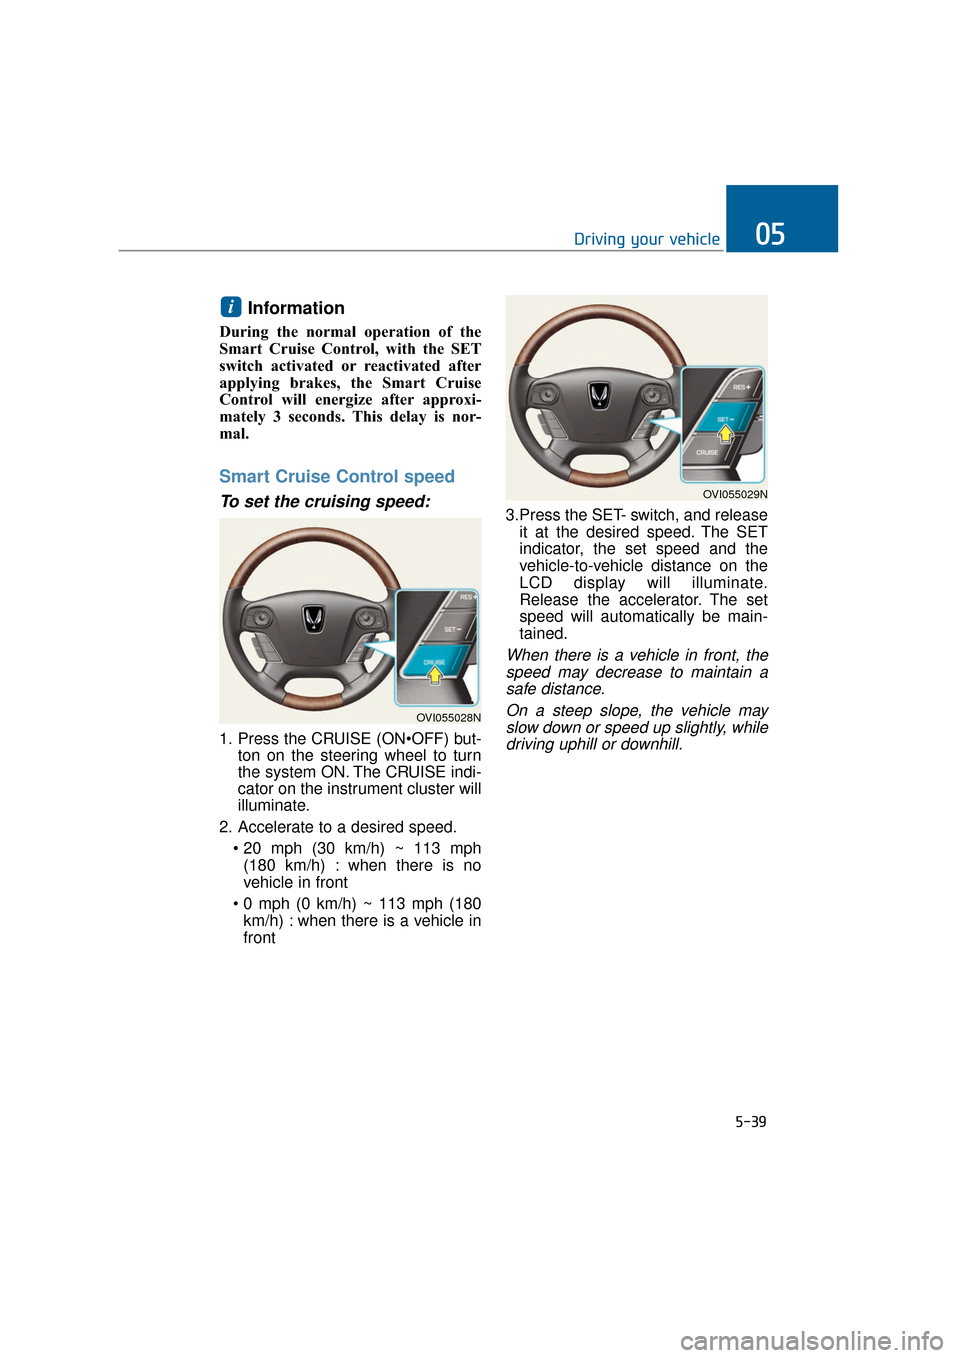
Smart Cruise Control speed
To set the cruising speed:
1. Press the CRUISE (ONton on the steering wheel to turn
the system ON. The CRUISE indi-
cator on the instrument cluster will
illuminate.
2. Accelerate to a desired speed. (180 km/h) : when there is no
vehicle in front
km/h) : when there is a vehicle in
front 3.Press the SET- switch, and release
it at the desired speed. The SET
indicator, the set speed and the
vehicle-to-vehicle distance on the
LCD display will illuminate.
Release the accelerator. The set
speed will automatically be main-
tained.
When there is a vehicle in front, thespeed may decrease to maintain asafe distance.
On a steep slope, the vehicle mayslow down or speed up slightly, whiledriving uphill or downhill.
i
5-39
Driving your vehicle05
OVI055028N
OVI055029N