change time Hyundai Equus 2016 Owner's Manual
[x] Cancel search | Manufacturer: HYUNDAI, Model Year: 2016, Model line: Equus, Model: Hyundai Equus 2016Pages: 477, PDF Size: 16.25 MB
Page 1 of 477
O
OW
W N
NE
ER
R '
'S
S
M
M A
AN
N U
U A
AL
L
O
Op
pe
er
ra
a t
ti
io
o n
n
M
M a
ai
in
n t
te
e n
n a
an
n c
ce
e
S
S p
pe
ec
ci
if
f i
ic
c a
a t
ti
io
o n
ns
s
All information in this Owner’s Manual is up to date
at the time of publication. However, HYUNDAI
reserves the rights to change the contents at any
time in order to carry out our policy of continual
product improvements.
This manual applies to all models, including
descriptions of options and standard equipment.
Thus, you may find that some contents in this man-
ual do not apply to your specific vehicle.
Page 16 of 477
F16
LCD display .........................3-69
LCD Modes ...............................3-69
Trip Computer Mode..............3-70
ASCC/LDWS Mode .................3-70
A/V Mode.................................3-70
Turn By Turn (TBT) Mode....3-70
Information Mode ..................3-71
User Settings Mode ...............3-72
Warning Messages.................3-78
Trip computer .....................3-86
Overview ...................................3-86
Trip A/B ....................................3-86
Fuel Economy..........................3-87
Warning and indicator
lights ....................................3-89
Warning lights .........................3-89
Indicator Lights .......................3-96
Head Up Display (HUD)...3-100
Description .............................3-100
Head Up Display ON/OFF ..3-101
Head Up Display
Information ............................3-101
Head Up Display Setting ....3-101
Parking assist system......3-102
Operation of the parking
assist system .........................3-103
Inoperable conditions of the
Parking Assist System ........3-105
Self-diagnosis .......................3-106
Rearview camera .............3-107
Multi-view camera
system ...............................3-108
Lighting..............................3-109
Battery saver function .......3-109
Headlamp escort function ..3-109
Lighting control ....................3-110
High beam operation...........3-111
Turn signals and lane
change signals ......................3-112
Front fog light.......................3-113
Daytime running light .........3-113 Headlight leveling device ...3-113
AFLS (Adaptive Front
Lighting System)...................3-114
Wipers and washer ..........3-115
Windshield wipers ................3-115
Windshield washer ...............3-117
Interior light......................3-118
Front........................................3-118
Rear .........................................3-119
Trunk room lamp ..................3-119
Door courtesy lamp .............3-119
Glove box lamp .....................3-120
Vanity mirror lamp ...............3-120
Welcome system ..............3-121
Puddle lamp ...........................3-121
Headlamp................................3-121
Interior light .........................3-121
Defroster ...........................3-122
Rear window defroster ......3-122
Front wiper deicer ...............3-122
Automatic climate control
system ...............................3-123
Automatic heating and air
conditioning ...........................3-124
Manual air heating and
cooling ....................................3-126
System operation .................3-135
Climate control air filter .....3-136
Checking the amount of air
conditioner refrigerant and
compressor lubricant ..........3-137
Windshield defrosting and
defogging ..........................3-138
Defogging logic.....................3-139
Storage compartments ....3-141
Center console storage .....3-141
Glove box ...............................3-141
Sunglass holder ....................3-142
Rear console storage ..........3-142
Cool and warm box ..............3-143
Page 36 of 477
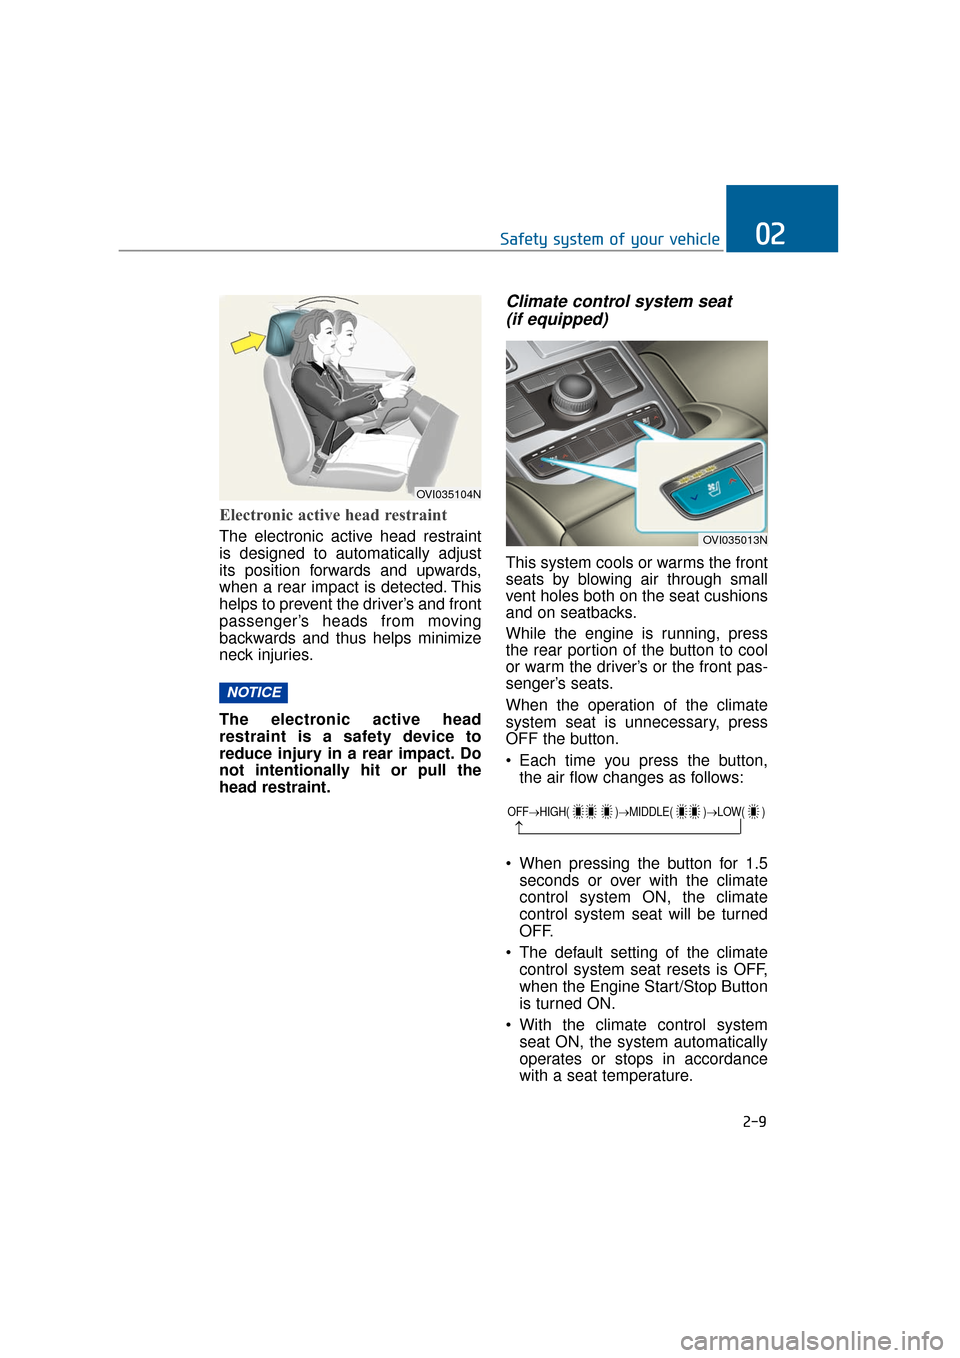
Electronic active head restraint
The electronic active head restraint
is designed to automatically adjust
its position forwards and upwards,
when a rear impact is detected. This
helps to prevent the driver’s and front
passenger’s heads from moving
backwards and thus helps minimize
neck injuries.
The electronic active head
restraint is a safety device to
reduce injury in a rear impact. Do
not intentionally hit or pull the
head restraint.
Climate control system seat (if equipped)
This system cools or warms the front
seats by blowing air through small
vent holes both on the seat cushions
and on seatbacks.
While the engine is running, press
the rear portion of the button to cool
or warm the driver’s or the front pas-
senger’s seats.
When the operation of the climate
system seat is unnecessary, press
OFF the button.
Each time you press the button,
the air flow changes as follows:
When pressing the button for 1.5 seconds or over with the climate
control system ON, the climate
control system seat will be turned
OFF.
The default setting of the climate control system seat resets is OFF,
when the Engine Start/Stop Button
is turned ON.
With the climate control system seat ON, the system automatically
operates or stops in accordance
with a seat temperature.
NOTICE
2-9
Safety system of your vehicle02
OVI035104N
OVI035013N
OFF→ HIGH( )→ MIDDLE( )→LOW( )
→
Page 47 of 477
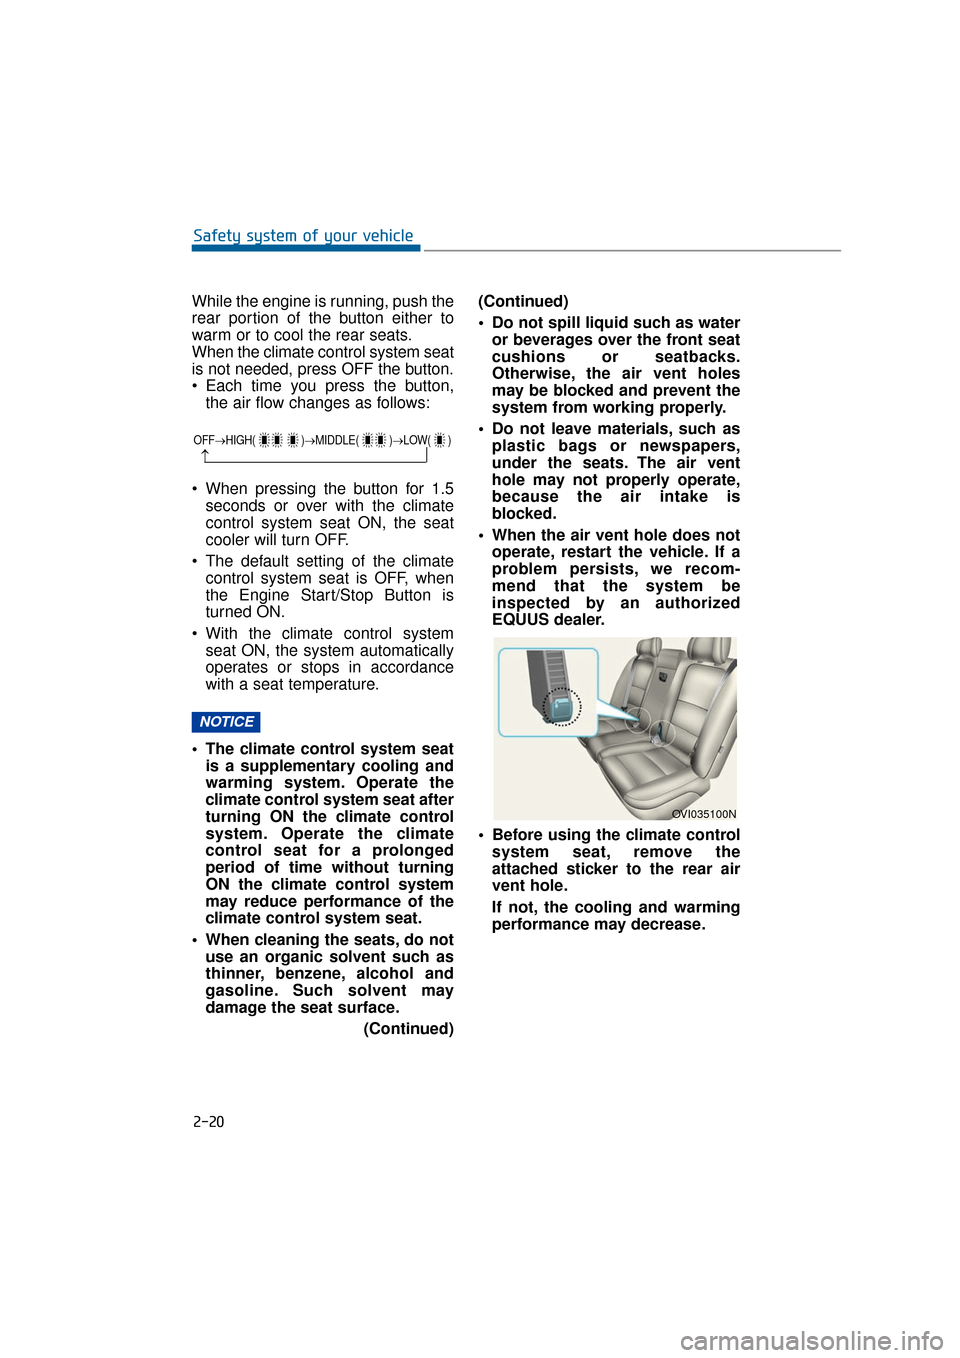
While the engine is running, push the
rear portion of the button either to
warm or to cool the rear seats.
When the climate control system seat
is not needed, press OFF the button.
Each time you press the button,the air flow changes as follows:
When pressing the button for 1.5 seconds or over with the climate
control system seat ON, the seat
cooler will turn OFF.
The default setting of the climate control system seat is OFF, when
the Engine Start/Stop Button is
turned ON.
With the climate control system seat ON, the system automatically
operates or stops in accordance
with a seat temperature.
The climate control system seat is a supplementary cooling and
warming system. Operate the
climate control system seat after
turning ON the climate control
system. Operate the climate
control seat for a prolonged
period of time without turning
ON the climate control system
may reduce performance of the
climate control system seat.
When cleaning the seats, do not use an organic solvent such as
thinner, benzene, alcohol and
gasoline. Such solvent may
damage the seat surface.
(Continued)(Continued)
Do not spill liquid such as water
or beverages over the front seat
cushions or seatbacks.
Otherwise, the air vent holes
may be blocked and prevent the
system from working properly.
Do not leave materials, such as plastic bags or newspapers,
under the seats. The air vent
hole may not properly operate,
because the air intake is
blocked.
When the air vent hole does not operate, restart the vehicle. If a
problem persists, we recom-
mend that the system be
inspected by an authorized
EQUUS dealer.
Before using the climate control system seat, remove the
attached sticker to the rear air
vent hole.
If not, the cooling and warming
performance may decrease.
OVI035100N
NOTICE
2-20
Safety system of your vehicle
OFF→ HIGH( )→ MIDDLE( )→LOW( )
→
Page 99 of 477
Rearview camera................................................3-107
Multi-view camera system ...............................3-108
Lighting................................................................3-109
Battery saver function ................................................3-109
Headlamp escort function ..........................................3-109
Lighting control .............................................................3-110
High beam operation....................................................3-111
Turn signals and lane change signals......................3-112
Front fog light ...............................................................3-113
Daytime running light .................................................3-113
Headlight leveling device ...........................................3-113
AFLS (Adaptive Front Lighting System) ..................3-114
Wipers and washer ............................................3-115
Windshield wipers ........................................................3-115
Windshield washer........................................................3-117
Interior light........................................................3-118
Front........................................................................\
.........3-118
Rear ........................................................................\
..........3-119
Trunk room lamp ...........................................................3-119
Door courtesy lamp ......................................................3-119
Glove box lamp ..............................................................3-120
Vanity mirror lamp ........................................................3-120
Welcome system ................................................3-121
Puddle lamp ....................................................................3-12\
1
Headlamp................................................................\
.........3-121
Interior light ..................................................................3-121
Defroster .............................................................3-122
Rear window defroster ...............................................3-122
Front wiper deicer ........................................................3-122
Convenient features ofyour vehicle
Page 116 of 477
Power Trunk Non-Opening orClosing Conditions:
The Power Trunk will not operate,
when driving faster than 1.8 mph
(3 km/h).
The Power Trunk is operable when the engine is not running.
However, the Power Trunk opera-
tion consumes large amounts of
vehicle electric power. To prevent
the battery from being drained, do
not operate it excessively (i.e.
more than approximately 10 times
in a consecutive manner.)
Do not modify or repair any part of the Power Trunk by yourself. This
must be done by an authorized
EQUUS dealer.
Before jacking up the vehicle to change a tire or repair the vehicle,
open the Power Trunk. Do not
operate the Power Trunk, when
the vehicle is raised up.
Otherwise, this may cause the
Power Trunk to improperly oper-
ate.
When there are substances, such as snow, on the Power Trunk, it
may not automatically open. After
removing the substances, try to
open it again.
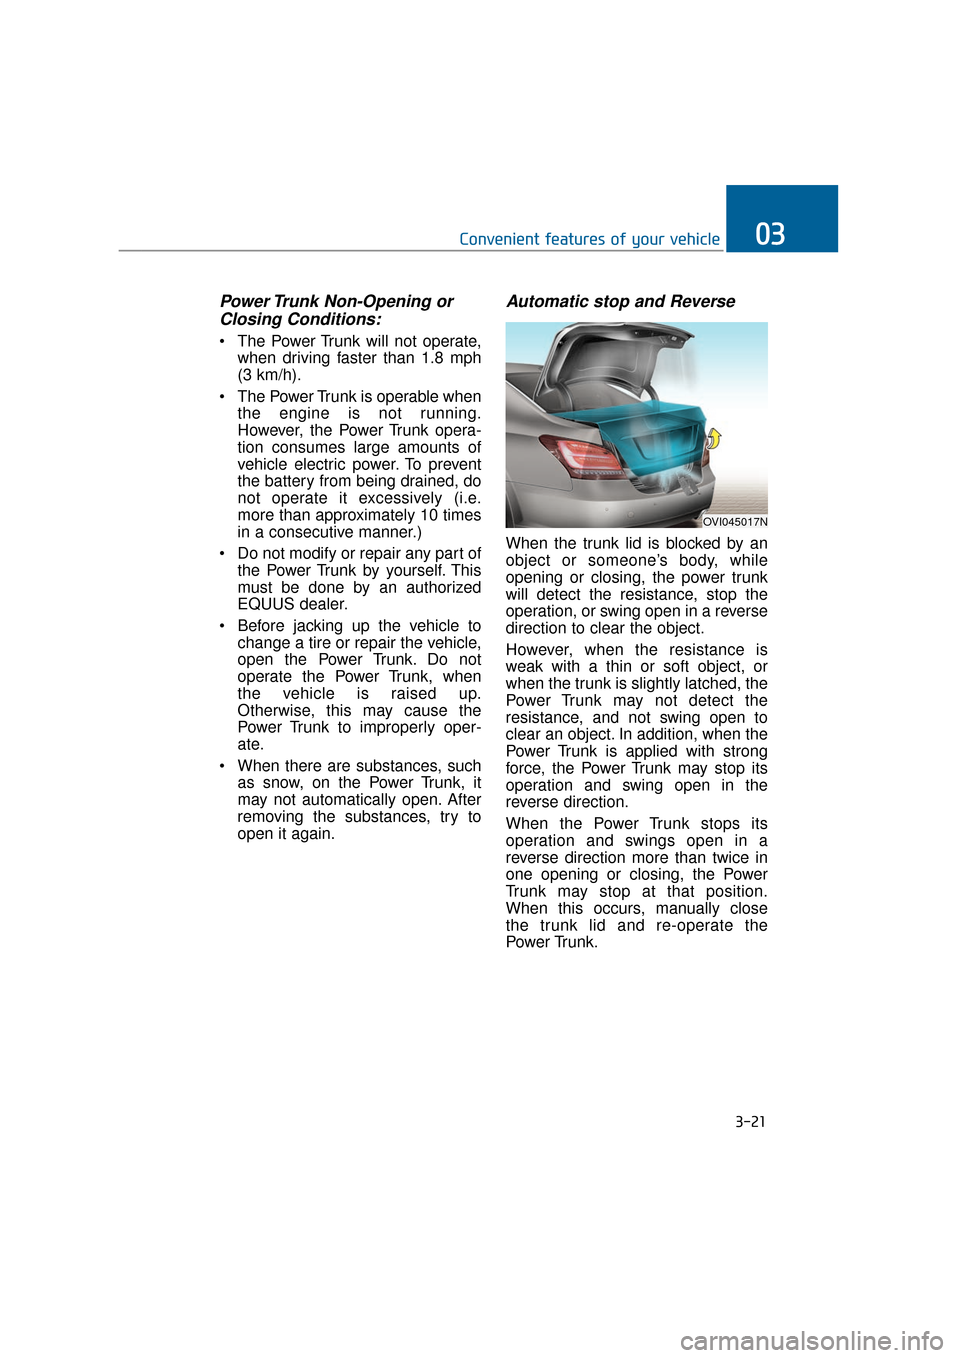
Automatic stop and Reverse
When the trunk lid is blocked by an
object or someone’s body, while
opening or closing, the power trunk
will detect the resistance, stop the
operation, or swing open in a reverse
direction to clear the object.
However, when the resistance is
weak with a thin or soft object, or
when the trunk is slightly latched, the
Power Trunk may not detect the
resistance, and not swing open to
clear an object. In addition, when the
Power Trunk is applied with strong
force, the Power Trunk may stop its
operation and swing open in the
reverse direction.
When the Power Trunk stops its
operation and swings open in a
reverse direction more than twice in
one opening or closing, the Power
Trunk may stop at that position.
When this occurs, manually close
the trunk lid and re-operate the
Power Trunk.
3-21
Convenient features of your vehicle03
OVI045017N
Page 137 of 477
Electronic Hydraulic Power
Steering (EHPS)
This system uses an electromotor to
assist your steering. When the
engine is turned OFF, or when the
EHPS becomes inoperative, you
may still steer the vehicle, but it
requires more effort in steering.
When you notice such a change
while steering, have the EHPS
checked by an authorized EQUUS
dealer.
Do not turn the steering wheel to
the extreme right or left for five
seconds or over, while running the
engine. This may cause damage to
the EHPS motor pump.
Information
When there is a malfunction with the
EHPS motor pump, the efforts to steer
may greatly increase.
Information
When the vehicle is parked outside for
an extended period of time at a cold
temperature (below 14°F/-10°C), the
power steering may require more
efforts, after first starting the engine.
This is due to the increased fluid vis-
cosity at a cold temperature and does
not indicate a malfunction.
When this happens, depress the accel-
erator to increase the engine RPM,
until it reaches 1,500 rpm. Then, let
the engine idle for two-to-three min-
utes to warm up the fluid.
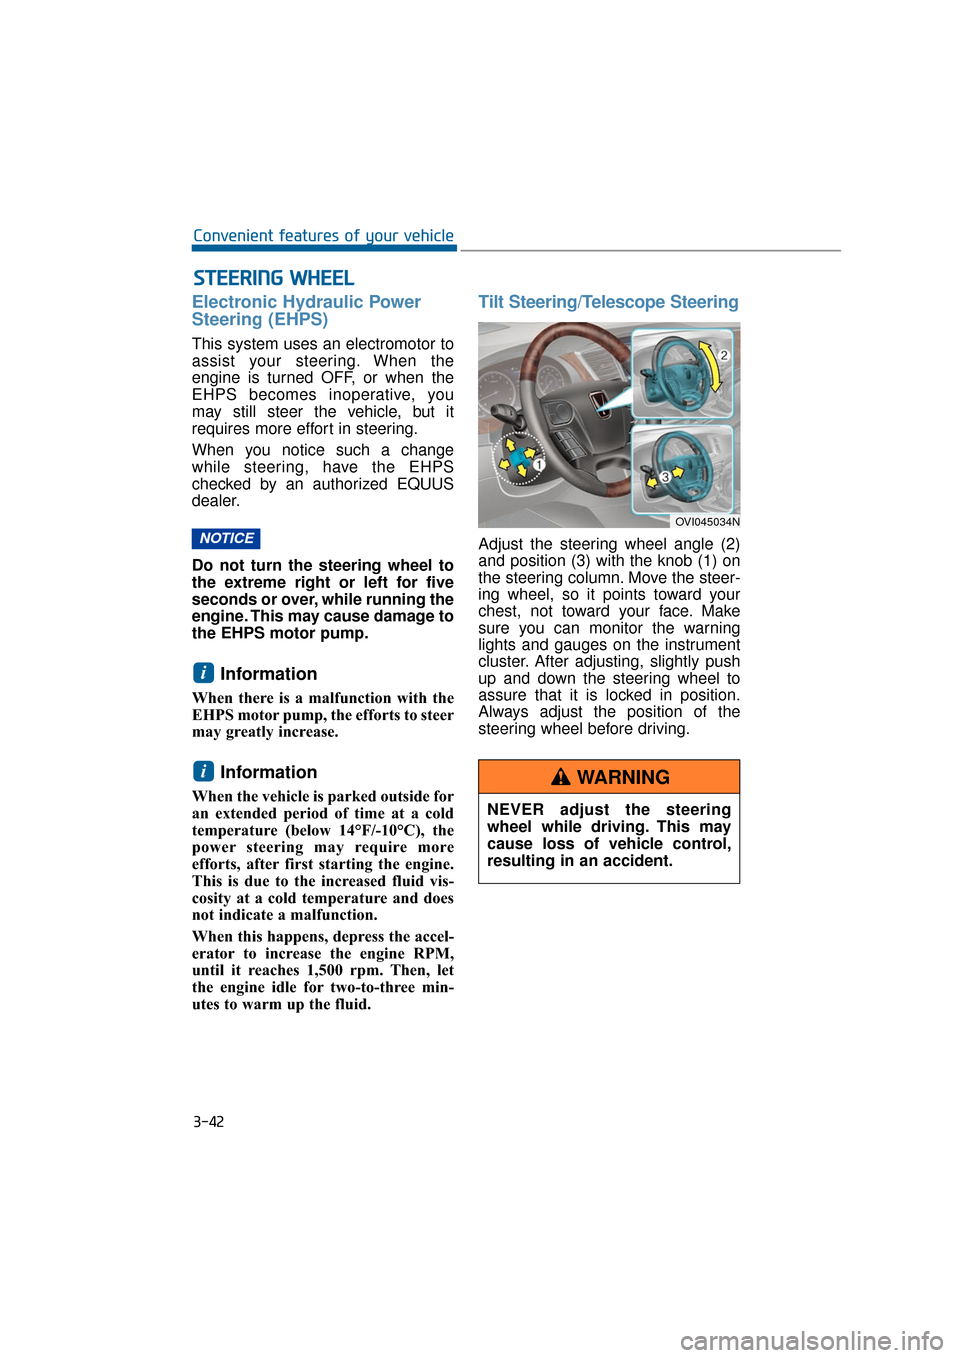
Tilt Steering/Telescope Steering
Adjust the steering wheel angle (2)
and position (3) with the knob (1) on
the steering column. Move the steer-
ing wheel, so it points toward your
chest, not toward your face. Make
sure you can monitor the warning
lights and gauges on the instrument
cluster. After adjusting, slightly push
up and down the steering wheel to
assure that it is locked in position.
Always adjust the position of the
steering wheel before driving.
i
i
NOTICE
S ST
T E
EE
ER
R I
IN
N G
G
W
W H
HE
EE
EL
L
3-42
Convenient features of your vehicle
OVI045034N
NEVER adjust the steering
wheel while driving. This may
cause loss of vehicle control,
resulting in an accident.
WARNING
Page 144 of 477
3. Simultaneously press and holdboth the HomeLink®and handheld
transmitter buttons until the
HomeLink
®indicator changes
from slow flashing to rapid flash-
ing. Now you may release both the
HomeLink
®and hand-held trans-
mitter buttons.
Information
Some devices may require you to
replace this Programming step 3 with
procedures noted in the "Gate
Operator/Canadian Programming"
chapter. When the HomeLink
®indica-
tor does not change to rapid flashing
after performing these steps, contact
HomeLink
®at www.homelink.com.
4. Firmly press, hold for 5 seconds and release the programmed
HomeLink
®button up to two sep-
arate times to activate the door.
When the door does not activate,
press and hold the just-pro-
grammed HomeLink
®button and
observe the indicator.
minated, programming is com-
plete. Your device will activate by
pressing and releasing the
HomeLink
®button.
ly for 2 seconds and then turns to
a constant light, continue with
"Programming" steps 5-7 to com-
plete the programming of a rolling
code-equipped device (most
commonly a garage door open-
er). 5. At the garage door opener receiv-
er (motor-head unit) in the
garage, find the "learn" or "smart"
button. This can usually be found
where the hanging antenna wire
is attached to the motor-head
unit.
6. Firmly press and release the "learn" or "smart" button. (The
name and color of the button vary
by manufacturer). Wait for 30 sec-
onds before starting the step 7.
7. Return to the vehicle. Firmly press and hold the programmed
HomeLink
®button for 2 seconds.
Then release it. Repeat this
"press/hold/release" sequence
for the second time. Depending
on the brand of the garage door
opener (or other rolling code
equipped device), repeat this
sequence for the third time to
complete the programming
process.
HomeLink
®should now activate your
rolling code equipped device.
i
3-49
Convenient features of your vehicle03
Page 146 of 477
This device complies with Part 15
of the FCC Rules.
Operation is subject to the following
two conditions:
1. This device may not cause harmfulinterference, and
2. This device must accept any inter- ference received, including inter-
ference that may cause undesired
operation.
NVS
®is a registered trademark and
Z-Nav™ is a trademark of the Gentex
Corporation, Zeeland, Michigan.
HomeLink
®is a registered trademark
owned by Johnson Controls,
Incorporated, Milwaukee, Wisconsin.
Electric chromic mirror (ECM) with HomeLink®system and
compass (Type B)
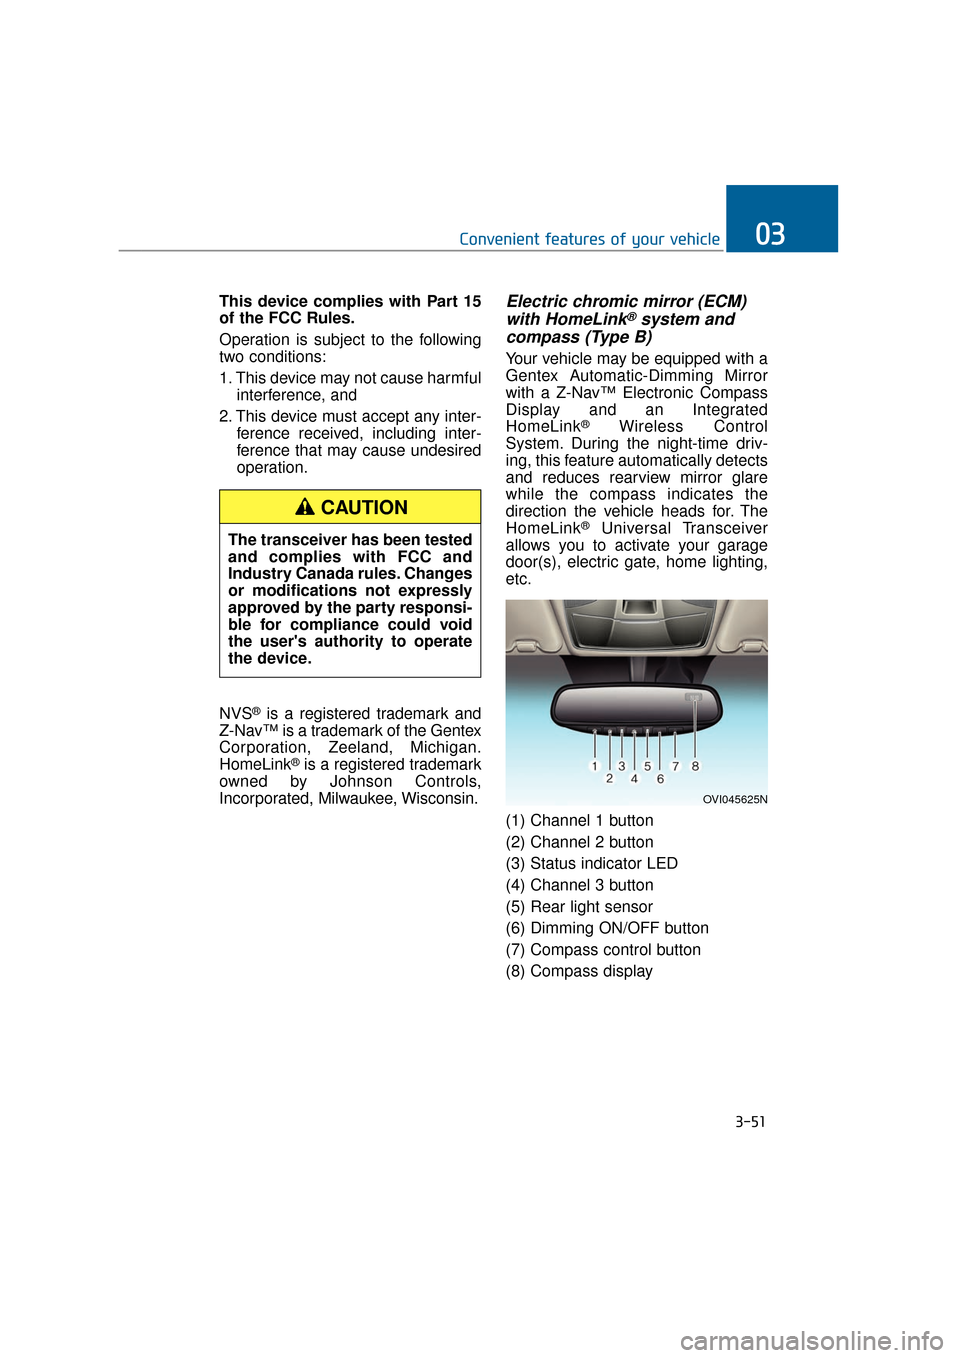
Your vehicle may be equipped with a
Gentex Automatic-Dimming Mirror
with a Z-Nav™ Electronic Compass
Display and an Integrated
HomeLink
®Wireless Control
System. During the night-time driv-
ing, this feature automatically detects
and reduces rearview mirror glare
while the compass indicates the
direction the vehicle heads for. The
HomeLink
®Universal Transceiver
allows you to activate your garage
door(s), electric gate, home lighting,
etc.
(1) Channel 1 button
(2) Channel 2 button
(3) Status indicator LED
(4) Channel 3 button
(5) Rear light sensor
(6) Dimming ON/OFF button
(7) Compass control button
(8) Compass display
3-51
Convenient features of your vehicle03
OVI045625N
The transceiver has been tested
and complies with FCC and
Industry Canada rules. Changes
or modifications not expressly
approved by the party responsi-
ble for compliance could void
the user's authority to operate
the device.
CAUTION
Page 171 of 477
3-76
Convenient features of your vehicle
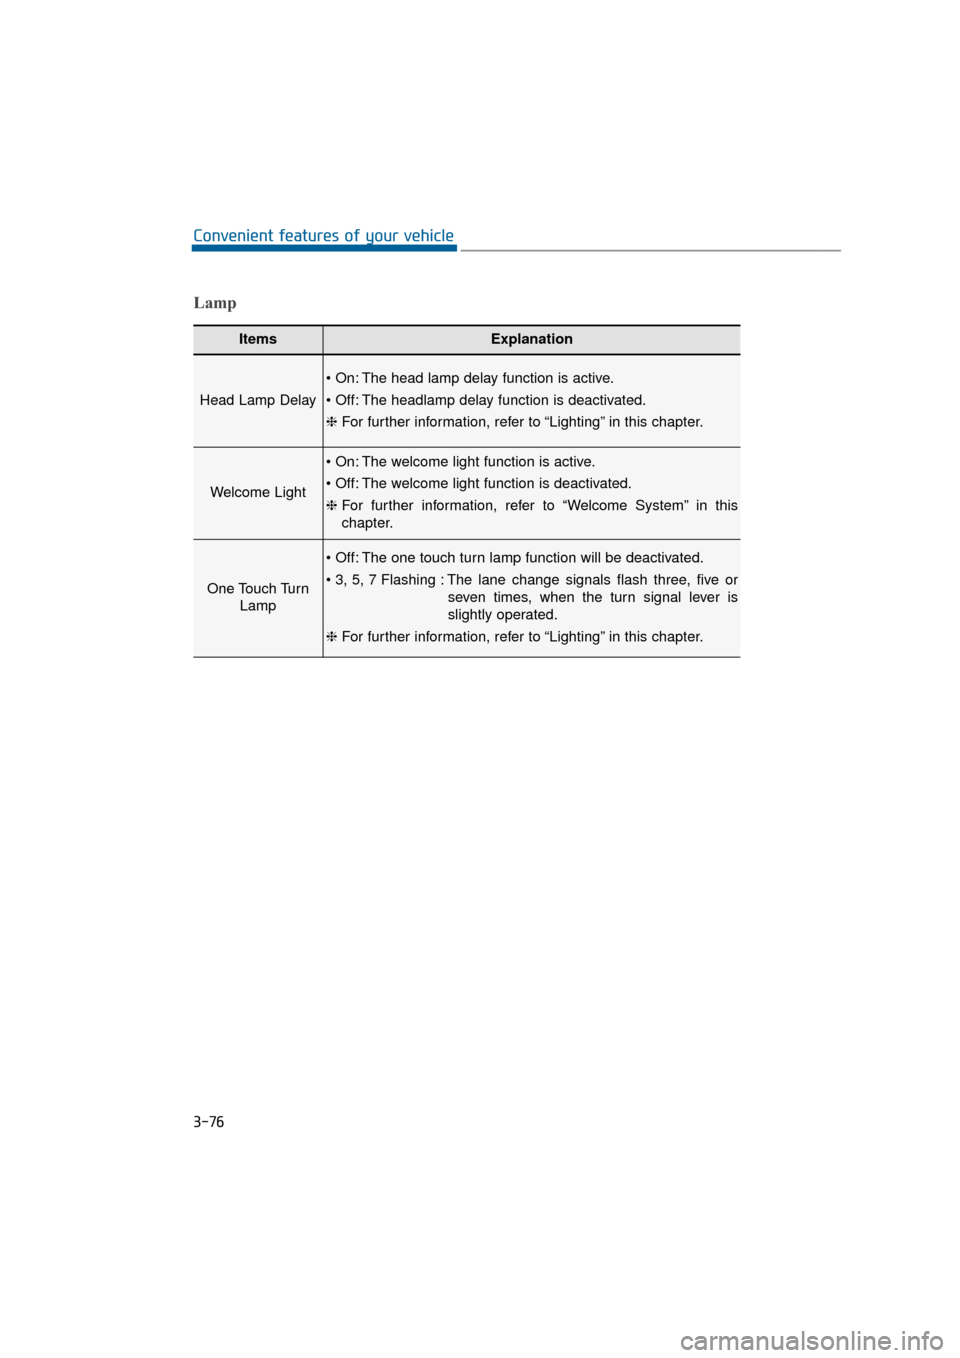
ItemsExplanation
Head Lamp Delay
The head lamp delay function is active.
The headlamp delay function is deactivated.
❈For further information, refer to “Lighting” in this chapter.
Welcome Light
The welcome light function is active.
The welcome light function is deactivated.
❈For further information, refer to “Welcome System” in this
chapter.
One Touch Turn
Lamp
The one touch turn lamp function will be deactivated.
The lane change signals flash three, five or
seven times, when the turn signal lever is
slightly operated.
❈ For further information, refer to “Lighting” in this chapter.
Lamp