lights Hyundai Equus 2016 Owner's Manual
[x] Cancel search | Manufacturer: HYUNDAI, Model Year: 2016, Model line: Equus, Model: Hyundai Equus 2016Pages: 477, PDF Size: 16.25 MB
Page 16 of 477
F16
LCD display .........................3-69
LCD Modes ...............................3-69
Trip Computer Mode..............3-70
ASCC/LDWS Mode .................3-70
A/V Mode.................................3-70
Turn By Turn (TBT) Mode....3-70
Information Mode ..................3-71
User Settings Mode ...............3-72
Warning Messages.................3-78
Trip computer .....................3-86
Overview ...................................3-86
Trip A/B ....................................3-86
Fuel Economy..........................3-87
Warning and indicator
lights ....................................3-89
Warning lights .........................3-89
Indicator Lights .......................3-96
Head Up Display (HUD)...3-100
Description .............................3-100
Head Up Display ON/OFF ..3-101
Head Up Display
Information ............................3-101
Head Up Display Setting ....3-101
Parking assist system......3-102
Operation of the parking
assist system .........................3-103
Inoperable conditions of the
Parking Assist System ........3-105
Self-diagnosis .......................3-106
Rearview camera .............3-107
Multi-view camera
system ...............................3-108
Lighting..............................3-109
Battery saver function .......3-109
Headlamp escort function ..3-109
Lighting control ....................3-110
High beam operation...........3-111
Turn signals and lane
change signals ......................3-112
Front fog light.......................3-113
Daytime running light .........3-113 Headlight leveling device ...3-113
AFLS (Adaptive Front
Lighting System)...................3-114
Wipers and washer ..........3-115
Windshield wipers ................3-115
Windshield washer ...............3-117
Interior light......................3-118
Front........................................3-118
Rear .........................................3-119
Trunk room lamp ..................3-119
Door courtesy lamp .............3-119
Glove box lamp .....................3-120
Vanity mirror lamp ...............3-120
Welcome system ..............3-121
Puddle lamp ...........................3-121
Headlamp................................3-121
Interior light .........................3-121
Defroster ...........................3-122
Rear window defroster ......3-122
Front wiper deicer ...............3-122
Automatic climate control
system ...............................3-123
Automatic heating and air
conditioning ...........................3-124
Manual air heating and
cooling ....................................3-126
System operation .................3-135
Climate control air filter .....3-136
Checking the amount of air
conditioner refrigerant and
compressor lubricant ..........3-137
Windshield defrosting and
defogging ..........................3-138
Defogging logic.....................3-139
Storage compartments ....3-141
Center console storage .....3-141
Glove box ...............................3-141
Sunglass holder ....................3-142
Rear console storage ..........3-142
Cool and warm box ..............3-143
Page 77 of 477
2-50
Safety system of your vehicle
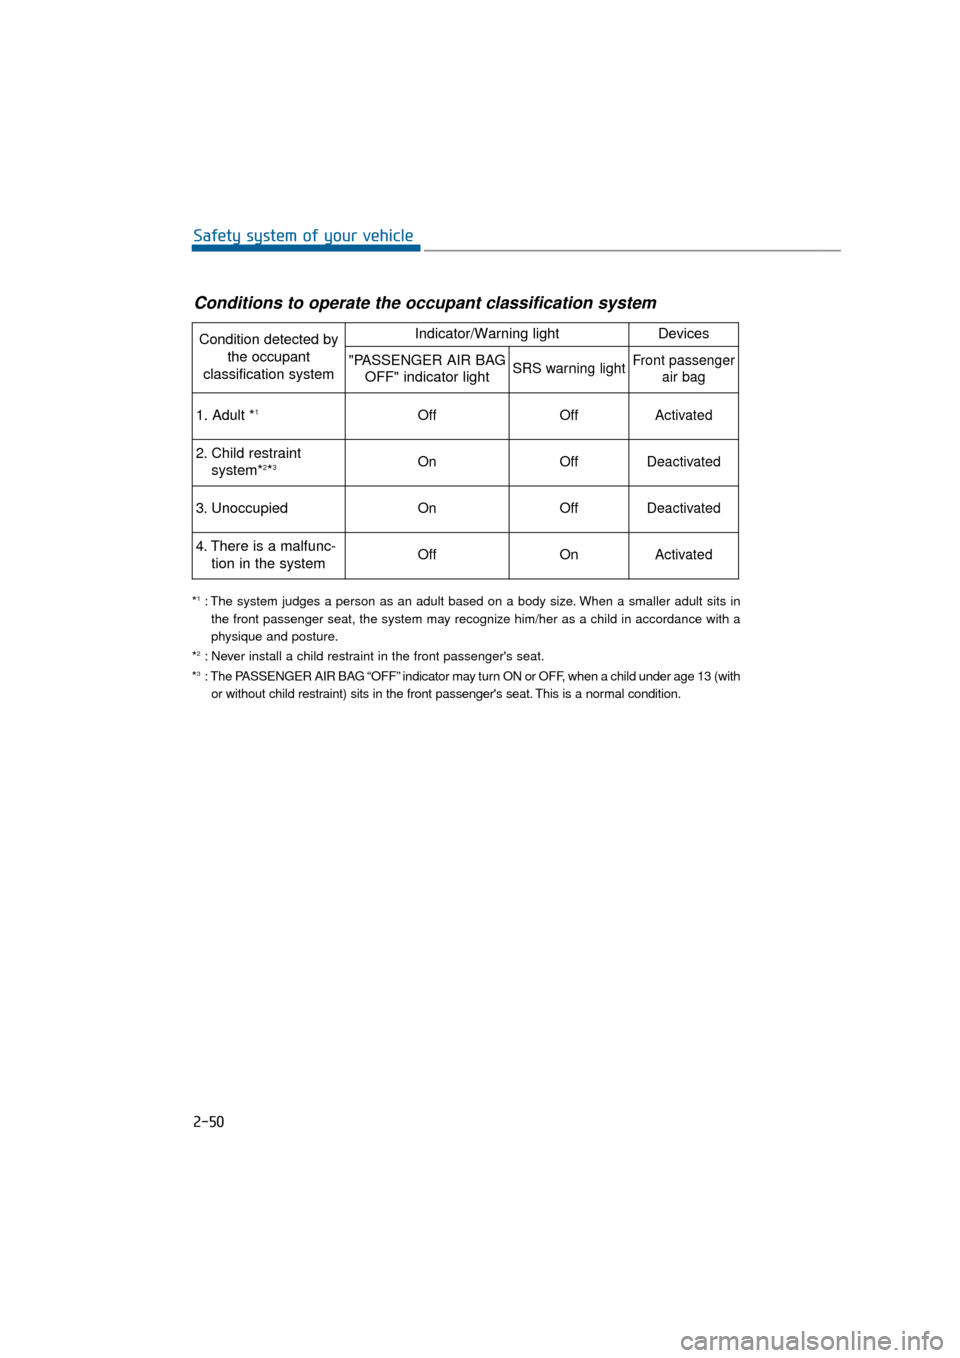
*1: The system judges a person as an adult based on a body size. When a smaller adult sits inthe front passenger seat, the system may recognize him/her as a child in accordance with a
physique and posture.
*
2: Never install a child restraint in the front passenger's seat.
*3: The PASSENGER AIR BAG “OFF” indicator may turn ON or OFF, when a child under age 13 (with or without child restraint) sits in the front passenger's seat. This is a normal condition.
Conditions to operate the occupant classification system
Condition detected by the occupant
classification systemIndicator/Warning lightDevices
"PASSENGER AIR BAG OFF" indicator lightSRS warning lightFront passenger air bag
1. Adult *1OffOffActivated
2. Child restraint
system*2*3OnOffDeactivated
3. Unoccupied OnOffDeactivated
4. There is a malfunc-tion in the systemOffOnActivated
Page 98 of 477
Instrument cluster................................................3-62
Instrument Cluster Control............................................3-64
LCD Display Control ........................................................3-64
Gauges ........................................................................\
.......3-65
LCD display ...........................................................3-69
LCD Modes ........................................................................\
3-69
Trip Computer Mode.......................................................3-70
ASCC/LDWS Mode ..........................................................3-70
A/V Mode........................................................................\
..3-70
Turn By Turn (TBT) Mode ............................................3-70
Information Mode ...........................................................3-71
User Settings Mode ........................................................3-72
Warning Messages..........................................................3-78
Trip computer .......................................................3-86
Overview........................................................................\
....3-86
Trip A/B ........................................................................\
.....3-86
Fuel Economy...................................................................3-87
Warning and indicator lights ..............................3-89
Warning lights ..................................................................3-89
Indicator Lights ................................................................3-96
Head Up Display (HUD).....................................3-100
Description ......................................................................3-\
100
Head Up Display ON/OFF ...........................................3-101
Head Up Display Information .....................................3-101
Head Up Display Setting .............................................3-101
Parking assist system........................................3-102
Operation of the parking assist system..................3-103
Inoperable conditions of the Parking Assist
System ........................................................................\
.....3-105
Self-diagnosis ................................................................3-106
Page 102 of 477
Locking
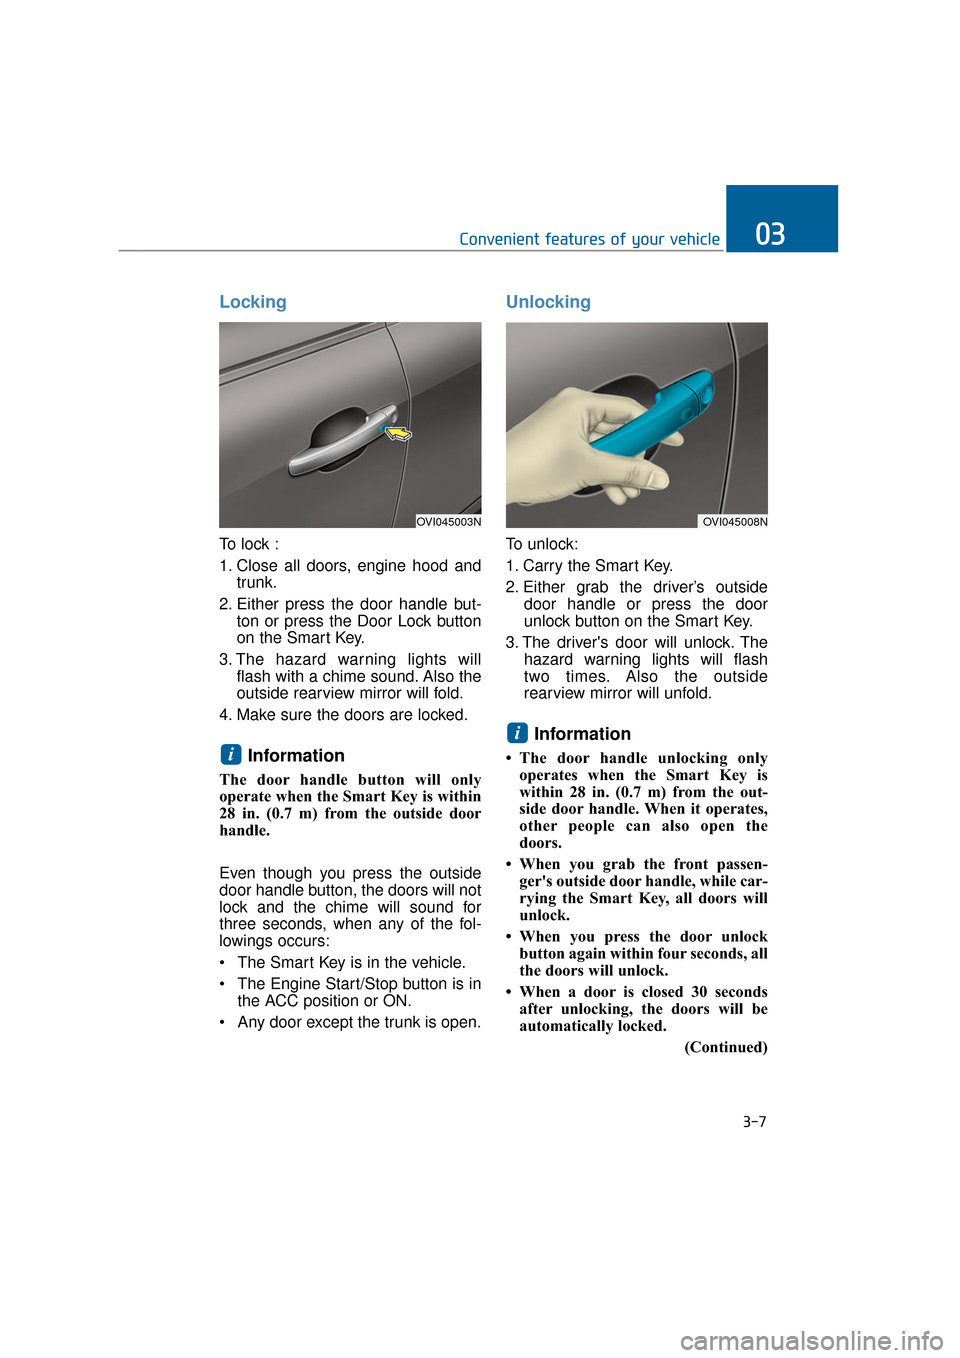
To lock :
1. Close all doors, engine hood andtrunk.
2. Either press the door handle but- ton or press the Door Lock button
on the Smart Key.
3. The hazard warning lights will flash with a chime sound. Also the
outside rearview mirror will fold.
4. Make sure the doors are locked.
Information
The door handle button will only
operate when the Smart Key is within
28 in. (0.7 m) from the outside door
handle.
Even though you press the outside
door handle button, the doors will not
lock and the chime will sound for
three seconds, when any of the fol-
lowings occurs:
• The Smart Key is in the vehicle.
The Engine Start/Stop button is in the ACC position or ON.
Any door except the trunk is open.
Unlocking
To unlock:
1. Carry the Smart Key.
2. Either grab the driver’s outside door handle or press the door
unlock button on the Smart Key.
3. The driver's door will unlock. The hazard warning lights will flash
two times. Also the outside
rearview mirror will unfold.
Information
• The door handle unlocking onlyoperates when the Smart Key is
within 28 in. (0.7 m) from the out-
side door handle. When it operates,
other people can also open the
doors.
• When you grab the front passen- ger's outside door handle, while car-
rying the Smart Key, all doors will
unlock.
• When you press the door unlock button again within four seconds, all
the doors will unlock.
• When a door is closed 30 seconds after unlocking, the doors will be
automatically locked.
(Continued)
i
i
Convenient features of your vehicle03
OVI045003NOVI045008N
3-7
Page 103 of 477
(Continued)
• You can control the door unlockmode in the User Settings menu on
the LCD display, such as unlocking
all the doors by pressing the unlock
button one time.
Trunk Unlocking
To unlock:
1. Carry the Smart Key.
2. Press either the trunk handle but- ton or the Trunk Unlock button on
the Smart Key for one second or
over.
3. The hazard warning lights will flash two times.
After opening and closing the trunk,
the trunk will automatically lock.
Information
The power trunk (if equipped) can be
operated even when the engine is not
running. However, the power trunk
consumes large amounts of vehicle
electric power. To prevent the battery
from being discharged, do not operate
it consecutively (more than approxi-
mately 10 times).
Panic Button
Press the Panic button (4) for more
than one second. The horn sounds
and hazard warning lights flash for
about 30 seconds.
To cancel the panic mode, press any
button on the Smart Key.
Start-Up
You can start the engine without
inserting the key. For detailed infor-
mation, refer to the Engine
Start/Stop Button in the chapter 5.
To prevent the Smart Key from
being damaged:
• Keep the Smart Key away from water or any liquid and fire. If the
inside of the Smart Key gets
damp (due to drinks or mois-
ture), or is heated, internal cir-
cuit may malfunction, excluding
the vehicle from the warranty.
Avoid dropping or throwing the Smart Key.
Do not keep the Smart Key at an extreme temperature.
NOTICE
i
3-8
Convenient features of your vehicle
Page 108 of 477
This system helps to protect your
vehicle and valuables. The hazard
warning lights will continuously flash
with a warning alarm, when any of
the followings occurs:
- A door is opened without using theSmart Key.
- The trunk is opened without using the Smart Key.
- The engine hood is opened.
The alarm continues for 30 seconds.
This repeats once more, and then
the system resets. To turn OFF the
alarm, unlock the doors with the
Smart Key.
The Theft Alarm System automati-
cally sets ON 30 seconds, after lock-
ing the doors and the trunk. To acti-
vate the system, you must lock the
doors and the trunk from outside with
the Smart Key or by pressing the but-
ton on the door handles with the
Smart Key. The hazard warning lights
flash once with a chime sound to
indicate onset of the system.
Once the Theft Alarm System sets
ON, opening any door, the trunk, or
the hood without using the Smart
Key will activate the alarm. The Theft
Alarm System will not set ON, when
the hood, the trunk, or any door is
not securely closed. When the sys-
tem does not set ON, check the
hood, the trunk, or the doors are
securely closed.
Do not attempt to modify this system
or add other devices to it.Information
• Do not lock the doors until all pas- sengers leave the vehicle. When any
passenger remains in the vehicle, the
alarm will activate.
• When you cannot cancel the Theft Alarm System with the Smart Key,
open the doors by using the mechan-
ical key and turn ON the Engine
Start/Stop button.
i
T TH
H E
EF
FT
T -
-A
A L
LA
A R
RM
M
S
S Y
Y S
ST
T E
EM
M
3-13
Convenient features of your vehicle03
Page 119 of 477
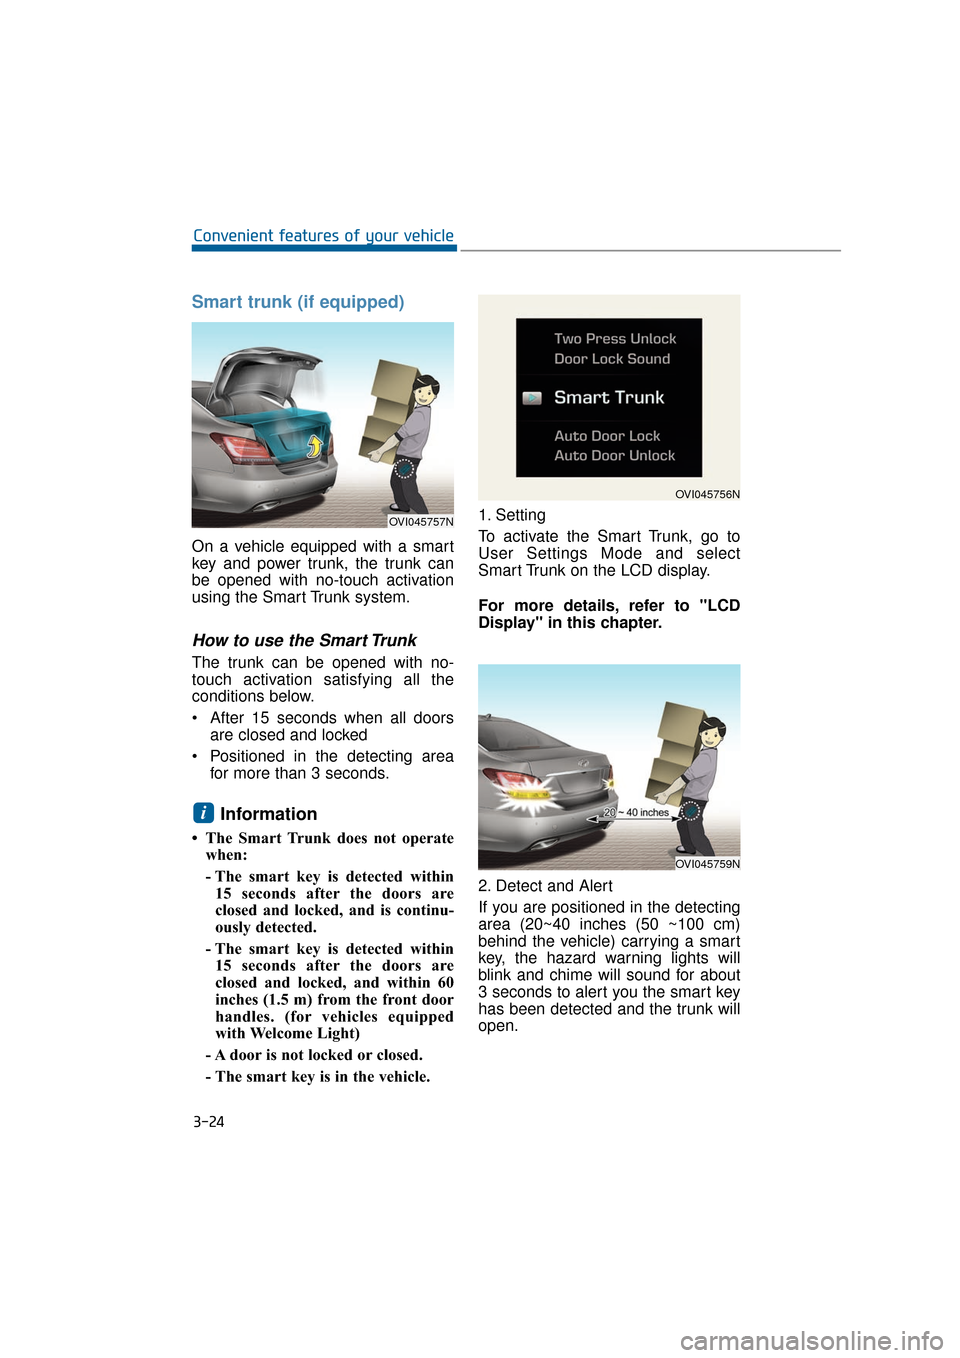
Smart trunk (if equipped)
On a vehicle equipped with a smart
key and power trunk, the trunk can
be opened with no-touch activation
using the Smart Trunk system.
How to use the Smart Trunk
The trunk can be opened with no-
touch activation satisfying all the
conditions below.
After 15 seconds when all doorsare closed and locked
Positioned in the detecting area for more than 3 seconds.
Information
• The Smart Trunk does not operatewhen:
- The smart key is detected within15 seconds after the doors are
closed and locked, and is continu-
ously detected.
- The smart key is detected within 15 seconds after the doors are
closed and locked, and within 60
inches (1.5 m) from the front door
handles. (for vehicles equipped
with Welcome Light)
- A door is not locked or closed.
- The smart key is in the vehicle. 1. Setting
To activate the Smart Trunk, go to
User Settings Mode and select
Smart Trunk on the LCD display.
For more details, refer to "LCD
Display" in this chapter.
2. Detect and Alert
If you are positioned in the detecting
area (20~40 inches (50 ~100 cm)
behind the vehicle) carrying a smart
key, the hazard warning lights will
blink and chime will sound for about
3 seconds to alert you the smart key
has been detected and the trunk will
open.
i
3-24
Convenient features of your vehicle
OVI045757N
OVI045756N
OVI045759N
Page 120 of 477
Information
Do not approach the detecting area if
you do not want the trunk to open. If
you have unintentionally entered the
detecting area and the hazard warn-
ing lights and chime starts to operate,
leave the detecting area with the smart
key. The trunk will stay closed.
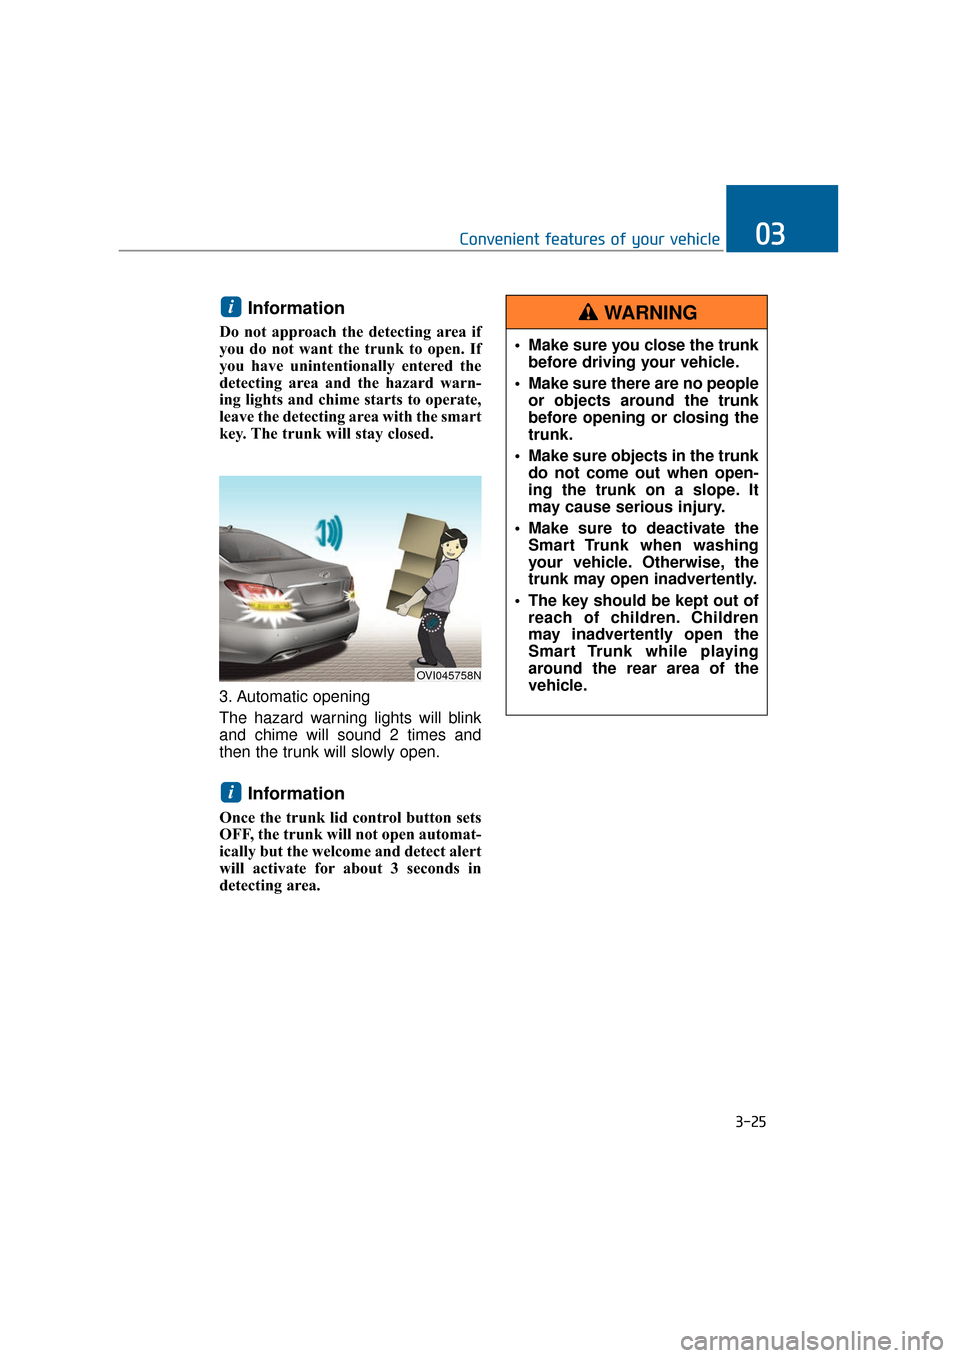
3. Automatic opening
The hazard warning lights will blink
and chime will sound 2 times and
then the trunk will slowly open.
Information
Once the trunk lid control button sets
OFF, the trunk will not open automat-
ically but the welcome and detect alert
will activate for about 3 seconds in
detecting area.
i
i
3-25
Convenient features of your vehicle03
OVI045758N
Make sure you close the trunkbefore driving your vehicle.
Make sure there are no people or objects around the trunk
before opening or closing the
trunk.
Make sure objects in the trunk do not come out when open-
ing the trunk on a slope. It
may cause serious injury.
Make sure to deactivate the Smart Trunk when washing
your vehicle. Otherwise, the
trunk may open inadvertently.
The key should be kept out of reach of children. Children
may inadvertently open the
Smart Trunk while playing
around the rear area of the
vehicle.
WARNING
Page 137 of 477
Electronic Hydraulic Power
Steering (EHPS)
This system uses an electromotor to
assist your steering. When the
engine is turned OFF, or when the
EHPS becomes inoperative, you
may still steer the vehicle, but it
requires more effort in steering.
When you notice such a change
while steering, have the EHPS
checked by an authorized EQUUS
dealer.
Do not turn the steering wheel to
the extreme right or left for five
seconds or over, while running the
engine. This may cause damage to
the EHPS motor pump.
Information
When there is a malfunction with the
EHPS motor pump, the efforts to steer
may greatly increase.
Information
When the vehicle is parked outside for
an extended period of time at a cold
temperature (below 14°F/-10°C), the
power steering may require more
efforts, after first starting the engine.
This is due to the increased fluid vis-
cosity at a cold temperature and does
not indicate a malfunction.
When this happens, depress the accel-
erator to increase the engine RPM,
until it reaches 1,500 rpm. Then, let
the engine idle for two-to-three min-
utes to warm up the fluid.
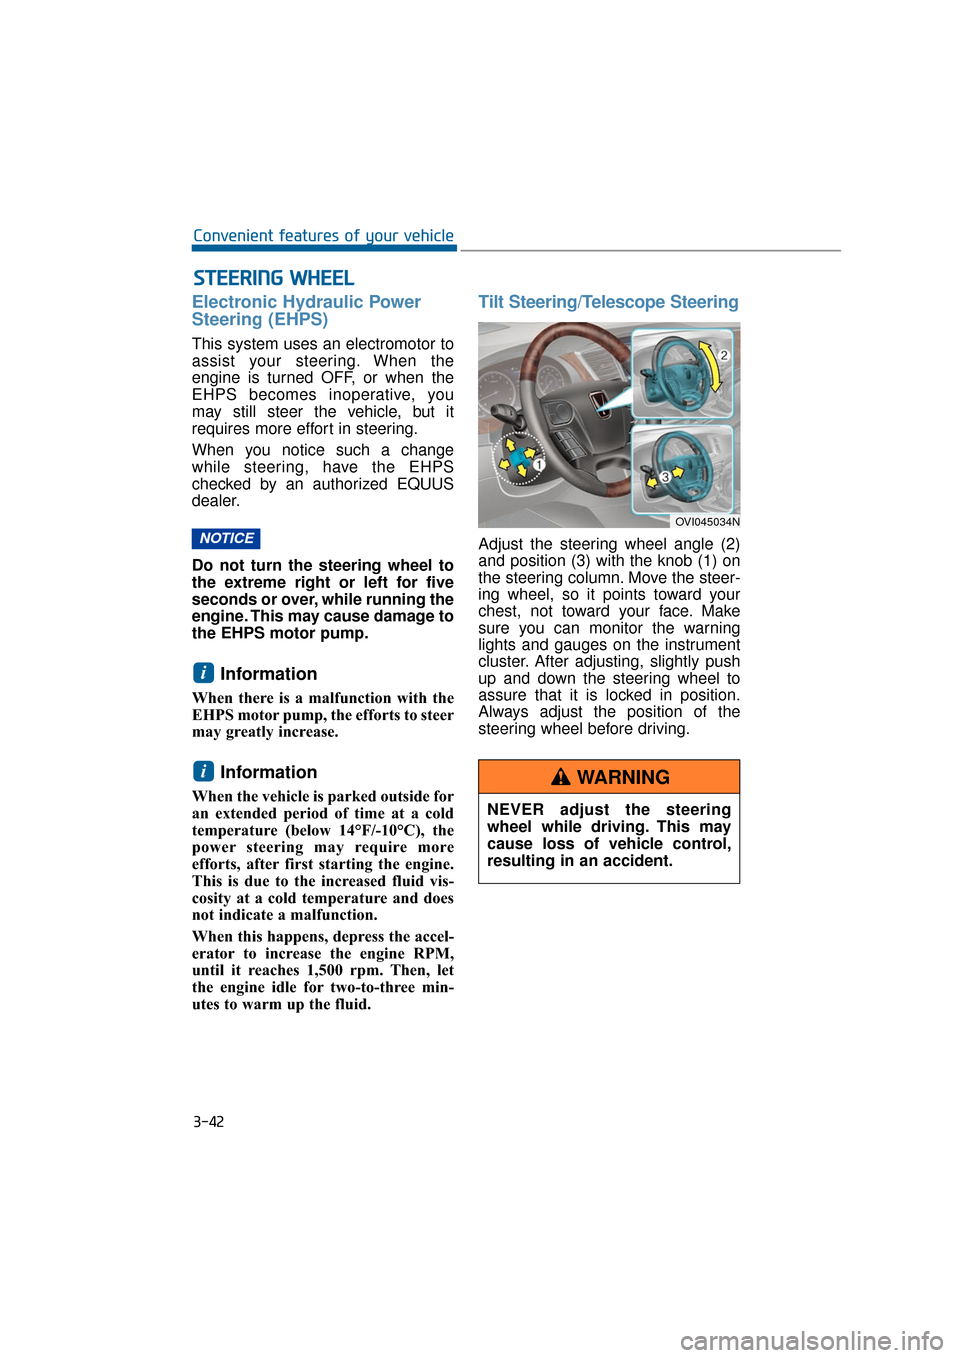
Tilt Steering/Telescope Steering
Adjust the steering wheel angle (2)
and position (3) with the knob (1) on
the steering column. Move the steer-
ing wheel, so it points toward your
chest, not toward your face. Make
sure you can monitor the warning
lights and gauges on the instrument
cluster. After adjusting, slightly push
up and down the steering wheel to
assure that it is locked in position.
Always adjust the position of the
steering wheel before driving.
i
i
NOTICE
S ST
T E
EE
ER
R I
IN
N G
G
W
W H
HE
EE
EL
L
3-42
Convenient features of your vehicle
OVI045034N
NEVER adjust the steering
wheel while driving. This may
cause loss of vehicle control,
resulting in an accident.
WARNING
Page 159 of 477
Instrument Cluster Control
Adjusting Instrument ClusterIllumination
The brightness of the instrument
panel illumination can be adjusted by
pressing the illumination control but-
tons (“+” or “-”) when the Engine
Start/Stop Button is ON or the tale
lights are turned ON.
The brightness has 20 levels: 1 (MIN) ~ 20 (MAX)
If you press the illumination con- trol button (“+” or “-”), the bright-
ness level will be continuously
adjusted.
If the brightness reaches to the maximum or minimum level, an
alarm will sound.
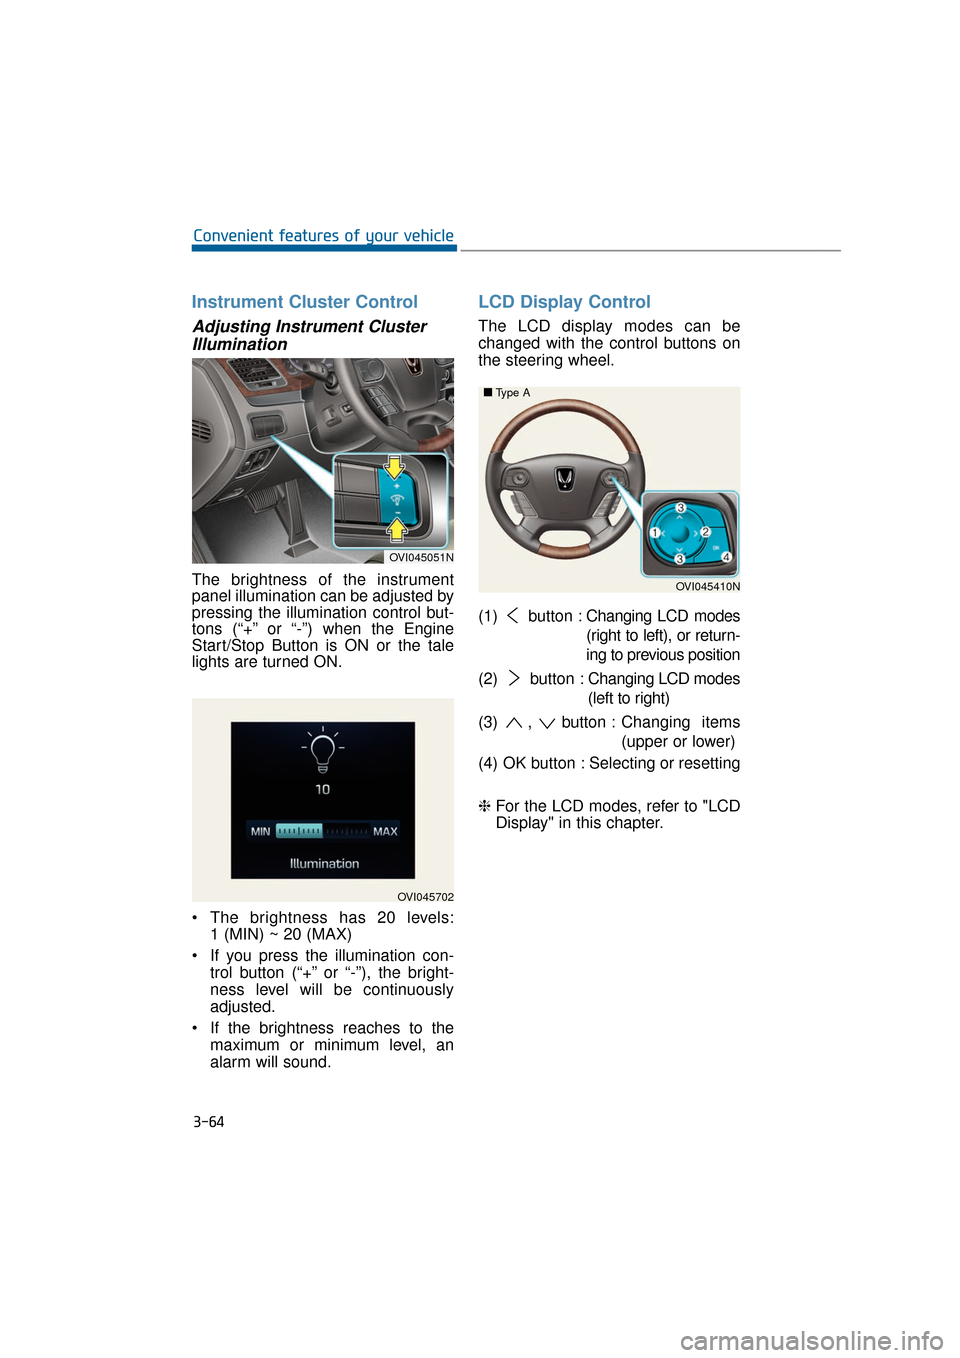
LCD Display Control
The LCD display modes can be
changed with the control buttons on
the steering wheel.
(1) button : Changing LCD modes
(right to left), or return-
ing to previous position
(2) button : Changing LCD modes
(left to right)
(3) , button : Changing items
(upper or lower)
(4) OK button : Selecting or resetting
❈ For the LCD modes, refer to "LCD
Display" in this chapter.
3-64
Convenient features of your vehicle
OVI045702
OVI045051N
OVI045410N
■
■
Type A