Hyundai Getz 2004 Owner's Manual
Manufacturer: HYUNDAI, Model Year: 2004, Model line: Getz, Model: Hyundai Getz 2004Pages: 445, PDF Size: 12.16 MB
Page 361 of 445
2- 18 DRIVING YOUR HYUNDAI
C190E02L
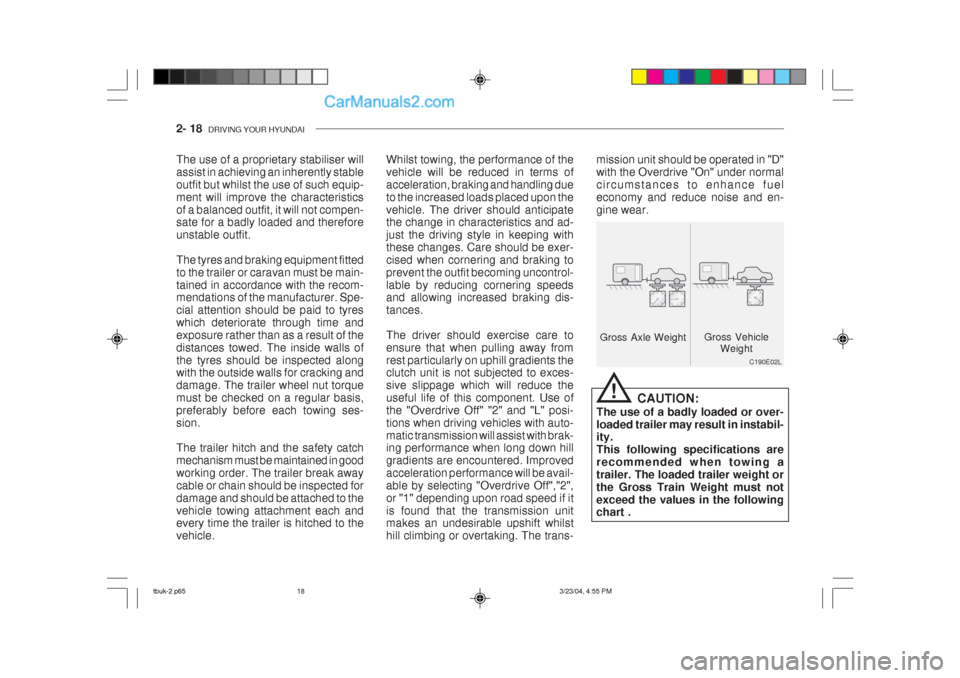
Gross Axle Weight
Gross Vehicle
Weight
The use of a proprietary stabiliser will assist in achieving an inherently stableoutfit but whilst the use of such equip-ment will improve the characteristicsof a balanced outfit, it will not compen- sate for a badly loaded and therefore unstable outfit. The tyres and braking equipment fitted to the trailer or caravan must be main-tained in accordance with the recom- mendations of the manufacturer. Spe- cial attention should be paid to tyreswhich deteriorate through time andexposure rather than as a result of thedistances towed. The inside walls ofthe tyres should be inspected along with the outside walls for cracking and damage. The trailer wheel nut torquemust be checked on a regular basis,preferably before each towing ses-sion. The trailer hitch and the safety catch mechanism must be maintained in goodworking order. The trailer break awaycable or chain should be inspected fordamage and should be attached to thevehicle towing attachment each and every time the trailer is hitched to the vehicle. Whilst towing, the performance of thevehicle will be reduced in terms ofacceleration, braking and handling dueto the increased loads placed upon thevehicle. The driver should anticipate the change in characteristics and ad- just the driving style in keeping withthese changes. Care should be exer-cised when cornering and braking toprevent the outfit becoming uncontrol-lable by reducing cornering speeds and allowing increased braking dis- tances. The driver should exercise care to ensure that when pulling away fromrest particularly on uphill gradients the clutch unit is not subjected to exces- sive slippage which will reduce theuseful life of this component. Use ofthe "Overdrive Off" "2" and "L" posi-tions when driving vehicles with auto-matic transmission will assist with brak- ing performance when long down hill gradients are encountered. Improvedacceleration performance will be avail-able by selecting "Overdrive Off","2",or "1" depending upon road speed if itis found that the transmission unit makes an undesirable upshift whilst hill climbing or overtaking. The trans- mission unit should be operated in "D"with the Overdrive "On" under normalcircumstances to enhance fueleconomy and reduce noise and en-gine wear.
CAUTION:
The use of a badly loaded or over-loaded trailer may result in instabil- ity. This following specifications arerecommended when towing atrailer. The loaded trailer weight orthe Gross Train Weight must notexceed the values in the following chart .
!
tbuk-2.p65 3/23/04, 4:55 PM
18
Page 362 of 445
DRIVING YOUR HYUNDAI 2- 19
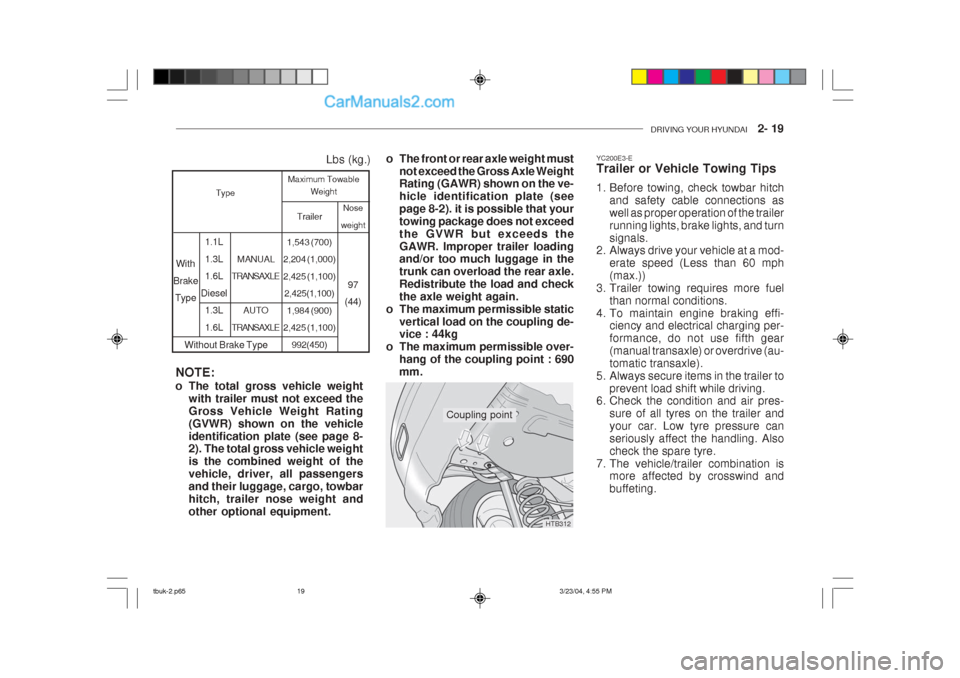
Coupling point
Nose
weight
97
(44)
Without Brake Type Trailer
1,543 (700)
2,204 (1,000) 2,425 (1,100) 2,425(1,100)
1,984 (900)
2,425 (1,100)
992(450)
MANUAL
TRANSAXLE
AUTO
TRANSAXLE
1.1L 1.3L 1.6L
Diesel 1.3L 1.6L
With
Brake Type Lbs (kg.)
Maximum Towable
Weight
Type
NOTE:
o The total gross vehicle weight with trailer must not exceed the Gross Vehicle Weight Rating(GVWR) shown on the vehicleidentification plate (see page 8- 2). The total gross vehicle weight is the combined weight of thevehicle, driver, all passengersand their luggage, cargo, towbarhitch, trailer nose weight andother optional equipment. o The front or rear axle weight must
not exceed the Gross Axle Weight Rating (GAWR) shown on the ve- hicle identification plate (seepage 8-2). it is possible that yourtowing package does not exceedthe GVWR but exceeds theGAWR. Improper trailer loading and/or too much luggage in the trunk can overload the rear axle.Redistribute the load and checkthe axle weight again.
o The maximum permissible static vertical load on the coupling de- vice : 44kg
o The maximum permissible over-
hang of the coupling point : 690 mm. YC200E3-E Trailer or Vehicle Towing Tips
1. Before towing, check towbar hitch
and safety cable connections as well as proper operation of the trailerrunning lights, brake lights, and turnsignals.
2. Always drive your vehicle at a mod-
erate speed (Less than 60 mph(max.))
3. Trailer towing requires more fuel than normal conditions.
4. To maintain engine braking effi- ciency and electrical charging per-formance, do not use fifth gear(manual transaxle) or overdrive (au-tomatic transaxle).
5. Always secure items in the trailer to
prevent load shift while driving.
6. Check the condition and air pres-
sure of all tyres on the trailer andyour car. Low tyre pressure canseriously affect the handling. Alsocheck the spare tyre.
7. The vehicle/trailer combination is more affected by crosswind andbuffeting.
HTB312
tbuk-2.p65 3/23/04, 4:55 PM
19
Page 363 of 445
2- 20 DRIVING YOUR HYUNDAI
When being passed by a large ve- hicle, keep a constant speed andsteer straight ahead. If there is toomuch wind buffeting slow down toget out of the other vehicle's air turbulence.
8. When parking your car and trailer, especially on a hill, be sure to follow all the normal precautions. Turn yourfront wheel into the curb, set theparking brake firmly, and put the transaxle in 1st or Reverse (manual) or Park (automatic). In addition,place wheel chocks at each of thetrailer's tyres.
9. If the trailer has electric brakes,
start your vehicle and trailer mov- ing, and then apply the trailer brake controller by hand to be sure thebrakes are working. This lets youcheck your electrical connection atthe same time.
10. During your trip, check occasion- ally to be sure that the load issecure, and that the lights andany trailer brakes are still working.
11. Avoid jerky starts, sudden accel- eration or sudden stops.
12. Avoid sharp turns and rapid lane changes. 13. Avoid holding the brake pedal
down too long or too frequently.This could cause the brakes tooverheat, resulting in reduced brak-ing efficiency.
14. When going down a hill, shift into
a lower gear and use the enginebraking effect.When ascending a long grade,
downshift the transaxle to a lowergear and reduce speed to reduce chances of engine overloading and/ or overheating.
15. If you have to stop while going
uphill, do not hold the vehicle inplace by pressing on the accelera-tor. This can cause the automatic transaxle to overheat. Use the park- ing brake or footbrake.
NOTE: When towing check transaxle fluid more frequently. CAUTION:
If overheating should occur whentowing, (temperature gauge reads near red zone), taking the following action may reduce or eliminate theproblem.
1. Turn off the air conditioner.
2. Reduce highway speed.
3. Select a lower gear when going uphill.
4. While in stop and go traffic, place the gear selection in park or neu- tral and idle the engine at a higherspeed.
!
tbuk-2.p65 3/23/04, 4:55 PM
20
Page 364 of 445
3. WHAT TO DO IN AN EMERGENCYIf the engine will not start ....................... ......................................... 3-2
Jump starting ...................................... ............................................ 3-3
If the engine overheats ................................................... ................ 3-4
Spare tyre ................................................... .................................... 3-5
In the event of a pun cture .............................................. ................. 3-6
Vehicle Towing or Recovery ........................................... ..............3-11
Emergency tow ing ................................................ ........................3-13
If you lose your keys ................................................... ..................3-13
3
tbuk-3.p65 3/23/04, 4:24 PM
1
Page 365 of 445
3- 2 WHAT TO DO IN AN EMERGENCY
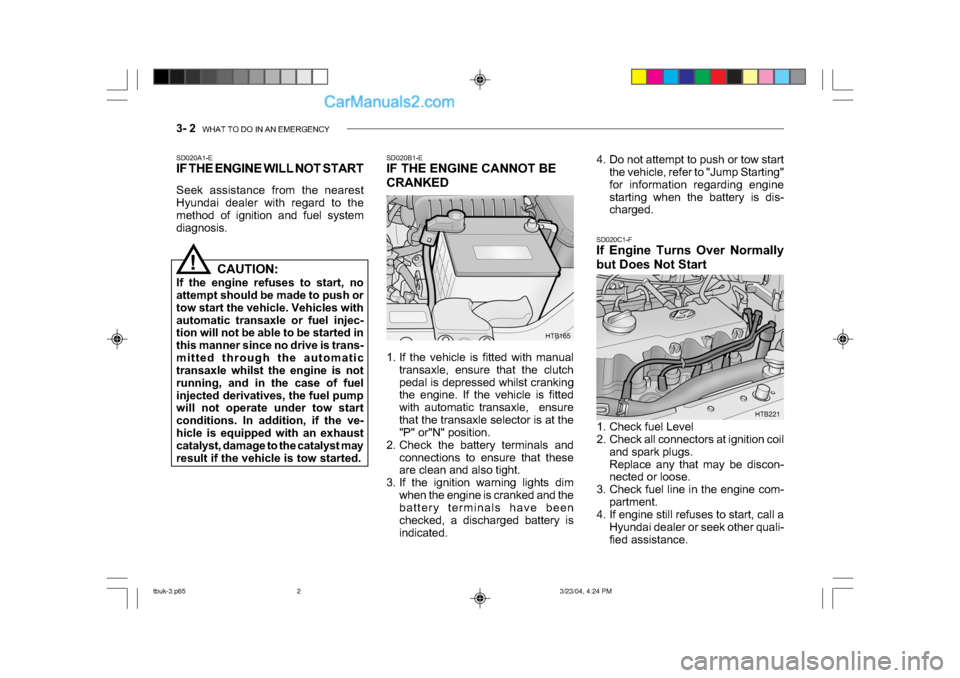
HTB165
SD020B1-E
IF THE ENGINE CANNOT BE
CRANKED
1. If the vehicle is fitted with manual
transaxle, ensure that the clutch
pedal is depressed whilst cranking
the engine. If the vehicle is fitted
with automatic transaxle, ensure
that the transaxle selector is at the
"P" or"N" position.
2. Check the battery terminals and
connections to ensure that these
are clean and also tight.
3. If the ignition warning lights dim
when the engine is cranked and the
battery terminals have been
checked, a discharged battery is
indicated. SD020C1-F
If Engine Turns Over Normally
but Does Not Start
SD020A1-E
IF THE ENGINE WILL NOT START
Seek assistance from the nearest
Hyundai dealer with regard to the
method of ignition and fuel system
diagnosis.
!
HTB221
CAUTION:
If the engine refuses to start, no
attempt should be made to push or
tow start the vehicle. Vehicles with
automatic transaxle or fuel injec-
tion will not be able to be started in
this manner since no drive is trans-
mitted through the automatic
transaxle whilst the engine is not
running, and in the case of fuel
injected derivatives, the fuel pump
will not operate under tow start
conditions. In addition, if the ve-
hicle is equipped with an exhaust
catalyst, damage to the catalyst may
result if the vehicle is tow started. 4. Do not attempt to push or tow start
the vehicle, refer to "Jump Starting"
for information regarding engine
starting when the battery is dis-
charged.
1. Check fuel Level
2. Check all connectors at ignition coil and spark plugs.
Replace any that may be discon-
nected or loose.
3. Check fuel line in the engine com- partment.
4. If engine still refuses to start, call a
Hyundai dealer or seek other quali-
fied assistance.
tbuk-3.p65 3/23/04, 4:24 PM
2
Page 366 of 445
WHAT TO DO IN AN EMERGENCY 3- 3
!
HTB218
Discharged
battery
Booster
battery
CAUTION:
Personal injury and damage to the
vehicle may occur if jump starting
is not performed correctly. If any
doubt exists as to how this opera-
tion should be performed, seek as-
sistance from qualified personnel.
SD030A1-E
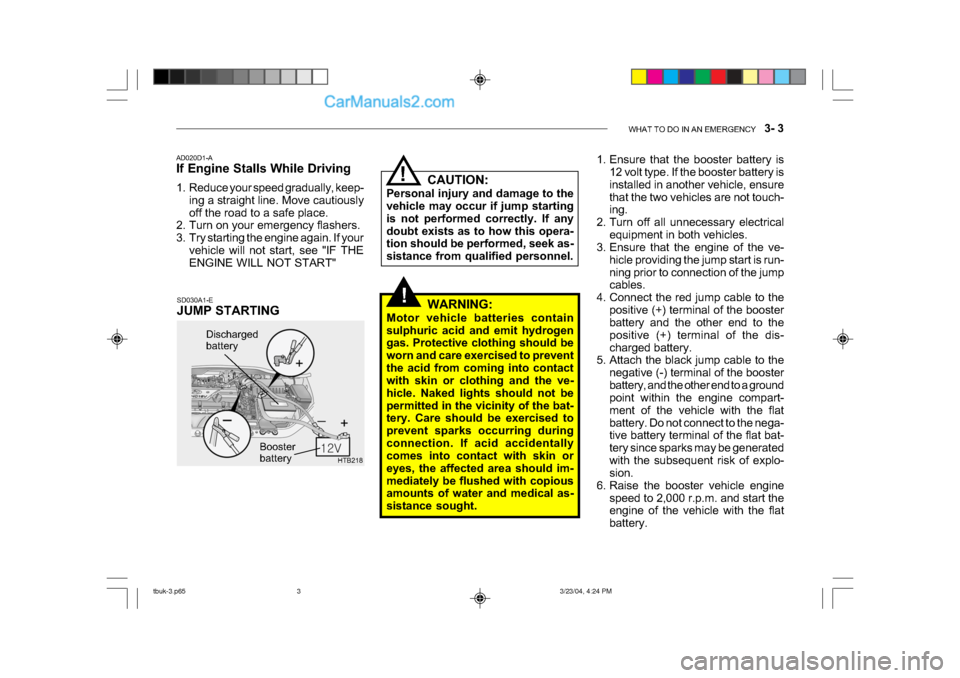
JUMP STARTING
AD020D1-A
If Engine Stalls While Driving
1. Reduce your speed gradually, keep-
ing a straight line. Move cautiously
off the road to a safe place.
2. Turn on your emergency flashers.
3. Try starting the engine again. If your
vehicle will not start, see "IF THE
ENGINE WILL NOT START"!
WARNING:
Motor vehicle batteries contain
sulphuric acid and emit hydrogen
gas. Protective clothing should be
worn and care exercised to prevent
the acid from coming into contact
with skin or clothing and the ve-
hicle. Naked lights should not be
permitted in the vicinity of the bat-
tery. Care should be exercised to
prevent sparks occurring during
connection. If acid accidentally
comes into contact with skin or
eyes, the affected area should im-
mediately be flushed with copious
amounts of water and medical as-
sistance sought. 1. Ensure that the booster battery is
12 volt type. If the booster battery is
installed in another vehicle, ensure
that the two vehicles are not touch-
ing.
2. Turn off all unnecessary electrical equipment in both vehicles.
3. Ensure that the engine of the ve-
hicle providing the jump start is run-
ning prior to connection of the jump
cables.
4. Connect the red jump cable to the positive (+) terminal of the booster
battery and the other end to the
positive (+) terminal of the dis-
charged battery.
5. Attach the black jump cable to the
negative (-) terminal of the booster
battery, and the other end to a ground
point within the engine compart-
ment of the vehicle with the flat
battery. Do not connect to the nega-
tive battery terminal of the flat bat-
tery since sparks may be generated
with the subsequent risk of explo-
sion.
6. Raise the booster vehicle engine speed to 2,000 r.p.m. and start the
engine of the vehicle with the flat
battery.
tbuk-3.p65 3/23/04, 4:24 PM
3
Page 367 of 445
3- 4 WHAT TO DO IN AN EMERGENCY
!
!
D030A01TB-EAT
IF THE ENGINE OVERHEATS
If the temperature gauge indicates
overheating:
1. Pull off the road and stop as soon as
it is safe to do so.
2. Place the gear selector lever in "P" (automatic), or neutral (manual
transaxle) and set the parking brake.
If the air conditioning is on, turn it off.
3. If coolant is running out under the car
or steam is coming out from under
the bonnet stop the engine. Do not
open the bonnet until the coolant has
stopped running or the steaming has
stopped. If there is no visible loss of
coolant and no steam, leave the
engine running and check to be sure
the engine cooling fan is operating.
If the fan is not running, turn the
engine off.
4. Check to see if the water pump drive belt is missing. If it is not missing,
check to see that it is tight. If the
drive belt seems to be satisfactory,
check for coolant leaking from the
radiator, hoses or under the car. (If
the air conditioning had been in use,
it is normal for cold water to be
draining from it). WARNING:
Whilst the engine is running, keep
hands and clothing away from mov-
ing parts such as the fan and drive
belts to prevent injury.
7. Switch ON the main beam
headlamps before carefully remov-
ing the jumper cables in the reverse
order of attachment. Once the
jumper cables have been removed,
switch "OFF" the main beam
headlamps.
CAUTION:
If the jump cable is incorrectly in-
stalled, damage to the vehicle elec-
trical system may occur, in particu-
lar the electronic components such
as the Fuel Injection system com-
puter and the Automatic transaxle
computer. The battery must never
be disconnected whilst the engine
is running.
!
WARNING (Diesel only):
Never work on injection system with
engine running or within 30 sec-
onds after shutting off engine. High
pressure pump, rail, injectors and
high pressure pipes are subject to
high pressure even after the engine
stopped. The fuel jet produced by
fuel leaks may cause serious in-
jury, if it touch the body. People
using pacemakers should not move
than 30cm closer to the ECU or
wiring harness within the engine
room while engine is running, since
the high currents in the Common
Rail system produce considerable
magnetic fields.
tbuk-3.p65 3/23/04, 4:24 PM
4
Page 368 of 445
WHAT TO DO IN AN EMERGENCY 3- 5
!
D040A01TB-EAT
TEMPORARY SPARE TYRE
(Not all models)
The following instructions for the tem-
porary spare tyre should be observed:
1. Check inflation pressure as soon as
practical after installing the spare
tyre, and adjust to the specified
pressure. The tyre pressure should
be periodically checked and main-
tained at the specified pressure
while the tyre is stored.
6. If the cause of the overheating can- not be found, wait until the engine
temperature has returned to nor-
mal. Then, if coolant has been lost,
carefully remove the radiator cap
and add water to bring the fluid level
in the reservoir up to the base of the
radiator fill opening. Fill the coolant
expansion tank to the halfway mark.
7. Proceed with caution until it is es-
tablished that the engine is operat-
ing normally. If the engine over-
heats repeatedly, the advice of a
Hyundai dealer should be sought. WARNING:
Do not remove the radiator cap when
the engine is hot since steam and
boiling water may be ejected from
the radiator resulting in burns or
scalding.
Inflation Pressure
Tyre Size
T105/70D14
420 kPa (60 psi)
2. The spare tyre should only be used temporarily and should be returned
to the luggage compartment as soon
as the original tyre can be repaired
or replaced.
3. Continuous use at speeds of over 50 mph(80 km/h) is not recom-
mended.
4. As the temporary spare tyre is spe- cifically designed for your car, it
should not be used on any other
vehicle.
Spare Tyre Pressure
YD050A1-E
SPARE TYRE
For Full Size (Not all models)
The following instructions for the FULL
SIZE spare tyre should be observed:
Check inflation pressure as soon as
possible after installing the spare tyre,
and adjust to the specified pressure.
The tyre pressure should be periodi-
cally checked and maintained at the
specified pressure while the tyre is
stored.
Spare Tyre Pressure
Tyre Size
Inflation Pressure
FULL SIZE
30 psi (210 kPa)
5. If the water pump drive belt is bro-
ken or coolant is leaking out, stop
the engine immediately and call the
nearest Hyundai dealer for assis-
tance.
! CAUTION:
Serious loss of coolant indicates
there is a leak in the cooling system
and this should be checked as soon
as possible by a Hyundai dealer.
tbuk-3.p65 3/23/04, 4:24 PM
5
Page 369 of 445
3- 6 WHAT TO DO IN AN EMERGENCY
SD060A1-E
IN THE EVENT OF A PUNCTURE
If a puncture occurs whilst driving the
vehicle:
1. Bring the car to rest as soon as it is
safe to do so and with the minimum
amount of braking required which
will assist in maintaining the maxi-
mum amount of control. The vehicle
should be parked wherever pos-
sible upon firm level ground to facili-
tate wheel changing.
2. If the vehicle is creating a hazard and the road conditions do not per-
mit the wheel to be changed safely,
assistance should be sought.
3. Passengers must not be allowed to
remain inside the vehicle during
wheel changing. If a puncture oc-
curs whilst the vehicle is on a
motorway, the passengers should
take refuge on the motorway em-
bankment to avoid the possibility of
injury occurring should the vehicle
be struck by other motorway traffic.
4. Wheel changing should be per-
formed according to the following
instructions.
SD050A2-E
SPARE WHEEL (Not all models)
The spare wheel is stored under the
luggage compartment floor and is ac-
cessed from within the luggage com-
partment by lifting the carpet and the
floor panel.
To remove the spare wheel, unscrew
the retainer, rotating this in an anti
clockwise direction and lift out the
wheel. To replace the wheel, screw
the retainer by hand until tight having
located the wheel in the luggage com-
partment floor well. The inflation pres-
sure of the spare wheel should be
checked at least monthly and when-
ever the wheel is fitted to the vehicle.
Inflation Pressure
Tyre Size
Spare Tyre Pressure
Full Size
210 kPa (30 psi)
CAUTION:
o Do not use snow chains with your temporary spare tyre.
o Do not use more than one tempo- rary spare tyre at a time.
!
5. The temporary spare tyre should
not be used on any other wheels,
nor should standard tyre, snow tyre,
wheel covers or trim rings be used
with the temporary spare wheel. If
such use is attempted, damage to
these items or other car compo-
nents may occur.
6. The temporary spare tyre pressure should be checked once a month
while the tyre is stored.
tbuk-3.p65 3/23/04, 4:24 PM
6
Page 370 of 445
WHAT TO DO IN AN EMERGENCY 3- 7
HTB153
HTB152
Groove
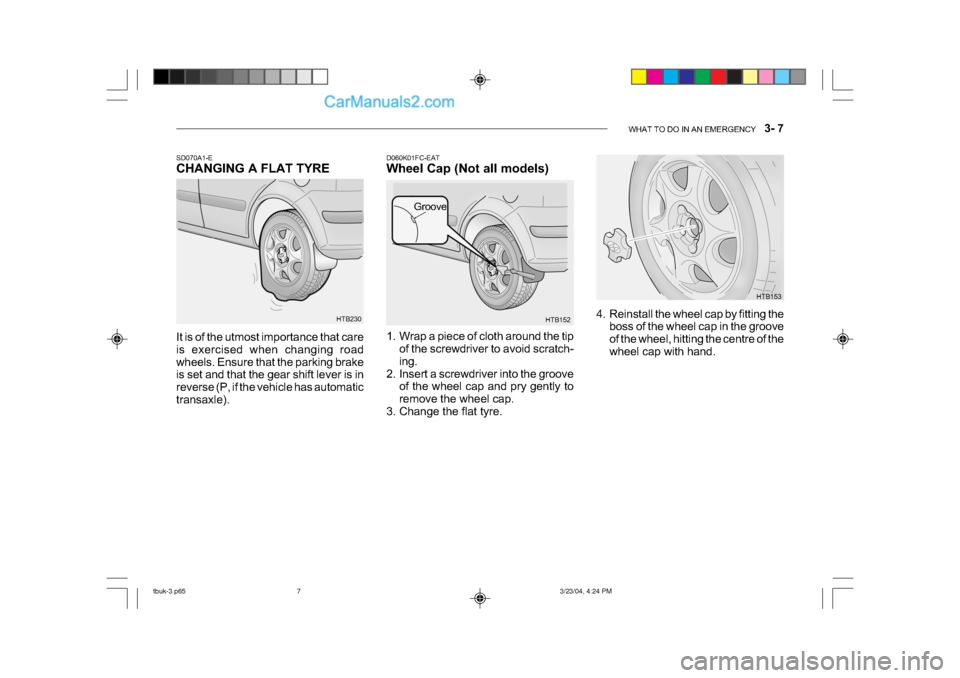
D060K01FC-EAT
Wheel Cap (Not all models)
1. Wrap a piece of cloth around the tip
of the screwdriver to avoid scratch-
ing.
2. Insert a screwdriver into the groove of the wheel cap and pry gently to
remove the wheel cap.
3. Change the flat tyre. 4. Reinstall the wheel cap by fitting the
boss of the wheel cap in the groove
of the wheel, hitting the centre of the
wheel cap with hand.
HTB230
SD070A1-E
CHANGING A FLAT TYRE
It is of the utmost importance that care
is exercised when changing road
wheels. Ensure that the parking brake
is set and that the gear shift lever is in
reverse (P, if the vehicle has automatic
transaxle).
tbuk-3.p65
3/23/04, 4:24 PM
7