clutch Hyundai H-1 (Grand Starex) 2011 Owner's Manual - RHD (UK, Australia)
[x] Cancel search | Manufacturer: HYUNDAI, Model Year: 2011, Model line: H-1 (Grand Starex), Model: Hyundai H-1 (Grand Starex) 2011Pages: 346, PDF Size: 39.27 MB
Page 194 of 346
Driving your vehicle
6
5
E040000AUN
E040100AUN
Starting the engine
1. Make sure the parking brake is
applied.
2. Manual Transmission - Depress the
clutch pedal fully and shift the trans-
mission into Neutral. Keep the clutch
pedal and brake pedal depressed
while turning the ignition switch to the
start position.
Automatic Transmission - Place the
transmission shift lever in P (Park).
Depress the brake pedal fully.
You can also start the engine when
the shift lever is in the N (Neutral)
position.
3. Turn the ignition switch to START and hold it there until the engine starts (a
maximum of 10 seconds), then
release the key. 4. In extremely cold weather (below
-18°C / 0°F) or after the vehicle has
not been operated for several days, let
the engine warm up without depress-
ing the accelerator.
Whether the engine is cold or warm, it
should be started without depressing
the accelerator.
E040101AUN
Starting the diesel engine
To start the diesel engine when the engine is cold, it has to be pre-heated
before starting the engine and then have
to be warmed up before starting to drive.
1. Make sure the parking brake is applied.
2. Manual Transmission - Depress the
clutch pedal fully and shift the trans-
mission into Neutral. Keep the clutch
pedal and brake pedal depressed
while turning the ignition switch to the
start position.
Automatic Transmission - Place the
transmission shift lever in P(park).
Depress the brake pedal fully.
You can also start the engine when the
shift lever is in the N(neutral) position.
STARTING THE ENGINE
WARNING
Always wear appropriate shoes
when operating your vehicle.
Unsuitable shoes (high heels, ski
boots,etc.) may interfere with yourability to use the brake and acceler-
ator pedal, and the clutch (ifequipped).
CAUTION
If the engine stalls while you are in motion, do not attempt to move the
shift lever to the P (Park) position. If traffic and road conditions permit,you may put the shift lever in the N(Neutral) position while the vehicle
is still moving and turn the ignitionswitch to the START position in anattempt to restart the engine.
CAUTION
Do not engage the starter for more
than 10 seconds. If the engine stalls or fails to start, wait 5 to 10 seconds before re-engaging the starter.Improper use of the starter may
damage it.
Page 196 of 346
Driving your vehicle
8
5
MANUAL TRANSMISSION (IF EQUIPPED)
E050100BTQ
Manual transmission operation
The manual transmission has 5 forward
gears.
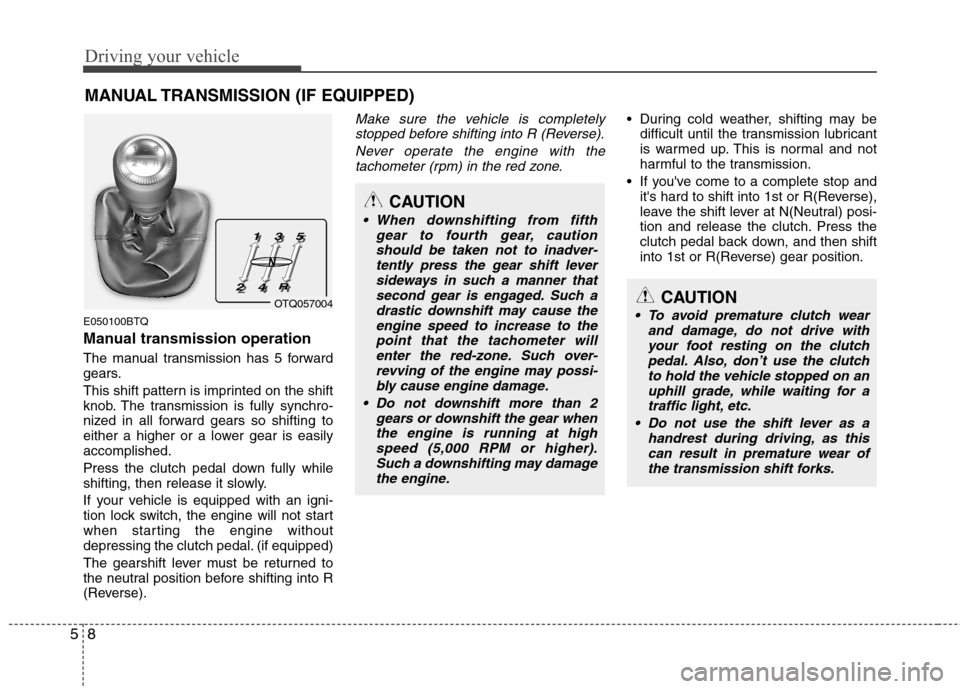
This shift pattern is imprinted on the shift
knob. The transmission is fully synchro-
nized in all forward gears so shifting to
either a higher or a lower gear is easilyaccomplished.
Press the clutch pedal down fully while
shifting, then release it slowly.
If your vehicle is equipped with an igni-
tion lock switch, the engine will not start
when starting the engine without
depressing the clutch pedal. (if equipped)
The gearshift lever must be returned to
the neutral position before shifting into R
(Reverse).
Make sure the vehicle is completely stopped before shifting into R (Reverse).
Never operate the engine with thetachometer (rpm) in the red zone. During cold weather, shifting may be difficult until the transmission lubricant
is warmed up. This is normal and not
harmful to the transmission.
If you've come to a complete stop and it's hard to shift into 1st or R(Reverse),
leave the shift lever at N(Neutral) posi-
tion and release the clutch. Press the
clutch pedal back down, and then shift
into 1st or R(Reverse) gear position.
OTQ057004
CAUTION
When downshifting from fifth
gear to fourth gear, caution
should be taken not to inadver- tently press the gear shift leversideways in such a manner thatsecond gear is engaged. Such a
drastic downshift may cause theengine speed to increase to thepoint that the tachometer willenter the red-zone. Such over-
revving of the engine may possi-bly cause engine damage.
Do not downshift more than 2 gears or downshift the gear whenthe engine is running at high
speed (5,000 RPM or higher).Such a downshifting may damagethe engine.
CAUTION
To avoid premature clutch wear and damage, do not drive with
your foot resting on the clutch pedal. Also, don’t use the clutchto hold the vehicle stopped on anuphill grade, while waiting for a traffic light, etc.
Do not use the shift lever as a handrest during driving, as thiscan result in premature wear ofthe transmission shift forks.
N
Page 197 of 346
59
Driving your vehicle
E050101AUN
Using the clutch
The clutch should be pressed all the way
to the floor before shifting, then released
slowly. The clutch pedal should always be
fully released while driving. Do not rest
your foot on the clutch pedal while driv-
ing. This can cause unnecessary wear.
Do not partially engage the clutch to hold
the car on an incline. This causes unnec-
essary wear. Use the foot brake or park-
ing brake to hold the car on an incline. Do
not operate the clutch pedal rapidly and
repeatedly.
E050102AUN
Downshifting
When you must slow down in heavy traf-
fic or while driving up steep hills, down-
shift before the engine starts to labor.
Downshifting reduces the chance of
stalling and gives better acceleration
when you again need to increase your
speed. When the vehicle is traveling
down steep hills, downshifting helps
maintain safe speed and prolongs brake
life.E050200AUN Good driving practices
Never take the car out of gear and
coast down a hill. This is extremely
hazardous. Always leave the car in
gear.
Don't "ride" the brakes. This can cause them to overheat and malfunction.
Instead, when you are driving down a
long hill, shift to a lower gear. When
you do this, engine braking will help
slow the car.
Slow down before shifting to a lower gear. This will help avoid over-revving
the engine, which can cause damage.
Slow down when you encounter cross winds. This gives you much better con-
trol of your car.
Be sure the car is completely stopped before you attempt to shift into reverse.
The transmission can be damaged if
you do not. To shift into reverse,
depress the clutch, move the shift lever
to neutral, wait 3 seconds, then shift to
the reverse position.
WARNING
Before leaving the driver’s seat, always set the parking brake fully
and shut the engine off. Thenmake sure the transmission is
shifted into 1st gear when the
vehicle is parked on a level or
uphill grade, and shifted into R
(Reverse) on a downhill grade.
Unexpected and sudden vehicle
movement can occur if these pre-
cautions are not followed in the
order identified.
If your vehicle has a manual transmission not equipped with a
ignition lock switch, it may moveand cause a serious accident
when starting the engine without
depressing the clutch pedal whilethe parking brake is released and
the shift lever not in theN(Neutral) position.
Page 217 of 346
529
Driving your vehicle
E100000AFD
Your vehicle's fuel economy depends
mainly on your style of driving, where you
drive and when you drive.
Each of these factors affects how many
miles (kilometers) you can get from a gal-
lon (liter) of fuel. To operate your vehicle
as economically as possible, use the fol-
lowing driving suggestions to help save
money in both fuel and repairs:
Drive smoothly. Accelerate at a moder-ate rate. Don't make "jack-rabbit" starts or full-throttle shifts and maintain a
steady cruising speed. Don't race
between stoplights. Try to adjust your
speed to that of the other traffic so you
don't have to change speeds unneces-
sarily. Avoid heavy traffic whenever
possible. Always maintain a safe dis-
tance from other vehicles so you can
avoid unnecessary braking. This also
reduces brake wear.
Drive at a moderate speed. The faster you drive, the more fuel your car uses.
Driving at a moderate speed, especial-
ly on the highway, is one of the most
effective ways to reduce fuel consump-tion. Don't "ride" the brake or clutch pedal.
This can increase fuel consumption
and also increase wear on these com-
ponents. In addition, driving with your
foot resting on the brake pedal may
cause the brakes to overheat, which
reduces their effectiveness and may
lead to more serious consequences.
Take care of your tires. Keep them inflated to the recommended pressure.
Incorrect inflation, either too much or
too little, results in unnecessary tire
wear. Check the tire pressures at leastonce a month.
Be sure that the wheels are aligned correctly. Improper alignment can
result from hitting curbs or driving too
fast over irregular surfaces. Poor align-
ment causes faster tire wear and may
also result in other problems as well as
greater fuel consumption.
Keep your car in good condition. For better fuel economy and reduced
maintenance costs, maintain your carin accordance with the maintenance
schedule in Section 7. If you drive your
car in severe conditions, more frequentmaintenance is required (see Section
7 for details). Keep your car clean. For maximum
service, your vehicle should be kept
clean and free of corrosive materials. It
is especially important that mud, dirt,
ice, etc. not be allowed to accumulate
on the underside of the car. This extra
weight can result in increased fuel con-
sumption and also contribute to corro-sion.
Travel lightly. Don't carry unnecessary weight in your car. Weight reduces fuel
economy.
Don't let the engine idle longer than necessary. If you are waiting (and not
in traffic), turn off your engine and
restart only when you're ready to go.
Remember, your vehicle does not require extended warm-up. After the
engine has started, allow the engine to
run for 10 to 20 seconds prior to plac-
ing the vehicle in gear. In very cold
weather, however, give your engine a
slightly longer warm-up period.
Don't "lug" or "over-rev" the engine. Lugging is driving too slowly in toohigh a gear resulting in the engine
bucking. If this happens, shift to a lower
gear. Over-revving is racing the engine
beyond its safe limit. This can be avoid-
ed by shifting at the recommended
speeds.
ECONOMICAL OPERATION
Page 237 of 346
What to do in an emergency
2
6
ROAD WARNING
F010100AUN
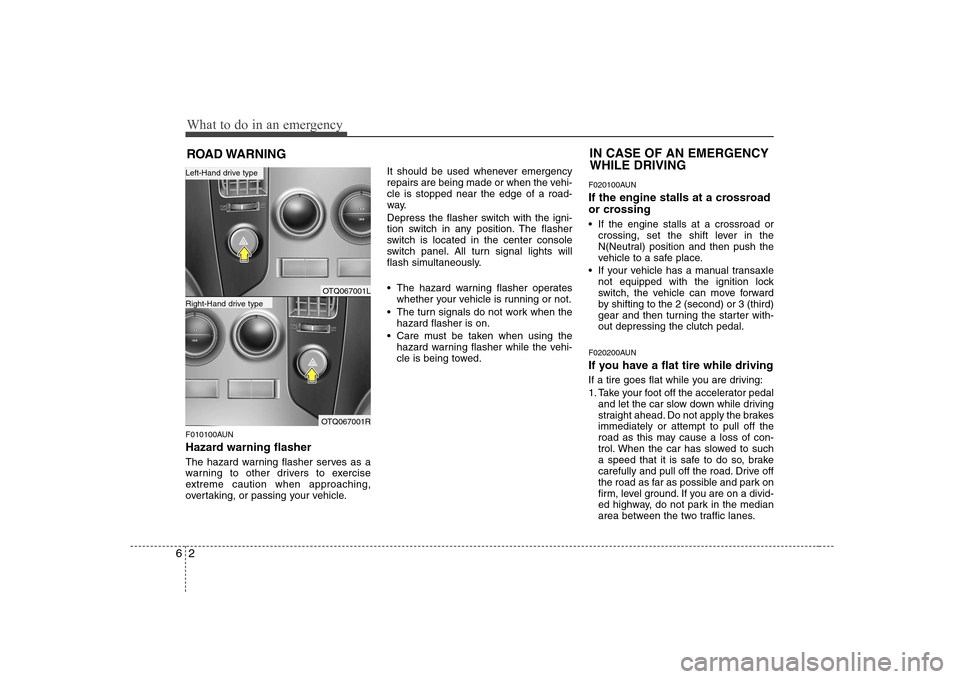
Hazard warning flasher
The hazard warning flasher serves as a
warning to other drivers to exercise
extreme caution when approaching,
overtaking, or passing your vehicle. It should be used whenever emergency
repairs are being made or when the vehi-cle is stopped near the edge of a road-
way.
Depress the flasher switch with the igni-
tion switch in any position. The flasher
switch is located in the center console
switch panel. All turn signal lights will
flash simultaneously.
• The hazard warning flasher operates
whether your vehicle is running or not.
The turn signals do not work when the hazard flasher is on.
Care must be taken when using the hazard warning flasher while the vehi-
cle is being towed. F020100AUN
If the engine stalls at a crossroad
or crossing
If the engine stalls at a crossroad or
crossing, set the shift lever in the
N(Neutral) position and then push the
vehicle to a safe place.
If your vehicle has a manual transaxle not equipped with the ignition lock
switch, the vehicle can move forward
by shifting to the 2 (second) or 3 (third)
gear and then turning the starter with-out depressing the clutch pedal.
F020200AUN
If you have a flat tire while driving
If a tire goes flat while you are driving:
1. Take your foot off the accelerator pedal and let the car slow down while driving
straight ahead. Do not apply the brakesimmediately or attempt to pull off the
road as this may cause a loss of con-
trol. When the car has slowed to such
a speed that it is safe to do so, brake
carefully and pull off the road. Drive off
the road as far as possible and park on
firm, level ground. If you are on a divid-
ed highway, do not park in the median
area between the two traffic lanes.
IN CASE OF AN EMERGENCY WHILE DRIVING
OTQ067001L
OTQ067001R
Right-Hand drive type
Left-Hand drive type
Page 255 of 346
7
Engine compartment / 7-2
Maintenance services / 7-4
Owner maintenance / 7-6
Scheduled maintenance service / 7-8
Explanation of scheduled maintenance items / 7-19
Engine oil / 7-22
Engine coolant / 7-23
Brakes and clutch fluid / 7-25
Power steering fluid / 7-26
Automatic transmission fluid / 7-28
Washer fluid / 7-29
Parking brake / 7-30
Fuel filter / 7-30
Air cleaner / 7-31
Climate control air filter / 7-32
Wiper blades / 7-34
Battery / 7-36
Tires and wheels / 7-39
Fuses / 7-48
Light bulbs / 7-58
Appearance care / 7-65
Emission control system / 7-71
Maintenance
Page 269 of 346
715
Maintenance
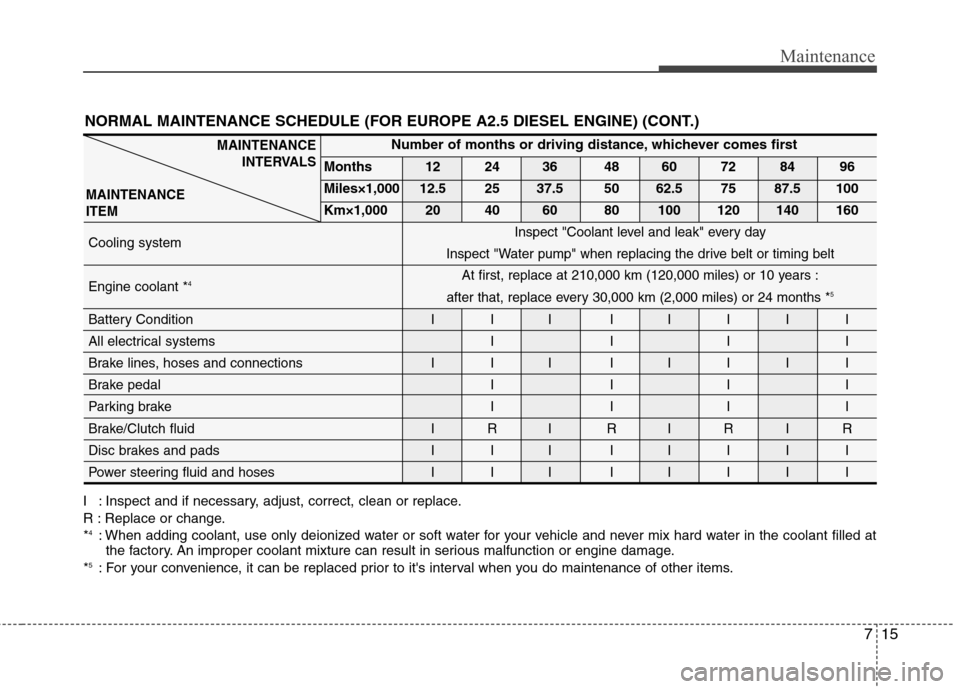
NORMAL MAINTENANCE SCHEDULE (FOR EUROPE A2.5 DIESEL ENGINE) (CONT.)
I : Inspect and if necessary, adjust, correct, clean or replace.
R : Replace or change.*4
: When adding coolant, use only deionized water or soft water for your vehicle and never mix hard water in the coolant filled at
the factory. An improper coolant mixture can result in serious malfunction or engine damage.
* 5
: For your convenience, it can be replaced prior to it's interval when you do maintenance of other items.
Number of months or driving distance, whichever comes first
Months 12 24 36 48 60 72 84 96
Miles×1,000 12.5 25 37.5 50 62.5 75 87.5 100
Km×1,000 20 40 60 80 100 120 140 160
Cooling system Engine coolant * 4
Battery Condition I I I I I I I I
All electrical systems I I I I
Brake lines, hoses and connections I I I I I I I I
Brake pedal I I I I
Parking brake I I I I
Brake/Clutch fluid I R I R I R I R
Disc brakes and pads I I I I I I I I
Power steering fluid and hoses I I I I I I I I
MAINTENANCE INTERVALS
MAINTENANCE ITEM
Inspect "Coolant level and leak" every day
Inspect "Water pump" when replacing the drive belt or timing belt At first, replace at 210,000 km (120,000 miles) or 10 years :
after that, replace every 30,000 km (2,000 miles) or 24 months * 5
Page 279 of 346
725
Maintenance
G070200AEN Changing the coolant
Have coolant changed by an authorized
HYUNDAI dealer according to theMaintenance Schedule at the beginningof this section.G080100AEN
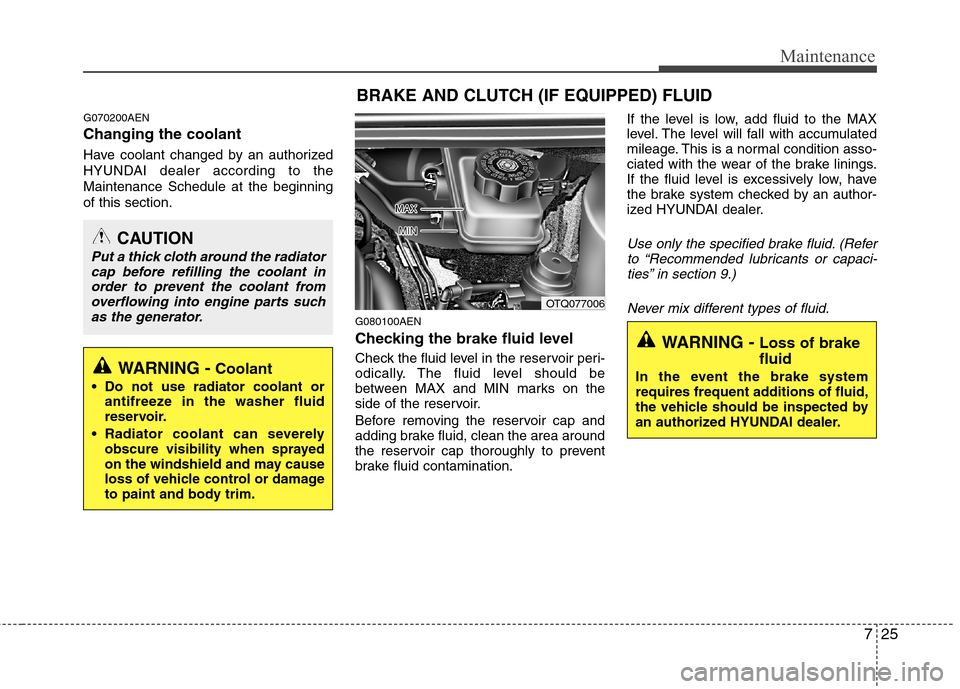
Checking the brake fluid level
Check the fluid level in the reservoir peri-
odically. The fluid level should be
between MAX and MIN marks on the
side of the reservoir.
Before removing the reservoir cap and
adding brake fluid, clean the area around
the reservoir cap thoroughly to prevent
brake fluid contamination.If the level is low, add fluid to the MAX
level. The level will fall with accumulated
mileage. This is a normal condition asso-
ciated with the wear of the brake linings.
If the fluid level is excessively low, have
the brake system checked by an author-
ized HYUNDAI dealer.
Use only the specified brake fluid. (Refer
to “Recommended lubricants or capaci-ties” in section 9.)
Never mix different types of fluid.CAUTION
Put a thick cloth around the radiatorcap before refilling the coolant inorder to prevent the coolant fromoverflowing into engine parts suchas the generator.
WARNING - Coolant
Do not use radiator coolant or antifreeze in the washer fluid
reservoir.
Radiator coolant can severely obscure visibility when sprayed
on the windshield and may cause
loss of vehicle control or damage
to paint and body trim.
BRAKE AND CLUTCH (IF EQUIPPED) FLUID
OTQ077006
WARNING - Loss of brake fluid
In the event the brake system
requires frequent additions of fluid,
the vehicle should be inspected by
an authorized HYUNDAI dealer.
Page 338 of 346
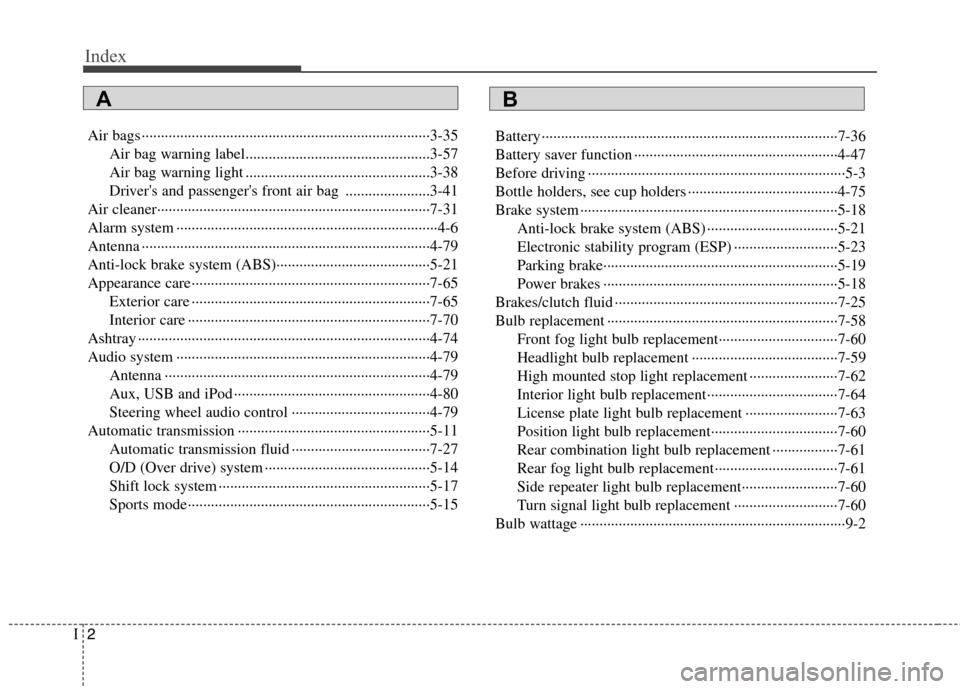
Index
2
I
Air bags ···········································································3-35
Air bag warning label................................................3-57
Air bag warning light ................................................3-38
Driver's and passenger's front air bag ......................3-41
Air cleaner·······································································7-31
Alarm system ····································································4-6
Antenna ···········································································4-79
Anti-lock brake system (ABS)········································5-21
Appearance care······························································7-65 Exterior care ······························································7-65
Interior care ·······························································7-70
Ashtray ············································································4-74
Audio system ··································································4-79 Antenna ·····································································4-79
Aux, USB and iPod ···················································4-80
Steering wheel audio control ····································4-79
Automatic transmission ··················································5-11 Automatic transmission fluid ····································7-27
O/D (Over drive) system ···········································5-14
Shift lock system ·······················································5-17
Sports mode·······························································5-15 Battery ·············································································7-36
Battery saver function ·····················································4-47
Before driving ···································································5-3
Bottle holders, see cup holders ·······································4-75
Brake system ···································································5-18
Anti-lock brake system (ABS) ··································5-21
Electronic stability program (ESP) ···························5-23
Parking brake·····························································5-19
Power brakes ·····························································5-18
Brakes/clutch fluid ··························································7-25
Bulb replacement ····························································7-58 Front fog light bulb replacement·······························7-60
Headlight bulb replacement ······································7-59
High mounted stop light replacement ·······················7-62
Interior light bulb replacement··································7-64
License plate light bulb replacement ························7-63
Position light bulb replacement·································7-60
Rear combination light bulb replacement ·················7-61
Rear fog light bulb replacement································7-61
Side repeater light bulb replacement·························7-60
Turn signal light bulb replacement ···························7-60
Bulb wattage ·····································································9-2
AB
Page 340 of 346
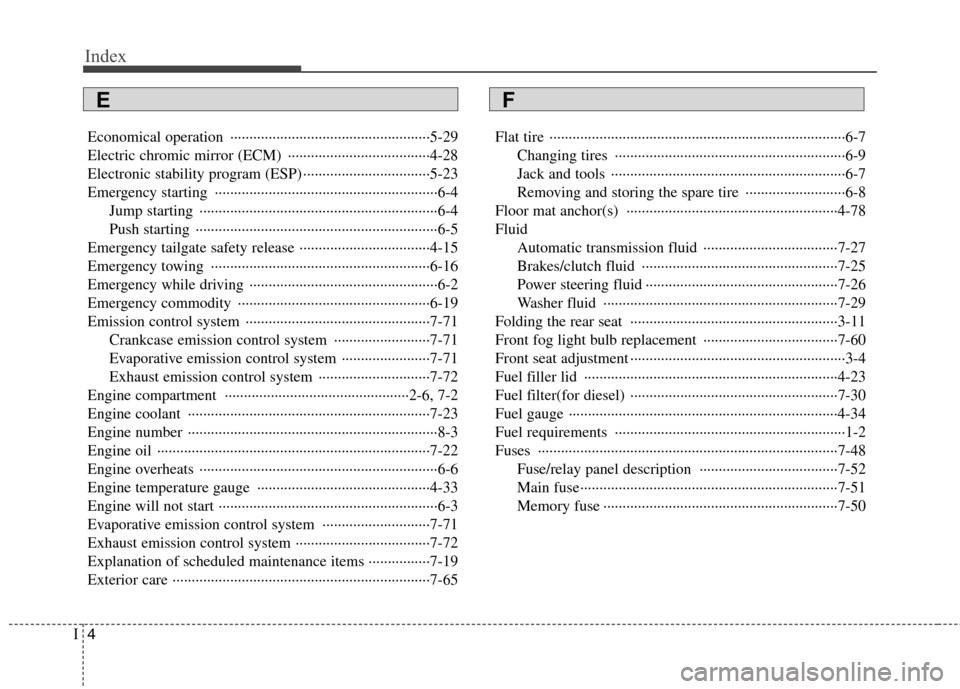
Index
4
I
Economical operation ····················································5-29
Electric chromic mirror (ECM) ·····································4-28
Electronic stability program (ESP) ·································5-23
Emergency starting ··························································6-4
Jump starting ······························································6-4
Push starting ·······························································6-5
Emergency tailgate safety release ··································4-15
Emergency towing ·························································6-16
Emergency while driving ·················································6-2
Emergency commodity ··················································6-19
Emission control system ················································7-71 Crankcase emission control system ·························7-71
Evaporative emission control system ·······················7-71
Exhaust emission control system ·····························7-72
Engine compartment ················································2-6, 7-2
Engine coolant ·······························································7-23
Engine number ·································································8-3
Engine oil ·······································································7-22
Engine overheats ······························································6-6
Engine temperature gauge ·············································4-33
Engine will not start ·························································6-3
Evaporative emission control system ····························7-71
Exhaust emission control system ···································7-72Explanation of scheduled maintenance items ················7-19
Exterior care ···································································7-65 Flat tire ·············································································6-7
Changing tires ····························································6-9
Jack and tools ·····························································6-7
Removing and storing the spare tire ··························6-8
Floor mat anchor(s) ·······················································4-78Fluid Automatic transmission fluid ···································7-27
Brakes/clutch fluid ···················································7-25
Power steering fluid ··················································7-26
Washer fluid ·····························································7-29
Folding the rear seat ······················································3-11
Front fog light bulb replacement ···································7-60
Front seat adjustment ························································3-4
Fuel filler lid ··································································4-23
Fuel filter(for diesel) ······················································7-30
Fuel gauge ······································································4-34
Fuel requirements ····························································1-2Fuses ··············································································7-48 Fuse/relay panel description ····································7-52
Main fuse···································································7-51
Memory fuse ·····························································7-50
EF