clock Hyundai H-1 (Grand Starex) 2016 - RHD (UK, Australia) Owner's Guide
[x] Cancel search | Manufacturer: HYUNDAI, Model Year: 2016, Model line: H-1 (Grand Starex), Model: Hyundai H-1 (Grand Starex) 2016Pages: 332, PDF Size: 6.89 MB
Page 243 of 332
What to do in an emergency
10 6
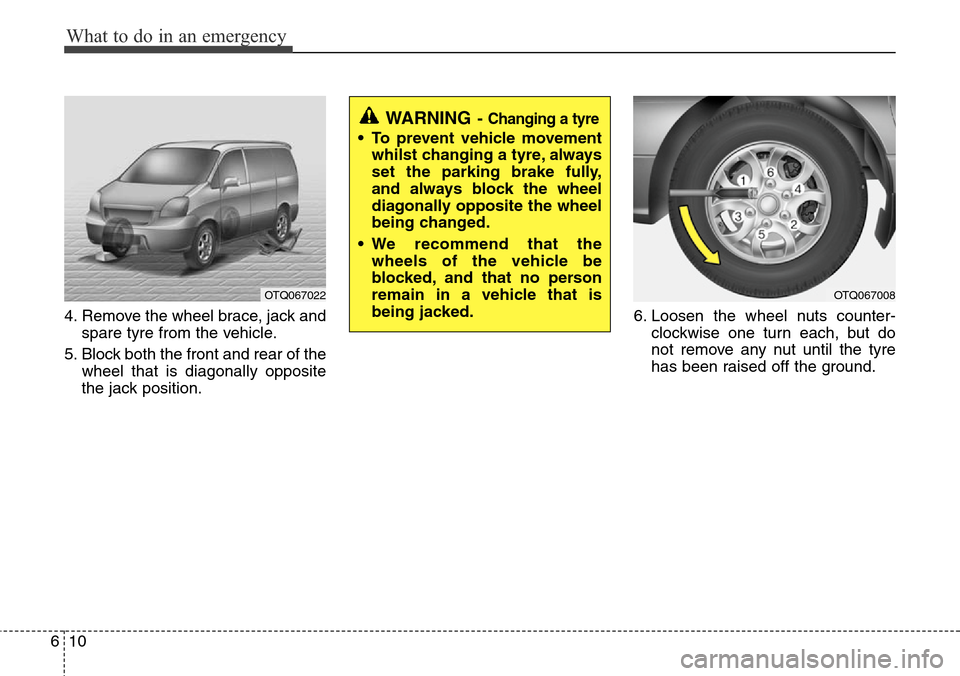
4. Remove the wheel brace, jack and
spare tyre from the vehicle.
5. Block both the front and rear of the
wheel that is diagonally opposite
the jack position.6. Loosen the wheel nuts counter-
clockwise one turn each, but do
not remove any nut until the tyre
has been raised off the ground.
OTQ067022OTQ067008
WARNING- Changing a tyre
• To prevent vehicle movement
whilst changing a tyre, always
set the parking brake fully,
and always block the wheel
diagonally opposite the wheel
being changed.
• We recommend that the
wheels of the vehicle be
blocked, and that no person
remain in a vehicle that is
being jacked.
Page 244 of 332
611
What to do in an emergency
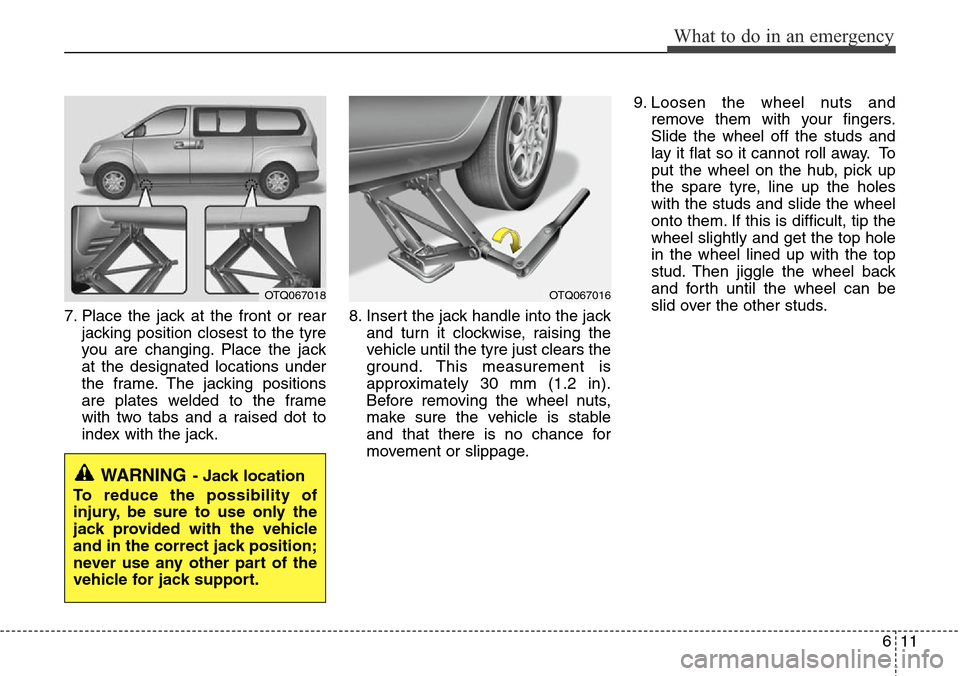
7. Place the jack at the front or rear
jacking position closest to the tyre
you are changing. Place the jack
at the designated locations under
the frame. The jacking positions
are plates welded to the frame
with two tabs and a raised dot to
index with the jack.8. Insert the jack handle into the jack
and turn it clockwise, raising the
vehicle until the tyre just clears the
ground. This measurement is
approximately 30 mm (1.2 in).
Before removing the wheel nuts,
make sure the vehicle is stable
and that there is no chance for
movement or slippage.9. Loosen the wheel nuts and
remove them with your fingers.
Slide the wheel off the studs and
lay it flat so it cannot roll away. To
put the wheel on the hub, pick up
the spare tyre, line up the holes
with the studs and slide the wheel
onto them. If this is difficult, tip the
wheel slightly and get the top hole
in the wheel lined up with the top
stud. Then jiggle the wheel back
and forth until the wheel can be
slid over the other studs.
WARNING- Jack location
To reduce the possibility of
injury, be sure to use only the
jack provided with the vehicle
and in the correct jack position;
never use any other part of the
vehicle for jack support.
OTQ067018OTQ067016
Page 245 of 332
What to do in an emergency
12 6
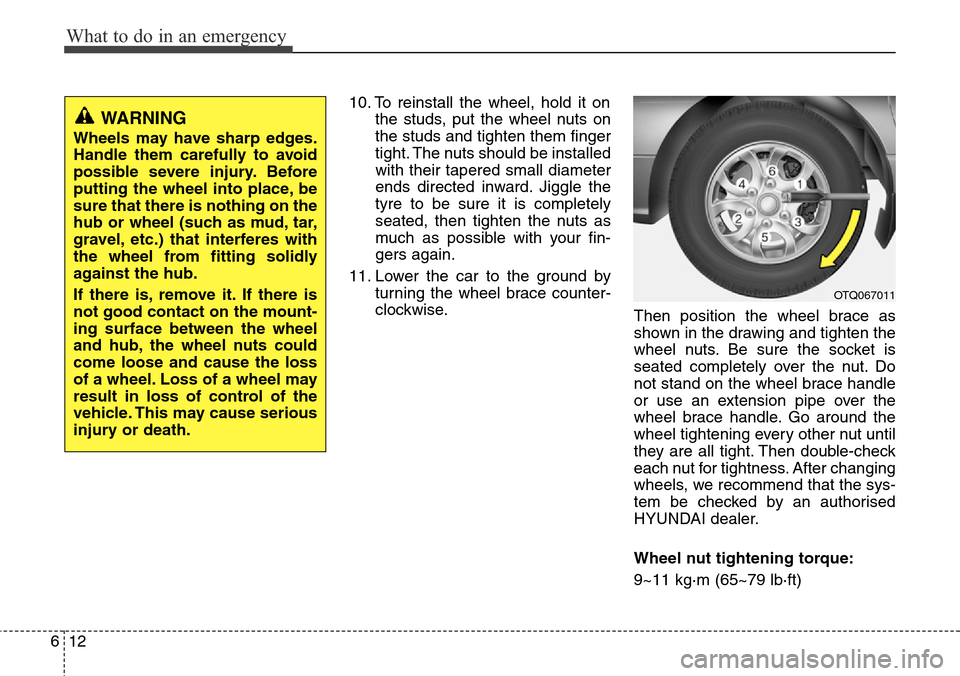
10. To reinstall the wheel, hold it on
the studs, put the wheel nuts on
the studs and tighten them finger
tight. The nuts should be installed
with their tapered small diameter
ends directed inward. Jiggle the
tyre to be sure it is completely
seated, then tighten the nuts as
much as possible with your fin-
gers again.
11. Lower the car to the ground by
turning the wheel brace counter-
clockwise.
Then position the wheel brace as
shown in the drawing and tighten the
wheel nuts. Be sure the socket is
seated completely over the nut. Do
not stand on the wheel brace handle
or use an extension pipe over the
wheel brace handle. Go around the
wheel tightening every other nut until
they are all tight. Then double-check
each nut for tightness. After changing
wheels, we recommend that the sys-
tem be checked by an authorised
HYUNDAI dealer.
Wheel nut tightening torque:
9~11 kg·m (65~79 lb·ft)
WARNING
Wheels may have sharp edges.
Handle them carefully to avoid
possible severe injury. Before
putting the wheel into place, be
sure that there is nothing on the
hub or wheel (such as mud, tar,
gravel, etc.) that interferes with
the wheel from fitting solidly
against the hub.
If there is, remove it. If there is
not good contact on the mount-
ing surface between the wheel
and hub, the wheel nuts could
come loose and cause the loss
of a wheel. Loss of a wheel may
result in loss of control of the
vehicle. This may cause serious
injury or death.
OTQ067011
Page 248 of 332
615
What to do in an emergency
When towing your vehicle in an emer-
gency without wheel dollies :
1. Set the ignition switch in the ACC posi-
tion.
2. Place the transmission shift lever in N
(Neutral).
3. Release the parking brake.
F080200ATQ
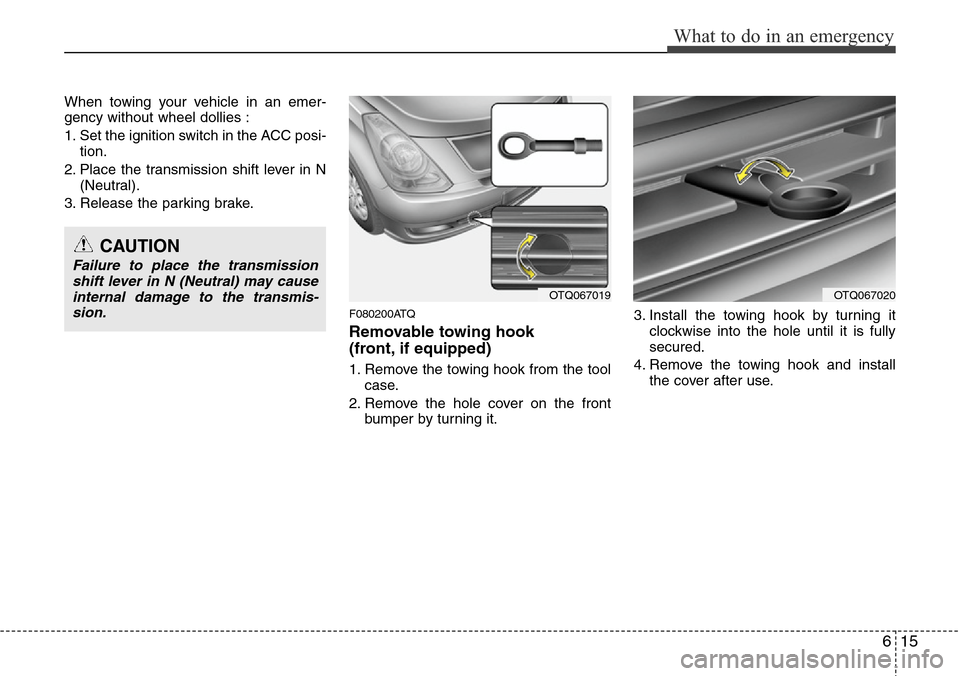
Removable towing hook
(front, if equipped)
1. Remove the towing hook from the tool
case.
2. Remove the hole cover on the front
bumper by turning it.3. Install the towing hook by turning it
clockwise into the hole until it is fully
secured.
4. Remove the towing hook and install
the cover after use.
CAUTION
Failure to place the transmission
shift lever in N (Neutral) may cause
internal damage to the transmis-
sion.
OTQ067019OTQ067020
Page 269 of 332
Maintenance
18 7
G060200AEN-EA
Changing the engine oil and filter
We recommend that the engine oil and
filter be replaced by an authorised
HYUNDAI dealer.
G070000BUN-EA
The high-pressure cooling system has a
reservoir filled with year-round antifreeze
coolant. The reservoir is filled at the fac-
tory.
Check the antifreeze protection and
coolant level at least once a year, at the
beginning of the winter season, and
before travelling to a colder climate.
G070100AEN-EA
Checking the coolant level
WARNING
Used engine oil may cause irrita-
tion or cancer of the skin if left in
contact with the skin for prolonged
periods of time. Used engine oil
contains chemicals that have
caused cancer in laboratory ani-
mals. Always protect your skin by
washing your hands thoroughly
with soap and warm water as soon
as possible after handling used oil.
ENGINE COOLANT
WARNING
Removing radiator
cap
• Never attempt to remove the radi-
ator cap whilst the engine is
operating or hot. Doing so might
lead to cooling system and
engine damage and could result
in serious personal injury from
escaping hot coolant or steam.
• Turn the engine off and wait until
it cools down. Use extreme care
when removing the radiator cap.
Wrap a thick towel around it, and
turn it counterclockwise slowly to
the first stop. Step back whilst
the pressure is released from the
cooling system. When you are
sure all the pressure has been
released, press down on the cap,
using a thick towel, and continue
turning counterclockwise to
remove it.
(Continued)CAUTION
• Do not drive with no engine
coolant. It may cause water pump
failure and engine seizure, etc.
• When the engine overheats from
low engine coolant, suddenly
adding engine coolant may cause
cracks in the engine. To prevent
damage, add engine coolant
slowly in small quantities.
Page 286 of 332
735
Maintenance
G190200AUN
Battery recharging
Your vehicle has a maintenance-free,
calcium-based battery.
• If the battery becomes discharged in a
short time (because, for example, the
headlights or interior lights were left on
whilst the vehicle was not in use),
recharge it by slow charging (trickle)
for 10 hours.
• If the battery gradually discharges
because of high electric load whilst the
vehicle is being used, recharge it at 20-
30A for two hours.
G190300BTQ
Reset items
Items should be reset after the battery
has been discharged or the battery has
been disconnected.
• Climate control system
(See section 4)
• Clock (See section 4)
• Audio (See section 4)
• Auto up/down window (See section 4)
• Trip computer (See section 4)
WARNING- Recharging
battery
When recharging the battery,
observe the following precautions:
• The battery must be removed
from the vehicle and placed in an
area with good ventilation.
• Do not allow cigarettes, sparks,
or flame near the battery.
• Watch the battery during charg-
ing, and stop or reduce the charg-
ing rate if the battery cells begin
gassing (boiling) violently or if
the temperature of the electrolyte
of any cell exceeds 49°C (120°F).
• Wear eye protection when check-
ing the battery during charging.
• Disconnect the battery charger in
the following order.
1. Turn off the battery charger main
switch.
2. Unhook the negative clamp from
the negative battery terminal.
3. Unhook the positive clamp from
the positive battery terminal.
WARNING
• Before performing maintenance
or recharging the battery, turn off
all accessories and stop the
engine.
• The negative battery cable must
be removed first and installed
last when the battery is discon-
nected.
Page 299 of 332
Maintenance
48 7
G210101AUN
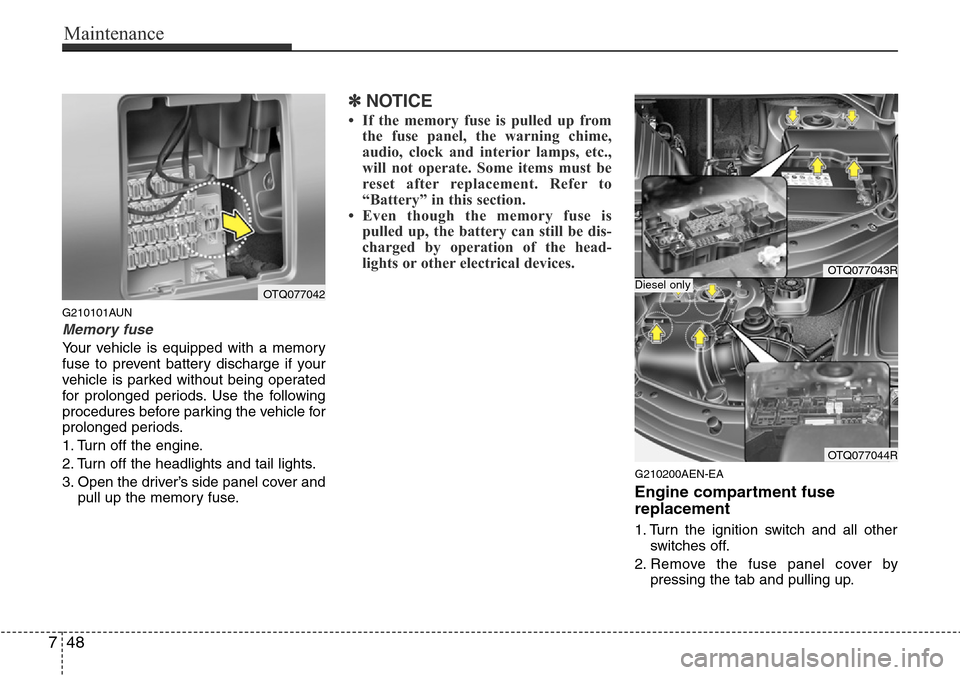
Memory fuse
Your vehicle is equipped with a memory
fuse to prevent battery discharge if your
vehicle is parked without being operated
for prolonged periods. Use the following
procedures before parking the vehicle for
prolonged periods.
1. Turn off the engine.
2. Turn off the headlights and tail lights.
3. Open the driver’s side panel cover and
pull up the memory fuse.
✽NOTICE
• If the memory fuse is pulled up from
the fuse panel, the warning chime,
audio, clock and interior lamps, etc.,
will not operate. Some items must be
reset after replacement. Refer to
“Battery” in this section.
• Even though the memory fuse is
pulled up, the battery can still be dis-
charged by operation of the head-
lights or other electrical devices.
G210200AEN-EA
Engine compartment fuse
replacement
1. Turn the ignition switch and all other
switches off.
2. Remove the fuse panel cover by
pressing the tab and pulling up.
OTQ077042
OTQ077043R
OTQ077044R
Diesel only
Page 302 of 332
751
Maintenance
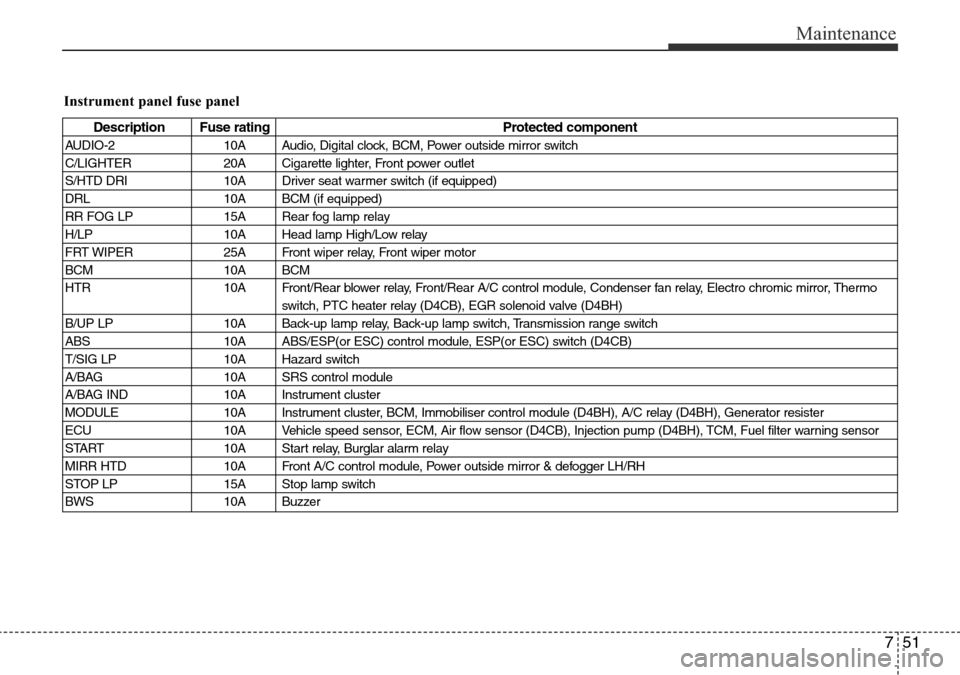
Instrument panel fuse panel
Description Fuse rating Protected component
AUDIO-2 10A Audio, Digital clock, BCM, Power outside mirror switch
C/LIGHTER 20A Cigarette lighter, Front power outlet
S/HTD DRI 10A Driver seat warmer switch (if equipped)
DRL 10A BCM (if equipped)
RR FOG LP 15A Rear fog lamp relay
H/LP 10A Head lamp High/Low relay
FRT WIPER 25A Front wiper relay, Front wiper motor
BCM 10A BCM
HTR 10A Front/Rear blower relay, Front/Rear A/C control module, Condenser fan relay, Electro chromic mirror, Thermo
switch, PTC heater relay (D4CB), EGR solenoid valve (D4BH)
B/UP LP 10A Back-up lamp relay, Back-up lamp switch, Transmission range switch
ABS 10A ABS/ESP(or ESC) control module, ESP(or ESC) switch (D4CB)
T/SIG LP 10A Hazard switch
A/BAG 10A SRS control module
A/BAG IND 10A Instrument cluster
MODULE 10A Instrument cluster, BCM, Immobiliser control module (D4BH), A/C relay (D4BH), Generator resister
ECU 10A Vehicle speed sensor, ECM, Air flow sensor (D4CB), Injection pump (D4BH), TCM, Fuel filter warning sensor
START 10A Start relay, Burglar alarm relay
MIRR HTD 10A Front A/C control module, Power outside mirror & defogger LH/RH
STOP LP 15A Stop lamp switch
BWS 10A Buzzer
Page 303 of 332
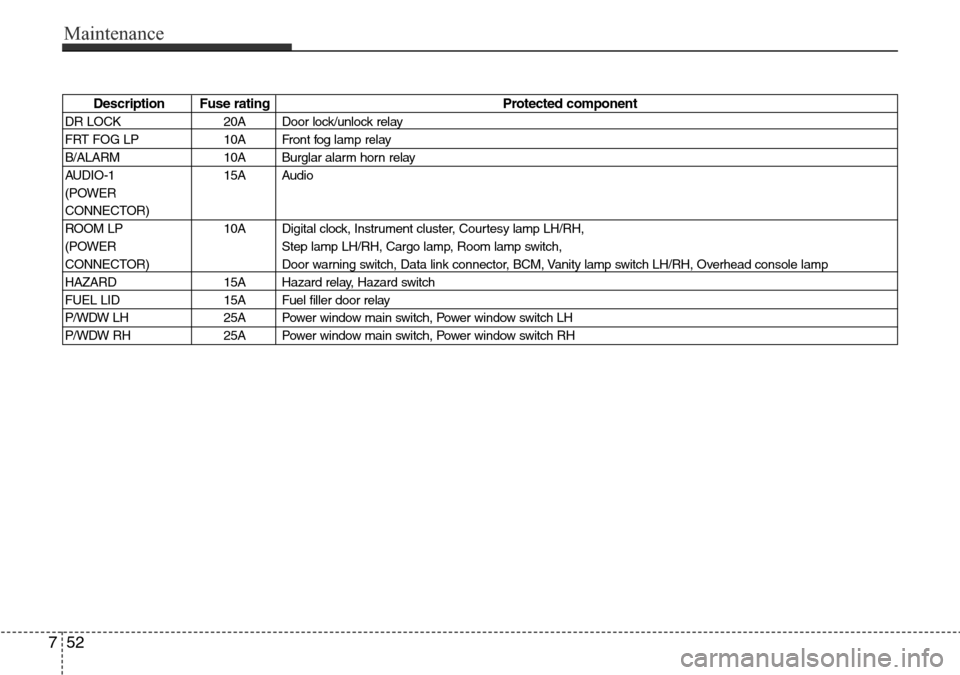
Maintenance
52 7
Description Fuse rating Protected component
DR LOCK 20A Door lock/unlock relay
FRT FOG LP 10A Front fog lamp relay
B/ALARM 10A Burglar alarm horn relay
AUDIO-1 15A Audio
(POWER
CONNECTOR)
ROOM LP 10A Digital clock, Instrument cluster, Courtesy lamp LH/RH,
(POWER Step lamp LH/RH, Cargo lamp, Room lamp switch,
CONNECTOR) Door warning switch, Data link connector, BCM, Vanity lamp switch LH/RH, Overhead console lamp
HAZARD 15A Hazard relay, Hazard switch
FUEL LID 15A Fuel filler door relay
P/WDW LH 25A Power window main switch, Power window switch LH
P/WDW RH 25A Power window main switch, Power window switch RH
Page 308 of 332
757
Maintenance
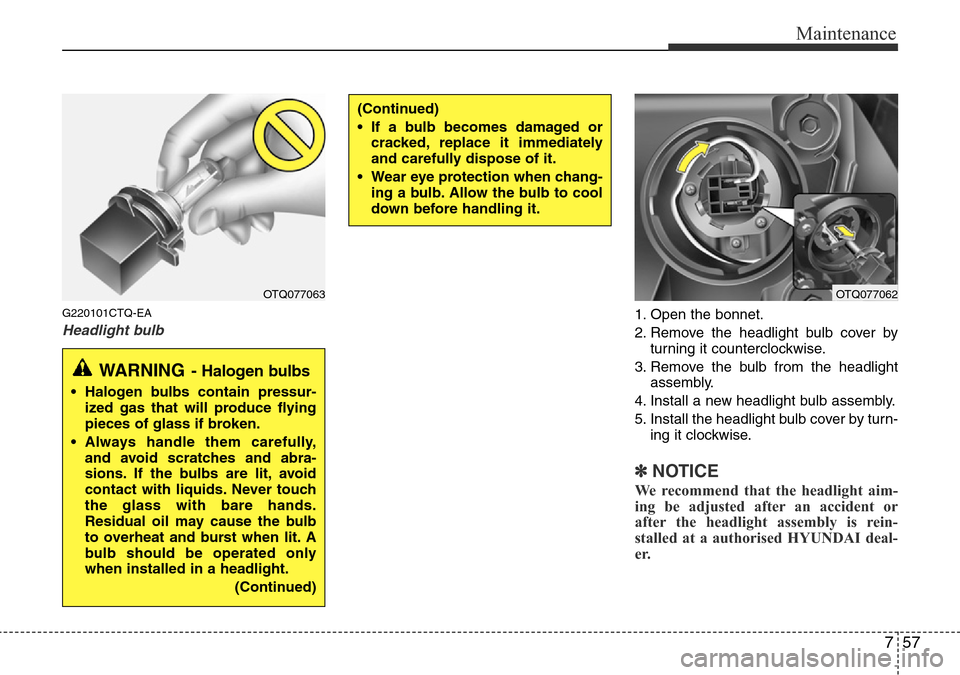
G220101CTQ-EA
Headlight bulb1. Open the bonnet.
2. Remove the headlight bulb cover by
turning it counterclockwise.
3. Remove the bulb from the headlight
assembly.
4. Install a new headlight bulb assembly.
5. Install the headlight bulb cover by turn-
ing it clockwise.
✽NOTICE
We recommend that the headlight aim-
ing be adjusted after an accident or
after the headlight assembly is rein-
stalled at a authorised HYUNDAI deal-
er.
(Continued)
• If a bulb becomes damaged or
cracked, replace it immediately
and carefully dispose of it.
• Wear eye protection when chang-
ing a bulb. Allow the bulb to cool
down before handling it.
OTQ077063OTQ077062
WARNING- Halogen bulbs
• Halogen bulbs contain pressur-
ized gas that will produce flying
pieces of glass if broken.
• Always handle them carefully,
and avoid scratches and abra-
sions. If the bulbs are lit, avoid
contact with liquids. Never touch
the glass with bare hands.
Residual oil may cause the bulb
to overheat and burst when lit. A
bulb should be operated only
when installed in a headlight.
(Continued)