lock HYUNDAI IONIQ 2020 Workshop Manual
[x] Cancel search | Manufacturer: HYUNDAI, Model Year: 2020, Model line: IONIQ, Model: HYUNDAI IONIQ 2020Pages: 561, PDF Size: 24.5 MB
Page 195 of 561
3-110
Convenient features of your vehicle
Front Door Lamp ( ):
The front or rear room lamps come
on when the front or rear doors are
opened. When doors are unlocked by
the smart key, the front and rear
lamps come on for approximately 30
seconds as long as any door is not
opened. The front and rear room
lamps go out gradually after approxi-
mately 30 seconds if the door is
closed. However, if the POWER but-
ton is in the ON position or all doors
are locked, the front and rear lamps
will turn off. If a door is opened with
the POWER button in the ACC posi-
tion or the OFF position, the front
and rear lamps stay on for about 20
minutes.
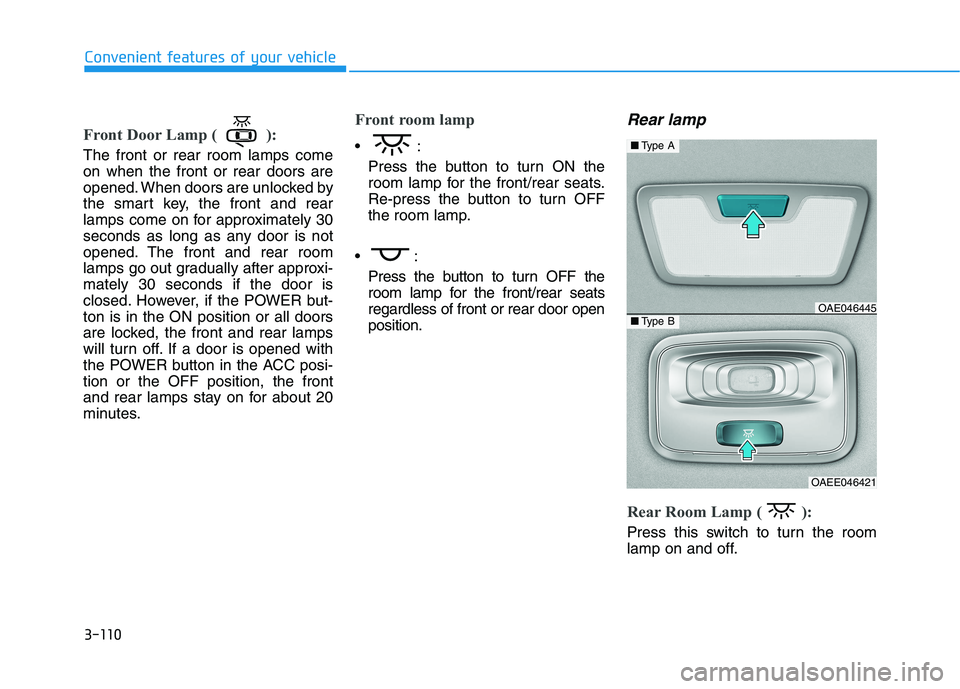
Front room lamp
Press the button to turn ON the
room lamp for the front/rear seats.
Re-press the button to turn OFF
the room lamp.
Press the button to turn OFF the
room lamp for the front/rear seats
regardless of front or rear door open
position.
Rear lamp
Rear Room Lamp ( ):
Press this switch to turn the room
lamp on and off.
■Type A
■Type BOAE046445
OAEE046421
Page 196 of 561
3-111
Convenient features of your vehicle
3
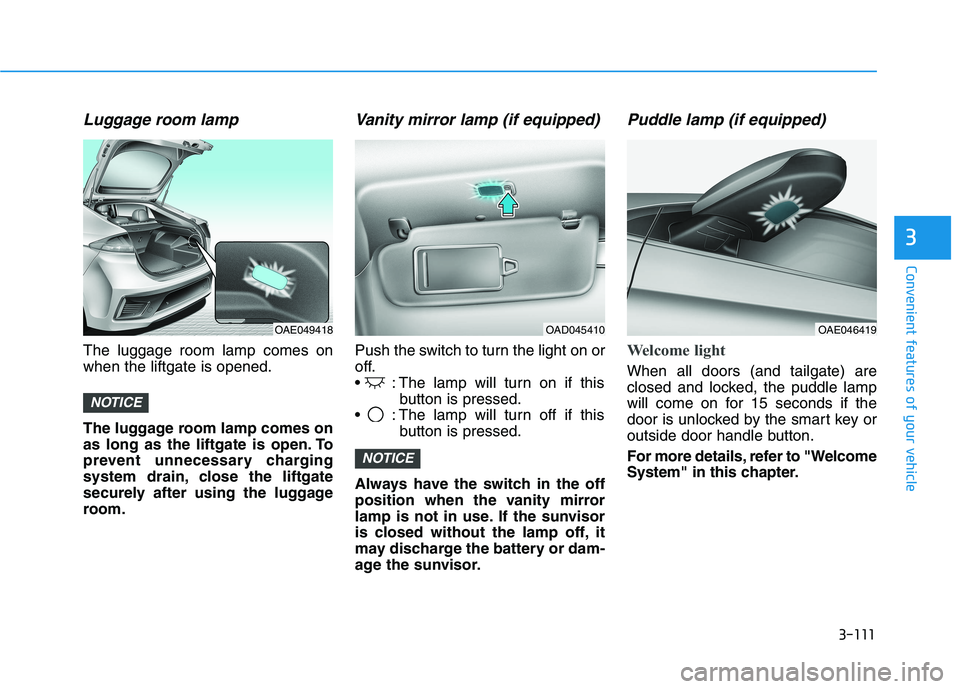
Luggage room lamp
The luggage room lamp comes on
when the liftgate is opened.
The luggage room lamp comes on
as long as the liftgate is open. To
prevent unnecessary charging
system drain, close the liftgate
securely after using the luggage
room.
Vanity mirror lamp (if equipped)
Push the switch to turn the light on or
off.
: The lamp will turn on if this
button is pressed.
: The lamp will turn off if this
button is pressed.
Always have the switch in the off
position when the vanity mirror
lamp is not in use. If the sunvisor
is closed without the lamp off, it
may discharge the battery or dam-
age the sunvisor.
Puddle lamp (if equipped)
Welcome light
When all doors (and tailgate) are
closed and locked, the puddle lamp
will come on for 15 seconds if the
door is unlocked by the smart key or
outside door handle button.
For more details, refer to "Welcome
System" in this chapter.
NOTICE
NOTICE
OAD045410OAE049418OAE046419
Page 197 of 561
3-112
Convenient features of your vehicle
Escort light
When the POWER button is in the
OFF position and the driver's door is
opened, the puddle lamp will come
on for 30 seconds. If the driver's door
is closed within the 30 seconds, the
puddle lamp will turn off after 15 sec-
onds. If the driver's door is closed
and locked, the puddle lamp will turn
off immediately.
The Puddle Lamp Escort Light will
turn on only the first time the driver's
door is opened after the vehicle is
turned off.
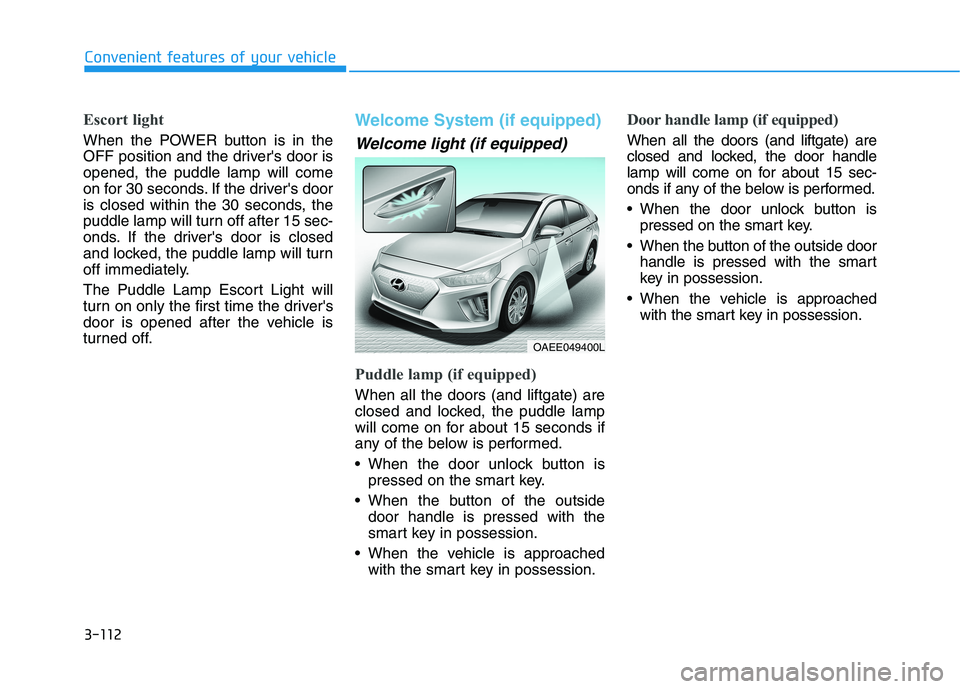
Welcome System (if equipped)
Welcome light (if equipped)
Puddle lamp (if equipped)
When all the doors (and liftgate) are
closed and locked, the puddle lamp
will come on for about 15 seconds if
any of the below is performed.
When the door unlock button is
pressed on the smart key.
When the button of the outside
door handle is pressed with the
smart key in possession.
When the vehicle is approached
with the smart key in possession.
Door handle lamp (if equipped)
When all the doors (and liftgate) are
closed and locked, the door handle
lamp will come on for about 15 sec-
onds if any of the below is performed.
When the door unlock button is
pressed on the smart key.
When the button of the outside door
handle is pressed with the smart
key in possession.
When the vehicle is approached
with the smart key in possession.
OAEE049400L
Page 198 of 561
3-113
Convenient features of your vehicle
3
Headlamp and parking lamp
When the headlamp (lamp switch in the
headlamp or AUTO position) is on and
all doors (and liftgate) are locked and
closed, the parking lamp and head-
lamp will come on for 15 seconds if/or
any of the below is performed.
When the door unlock button is
pressed on the smart key.
At this time, if you press the door lock
or unlock button, the parking lamp and
headlamp will turn off immediately.
You can activate or deactivate the
Welcome Light from the User
Settings mode on the LCD display.
For more details, refer to "LCD
Display" in this chapter.
Interior lamp
When the interior lamp switch is in
the DOOR position and all doors (and
liftgate) are closed and locked, the
room lamp will come on for 30 sec-
onds if any of the below is performed.
When the door unlock button is
pressed on the smart key.
When the button of the outside
door handle is pressed.
At this time, if you press the door lock
or unlock button, the room lamp will
turn off immediately.
Page 222 of 561
3-137
Convenient features of your vehicle
3
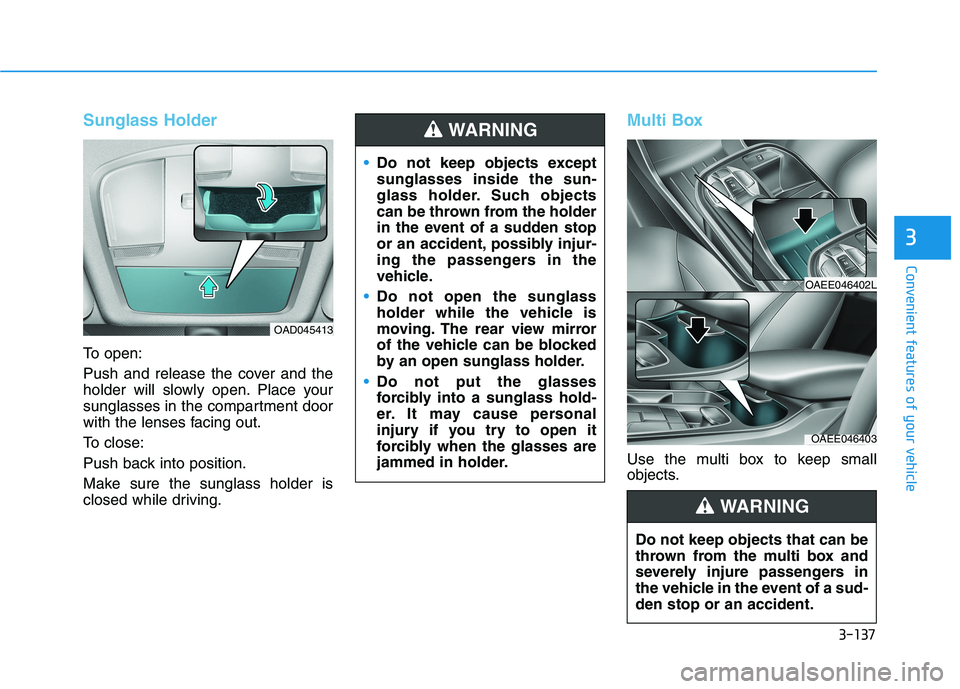
Sunglass Holder
To open:
Push and release the cover and the
holder will slowly open. Place your
sunglasses in the compartment door
with the lenses facing out.
To close:
Push back into position.
Make sure the sunglass holder is
closed while driving.
Multi Box
Use the multi box to keep small
objects.
OAD045413
Do not keep objects except
sunglasses inside the sun-
glass holder. Such objects
can be thrown from the holder
in the event of a sudden stop
or an accident, possibly injur-
ing the passengers in the
vehicle.
Do not open the sunglass
holder while the vehicle is
moving. The rear view mirror
of the vehicle can be blocked
by an open sunglass holder.
Do not put the glasses
forcibly into a sunglass hold-
er. It may cause personal
injury if you try to open it
forcibly when the glasses are
jammed in holder.
WARNING
OAEE046402L
OAEE046403
Do not keep objects that can be
thrown from the multi box and
severely injure passengers in
the vehicle in the event of a sud-
den stop or an accident.
WARNING
Page 224 of 561
3-139
Convenient features of your vehicle
3
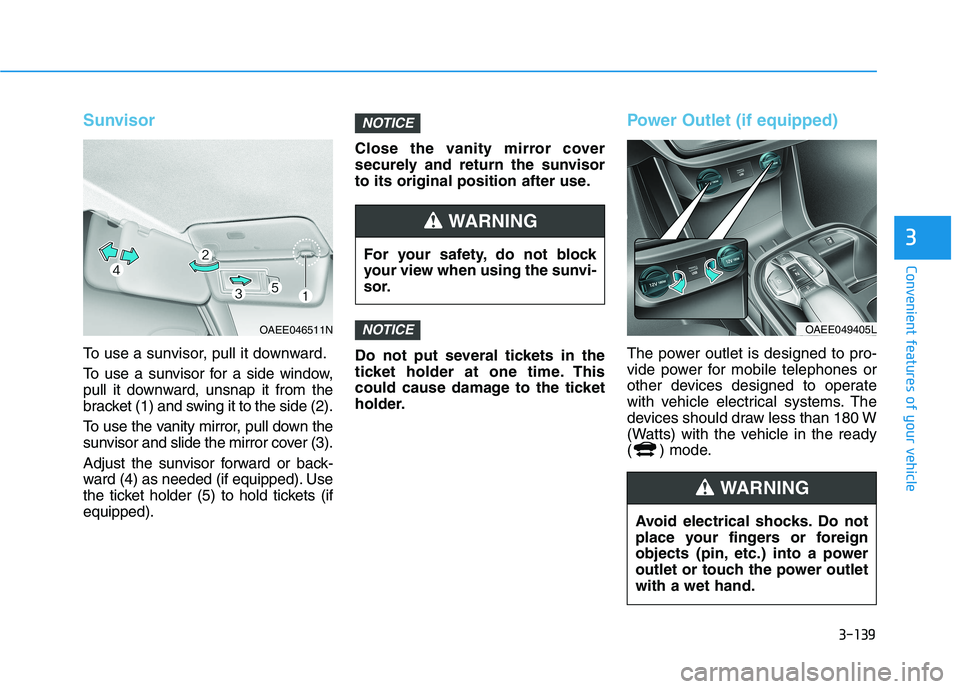
Sunvisor
To use a sunvisor, pull it downward.
To use a sunvisor for a side window,
pull it downward, unsnap it from the
bracket (1) and swing it to the side (2).
To use the vanity mirror, pull down the
sunvisor and slide the mirror cover (3).
Adjust the sunvisor forward or back-
ward (4) as needed (if equipped). Use
the ticket holder (5) to hold tickets (if
equipped).Close the vanity mirror cover
securely and return the sunvisor
to its original position after use.
Do not put several tickets in the
ticket holder at one time. This
could cause damage to the ticket
holder.
Power Outlet (if equipped)
The power outlet is designed to pro-
vide power for mobile telephones or
other devices designed to operate
with vehicle electrical systems. The
devices should draw less than 180 W
(Watts) with the vehicle in the ready
( ) mode.
NOTICE
NOTICE
OAEE046511N
For your safety, do not block
your view when using the sunvi-
sor.
WARNING
OAEE049405L
Avoid electrical shocks. Do not
place your fingers or foreign
objects (pin, etc.) into a power
outlet or touch the power outlet
with a wet hand.
WARNING
Page 226 of 561
3-141
Convenient features of your vehicle
3
To charge a cellular phone
The wireless cellular phone charging
system charges only the Qi-enabled
cellular phones ( ). Read the label
on the cellular phone accessory
cover or visit your cellular phone
manufacturer’s website to check
whether your cellular phone supports
the Qi technology.
The wireless charging process starts
when you put a Qi-enabled cellular
phone on the wireless charging unit.
1. Remove other items, including the
smart key, from the wireless charg-
ing unit. If not, the wireless charg-
ing process may be interrupted.
Place the cellular phone on the
center of charging pad.
2. The indicator light is orange when
the cellular phone is chargeing.
The indicator light turns green
when phone charging is complet-
ed.
3. You can turn ON or OFF the wire-
less charging function in the user
settings mode on the instrument
cluster. (For further information,
refer to the "LCD Display Modes"
in this chapter.) If your cellular phone is not charging:
- Slightly change the position of the
cellular phone on the charging pad.
- Make sure the indicator light is
orange.
The indicator light will blink orange
for 10 seconds if there is a malfunc-
tion in the wireless charging system.
In this case, temporarily stop the
charging process, and re-attempt to
wirelessly charge your cellular phone
again.
The system warns you with a mes-
sage on the LCD display if the cellu-
lar phone is still on the wireless
charging unit after the POWER but-
ton is in the OFF position and the
front door is opened.
Information
For some manufacturers' cellular
phones, the system may not warn you
even though the cellular phone is left
on the wireless charging unit. This is
due to the particular characteristic of
the cellular phone and not a malfunc-
tion of the wireless charging. The wireless cellular phone
charging system may not sup-
port certain cellular phones,
which are not verified for the Qi
specification ( ).
When placing your cellular
phone on the charging mat,
position the phone in the middle
of the mat for optimal charging
performance. If your cell phone
is off to the side, the charging
rate may be less and in some
cases the cell phone may experi-
ence higher heat conduction.
In some cases, the wireless
charging may stop temporarily
when the Smart Key is used,
either when starting the vehicle
or locking/unlocking the doors,
etc.
When charging certain cellular
phones, the charging indicator
may not change to green when
the cell phone is fully charged.
(Continued)
NOTICE
i
Page 227 of 561
3-142
Convenient features of your vehicle
(Continued)
The wireless charging process
may temporarily stop, when tem-
perature abnormally increases
inside the wireless cellular
phone charging system. The
wireless charging process
restarts, when temperature falls
to a proper level.
The wireless charging process
may temporarily stop when
there is any metallic item, such
as a coin, between the wireless
cellular phone charging system
and a cellular phone.
For certain cellular phone with
their own protection, the wire-
less charging speed may
decrease and the wireless
charging may stop.
If the cellular phone has a thick
cover, the wireless charging may
not be possible.
If the cell phone is not complete-
ly contacting the charging pad,
wireless charging may not oper-
ate properly.
(Continued)(Continued)
Some magnetic items like credit
cards, phone cards or rail tickets
may be damaged if left with the
cellular phone during the charg-
ing process.
If the cellular phone without the
wireless charging function or
the metallic items are placed on
the charging pad, it may cause
slight noise. This noise does not
affect the cellular phone and the
vehicle, because this noise is an
operating sound during deter-
mining the item on the charging
pad.
If the POWER button is in the
OFF position, the charging also
stops.
Clock
Vehicles with Audio system
Select the [SETUP]button on the
audio system ➟Select [Date/Time].
Set time : Set the time displayed on
the audio screen.
Time format : Choose between 12-
hour and 24-hour time formats. Do not adjust the clock while
driving, you may lose your
steering control and cause an
accident that results in severe
personal injury or death.
WARNING
Page 234 of 561
4-3
Infotainment System
4
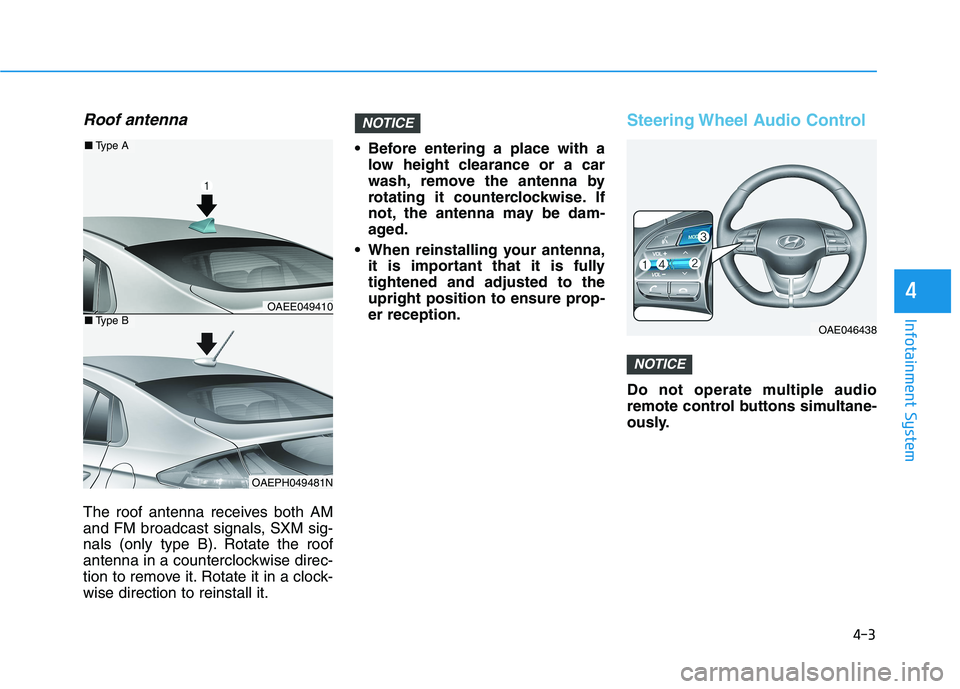
Roof antenna
The roof antenna receives both AM
and FM broadcast signals, SXM sig-
nals (only type B). Rotate the roof
antenna in a counterclockwise direc-
tion to remove it. Rotate it in a clock-
wise direction to reinstall it. Before entering a place with a
low height clearance or a car
wash, remove the antenna by
rotating it counterclockwise. If
not, the antenna may be dam-
aged.
When reinstalling your antenna,
it is important that it is fully
tightened and adjusted to the
upright position to ensure prop-
er reception.
Steering Wheel Audio Control
Do not operate multiple audio
remote control buttons simultane-
ously.
NOTICE
NOTICE
OAE046438
OAEE049410
OAEPH049481N
■Type A
■Type B
Page 237 of 561
Driving your vehicle
Before driving.........................................................5-3
Before Entering the Vehicle ...........................................5-3
Before Starting ..................................................................5-3
Power button ..........................................................5-5
POWER Button Positions.................................................5-6
Starting the Vehicle ..........................................................5-8
Turning Off the Vehicle ...................................................5-9
Reduction gear .....................................................5-10
Reduction Gear Operation ............................................5-10
Parking ...............................................................................5-12
LCD Display Messages ...................................................5-12
Good Driving Practices ..................................................5-15
Paddle shifter (regenerative braking control) ..5-16
One Pedal Driving ...........................................................5-17
Smart regeneration system with
smart cruise control system...............................5-18
System Setting .................................................................5-18
Activating the Smart Regeneration System .............5-18
Cancelling the Smart Regeneration System .............5-20
Resuming the Smart Regeneration System ..............5-20
Disabling the Smart Regeneration System ...............5-20
Vehicle-to-Vehicle Front Recognition
- Front Radar Sensor ....................................................5-20
Warning Message............................................................5-21
Limitations of the System .............................................5-21
Braking system ...................................................5-26
Power Brakes ...................................................................5-26
Disc Brake Wear Indicator ............................................5-27
Electronic Parking Brake (EPB)...................................5-27
Auto Hold ..........................................................................5-32
Anti-lock Brake System (ABS) ....................................5-36
Electronic Stability Control (ESC)................................5-38
Vehicle Stability Management (VSM).........................5-42
Hill-Start Assist Control (HAC) ....................................5-43
Good Braking Practices .................................................5-44
Drive Mode Integrated Control System ...........5-45
Drive mode ........................................................................5-45
Initial setting for each Drive Mode ............................5-45
Forward Collision-Avoidance assist (FCA) .....5-46
System setting and activation......................................5-46
FCA warning message and brake control .................5-48
FCA sensor (Front view camera+ Front radar) .......5-51
System malfunction ........................................................5-53
Limitations of the system .............................................5-55
Lane Keeping Assist (LKA) .................................5-62
LKA operation ..................................................................5-64
Warning light and message ..........................................5-67
Limitations of the System .............................................5-68
LKA system function change .......................................5-70
5