display HYUNDAI IONIQ 6 2023 Owners Manual
[x] Cancel search | Manufacturer: HYUNDAI, Model Year: 2023, Model line: IONIQ 6, Model: HYUNDAI IONIQ 6 2023Pages: 582, PDF Size: 10.77 MB
Page 17 of 582
1
1-11
capacity and distance to empty keep failing, have the vehicle inspected by an
authorized HYUNDAI dealer.
• If you do not use the vehicle for a long time, charge the vehicle at least once every three months to prevent both the high voltage and the 12 V battery from fully discharging.
When the battery level has low level, immediately charge the vehicle.
• Using AC charging as much as possible can help keep the battery in optimal condition. Fully charging the battery when it is 20 % or lower helps to keep the battery in optimal
condition. (Charging once a month or more is recommended.)
• The charging level value displayed on the instrument cluster may decrease according to the charging conditions (charger status, outside temperature, battery temperature,
etc.). For longer battery life and safety, after a certain charging level is reached, the
charging current is gradually lowered to fully charge the battery.
Other Precautions for Electric Vehicle Management
CAUTION • When heat treatment after repairs or painting is applied to the vehicle due to an accident, the high voltage battery’s performance may be degraded. If heat treatment
is required, contact an authorized HYUNDAI dealer.
• When cleaning the motor compartment, do not use a high pressure washer. Doing so may result in electric shock, due to a discharge in high voltage electricity, or damage
the vehicle’s electric system.
• Do not install third-party parts or modified parts on the vehicle. Doing so may damage the electric power system. Only use or install genuine parts.
Hyundai_CE_en_US.book Page 11
Page 29 of 582
1
1-23
WARNING Do not touch the charging connector of the charging cable or the charging inlet on the
vehicle.
5. Remove the charging connector protection cap of the AC charging cable, hold the charging connector handle, and connect it to the AC charging inlet on the vehicle. Push
it until you hear a click.
6. [If using separately purchased charging cable] Remove the charging plug protection
cap of the AC charging cable, hold the charging plug handle, and connect it to the
electric outlet (120 V) of the AC charger.
• This process is required only when using a separately purchased AC charging cable. If you use a charging cable installed in an AC charger, a separate charging plug
connection is not required.
• When charging starts, the estimated charging time will be displayed on the instrument cluster for about one minute.
Information • If you open the driver’s door while charging, the estimated charging time will also be displayed on the instrument cluster for about one minute.
• When scheduled charging is set, a message saying "Waiting to charge at scheduled time" will be displayed.
• When scheduled air conditioner or heater operates while waiting for the scheduled charging, the estimated charging time will be displayed as “-”.
7. [If using a separately purchased charging cable] When charging is complete, hold the
charging plug handle, disconnect the charging plug from the electric outlet (120 V) of
the AC charger, and close the protection cap of the charging plug.
• This process is required only when using an AC charging cable purchased separately. If you use a charging cable installed in an AC charger, a separate charging plug
disconnection is not required.
8. Hold the charging connector handle with the unlock button pressed, and pull the charging connector to disconnect it from the charging inlet.
CAUTION Do not forcibly disconnect the charging connector without pressing the unlock button
on the charging connector. It may damage the charging connector or the charging
inlet on the vehicle.
9. Close the charging inlet cover and press the charging door to completely close it.
Hyundai_CE_en_US.book Page 23
Page 31 of 582
1
1-25
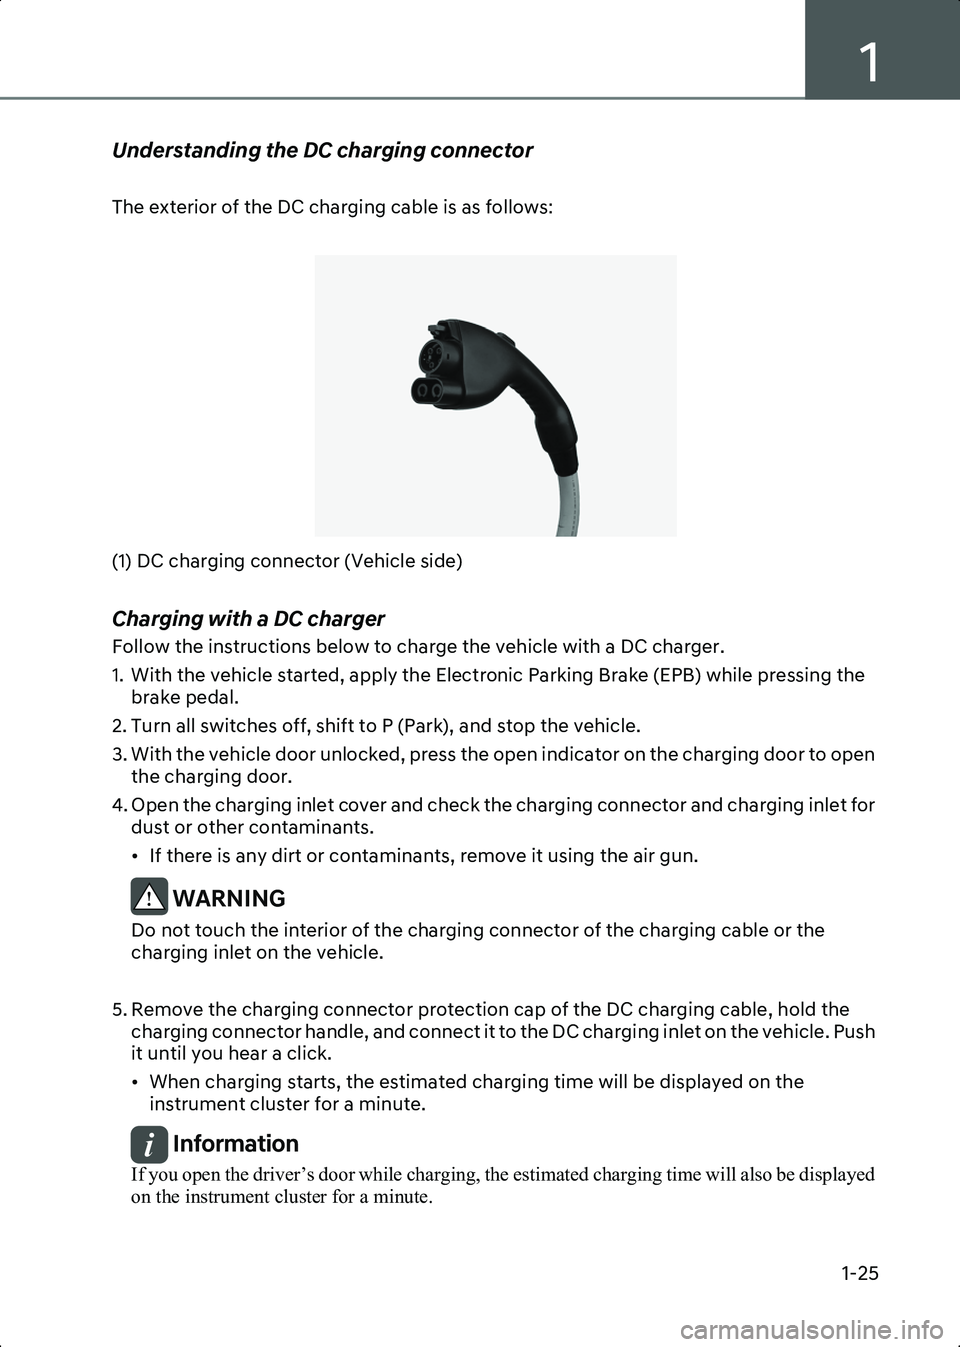
Understanding the DC charging connector
The exterior of the DC charging cable is as follows:
B0001101(1) DC charging connector (Vehicle side)
Charging with a DC charger
Follow the instructions below to charge the vehicle with a DC charger.
1. With the vehicle started, apply the Electronic Parking Brake (EPB) while pressing the brake pedal.
2. Turn all switches off, shift to P (Park), and stop the vehicle.
3. With the vehicle door unlocked, press the open indicator on the charging door to open the charging door.
4. Open the charging inlet cover and check the charging connector and charging inlet for dust or other contaminants.
• If there is any dirt or contaminants, remove it using the air gun.
WARNING Do not touch the interior of the charging connector of the charging cable or the
charging inlet on the vehicle.
5. Remove the charging connector protection cap of the DC charging cable, hold the charging connector handle, and connect it to the DC charging inlet on the vehicle. Push
it until you hear a click.
• When charging starts, the estimated charging time will be displayed on the instrument cluster for a minute.
Information If you open the driver’s door while charging, the estimated charging time will also be displayed
on the instrument cluster for a minute.
Hyundai_CE_en_US.book Page 25
Page 33 of 582
1
1-27
• If the power distributor exceeds its capacity while charging the vehicle with a portable charger at home, the power to the home may be cut off or a fire may occur.
• Immediately stop charging if you discover abnormal conditions, such as odor or smoke.
• Use a portable charger only in emergencies, and do not use it to fully charge the battery.
• If you charge the vehicle with household electricity, you will be charged electricity bill according to the home rate system, not the electric vehicle rate system.
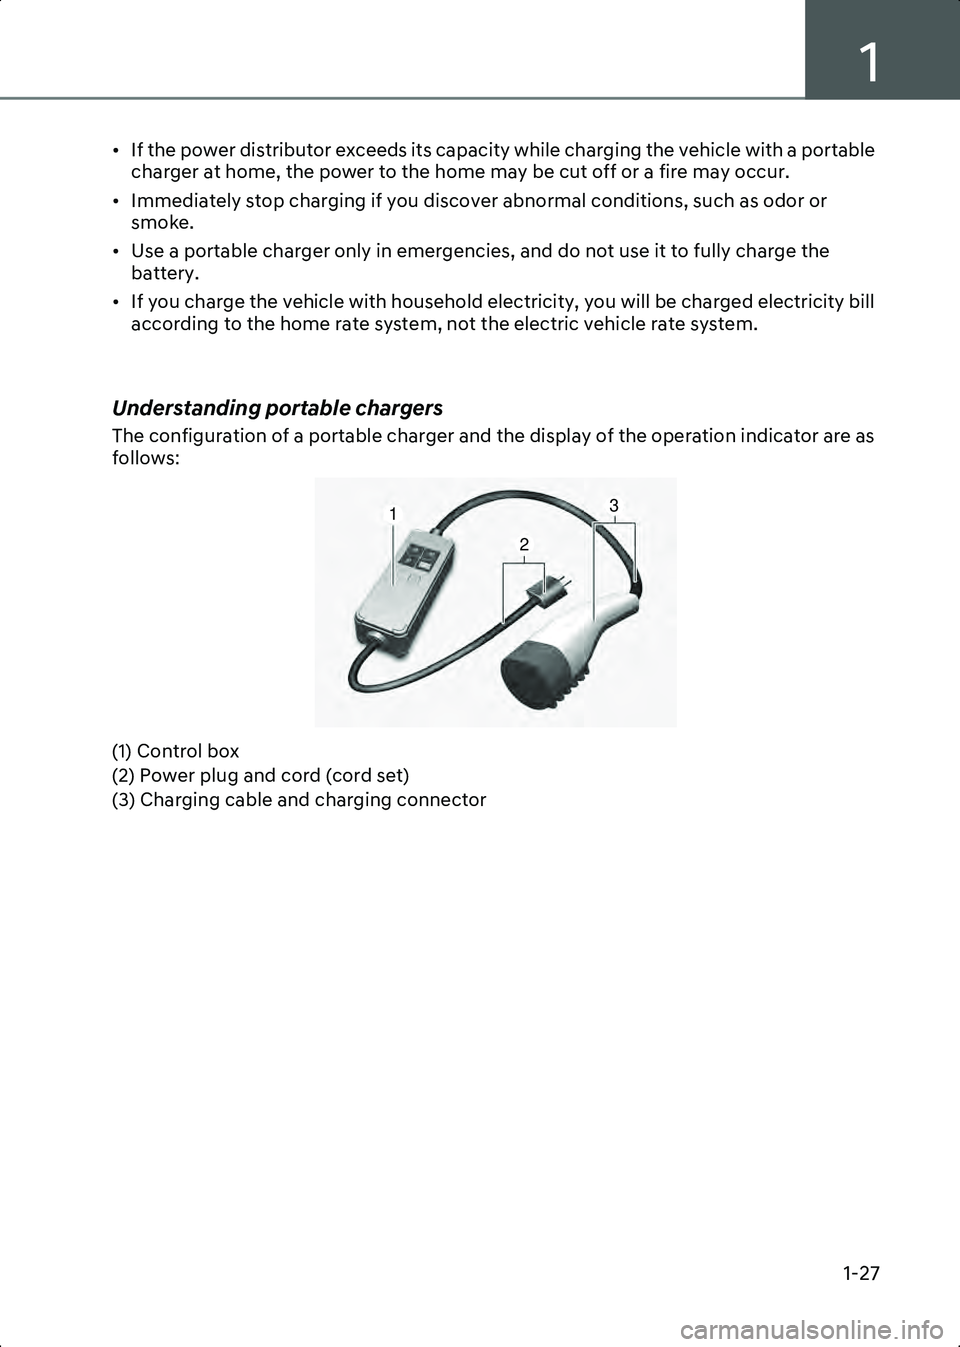
Understanding portable chargers
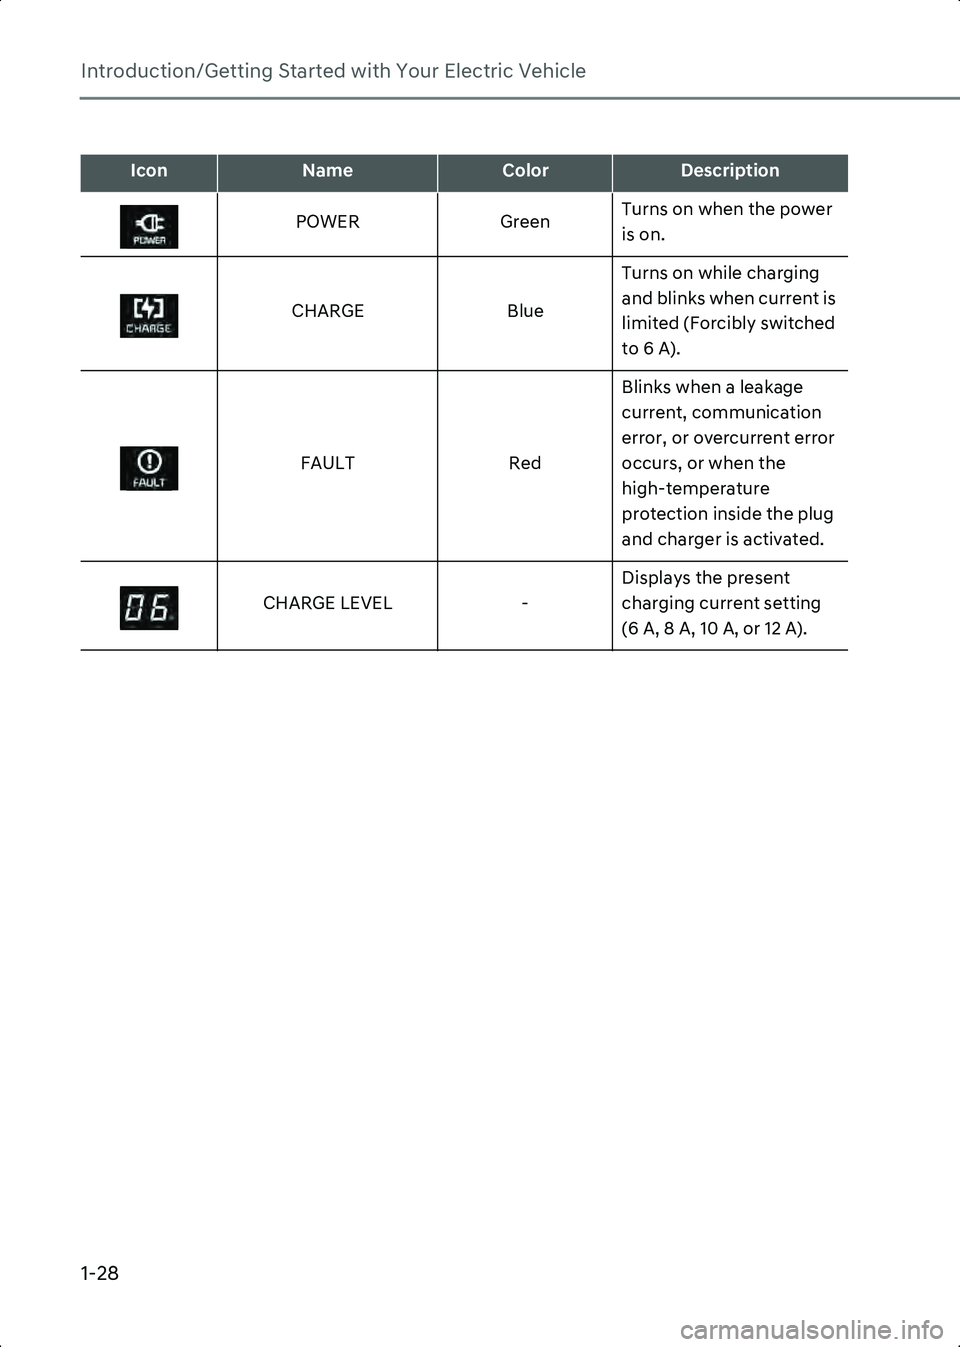
The configuration of a portable charger and the display of the operation indicator are as
follows:
B0001201(1) Control box
(2) Power plug and cord (cord set)
(3) Charging cable and charging connector
1
2
3
Hyundai_CE_en_US.book Page 27
Page 34 of 582
Introduction/Getting Started with Your Electric Vehicle
1-28
IconNameColorDescription
POWER GreenTurns on when the power
is on.
CHARGE BlueTurns on while charging
and blinks when current is
limited (Forcibly switched
to 6 A).
FAULT RedBlinks when a leakage
current, communication
error, or overcurrent error
occurs, or when the
high-temperature
protection inside the plug
and charger is activated.
CHARGE LEVEL -Displays the present
charging current setting
(6 A, 8 A, 10 A, or 12 A).
Hyundai_CE_en_US.book Page 28
Page 36 of 582
Introduction/Getting Started with Your Electric Vehicle
1-30
• If an error occurs, you can reset the portable charger by disconnecting and reconnecting the power plug, and then pressing the button on the control box for more
than two seconds.
• If the same symptom repeats after resetting the portable charger, have the vehicle inspected by an authorized HYUNDAI dealer.
• If there is no status change for more than one minute, the portable charger will be switched to power saving mode, and the display light will be turned off.
Charging with a portable charger
Follow the instructions below to charge the vehicle with a portable charger.
1. Connect the power plug of the portable charger to the electrical outlet at tour home.
• The power indicator light on the control box will turn green.
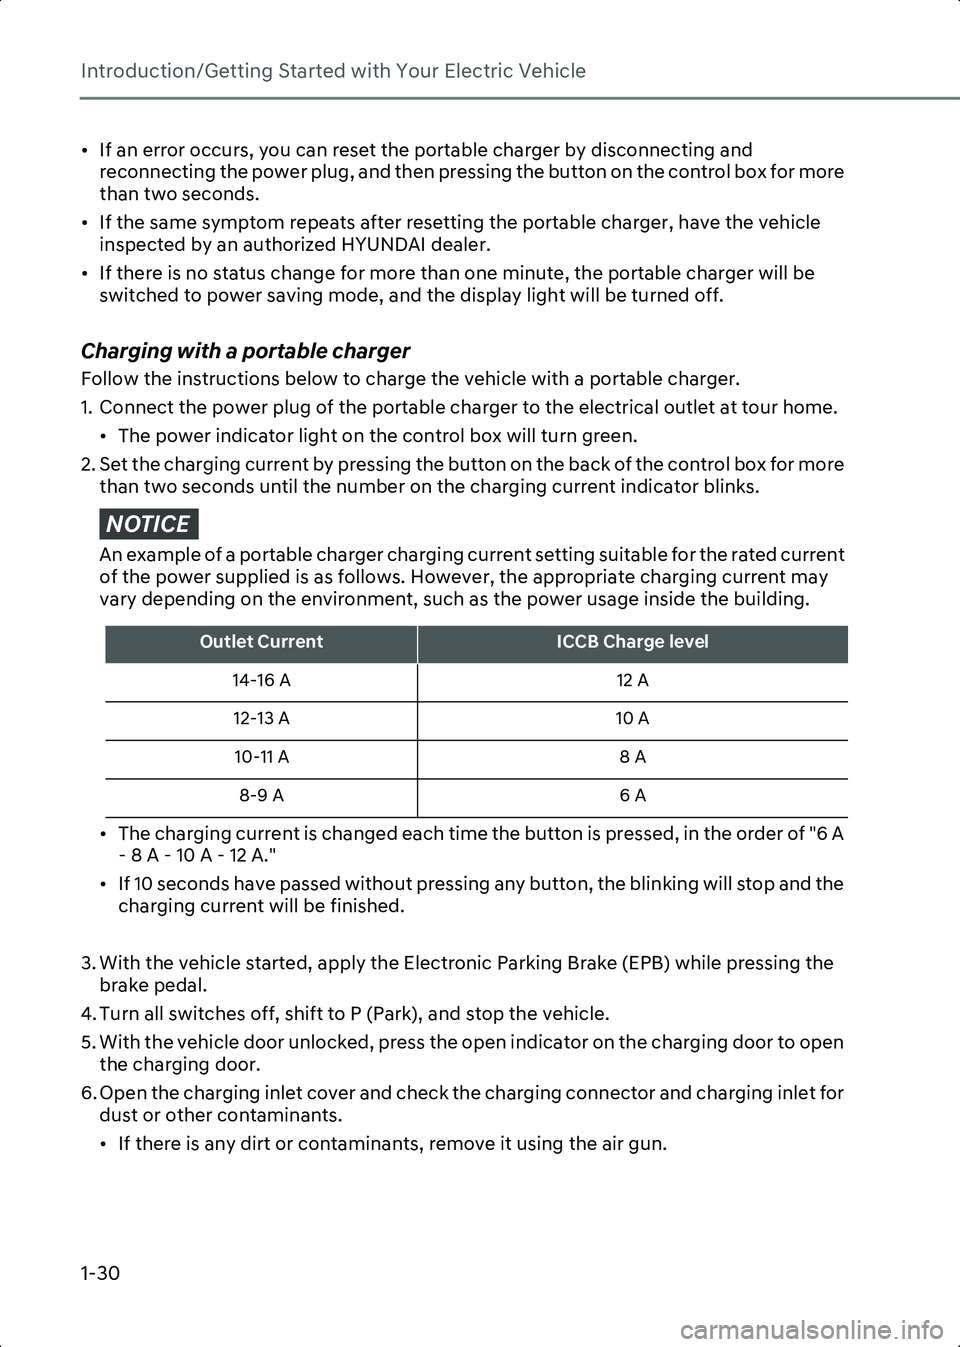
2. Set the charging current by pressing the button on the back of the control box for more than two seconds until the number on the charging current indicator blinks.
NOTICE An example of a portable charger charging current setting suitable for the rated current
of the power supplied is as follows. However, the appropriate charging current may
vary depending on the environment, such as the power usage inside the building.
• The charging current is changed each time the button is pressed, in the order of "6 A - 8 A - 10 A - 12 A."
• If 10 seconds have passed without pressing any button, the blinking will stop and the charging current will be finished.
3. With the vehicle started, apply the Electronic Parking Brake (EPB) while pressing the brake pedal.
4. Turn all switches off, shift to P (Park), and stop the vehicle.
5. With the vehicle door unlocked, press the open indicator on the charging door to open the charging door.
6. Open the charging inlet cover and check the charging connector and charging inlet for dust or other contaminants.
• If there is any dirt or contaminants, remove it using the air gun.
Outlet CurrentICCB Charge level
14-16 A 12 A
12-13 A 10 A
10-11 A 8 A
8-9 A 6 A
Hyundai_CE_en_US.book Page 30
Page 37 of 582
1
1-31
WARNING Do not touch interior of the charging connector of the charging cable or the charging
inlet of the vehicle.
7. Remove the charging connector protection cap of the portable charging cable, hold the charging connector handle, and connect it to the AC charging inlet of the vehicle.
Push it until you hear a click.
• When charging starts, the estimated charging time will be displayed on the instrument cluster for about one minute.
Information • If you open the driver’s door while charging, the estimated charging time will also be displayed on the instrument cluster for about one minute.
• When scheduled charging is set, a message saying “Waiting to charge at scheduled time” will be displayed.
• When scheduled air conditioner or heater operates while waiting for the scheduled charging, the estimated charging time will be displayed as ‘-’.
8. When charging is complete, hold the charging connector handle with the unlock button pressed and pull on the charging connector to disconnect it from the charging
inlet.
Information If you have set the charging connector locking mode as Alwaysor While Charging , unlock the
door by pressing the button on the smart key or the button on the driver’s door, and disconnect
the charging connector from the charging inlet.
• For more information, refer to the “Setting charging connector locking mode” section in this chapter.
9. Close the charging inlet cover.
10.Press the charging door to completely close it.
Using the scheduled charging function
The scheduled charging function allows you to charge your vehicle using low cost, late
night power until the next departure time.
Information You can use the scheduled charging function only when using an AC charger or the portable
charger (ICCB: In-Cable Control Box). For more information about connecting an AC charger and
portable charger, refer to the “Using an AC Charger”and “Using a Portable Charger (ICCB)”
section in this chapter.
Hyundai_CE_en_US.book Page 31
Page 39 of 582
1
1-33
Using EV Mode Functions
EV mode provides driving information and high voltage battery information. You can set
various electric vehicle functions in EV mode.
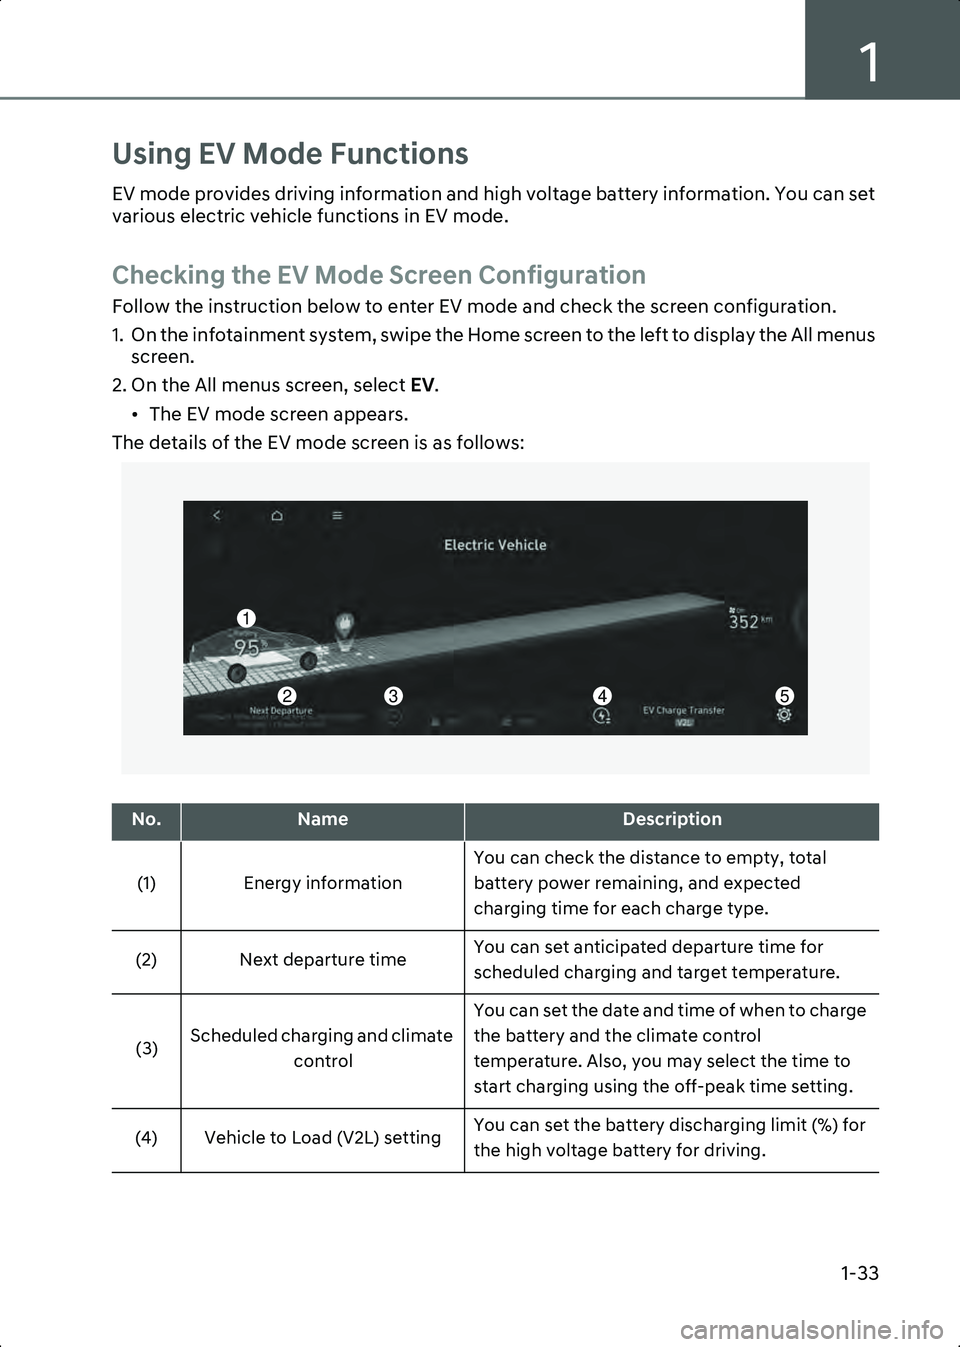
Checking the EV Mode Screen Configuration
Follow the instruction below to enter EV mode and check the screen configuration.
1. On the infotainment system, swipe the Home screen to the left to display the All menus screen.
2. On the All menus screen, select EV.
• The EV mode screen appears.
The details of the EV mode screen is as follows:
A0001601
No.NameDescription
(1) Energy information You can check the distance to empty, total
battery power remaining, and expected
charging time for each charge type.
(2) Next departure time You can set anticipated departure time for
scheduled charging and target temperature.
(3) Scheduled charging and climate
control You can set the date and time of when to charge
the battery and the climate control
temperature. Also, you may select the time to
start charging using the off-peak time setting.
(4) Vehicle to Load (V2L) setting You can set the battery discharging limit (%) for
the high voltage battery for driving.
1
2345
Hyundai_CE_en_US.book Page 33
Page 40 of 582
Introduction/Getting Started with Your Electric Vehicle
1-34
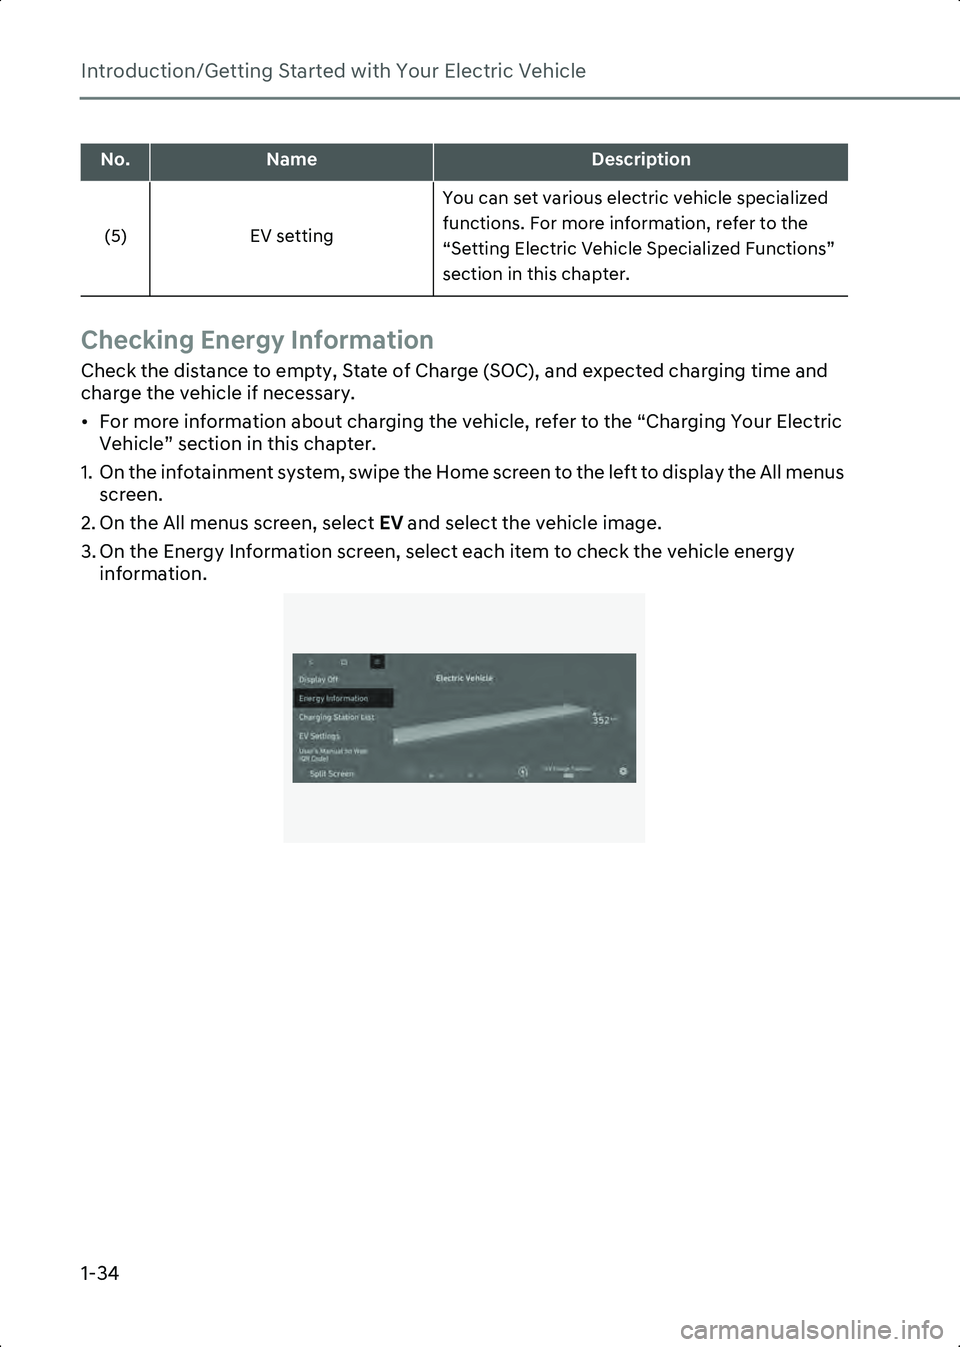
Checking Energy Information
Check the distance to empty, State of Charge (SOC), and expected charging time and
charge the vehicle if necessary.
• For more information about charging the vehicle, refer to the “Charging Your Electric Vehicle” section in this chapter.
1. On the infotainment system, swipe the Home screen to the left to display the All menus screen.
2. On the All menus screen, select EV and select the vehicle image.
3. On the Energy Information screen, select each item to check the vehicle energy information.
B0001701
(5) EV setting You can set various electric vehicle specialized
functions. For more information, refer to the
“Setting Electric Vehicle Specialized Functions”
section in this chapter.
No.NameDescription
Hyundai_CE_en_US.book Page 34
Page 43 of 582
1
1-37
Checking the electric energy economy history
On the Energy Information screen, select EV Electricity History.
• You can check the history of electric energy economy with the date and distance of previous driving.
B0001704
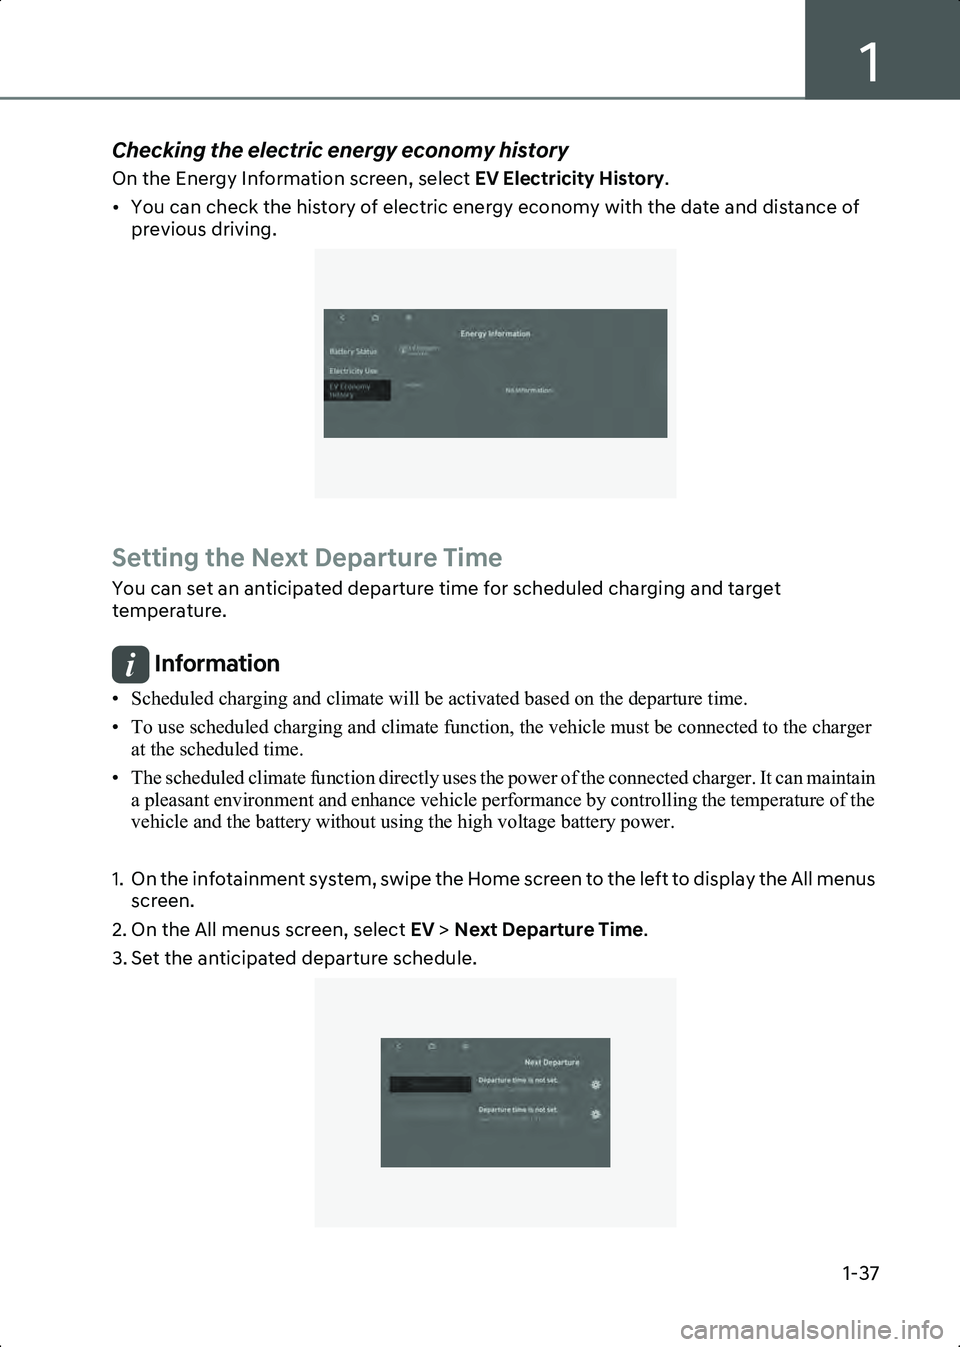
Setting the Next Departure Time
You can set an anticipated departure time for scheduled charging and target
temperature.
Information • Scheduled charging and climate will be activated based on the departure time.
• To use scheduled charging and climate function, the vehicle must be connected to the charger at the scheduled time.
• The scheduled climate function directly uses the power of the connected charger. It can maintain a pleasant environment and enhance vehicle performance by controlling the temperature of the
vehicle and the battery without using the high voltage battery power.
1. On the infotainment system, swipe the Home screen to the left to display the All menus screen.
2. On the All menus screen, select EV > Next Departure Time .
3. Set the anticipated departure schedule.
B0001801
Hyundai_CE_en_US.book Page 37