instrument cluster Hyundai Ioniq Hybrid 2017 User Guide
[x] Cancel search | Manufacturer: HYUNDAI, Model Year: 2017, Model line: Ioniq Hybrid, Model: Hyundai Ioniq Hybrid 2017Pages: 553, PDF Size: 59.51 MB
Page 238 of 553
3-136
Convenient features of your vehicle
The wireless charging process starts
when you put a Qi-enabled cellularphone on the wireless charging unit.
1. Remove other items, including thesmart key, from the wireless charg-
ing unit. If not, the wireless charg-
ing process may be interrupted.
2. The indicator illuminates in orange during the charging process. The
indicator color changes to green,when the charging process iscompleted.
3. You can turn ON or OFF the wire- less charging function in the user
settings mode on the instrument
cluster. (For further information,
refer to the “LCD Modes” in this
chapter.)
Slightly change the cellular phoneposition, when the cellular phone is
not being charged. Make sure that
the indicator illuminates in orange.
The indicator color may not change
to green in accordance with the cel-
lular phone type, even though the
charging process is completed. The
indicator blinks in orange for 10 sec-onds when there is a malfunctionwith the wireless charging system. In this case, temporarily stop the
charging process, and re-attempt to
wirelessly charge your cellular phoneagain.
The system warns you with a mes-
sage on the LCD display when you do
not take out the cellular phone fromthe wireless charging unit with thefront door open and the Engine
Start/Stop button in the OFF position.
The wireless cellular phone
charging system may not sup-
port certain cellular phones,
which are not verified for the Qi
specification ( ).
Locate your cell phone well in the middle of the wireless cellular
phone charging system. Even
when your cell phone locates
slightly to one side, the charging
speed may decrease.
The wireless charging process may temporarily stop, when a
smart key function operates (i.e.
starting the engine, opening the
doors, closing the doors). For certain cell phones, the indi-
cator color may not change to
green, even when the wireless
charging process is properlycompleted.
The wireless charging process may temporarily stop, when tempera-
ture abnormally increases inside
the wireless cellular phone charg-
ing system. The wireless charging
process restarts, when tempera-
ture falls to a proper level.
The wireless charging process may temporarily stop when there
is any metallic item, such as a
coin, between the wireless cellu-
lar phone charging system and a
cellular phone.
NOTICE
Page 304 of 553
5-20
Driving your vehicle
R (Reverse)
Use this position to drive the vehicle
backward.
Always come to a complete stop
before shifting into or out of R
(Reverse); you may damage the
transmission if you shift into R
(Reverse) while the vehicle is inmotion.
N (Neutral)
The wheels and transmission are not engaged.
D (Drive)
This is the normal driving position.
The transmission will automatically
shift through a 6-gear sequence, pro-
viding the best fuel economy and
power.
For extra power when passing anoth-
er vehicle or driving uphill, depress
the accelerator fully. The transmis-
sion will automatically downshift to
the next lower gear (or gears, as
appropriate).
If you drive the vehicle with the shift
lever in D (Drive), the vehicle will
automatically change to ECO mode.
The indicator will illuminate on
the instrument cluster.
When driving in ECO mode, the vehi-
cle improves fuel efficiency for eco-
friendly driving.
S (Sport)
If you drive the vehicle with the shift
lever in S (Sport), the vehicle will
automatically change to SPORT
mode. The indicator will illumi-
nate on the instrument cluster.
When driving in SPORT mode, the
vehicle provides sporty but firm rid-ing.Information
In SPORT mode, the fuel efficiency
may decrease.
i
NOTICE
Page 344 of 553
5-60
LKAS operation
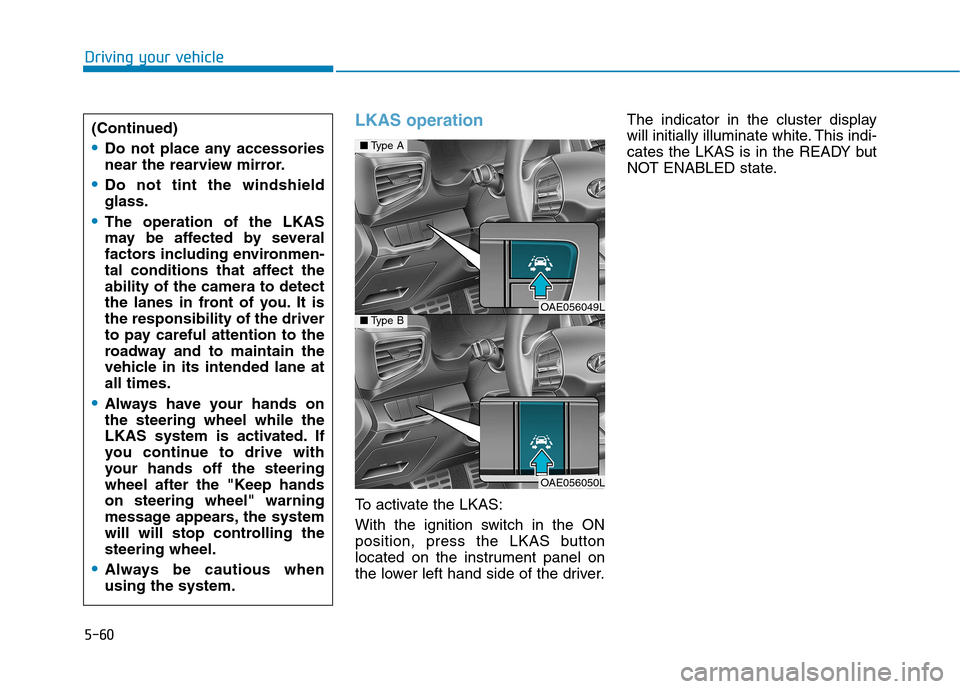
To activate the LKAS:
With the ignition switch in the ON
position, press the LKAS button
located on the instrument panel on
the lower left hand side of the driver.The indicator in the cluster display
will initially illuminate white. This indi-
cates the LKAS is in the READY but
NOT ENABLED state.
Driving your vehicle
(Continued)
Do not place any accessories
near the rearview mirror.
Do not tint the windshield glass.
The operation of the LKAS
may be affected by several
factors including environmen-
tal conditions that affect theability of the camera to detect
the lanes in front of you. It isthe responsibility of the driver
to pay careful attention to the
roadway and to maintain the
vehicle in its intended lane atall times.
Always have your hands on the steering wheel while the
LKAS system is activated. If
you continue to drive with
your hands off the steering
wheel after the "Keep handson steering wheel" warning
message appears, the system
will will stop controlling thesteering wheel.
Always be cautious when using the system.
■
Type A
OAE056049L■Type B
OAE056050L
Page 351 of 553
5-67
Driving your vehicle
5
Speed Limit Control operation
You can set the speed limit when you
do not want to drive over a specificspeed.
If you drive over the preset speed
limit, the warning system operates
(set speed limit will blink and chime
will sound) until the vehicle speed
returns within the speed limit.Information
While speed limit control is in opera-
tion, the cruise control system cannot
be activated.
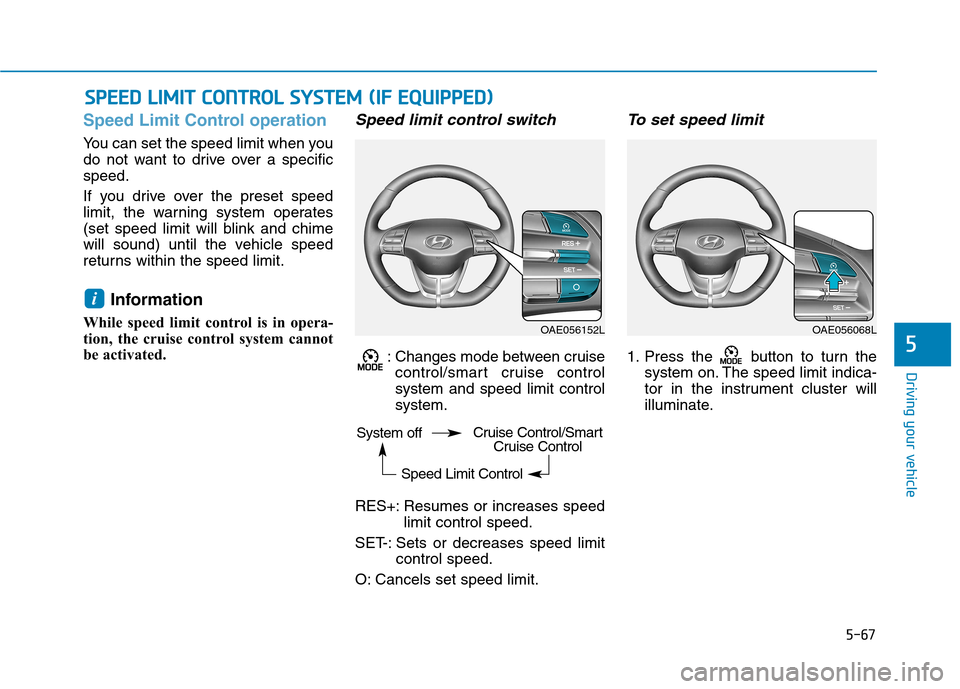
Speed limit control switch
: Changes mode between cruise control/smart cruise controlsystem and speed limit controlsystem.
RES+: Resumes or increases speed limit control speed.
SET-: Sets or decreases speed limit control speed.
O: Cancels set speed limit.
To set speed limit
1. Press the button to turn the system on. The speed limit indica-
tor in the instrument cluster will
illuminate.
i
SSPP EEEEDD LL IIMM IITT CC OO NNTTRR OO LL SS YY SSTT EEMM (( IIFF EE QQ UUIIPP PPEEDD ))
OAE056152LOAE056068L
System off
Speed Limit ControlCruise Control/SmartCruise Control
Page 352 of 553
5-68
Driving your vehicle
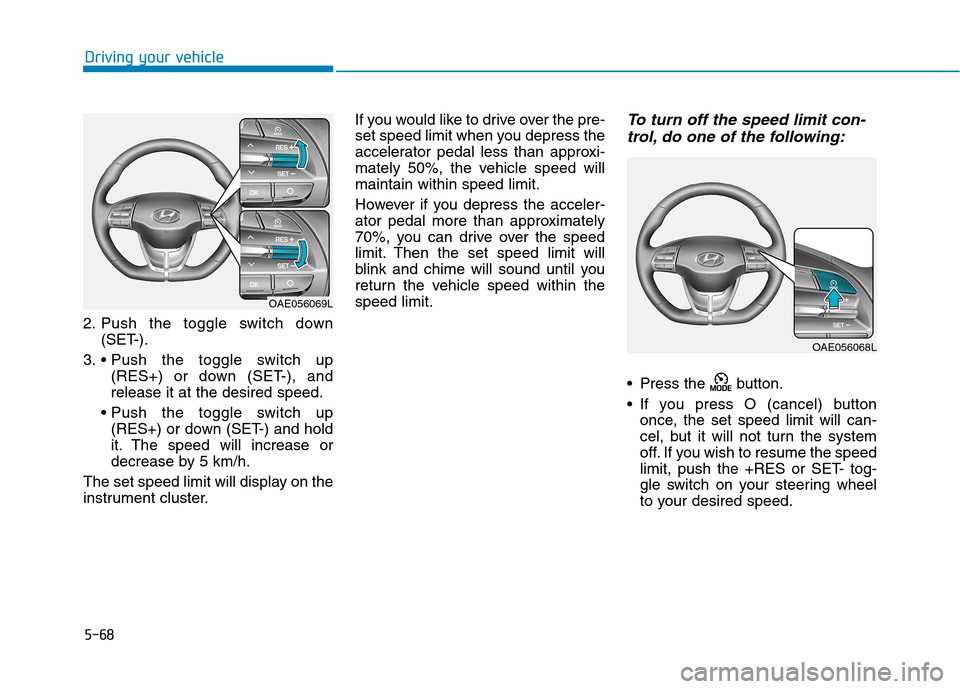
2. Push the toggle switch down(SET-).
3. (RES+) or down (SET-), and release it at the desired speed.
(RES+) or down (SET-) and hold
it. The speed will increase or
decrease by 5 km/h.
The set speed limit will display on the
instrument cluster. If you would like to drive over the pre-
set speed limit when you depress the
accelerator pedal less than approxi-
mately 50%, the vehicle speed willmaintain within speed limit.
However if you depress the acceler-
ator pedal more than approximately
70%, you can drive over the speed
limit. Then the set speed limit will
blink and chime will sound until you
return the vehicle speed within thespeed limit.
To turn off the speed limit con-
trol, do one of the following:
Press the button.
If you press O (cancel) button once, the set speed limit will can-
cel, but it will not turn the system
off. If you wish to resume the speed
limit, push the +RES or SET- tog-
gle switch on your steering wheel
to your desired speed.
OAE056069L
OAE056068L
Page 353 of 553
5-69
Driving your vehicle
5
Cruise Control operation
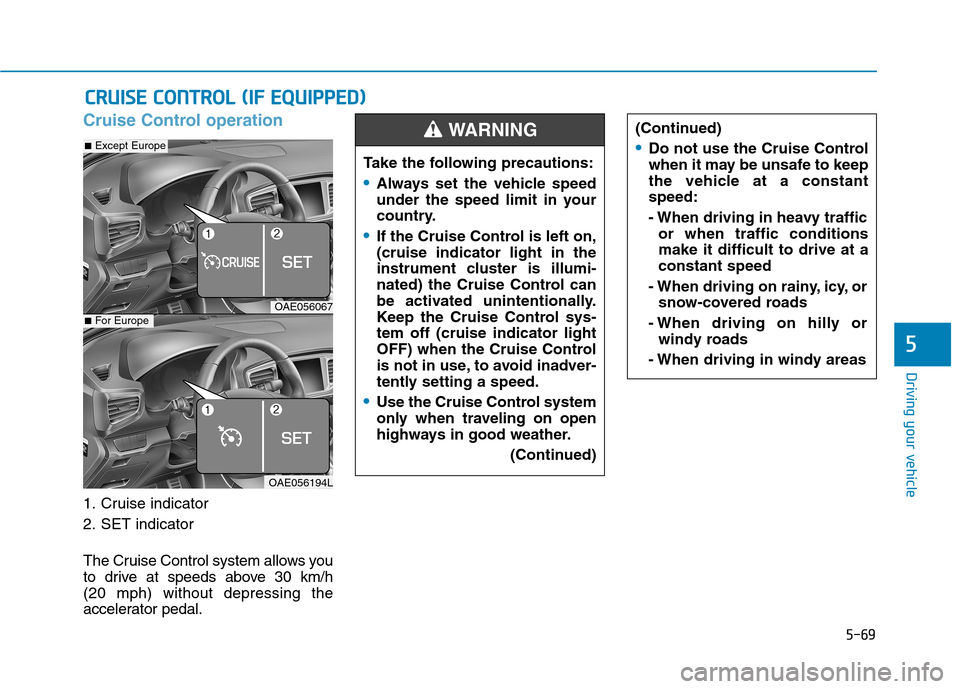
1. Cruise indicator
2. SET indicator
The Cruise Control system allows you
to drive at speeds above 30 km/h (20 mph) without depressing the
accelerator pedal.
CCRR UU IISS EE CC OO NNTTRR OO LL (( IIFF EE QQ UUIIPP PP EEDD ))
Take the following precautions:
Always set the vehicle speed
under the speed limit in your
country.
If the Cruise Control is left on, (cruise indicator light in the
instrument cluster is illumi-
nated) the Cruise Control can
be activated unintentionally.
Keep the Cruise Control sys-tem off (cruise indicator light
OFF) when the Cruise Control
is not in use, to avoid inadver-
tently setting a speed.
Use the Cruise Control system
only when traveling on open
highways in good weather.
(Continued)
(Continued)
Do not use the Cruise Control
when it may be unsafe to keep
the vehicle at a constantspeed:
- When driving in heavy trafficor when traffic conditions make it difficult to drive at aconstant speed
- When driving on rainy, icy, or snow-covered roads
- When driving on hilly or windy roads
- When driving in windy areas
WARNING
OAE056067
OAE056194L
■ Except Europe
■For Europe
Page 393 of 553
6-8
What to do in an emergency
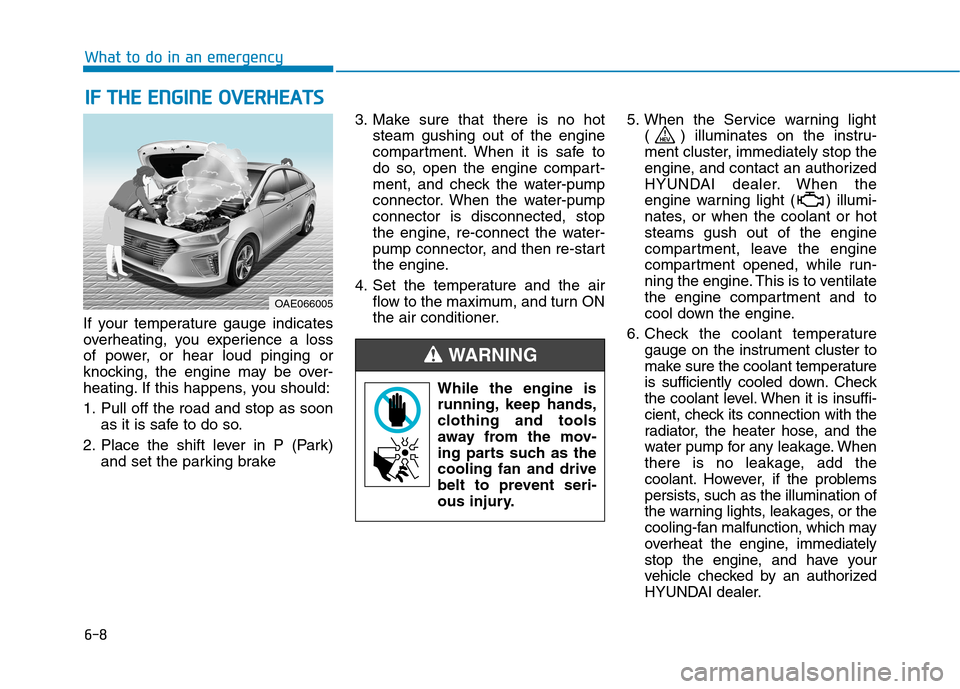
If your temperature gauge indicates
overheating, you experience a loss
of power, or hear loud pinging or
knocking, the engine may be over-
heating. If this happens, you should:
1. Pull off the road and stop as soonas it is safe to do so.
2. Place the shift lever in P (Park) and set the parking brake 3. Make sure that there is no hot
steam gushing out of the engine
compartment. When it is safe to
do so, open the engine compart-
ment, and check the water-pump
connector. When the water-pumpconnector is disconnected, stop
the engine, re-connect the water-
pump connector, and then re-start
the engine.
4. Set the temperature and the air flow to the maximum, and turn ON
the air conditioner. 5. When the Service warning light
( ) illuminates on the instru-
ment cluster, immediately stop the
engine, and contact an authorized
HYUNDAI dealer. When the
engine warning light ( ) illumi-
nates, or when the coolant or hotsteams gush out of the engine
compartment, leave the engine
compartment opened, while run-
ning the engine. This is to ventilate
the engine compartment and to
cool down the engine.
6. Check the coolant temperature gauge on the instrument cluster to
make sure the coolant temperature
is sufficiently cooled down. Check
the coolant level. When it is insuffi-
cient, check its connection with the
radiator, the heater hose, and the
water pump for any leakage. When
there is no leakage, add the
coolant. However, if the problems
persists, such as the illumination of
the warning lights, leakages, or the
cooling-fan malfunction, which may
overheat the engine, immediately
stop the engine, and have your
vehicle checked by an authorized
HYUNDAI dealer.
IIFF TT HH EE EE NN GGIINN EE OO VVEERR HH EEAA TTSS
While the engine is
running, keep hands,
clothing and tools
away from the mov-
ing parts such as thecooling fan and drive
belt to prevent seri-
ous injury.
WARNING
OAE066005
Page 478 of 553
7-57
7
Maintenance
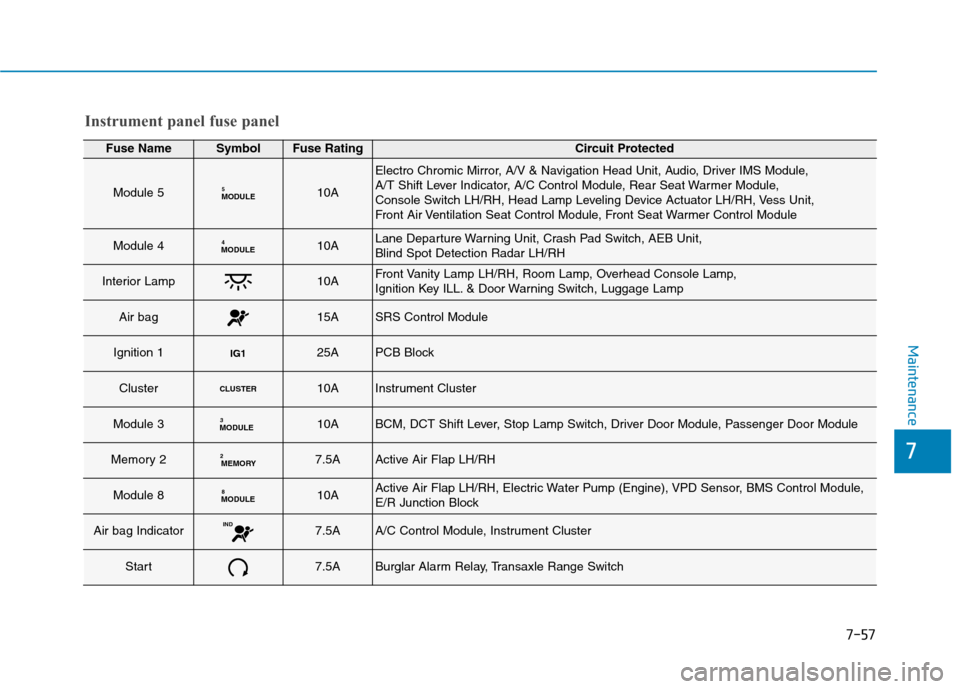
Instrument panel fuse panel
Fuse NameSymbolFuse RatingCircuit Protected
Module 5MODULE510A
Electro Chromic Mirror, A/V & Navigation Head Unit, Audio, Driver IMS Module,
A/T Shift Lever Indicator, A/C Control Module, Rear Seat Warmer Module,
Console Switch LH/RH, Head Lamp Leveling Device Actuator LH/RH, Vess Unit,
Front Air Ventilation Seat Control Module, Front Seat Warmer Control Module
Module 4MODULE410ALane Departure Warning Unit, Crash Pad Switch, AEB Unit, Blind Spot Detection Radar LH/RH
Interior Lamp10AFront Vanity Lamp LH/RH, Room Lamp, Overhead Console Lamp,
Ignition Key ILL. & Door Warning Switch, Luggage Lamp
Air bag15ASRS Control Module
Ignition 1IG125APCB Block
ClusterCLUSTER10AInstrument Cluster
Module 3MODULE310ABCM, DCT Shift Lever, Stop Lamp Switch, Driver Door Module, Passenger Door Module
Memory 2MEMORY
27.5AActive Air Flap LH/RH
Module 8MODULE 810AActive Air Flap LH/RH, Electric Water Pump (Engine), VPD Sensor, BMS Control Module,
E/R Junction Block
Air bag IndicatorIND7.5AA/C Control Module, Instrument Cluster
Start7.5ABurglar Alarm Relay, Transaxle Range Switch
Page 479 of 553
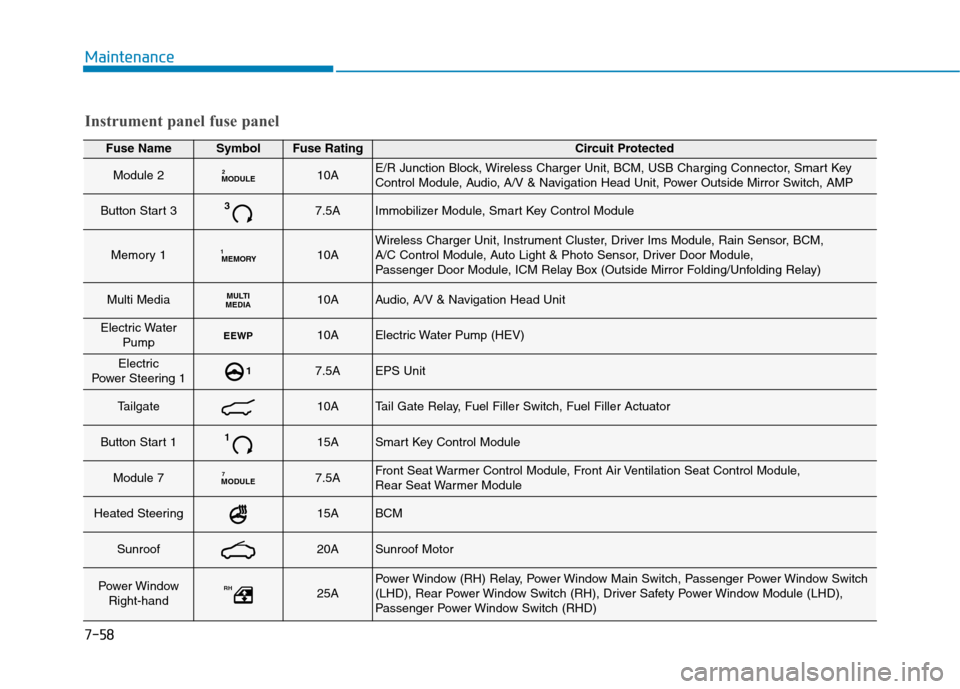
7-58
Maintenance
Fuse NameSymbolFuse RatingCircuit Protected
Module 2MODULE210AE/R Junction Block, Wireless Charger Unit, BCM, USB Charging Connector, Smart Key
Control Module, Audio, A/V & Navigation Head Unit, Power Outside Mirror Switch, AMP
Button Start 337.5AImmobilizer Module, Smart Key Control Module
Memory 1MEMORY
110AWireless Charger Unit, Instrument Cluster, Driver Ims Module, Rain Sensor, BCM,
A/C Control Module, Auto Light & Photo Sensor, Driver Door Module,
Passenger Door Module, ICM Relay Box (Outside Mirror Folding/Unfolding Relay)
Multi MediaMULTI
MEDIA10AAudio, A/V & Navigation Head Unit
Electric Water
PumpEEWP10AElectric Water Pump (HEV)
Electric
Power Steering 117.5AEPS Unit
Tailgate10ATail Gate Relay, Fuel Filler Switch, Fuel Filler Actuator
Button Start 1115ASmart Key Control Module
Module 7MODULE 77.5AFront Seat Warmer Control Module, Front Air Ventilation Seat Control Module,
Rear Seat Warmer Module
Heated Steering15ABCM
Sunroof20ASunroof Motor
Power Window
Right-handRH25APower Window (RH) Relay, Power Window Main Switch, Passenger Power Window Switch
(LHD), Rear Power Window Switch (RH), Driver Safety Power Window Module (LHD),
Passenger Power Window Switch (RHD)
Instrument panel fuse panel
Page 545 of 553
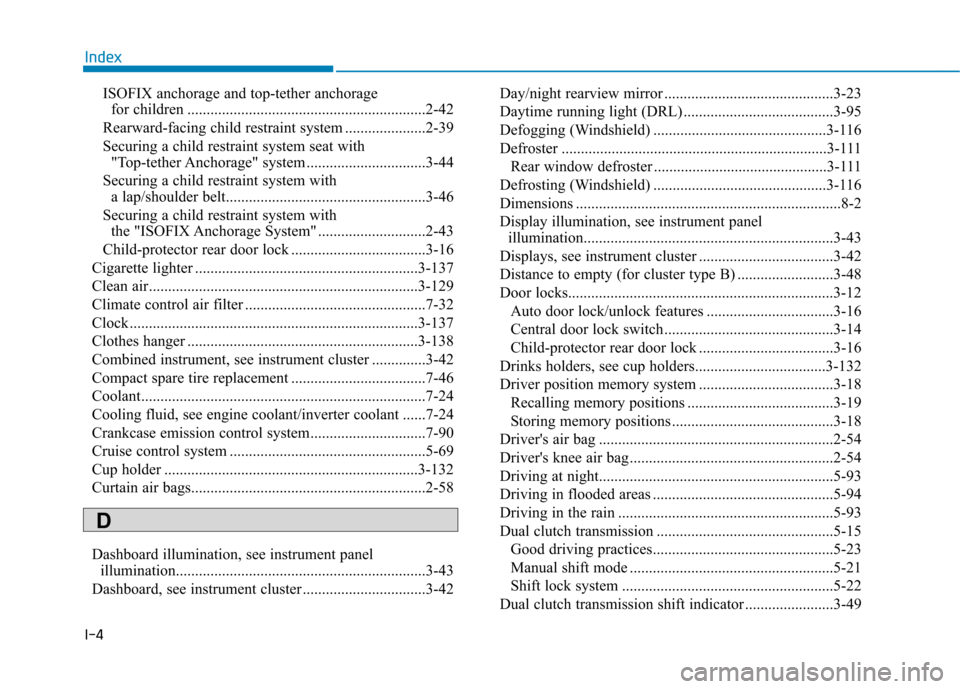
I-4ISOFIX anchorage and top-tether anchorage
for children ..............................................................2-42
Rearward-facing child restraint system .....................2-39
Securing a child restraint system seat with "Top-tether Anchorage" system ...............................3-44
Securing a child restraint system with a lap/shoulder belt....................................................3-46
Securing a child restraint system with the "ISOFIX Anchorage System" ............................2-43
Child-protector rear door lock ...................................3-16
Cigarette lighter ..........................................................3-137
Clean air......................................................................3-129
Climate control air filter ...............................................7-32
Clock ...........................................................................3-137
Clothes hanger ............................................................3-138
Combined instrument, see instrument cluster ..............3-42
Compact spare tire replacement ...................................7-46
Coolant..........................................................................7-24
Cooling fluid, see engine coolant/inverter coolant ......7-24
Crankcase emission control system..............................7-90
Cruise control system ...................................................5-69
Cup holder ..................................................................3-132
Curtain air bags.............................................................2-58
Dashboard illumination, see instrument panel illumination.................................................................3-43
Dashboard, see instrument cluster ................................3-42 Day/night rearview mirror ............................................3-23
Daytime running light (DRL) .......................................3-95
Defogging (Windshield) .............................................3-116
Defroster .....................................................................3-111
Rear window defroster .............................................3-111
Defrosting (Windshield) .............................................3-116
Dimensions .....................................................................8-2
Display illumination, see instrument panel illumination.................................................................3-43
Displays, see instrument cluster ...................................3-42
Distance to empty (for cluster type B) .........................3-48
Door locks.....................................................................3-12 Auto door lock/unlock features .................................3-16
Central door lock switch ............................................3-14
Child-protector rear door lock ...................................3-16
Drinks holders, see cup holders..................................3-132
Driver position memory system ...................................3-18 Recalling memory positions ......................................3-19
Storing memory positions ..........................................3-18
Driver's air bag .............................................................2-54
Driver's knee air bag .....................................................2-54
Driving at night.............................................................5-93
Driving in flooded areas ...............................................5-94
Driving in the rain ........................................................5-93
Dual clutch transmission ..............................................5-15 Good driving practices...............................................5-23
Manual shift mode .....................................................5-21
Shift lock system .......................................................5-22
Dual clutch transmission shift indicator .......................3-49
Index
D