Lamp Hyundai Ioniq Hybrid 2017 Owner's Guide
[x] Cancel search | Manufacturer: HYUNDAI, Model Year: 2017, Model line: Ioniq Hybrid, Model: Hyundai Ioniq Hybrid 2017Pages: 553, PDF Size: 59.51 MB
Page 427 of 553
7-6
Maintenance
While operating your vehicle:
Note any changes in the sound ofthe exhaust or any smell of
exhaust fumes in the vehicle.
Check for vibrations in the steering wheel. Notice if there is any
increased steering effort or loose-
ness in the steering wheel, or
change in its straight-ahead posi-tion.
Notice if your vehicle constantly turns slightly or “pulls” to one side
when traveling on smooth, levelroad.
When stopping, listen and check for unusual sounds, pulling to one
side, increased brake pedal travel
or “hard-to-push” brake pedal.
If any slipping or changes in the operation of your transmission
occurs, check the transmission
fluid level.
Check the dual clutch transmission P (Park) function.
Check the parking brake.
Check for fluid leaks under your vehicle (water dripping from the air
conditioning system during or after
use is normal).
At least monthly:
Check coolant level in the enginecoolant reservoir.
Check the operation of all exterior lights, including the stoplights, turn
signals and hazard warning flashers.
Check the inflation pressures of all tires including the spare for tires
that are worn, show uneven wear,or are damaged.
Check for loose wheel lug nuts.
At least twice a year: (i.e., every Spring and Fall)
Check radiator, heater and air condi- tioning hoses for leaks or damage.
Check windshield washer spray and wiper operation. Clean wiper
blades with clean cloth dampened
with washer fluid.
Check headlamp alignment.
Check muffler, exhaust pipes, shields and clamps.
Check the seat belts for wear and function.
At least once a year:
Clean body and door drain holes.
Lubricate door hinges and hoodhinges.
Lubricate door and hood locks and latches.
Lubricate door rubber weather strips.
Check the air conditioning system.
Inspect and lubricate automatic transaxle linkage and controls.
Clean the battery and terminals.
Check the brake fluid level.
Page 442 of 553
7-21
7
Maintenance
Dual clutch transmission fluid
The dual clutch transmission fluid should be inspected according to the
intervals specified in the mainte-
nance schedule.
Engine clutch actuator fluid
The engine clutch actuator fluid level should be inspected or replaced to
the intervals specified in the mainte-
nance schedule.
Brake hoses and lines
Visually check for proper installation,
chafing, cracks, deterioration and
any leakage. Replace any deteriorat-
ed or damaged parts immediately.
Brake fluid
Check brake fluid level in the brake
fluid reservoir. The level should be
between the MIN and the MAX
marks on the side of the reservoir.
Use only hydraulic brake fluid con-
forming to DOT 3 or DOT 4 specifi-cation.
Parking brake
Inspect the parking brake system
including the parking brake pedal
and cables.
Brake discs, pads, calipers
and rotors
Check the pads, the disc, and the
rotor for any excessive wear-out.
Inspect calipers for any fluid leakage
For more information on checking
the pads or lining wear limit, refer to
the HYUNDAI web site. (http://ser
vice.hyundai-motor.com)
Exhaust pipe and muffler
Visually inspect the exhaust pipes,
muffler and hangers for cracks, dete-
rioration, or damage. Start the
engine and listen carefully for any
exhaust gas leakage. Tighten con-
nections or replace parts as neces-
sary.
Suspension mounting bolts
Check the suspension connections
for looseness or damage. Retighten
to the specified torque.
Steering gear box, linkage &
boots/lower arm ball joint
With the vehicle stopped and the
hybrid system off, check for exces-
sive free-play in the steering wheel.
Check the linkage for bends or dam-
age. Check the dust boots and ball
joints for deterioration, cracks, or
damage.
Replace any damaged parts.
Drive shafts and boots
Check the drive shafts, boots and
clamps for cracks, deterioration, or
damage. Replace any damaged
parts and, if necessary, repack the
grease.
Air conditioning refrigerant
Check the air conditioning lines and
connections for leakage and damage.
Page 460 of 553
7-39
7
Maintenance
Battery recharging
By battery charger
Your vehicle has a maintenance-free,
calcium-based battery.
If the battery becomes dischargedin a short time (because, for exam-
ple, the headlights or interior lights
were left on while the vehicle was
not in use), recharge it by slow
charging (trickle) for 10 hours.
If the battery gradually discharges because of high electric load while
the vehicle is being used, recharge
it at 20-30A for two hours. Always follow these instructions
when recharging your vehicle’s
battery to avoid the risk of SERI-
OUS INJURY or DEATH from
explosions or acid burns:
Before performing mainte-
nance or recharging the bat-
tery, turn off all accessories
and place the Engine Start/
Stop button to the OFF posi-tion.
Keep all flames, sparks, or
smoking materials away from
the battery.
Always work outdoors or in an area with plenty of ventilation.
Wear eye protection when
checking the battery during
charging.
The battery must be removed
from the vehicle and placed ina well ventilated area.
(Continued)
WARNING (Continued)
Watch the battery during
charging, and stop or reduce
the charging rate if the battery
cells begin boiling violently.
The negative battery cable
must be removed first and
installed last when the battery
is disconnected. Disconnect
the battery charger in the fol-
lowing order:
(1) Turn off the battery chargermain switch.
(2) Unhook the negative
clamp from the negative
battery terminal.
(3) Unhook the positive clamp from the positive batteryterminal.
Always use a genuine HYUNDAI
approved battery when you
replace the battery.
Page 474 of 553
7-53
Maintenance
Instrument panel fuse replace- ment
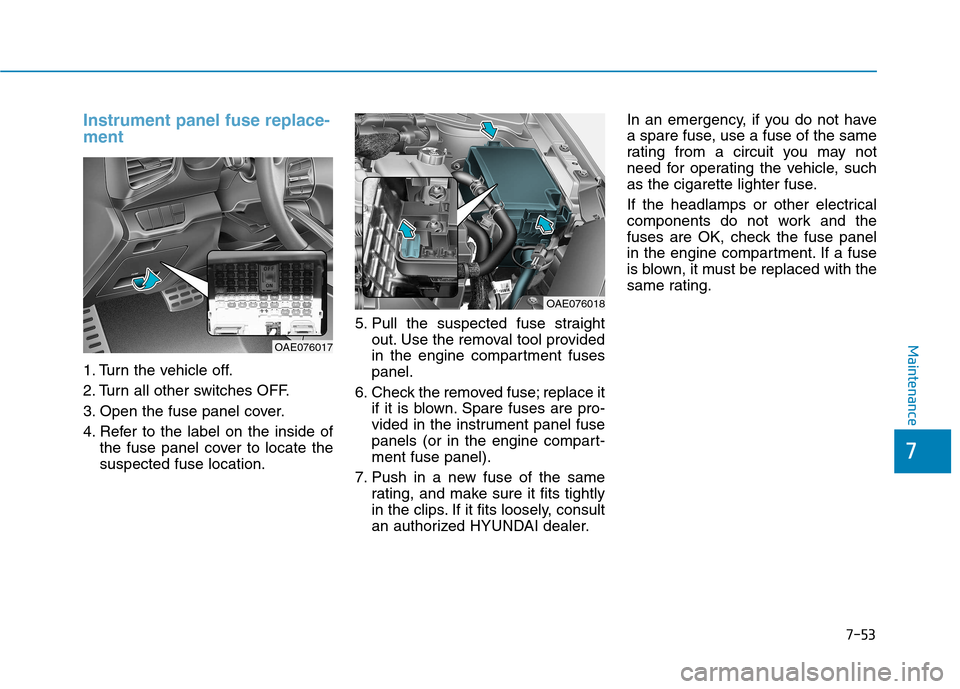
1. Turn the vehicle off.
2. Turn all other switches OFF.
3. Open the fuse panel cover.
4. Refer to the label on the inside ofthe fuse panel cover to locate the suspected fuse location. 5. Pull the suspected fuse straight
out. Use the removal tool provided
in the engine compartment fusespanel.
6. Check the removed fuse; replace it if it is blown. Spare fuses are pro-
vided in the instrument panel fuse
panels (or in the engine compart-ment fuse panel).
7. Push in a new fuse of the same rating, and make sure it fits tightly
in the clips. If it fits loosely, consult
an authorized HYUNDAI dealer. In an emergency, if you do not have
a spare fuse, use a fuse of the same
rating from a circuit you may not
need for operating the vehicle, such
as the cigarette lighter fuse.
If the headlamps or other electrical
components do not work and the
fuses are OK, check the fuse panel
in the engine compartment. If a fuse
is blown, it must be replaced with the
same rating.
OAE076017
OAE076018
7
Page 478 of 553
7-57
7
Maintenance
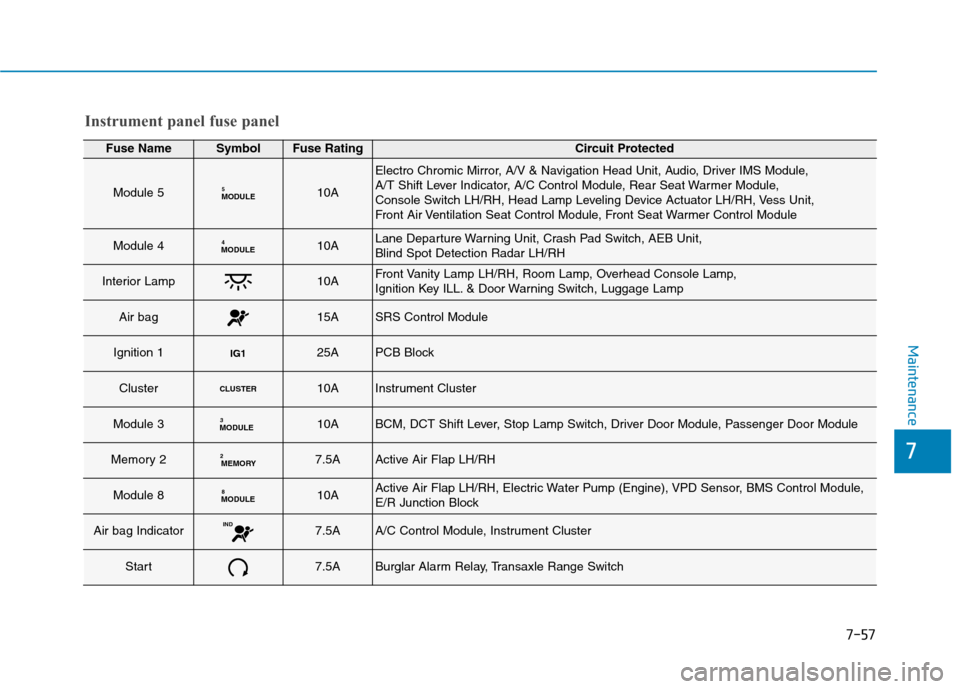
Instrument panel fuse panel
Fuse NameSymbolFuse RatingCircuit Protected
Module 5MODULE510A
Electro Chromic Mirror, A/V & Navigation Head Unit, Audio, Driver IMS Module,
A/T Shift Lever Indicator, A/C Control Module, Rear Seat Warmer Module,
Console Switch LH/RH, Head Lamp Leveling Device Actuator LH/RH, Vess Unit,
Front Air Ventilation Seat Control Module, Front Seat Warmer Control Module
Module 4MODULE410ALane Departure Warning Unit, Crash Pad Switch, AEB Unit, Blind Spot Detection Radar LH/RH
Interior Lamp10AFront Vanity Lamp LH/RH, Room Lamp, Overhead Console Lamp,
Ignition Key ILL. & Door Warning Switch, Luggage Lamp
Air bag15ASRS Control Module
Ignition 1IG125APCB Block
ClusterCLUSTER10AInstrument Cluster
Module 3MODULE310ABCM, DCT Shift Lever, Stop Lamp Switch, Driver Door Module, Passenger Door Module
Memory 2MEMORY
27.5AActive Air Flap LH/RH
Module 8MODULE 810AActive Air Flap LH/RH, Electric Water Pump (Engine), VPD Sensor, BMS Control Module,
E/R Junction Block
Air bag IndicatorIND7.5AA/C Control Module, Instrument Cluster
Start7.5ABurglar Alarm Relay, Transaxle Range Switch
Page 480 of 553
7-59
7
Maintenance
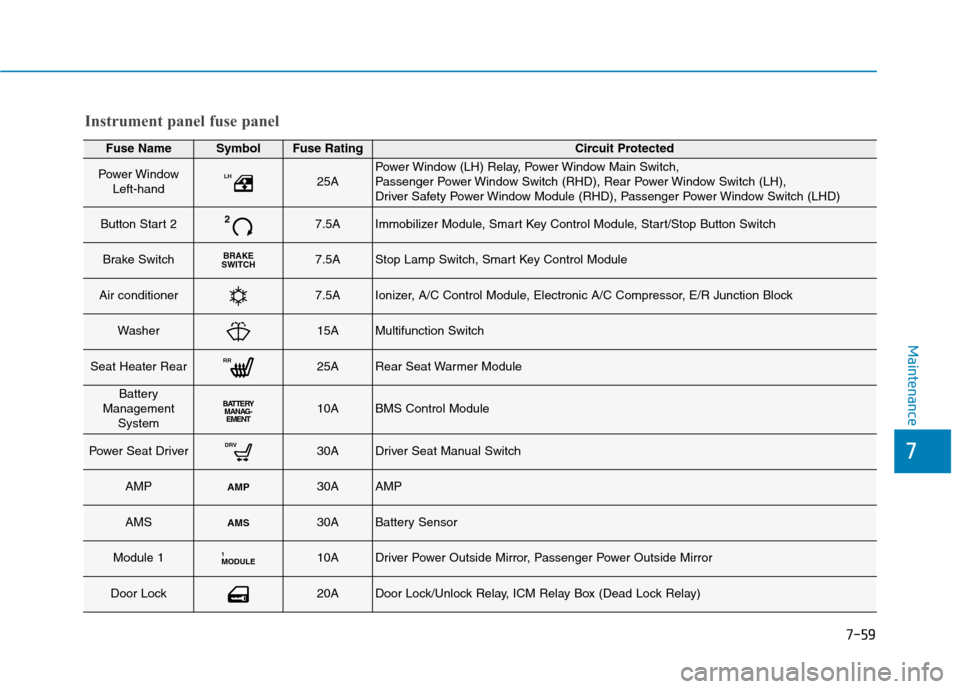
Fuse NameSymbolFuse RatingCircuit Protected
Power WindowLeft-handLH25APower Window (LH) Relay, Power Window Main Switch,
Passenger Power Window Switch (RHD), Rear Power Window Switch (LH),
Driver Safety Power Window Module (RHD), Passenger Power Window Switch (LHD)
Button Start 227.5AImmobilizer Module, Smart Key Control Module, Start/Stop Button Switch
Brake SwitchBRAKE
S WITCH7.5AStop Lamp Switch, Smart Key Control Module
Air conditioner7.5AIonizer, A/C Control Module, Electronic A/C Compressor, E/R Junction Block
Washer15AMultifunction Switch
Seat Heater RearRR25ARear Seat Warmer Module
Battery
Management SystemBATTERYMANAG-EMENT10ABMS Control Module
Power Seat DriverDRV30ADriver Seat Manual Switch
AMPAMP30AAMP
AMSAM S30ABattery Sensor
Module 1MODULE110ADriver Power Outside Mirror, Passenger Power Outside Mirror
Door Lock20ADoor Lock/Unlock Relay, ICM Relay Box (Dead Lock Relay)
Instrument panel fuse panel
Page 484 of 553
7-63
7
Maintenance
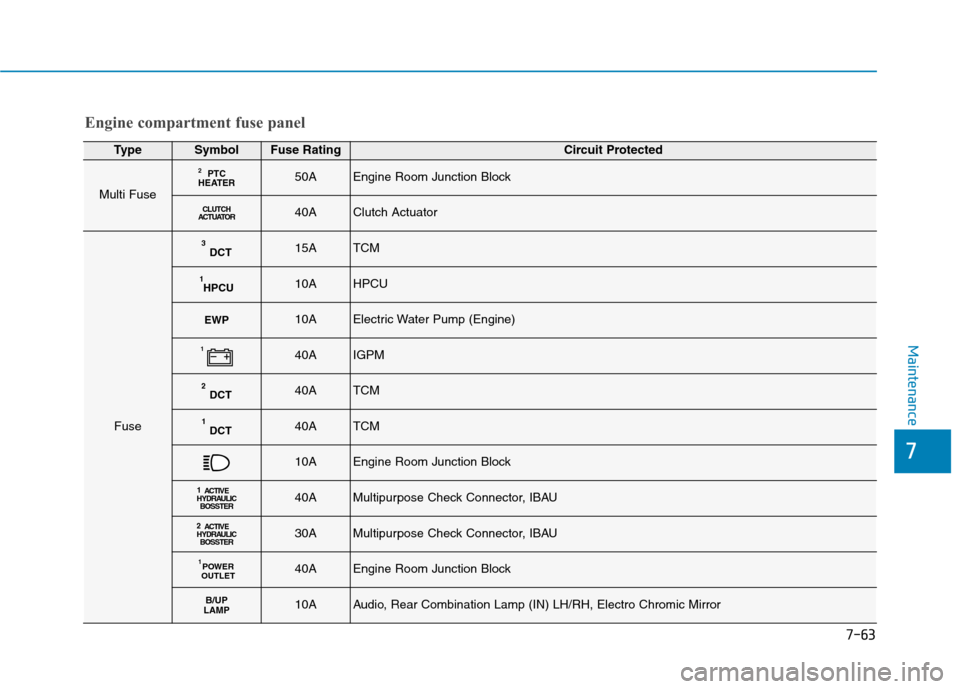
TypeSymbolFuse RatingCircuit Protected
Multi Fuse
PTC
HEATER 250AEngine Room Junction Block
CLUTCH
ACTUATOR40AClutch Actuator
Fuse
DCT
315ATCM
HPCU
110AHPCU
EWP10AElectric Water Pump (Engine)
140AIGPM
DCT
240ATCM
DCT
140ATCM
10AEngine Room Junction Block
1
ACTIVE
HYDRAULIC BO SSTER40AMultipurpose Check Connector, IBAU
2
ACTIVE
HYDRAULIC BO SSTER30AMultipurpose Check Connector, IBAU
POWER
OUTLET140AEngine Room Junction Block
B/UP
LAMP10AAudio, Rear Combination Lamp (IN) LH/RH, Electro Chromic Mirror
Engine compartment fuse panel
Page 487 of 553
7-66
MaintenanceL
L IIGG HH TT BB UU LLBB SS
Consult an authorized HYUNDAI
dealer to replace most vehicle light
bulbs. It is difficult to replace vehicle
light bulbs because other parts of the
vehicle must be removed before you
can get to the bulb. This is especially
true for removing the headlamp
assembly to get to the bulb(s).
Removing/installing the headlamp
assembly can result in damage to
the vehicle.
Information
After heavy driving, rain or washing,
the lamps could appear frosty. This
condition is caused by the temperature
difference between the lamp inside and
the outside temperature. This is similar
to the condensation on your windows
inside your vehicle during the rain and
doesn’t indicate a problem with your
vehicle. If the water leaks into the light
bulb circuitry, have your vehicle
checked by an authorized HYUNDAI
dealer. Information
A normally functioning lamp may flicker momentarily to stabilize the
vehicle’s electrical control system.
However, if the lamp goes out after
flickering momentarily, or contin-
ues to flicker, we recommend the
system be checked by an authorized
HYUNDAI dealer.
The position lamp may not turn on when the position lamp switch is
turned on, but the position lamp and
headlamp switch may turn on when
the headlamp switch is turned on.
This may be caused by network fail-
ure or vehicle electrical control sys-
tem malfunction. If this occurs, we
recommend the system be checked
by an authorized HYUNDAI dealer.i
i
Prior to replacing a lamp,
depress the foot brake, move
the shift lever into P (Park),
apply the parking brake, place
the ignition switch in the
LOCK/OFF position, and take
the key with you when leaving
the vehicle to avoid sudden
movement of the vehicle and
to prevent possible electric
shock.
Be aware the bulbs may be hot
and may burn your fingers.
WARNING
Page 488 of 553
7-67
7
Maintenance
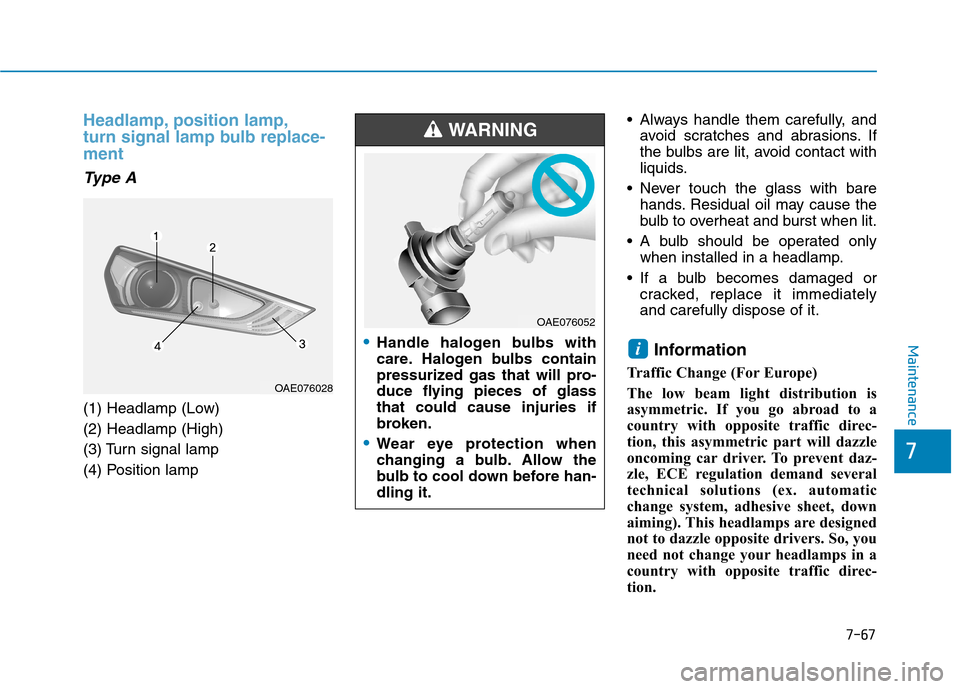
Headlamp, position lamp,
turn signal lamp bulb replace-ment
Type A
(1) Headlamp (Low) (2) Headlamp (High)
(3) Turn signal lamp
(4) Position lamp Always handle them carefully, and
avoid scratches and abrasions. If
the bulbs are lit, avoid contact with
liquids.
Never touch the glass with bare hands. Residual oil may cause the
bulb to overheat and burst when lit.
A bulb should be operated only when installed in a headlamp.
If a bulb becomes damaged or cracked, replace it immediatelyand carefully dispose of it.
Information
Traffic Change (For Europe)
The low beam light distribution is
asymmetric. If you go abroad to a
country with opposite traffic direc-
tion, this asymmetric part will dazzle
oncoming car driver. To prevent daz-
zle, ECE regulation demand several
technical solutions (ex. automatic
change system, adhesive sheet, down
aiming). This headlamps are designed
not to dazzle opposite drivers. So, you
need not change your headlamps in a
country with opposite traffic direc-
tion.
i
OAE076028
Handle halogen bulbs with
care. Halogen bulbs contain
pressurized gas that will pro-
duce flying pieces of glassthat could cause injuries if
broken.
Wear eye protection when
changing a bulb. Allow the
bulb to cool down before han-dling it.
WARNING
OAE076052
Page 489 of 553
7-68
Maintenance
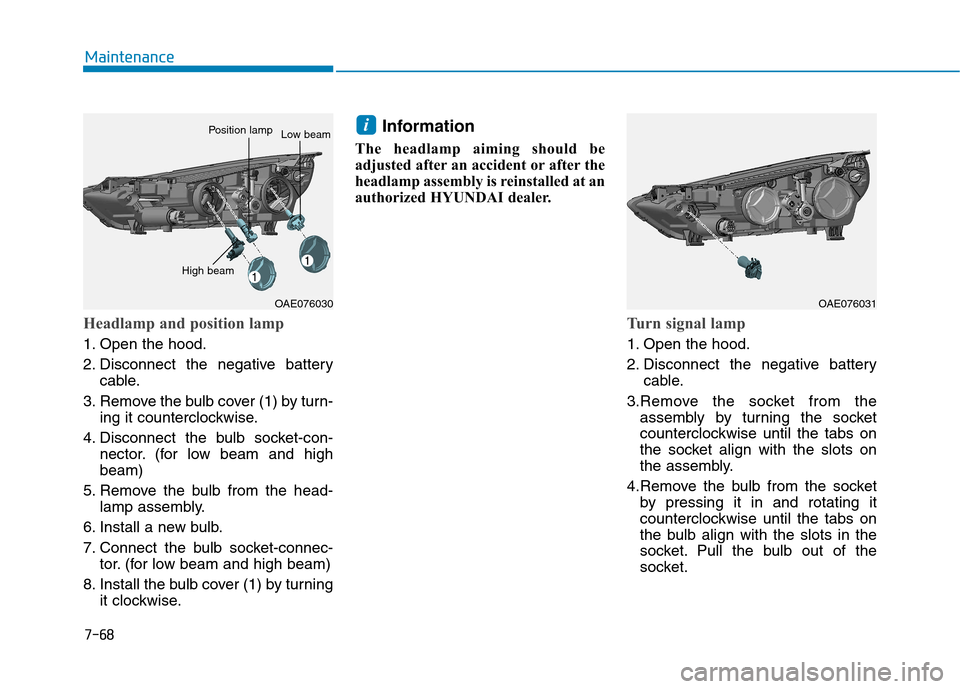
Headlamp and position lamp
1. Open the hood.
2. Disconnect the negative batterycable.
3. Remove the bulb cover (1) by turn- ing it counterclockwise.
4. Disconnect the bulb socket-con- nector. (for low beam and high beam)
5. Remove the bulb from the head- lamp assembly.
6. Install a new bulb.
7. Connect the bulb socket-connec- tor. (for low beam and high beam)
8. Install the bulb cover (1) by turning it clockwise. Information
The headlamp aiming should be
adjusted after an accident or after the
headlamp assembly is reinstalled at an
authorized HYUNDAI dealer.
Turn signal lamp
1. Open the hood.
2. Disconnect the negative battery cable.
3.Remove the socket from the assembly by turning the socket
counterclockwise until the tabs on
the socket align with the slots on
the assembly.
4.Remove the bulb from the socket by pressing it in and rotating it
counterclockwise until the tabs on
the bulb align with the slots in the
socket. Pull the bulb out of the
socket.
i
OAE076030
High beam
Position lampLow beam
OAE076031