test HYUNDAI IX35 2014 Owner's Manual
[x] Cancel search | Manufacturer: HYUNDAI, Model Year: 2014, Model line: IX35, Model: HYUNDAI IX35 2014Pages: 1534, PDF Size: 39.76 MB
Page 529 of 1534
439
Features of your vehicle
Inside rearview mirror
Adjust the rearview mirror to center on
the view through the rear window. Make
this adjustment before you start driving.
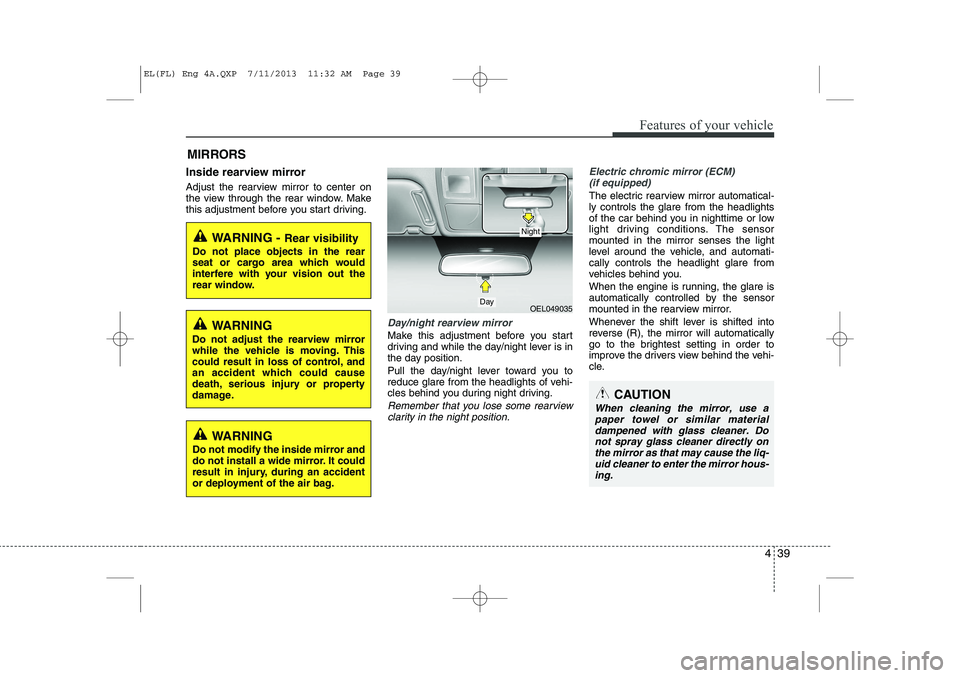
Day/night rearview mirror
Make this adjustment before you start
driving and while the day/night lever is in
the day position.
Pull the day/night lever toward you to
reduce glare from the headlights of vehi-
cles behind you during night driving.
Remember that you lose some rearviewclarity in the night position.
Electric chromic mirror (ECM) (if equipped)
The electric rearview mirror automatical- ly controls the glare from the headlights
of the car behind you in nighttime or low
light driving conditions. The sensormounted in the mirror senses the light
level around the vehicle, and automati-cally controls the headlight glare from
vehicles behind you.
When the engine is running, the glare is
automatically controlled by the sensor
mounted in the rearview mirror.
Whenever the shift lever is shifted into
reverse (R), the mirror will automatically
go to the brightest setting in order to
improve the drivers view behind the vehi-
cle.
MIRRORS
WARNING -
Rear visibility
Do not place objects in the rear
seat or cargo area which would
interfere with your vision out the
rear window.
OEL049035
CAUTION
When cleaning the mirror, use a paper towel or similar materialdampened with glass cleaner. Do not spray glass cleaner directly on
the mirror as that may cause the liq- uid cleaner to enter the mirror hous-ing.
Day
Night
WARNING
Do not adjust the rearview mirror
while the vehicle is moving. This
could result in loss of control, and
an accident which could cause
death, serious injury or property
damage.
WARNING
Do not modify the inside mirror and
do not install a wide mirror. It could
result in injury, during an accident
or deployment of the air bag.
EL(FL) Eng 4A.QXP 7/11/2013 11:32 AM Page 39
Page 778 of 1534
Driving your vehicle
24
5
R (Reverse)
Use this position to drive the vehicle
backward. N (Neutral)
The wheels and transaxle are not
engaged. The vehicle will roll freely even
on the slightest incline unless the parking
brake or service brakes are applied. D (Drive)
This is the normal forward driving posi-
tion. The transaxle will automatically shift
through a 6-gear sequence, providing the
best fuel economy and power.
For extra power when passing another
vehicle or climbing grades, depress the
accelerator fully, at which time the
transaxle will automatically downshift to
the next lower gear.
✽✽
NOTICE
Always come to a complete stop before shifting into D (Drive).
WARNING
Shifting into P (Park) while the vehicle is in motion will cause the
drive wheels to lock which will
cause you to lose control of the
vehicle.
Do not use the P (Park) position in place of the parking brake.
Always make sure the shift lever
is latched in the P (Park) position
and set the parking brake fully.
Never leave a child unattended in a vehicle.
CAUTION
The transaxle may be damaged if
you shift into P (Park) while the
vehicle is in motion.
CAUTION
Always come to a complete stopbefore shifting into or out of R
(Reverse); you may damage thetransaxle if you shift into R (Reverse) while the vehicle is inmotion, except as explained in
“Rocking the vehicle”, in this manu-al.
EL(FL) Eng 5.QXP 7/11/2013 11:03 AM Page 24
Page 788 of 1534
Driving your vehicle
34
5
Full-time 4WD vehicles must be tested
on a special four wheel chassis
dynamometer.
✽✽ NOTICE
Never engage the parking brake while performing these tests.
A full-time 4WD vehicle should not be tested on a 2WD roll tester. If a 2WD
roll tester must be used, perform the
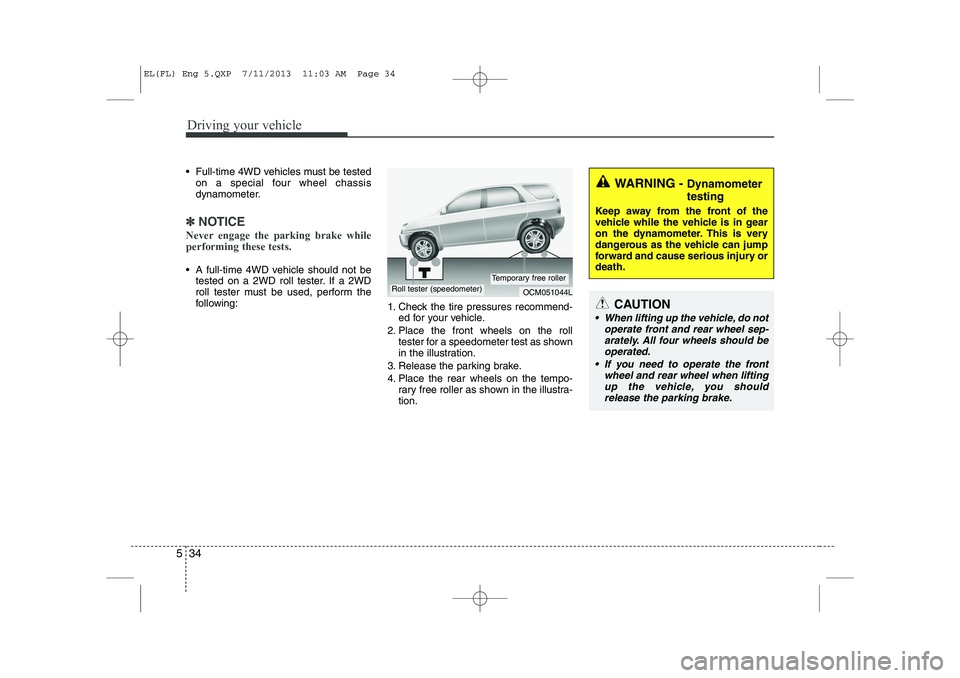
following: 1. Check the tire pressures recommend-
ed for your vehicle.
2. Place the front wheels on the roll tester for a speedometer test as shown
in the illustration.
3. Release the parking brake.
4. Place the rear wheels on the tempo- rary free roller as shown in the illustra- tion.
WARNING - Dynamometer testing
Keep away from the front of the
vehicle while the vehicle is in gear
on the dynamometer. This is very
dangerous as the vehicle can jump
forward and cause serious injury ordeath.
OCM051044LRoll tester (speedometer)Temporary free roller
CAUTION
When lifting up the vehicle, do not operate front and rear wheel sep-
arately. All four wheels should beoperated.
If you need to operate the front wheel and rear wheel when lifting
up the vehicle, you shouldrelease the parking brake.
EL(FL) Eng 5.QXP 7/11/2013 11:03 AM Page 34
Page 789 of 1534
535
Driving your vehicle
Power brakes
Your vehicle has power-assisted brakes
that adjust automatically through normal
usage.
In the event that the power-assisted
brakes lose power because of a stalled
engine or some other reason, you can
still stop your vehicle by applying greater
force to the brake pedal than you nor-
mally would. The stopping distance, how-
ever, will be longer.
When the engine is not running, the
reserve brake power is partially depleted
each time the brake pedal is applied. Do
not pump the brake pedal when the
power assist has been interrupted.
Pump the brake pedal only when neces-
sary to maintain steering control on slip-
pery surfaces.In the event of brake failure
If service brakes fail to operate while the
vehicle is in motion, you can make an
emergency stop with the parking brake.
The stopping distance, however, will be
much greater than normal.
BRAKE SYSTEM (Continued)
When descending a long or steep
hill, shift to a lower gear and
avoid continuous application of
the brakes. Continuous brakeapplication will cause the brakes
to overheat and could result in a
temporary loss of braking per-
formance.
Wet brakes may impair the vehi- cle’s ability to sefely slow down;
the vehicle may also pull to oneside when the brakes are applied.
Applying the brakes lightly will
indicate whether they have been
affected in this way. Always test
your brakes in this fashion after
driving through deep water. To
dry the brakes, apply them lightly
while maintaining a safe forward
speed until brake performancereturns to normal.
Always, confirm the position of the brake and accelerator pedal
before driving. If you don't checkthe position of the accelerator
and brake pedal before driving,
you may depress the accelerator
instead of the brake pedal. It maycause a serious accident.
WARNING - Parking brake
Applying the parking brake while
the vehicle is moving at normal
speeds can cause a sudden loss of
control of the vehicle. If you mustuse the parking brake to stop the
vehicle, use great caution in apply-
ing the brake.
WARNING - Brakes
Do not drive with your foot rest- ing on the brake pedal. This will create abnormal high brake tem-
peratures, excessive brake lining
and pad wear, and increasedstopping distances.
(Continued)
EL(FL) Eng 5.QXP 7/11/2013 11:03 AM Page 35
Page 792 of 1534
Driving your vehicle
38
5
Anti-lock brake system (ABS) The ABS continuously senses the speed
of the wheels. If the wheels are going to
lock, the ABS system repeatedly modu-
lates the hydraulic brake pressure to the
wheels.
When you apply your brakes under con-
ditions which may lock the wheels, you
may hear a “tik-tik’’ sound from the
brakes, or feel a corresponding sensation
in the brake pedal. This is normal and it
means your ABS is active.
In order to obtain the maximum benefit
from your ABS in an emergency situa-
tion, do not attempt to modulate your
brake pressure and do not try to pump
your brakes. Press your brake pedal as
hard as possible or as hard as the situa-
tion warrants and allow the ABS to con-
trol the force being delivered to the
brakes.
WARNING
ABS (or ESC) will not prevent acci-
dents due to improper or danger-
ous driving maneuvers. Even
though vehicle control is improved
during emergency braking, always
maintain a safe distance between
you and objects ahead. Vehicle
speeds should always be reduced
during extreme road conditions.
The braking distance for vehicle
equipped with an anti-lock braking
system (Electronic Stability
Program System) may be longer
than for those without it in the fol-
lowing road conditions.
During these conditions the vehicle should be driven at reducedspeeds:
Rough, gravel or snow-covered roads.
With tire chains installed.
On roads where the road surface is pitted or has different surface height.
(Continued)
(Continued)
The safety features of an ABS (or
ESC) equipped vehicle should not
be tested by high speed driving or
cornering. This could endanger the
safety of yourself or others.
EL(FL) Eng 5.QXP 7/11/2013 11:03 AM Page 38
Page 817 of 1534
563
Driving your vehicle
Use high quality ethylene glycol coolant
Your vehicle is delivered with high quality
ethylene glycol coolant in the cooling
system. It is the only type of coolant that
should be used because it helps prevent
corrosion in the cooling system, lubri-
cates the water pump and prevents
freezing. Be sure to replace or replenish
your coolant in accordance with themaintenance schedule in section 7.
Before winter, have your coolant tested toassure that its freezing point is sufficient
for the temperatures anticipated during
the winter.
Check battery and cables
Winter puts additional burdens on the
battery system. Visually inspect the bat-
tery and cables as described in section
7. We recommend that the system be
checked by an authorized HYUNDAI
dealer.Change to "winter weight" oil if
necessary In some climates it is recommended that
a lower viscosity "winter weight" oil be
used during cold weather. See section 8
for recommendations. If you aren't sure
what weight oil you should use, we rec-
ommend that you consult an authorized
HYUNDAI dealer.
Check spark plugs and ignition system
Inspect your spark plugs as described in
section 7 and replace them if necessary.
Also check all ignition wiring and compo-
nents to be sure they are not cracked,
worn or damaged in any way.
CAUTION
Chains that are the wrong size or
improperly installed can damage
your vehicle's brake lines, sus-pension, body and wheels.
Stop driving and retighten the chains any time you hear them
hitting the vehicle.
WARNING - Tire chains
The use of chains may adversely affect vehicle handling.
Do not exceed 30 km/h (20 mph) or the chain manufacturer’s rec-
ommended speed limit, whichev-
er is lower.
Drive carefully and avoid bumps, holes, sharp turns, and other
road hazards, which may cause
the vehicle to bounce.
Avoid sharp turns or locked- wheel braking.
EL(FL) Eng 5.QXP 7/11/2013 11:04 AM Page 63
Page 932 of 1534
767
Maintenance
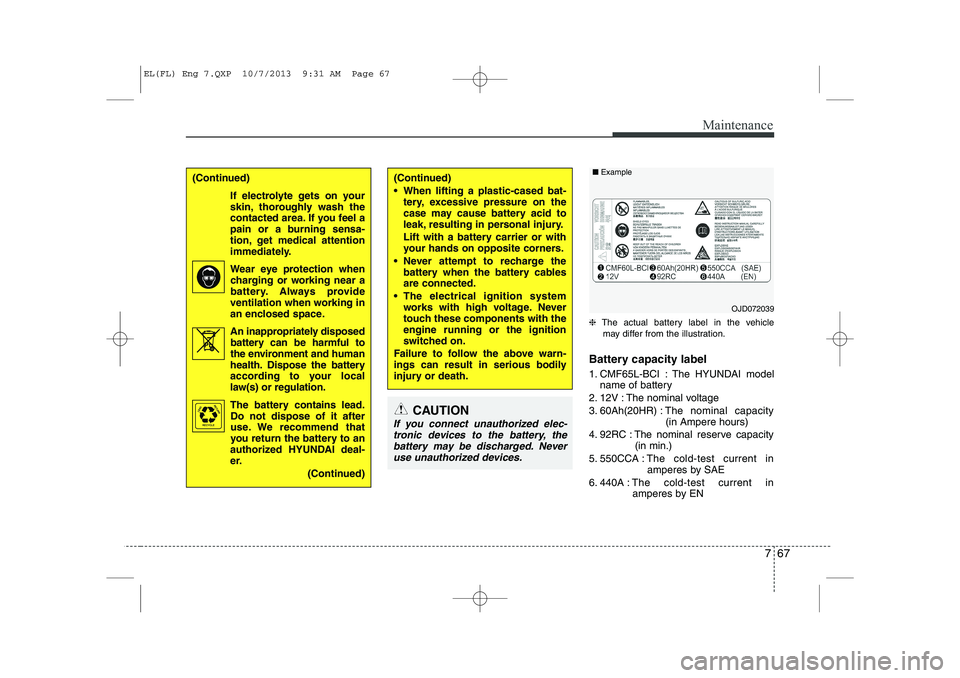
❈The actual battery label in the vehicle
may differ from the illustration.
Battery capacity label
1. CMF65L-BCI : The HYUNDAI model name of battery
2. 12V : The nominal voltage
3. 60Ah(20HR) : The nominal capacity
(in Ampere hours)
4. 92RC : The nominal reserve capacity (in min.)
5. 550CCA : The cold-test current in
amperes by SAE
6. 440A : The cold-test current in
amperes by EN
(Continued)
When lifting a plastic-cased bat- tery, excessive pressure on the
case may cause battery acid to
leak, resulting in personal injury.
Lift with a battery carrier or with
your hands on opposite corners.
Never attempt to recharge the battery when the battery cablesare connected.
The electrical ignition system works with high voltage. Never
touch these components with theengine running or the ignition
switched on.
Failure to follow the above warn-
ings can result in serious bodily
injury or death.(Continued)
If electrolyte gets on your
skin, thoroughly wash the
contacted area. If you feel a
pain or a burning sensa-
tion, get medical attention
immediately.
Wear eye protection whencharging or working near a
battery. Always provide
ventilation when working in
an enclosed space.
An inappropriately disposed battery can be harmful to
the environment and human
health. Dispose the battery
according to your local
law(s) or regulation.
The battery contains lead.
Do not dispose of it after
use. We recommend that
you return the battery to an
authorized HYUNDAI deal-
er.
(Continued)
Pb
CAUTION
If you connect unauthorized elec-tronic devices to the battery, the battery may be discharged. Neveruse unauthorized devices.
OJD072039
■
Example
EL(FL) Eng 7.QXP 10/7/2013 9:31 AM Page 67
Page 942 of 1534
777
Maintenance
4. Tire ply composition and material
The number of layers or plies of rub-
ber-coated fabric are in the tire. Tire
manufacturers also must indicate the
materials in the tire, which include
steel, nylon, polyester, and others.
The letter "R" means radial ply con-
struction; the letter "D" means diago-
nal or bias ply construction; and theletter "B" means belted-bias ply con-
struction.
5. Maximum permissible inflationpressure
This number is the greatest amount of air pressure that should be put in
the tire. Do not exceed the maximum
permissible inflation pressure. Refer
to the Tire and Loading Information
label for recommended inflation
pressure.
6. Maximum load rating
This number indicates the maximum
load in kilograms and pounds that
can be carried by the tire. When
replacing the tires on the vehicle,
always use a tire that has the same
load rating as the factory installed
tire.
7. Uniform tire quality grading
Quality grades can be found where
applicable on the tire sidewall
between tread shoulder and maxi-
mum section width.
For example:
TREADWEAR 200
TRACTION AA
TEMPERATURE A Tread wear
The tread wear grade is a compara-
tive rating based on the wear rate ofthe tire when tested under controlled
conditions on a specified govern-
ment test course. For example, a tire
graded 150 would wear one-and-a-
half times (1½) as well on the gov-
ernment course as a tire graded 100.
The relative performance of tires depends upon the actual conditions
of their use, however, and may
depart significantly from the norm
because of variations in driving
habits, service practices and differ-
ences in road characteristics and cli-
mate.
These grades are molded on the
side-walls of passenger vehicle tires.
The tires available as standard or
optional equipment on your vehicles
may vary with respect to grade.
WARNING - Tire age
Tires degrade over time, even
when they are not being used.
Regardless of the remaining
tread, it is recommended that
tires generally be replaced after
six (6) years of normal service.
Heat caused by hot climates orfrequent high loading condi-
tions can accelerate the aging
process. Failure to follow this
Warning can result in sudden
tire failure, which could lead to
a loss of control and an acci-
dent involving serious injury ordeath.
EL(FL) Eng 7.QXP 10/7/2013 9:31 AM Page 77
Page 943 of 1534

Maintenance
78
7
Traction - AA, A, B & C
The traction grades, from highest to
lowest, are AA, A, B and C. Those
grades represent the tires ability to
stop on wet pavement as measuredunder controlled conditions on spec-
ified government test surfaces of
asphalt and concrete. A tire marked
C may have poor traction perform-
ance. Temperature -A, B & C
The temperature grades are A (the highest), B and C representing the
tire’s resistance to the generation ofheat and its ability to dissipate heatwhen tested under controlled condi-
tions on a specified indoor laboratorytest wheel.
Sustained high temperature can
cause the material of the tire to
degenerate and reduce tire life, and
excessive temperature can lead to
sudden tire failure. Grades B and A
represent higher levels of perform-
ance on the laboratory test wheel
than the minimum required by the
law.
WARNING
The traction grade assigned to this tire is based on straight-ahead braking traction tests,
and does not include accelera-
tion, cornering, hydroplaning,
or peak traction characteristics.
WARNING - Tire temperature
The temperature grade for this
tire is established for a tire that
is properly inflated and not
overloaded. Excessive speed,
underinflation, or excessive
loading, either separately or in
combination, can cause heat
build-up and possible sudden
tire failure. This can cause loss
of vehicle control and serious
injury or death.
EL(FL) Eng 7.QXP 10/7/2013 9:31 AM Page 78
Page 961 of 1534
Maintenance
96
7
Front fog light bulbs (if equipped)
1. Remove the front bumper under cover.
2. Reach your hand into the back of the
front bumper.
3. Disconnect the power connector from the socket.
4. Remove the bulb-socket from the housing by turning the socket counter
clockwise until the tabs on the socketalign with the slots on the housing.
5. Install the new bulb-socket into the housing by aligning the tabs on the
socket with the slots in the housing.
Push the socket into the housing and
turn the socket clockwise.
6. Connect the power connector to the socket.
7. Reinstall the front bumper under cover. Headlight and front fog light aim-
ing (for Europe)
Headlight aiming
1. Inflate the tires to the specified pres-
sure and remove any loads from the
vehicle except the driver, spare tire,
and tools.
2. The vehicle should be placed on a flat floor.
3. Draw vertical lines (Vertical lines pass- ing through respective head lamp cen-
ters) and a horizontal line (Horizontalline passing through center of headlamps) on the screen. 4. With the head lamp and battery in nor-
mal condition, aim the head lamps so
the brightest portion falls on the hori-
zontal and vertical lines.
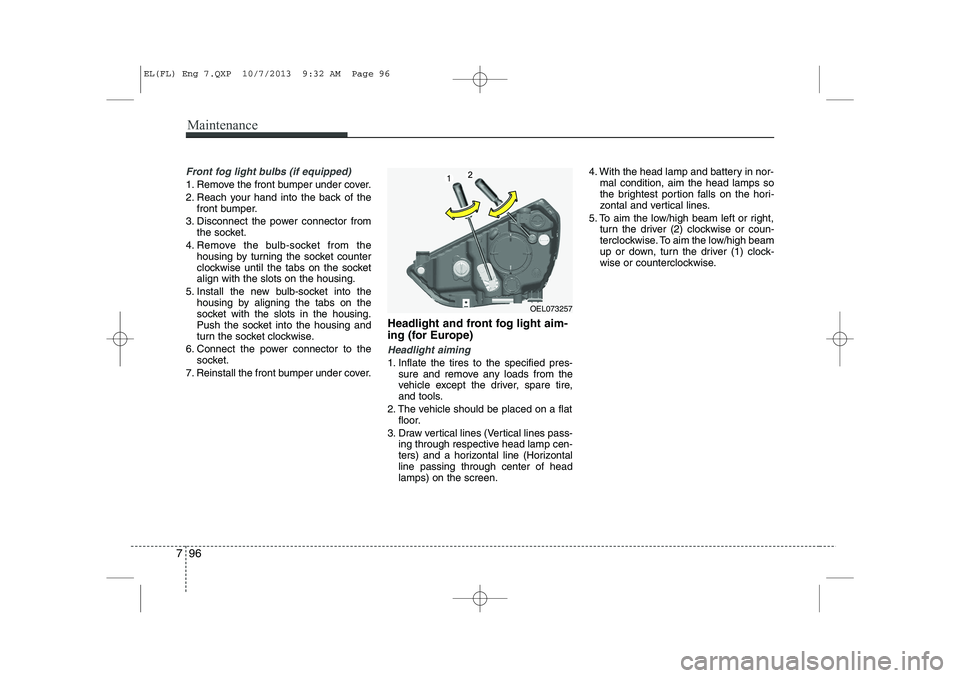
5. To aim the low/high beam left or right, turn the driver (2) clockwise or coun-
terclockwise. To aim the low/high beam
up or down, turn the driver (1) clock-
wise or counterclockwise.
OEL073257
EL(FL) Eng 7.QXP 10/7/2013 9:32 AM Page 96