instrument Hyundai Kona 2018 - RHD (UK, Australia) User Guide
[x] Cancel search | Manufacturer: HYUNDAI, Model Year: 2018, Model line: Kona, Model: Hyundai Kona 2018Pages: 497, PDF Size: 11.7 MB
Page 77 of 497
2-61
Safety system of your vehicle
2
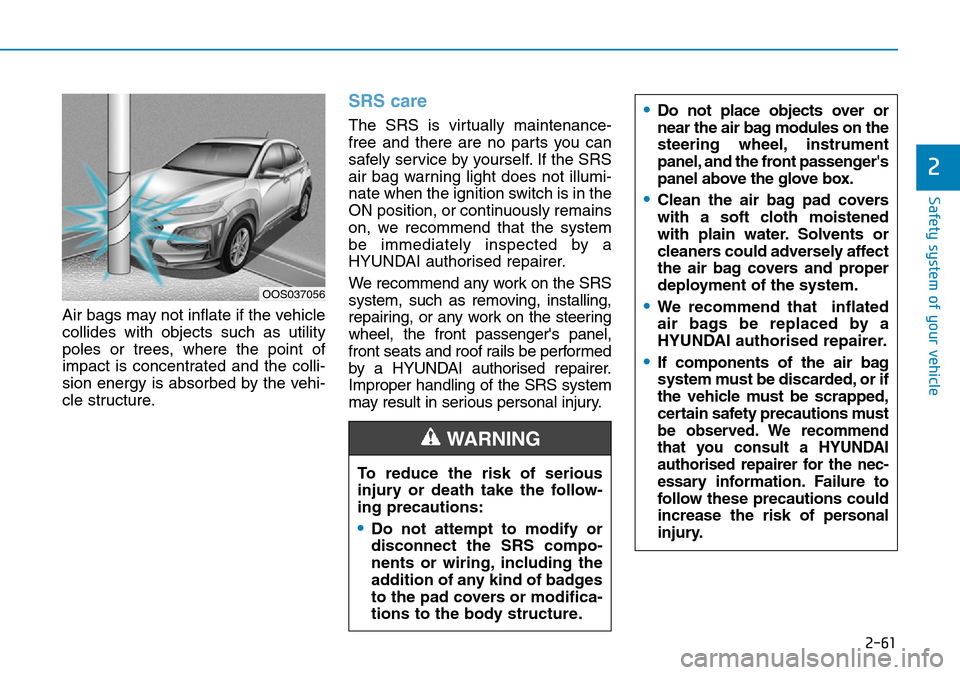
Air bags may not inflate if the vehicle
collides with objects such as utility
poles or trees, where the point of
impact is concentrated and the colli-
sion energy is absorbed by the vehi-
cle structure.
SRS care
The SRS is virtually maintenance-
free and there are no parts you can
safely service by yourself. If the SRS
air bag warning light does not illumi-
nate when the ignition switch is in the
ON position, or continuously remains
on, we recommend that the system
be immediately inspected by a
HYUNDAI authorised repairer.
We recommend any work on the SRS
system, such as removing, installing,
repairing, or any work on the steering
wheel, the front passenger's panel,
front seats and roof rails be performed
by a HYUNDAI authorised repairer.
Improper handling of the SRS system
may result in serious personal injury.
OOS037056
To reduce the risk of serious
injury or death take the follow-
ing precautions:
•Do not attempt to modify or
disconnect the SRS compo-
nents or wiring, including the
addition of any kind of badges
to the pad covers or modifica-
tions to the body structure.
WARNING
•Do not place objects over or
near the air bag modules on the
steering wheel, instrument
panel, and the front passenger's
panel above the glove box.
•Clean the air bag pad covers
with a soft cloth moistened
with plain water. Solvents or
cleaners could adversely affect
the air bag covers and proper
deployment of the system.
•We recommend that inflated
air bags be replaced by a
HYUNDAI authorised repairer.
•If components of the air bag
system must be discarded, or if
the vehicle must be scrapped,
certain safety precautions must
be observed. We recommend
that you consult a HYUNDAI
authorised repairer for the nec-
ess
ary information. Failure to
follow these precautions could
increase the risk of personal
injury.
Page 79 of 497
Convenient features of your vehicle
Accessing your vehicle .........................................3-3
Remote key ........................................................................\
.3-3
Smart key ........................................................................\
....3-6
Immobiliser system .........................................................3-10
Door locks .............................................................3-11
Operating door locks from outside the vehicle ......3-11
Operating door locks from inside the vehicle .........3-12
Deadlocks ........................................................................\
..3-14
Auto door lock/unlock features..................................3-15
Child-protector rear door locks ..................................3-15
Theft-alarm system.............................................3-16
Steering wheel......................................................3-17
Electric power steering (EPS) ......................................3-17
Tilt steering/Telescopic steering.................................3-17
Heated steering wheel ...................................................3-18
Horn ........................................................................\
............3-19
Mirrors ...................................................................3-19
Inside rearview mirror....................................................3-19
Outside rearview mirror ................................................3-20
Windows ................................................................3-23
Power windows................................................................3-23
Sunroof..................................................................3-27
Sunroof opening and closing .......................................3-28
Sliding the sunroof .........................................................3-28
Tilting the sunroof ..........................................................3-29
Sunshade ........................................................................\
...3-29Resetting the sunroof ....................................................3-30
Sunroof open warning ...................................................3-30
Exterior features .................................................3-31
Bonnet........................................................................\
........3-31
Tailgate.....................................................................\
..........3-32
Fuel filler door .................................................................3-34
Instrument cluster................................................3-38
Instrument cluster control ............................................3-39
Gauges and meters .........................................................3-39
Icy Road Warning Light .................................................3-42
Transmission shift indicator .........................................3-43
Manual transmission shift indicator ...........................3-43
Warning and indicator lights ........................................3-45
LCD display messages ..................................................3-58
LCD display (Cluster Type B,C) ..........................3-64
LCD display control.........................................................3-64
LCD display modes ..........................................................3-65
Trip computer and service reminder
(For cluster Type A) ............................................3-72
Trip computer ...................................................................3-72
Service reminder .............................................................3-75
Trip computer (Type B, Type C).........................3-77
Trip modes ........................................................................\
3-77
Head up display (HUD)........................................3-80
Lighting..................................................................3-83
Exterior lights ..................................................................3-83
3
Page 96 of 497
3-18
Convenient features of your vehicle
Information
After adjustment, sometimes the lock-
release lever may not lock the steering
wheel.
It is not a malfunction. This occurs
when two gears are not engaged cor-
rectly. In this case, adjust the steering
wheel again and then lock the steering
wheel.
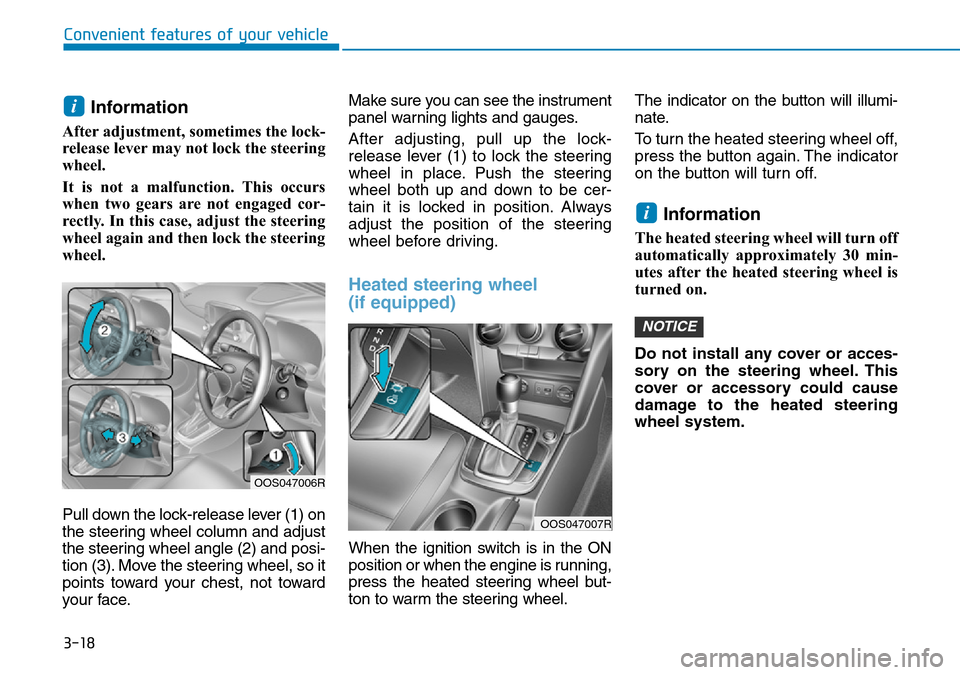
Pull down the lock-release lever (1) on
the steering wheel column and adjust
the steering wheel angle (2) and posi-
tion (3). Move the steering wheel, so it
points toward your chest, not toward
your face.Make sure you can see the instrument
panel warning lights and gauges.
After adjusting, pull up the lock-
release lever (1) to lock the steering
wheel in place. Push the steering
wheel both up and down to be cer-
tain it is locked in position. Always
adjust the position of the steering
wheel before driving.
Heated steering wheel
(if equipped)
When the ignition switch is in the ON
position or when the engine is running,
press the heated steering wheel but-
ton to warm the steering wheel.
The indicator on the button will illumi-
nate.
To turn the heated steering wheel off,
press the button again. The indicator
on the button will turn off.
Information
The heated steering wheel will turn off
automatically approximately 30 min-
utes after the heated steering wheel is
turned on.
Do not install any cover or acces-
sory on the steering wheel. This
cover or accessory could cause
damage to the heated steering
wheel system.
NOTICE
i
i
OOS047006R
OOS047007R
Page 110 of 497
3-32
Convenient features of your vehicle
3. Lower the bonnet halfway (lifted approximately 30cm from the
closed position) and push down to
securely lock in place. Then double
check to be sure the bonnet is
secure.
If the bonnet can be raised slightly, it
is not securely locked. Open it again
and close it with more force.
Tailgate
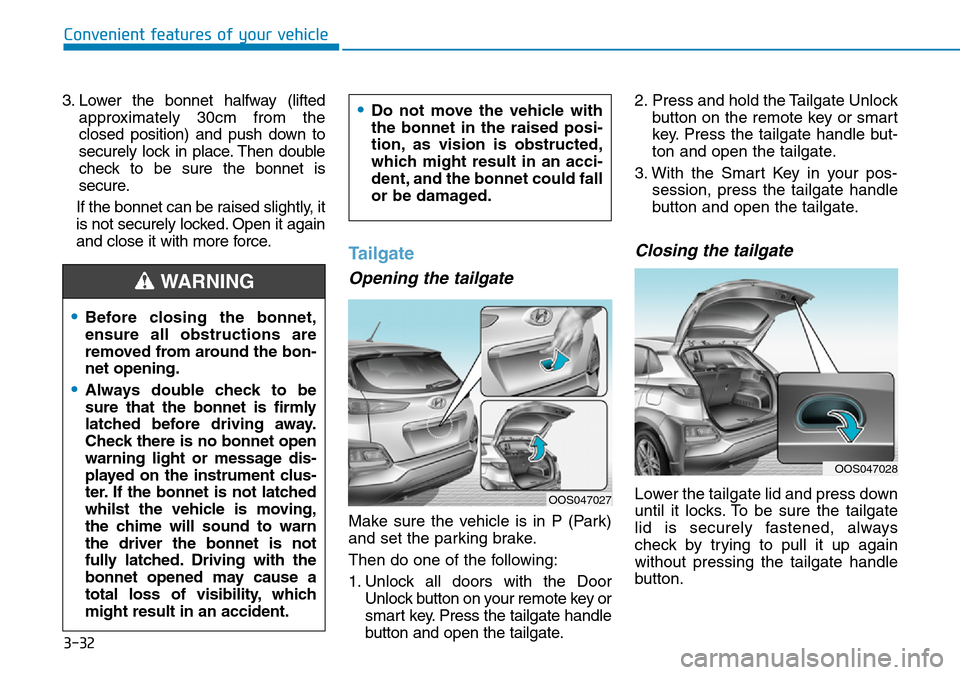
Opening the tailgate
Make sure the vehicle is in P (Park)
and set the parking brake.
Then do one of the following:
1. Unlock all doors with the Door Unlock button on your remote key or
smart key. Press the tailgate handle
button and open the tailgate. 2. Press and hold the Tailgate Unlock
button on the remote key or smart
key. Press the tailgate handle but-
ton and open the tailgate.
3. With the Smart Key in your pos- session, press the tailgate handle
button and open the tailgate.
Closing the tailgate
Lower the tailgate lid and press down
until it locks. To be sure the tailgate
lid is securely fastened, always
check by trying to pull it up again
without pressing the tailgate handle
button.
•Before closing the bonnet,
ensure all obstructions are
removed from around the bon-
net opening.
•Always double check to be
sure that the bonnet is firmly
latched before driving away.
Check there is no bonnet open
warning light or message dis-
played on the instrument clus-
ter. If the bonnet is not latched
whilst the vehicle is moving,
the chime will sound to warn
the driver the bonnet is not
fully latched. Driving with the
bonnet opened may cause a
total loss of visibility, which
might result in an accident.
•Do not move the vehicle with
the bonnet in the raised posi-
tion, as vision is obstructed,
which might result in an acci-
dent, and the bonnet could fall
or be damaged.
WARNING
OOS047027
OOS047028
Page 116 of 497
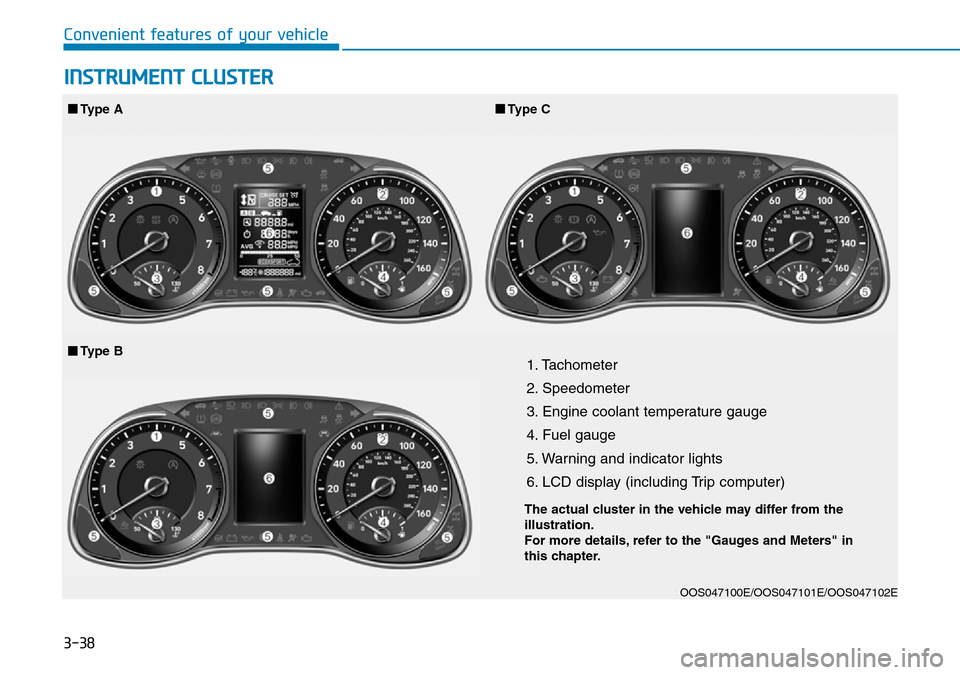
3-38
Convenient features of your vehicle
1. Tachometer
2. Speedometer
3. Engine coolant temperature gauge
4. Fuel gauge
5. Warning and indicator lights
6. LCD display (including Trip computer)
OOS047100E/OOS047101E/OOS047102E
■Type A■Type C
■Type B
INSTRUMENT CLUSTER
The actual cluster in the vehicle may differ from the
illustration.
For more details, refer to the "Gauges and Meters" in
this chapter.
Page 117 of 497
3-39
Convenient features of your vehicle
3
Instrument cluster control
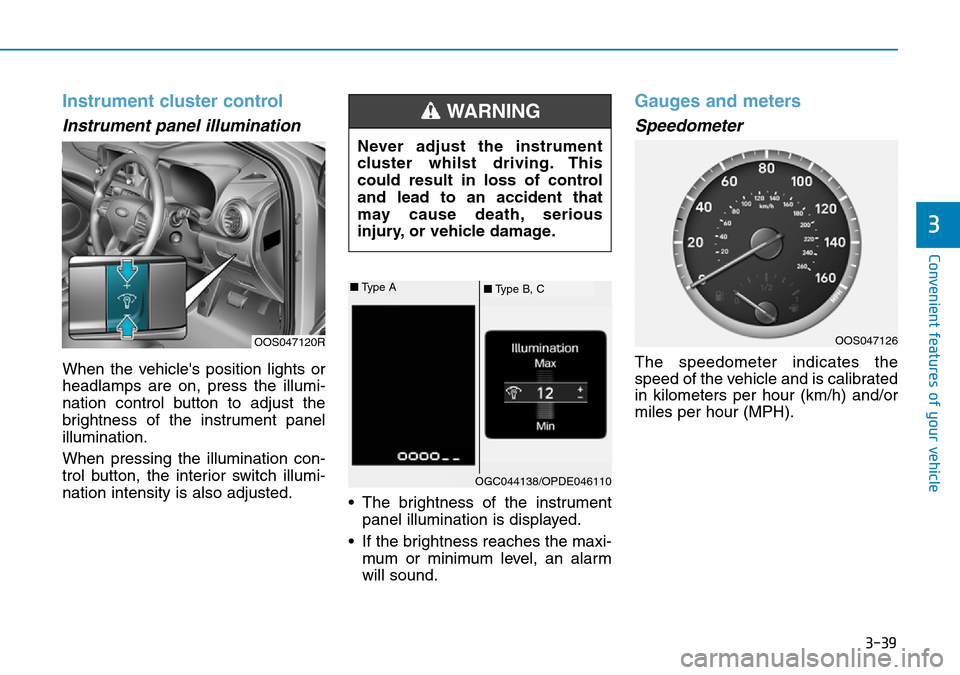
Instrument panel illumination
When the vehicle's position lights or
headlamps are on, press the illumi-
nation control button to adjust the
brightness of the instrument panel
illumination.
When pressing the illumination con-
trol button, the interior switch illumi-
nation intensity is also adjusted.• The brightness of the instrument
panel illumination is displayed.
• If the brightness reaches the maxi- mum or minimum level, an alarm
will sound.
Gauges and meters
Speedometer
The speedometer indicates the
speed of the vehicle and is calibrated
in kilometers per hour (km/h) and/or
miles per hour (MPH).
OOS047120R
Never adjust the instrument
cluster whilst driving. This
could result in loss of control
and lead to an accident that
may cause death, serious
injury, or vehicle damage.
WARNING
■ Type B, C
■
Type A
OGC044138/OPDE046110
OOS047126
Page 119 of 497
3-41
Convenient features of your vehicle
3
Information
• The fuel tank capacity is given inchapter 8.
• The fuel gauge is supplemented by a low fuel warning light, which will
illuminate when the fuel tank is
nearly empty.
• On inclines or curves, the fuel gauge pointer may fluctuate or the low fuel
warning light may come on earlier
than usual due to the movement of
fuel in the tank.
Avoid driving with an extremely
low fuel level. Running out of fuel
could cause the engine to misfire
damaging the catalytic converter.
Outside temperature gauge
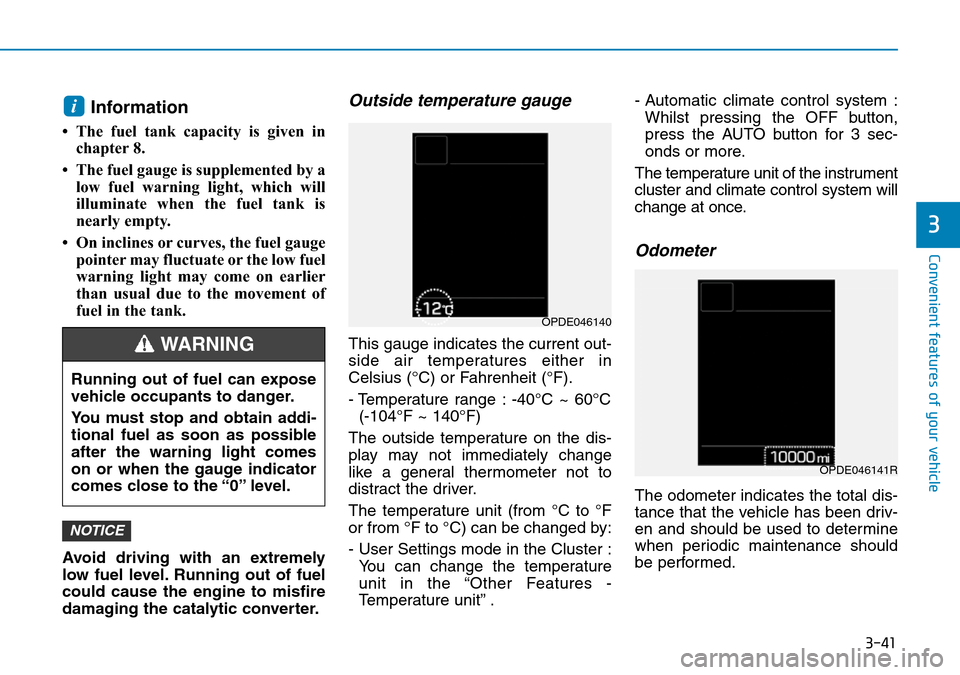
This gauge indicates the current out-
side air temperatures either in
Celsius (°C) or Fahrenheit (°F).
- Temperature range : -40°C ~ 60°C (-104°F ~ 140°F)
The outside temperature on the dis-
play may not immediately change
like a general thermometer not to
distract the driver.
The temperature unit (from °C to °F
or from °F to °C) can be changed by:
- User Settings mode in the Cluster : You can change the temperature
unit in the “Other Features -
Temperature unit” . - Automatic climate control system :
Whilst pressing the OFF button,
press the AUTO button for 3 sec-
onds or more.
The temperature unit of the instrument
cluster and climate control system will
change at once.
Odometer
The odometer indicates the total dis-
tance that the vehicle has been driv-
en and should be used to determine
when periodic maintenance should
be performed.
NOTICE
i
Running out of fuel can expose
vehicle occupants to danger.
You must stop and obtain addi-
tional fuel as soon as possible
after the warning light comes
on or when the gauge indicator
comes close to the “0” level.
WARNING
OPDE046140
OPDE046141R
Page 138 of 497
3-60
Convenient features of your vehicle
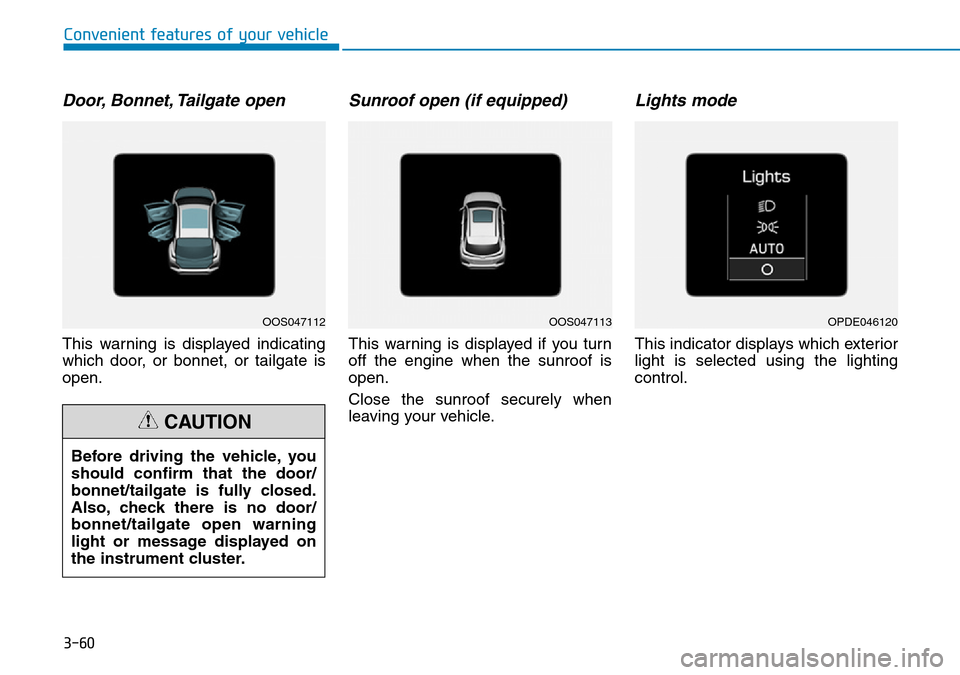
Door, Bonnet, Tailgate open
This warning is displayed indicating
which door, or bonnet, or tailgate is
open.
Sunroof open (if equipped)
This warning is displayed if you turn
off the engine when the sunroof is
open.
Close the sunroof securely when
leaving your vehicle.
Lights mode
This indicator displays which exterior
light is selected using the lighting
control.
Before driving the vehicle, you
should confirm that the door/
bonnet/tailgate is fully closed.
Also, check there is no door/
bonnet/tailgate open warning
light or message displayed on
the instrument cluster.
CAUTION
OOS047112OOS047113OPDE046120
Page 146 of 497
3-68
Convenient features of your vehicle
User settings mode
In this mode, you can change the
settings of the instrument cluster,
doors, lamps, etc.
1. Head-up display (if equipped)
2. Driver assistance
3. Door
4. Lights
5. Sound
6. Convenience
7. Service interval
8. Other features
9. Languages
10. Reset
The information provided may dif-
fer depending on which functions
are applicable to your vehicle.
1. Head up display (if equipped)
• Display height- Adjust the height of the HUDimage on the display.
• Rotation - Adjust the angle of the image. • Brightness
- Adjust the intensity of the HUDillumination.
• Content select - Tu r n b y Tu r n
- Traffic information
- Cruise control
- Lane keeping assist (LKA) sys-tem
- Blind-spot Collision Warning (BCW) system
• Speedometer size - Choose the speedometer fontsize of the HUD. (Large, Medium,
Small)
• Speedometer colour - Choose the speedometer fontcolour of the HUD. (White,
Orange, Green) 2. Driver assistance
• DAW (Driver Attention Warning)
- Off/Normal sensitivity/ High sensitivity
To adjust the sensitivity of the Driver
Attention Warning (DAW).
For more information, refer to the
"Driver Attention Warning (DAW)
system " in chapter 5.
• Lane Safety - Lane Departure Warning
- Standard LKA
- Active LKA
To adjust the Lane Keeping Assist
(LKA) function.
For more information, refer to the
"Lane Keeping Assist (LKA) sys-
tem " in chapter 5.
• FCA (Forward Collision-Avoidance Assist)
To activate or deactivate the Forward
Collision-Avoidance Assist (FCA).
For more information, refer to the
"Forward Collision-Avoidance
Assist (FCA) system" in chapter 5.
Page 158 of 497
3-80
Convenient features of your vehicle
HEAD UP DISPLAY (HUD) (IF EQUIPPED)
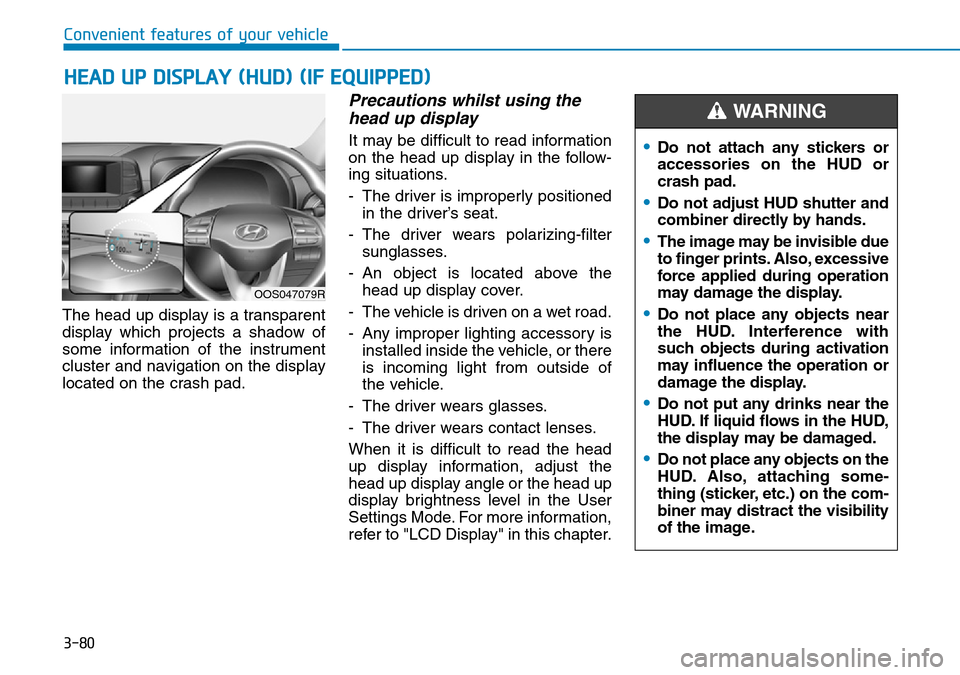
The head up display is a transparent
display which projects a shadow of
some information of the instrument
cluster and navigation on the display
located on the crash pad.
Precautions whilst using thehead up display
It may be difficult to read information
on the head up display in the follow-
ing situations.
- The driver is improperly positioned
in the driver’s seat.
- The driver wears polarizing-filter sunglasses.
- An object is located above the head up display cover.
- The vehicle is driven on a wet road.
- Any improper lighting accessory is installed inside the vehicle, or there
is incoming light from outside of
the vehicle.
- The driver wears glasses.
- The driver wears contact lenses.
When it is difficult to read the head
up display information, adjust the
head up display angle or the head up
display brightness level in the User
Settings Mode. For more information,
refer to "LCD Display" in this chapter.
OOS047079R
•Do not attach any stickers or
accessories on the HUD or
crash pad.
•Do not adjust HUD shutter and
combiner directly by hands.
•The image may be invisible due
to finger prints. Also, excessive
force applied during operation
may damage the display.
•Do not place any objects near
the HUD. Interference with
such objects during activation
may influence the operation or
damage the display.
•Do not put any drinks near the
HUD. If liquid flows in the HUD,
the display may be damaged.
•Do not place any objects on the
HUD. Also, attaching some-
thing (sticker, etc.) on the com-
biner may distract the visibility
of the image.
WARNING