brake Hyundai Kona EV 2019 Owner's Manual
[x] Cancel search | Manufacturer: HYUNDAI, Model Year: 2019, Model line: Kona EV, Model: Hyundai Kona EV 2019Pages: 540, PDF Size: 21.84 MB
Page 8 of 540
F8
Introduction
This vehicle is equipped with an
event data recorder (EDR). The
main purpose of an EDR is to
record, in certain crash or near
crash-like situations, such as an
air bag deployment or hitting a
road obstacle, data that will assist
in understanding how a vehicle’s
systems performed. The EDR is
designed to record data related to
vehicle dynamics and safety sys-
tems for a short period of time,
typically 30 seconds or less. The
EDR in this vehicle is designed to
record such data as:
vehicle were operating;
passenger safety belts were
buckled/ fastened;
depressing the accelerator
and/or brake pedal; and,
ing. These data can help provide a bet-
ter understanding of the circum-
stances in which crashes and
injuries occur. NOTE: EDR data
are recorded by your vehicle only
if a non-trivial crash situation
occurs; no data are recorded by
the EDR under normal driving
conditions and no personal data
(e.g., name, gender, age, and
crash location) are recorded.
However, other parties, such as
law enforcement, could combine
the EDR data with the type of per-
sonally identifying data routinely
acquired during a crash investiga-
tion.
To read data recorded by an EDR,
special equipment is required, and
access to the vehicle or the EDR is
needed. In addition to the vehicle
manufacturer, other parties, such
as law enforcement, that have the
special equipment, can read the
information if they have access to
the vehicle or the EDR.
V V
E
EH
H I
IC
C L
LE
E
D
D A
A T
TA
A
C
C O
O L
LL
LE
E C
CT
T I
IO
O N
N
A
A N
N D
D
E
E V
V E
EN
N T
T
D
D A
A T
TA
A
R
R E
EC
CO
O R
RD
D E
ER
R S
S
Page 14 of 540
I
IN
N S
ST
T R
R U
U M
M E
EN
N T
T
P
P A
A N
N E
EL
L
O
O V
VE
ER
R V
V I
IE
E W
W
The actual shape may differ from the illustration.
1-5
Your vehicle at a glance
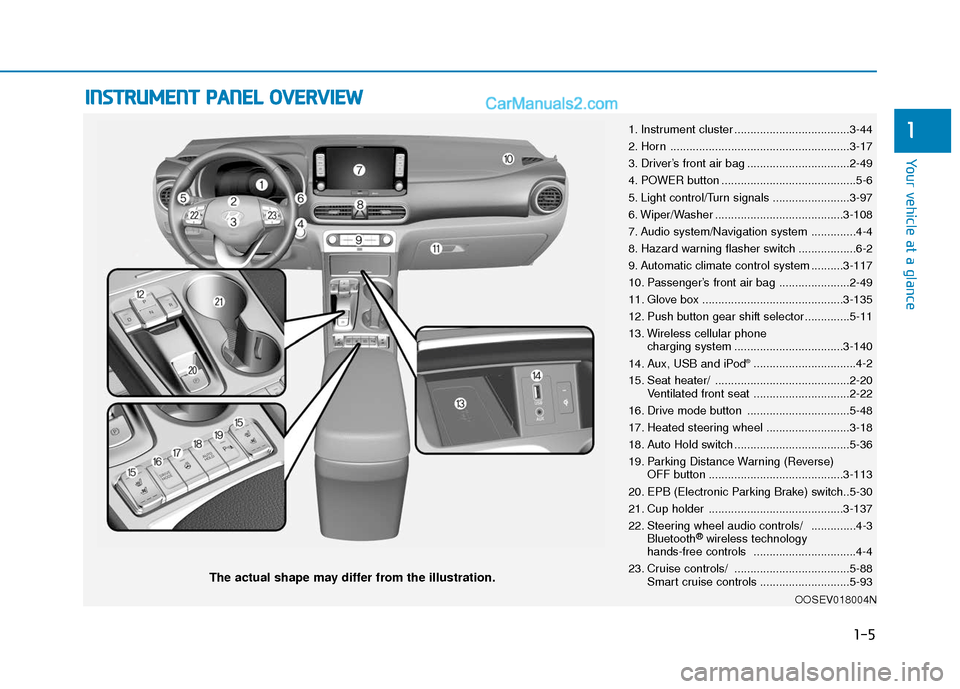
11. Instrument cluster ....................................3-44
2. Horn ........................................................3-17
3. Driver’s front air bag ................................2-49
4. POWER button ..........................................5-6
5. Light control/Turn signals ........................3-97
6. Wiper/Washer ........................................3-108
7. Audio system/Navigation system ..............4-4
8. Hazard warning flasher switch ..................6-2
9. Automatic climate control system ..........3-117
10. Passenger’s front air bag ......................2-49
11. Glove box ............................................3-135
12. Push button gear shift selector..............5-11
13. Wireless cellular phone
charging system ..................................3-140
14. Aux, USB and iPod
®................................4-2
15. Seat heater/ ..........................................2-20 Ventilated front seat ..............................2-22
16. Drive mode button ................................5-48
17. Heated steering wheel ..........................3-18
18. Auto Hold switch ....................................5-36
19. Parking Distance Warning (Reverse) OFF button ..........................................3-113
20. EPB (Electronic Parking Brake) switch..5-30
21. Cup holder ..........................................3-137
22. Steering wheel audio controls/ ..............4-3 Bluetooth
®wireless technology
hands-free controls ................................4-4
23. Cruise controls/ ....................................5-88 Smart cruise controls ............................5-93
OOSEV018004N
Page 15 of 540
1-6
Your vehicle at a glance
E
EV
V
D
D R
RI
IV
V E
E
M
M O
OT
TO
O R
R
C
C O
O M
M P
PA
A R
RT
TM
M E
EN
N T
T
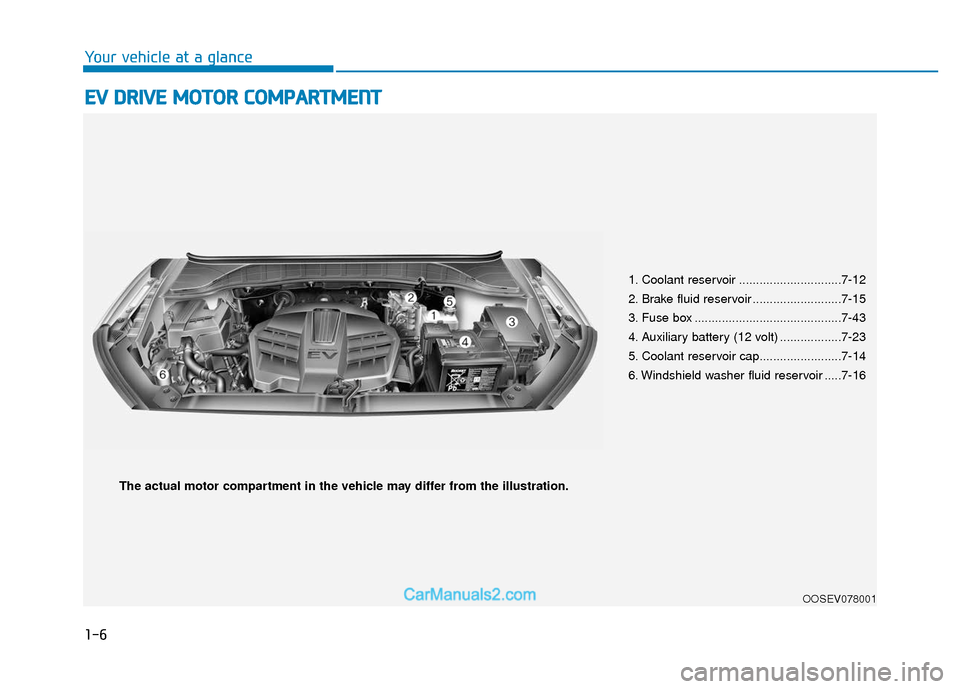
1. Coolant reservoir ..............................7-12
2. Brake fluid reservoir ..........................7-15
3. Fuse box ...........................................7-43
4. Auxiliary battery (12 volt) ..................7-23
5. Coolant reservoir cap........................7-14
6. Windshield washer fluid reservoir .....7-16
OOSEV078001
The actual motor compartment in the vehicle may differ from the illustration.
Page 30 of 540
2-15
Safety system of your vehicle
2
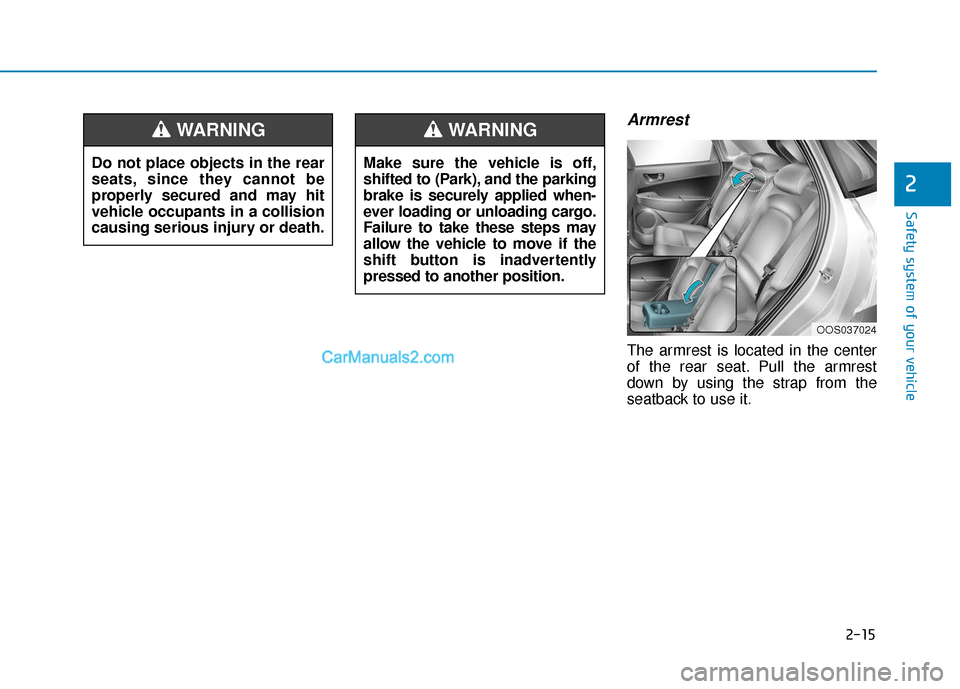
Armrest
The armrest is located in the center
of the rear seat. Pull the armrest
down by using the strap from the
seatback to use it.
Do not place objects in the rear
seats, since they cannot be
properly secured and may hit
vehicle occupants in a collision
causing serious injury or death.
WARNING
Make sure the vehicle is off,
shifted to (Park), and the parking
brake is securely applied when-
ever loading or unloading cargo.
Failure to take these steps may
allow the vehicle to move if the
shift button is inadvertently
pressed to another position.
WARNING
OOS037024
Page 82 of 540
2-67
Safety system of your vehicle
2
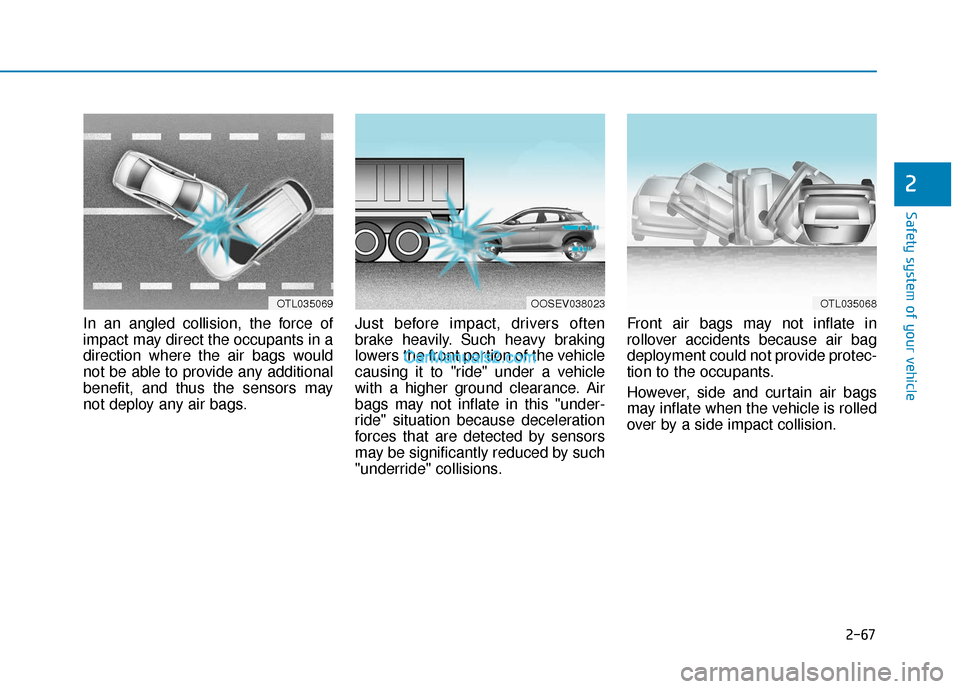
In an angled collision, the force of
impact may direct the occupants in a
direction where the air bags would
not be able to provide any additional
benefit, and thus the sensors may
not deploy any air bags.Just before impact, drivers often
brake heavily. Such heavy braking
lowers the front portion of the vehicle
causing it to "ride" under a vehicle
with a higher ground clearance. Air
bags may not inflate in this "under-
ride" situation because deceleration
forces that are detected by sensors
may be significantly reduced by such
"underride" collisions.Front air bags may not inflate in
rollover accidents because air bag
deployment could not provide protec-
tion to the occupants.
However, side and curtain air bags
may inflate when the vehicle is rolled
over by a side impact collision.
OTL035069OOSEV038023OTL035068
Page 97 of 540
3-13
Convenient features of your vehicle
3
Automatic Door Lock and
Unlock Features
Your vehicle is equipped with fea-
tures that will automatically lock or
unlock your vehicle based on set-
tings you select in the cluster LCD
display.
Auto LOCK - Enable on Speed
When this feature is set in the cluster
LCD display, all the doors will be
locked automatically when the vehi-
cle exceeds 9 mph (15 kph).
Auto LOCK - Enable on Shift
When this feature is set in the cluster
LCD display, all the doors will be
locked automatically when the vehi-
cle is shifted out of P (Park) while the
vehicle is in the ready ( ) mode.
Always secure your vehicle.
Leaving your vehicle unlocked
increases the potential risk to
you or others from someone
hiding in your vehicle.
To secure your vehicle, while
depressing the brake, shift to
the P (Park) position, engage
the parking brake, and place the
POWER button in the OFF posi-
tion, close all windows, lock all
doors, and always take the key
with you.
WARNING
Opening a door when something
is approaching may cause dam-
age or injury. Be careful when
opening doors and watch for
vehicles, motorcycles, bicycles
or pedestrians approaching the
vehicle in the path of the door.
CAUTION
If you stay in the vehicle for a
long time while the weather is
very hot or cold, there are risks
of injuries or danger to life. Do
not lock the vehicle from the
outside when someone is in the
vehicle.
WARNING
Page 123 of 540
3-39
Convenient features of your vehicle
3
Hood
Opening the hood
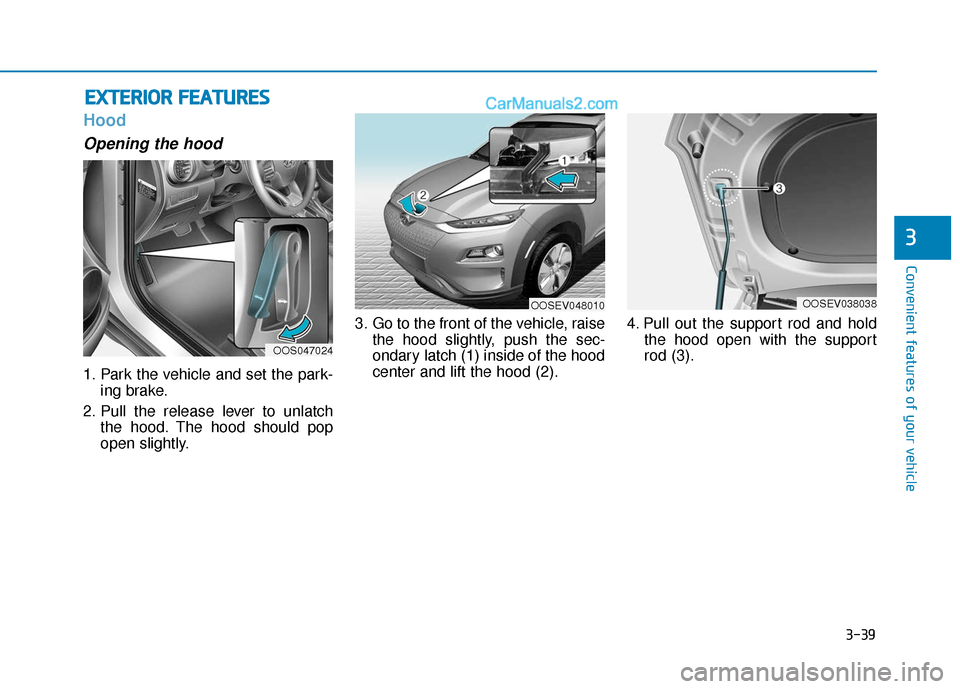
1. Park the vehicle and set the park-ing brake.
2. Pull the release lever to unlatch the hood. The hood should pop
open slightly. 3. Go to the front of the vehicle, raise
the hood slightly, push the sec-
ondary latch (1) inside of the hood
center and lift the hood (2). 4. Pull out the support rod and hold
the hood open with the support
rod (3).
E EX
X T
TE
ER
R I
IO
O R
R
F
F E
E A
A T
TU
U R
RE
ES
S
OOS047024
OOSEV048010OOSEV038038
Page 127 of 540
3-43
Convenient features of your vehicle
Charging Door
Opening the charging door
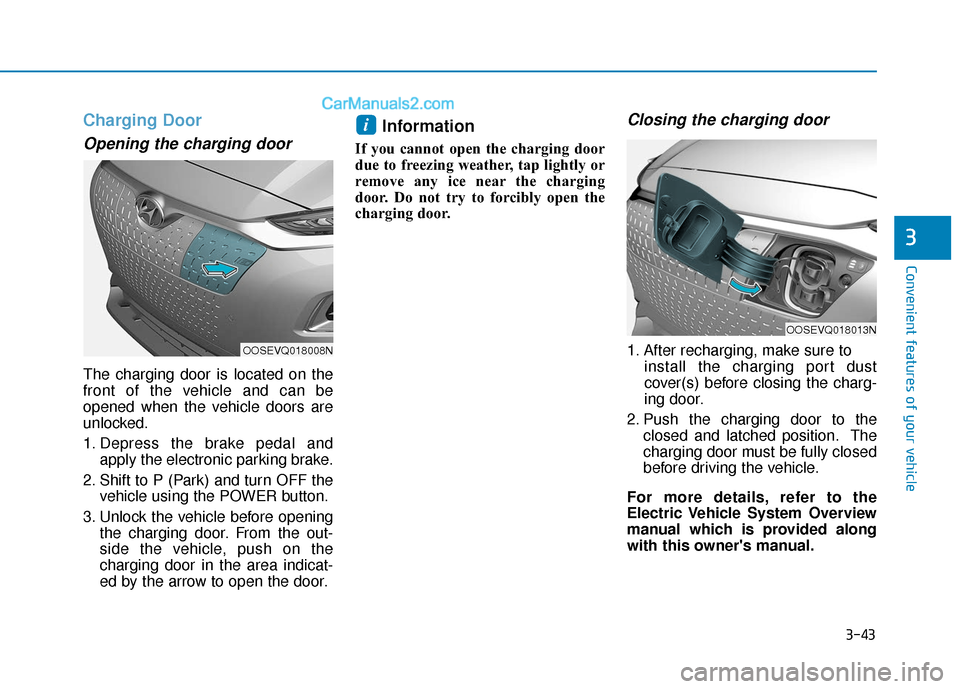
The charging door is located on the
front of the vehicle and can be
opened when the vehicle doors are
unlocked.
1. Depress the brake pedal andapply the electronic parking brake.
2. Shift to P (Park) and turn OFF the vehicle using the POWER button.
3. Unlock the vehicle before opening the charging door. From the out-
side the vehicle, push on the
charging door in the area indicat-
ed by the arrow to open the door.
Information
If you cannot open the charging door
due to freezing weather, tap lightly or
remove any ice near the charging
door. Do not try to forcibly open the
charging door.
Closing the charging door
1. After recharging, make sure to install the charging port dust
cover(s) before closing the charg-
ing door.
2. Push the charging door to the closed and latched position. The
charging door must be fully closed
before driving the vehicle.
For more details, refer to the
Electric Vehicle System Overview
manual which is provided along
with this owner's manual.
i
3
OOSEVQ018008N
OOSEVQ018013N
Page 131 of 540
3-47
Convenient features of your vehicle
3
Toque gauge
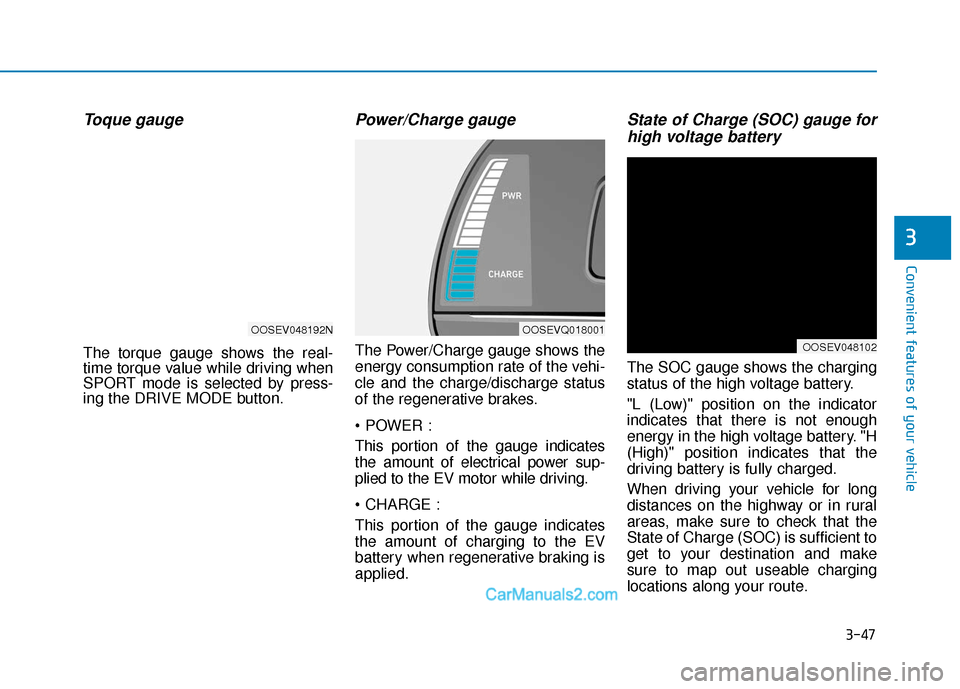
The torque gauge shows the real-
time torque value while driving when
SPORT mode is selected by press-
ing the DRIVE MODE button.
Power/Charge gauge
The Power/Charge gauge shows the
energy consumption rate of the vehi-
cle and the charge/discharge status
of the regenerative brakes.
This portion of the gauge indicates
the amount of electrical power sup-
plied to the EV motor while driving.
This portion of the gauge indicates
the amount of charging to the EV
battery when regenerative braking is
applied.
State of Charge (SOC) gauge forhigh voltage battery
The SOC gauge shows the charging
status of the high voltage battery.
"L (Low)" position on the indicator
indicates that there is not enough
energy in the high voltage battery. "H
(High)" position indicates that the
driving battery is fully charged.
When driving your vehicle for long
distances on the highway or in rural
areas, make sure to check that the
State of Charge (SOC) is sufficient to
get to your destination and make
sure to map out useable charging
locations along your route.
OOSEVQ018001
OOSEV048102
OOSEV048192N
Page 137 of 540
3-53
Convenient features of your vehicle
3
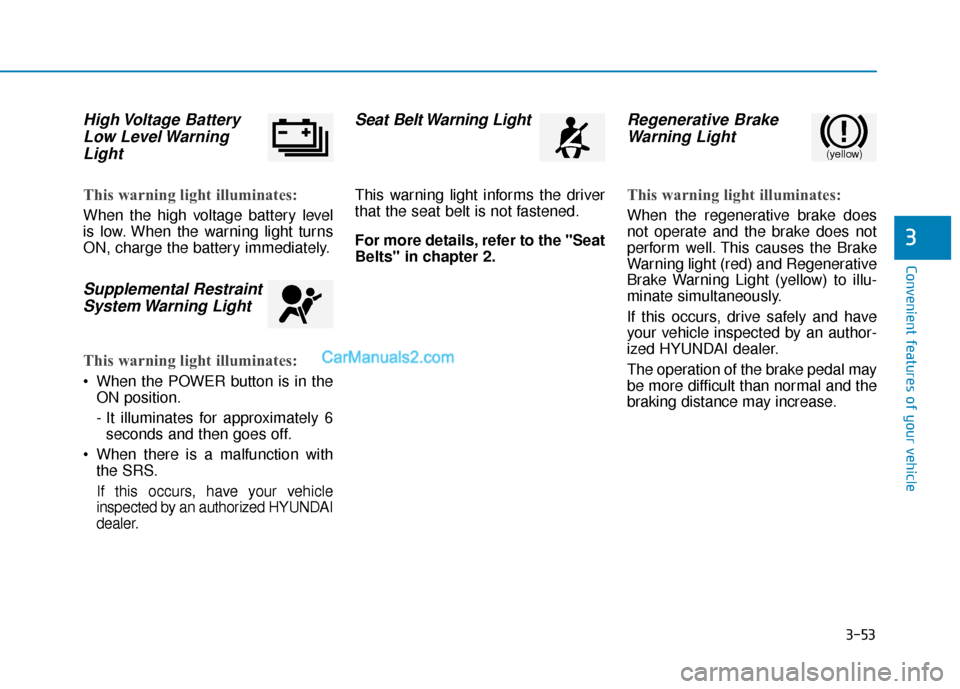
High Voltage BatteryLow Level WarningLight
This warning light illuminates:
When the high voltage battery level
is low. When the warning light turns
ON, charge the battery immediately.
Supplemental RestraintSystem Warning Light
This warning light illuminates:
When the POWER button is in the
ON position.
- It illuminates for approximately 6seconds and then goes off.
When there is a malfunction with the SRS.
If this occurs, have your vehicle
inspected by an authorized HYUNDAI
dealer.
Seat Belt Warning Light
This warning light informs the driver
that the seat belt is not fastened.
For more details, refer to the "Seat
Belts" in chapter 2.
Regenerative BrakeWarning Light
This warning light illuminates:
When the regenerative brake does
not operate and the brake does not
perform well. This causes the Brake
Warning light (red) and Regenerative
Brake Warning Light (yellow) to illu-
minate simultaneously.
If this occurs, drive safely and have
your vehicle inspected by an author-
ized HYUNDAI dealer.
The operation of the brake pedal may
be more difficult than normal and the
braking distance may increase.
(yellow)