HYUNDAI KONA EV 2023 Owner's Guide
Manufacturer: HYUNDAI, Model Year: 2023, Model line: KONA EV, Model: HYUNDAI KONA EV 2023Pages: 548, PDF Size: 49.14 MB
Page 31 of 548
Foreword / Electric Vehicle System Overview
1-26
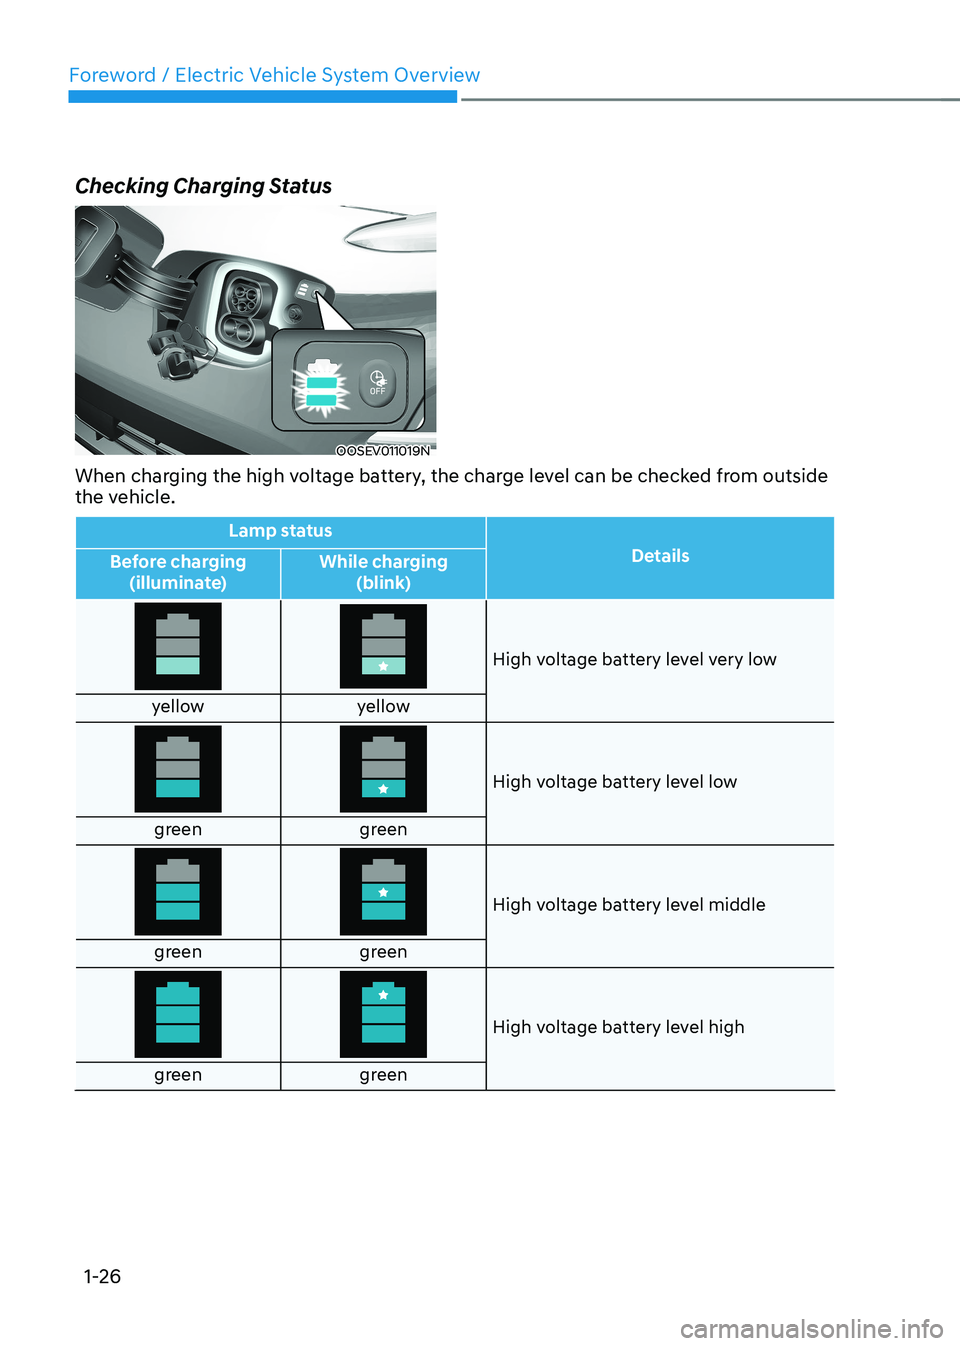
Checking Charging Status
OOSEV011019N
When charging the high voltage battery, the charge level can be checked from outside
the vehicle.
Lamp status Details
Before charging
(illuminate) While charging
(blink)
High voltage battery level very low
yellow yellow
High voltage battery level low
green green
High voltage battery level middle
green green
High voltage battery level high
green green
Page 32 of 548
01
1-27
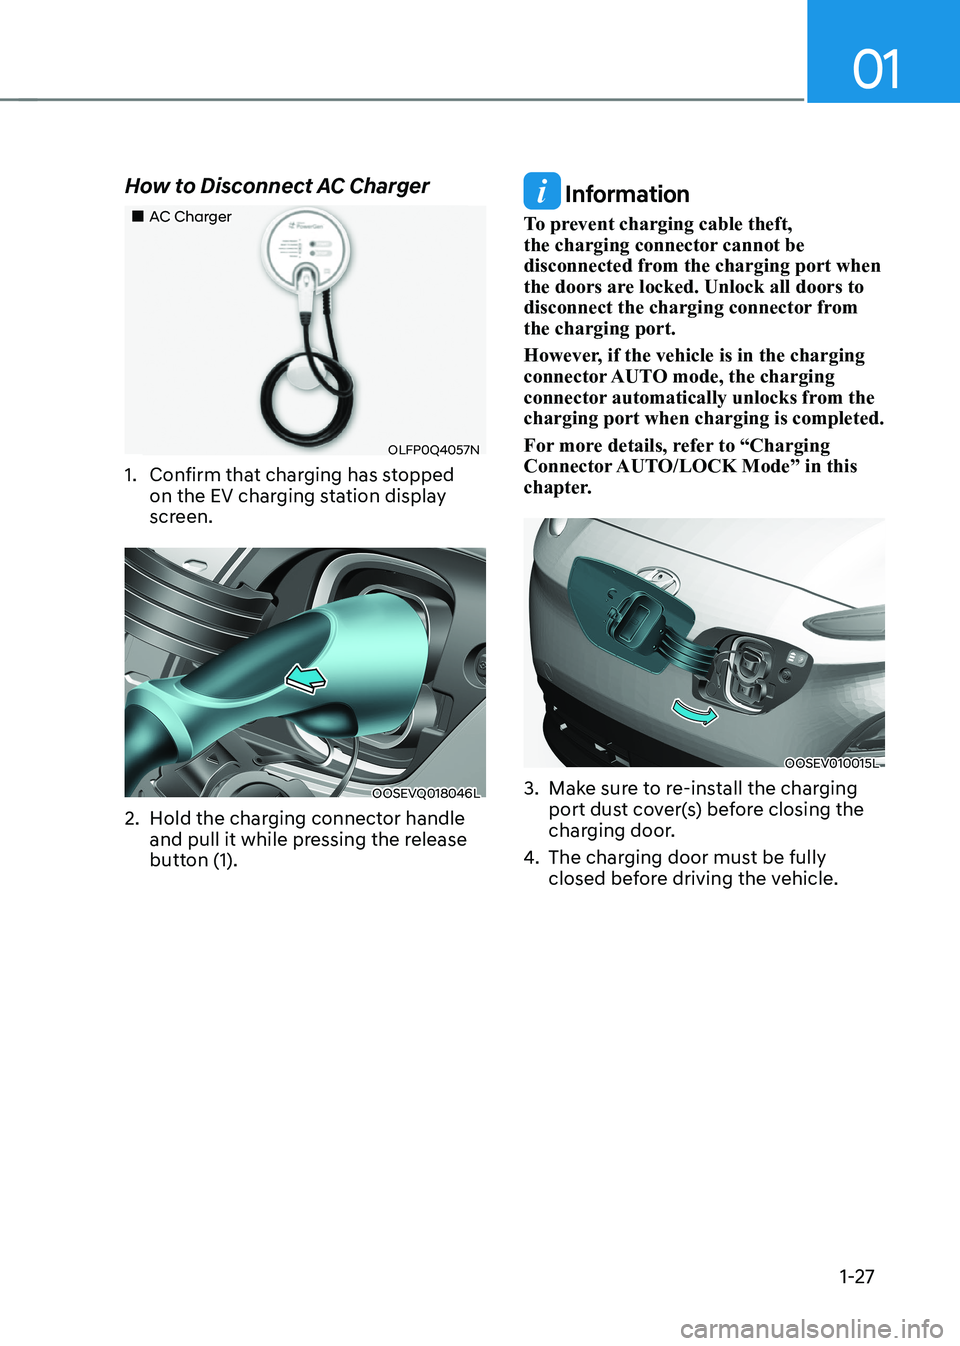
How to Disconnect AC Charger
„„AC Charger
OLFP0Q4057N
1. Confirm that charging has stopped on the EV charging station display
screen.
OOSEVQ018046L
2. Hold the charging connector handle and pull it while pressing the release
button (1).
Information
To prevent charging cable theft,
the charging connector cannot be
disconnected from the charging port when
the doors are locked. Unlock all doors to
disconnect the charging connector from the charging port.
However, if the vehicle is in the charging
connector AUTO mode, the charging
connector automatically unlocks from the charging port when charging is completed.
For more details, refer to “Charging
Connector AUTO/LOCK Mode” in this
chapter.
OOSEV010015L
3. Make sure to re-install the charging port dust cover(s) before closing the
charging door.
4. The charging door must be fully
closed before driving the vehicle.
Page 33 of 548
Foreword / Electric Vehicle System Overview
1-28
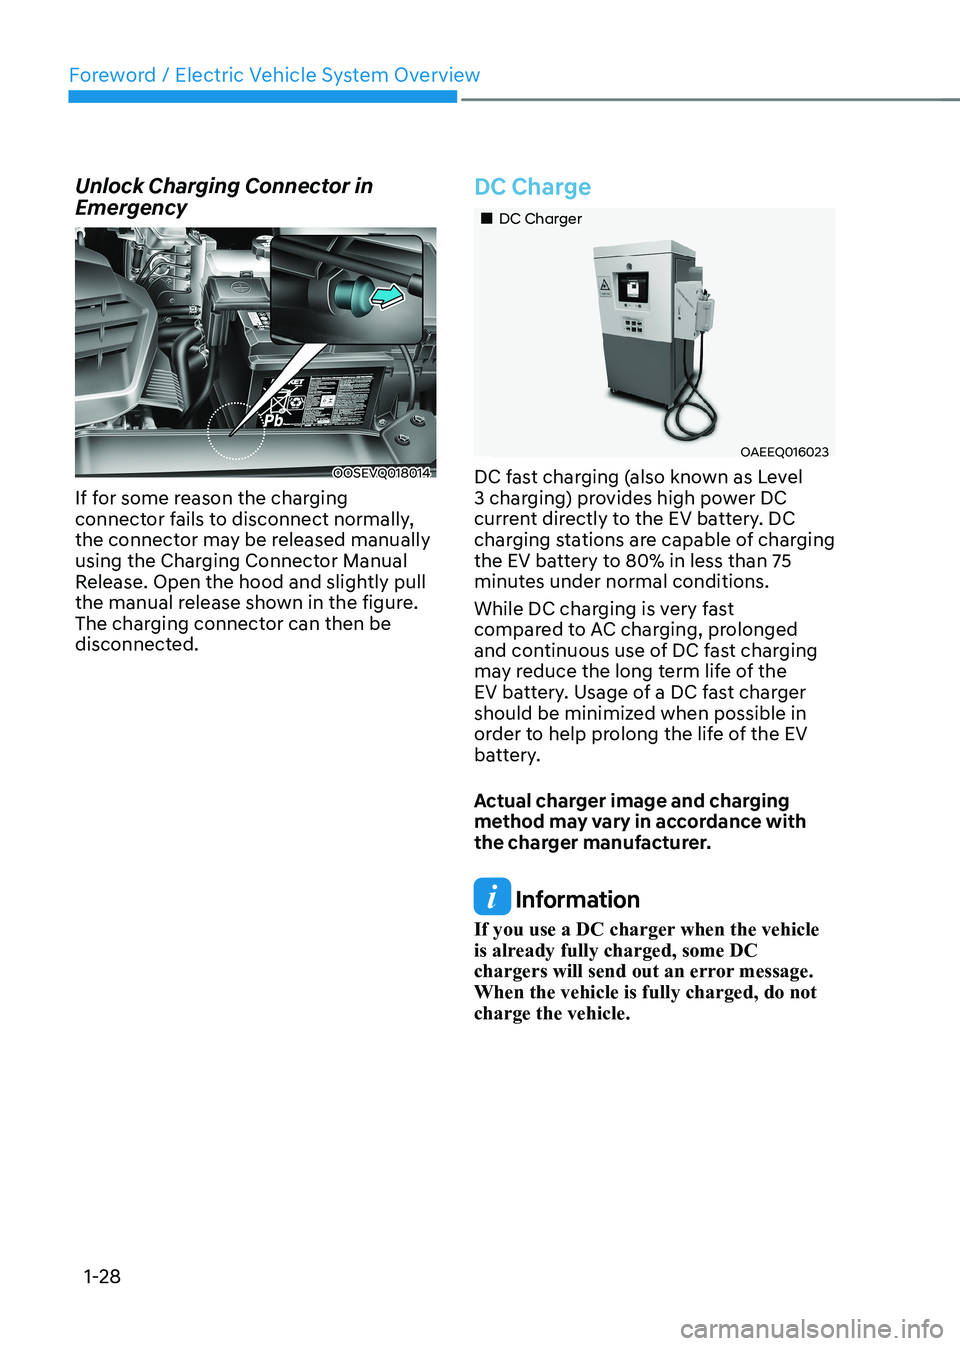
Unlock Charging Connector in
Emergency
OOSEVQ018014
If for some reason the charging
connector fails to disconnect normally,
the connector may be released manually
using the Charging Connector Manual
Release. Open the hood and slightly pull
the manual release shown in the figure.
The charging connector can then be
disconnected.
DC Charge
„„DC Charger
OAEEQ016023
DC fast charging (also known as Level
3 charging) provides high power DC
current directly to the EV battery. DC
charging stations are capable of charging
the EV battery to 80% in less than 75
minutes under normal conditions.
While DC charging is very fast
compared to AC charging, prolonged
and continuous use of DC fast charging
may reduce the long term life of the
EV battery. Usage of a DC fast charger
should be minimized when possible in
order to help prolong the life of the EV
battery.
Actual charger image and charging
method may vary in accordance with
the charger manufacturer.
Information
If you use a DC charger when the vehicle
is already fully charged, some DC
chargers will send out an error message. When the vehicle is fully charged, do not charge the vehicle.
Page 34 of 548
01
1-29
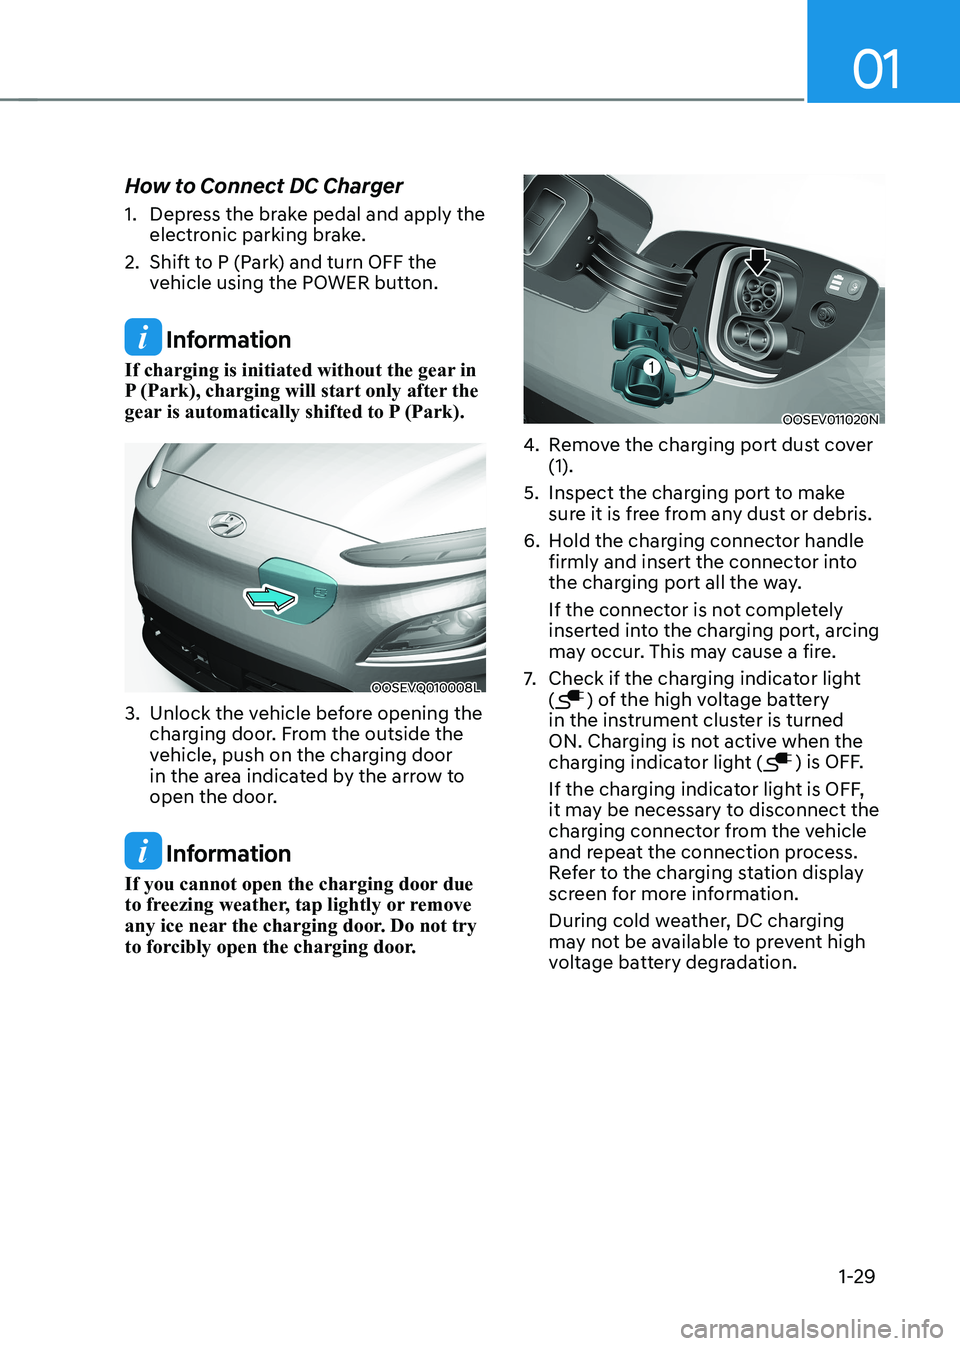
How to Connect DC Charger
1. Depress the brake pedal and apply the
electronic parking brake.
2. Shift to P (Park) and turn OFF the vehicle using the POWER button.
Information
If charging is initiated without the gear in
P (Park), charging will start only after the
gear is automatically shifted to P (Park).
OOSEVQ010008L
3. Unlock the vehicle before opening the charging door. From the outside the
vehicle, push on the charging door
in the area indicated by the arrow to
open the door.
Information
If you cannot open the charging door due
to freezing weather, tap lightly or remove
any ice near the charging door. Do not try
to forcibly open the charging door.
OOSEV011020N
4. Remove the charging port dust cover (1).
5. Inspect the charging port to make sure it is free from any dust or debris.
6. Hold the charging connector handle firmly and insert the connector into
the charging port all the way.
If the connector is not completely
inserted into the charging port, arcing
may occur. This may cause a fire.
7. Check if the charging indicator light (
) of the high voltage battery
in the instrument cluster is turned
ON. Charging is not active when the
charging indicator light (
) is OFF.
If the charging indicator light is OFF,
it may be necessary to disconnect the
charging connector from the vehicle
and repeat the connection process.
Refer to the charging station display
screen for more information.
During cold weather, DC charging
may not be available to prevent high
voltage battery degradation.
Page 35 of 548
Foreword / Electric Vehicle System Overview
1-30
NOTICE
In high ambient temperature conditions
like during summer months, the A/C
system may be operating during
EV battery charging. You may hear
additional noises generated from the
operation of the A/C compressor and
cooling fan. This is a normal condition.
Information
Note that the vehicle cannot be shifted out
of P (Park) when the vehicle is charging.OOSEV040489L
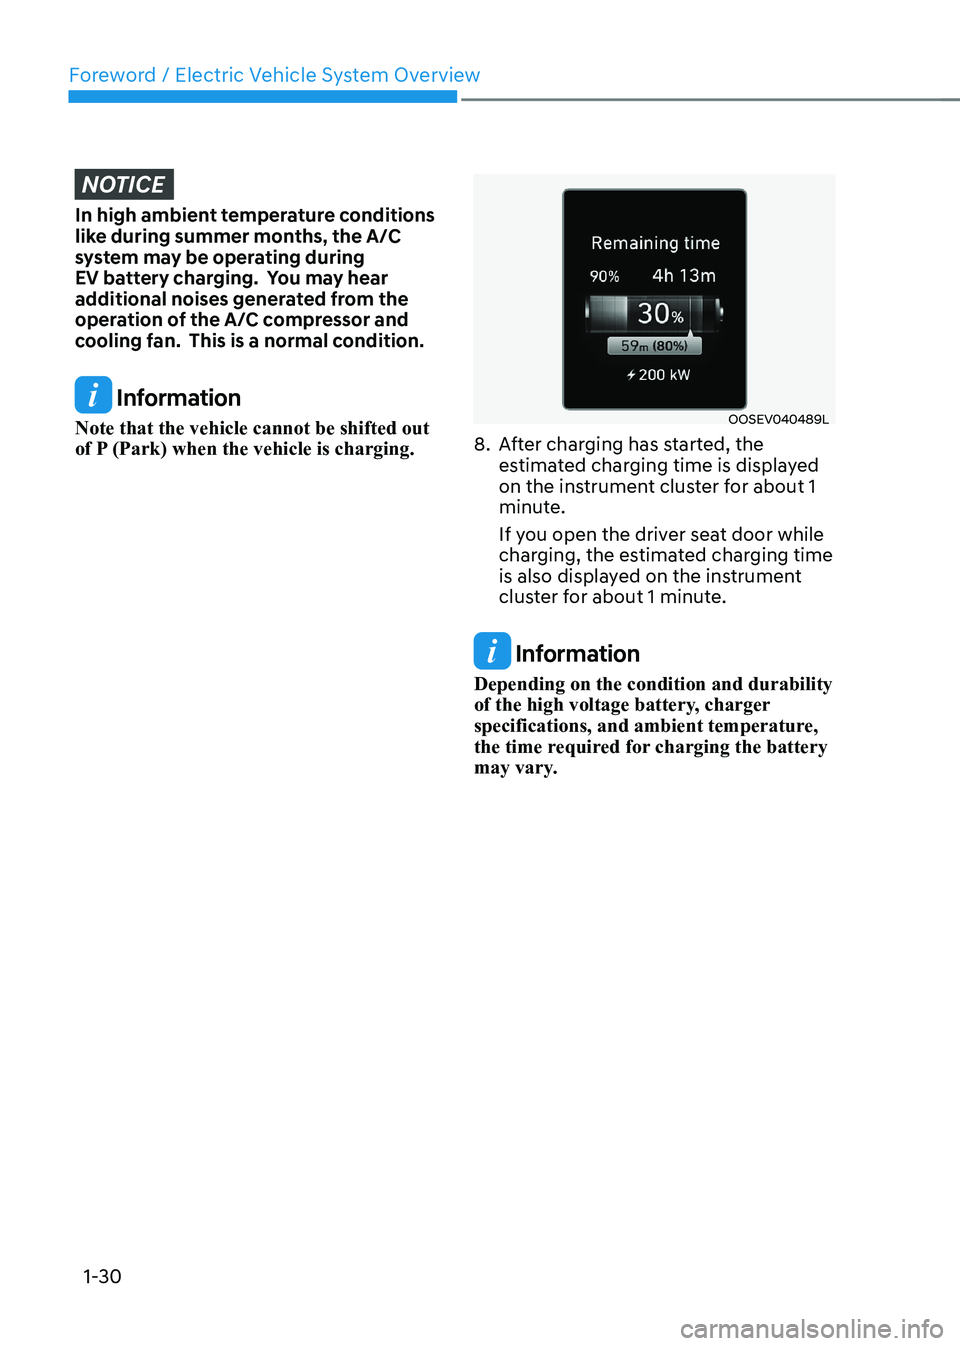
8. After charging has started, the estimated charging time is displayed
on the instrument cluster for about 1
minute.
If you open the driver seat door while
charging, the estimated charging time
is also displayed on the instrument
cluster for about 1 minute.
Information
Depending on the condition and durability
of the high voltage battery, charger
specifications, and ambient temperature,
the time required for charging the battery
may vary.
Page 36 of 548
01
1-31
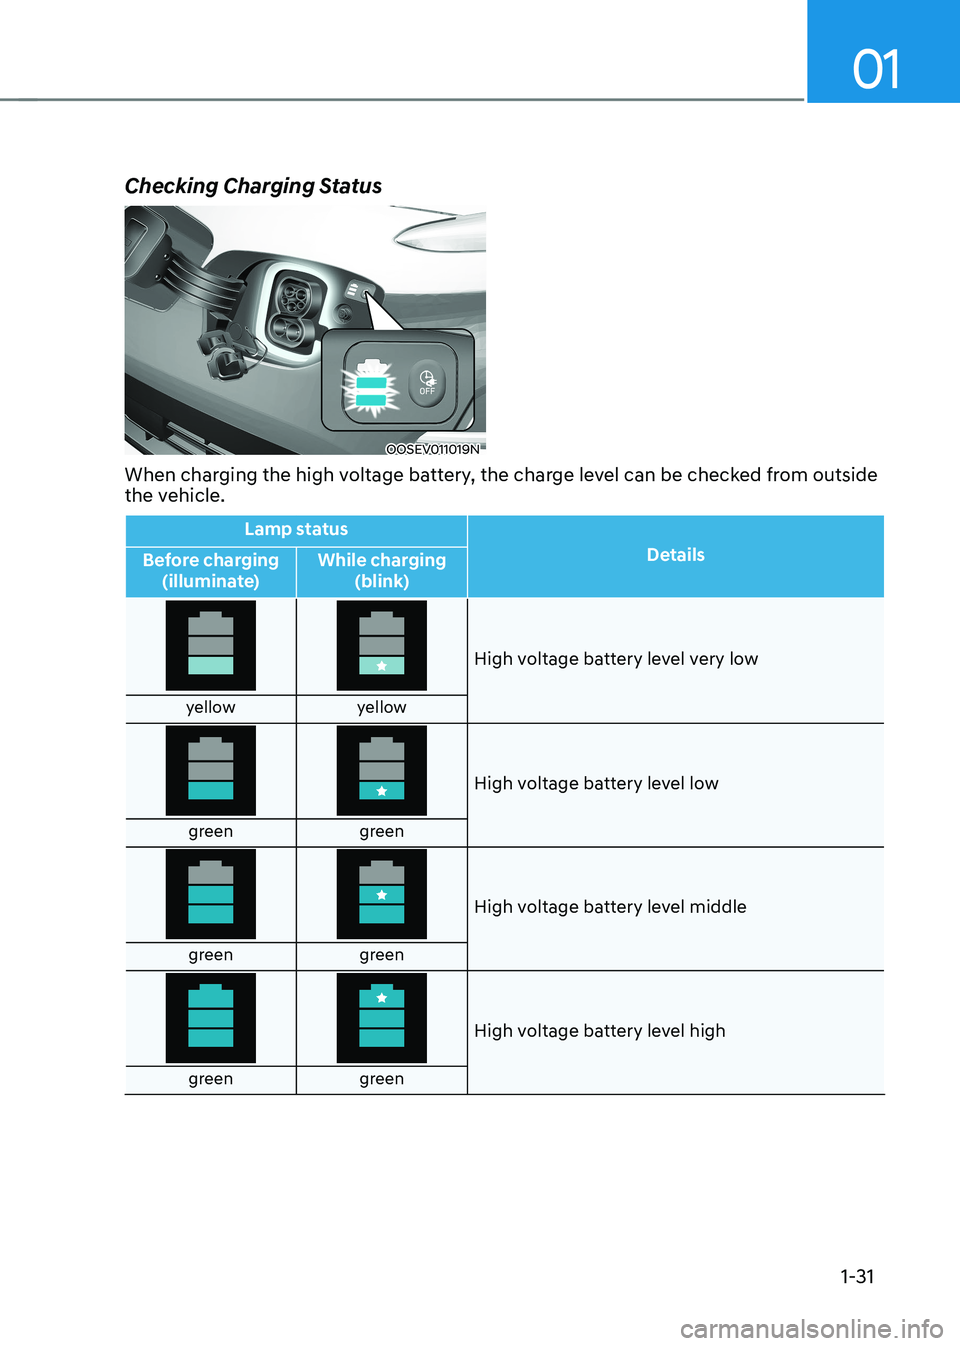
Checking Charging Status
OOSEV011019N
When charging the high voltage battery, the charge level can be checked from outside
the vehicle.
Lamp status Details
Before charging
(illuminate) While charging
(blink)
High voltage battery level very low
yellow yellow
High voltage battery level low
green green
High voltage battery level middle
green green
High voltage battery level high
green green
Page 37 of 548
Foreword / Electric Vehicle System Overview
1-32
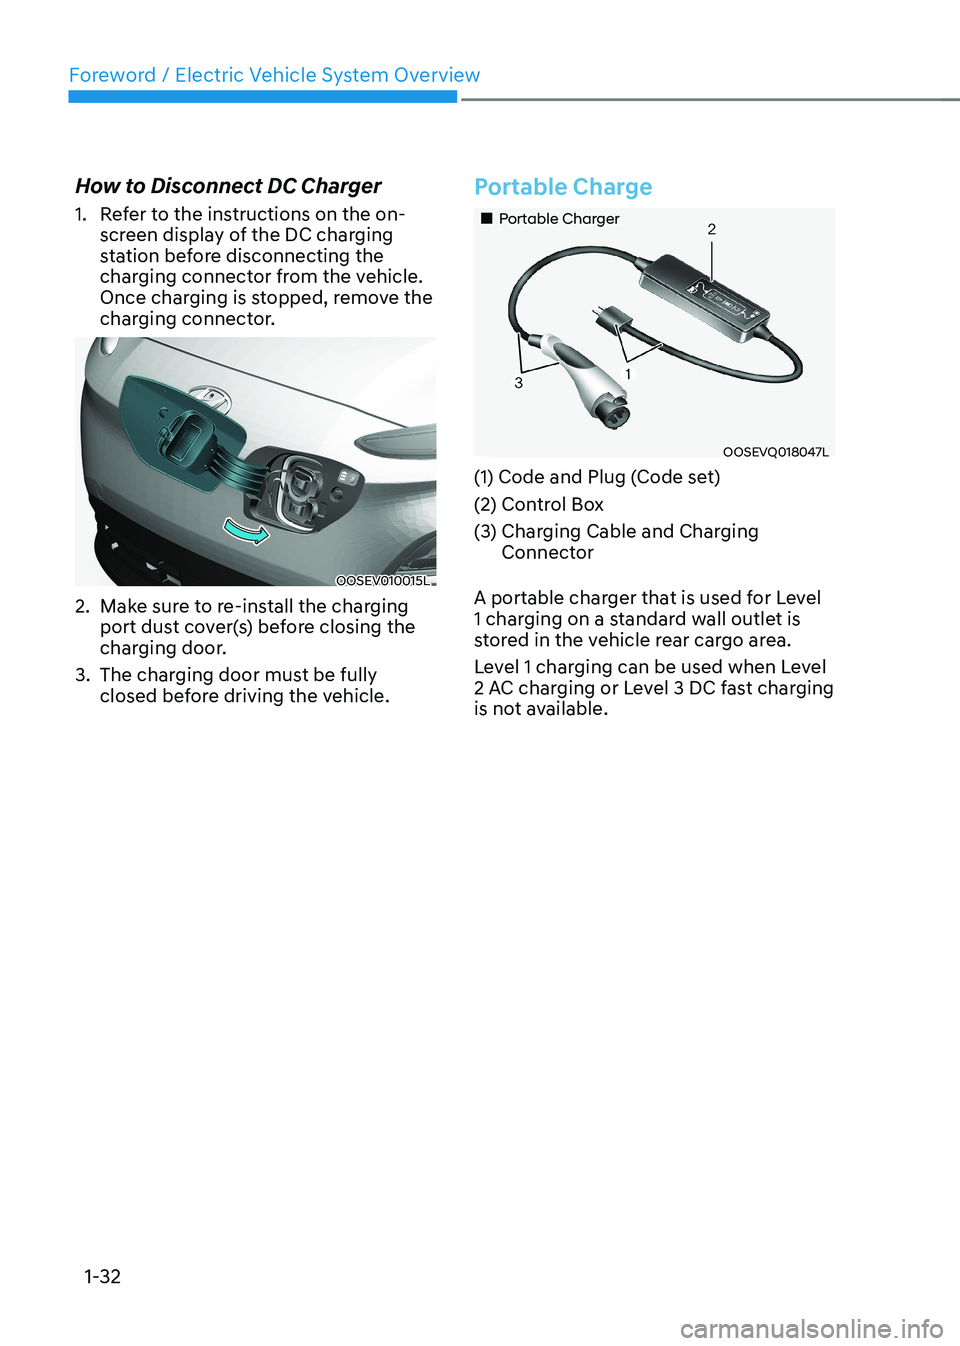
How to Disconnect DC Charger
1. Refer to the instructions on the on-
screen display of the DC charging
station before disconnecting the
charging connector from the vehicle.
Once charging is stopped, remove the
charging connector.
OOSEV010015L
2. Make sure to re-install the charging port dust cover(s) before closing the
charging door.
3. The charging door must be fully closed before driving the vehicle.
Portable Charge
„„Portable Charger
OOSEVQ018047L
(1) Code and Plug (Code set)
(2) Control Box
(3) Charging Cable and Charging Connector
A portable charger that is used for Level
1 charging on a standard wall outlet is
stored in the vehicle rear cargo area.
Level 1 charging can be used when Level
2 AC charging or Level 3 DC fast charging
is not available.
Page 38 of 548
01
1-33
How to set the charging rate of the
portable charger
OAEE046506N
PlugElectric Outlet
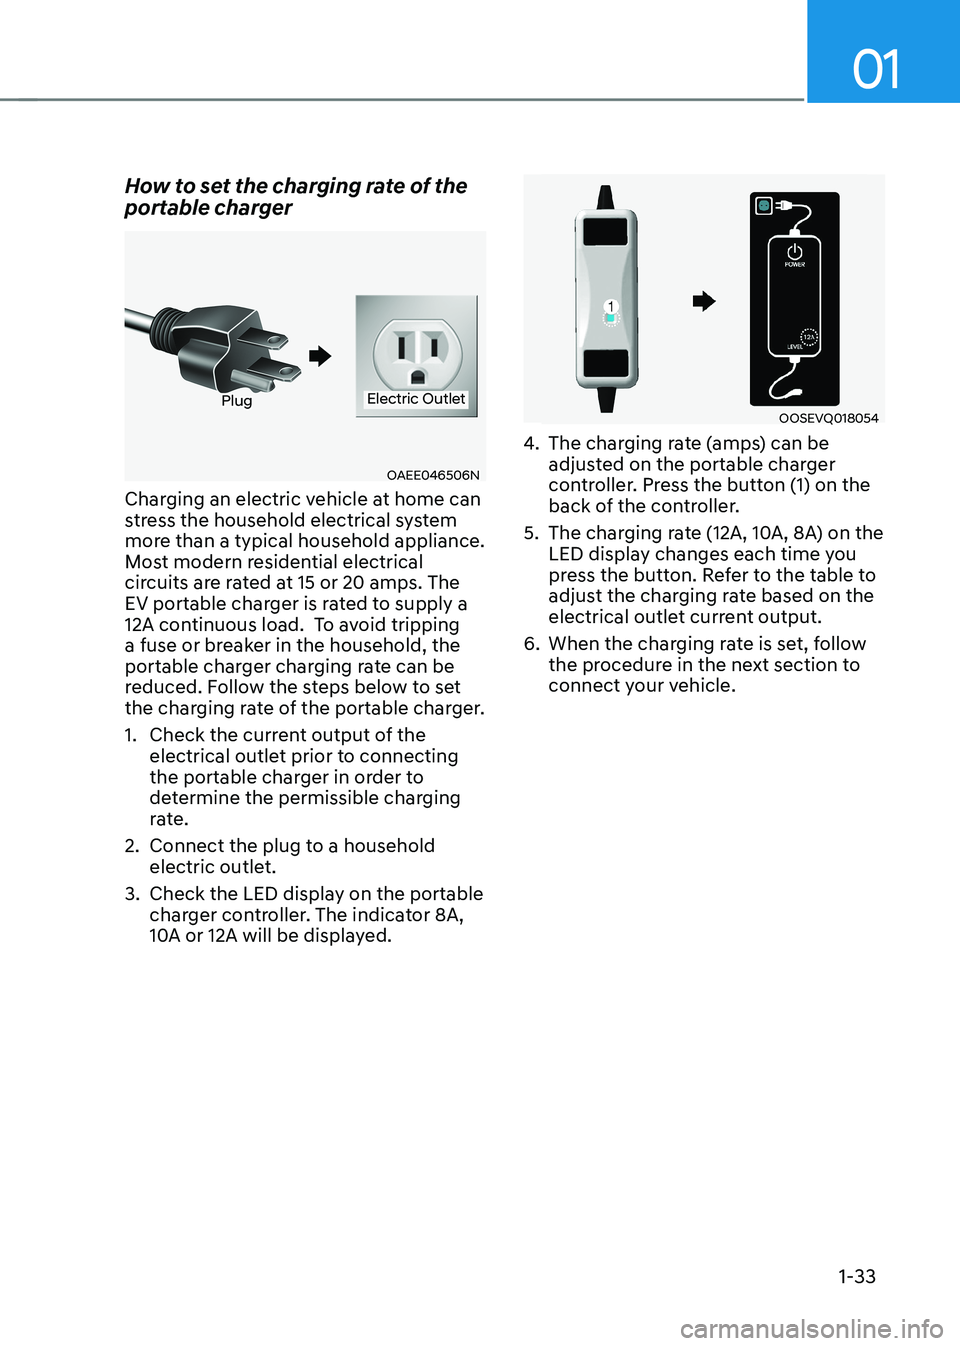
Charging an electric vehicle at home can
stress the household electrical system
more than a typical household appliance.
Most modern residential electrical
circuits are rated at 15 or 20 amps. The
EV portable charger is rated to supply a
12A continuous load. To avoid tripping
a fuse or breaker in the household, the
portable charger charging rate can be
reduced. Follow the steps below to set
the charging rate of the portable charger.
1. Check the current output of the electrical outlet prior to connecting
the portable charger in order to
determine the permissible charging
rate.
2. Connect the plug to a household electric outlet.
3. Check the LED display on the portable charger controller. The indicator 8A,
10A or 12A will be displayed.OOSEVQ018054
4. The charging rate (amps) can be
adjusted on the portable charger
controller. Press the button (1) on the
back of the controller.
5. The charging rate (12A, 10A, 8A) on the LED display changes each time you
press the button. Refer to the table to
adjust the charging rate based on the
electrical outlet current output.
6. When the charging rate is set, follow the procedure in the next section to
connect your vehicle.
Page 39 of 548
Foreword / Electric Vehicle System Overview
1-34
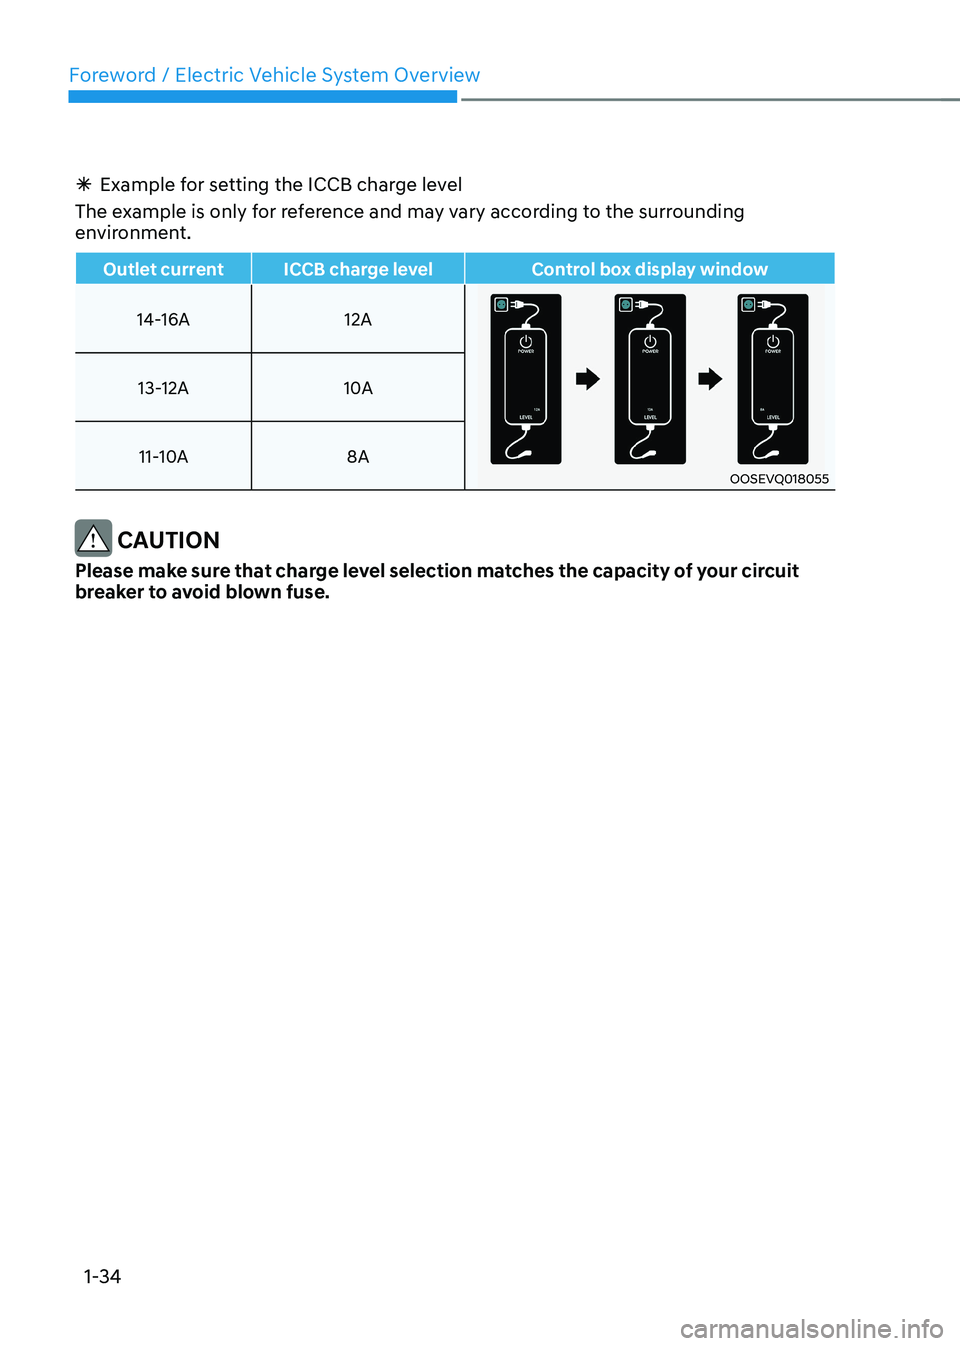
à Example for setting the ICCB charge level
The example is only for reference and may vary according to the surrounding
environment.
Outlet current ICCB charge level Control box display window
14-16A 12A
OOSEVQ018055
13-12A
10A
11-10A 8A
CAUTION
Please make sure that charge level selection matches the capacity of your circuit
breaker to avoid blown fuse.
Page 40 of 548
01
1-35
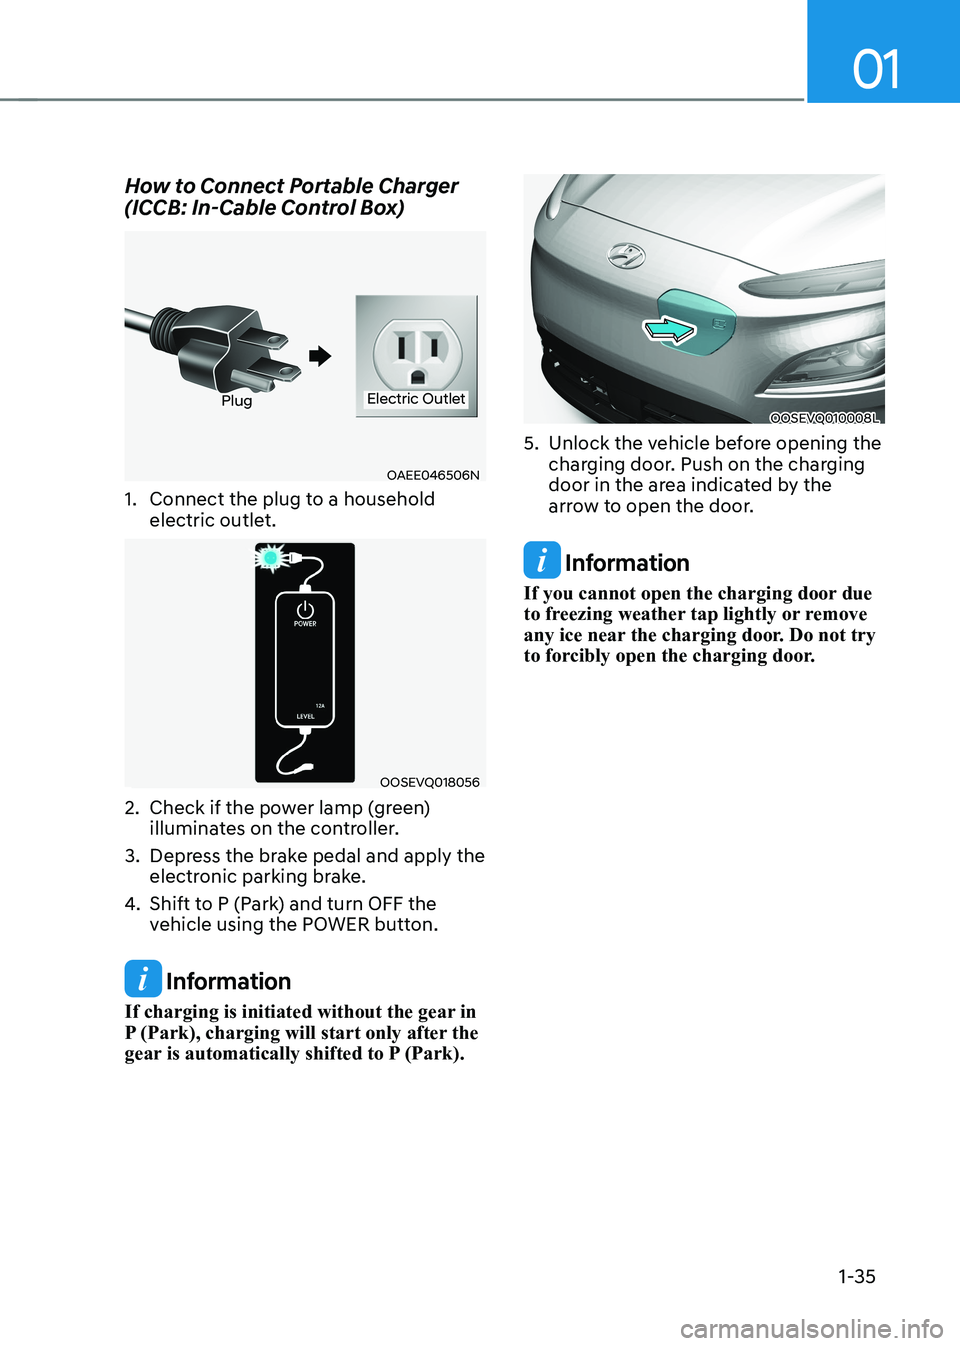
How to Connect Portable Charger
(ICCB: In-Cable Control Box)
OAEE046506N
PlugElectric Outlet
1. Connect the plug to a household electric outlet.
OOSEVQ018056
2. Check if the power lamp (green) illuminates on the controller.
3. Depress the brake pedal and apply the electronic parking brake.
4. Shift to P (Park) and turn OFF the
vehicle using the POWER button.
Information
If charging is initiated without the gear in
P (Park), charging will start only after the
gear is automatically shifted to P (Park).
OOSEVQ010008L
5. Unlock the vehicle before opening the charging door. Push on the charging
door in the area indicated by the
arrow to open the door.
Information
If you cannot open the charging door due
to freezing weather tap lightly or remove
any ice near the charging door. Do not try
to forcibly open the charging door.