engine coolant Hyundai Matrix 2003 User Guide
[x] Cancel search | Manufacturer: HYUNDAI, Model Year: 2003, Model line: Matrix, Model: Hyundai Matrix 2003Pages: 312, PDF Size: 4.1 MB
Page 136 of 312
DO-IT-YOURSELF MAINTENANCE 6-3
G010E01FC-GAT
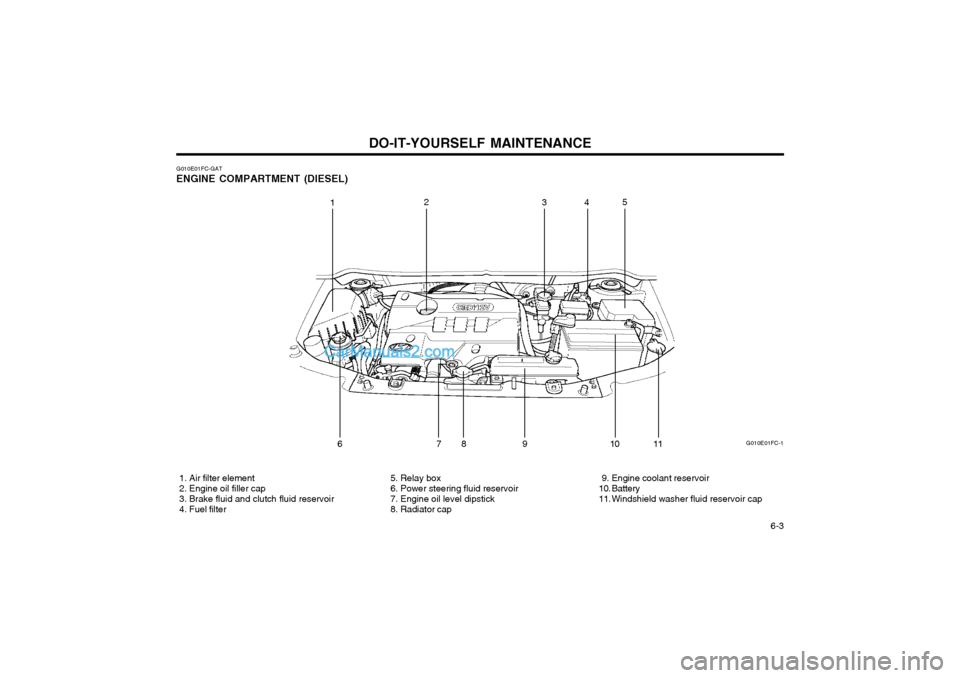
ENGINE COMPARTMENT (DIESEL)
G010E01FC-1
12
345
6 7 8 9 10 11
1. Air filter element
2. Engine oil filler cap
3. Brake fluid and clutch fluid reservoir
4. Fuel filter 5. Relay box
6. Power steering fluid reservoir
7. Engine oil level dipstick
8. Radiator cap 9. Engine coolant reservoir
10. Battery
11. Windshield washer fluid reservoir cap
Page 137 of 312
DO-IT-YOURSELF MAINTENANCE
6-4
G020A01A-AAT
GENERAL CHECKS Engine Compartment
The following should be checked regularly:
o Engine oil level and condition
o Transaxle fluid level and condition
o Brake fluid level
o Clutch fluid level
o Engine coolant level
o Windshield washer fluid level
o Accessory drive belt condition
o Engine coolant hose condition
o Fluid leaks (on or below components)
o Power steering fluid level
o Battery condition
o Air filter condition
G020B01A-AAT
Vehicle Exterior The following should be checked monthly:
o Overall appearance and condition
o Wheel condition and wheel nut torque
o Exhaust system condition
o Light condition and operation
o Windshield glass condition
o Wiper blade condition
o Paint condition and body corrosion
o Fluid leaks
o Door and hood lock condition
o Tire pressure and condition (including spare tire) G020C01A-AAT
Vehicle Interior
The following should be checked each time when the vehicle is driven:
o Lights operation
o Windshield wiper operation
o Horn operation
o Defroster, heating system operation (and air conditioning, if installed)
o Steering operation and condition
o Mirror condition and operation
o Turn signal operation
o Accelerator pedal operation
o Brake operation, including parking brake
o Manual transaxle operation, including clutch operation
o Automatic transaxle operation, including "Park" mechanism operation
o Seat control condition and operation
o Seat belt condition and operation
o Sunvisor operation
If you notice anything that does not operate correctly or appears to be functioning incorrect-ly, inspect it carefully and seek assistance fromyour Hyundai dealer if service is needed. G030A01FC-GAT
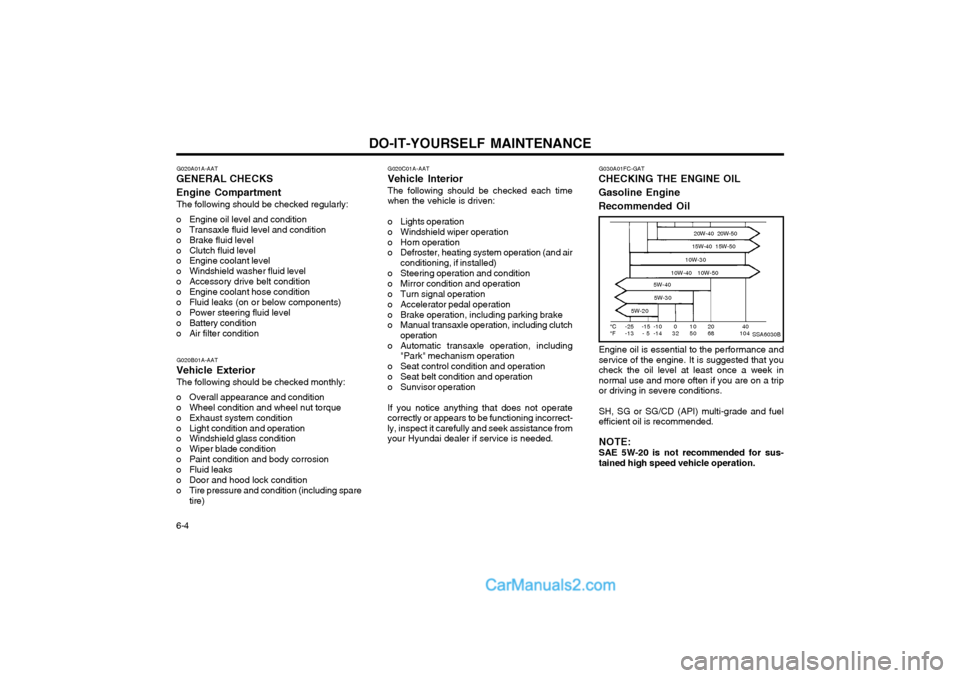
CHECKING THE ENGINE OIL Gasoline EngineRecommended Oil
SSA6030B
20W-40 20W-50
10W-30 15W-40 15W-50
10W-40 10W-50
°C °F -25-13 2068 40104
-15
- 5 -10-14 0
32 1050
5W-40
5W-30
5W-20
Engine oil is essential to the performance and service of the engine. It is suggested that youcheck the oil level at least once a week innormal use and more often if you are on a tripor driving in severe conditions. SH, SG or SG/CD (API) multi-grade and fuel efficient oil is recommended. NOTE: SAE 5W-20 is not recommended for sus- tained high speed vehicle operation.
Page 139 of 312
DO-IT-YOURSELF MAINTENANCE
6-6 If the oil level is close to or below the "L" mark,
add oil until it reaches the "F" mark. To add oil:
1. Remove the oil filler cap by turning it counter- clockwise.
2. Add oil, then check the level again. Do not overfill.
3. Replace the cap by turning it clockwise.
The distance between the "F" and "L" marks is
equal to about 1 liter(Gasoline Engine)/1.2 liter(Diesel Engine) of oil.
G350A01A-GAT
ENGINE OIL CONSUMPTION Function of Engine Oil
Engine oil has the primary function of lubricat-
ing and cooling the inside of the engine.
Engine oil consumption It is normal that an engine should consume
some engine oil while normal driving. The cause of oil consumption in a normal engine are asfollows;
o Engine oil is used to lubricate pistons, piston rings and cylinders. A thin film of oil is left on the cylinder wall when a piston moves downwards in thecylinder. High negative pressure generated
during engine operation sucks some of theoil into the combustion chamber. This oil with some oil of the cylinder wall is burned by the high temperature combustion gases during the combustion process.
o The engine oil consumption is strongly ef- fected by the viscosity and quality of oil,engine rpm and driving condition etc. Theengine oil is more consumed under severedriving conditions such as high speeds and
frequent acceleration and deceleration thannormal driving condition.
G040A03FC-GAT
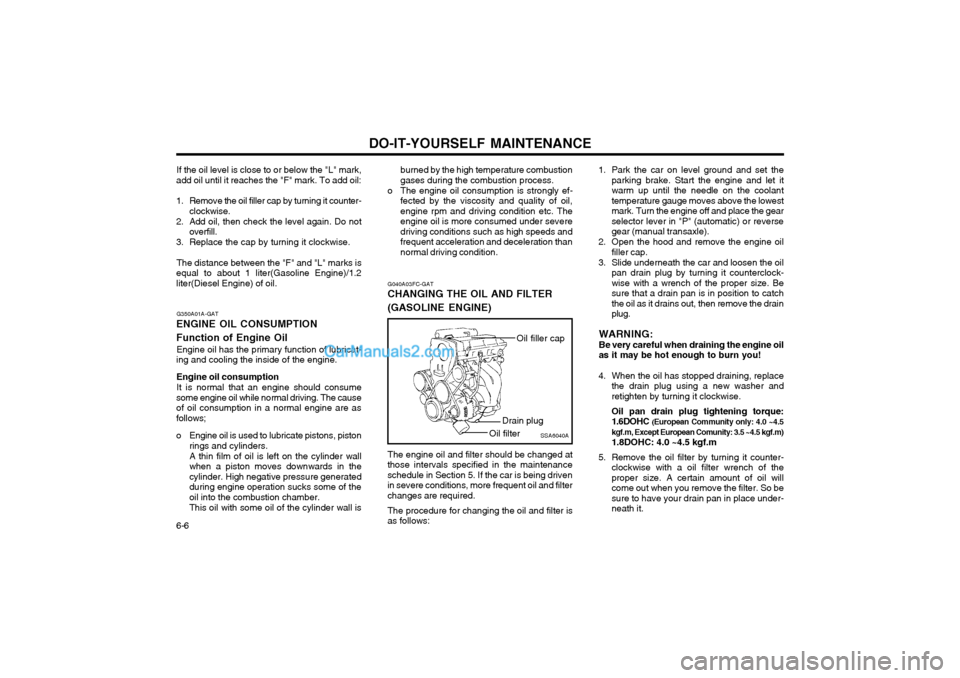
CHANGING THE OIL AND FILTER (GASOLINE ENGINE)
The engine oil and filter should be changed at
those intervals specified in the maintenance schedule in Section 5. If the car is being drivenin severe conditions, more frequent oil and filterchanges are required.
The procedure for changing the oil and filter is
as follows: 1. Park the car on level ground and set the
parking brake. Start the engine and let itwarm up until the needle on the coolanttemperature gauge moves above the lowestmark. Turn the engine off and place the gearselector lever in "P" (automatic) or reversegear (manual transaxle).
2. Open the hood and remove the engine oil filler cap.
3. Slide underneath the car and loosen the oil pan drain plug by turning it counterclock-wise with a wrench of the proper size. Besure that a drain pan is in position to catchthe oil as it drains out, then remove the drainplug.
WARNING:Be very careful when draining the engine oilas it may be hot enough to burn you!
4. When the oil has stopped draining, replace the drain plug using a new washer andretighten by turning it clockwise. Oil pan drain plug tightening torque: 1.6DOHC (European Community only: 4.0 ~4.5
kgf.m, Except European Comunity: 3.5 ~4.5 kgf.m) 1.8DOHC: 4.0 ~4.5 kgf.m
5. Remove the oil filter by turning it counter- clockwise with a oil filter wrench of the proper size. A certain amount of oil willcome out when you remove the filter. So besure to have your drain pan in place under-neath it.
SSA6040A
Oil filler cap
Drain plug
Oil filter
Page 140 of 312
DO-IT-YOURSELF MAINTENANCE 6-7
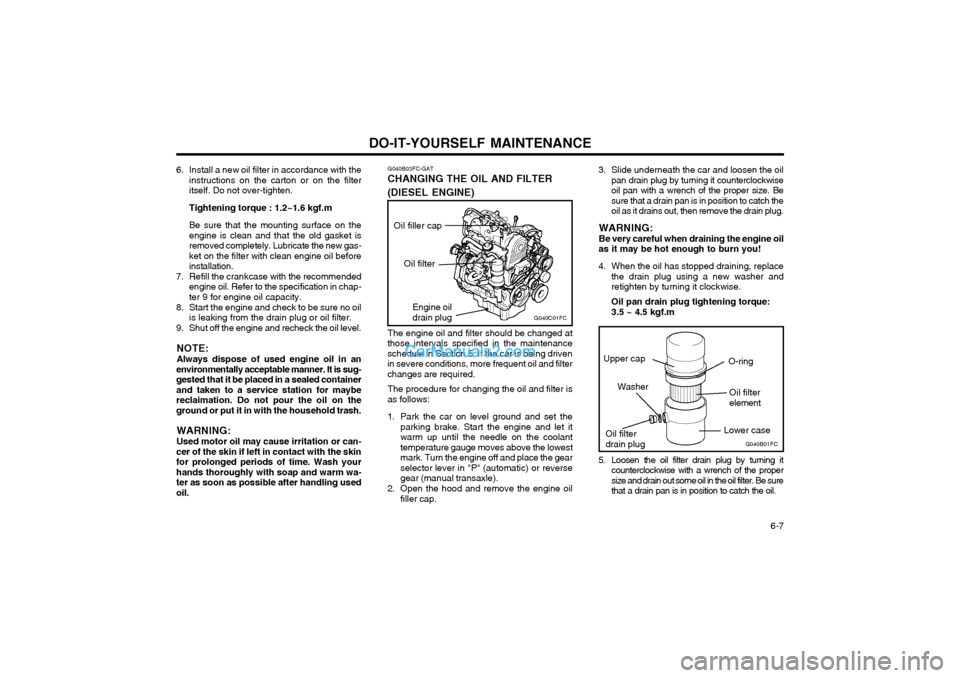
G040C01FCEngine oil drain plug
Oil filter
G040B03FC-GAT
CHANGING THE OIL AND FILTER (DIESEL ENGINE)
The engine oil and filter should be changed at
those intervals specified in the maintenance schedule in Section 5. If the car is being drivenin severe conditions, more frequent oil and filterchanges are required.
The procedure for changing the oil and filter is
as follows:
1. Park the car on level ground and set the parking brake. Start the engine and let it warm up until the needle on the coolanttemperature gauge moves above the lowestmark. Turn the engine off and place the gearselector lever in "P" (automatic) or reversegear (manual transaxle).
2. Open the hood and remove the engine oil filler cap. 3. Slide underneath the car and loosen the oil
pan drain plug by turning it counterclockwiseoil pan with a wrench of the proper size. Besure that a drain pan is in position to catch theoil as it drains out, then remove the drain plug.
WARNING: Be very careful when draining the engine oil
as it may be hot enough to burn you!
4. When the oil has stopped draining, replace the drain plug using a new washer and retighten by turning it clockwise. Oil pan drain plug tightening torque: 3.5 ~ 4.5 kgf.m
6. Install a new oil filter in accordance with the
instructions on the carton or on the filter itself. Do not over-tighten. Tightening torque : 1.2~1.6 kgf.mBe sure that the mounting surface on the engine is clean and that the old gasket isremoved completely. Lubricate the new gas-ket on the filter with clean engine oil beforeinstallation.
7. Refill the crankcase with the recommended engine oil. Refer to the specification in chap-ter 9 for engine oil capacity.
8. Start the engine and check to be sure no oil is leaking from the drain plug or oil filter.
9. Shut off the engine and recheck the oil level.
NOTE: Always dispose of used engine oil in an
environmentally acceptable manner. It is sug- gested that it be placed in a sealed containerand taken to a service station for maybereclaimation. Do not pour the oil on theground or put it in with the household trash.
WARNING: Used motor oil may cause irritation or can-
cer of the skin if left in contact with the skin for prolonged periods of time. Wash yourhands thoroughly with soap and warm wa-ter as soon as possible after handling usedoil. 5. Loosen the oil filter drain plug by turning it
counterclockwise with a wrench of the propersize and drain out some oil in the oil filter. Be surethat a drain pan is in position to catch the oil.
G040B01FCOil filter drain plug O-ring
Oil filterelement
Washer
Upper cap
Lower case
Oil filler cap
Page 141 of 312
DO-IT-YOURSELF MAINTENANCE
6-8
G050B01A-AAT
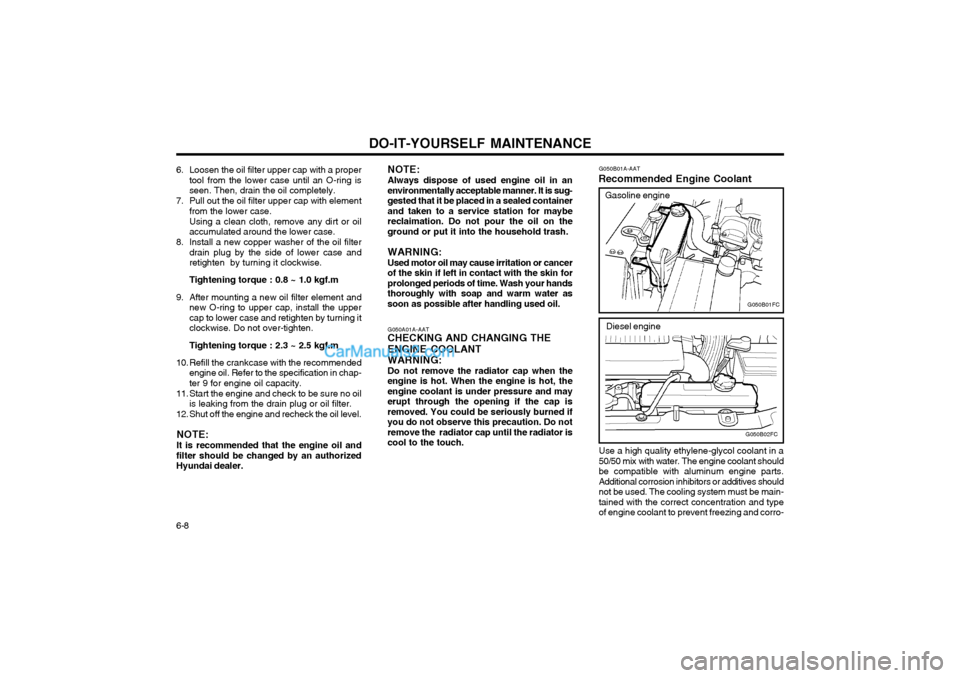
Recommended Engine Coolant
Use a high quality ethylene-glycol coolant in a 50/50 mix with water. The engine coolant shouldbe compatible with aluminum engine parts.Additional corrosion inhibitors or additives shouldnot be used. The cooling system must be main-tained with the correct concentration and typeof engine coolant to prevent freezing and corro-
G050B01FC
G050B02FC
Gasoline engine
Diesel engine
6. Loosen the oil filter upper cap with a proper tool from the lower case until an O-ring is seen. Then, drain the oil completely.
7. Pull out the oil filter upper cap with element from the lower case. Using a clean cloth, remove any dirt or oil accumulated around the lower case.
8. Install a new copper washer of the oil filter drain plug by the side of lower case andretighten by turning it clockwise.
Tightening torque : 0.8 ~ 1.0 kgf.m
9. After mounting a new oil filter element and new O-ring to upper cap, install the upper cap to lower case and retighten by turning itclockwise. Do not over-tighten.
Tightening torque : 2.3 ~ 2.5 kgf.m
10. Refill the crankcase with the recommended engine oil. Refer to the specification in chap- ter 9 for engine oil capacity.
11. Start the engine and check to be sure no oil is leaking from the drain plug or oil filter.
12. Shut off the engine and recheck the oil level.
NOTE: It is recommended that the engine oil and
filter should be changed by an authorized Hyundai dealer. G050A01A-AAT
CHECKING AND CHANGING THE ENGINE COOLANT
WARNING: Do not remove the radiator cap when the
engine is hot. When the engine is hot, the engine coolant is under pressure and mayerupt through the opening if the cap isremoved. You could be seriously burned ifyou do not observe this precaution. Do notremove the radiator cap until the radiator iscool to the touch. NOTE: Always dispose of used engine oil in an environmentally acceptable manner. It is sug-gested that it be placed in a sealed containerand taken to a service station for maybereclaimation. Do not pour the oil on theground or put it into the household trash. WARNING: Used motor oil may cause irritation or
cancer
of the skin if left in contact with the skin for prolonged periods of time. Wash your handsthoroughly with soap and warm water assoon as possible after handling used oil.
Page 142 of 312

DO-IT-YOURSELF MAINTENANCE 6-9
35% 65%
40% 60%
50% 50%
60% 40%
Ambient
temperature °C ( °F)-15 (5)
-25 (-13) -35 (-31)-45 (-49)
Antifreeze solution Water
Engine coolant concentration G050C01A-GAT
To Check the Coolant Level
G050C01FC
The coolant level can be seen on the side of the
plastic coolant reservoir. The level of the cool- ant should be between the "LOW" and "FULL"lines on the reservoir when the engine is cold.If the level is below the "LOW" mark, addengine coolant to bring it up between "LOW"and "FULL". If the level is low, inspect for G050D02A-AAT
To Change the Coolant The coolant should be changed at those inter-
vals specified in the vehicle maintenance sched-ule in Section 5.
CAUTION: Engine coolant can damage the finish of
your car. If you spill engine coolant on the car, wash it off thoroughly with clean water.
1. Park the car on level ground, set the park- ing brake and remove the radiator cap when cool.
2. Be sure your drain receptacle is in place. Open the drain cock on the radiator. Allowall the engine coolant to drain from thecooling system, then securely close the draincock.
3. Check Section 9 for the capacity of the cooling system in your car. Then, followingthe manufacturer’s directions on the enginecoolant container, add the appropriate quan-tity of coolant to the radiator.
G050C02FC
Diesel engine
Gasoline engine
sion. Never allow the concentration of anti- freeze to exceed the 60% level or go below the35% level, or damage to the cooling systemmay result. For proper concentration when add-ing or replacing the engine coolant, refer to thefollowing table.
coolant leaks and recheck the fluid level fre-quently. If the level drops again, visit yourHyundai dealer for an inspection and diagnosisof the reason.
Page 143 of 312
DO-IT-YOURSELF MAINTENANCE
6-10
CHAMPION NGK RC10YC BKR5ES
Unleaded
engine Leaded
engine
RC10YC4 BKR5ES-11
4. Turn the radiator cap counterclockwise with-
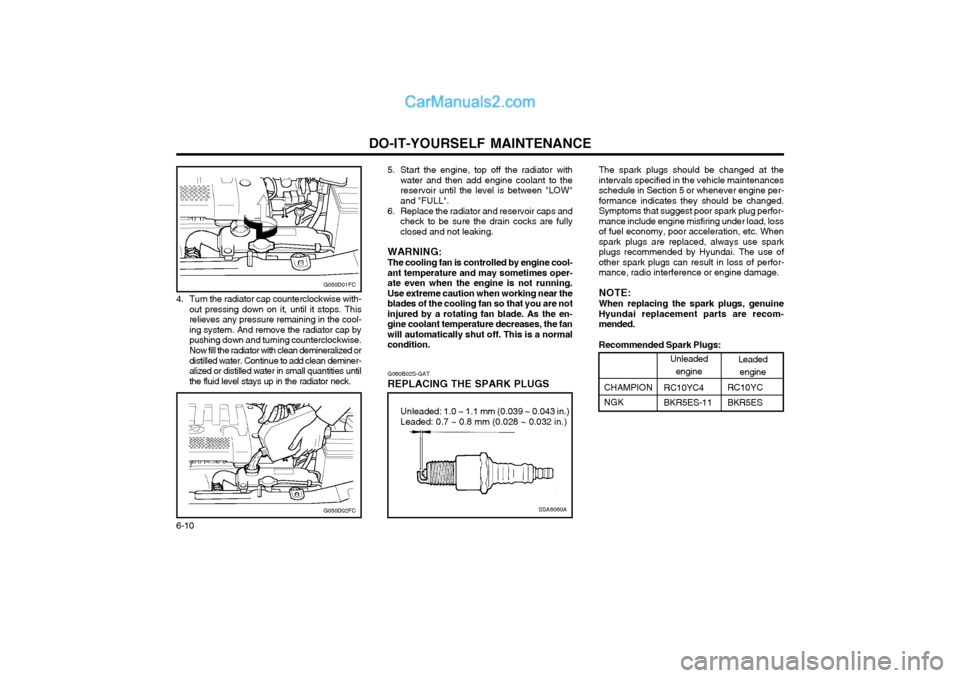
out pressing down on it, until it stops. This relieves any pressure remaining in the cool-ing system. And remove the radiator cap bypushing down and turning counterclockwise. Now fill the radiator with clean demineralized or distilled water. Continue to add clean deminer-alized or distilled water in small quantities untilthe fluid level stays up in the radiator neck. G060B02S-GAT
REPLACING THE SPARK PLUGS The spark plugs should be changed at theintervals specified in the vehicle maintenancesschedule in Section 5 or whenever engine per-formance indicates they should be changed.Symptoms that suggest poor spark plug perfor-mance include engine misfiring under load, lossof fuel economy, poor acceleration, etc. Whenspark plugs are replaced, always use sparkplugs recommended by Hyundai. The use ofother spark plugs can result in loss of perfor-mance, radio interference or engine damage. NOTE: When replacing the spark plugs, genuine Hyundai replacement parts are recom-mended. Recommended Spark Plugs:
SSA6060A
Unleaded: 1.0 ~ 1.1 mm (0.039 ~ 0.043 in.) Leaded: 0.7 ~ 0.8 mm (0.028 ~ 0.032 in.)
G050D01FC
5. Start the engine, top off the radiator with
water and then add engine coolant to the reservoir until the level is between "LOW"and "FULL".
6. Replace the radiator and reservoir caps and check to be sure the drain cocks are fullyclosed and not leaking.
WARNING: The cooling fan is controlled by engine cool- ant temperature and may sometimes oper-ate even when the engine is not running.Use extreme caution when working near theblades of the cooling fan so that you are notinjured by a rotating fan blade. As the en-gine coolant temperature decreases, the fanwill automatically shut off. This is a normalcondition.
G050D02FC
Page 145 of 312

DO-IT-YOURSELF MAINTENANCE
6-12
G090A01A-GAT
FILLING THE WASHER RESERVOIR
The washer fluid reservoir supplies fluid to the windshield washer system. A good quality washer fluid should be used to fill the washer reservoir. The fluid level should bechecked more frequently during bad weather orwhenever the washer system is in more fre-quent use. The capacity of the washer reservoir is 3.0 liters (3.2 U.S. quarts). CAUTION:
o Radiator antifreeze (engine coolant) should not be used in the washer system because it will damage the car's finish.
HFC5010
G080A02A-AAT
WINDSHIELD WIPER BLADESHEF-119
The wiper blades should be carefully inspected from time to time and cleaned to remove accu-mulations of road film or other debris. To cleanthe wiper blades and arms, use a clean spongeor cloth with a mild soap or detergent and water.If the wipers continue to streak or smear the
glass, replace them with Genuine Hyundai Re-
placement Parts or their equivalent. NOTE:
o Do not operate the wipers on dry glass. This can result in more rapid wear of the wiper blades and may scratch the glass.
CAUTION: Operating your vehicle without a proper air filter in place can result in excessive enginewear.
G070A01S-AAT
CHANGING THE AIR CLEANER FILTER
Gasoline engine
Diesel engine
To change the filter, unsnap the clips around
the cover. When this is done, the cover can be lifted off, the old filter removed and the new filterput in its place. Genuine Hyundai ReplacementParts are recommended.
HFC5003
G070A02FC o Keep the blade rubber out of contact
with petroleum products such as engine oil, gasoline, etc.
Page 147 of 312

DO-IT-YOURSELF MAINTENANCE
6-14 While the engine is idling, apply the brakes and move the gear selector lever from "P" to eachof its other positions -- "R", "N", "D", "2", "L" -- and then return to "N" or "P". With the enginestill idling:
1. Open the hood, being careful to keep hands,
long hair and clothing clear of any moving parts.
2. Remove the transaxle dipstick, wipe it clean, reinsert the dipstick as far as it will go, thenremove it again. Now check the fluid level onthe dipstick. It should be in the "HOT" rangeon the dipstick.
3. If the transaxle fluid level is low, use a funnel to add transaxle fluid through the dipsticktube until the level reaches the "HOT" range.Do not overfill.Fluid level should be within this range
C090A03FC
�Î�Î
WARNING: The cooling fan is controlled by engine cool- ant temperature and may sometimes oper-ate even when the engine is not running.Use extreme caution when working near theblades of the cooling fan, so that you are notinjured by a rotating fan blade. As the en-gine coolant temperature decreases, the fanwill automatically shut off. This is a normalcondition. WARNING (Diesel only): Never work on injection system with engine running or within 30 seconds after shuttingoff engine. High pressure pump, rail, injec-tors and high pressure pipes are subject tohigh pressure even after the engine stopped.The fuel jet produced by fuel leaks maycause serious injury, if it touch the body.People using pacemakers should not movethan 30cm closer to the ECU or wiring har-ness within the engine room while engine isrunning, since the high currents in the Com-mon Rail system produce considerable mag-netic fields.
HFC5008
G110D03A-GAT
To Check the Transaxle Fluid Level
Park the car on level ground with the parking brake engaged. When the transaxle fluid levelis checked, the transaxle fluid should be atnormal operating temperature and the engineidling.
C090A01FC
Page 154 of 312

DO-IT-YOURSELF MAINTENANCE 6-21
G220A01A-AAT
CHECKING ELECTRIC COOLING FANS WARNING: The cooling fan is controlled by engine cool-
ant temperature and may sometimes oper- ate even when the engine is not running.Use extreme caution when working near theblades of the coolant fan, so that you are notinjured by a rotating fan blade. As the en-gine coolant temperature decreases the fanwill automatically shut off. This is a normalcondition.
G220B01A-AAT
Checking Engine Cooling Fan The engine coolant fan should come on auto-
matically if the engine coolant temperature ishigh.
G220C01A-AAT
Checking Condenser Cooling Fan The condenser coolant fan should come on
automatically whenever the air conditioning isin operation. G230A03A-GAT
POWER STEERING FLUID LEVEL
HFC5004
G210B01A-AAT
Checking the Battery Keep the battery clean. Any evidence of corro-
sion around the battery posts or terminals should be removed using a solution of household bak-ing soda and warm water. After the batteryterminals are dry, cover them with a light coat-ing of grease.
o If you swallow battery fluid, drink a large
quantity of water or milk followed by milk ofmagnesia, eat a raw egg or drink vegetableoil. Get medical assistance as soon aspossible.
While batteries are being charged (either by abattery charger or by the vehicle’s alternator),they produce explosive gases. Always observethese warnings to prevent injuries from occur-ring:
o Charge batteries only in a well ventilated area.
o Do not permit flames, sparks or smoking in the area.
o Keep children away from the area.
Gasoline engine
The power steering fluid level should be checked
regularly.
To check the power steering fluid level, be sure
the ignition is "OFF", then check to make cer- tain that the power steering fluid level is be-tween the "MAX" and "MIN" level markings onthe fluid reservoir.
G230A02FC
Diesel engine