ECO mode Hyundai Matrix 2004 User Guide
[x] Cancel search | Manufacturer: HYUNDAI, Model Year: 2004, Model line: Matrix, Model: Hyundai Matrix 2004Pages: 317, PDF Size: 5.12 MB
Page 80 of 317
FEATURES OF YOUR HYUNDAI
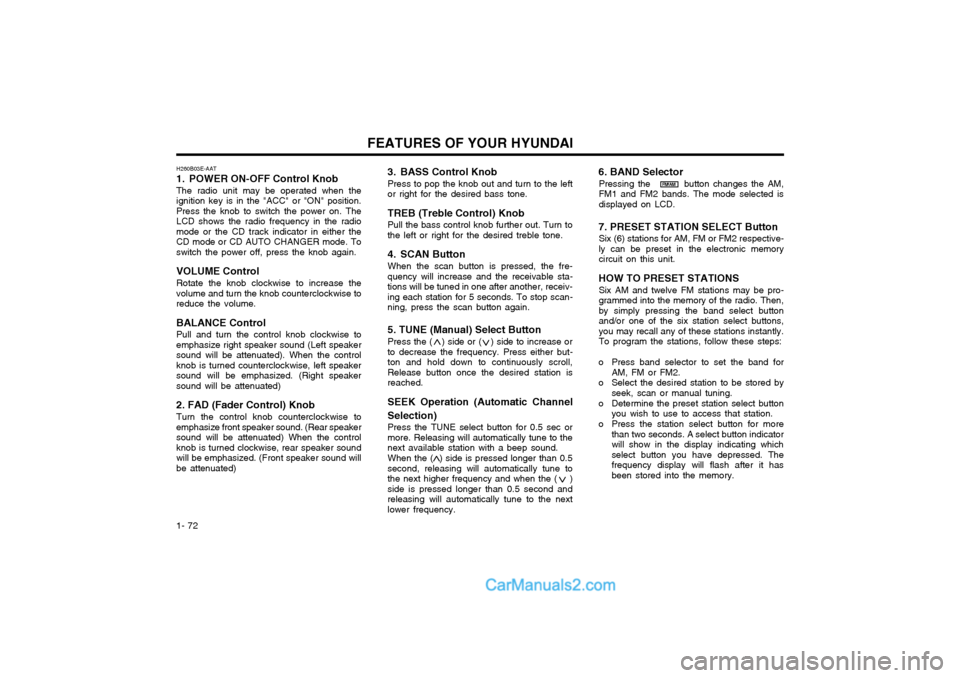
1- 72 3. BASS Control Knob Press to pop the knob out and turn to the left or right for the desired bass tone. TREB (Treble Control) Knob Pull the bass control knob further out. Turn to the left or right for the desired treble tone.
4. SCAN Button When the scan button is pressed, the fre- quency will increase and the receivable sta-tions will be tuned in one after another, receiv-ing each station for 5 seconds. To stop scan-ning, press the scan button again. 5. TUNE (Manual) Select Button Press the ( ) side or ( ) side to increase or to decrease the frequency. Press either but-ton and hold down to continuously scroll,Release button once the desired station isreached. SEEK Operation (Automatic Channel Selection) Press the TUNE select button for 0.5 sec or more. Releasing will automatically tune to thenext available station with a beep sound. When the ( ) side is pressed longer than 0.5 second, releasing will automatically tune tothe next higher frequency and when the ( )side is pressed longer than 0.5 second andreleasing will automatically tune to the nextlower frequency.
6. BAND Selector
Pressing the button changes the AM,FM1 and FM2 bands. The mode selected isdisplayed on LCD.
7. PRESET STATION SELECT Button Six (6) stations for AM, FM or FM2 respective-ly can be preset in the electronic memorycircuit on this unit.
HOW TO PRESET STATIONS Six AM and twelve FM stations may be pro-grammed into the memory of the radio. Then,by simply pressing the band select buttonand/or one of the six station select buttons,you may recall any of these stations instantly.To program the stations, follow these steps:
o Press band selector to set the band for AM, FM or FM2.
o Select the desired station to be stored by seek, scan or manual tuning.
o Determine the preset station select button you wish to use to access that station.
o Press the station select button for more than two seconds. A select button indicatorwill show in the display indicating whichselect button you have depressed. Thefrequency display will flash after it hasbeen stored into the memory.
H260B03E-AAT
1. POWER ON-OFF Control Knob The radio unit may be operated when the ignition key is in the "ACC" or "ON" position.Press the knob to switch the power on. TheLCD shows the radio frequency in the radiomode or the CD track indicator in either theCD mode or CD AUTO CHANGER mode. Toswitch the power off, press the knob again. VOLUME Control Rotate the knob clockwise to increase the volume and turn the knob counterclockwise toreduce the volume. BALANCE Control Pull and turn the control knob clockwise to emphasize right speaker sound (Left speakersound will be attenuated). When the controlknob is turned counterclockwise, left speakersound will be emphasized. (Right speakersound will be attenuated) 2. FAD (Fader Control) Knob Turn the control knob counterclockwise to emphasize front speaker sound. (Rear speakersound will be attenuated) When the controlknob is turned clockwise, rear speaker soundwill be emphasized. (Front speaker sound willbe attenuated)
FM/AM
Page 87 of 317
FEATURES OF YOUR HYUNDAI 1- 79
H290B03E-GAT
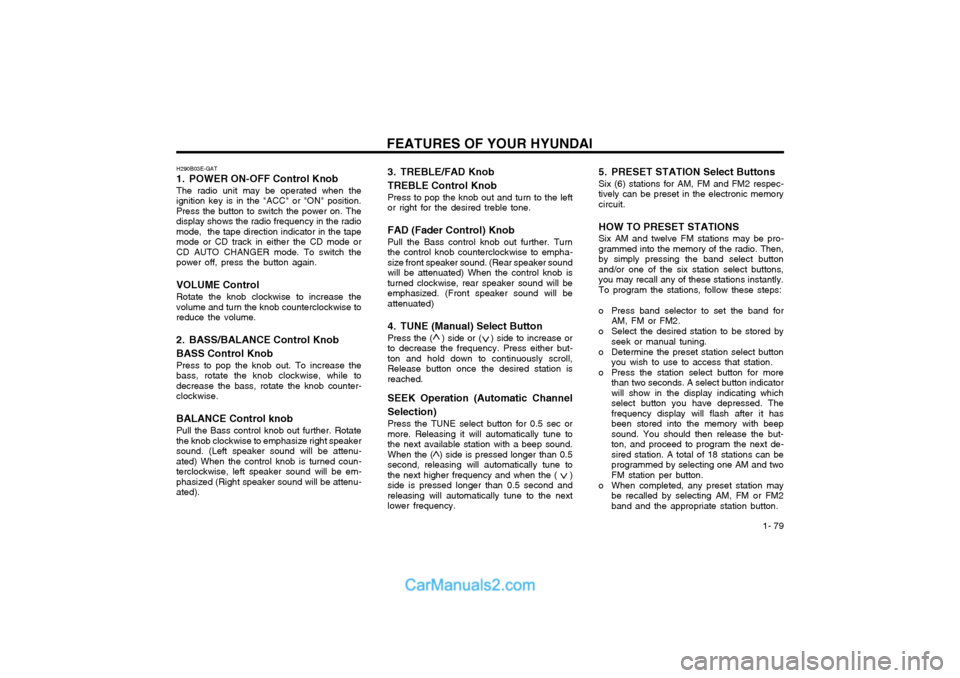
1. POWER ON-OFF Control Knob
The radio unit may be operated when the ignition key is in the "ACC" or "ON" position.Press the button to switch the power on. Thedisplay shows the radio frequency in the radiomode, the tape direction indicator in the tapemode or CD track in either the CD mode orCD AUTO CHANGER mode. To switch thepower off, press the button again.
VOLUME Control Rotate the knob clockwise to increase thevolume and turn the knob counterclockwise toreduce the volume.
2. BASS/BALANCE Control Knob BASS Control Knob Press to pop the knob out. To increase the bass, rotate the knob clockwise, while todecrease the bass, rotate the knob counter-clockwise.
BALANCE Control knob Pull the Bass control knob out further. Rotatethe knob clockwise to emphasize right speakersound. (Left speaker sound will be attenu-ated) When the control knob is turned coun-terclockwise, left speaker sound will be em-phasized (Right speaker sound will be attenu-ated). 3. TREBLE/FAD Knob TREBLE Control Knob
Press to pop the knob out and turn to the left or right for the desired treble tone.
FAD (Fader Control) Knob Pull the Bass control knob out further. Turnthe control knob counterclockwise to empha-size front speaker sound. (Rear speaker soundwill be attenuated) When the control knob isturned clockwise, rear speaker sound will beemphasized. (Front speaker sound will beattenuated)
4. TUNE (Manual) Select Button Press the ( ) side or ( ) side to increase orto decrease the frequency. Press either but-ton and hold down to continuously scroll,Release button once the desired station isreached.
SEEK Operation (Automatic Channel Selection) Press the TUNE select button for 0.5 sec or more. Releasing it will automatically tune tothe next available station with a beep sound.When the ( ) side is pressed longer than 0.5second, releasing will automatically tune tothe next higher frequency and when the ( )side is pressed longer than 0.5 second andreleasing will automatically tune to the nextlower frequency. 5. PRESET STATION Select Buttons Six (6) stations for AM, FM and FM2 respec- tively can be preset in the electronic memorycircuit. HOW TO PRESET STATIONS Six AM and twelve FM stations may be pro- grammed into the memory of the radio. Then,by simply pressing the band select buttonand/or one of the six station select buttons,you may recall any of these stations instantly.To program the stations, follow these steps:
o Press band selector to set the band for
AM, FM or FM2.
o Select the desired station to be stored by seek or manual tuning.
o Determine the preset station select button you wish to use to access that station.
o Press the station select button for more than two seconds. A select button indicator will show in the display indicating whichselect button you have depressed. Thefrequency display will flash after it hasbeen stored into the memory with beepsound. You should then release the but-ton, and proceed to program the next de-sired station. A total of 18 stations can beprogrammed by selecting one AM and twoFM station per button.
o When completed, any preset station may be recalled by selecting AM, FM or FM2band and the appropriate station button.
Page 88 of 317
FEATURES OF YOUR HYUNDAI
1- 80
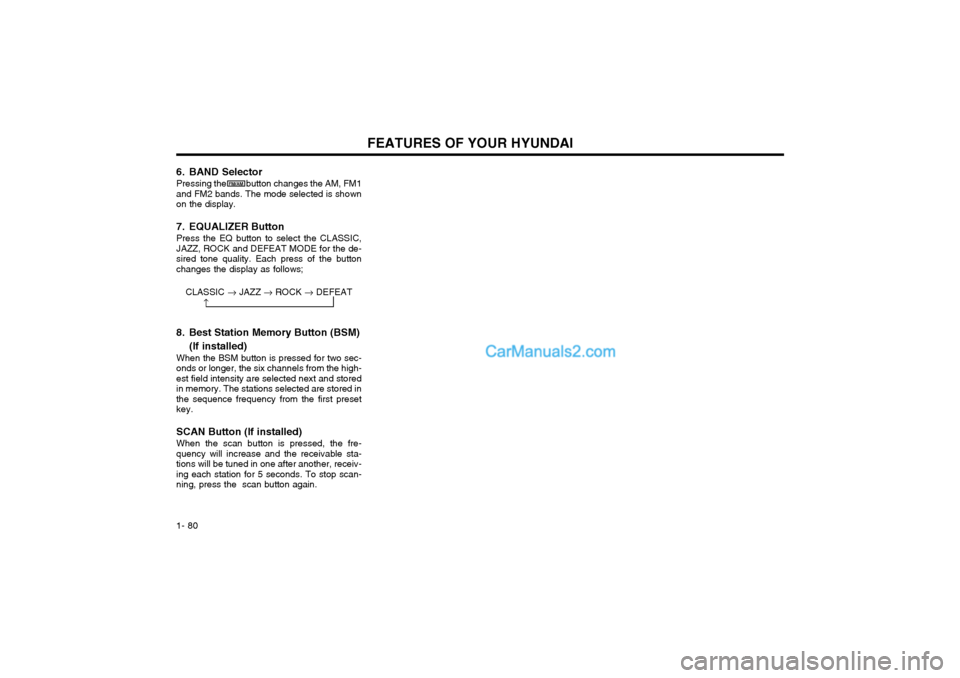
6. BAND Selector Pressing the button changes the AM, FM1 and FM2 bands. The mode selected is shownon the display.
7. EQUALIZER Button Press the EQ button to select the CLASSIC, JAZZ, ROCK and DEFEAT MODE for the de-sired tone quality. Each press of the buttonchanges the display as follows;
8. Best Station Memory Button (BSM)
(If installed)
When the BSM button is pressed for two sec- onds or longer, the six channels from the high-est field intensity are selected next and storedin memory. The stations selected are stored inthe sequence frequency from the first presetkey. SCAN Button (If installed) When the scan button is pressed, the fre- quency will increase and the receivable sta-tions will be tuned in one after another, receiv-ing each station for 5 seconds. To stop scan-ning, press the scan button again. CLASSIC
� JAZZ � ROCK � DEFEAT
�
FM/AM
Page 90 of 317

FEATURES OF YOUR HYUNDAI
1- 82
H290D01O-GAT
1. FF/REW Button
o Fast forward tape winding starts when the
FF ( ) button is pressed during the PLAY or REW mode.
o Tape play starts when the FF ( ) button is pressed again during the FF mode.
o Tape rewinding starts when the REW ( ) button is pressed during the PLAY orFF mode.
o Tape play starts when the REW ( ) button pressed again during the REW mode.
2. AUTO MUSIC Select Button Press the button to find the starting point of each song in a prerecorded music tape. Thequiet space between songs (must have at leasta 4 sec. gap) can be accepted by the AUTOMUSIC Select button.
o Pressing the button will play the beginn- ing of the next music segment.
o Pressing the button will start replay at the beginning of the music just listened to.
3. TAPE PROGRAM Button This allows you to play the reverse side of the tape by merely depressing the program button.An arrow will appear in the display to show tapedirection. 4. TAPE EJECT button
o When the button is pressed with the
cassette loaded, the cassette is ejected.
o When the button is pressed during the FF/REW mode, the cassette is ejected.
5. EQ ButtonPress the EQ button to select the CLASSIC, JAZZ, ROCK and DEFEAT MODE for the de-sired tone quality. Each press of the buttonchanges the display as follows;
6. DOLBY Button If you get background noise during tape PLAY, you can reduce this considerably by merelypressing the DOLBY button. If you want tocancel the DOLBY feature, press the buttonagain. CLASSIC
� JAZZ � ROCK � DEFEAT
�
Page 92 of 317
FEATURES OF YOUR HYUNDAI
1- 84
H290F02O-GAT
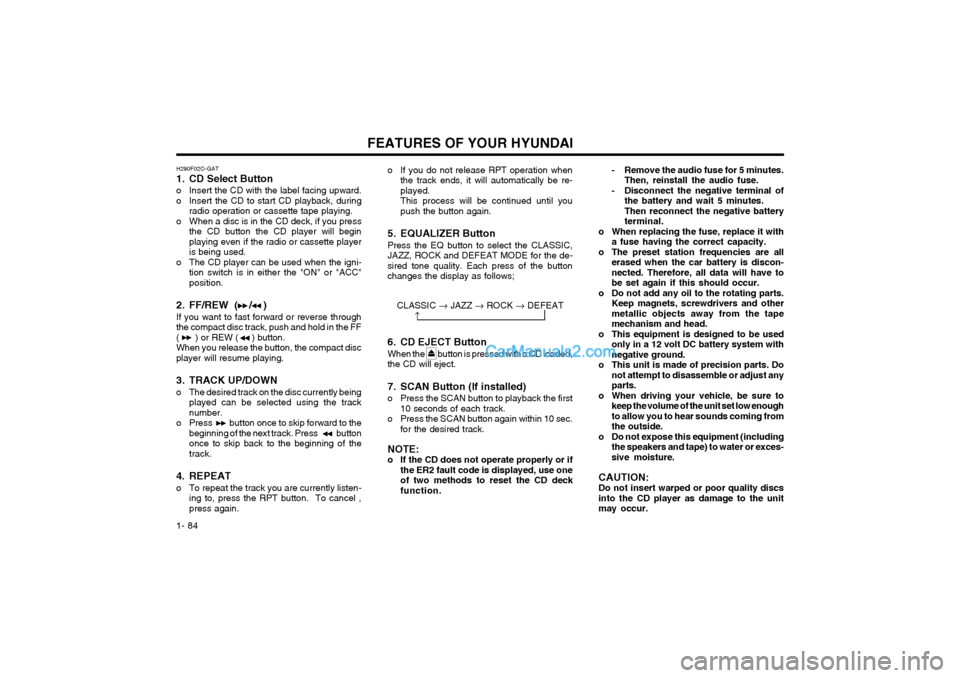
1. CD Select Button
o Insert the CD with the label facing upward.
o Insert the CD to start CD playback, during
radio operation or cassette tape playing.
o When a disc is in the CD deck, if you press the CD button the CD player will beginplaying even if the radio or cassette playeris being used.
o The CD player can be used when the igni- tion switch is in either the "ON" or "ACC"position.
2. FF/REW ( / ) If you want to fast forward or reverse through the compact disc track, push and hold in the FF( ) or REW ( ) button.When you release the button, the compact discplayer will resume playing.
3. TRACK UP/DOWN
o The desired track on the disc currently being played can be selected using the track number.
o Press button once to skip forward to the beginning of the next track. Press buttononce to skip back to the beginning of thetrack.
4. REPEAT
o To repeat the track you are currently listen- ing to, press the RPT button. To cancel , press again. o If you do not release RPT operation when
the track ends, it will automatically be re-played.This process will be continued until youpush the button again.
5. EQUALIZER Button Press the EQ button to select the CLASSIC, JAZZ, ROCK and DEFEAT MODE for the de-sired tone quality. Each press of the buttonchanges the display as follows; - Remove the audio fuse for 5 minutes.
Then, reinstall the audio fuse.
- Disconnect the negative terminal of the battery and wait 5 minutes.Then reconnect the negative batteryterminal.
o When replacing the fuse, replace it with a fuse having the correct capacity.
o The preset station frequencies are all erased when the car battery is discon-nected. Therefore, all data will have tobe set again if this should occur.
o Do not add any oil to the rotating parts. Keep magnets, screwdrivers and othermetallic objects away from the tapemechanism and head.
o This equipment is designed to be used only in a 12 volt DC battery system withnegative ground.
o This unit is made of precision parts. Do not attempt to disassemble or adjust anyparts.
o When driving your vehicle, be sure to keep the volume of the unit set low enoughto allow you to hear sounds coming fromthe outside.
o Do not expose this equipment (including the speakers and tape) to water or exces-sive moisture.
CAUTION:Do not insert warped or poor quality discsinto the CD player as damage to the unitmay occur.
CLASSIC � JAZZ � ROCK � DEFEAT
�
6. CD EJECT Button When the button is pressed with a CD loaded, the CD will eject.
7. SCAN Button (If installed)
o Press the SCAN button to playback the first 10 seconds of each track.
o Press the SCAN button again within 10 sec. for the desired track.
NOTE:
o If the CD does not operate properly or if the ER2 fault code is displayed, use oneof two methods to reset the CD deckfunction.
Page 94 of 317
FEATURES OF YOUR HYUNDAI
1- 86
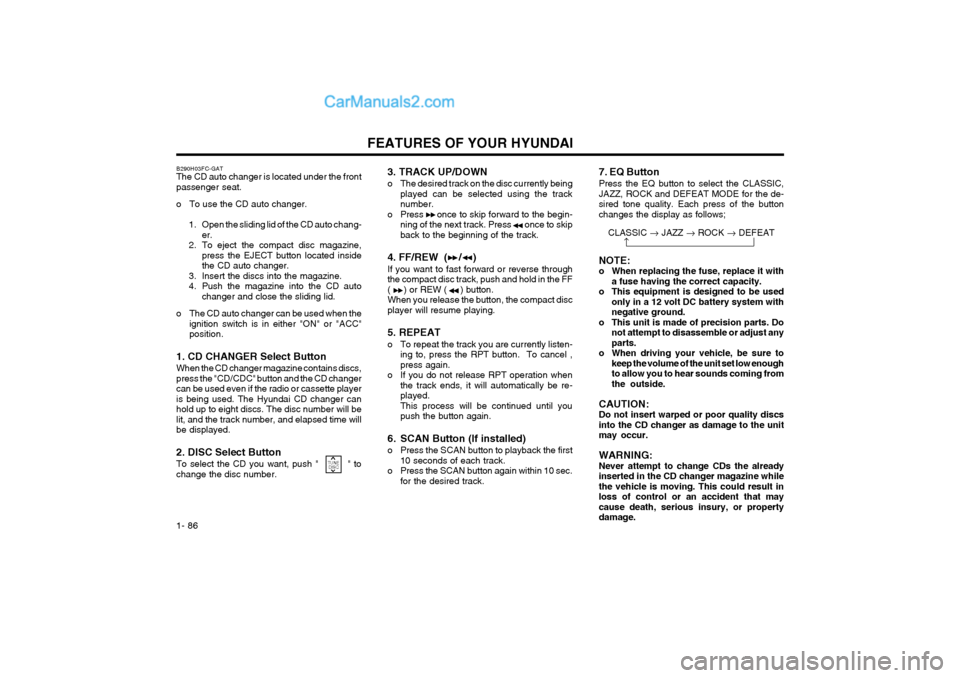
3. TRACK UP/DOWN
o The desired track on the disc currently being played can be selected using the track number.
o Press once to skip forward to the begin- ning of the next track. Press once to skipback to the beginning of the track.
4. FF/REW ( / ) If you want to fast forward or reverse through the compact disc track, push and hold in the FF( ) or REW ( ) button.When you release the button, the compact discplayer will resume playing. 5. REPEAT
o To repeat the track you are currently listen- ing to, press the RPT button. To cancel , press again.
o If you do not release RPT operation when the track ends, it will automatically be re-played.This process will be continued until youpush the button again.
6. SCAN Button (If installed)
o Press the SCAN button to playback the first 10 seconds of each track.
o Press the SCAN button again within 10 sec. for the desired track.B290H03FC-GAT The CD auto changer is located under the front passenger seat.
o To use the CD auto changer.
1. Open the sliding lid of the CD auto chang- er.
2. To eject the compact disc magazine, press the EJECT button located inside the CD auto changer.
3. Insert the discs into the magazine.
4. Push the magazine into the CD auto changer and close the sliding lid.
o The CD auto changer can be used when the ignition switch is in either "ON" or "ACC"position.
1. CD CHANGER Select Button When the CD changer magazine contains discs, press the "CD/CDC" button and the CD changercan be used even if the radio or cassette playeris being used. The Hyundai CD changer canhold up to eight discs. The disc number will belit, and the track number, and elapsed time willbe displayed. 2. DISC Select Button To select the CD you want, push " " to change the disc number.
CLASSIC � JAZZ � ROCK � DEFEAT�
7. EQ Button Press the EQ button to select the CLASSIC, JAZZ, ROCK and DEFEAT MODE for the de-sired tone quality. Each press of the buttonchanges the display as follows;
TUNE DISC
NOTE:
o When replacing the fuse, replace it with
a fuse having the correct capacity.
o This equipment is designed to be used only in a 12 volt DC battery system withnegative ground.
o This unit is made of precision parts. Do not attempt to disassemble or adjust anyparts.
o When driving your vehicle, be sure to keep the volume of the unit set low enoughto allow you to hear sounds coming fromthe outside.
CAUTION:Do not insert warped or poor quality discsinto the CD changer as damage to the unitmay occur. WARNING: Never attempt to change CDs the alreadyinserted in the CD changer magazine whilethe vehicle is moving. This could result inloss of control or an accident that maycause death, serious insury, or propertydamage.
Page 107 of 317
DRIVING YOUR HYUNDAI 2- 9
an anti-lock braking system may be longer than for those without it in the following road conditions.
o Driving on rough, gravel or snow-covered
roads.
o Driving with tire chains installed.
o Driving on roads where the road surface is pitted or has different surface height.
During these conditions, the vehicle shouldbe driven at reduced speeds. The safety fea- tures of an ABS equipped vehicle should not be tested by high speed driving or cornering. This could endanger the safety of yourself or others. C300A01O-GAT BRAKE TRACTION CONTROL SYSTEM (BTCS) (If Installed) On slippery road surfaces, the traction control system (TCS) limits the drive wheels from spin- ning excessively, thus helping the car to acceler- ate. It also provides sufficient driving force and steering performance as the car turns at acceler- ated speeds. SLIP Control Limits the drive wheels from spinning exces- sively during starting or while making accelerat- ed turns on slippery roads to avoid losing the driving force of the front wheels. C300B01O-GAT TCS ON ModeIn the TCS ON mode, the indicator in the instru- ment cluster will not be illuminated. NOTE:
1) Turn off the engine. Then restart the en-
gine, and the TCS mode will automaticallyturn "ON".
2) When the traction control is operating
properly, you can feel a slight pulsation in the vehicle. This is only the effect of brake control and indicates nothing unusual. C300D02O-GAT Indicator and Warning The indicator should illuminate when the ignition key is turned to "ON" or "START", but should go out after three seconds. If the indicator does not illuminate, have it checked by an authorized Hyundai dealer. Should there be any unusual conditions in the device, TCS illuminates as a warning. If TCS illuminates, pull your car to a safe place and stop the engine. Then, start the engine again to check if the TCS indicator goes out. If the indicator remains lit even after the engine has been started, have your car checked by an authorized Hyundai dealer. NOTE: When TCS illuminates, traction control is automatically deactivated for safety.
Driving hints TCS does not actively apply brakes. Be sure to decelerate the car sufficiently before entering curves. CAUTION: When the TCS indicator blinks, SLIP control has been activated. It also means that the road is slippery or your car is accelerating excessively. In this situation, release foot pressure from the accelerator pedal and main- tain moderate speed. WARNING: Traction control is only a driving aid; all normal precautions for driving in inclement weather and on slippery driving surfaces should be observed.
3) When the engine starts, a click is heard
from the engine compartment; however, this is only the sound of traction control being checked.
4) When moving out of the mud or fresh
snow, pressing the accelerator pedal may not cause the engine speed to increase.
Page 108 of 317
DRIVING YOUR HYUNDAI
2- 10 C150A01A-AAT
SMOOTH CORNERING
Avoid braking or gear changing in corners, espe- cially when roads are wet. Ideally, corners should always be taken under gentle acceleration. If you follow these suggestions, tire wear will be held to a minimum.
curbs or driving too fast over irregular surfac- es. Poor alignment causes faster tire wear and may also result in other problems as well as greater fuel consumption.
o Keep your car in good condition. For better
fuel economy and reduced maintenance costs, maintain your car in accordance with the maintenance schedule in Section 5. If you drive your car in severe conditions, more frequent maintenance is required (see Sec- tion 5 for details).
o Keep your car clean. For maximum service, your Hyundai should be kept clean and free of corrosive materials. It is especially important that mud, dirt, ice, etc. not be allowed to accumulate on the underside of the car. This extra weight can result in increased fuel con- sumption and also contribute to corrosion.
o Travel lightly. Don't carry unnecessary weight
in your car. Weight reduces fuel economy.
o Don't let the engine idle longer than neces-
sary. If you are waiting (and not in traffic), turn off your engine and restart only when you're ready to go.
o Remember, your Hyundai does not require
extended warm-up. As soon as the engine is running smoothly, you can drive away. In very cold weather, however, give your engine a slightly longer warm-up period.
o Don't "lug" or "over-rev" the engine. Lugging is driving too slowly in too high a gear result- ing in the engine bucking. If this happens, shift to a lower gear. Over-revving is racing the engine beyond its safe limit. This can be C160A01A-AAT WINTER DRIVING The more severe weather conditions of winter result in greater wear and other problems. To minimize the problems of winter driving, you should follow these suggestions: C160B01A-GAT Snowy or Icy ConditionsTo drive your vehicle in deep snow, it may be necessary to use snow tires or to install tire chains on your tires. If snow tires are needed, it is necessary to select tires equivalent in size and type to the original equipment tires. Failure to do so may adversely affect the safety and handling of your car. Speeding, rapid acceleration, sud- den brake applications, and sharp turns are potentially very hazardous practices. During
C140A01A-GAT DRIVING FOR ECONOMY You can save fuel and get more kilometers from your car if you follow these suggestions:
o Drive smoothly. Accelerate at a moderate
rate. Don't make "jack-rabbit" starts or full- throttle shifts and maintain a steady cruising speed. Don't race between stoplights. Try to adjust your speed to that of the other traffic so you don't have to change speeds unneces- sarily. Avoid heavy traffic whenever possible. Always maintain a safe distance from other vehicles so you can avoid unnecessary brak- ing. This also reduces brake wear.
o Drive at a moderate speed. The faster you drive, the more fuel your car uses. Driving at a moderate speed, especially on the high- way, is one of the most effective ways to reduce fuel consumption.
o Don't "ride" the brake or clutch pedal. This
can increase fuel consumption and also in- crease wear on these components. In addi- tion, driving with your foot resting on the brake pedal may cause the brakes to overheat, which reduces their effectiveness and may lead to more serious consequences.
o Take care of your tires. Keep them inflated to the recommended pressure. Incorrect infla- tion, either too much or too little, results in unnecessary tire wear. Check the tire pres- sures at least once a month.
o Be sure that the wheels are aligned correctly.
Improper alignment can result from hitting avoided by shifting at the recommendedspeeds.
o Use your air conditioning sparingly. The air
conditioning system is operated by engine power so your fuel economy is reduced when you use it.
Page 184 of 317
CONTROLS AND EQUIPMENT
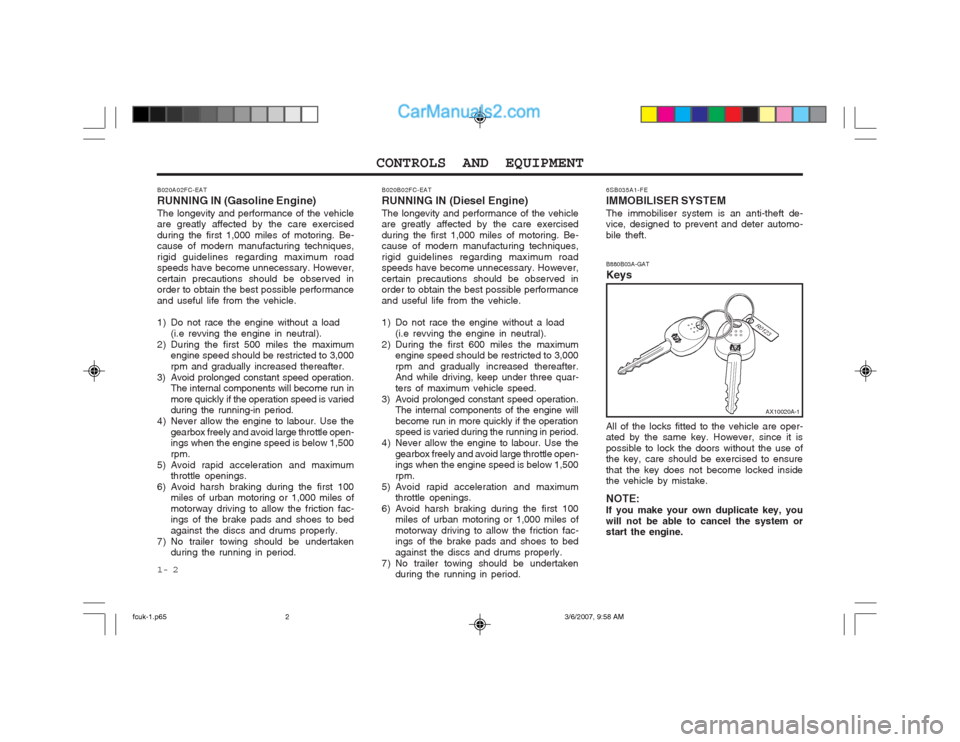
1- 2 6SB035A1-FE IMMOBILISER SYSTEMThe immobiliser system is an anti-theft de- vice, designed to prevent and deter automo- bile theft. B880B03A-GAT Keys All of the locks fitted to the vehicle are oper- ated by the same key. However, since it is possible to lock the doors without the use of the key, care should be exercised to ensure that the key does not become locked inside the vehicle by mistake. NOTE: If you make your own duplicate key, youwill not be able to cancel the system or start the engine.
B020A02FC-EAT RUNNING IN (Gasoline Engine)The longevity and performance of the vehicle are greatly affected by the care exercised during the first 1,000 miles of motoring. Be- cause of modern manufacturing techniques, rigid guidelines regarding maximum road speeds have become unnecessary. However, certain precautions should be observed in order to obtain the best possible performance and useful life from the vehicle.
1) Do not race the engine without a load
(i.e revving the engine in neutral).
2) During the first 500 miles the maximum engine speed should be restricted to 3,000 rpm and gradually increased thereafter.
3) Avoid prolonged constant speed operation. The internal components will become run in
more quickly if the operation speed is varied
during the running-in period.
4) Never allow the engine to labour. Use the gearbox freely and avoid large throttle open-ings when the engine speed is below 1,500 rpm.
5) Avoid rapid acceleration and maximum throttle openings.
6) Avoid harsh braking during the first 100 miles of urban motoring or 1,000 miles ofmotorway driving to allow the friction fac- ings of the brake pads and shoes to bed against the discs and drums properly.
7) No trailer towing should be undertaken during the running in period.
AX10020A-1
B020B02FC-EAT RUNNING IN (Diesel Engine)The longevity and performance of the vehicle are greatly affected by the care exercised during the first 1,000 miles of motoring. Be- cause of modern manufacturing techniques, rigid guidelines regarding maximum road speeds have become unnecessary. However, certain precautions should be observed in order to obtain the best possible performance and useful life from the vehicle.
1) Do not race the engine without a load
(i.e revving the engine in neutral).
2) During the first 600 miles the maximum engine speed should be restricted to 3,000 rpm and gradually increased thereafter. And while driving, keep under three quar- ters of maximum vehicle speed.
3) Avoid prolonged constant speed operation. The internal components of the engine will
become run in more quickly if the operation speed is varied during the running in period.
4) Never allow the engine to labour. Use the gearbox freely and avoid large throttle open-ings when the engine speed is below 1,500 rpm.
5) Avoid rapid acceleration and maximum throttle openings.
6) Avoid harsh braking during the first 100 miles of urban motoring or 1,000 miles ofmotorway driving to allow the friction fac- ings of the brake pads and shoes to bed against the discs and drums properly.
7) No trailer towing should be undertaken during the running in period.
fcuk-1.p65 3/6/2007, 9:58 AM
2
Page 187 of 317
1- 5
CONTROLS AND EQUIPMENT
SB040G1-F CENTRAL DOOR LOCK (Not all models)
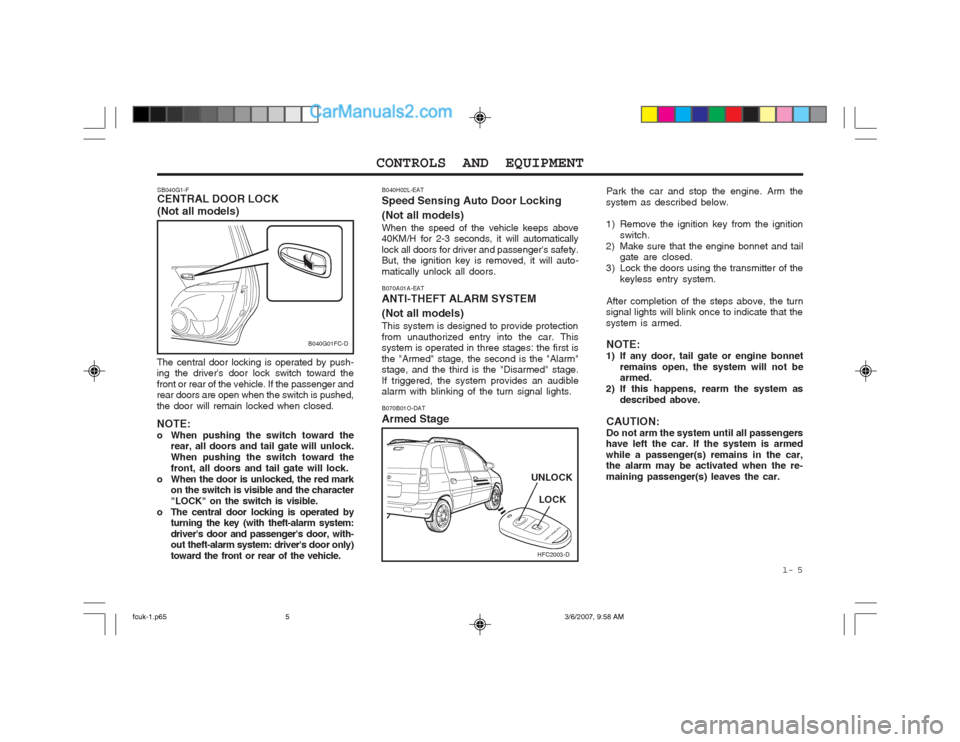
The central door locking is operated by push- ing the driver's door lock switch toward the front or rear of the vehicle. If the passenger and rear doors are open when the switch is pushed, the door will remain locked when closed. NOTE:
o When pushing the switch toward the rear, all doors and tail gate will unlock.When pushing the switch toward thefront, all doors and tail gate will lock.
o When the door is unlocked, the red mark on the switch is visible and the character"LOCK" on the switch is visible.
o The central door locking is operated by turning the key (with theft-alarm system:driver's door and passenger's door, with- out theft-alarm system: driver's door only) toward the front or rear of the vehicle. B070A01A-EAT ANTI-THEFT ALARM SYSTEM (Not all models) This system is designed to provide protection from unauthorized entry into the car. This system is operated in three stages: the first is the "Armed" stage, the second is the "Alarm" stage, and the third is the "Disarmed" stage. If triggered, the system provides an audible alarm with blinking of the turn signal lights.
HFC2003-D
LOCK
UNLOCK
B040G01FC-D
B070B01O-DAT Armed Stage Park the car and stop the engine. Arm the
system as described below.
1) Remove the ignition key from the ignition
switch.
2) Make sure that the engine bonnet and tail gate are closed.
3) Lock the doors using the transmitter of the keyless entry system.
After completion of the steps above, the turn
signal lights will blink once to indicate that the system is armed.
NOTE:
1) If any door, tail gate or engine bonnet remains open, the system will not be armed.
2) If this happens, rearm the system as described above.
CAUTION: Do not arm the system until all passengers
have left the car. If the system is armedwhile a passenger(s) remains in the car, the alarm may be activated when the re- maining passenger(s) leaves the car.
B040H02L-EAT Speed Sensing Auto Door Locking (Not all models) When the speed of the vehicle keeps above 40KM/H for 2-3 seconds, it will automatically lock all doors for driver and passenger's safety. But, the ignition key is removed, it will auto- matically unlock all doors.
fcuk-1.p65
3/6/2007, 9:58 AM
5