display Hyundai Matrix 2004 Owner's Manual
[x] Cancel search | Manufacturer: HYUNDAI, Model Year: 2004, Model line: Matrix, Model: Hyundai Matrix 2004Pages: 317, PDF Size: 5.12 MB
Page 45 of 317
FEATURES OF YOUR HYUNDAI 1- 37
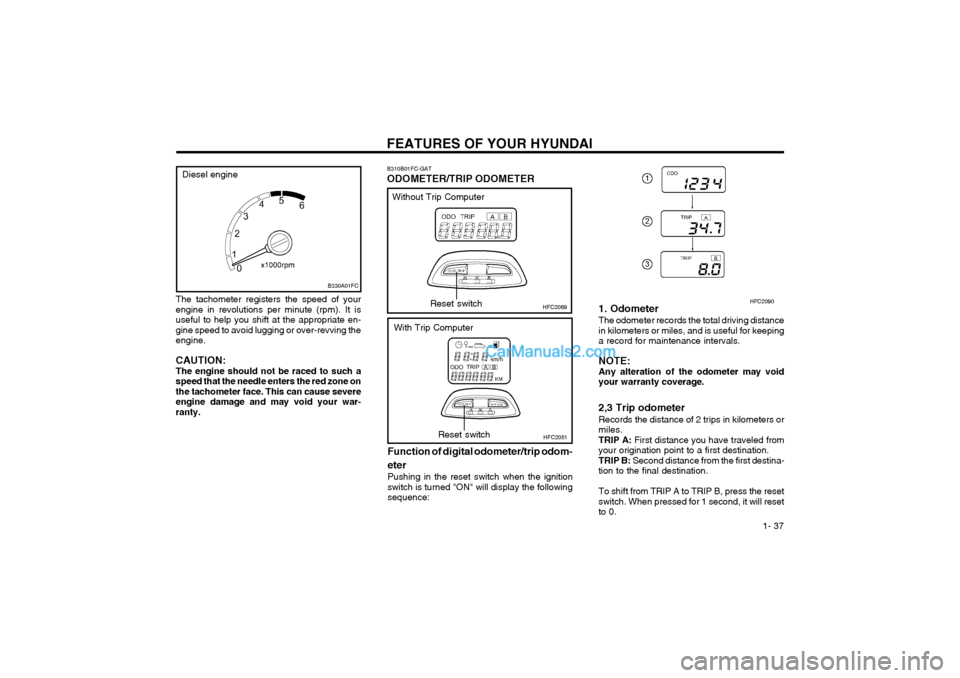
The tachometer registers the speed of your engine in revolutions per minute (rpm). It isuseful to help you shift at the appropriate en-gine speed to avoid lugging or over-revving theengine. CAUTION: The engine should not be raced to such aspeed that the needle enters the red zone onthe tachometer face. This can cause severeengine damage and may void your war-ranty.
B310B01FC-GAT ODOMETER/TRIP ODOMETER
HFC2089
Function of digital odometer/trip odom- eter
Pushing in the reset switch when the ignition switch is turned "ON" will display the followingsequence:Reset switch
HFC2051Reset switch
Without Trip Computer
With Trip Computer 1. Odometer The odometer records the total driving distance in kilometers or miles, and is useful for keepinga record for maintenance intervals. NOTE: Any alteration of the odometer may voidyour warranty coverage. 2,3 Trip odometer Records the distance of 2 trips in kilometers or miles.TRIP A:
First distance you have traveled from
your origination point to a first destination.TRIP B: Second distance from the first destina-
tion to the final destination. To shift from TRIP A to TRIP B, press the reset switch. When pressed for 1 second, it will resetto 0.
HFC2090
B330A01FC
Diesel engine
Page 46 of 317
FEATURES OF YOUR HYUNDAI
1- 38
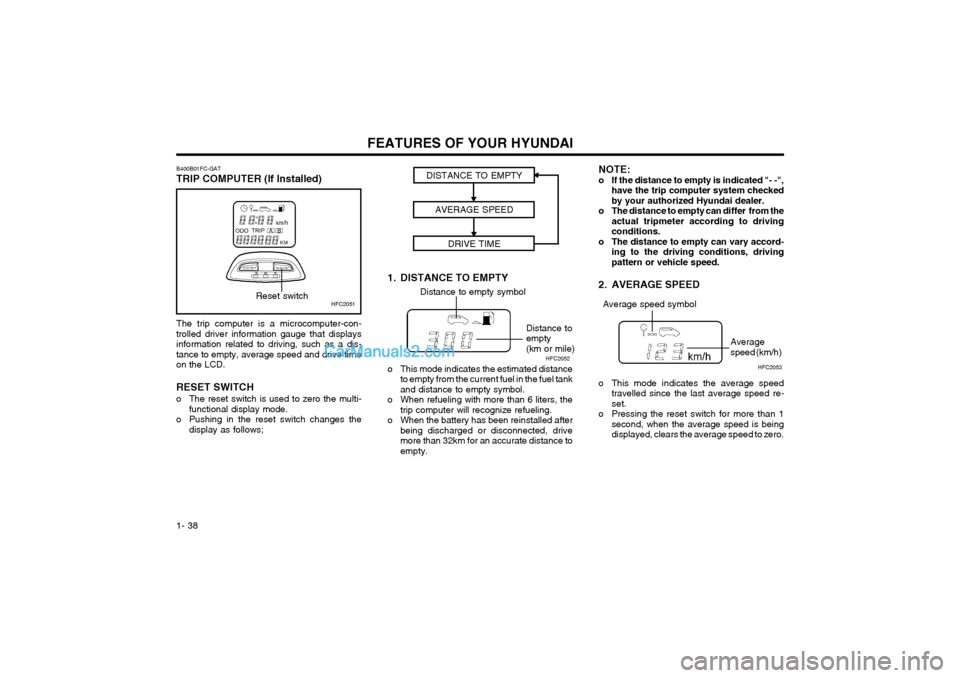
The trip computer is a microcomputer-con- trolled driver information gauge that displaysinformation related to driving, such as a dis-tance to empty, average speed and drive timeon the LCD. RESET SWITCH
o The reset switch is used to zero the multi-
functional display mode.
o Pushing in the reset switch changes the display as follows;
HFC2051
B400B01FC-GAT TRIP COMPUTER (If Installed)Reset switch
1. DISTANCE TO EMPTYDISTANCE TO EMPTY
AVERAGE SPEED DRIVE TIMEDistance to empty symbol
Distance to empty(km or mile)
o This mode indicates the estimated distance to empty from the current fuel in the fuel tankand distance to empty symbol.
o When refueling with more than 6 liters, the trip computer will recognize refueling.
o When the battery has been reinstalled after being discharged or disconnected, drivemore than 32km for an accurate distance toempty. NOTE:
o If the distance to empty is indicated "- -",
have the trip computer system checkedby your authorized Hyundai dealer.
o The distance to empty can differ from the actual tripmeter according to drivingconditions.
o The distance to empty can vary accord- ing to the driving conditions, drivingpattern or vehicle speed.
2. AVERAGE SPEED
o This mode indicates the average speed travelled since the last average speed re- set.
o Pressing the reset switch for more than 1 second, when the average speed is beingdisplayed, clears the average speed to zero.
Average speed symbol
Average speed (km/h)
HFC2052
HFC2053
Page 74 of 317
FEATURES OF YOUR HYUNDAI
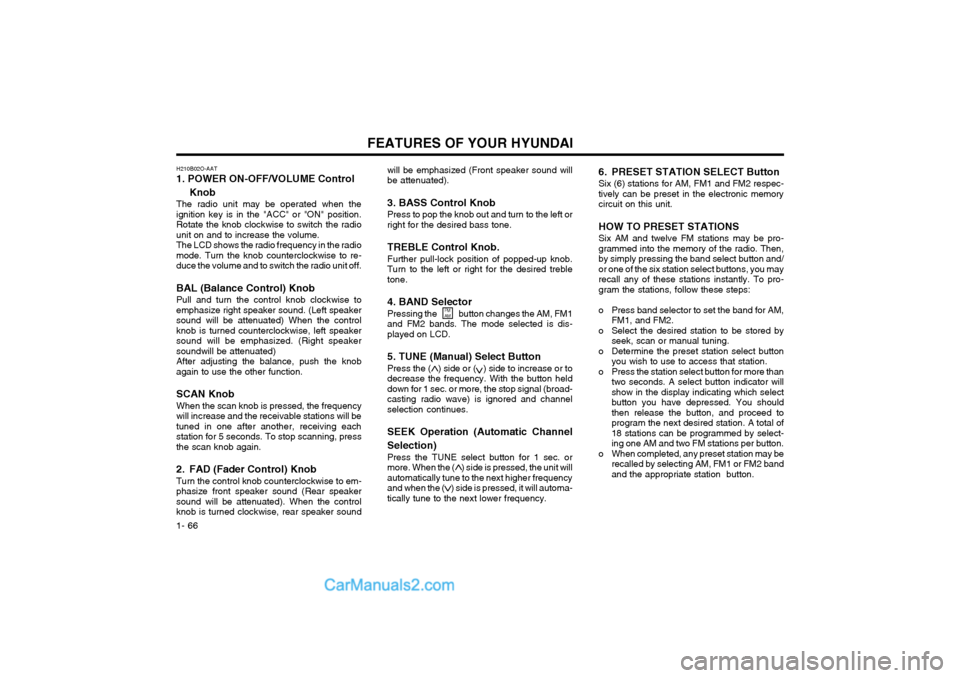
1- 66 will be emphasized (Front speaker sound will be attenuated). 3. BASS Control Knob Press to pop the knob out and turn to the left or right for the desired bass tone. TREBLE Control Knob. Further pull-lock position of popped-up knob. Turn to the left or right for the desired trebletone. 4. BAND Selector Pressing the button changes the AM, FM1 and FM2 bands. The mode selected is dis-played on LCD.
5. TUNE (Manual) Select Button Press the ( ) side or ( ) side to increase or to decrease the frequency. With the button helddown for 1 sec. or more, the stop signal (broad-casting radio wave) is ignored and channelselection continues. SEEK Operation (Automatic Channel Selection) Press the TUNE select button for 1 sec. or more. When the ( ) side is pressed, the unit willautomatically tune to the next higher frequencyand when the ( ) side is pressed, it will automa-tically tune to the next lower frequency.
6. PRESET STATION SELECT Button Six (6) stations for AM, FM1 and FM2 respec- tively can be preset in the electronic memorycircuit on this unit. HOW TO PRESET STATIONS Six AM and twelve FM stations may be pro- grammed into the memory of the radio. Then,by simply pressing the band select button and/or one of the six station select buttons, you mayrecall any of these stations instantly. To pro-gram the stations, follow these steps:
o Press band selector to set the band for AM,
FM1, and FM2.
o Select the desired station to be stored by seek, scan or manual tuning.
o Determine the preset station select button you wish to use to access that station.
o Press the station select button for more than two seconds. A select button indicator will show in the display indicating which selectbutton you have depressed. You shouldthen release the button, and proceed toprogram the next desired station. A total of18 stations can be programmed by select-ing one AM and two FM stations per button.
o When completed, any preset station may be recalled by selecting AM, FM1 or FM2 bandand the appropriate station button.
FM AM
H210B02O-AAT 1. POWER ON-OFF/VOLUME Control
Knob
The radio unit may be operated when the ignition key is in the "ACC" or "ON" position.Rotate the knob clockwise to switch the radiounit on and to increase the volume.The LCD shows the radio frequency in the radiomode. Turn the knob counterclockwise to re-duce the volume and to switch the radio unit off. BAL (Balance Control) Knob Pull and turn the control knob clockwise to emphasize right speaker sound. (Left speakersound will be attenuated) When the controlknob is turned counterclockwise, left speakersound will be emphasized. (Right speakersoundwill be attenuated)After adjusting the balance, push the knobagain to use the other function. SCAN Knob When the scan knob is pressed, the frequency will increase and the receivable stations will betuned in one after another, receiving eachstation for 5 seconds. To stop scanning, pressthe scan knob again.
2. FAD (Fader Control) Knob Turn the control knob counterclockwise to em- phasize front speaker sound (Rear speakersound will be attenuated). When the controlknob is turned clockwise, rear speaker sound
Page 76 of 317
FEATURES OF YOUR HYUNDAI
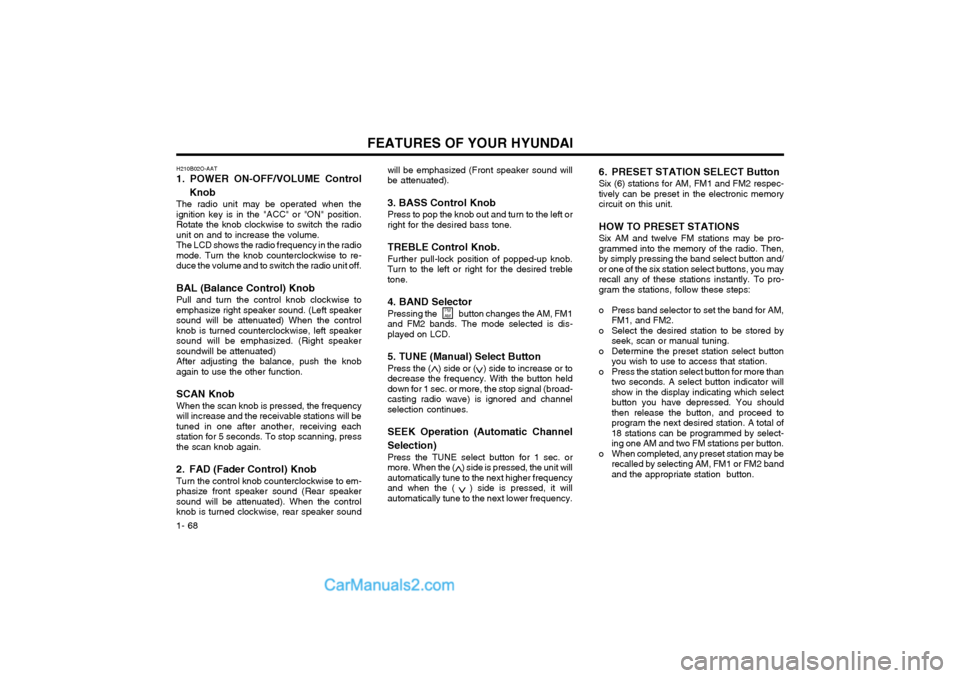
1- 68 will be emphasized (Front speaker sound will be attenuated). 3. BASS Control Knob Press to pop the knob out and turn to the left or right for the desired bass tone. TREBLE Control Knob. Further pull-lock position of popped-up knob. Turn to the left or right for the desired trebletone. 4. BAND Selector Pressing the button changes the AM, FM1 and FM2 bands. The mode selected is dis-played on LCD.
5. TUNE (Manual) Select Button Press the ( ) side or ( ) side to increase or to decrease the frequency. With the button helddown for 1 sec. or more, the stop signal (broad-casting radio wave) is ignored and channelselection continues. SEEK Operation (Automatic Channel Selection) Press the TUNE select button for 1 sec. or more. When the ( ) side is pressed, the unit willautomatically tune to the next higher frequencyand when the ( ) side is pressed, it willautomatically tune to the next lower frequency.
6. PRESET STATION SELECT Button Six (6) stations for AM, FM1 and FM2 respec- tively can be preset in the electronic memorycircuit on this unit. HOW TO PRESET STATIONS Six AM and twelve FM stations may be pro- grammed into the memory of the radio. Then,by simply pressing the band select button and/or one of the six station select buttons, you mayrecall any of these stations instantly. To pro-gram the stations, follow these steps:
o Press band selector to set the band for AM,
FM1, and FM2.
o Select the desired station to be stored by seek, scan or manual tuning.
o Determine the preset station select button you wish to use to access that station.
o Press the station select button for more than two seconds. A select button indicator will show in the display indicating which selectbutton you have depressed. You shouldthen release the button, and proceed toprogram the next desired station. A total of18 stations can be programmed by select-ing one AM and two FM stations per button.
o When completed, any preset station may be recalled by selecting AM, FM1 or FM2 bandand the appropriate station button.
FM
AM
H210B02O-AAT 1. POWER ON-OFF/VOLUME Control
Knob
The radio unit may be operated when the ignition key is in the "ACC" or "ON" position.Rotate the knob clockwise to switch the radiounit on and to increase the volume.The LCD shows the radio frequency in the radiomode. Turn the knob counterclockwise to re-duce the volume and to switch the radio unit off. BAL (Balance Control) Knob Pull and turn the control knob clockwise to emphasize right speaker sound. (Left speakersound will be attenuated) When the controlknob is turned counterclockwise, left speakersound will be emphasized. (Right speakersoundwill be attenuated)After adjusting the balance, push the knobagain to use the other function. SCAN Knob When the scan knob is pressed, the frequency will increase and the receivable stations will betuned in one after another, receiving eachstation for 5 seconds. To stop scanning, pressthe scan knob again.
2. FAD (Fader Control) Knob Turn the control knob counterclockwise to em- phasize front speaker sound (Rear speakersound will be attenuated). When the controlknob is turned clockwise, rear speaker sound
Page 80 of 317
FEATURES OF YOUR HYUNDAI
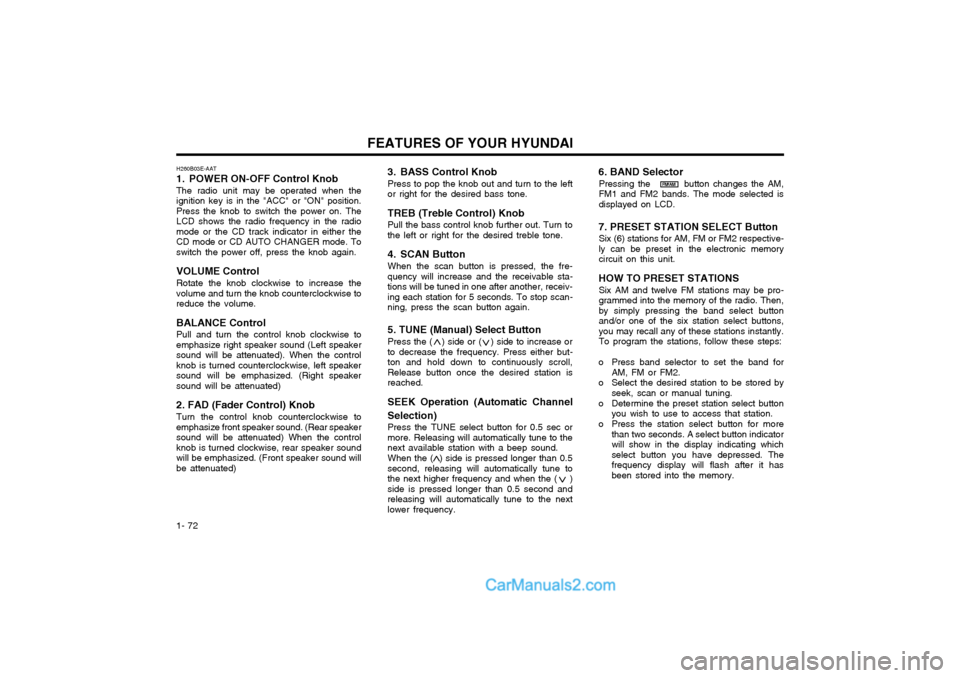
1- 72 3. BASS Control Knob Press to pop the knob out and turn to the left or right for the desired bass tone. TREB (Treble Control) Knob Pull the bass control knob further out. Turn to the left or right for the desired treble tone.
4. SCAN Button When the scan button is pressed, the fre- quency will increase and the receivable sta-tions will be tuned in one after another, receiv-ing each station for 5 seconds. To stop scan-ning, press the scan button again. 5. TUNE (Manual) Select Button Press the ( ) side or ( ) side to increase or to decrease the frequency. Press either but-ton and hold down to continuously scroll,Release button once the desired station isreached. SEEK Operation (Automatic Channel Selection) Press the TUNE select button for 0.5 sec or more. Releasing will automatically tune to thenext available station with a beep sound. When the ( ) side is pressed longer than 0.5 second, releasing will automatically tune tothe next higher frequency and when the ( )side is pressed longer than 0.5 second andreleasing will automatically tune to the nextlower frequency.
6. BAND Selector
Pressing the button changes the AM,FM1 and FM2 bands. The mode selected isdisplayed on LCD.
7. PRESET STATION SELECT Button Six (6) stations for AM, FM or FM2 respective-ly can be preset in the electronic memorycircuit on this unit.
HOW TO PRESET STATIONS Six AM and twelve FM stations may be pro-grammed into the memory of the radio. Then,by simply pressing the band select buttonand/or one of the six station select buttons,you may recall any of these stations instantly.To program the stations, follow these steps:
o Press band selector to set the band for AM, FM or FM2.
o Select the desired station to be stored by seek, scan or manual tuning.
o Determine the preset station select button you wish to use to access that station.
o Press the station select button for more than two seconds. A select button indicatorwill show in the display indicating whichselect button you have depressed. Thefrequency display will flash after it hasbeen stored into the memory.
H260B03E-AAT
1. POWER ON-OFF Control Knob The radio unit may be operated when the ignition key is in the "ACC" or "ON" position.Press the knob to switch the power on. TheLCD shows the radio frequency in the radiomode or the CD track indicator in either theCD mode or CD AUTO CHANGER mode. Toswitch the power off, press the knob again. VOLUME Control Rotate the knob clockwise to increase the volume and turn the knob counterclockwise toreduce the volume. BALANCE Control Pull and turn the control knob clockwise to emphasize right speaker sound (Left speakersound will be attenuated). When the controlknob is turned counterclockwise, left speakersound will be emphasized. (Right speakersound will be attenuated) 2. FAD (Fader Control) Knob Turn the control knob counterclockwise to emphasize front speaker sound. (Rear speakersound will be attenuated) When the controlknob is turned clockwise, rear speaker soundwill be emphasized. (Front speaker sound willbe attenuated)
FM/AM
Page 83 of 317
FEATURES OF YOUR HYUNDAI 1- 75
B260D03O-AAT
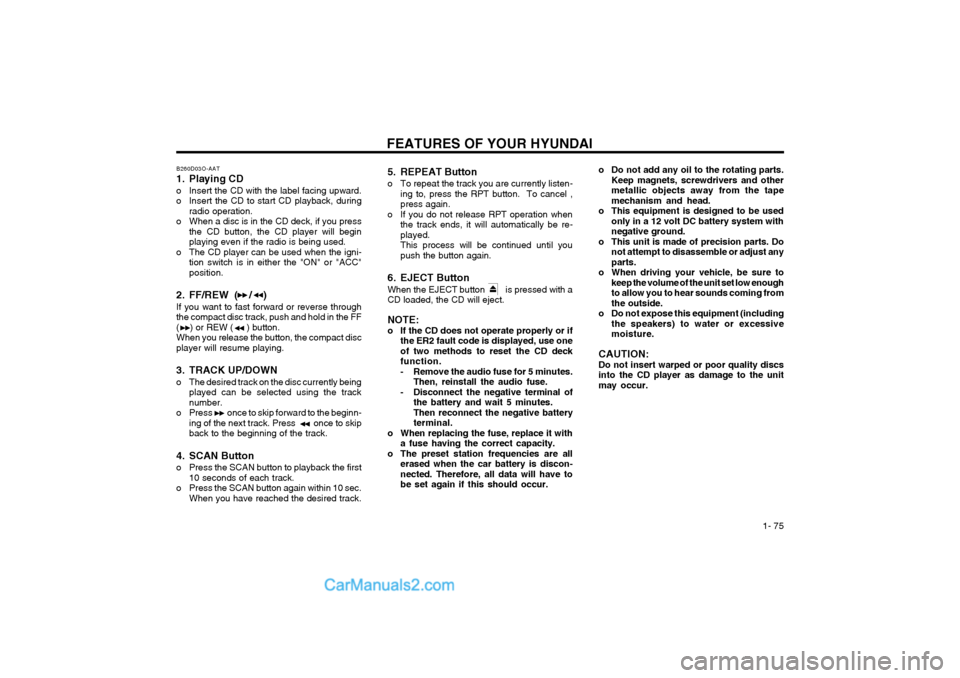
1. Playing CD
o Insert the CD with the label facing upward.
o Insert the CD to start CD playback, during
radio operation.
o When a disc is in the CD deck, if you press the CD button, the CD player will beginplaying even if the radio is being used.
o The CD player can be used when the igni- tion switch is in either the "ON" or "ACC"position.
2. FF/REW ( / ) If you want to fast forward or reverse through the compact disc track, push and hold in the FF( ) or REW ( ) button.When you release the button, the compact discplayer will resume playing.
3. TRACK UP/DOWN
o The desired track on the disc currently being played can be selected using the track number.
o Press once to skip forward to the beginn- ing of the next track. Press once to skipback to the beginning of the track.
4. SCAN Button
o Press the SCAN button to playback the first 10 seconds of each track.
o Press the SCAN button again within 10 sec. When you have reached the desired track. 5. REPEAT Button
o To repeat the track you are currently listen-
ing to, press the RPT button. To cancel , press again.
o If you do not release RPT operation when the track ends, it will automatically be re-played.This process will be continued until youpush the button again.
6. EJECT Button When the EJECT button is pressed with a CD loaded, the CD will eject. NOTE:
o If the CD does not operate properly or if the ER2 fault code is displayed, use oneof two methods to reset the CD deckfunction.
- Remove the audio fuse for 5 minutes.Then, reinstall the audio fuse.
- Disconnect the negative terminal of the battery and wait 5 minutes.Then reconnect the negative batteryterminal.
o When replacing the fuse, replace it with a fuse having the correct capacity.
o The preset station frequencies are all erased when the car battery is discon-nected. Therefore, all data will have tobe set again if this should occur.
o Do not add any oil to the rotating parts.Keep magnets, screwdrivers and other metallic objects away from the tapemechanism and head.
o This equipment is designed to be used only in a 12 volt DC battery system withnegative ground.
o This unit is made of precision parts. Do not attempt to disassemble or adjust anyparts.
o When driving your vehicle, be sure to keep the volume of the unit set low enoughto allow you to hear sounds coming fromthe outside.
o Do not expose this equipment (including the speakers) to water or excessivemoisture.
CAUTION:Do not insert warped or poor quality discsinto the CD player as damage to the unitmay occur.
Page 85 of 317
FEATURES OF YOUR HYUNDAI 1- 77
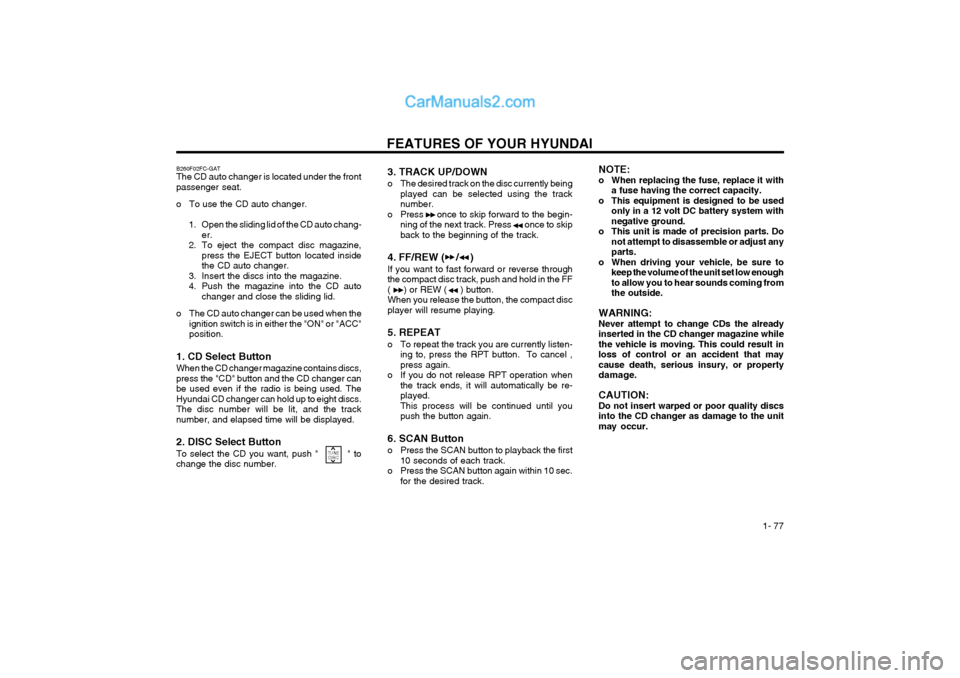
B260F02FC-GAT The CD auto changer is located under the front passenger seat.
o To use the CD auto changer.1. Open the sliding lid of the CD auto chang- er.
2. To eject the compact disc magazine, press the EJECT button located inside the CD auto changer.
3. Insert the discs into the magazine.
4. Push the magazine into the CD auto changer and close the sliding lid.
o The CD auto changer can be used when the ignition switch is in either the "ON" or "ACC"position.
1. CD Select Button When the CD changer magazine contains discs, press the "CD" button and the CD changer canbe used even if the radio is being used. TheHyundai CD changer can hold up to eight discs.The disc number will be lit, and the tracknumber, and elapsed time will be displayed. 2. DISC Select Button To select the CD you want, push " " to change the disc number. 3. TRACK UP/DOWN
o The desired track on the disc currently being
played can be selected using the track number.
o Press once to skip forward to the begin- ning of the next track. Press once to skipback to the beginning of the track.
4. FF/REW ( / ) If you want to fast forward or reverse through the compact disc track, push and hold in the FF( ) or REW ( ) button.When you release the button, the compact discplayer will resume playing. 5. REPEAT
o To repeat the track you are currently listen- ing to, press the RPT button. To cancel , press again.
o If you do not release RPT operation when the track ends, it will automatically be re-played.This process will be continued until youpush the button again.
6. SCAN Button
o Press the SCAN button to playback the first 10 seconds of each track.
o Press the SCAN button again within 10 sec. for the desired track.NOTE:
o When replacing the fuse, replace it witha fuse having the correct capacity.
o This equipment is designed to be used only in a 12 volt DC battery system withnegative ground.
o This unit is made of precision parts. Do not attempt to disassemble or adjust anyparts.
o When driving your vehicle, be sure to keep the volume of the unit set low enoughto allow you to hear sounds coming fromthe outside.
WARNING:Never attempt to change CDs the alreadyinserted in the CD changer magazine whilethe vehicle is moving. This could result inloss of control or an accident that maycause death, serious insury, or propertydamage. CAUTION: Do not insert warped or poor quality discsinto the CD changer as damage to the unitmay occur.
TUNE DISC
Page 87 of 317
FEATURES OF YOUR HYUNDAI 1- 79
H290B03E-GAT
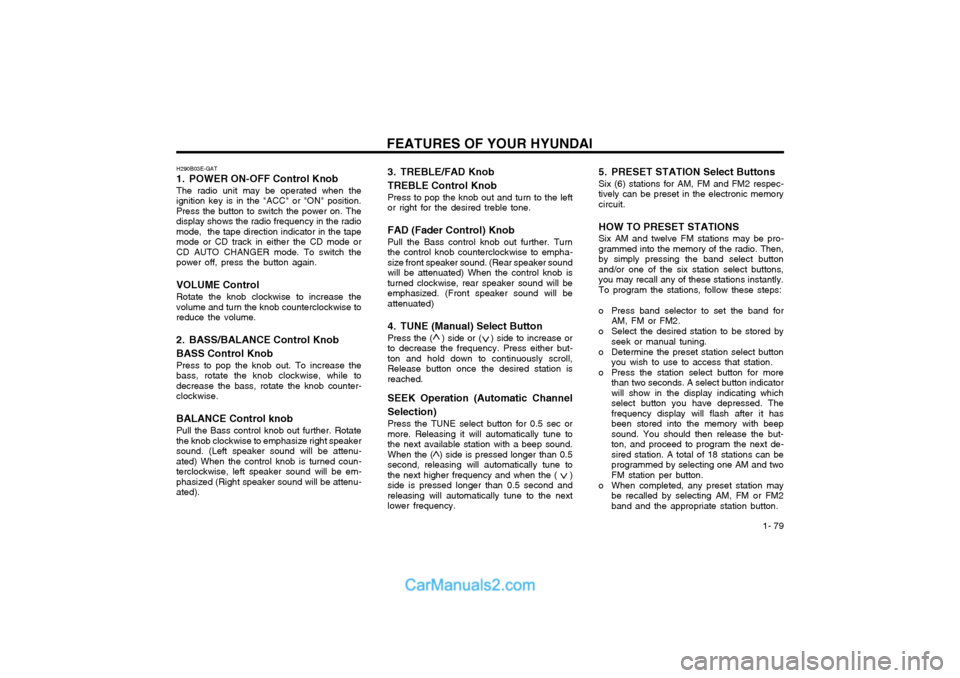
1. POWER ON-OFF Control Knob
The radio unit may be operated when the ignition key is in the "ACC" or "ON" position.Press the button to switch the power on. Thedisplay shows the radio frequency in the radiomode, the tape direction indicator in the tapemode or CD track in either the CD mode orCD AUTO CHANGER mode. To switch thepower off, press the button again.
VOLUME Control Rotate the knob clockwise to increase thevolume and turn the knob counterclockwise toreduce the volume.
2. BASS/BALANCE Control Knob BASS Control Knob Press to pop the knob out. To increase the bass, rotate the knob clockwise, while todecrease the bass, rotate the knob counter-clockwise.
BALANCE Control knob Pull the Bass control knob out further. Rotatethe knob clockwise to emphasize right speakersound. (Left speaker sound will be attenu-ated) When the control knob is turned coun-terclockwise, left speaker sound will be em-phasized (Right speaker sound will be attenu-ated). 3. TREBLE/FAD Knob TREBLE Control Knob
Press to pop the knob out and turn to the left or right for the desired treble tone.
FAD (Fader Control) Knob Pull the Bass control knob out further. Turnthe control knob counterclockwise to empha-size front speaker sound. (Rear speaker soundwill be attenuated) When the control knob isturned clockwise, rear speaker sound will beemphasized. (Front speaker sound will beattenuated)
4. TUNE (Manual) Select Button Press the ( ) side or ( ) side to increase orto decrease the frequency. Press either but-ton and hold down to continuously scroll,Release button once the desired station isreached.
SEEK Operation (Automatic Channel Selection) Press the TUNE select button for 0.5 sec or more. Releasing it will automatically tune tothe next available station with a beep sound.When the ( ) side is pressed longer than 0.5second, releasing will automatically tune tothe next higher frequency and when the ( )side is pressed longer than 0.5 second andreleasing will automatically tune to the nextlower frequency. 5. PRESET STATION Select Buttons Six (6) stations for AM, FM and FM2 respec- tively can be preset in the electronic memorycircuit. HOW TO PRESET STATIONS Six AM and twelve FM stations may be pro- grammed into the memory of the radio. Then,by simply pressing the band select buttonand/or one of the six station select buttons,you may recall any of these stations instantly.To program the stations, follow these steps:
o Press band selector to set the band for
AM, FM or FM2.
o Select the desired station to be stored by seek or manual tuning.
o Determine the preset station select button you wish to use to access that station.
o Press the station select button for more than two seconds. A select button indicator will show in the display indicating whichselect button you have depressed. Thefrequency display will flash after it hasbeen stored into the memory with beepsound. You should then release the but-ton, and proceed to program the next de-sired station. A total of 18 stations can beprogrammed by selecting one AM and twoFM station per button.
o When completed, any preset station may be recalled by selecting AM, FM or FM2band and the appropriate station button.
Page 88 of 317
FEATURES OF YOUR HYUNDAI
1- 80
6. BAND Selector Pressing the button changes the AM, FM1 and FM2 bands. The mode selected is shownon the display.
7. EQUALIZER Button Press the EQ button to select the CLASSIC, JAZZ, ROCK and DEFEAT MODE for the de-sired tone quality. Each press of the buttonchanges the display as follows;
8. Best Station Memory Button (BSM)
(If installed)
When the BSM button is pressed for two sec- onds or longer, the six channels from the high-est field intensity are selected next and storedin memory. The stations selected are stored inthe sequence frequency from the first presetkey. SCAN Button (If installed) When the scan button is pressed, the fre- quency will increase and the receivable sta-tions will be tuned in one after another, receiv-ing each station for 5 seconds. To stop scan-ning, press the scan button again. CLASSIC
� JAZZ � ROCK � DEFEAT
�
FM/AM
Page 90 of 317

FEATURES OF YOUR HYUNDAI
1- 82
H290D01O-GAT
1. FF/REW Button
o Fast forward tape winding starts when the
FF ( ) button is pressed during the PLAY or REW mode.
o Tape play starts when the FF ( ) button is pressed again during the FF mode.
o Tape rewinding starts when the REW ( ) button is pressed during the PLAY orFF mode.
o Tape play starts when the REW ( ) button pressed again during the REW mode.
2. AUTO MUSIC Select Button Press the button to find the starting point of each song in a prerecorded music tape. Thequiet space between songs (must have at leasta 4 sec. gap) can be accepted by the AUTOMUSIC Select button.
o Pressing the button will play the beginn- ing of the next music segment.
o Pressing the button will start replay at the beginning of the music just listened to.
3. TAPE PROGRAM Button This allows you to play the reverse side of the tape by merely depressing the program button.An arrow will appear in the display to show tapedirection. 4. TAPE EJECT button
o When the button is pressed with the
cassette loaded, the cassette is ejected.
o When the button is pressed during the FF/REW mode, the cassette is ejected.
5. EQ ButtonPress the EQ button to select the CLASSIC, JAZZ, ROCK and DEFEAT MODE for the de-sired tone quality. Each press of the buttonchanges the display as follows;
6. DOLBY Button If you get background noise during tape PLAY, you can reduce this considerably by merelypressing the DOLBY button. If you want tocancel the DOLBY feature, press the buttonagain. CLASSIC
� JAZZ � ROCK � DEFEAT
�