brake fluid Hyundai Matrix 2005 Owner's Guide
[x] Cancel search | Manufacturer: HYUNDAI, Model Year: 2005, Model line: Matrix, Model: Hyundai Matrix 2005Pages: 407, PDF Size: 10.31 MB
Page 308 of 407

2
DRIVING YOUR HYUNDAI
19
C160H01A-AAT Use Approved Anti-Freeze in Window Washer System To keep the water in the window washer system from freezing, add an approvedanti-freeze solution in accordance with instructions on the container. Window washer anti-freeze is available fromHyundai dealers and most auto parts outlets. Do not use engine coolant or other types of anti-freeze as thesemay damage the finish.
C160G02A-GAT To Keep Locks from Freezing To keep the locks from freezing, squirt an approved de-icer fluid or glycerineinto the key opening. If a lock is cov- ered with ice, squirt it with an approved de-icing fluid to remove the ice. If thelock is frozen internally, you may be able to thaw it out by using a heated key. Handle the heated key with careto avoid injury. NOTE: The proper temperature for using the immobilizer key is from -40°C (-40°F) to 80°C(176°F). If you heat the immobilizer key over 80°C toopen the frozen lock, it may cause damage to the transponder in its head.
C160D01A-AAT Check Battery and Cables Winter puts additional burdens on the battery system. Visually inspect thebattery and cables as described in Section 6. The level of charge in your battery can be checked by your Hyundaidealer or a service station.
C160F01A-AAT Check Spark Plugs and Ignition System Inspect your spark plugs as described in Section 6 and replace them if neces-sary. Also check all ignition wiring and components to be sure they are not cracked, worn or damaged in any way.
C160E01A-AAT Change to "Winter Weight" Oil if Necessary In some climates it is recommended that a lower viscosity "winter weight" oil be used during cold weather. See Section 9 for recommendations. If youaren't sure what weight oil you should use, consult your Hyundai dealer.
C160I01A-AAT Don't Let Your Parking Brake Freeze Under some conditions your parking brake can freeze in the engaged posi- tion. This is most likely to happenwhen there is an accumulation of snow or ice around or near the rear brakes or if the brakes are wet. If there is a riskthe parking brake may freeze, apply it only temporarily while you put the gear selector lever in "P" (automatic) or infirst or reverse gear (manual transaxle) and block the rear wheels so the car cannot roll. Then release the parkingbrake.
Page 313 of 407

2 DRIVING YOUR HYUNDAI
24
CAUTION:
If overheating should occur when towing, (temperature gauge reads near red zone), taking the following action may reduce or eliminate theproblem.
1. Turn off the air conditioner.
2. Reduce highway speed.
3. Select a lower gear when going uphill.
4. While in stop and go traffic, place the gear selection in park or neu- tral and idle the engine at a higherspeed.
!
8. When parking your car and trailer,
especially on a hill, be sure to follow all the normal precautions. Turn your front wheel into the curb, set the parking brake firmly, and putthe transaxle in 1st or Reverse (manual) or Park (automatic). In addition, place wheel chocks ateach of the trailer's tires.
9. If the trailer has electric brakes,
start your vehicle and trailer mov-ing, and then apply the trailer brake controller by hand to be sure the brakes are working. This lets youcheck your electrical connection at the same time.
10.During your trip, check occasion- ally to be sure that the load issecure, and that the lights and any trailer brakes are still working.
11.Avoid jerky starts, sudden accel- eration or sudden stops.
12.Avoid sharp turns and rapid lane changes.
13.Avoid holding the brake pedal down
too long or too frequently. This couldcause the brakes to overheat, re- sulting in reduced braking efficiency. 14.When going down a hill, shift into a
lower gear and use the engine brak- ing effect. When ascending a long grade, downshift the transaxle to a lowergear and reduce speed to reduce chances of engine overloading and/ or overheating.
15.If you have to stop while going uphill, do not hold the vehicle inplace by pressing on the accelera-tor. This can cause the automatic transaxle to overheat. Use the park- ing brake or footbrake.
NOTE: When towing check transaxle fluid more frequently.
Page 326 of 407
3
WHAT TO DO IN AN EMERGENCY
13
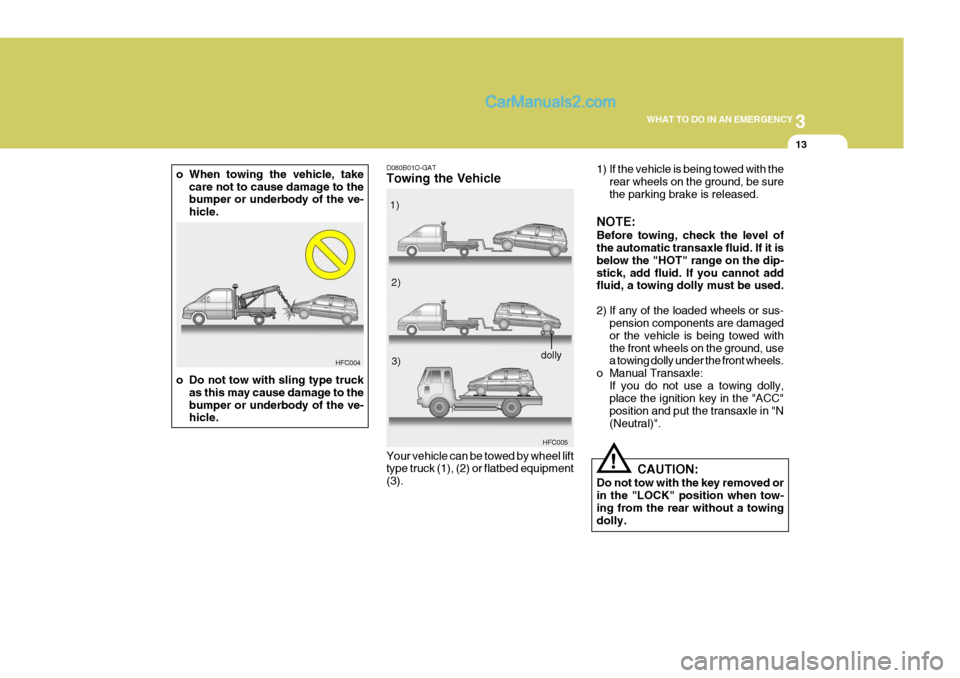
o When towing the vehicle, take
care not to cause damage to the bumper or underbody of the ve- hicle.
o Do not tow with sling type truck as this may cause damage to thebumper or underbody of the ve- hicle. HFC004D080B01O-GAT Towing the Vehicle
HFC005
Your vehicle can be towed by wheel lift type truck (1), (2) or flatbed equipment (3).
!
1) If the vehicle is being towed with the
rear wheels on the ground, be sure the parking brake is released.
NOTE: Before towing, check the level of the automatic transaxle fluid. If it is below the "HOT" range on the dip-stick, add fluid. If you cannot add fluid, a towing dolly must be used.
2) If any of the loaded wheels or sus- pension components are damaged or the vehicle is being towed withthe front wheels on the ground, use a towing dolly under the front wheels.
o Manual Transaxle: If you do not use a towing dolly,place the ignition key in the "ACC" position and put the transaxle in "N(Neutral)".
1)
2)
3)
dolly
CAUTION:
Do not tow with the key removed or in the "LOCK" position when tow- ing from the rear without a towing dolly.
Page 333 of 407

4
CORROSION PREVENTION AND APPEARANCE CARE
5
4
CORROSION PREVENTION AND APPEARANCE CARE
5CLEANING THE INTERIOR
E030D01A-AAT When to Wax Again You should polish and wax the car again when water no longer beads ona clean surface but spreads out over a larger area. E030E01A-AAT Maintaining Bumpers Special precautions must be observed to preserve the appearance of the bumpers on your Hyundai. They are:
o Be careful not to spill battery elec- trolyte or hydraulic brake fluid on the bumpers. If you do, wash it off immediately with clear water.
o Be gentle when cleaning the bumper surfaces. They are made of softplastic and the surface can be dam-aged if mistreated. Do not use abra- sive cleaners. Use warm water and mild soap or car-washing solution.
o Do not expose the bumpers to high temperatures. For example, if youhave your car repainted, do notleave the bumpers on the car if the car is going to be placed in a high- temperature paint booth. E040A01A-AAT To Clean the Vinyl Upholstery To clean the vinyl upholstery, first re- move loose dirt and dust with a vacuumcleaner. Then apply a solution of mild soap or detergent and water using a clean sponge or soft cloth. Allow this tostay on the surface to loosen the dirt, then wipe with a clean damp sponge or cloth. If all the dirt stains are not re-moved, repeat this procedure until the upholstery is clean. Do not use gaso- line, solvent, paint thinner or otherstrong cleaners.
E030B01A-AAT Spot Cleaning Don't use gasoline, strong solvents or corrosive cleaning agents. These can damage the finish of the car. To re-move road tar, use turpentine on a clean, soft cloth or commercially avail- able bug and tar remover. Be gentle.To remove dead insects or tree sap, use warm water and mild soap or car- washing solution. Soak the spot andrub gently. If the paint has lost its luster, use a commercial car-cleaning polish. E030C01A-AAT Polishing and Waxing Always wash and dry the car before polishing or waxing or using a combi- nation cleaner and wax. Use a good quality commercial product and followthe manufacturer's directions on the container. Polish and wax the bright trim pieces as well as the paint.
solution. Be sure to rinse the surfaceafter washing to remove the solution.Never allow the solution to dry on the painted surfaces.
Page 336 of 407
5VEHICLE MAINTENANCE REQUIREMENTS
2MAINTENANCE INTERVALS
F010C01A-GAT
Specified Scheduled Procedures
These are the procedures such as
inspections, adjustments and replace- ments that are listed in the mainte-nance charts starting on page 5-4. These procedures must be performed at the intervals shown in the mainte-nance schedule to assure that your warranty remains in effect. Although it is strongly recommended that they beperformed by the factory-trained or distributor-trained technicians at your Hyundai dealer, these procedures maybe performed at any qualified service facility. F010D01A-AAT
General Checks
These are the regular checks you should perform when you drive your Hyundai or you fill the fuel tank. A list of these items will be found on page 6-5.
F010A01A-GAT Service Requirements To assure that you receive the great- est number of kilometers of satisfying operation from your Hyundai, certain maintenance procedures must be per-formed. Although careful design and engineering have reduced these to a minimum, those that are required areof the utmost importance.It is your responsibility to have thesemaintenance procedures performed to comply with the terms of the warran- ties covering your new Hyundai. TheService Passport supplied with your new vehicle provides further informa- tion about these warranties.
F010B01A-AAT
Maintenance Requirements
The maintenance required for your
Hyundai can be divided into three main areas: o Specified scheduled procedures o General checks o Do-it-yourself maintenance It is suggested that genuine Hyundai
service parts be used for any requiredrepairs or replacements. Other parts of equivalent quality such as engine oil, engine coolant, manual or autotransaxle oil, brake fluid and so on which are not supplied by Hyundai Motor Company or its distributor maybe used without affecting your war- ranty coverage but you should always be sure these are equivalent to thequality of the original Hyundai parts. Your Service Passport provides fur- ther information about your warrantycoverage.
Page 340 of 407

5VEHICLE MAINTENANCE REQUIREMENTS
6
F030C04E-GAT R : Replace I : Inspect and, after inspection, clean, adjust, repair or replace if necessary
DESCRIPTION
GENERAL MAINTENANCE COOLING SYSTEMCOOLANT MANUAL TRANSAXLE OIL AUTOMATIC TRANSAXLEFLUIDBRAKE HOSES AND LINESBRAKE FLUIDREAR BRAKE DRUMS/LININGS, PARKING BRAKEBRAKE PADS, CALIPERS AND ROTORSEXHAUST PIPE AND MUFFLERSUSPENSION MOUNTING BOLTSSTEERING GEAR BOX, LINKAGE & BOOTS/LOWER ARM BALL JOINTPOWER STEERING PUMP, BELT AND HOSESDRIVE SHAFTS AND BOOTSAIR CONDITIONING REFRIGERANTAIR CONDITIONER FILTER (IN FRONT OF BLOWER UNIT)
NO.
12 3 4 5 6789
101112131415
120 96
I
R I IIIIIIIIIIII
105
84
I I III I IIII I
90 72
I
R I
R IIIIIIIIIII
7560
I I III I IIII I
60 48
I
R IIIIIIIIIIIII
4536
I I III I IIII I
30 24
I
R IIIIIIIIIIIII
1512
I I III I IIII I
KILOMETERS X 1000 MONTHS
European Community Only Except European Community
See Note (2)
See Note (1)
GASOLINE ENGINE DIESEL ENGINE
Note : (1) FOR EVERY 24 MONTHS OR 45,000 KM, WHICHEVER OCCURS FIRST : "R"
(2) FOR EVERY 12 MONTHS OR 20,000 KM, WHICHEVER OCCURS FIRST : "R"
Page 341 of 407
5
VEHICLE MAINTENANCE REQUIREMENTS
7
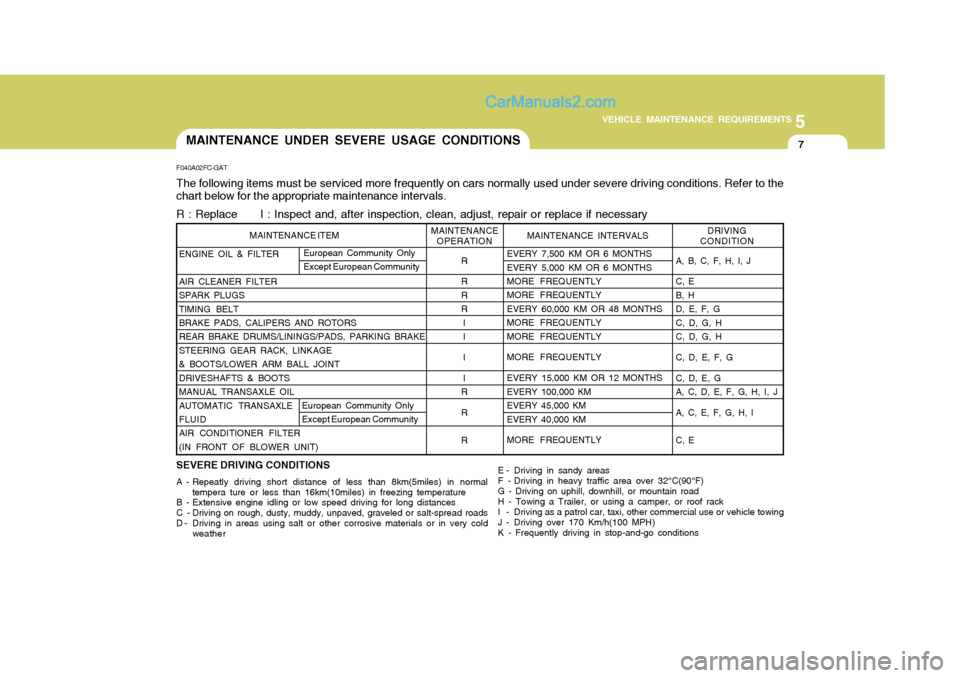
ENGINE OIL & FILTER AIR CLEANER FILTER SPARK PLUGSTIMING BELTBRAKE PADS, CALIPERS AND ROTORS REAR BRAKE DRUMS/LININGS/PADS, PARKING BRAKE STEERING GEAR RACK, LINKAGE& BOOTS/LOWER ARM BALL JOINTDRIVESHAFTS & BOOTSMANUAL TRANSAXLE OILAUTOMATIC TRANSAXLE FLUID AIR CONDITIONER FILTER(IN FRONT OF BLOWER UNIT) A, B, C, F, H, I, J C, E B, HD, E, F, GC, D, G, HC, D, G, H C, D, E, F, G C, D, E, G A, C, D, E, F, G, H, I, J A, C, E, F, G, H, I C, E
R R RR
II I I
R R R DRIVING
CONDITION
EVERY 7,500 KM OR 6 MONTHS EVERY 5,000 KM OR 6 MONTHS MORE FREQUENTLY MORE FREQUENTLYEVERY 60,000 KM OR 48 MONTHSMORE FREQUENTLYMORE FREQUENTLY MORE FREQUENTLY EVERY 15,000 KM OR 12 MONTHS EVERY 100,000 KMEVERY 45,000 KMEVERY 40,000 KM MORE FREQUENTLY MAINTENANCE INTERVALS
European Community Only Except European Community
F040A02FC-GAT The following items must be serviced more frequently on cars normally used under severe driving conditions. Refer to the chart below for the appropriate maintenance intervals. R : Replace I : Inspect and, after inspection, clean, adjust, repair or replace if necessary
SEVERE DRIVING CONDITIONS
A - Repeatly driving short distance of less than 8km(5miles) in normal
tempera ture or less than 16km(10miles) in freezing temperature
B - Extensive engine idling or low speed driving for long distances
C - Driving on rough, dusty, muddy, unpaved, graveled or salt-spread roads
D - Driving in areas using salt or other corrosive materials or in very cold weather
MAINTENANCEOPERATION
MAINTENANCE ITEM
E - Driving in sandy areas
F - Driving in heavy traffic area over 32°C(90°F)G - Driving on uphill, downhill, or mountain road H - Towing a Trailer, or using a camper, or roof rack
I - Driving as a patrol car, taxi, other commercial use or vehicle towing
J - Driving over 170 Km/h(100 MPH)K - Frequently driving in stop-and-go conditions
MAINTENANCE UNDER SEVERE USAGE CONDITIONS
European Community Only Except European Community
Page 344 of 407
5VEHICLE MAINTENANCE REQUIREMENTS
10
F070F01A-AAT
o Brake Hoses and Lines
Visually check for proper installation, chafing, cracks, deterioration and any leakage. Replace any deteriorated or damaged parts immediately. F070G02A-AAT
o Brake Fluid
Check brake fluid level in the brakefluid reservoir. The level should be between "MIN" and "MAX" marks on the side of the reservoir. Use onlyhydraulic brake fluid conforming to DOT 3 or DOT 4.
F070H01A-AAT
o Rear Brake Drums and
Linings, Parking Brake
Check the rear brake drums and lin-
ings for scoring, burning, leaking fluid, broken parts, and excessive wear. In- spect the parking brake system in- cluding the parking brake lever andcables. For detailed service proce- dures, refer to the Shop Manual.
F070D01A-AAT o Manual Transaxle Oil Inspect the manual transaxle oil ac- cording to the maintenance schedule. NOTE: If the oil level is low, check for possible leaks before adding oil. Do not overfill. F070E06A-AAT
o Automatic Transaxle Fluid
The fluid level should be in the "HOT"range of the dipstick, after the engine and transaxle are at normal operating temperature. Check the automatictransaxle fluid level with the engine running and the transaxle in neutral, with the parking brake properly ap-plied. Use HYUNDAI GENUINE ATF SP III, DIAMOND ATF SP III, SK ATF SP III or other brands approved byHyundai Motor Co., when adding or changing fluid. Using the wrong ATF may result in damage to the ATM.
F070C01A-AAT o Engine Coolant The coolant should be changed at the intervals specified in the mainte- nance schedule.
Page 345 of 407

5
VEHICLE MAINTENANCE REQUIREMENTS
11
F070L01A-AAT
o Suspension Mounting Bolts
Check the suspension connections for looseness or damage. Retighten to thespecified torque.F070J01A-AAT
o Brake Pads, Calipers and
Rotors
Check the pads for excessive wear,
discs for run out and wear, and cali- pers for fluid leakage.
F070K01A-AAT
o Exhaust Pipe and Muffler
Visually inspect the exhaust pipes,
muffler and hangers for cracks, dete- rioration, or damage. Start the engineand listen carefully for any exhaust gas leakage. Tighten connections or replace parts as necessary. F070M01A-AAT
o Steering Gear Box, Linkage &
Boots/Lower arm Ball Joint
With the vehicle stopped and engine
off, check for excessive free-play in the steering wheel. Check the linkage for bends or damage. Check the dustboots and ball joints for deterioration, cracks, or damage. Replace any dam- aged parts.
F070N01A-AAT
o Power Steering Pump, Belt
and Hoses
Check the power steering pump and
hoses for leakage and damage. Re- place any damaged or leaking parts immediately. Inspect the power steer-ing belt for evidence of cuts, cracks, excessive wear, oiliness and proper tension. Replace or adjust it if neces-sary. F070P01A-AAT
o Driveshafts and Boots
Check the drive shafts, boots andclamps for cracks, deterioration, or damage. Replace any damaged parts and, if necessary, repack the grease. F070Q01A-AAT
o Air Conditioning Refrigerant
Check the air conditioning lines and connections for leakage and damage.Check air conditioning performance according to the relevant shop manual if necessary.
Page 346 of 407

Engine Compartment ................................................... 6-2
General Checks ........................................................... 6-5
Checking the Engine Oil .............................................. 6-6
Changing the Oil and Filter ......................................... 6-9
Checking and Changing the Engine Coolant ...........6-12
Spark Plugs ................................................................ 6-15
Changing the Air Cleaner Filter ................................ 6-17
Checking the Transaxle Oil (Manual) ....................... 6-19
Checking the Transaxle Fluid (Automatic) ................ 6-20
Checking the Brakes ................................................. 6-22
Checking the Clutch Fluid ......................................... 6-24
Air Conditioning Care ................................................ 6-25
Changing the Air Conditioner Filter
(In Front of Blower Unit) .......................................... 6-26
Checking Drive Belts ................................................. 6-28
Checking and Replacing Fuses ................................ 6-29
Checking The Battery ................................................ 6-31
Checking The Eclectric Cooling Fans ....................... 6-32
Power Steering Fluid Level ....................................... 6-32
Headlight Aiming Adjustment .................................... 6-35
Replacing headlight Bulbs ......................................... 6-36
Bulb Wattage ............................................................. 6-38
Fuse Panel Description ............................................. 6-39
DO-IT-YOURSELF MAINTENANCE
6
6