check engine Hyundai Matrix 2006 Workshop Manual
[x] Cancel search | Manufacturer: HYUNDAI, Model Year: 2006, Model line: Matrix, Model: Hyundai Matrix 2006Pages: 490, PDF Size: 11.58 MB
Page 231 of 490
6
DO-IT-YOURSELF MAINTENANCE
25CHANGING THE AIR CONDITIONER FILTER
G140D01S-GAT
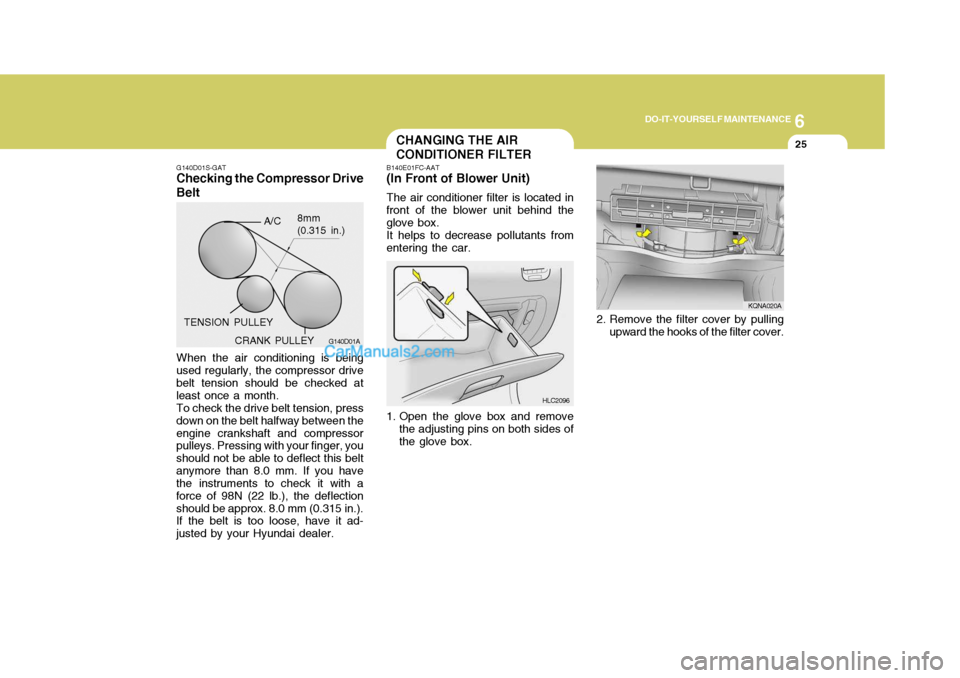
Checking the Compressor DriveBelt
When the air conditioning is being
used regularly, the compressor drive belt tension should be checked at least once a month. To check the drive belt tension, press
down on the belt halfway between theengine crankshaft and compressor pulleys. Pressing with your finger, you should not be able to deflect this beltanymore than 8.0 mm. If you have the instruments to check it with a force of 98N (22 lb.), the deflectionshould be approx. 8.0 mm (0.315 in.). If the belt is too loose, have it ad- justed by your Hyundai dealer. CRANK PULLEY
G140D01A
A/C
TENSION PULLEY 8mm (0.315 in.)
B140E01FC-AAT
(In Front of Blower Unit)
The air conditioner filter is located in
front of the blower unit behind the glove box.
It helps to decrease pollutants from
entering the car.
1. Open the glove box and remove
the adjusting pins on both sides of the glove box. 2. Remove the filter cover by pulling
upward the hooks of the filter cover.
HLC2096 KQNA020A
Page 232 of 490
6 DO-IT-YOURSELF MAINTENANCE
26CHECKING THE FREEPLAY
G160A01A-GAT
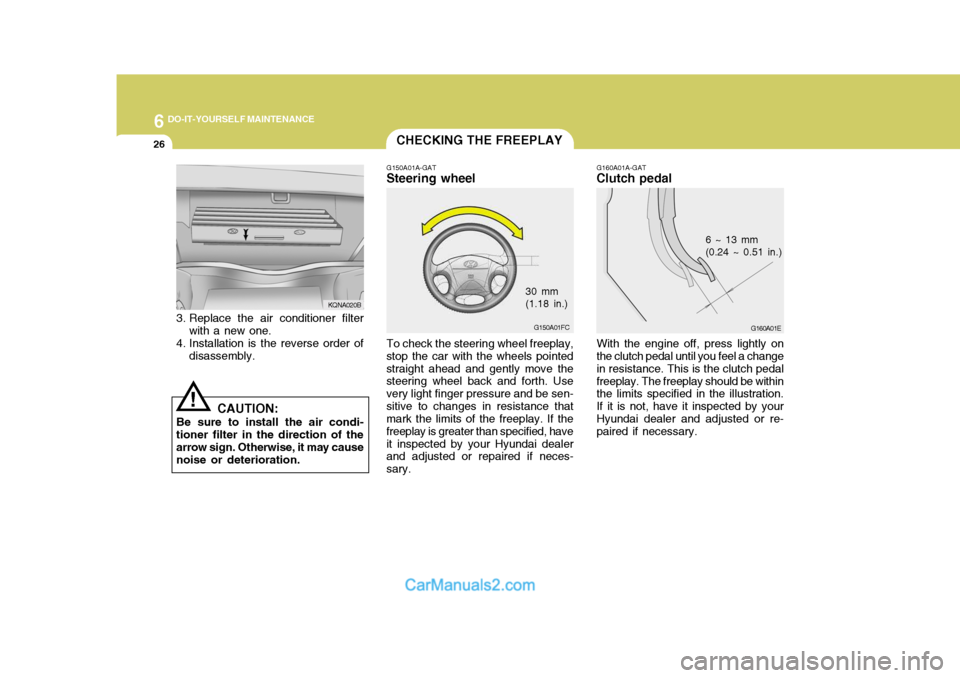
Clutch pedal
G160A01E
6 ~ 13 mm (0.24 ~ 0.51 in.)
With the engine off, press lightly onthe clutch pedal until you feel a change in resistance. This is the clutch pedalfreeplay. The freeplay should be within the limits specified in the illustration. If it is not, have it inspected by yourHyundai dealer and adjusted or re- paired if necessary.
G150A01A-GAT
Steering wheel
G150A01FC
To check the steering wheel freeplay,
stop the car with the wheels pointed straight ahead and gently move the steering wheel back and forth. Use very light finger pressure and be sen-sitive to changes in resistance that mark the limits of the freeplay. If the freeplay is greater than specified, haveit inspected by your Hyundai dealer and adjusted or repaired if neces- sary. 30 mm (1.18 in.)
3. Replace the air conditioner filter with a new one.
4. Installation is the reverse order of disassembly.
CAUTION:
Be sure to install the air condi- tioner filter in the direction of thearrow sign. Otherwise, it may cause noise or deterioration.
! KQNA020B
Page 233 of 490
6
DO-IT-YOURSELF MAINTENANCE
27
G170A01A-GAT
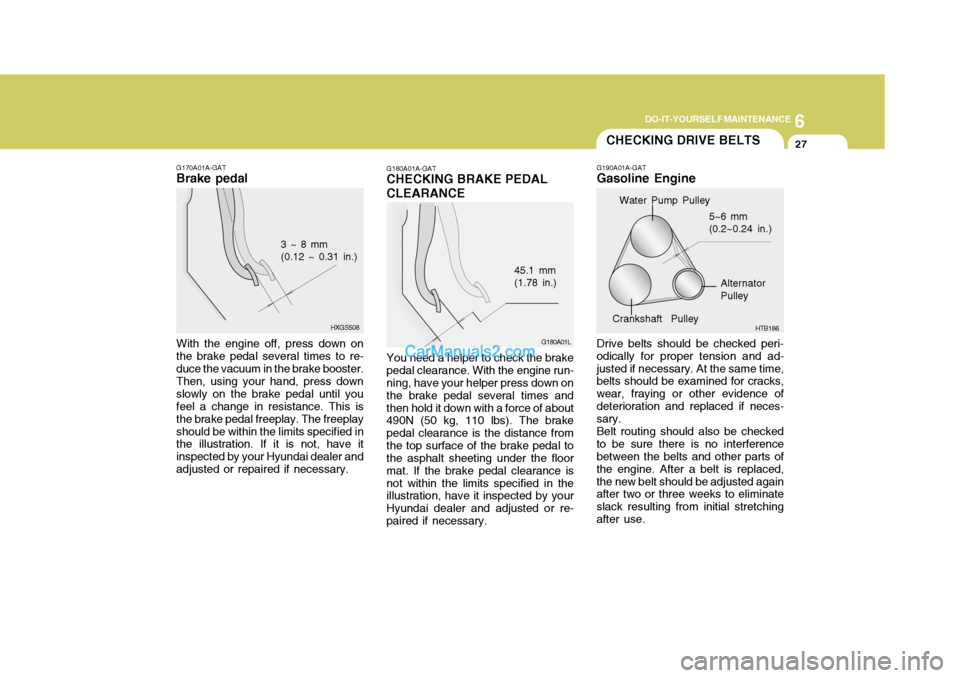
Brake pedal
HXGS508
3 ~ 8 mm (0.12 ~ 0.31 in.)
With the engine off, press down on the brake pedal several times to re-duce the vacuum in the brake booster.Then, using your hand, press downslowly on the brake pedal until you feel a change in resistance. This is the brake pedal freeplay. The freeplayshould be within the limits specified in the illustration. If it is not, have it inspected by your Hyundai dealer andadjusted or repaired if necessary.
Water Pump Pulley Alternator Pulley
Crankshaft Pulley 5~6 mm(0.2~0.24 in.)
HTB186
G190A01A-GAT Gasoline Engine Drive belts should be checked peri- odically for proper tension and ad-justed if necessary. At the same time, belts should be examined for cracks, wear, fraying or other evidence ofdeterioration and replaced if neces- sary. Belt routing should also be checked to be sure there is no interference between the belts and other parts of the engine. After a belt is replaced,the new belt should be adjusted again after two or three weeks to eliminate slack resulting from initial stretchingafter use.
G180A01A-GAT CHECKING BRAKE PEDAL CLEARANCE
G180A01L
45.1 mm (1.78 in.)
You need a helper to check the brake pedal clearance. With the engine run- ning, have your helper press down on the brake pedal several times andthen hold it down with a force of about 490N (50 kg, 110 lbs). The brake pedal clearance is the distance fromthe top surface of the brake pedal to the asphalt sheeting under the floor mat. If the brake pedal clearance isnot within the limits specified in the illustration, have it inspected by your Hyundai dealer and adjusted or re-paired if necessary. CHECKING DRIVE BELTS
Page 234 of 490
6 DO-IT-YOURSELF MAINTENANCE
28CHECKING AND REPLACING FUSES
G200A01A-AAT
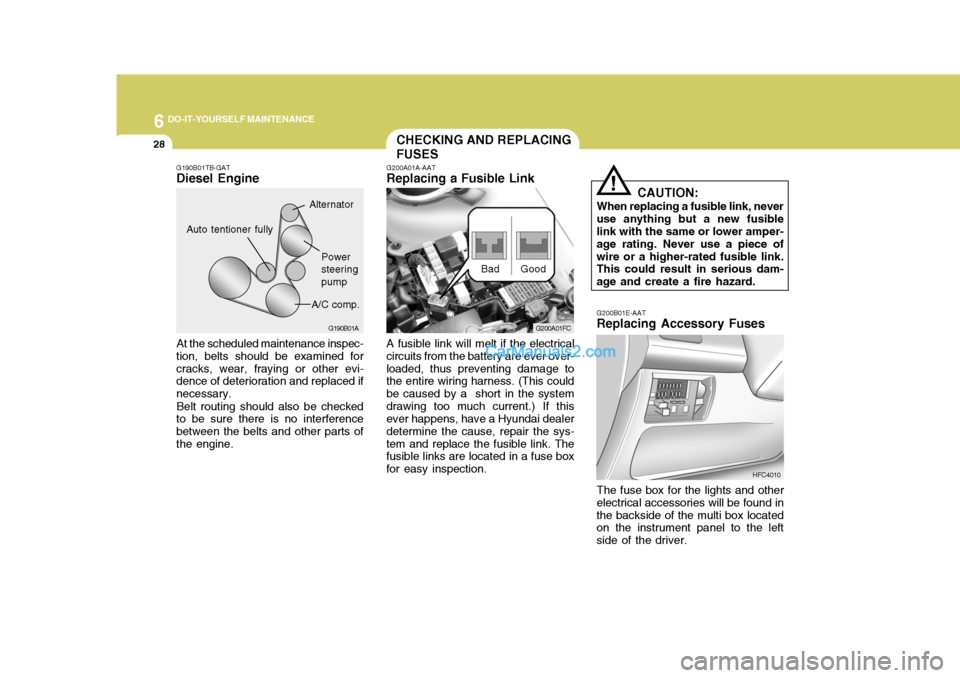
Replacing a Fusible Link
A fusible link will melt if the electrical
circuits from the battery are ever over- loaded, thus preventing damage to the entire wiring harness. (This could be caused by a short in the systemdrawing too much current.) If this ever happens, have a Hyundai dealer determine the cause, repair the sys-tem and replace the fusible link. The fusible links are located in a fuse box for easy inspection. Good
Bad
G200B01E-AAT
Replacing Accessory Fuses
HFC4010
CAUTION:
When replacing a fusible link, neveruse anything but a new fusible link with the same or lower amper- age rating. Never use a piece ofwire or a higher-rated fusible link. This could result in serious dam- age and create a fire hazard.
!
G200A01FC
G190B01A
Power steeringpump
A/C comp.
Auto tentioner fully
Alternator
G190B01TB-GAT Diesel Engine
At the scheduled maintenance inspec-
tion, belts should be examined for cracks, wear, fraying or other evi- dence of deterioration and replaced if necessary.
Belt routing should also be checked
to be sure there is no interferencebetween the belts and other parts ofthe engine.
The fuse box for the lights and other
electrical accessories will be found inthe backside of the multi box located on the instrument panel to the left side of the driver.
Page 237 of 490

6
DO-IT-YOURSELF MAINTENANCE
31
!
G210B01Y-GET
Checking the Battery
Keep the battery clean. Any evidence of corrosion around the battery posts or terminals should be removed using a solution of household baking sodaand warm water. After the battery ter- minals are dry, cover them with a light coating of grease.
WARNING:Always read the followinginstructions carefully whenhandling a battery.Keep lighted cigarettes andall other flames or sparksaway from the battery.Hydrogen, which is a highlycombustible gas, is always present in battery cells and may explode if ignited.Keep batteries out of the reach of children becausebatteries contain highly cor- rosive SULFURIC ACID. Do not allow battery acid tocontact your skin, eyes, clothing or paint finish. If any electrolyte gets into your eyes, flush your eyes with clean water for at least15 minutes and get imme- diate medical attention. If possible, continue to applywater with a sponge or cloth until medical atten- tion is received. If electrolyte gets on your skin, thoroughly wash the contacted area.If you feel a pain or a burn-ing sensation, get medicalattention immediately.Wear eye protection whencharging or working near abattery.Always provide ventilationwhen working in an en- closed space.o When lifting a plastic-cased bat- tery, excessive pressure on the case may cause battery acid toleak, resulting in personal injury. Lift with a battery carrier or with your hands on opposite corners.
o Never attempt to charge the bat- tery when the battery cables areconnected.
o The electrical ignition system works with high voltage. Never touch these components with the engine running or the ignition switched on.
Page 238 of 490
6 DO-IT-YOURSELF MAINTENANCE
32
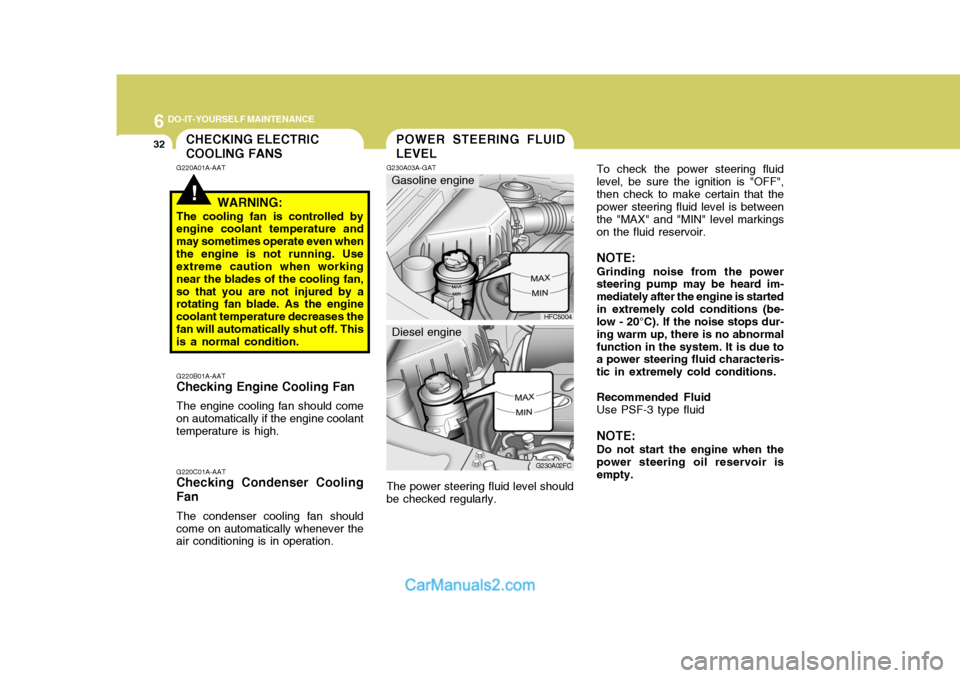
To check the power steering fluid level, be sure the ignition is "OFF",then check to make certain that the power steering fluid level is between the "MAX" and "MIN" level markingson the fluid reservoir. NOTE: Grinding noise from the power steering pump may be heard im- mediately after the engine is startedin extremely cold conditions (be- low - 20°C). If the noise stops dur- ing warm up, there is no abnormalfunction in the system. It is due to a power steering fluid characteris- tic in extremely cold conditions. Recommended Fluid Use PSF-3 type fluid NOTE: Do not start the engine when the power steering oil reservoir is empty.
!
CHECKING ELECTRIC COOLING FANS
G220A01A-AAT
WARNING:
The cooling fan is controlled by engine coolant temperature and may sometimes operate even whenthe engine is not running. Use extreme caution when working near the blades of the cooling fan,so that you are not injured by a rotating fan blade. As the engine coolant temperature decreases thefan will automatically shut off. This is a normal condition.POWER STEERING FLUID LEVEL
G220B01A-AAT
Checking Engine Cooling Fan
The engine cooling fan should come on automatically if the engine coolant temperature is high. G220C01A-AAT
Checking Condenser Cooling Fan
The condenser cooling fan should come on automatically whenever the air conditioning is in operation. G230A03A-GAT
HFC5004
G230A02FC
Gasoline engine
Diesel engine
The power steering fluid level should be checked regularly.
Page 239 of 490
6
DO-IT-YOURSELF MAINTENANCE
33
G240A01A-AAT
POWER STEERING HOSES
It is suggested that you check the power steering hose connections for fluid leakage at regular intervals. The power steering hoses should be re-placed if there is severe surface crack- ing, scuffing or worn spots. Deteriora- tion of the hose could cause prema-ture failure.
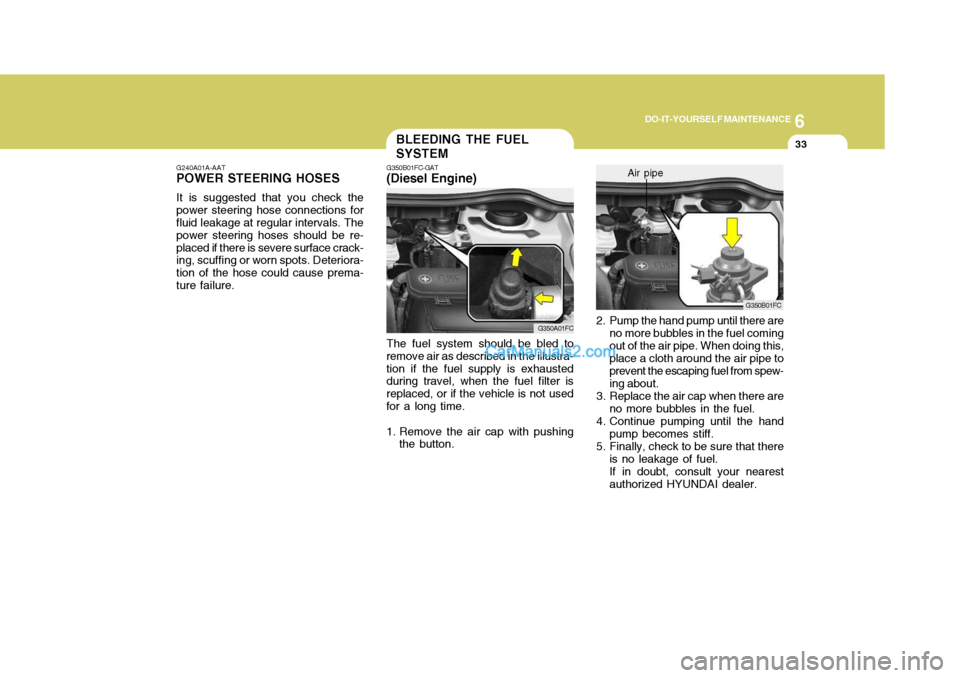
2. Pump the hand pump until there are no more bubbles in the fuel coming out of the air pipe. When doing this, place a cloth around the air pipe to prevent the escaping fuel from spew-ing about.
3. Replace the air cap when there are no more bubbles in the fuel.
4. Continue pumping until the hand pump becomes stiff.
5. Finally, check to be sure that there
is no leakage of fuel. If in doubt, consult your nearest authorized HYUNDAI dealer. G350B01FC
Air pipe
The fuel system should be bled to
remove air as described in the illustra- tion if the fuel supply is exhausted during travel, when the fuel filter is replaced, or if the vehicle is not usedfor a long time.
1. Remove the air cap with pushing the button.
G350A01FC
BLEEDING THE FUEL SYSTEM
G350B01FC-GAT
(Diesel Engine)
Page 240 of 490

6 DO-IT-YOURSELF MAINTENANCE
34
G300A02FC
If the fuel filter warning light illumi- nates during driving, it indicates thatwater has accumulated in the fuel filter. If this occurs, remove the water as described.1. Loosen the drain plug at the bottom of the fuel filter.
2. Tighten the drain plug when water no longer comes out.
3. Check to be sure that the warning lamp illuminates when the ignition key is turned to "ON", and that it goes off when the engine is started. If in doubt, consult your nearest authorized HYUNDAI dealer.
NOTE: It is recommended that water ac-
cumulated in the fuel filter should be removed by an authorized Hyundai dealer. G300B02FC
!WARNING:
o Do not smoke or have any other open flame near the vehicle while bleeding the fuel system.
o Be sure to carefully wipe away
any water drained out in thismanner, because the fuel mixed in the water might be ignited and result in a fire.
REMOVAL OF WATER FROM THE FUEL FILTER
G300A01B-GAT
(Diesel Engine)
Page 262 of 490

9
VEHICLE SPECIFICATIONS
3
DIESEL
1.5 4Cylinder in-line DOHC
740 ± 100
- -- - --
Auto Lash Auto Lash -
1 - 3 - 4 - 2ENGINE
J070A04FC-GAT
NGK CHAMPION NGKCHAMPION
Unleaded Leaded Unleaded Leaded For adjusting For checking
Engine Type Idle Speed (RPM) Spark Plug Spark Plug Gap Valve Clearance (Cold engine:20 ± 5°C) Ignition Timing Firing Order
ITEMS
A/CON OFF A/CON ON
GASOLINE
1.6/1.8 4Cylinder in-line DOHC
800 ± 100 (1.6L), 750 ± 100 (1.8 L) 800 ± 100 (1.6L), 800 ± 100 (1.8 L) BKR5ES-11
RC10YC4BKR5ES
RC10YC
1.0 ~ 1.1 mm (0.039 ~ 0.043 in.)0.7 ~ 0.8 mm (0.028 ~ 0.032 in.) Auto Lash (1.6 DOHC)
0.17 ~ 0.23 mm (0.0067 ~ 0.0091 in.) (1.8DOHC)
Auto Lash (1.6 DOHC)
0.25 ~ 0.31 mm (0.0098 ~ 0.0122 in.) (1.8 DOHC)
Auto Lash (1.6 DOHC)
0.12 ~ 0.28 mm (0.0047 ~ 0.011 in.) (1.8 DOHC) Auto Lash (1.6 DOHC)
0.20 ~ 0.38 mm (0.0079 ~ 0.015 in.) (1.8 DOHC)
BTDC 5° ± 5° (1.6L), BTDC 7° ± 5° (1.8L) 1 - 3 - 4 - 2
Intake Exhaust Intake Exhaust
Page 266 of 490
10
INDEX
3
D Defrosting/Defogging .................................................. 1-88
Digital Clock .............................................................. 1-65
Door Central door lock ...................................................... 1-9
Child-protector rear door lock .................................... 1-9
Door locks ................................................................ 1-7
Locking and unlocking front doors with a key .......... 1-7
Drink Holder ............................................................... 1-67
Drive Belts ................................................................. 6-29
Driving
Economical driving ................................................. 2-18
Smooth corneri ng .................................................... 2-19
Winter driving .......................................................... 2-20
E
EGR System ............................................................... 7-4 Electronic Stability Program (ESP) ...........................2-16
Emissions Control Systems ........................................ 7-2Engine Before starting the engine ........................................ 2-3Compartment .................................................. 6-2 ~ 6-4
Coolant ................................................................... 6-12
Coolant temperature gauge .....................................1-54
If the engine overheats ............................................. 3-4
Number ..................................................................... 8-2
Oil ............................................................................. 6-6Starting ..................................................................... 2-5
Engine Exhaust Can Be Dangerous ............................ 2-2 FFog Light
Front fog light switch .............................................. 1-63
Rear fog light switch ............................................... 1-64
Fold-up Tray .............................................................. 1-76
Front Seats Adjustable front seats ............................................. 1-14
Lumbar support control ........................................... 1-16
Seat cushion height adjustment ............................. 1-16
Fuel Capacity ................................................................... 9-2
Gauge ..................................................................... 1-54
Recommendations .................................................... 1-2
Fuel Filler Lid Remote release ...................................................... 1-77
Fuse Panel Description ............................................. 6-41
Fuses ........................................................................ 6-31
GGeneral Checks ........................................................... 6-5
Glove box .................................................................. 1-73
HHazard Warning System ............................................ 1-62
Headlight Aiming Adjustm ent .................................... 6-37
Headlight Bulb ........................................................... 6-38
Headlight Leveling Device S ystem ............................1-64
Heating and Cooling Control ......................................1-83